Tiki Central / Home Tiki Bars
Leroys Lū‘au Lounge
|
L

leevigraham
Posted
posted
on
Tue, Jan 29, 2019 2:52 AM
Hi Tiki friends! Firstly a quick introduction. My names Leevi and I live in Australia. My wife started calling me Leroy as a joke which morphed into Roy. I've been interested in tiki (in a broader sense) since I was a kid. Pretty sure it was watching Elvis movies in the back ground, my mum travelling to NZ in the 80s (coming back with stories) and finding all kinds of Polynesian tourist art at local markets. What follows is a summary of the build so far from August 2018 to Jan 2019, 5 months in total. It's my first ever bar build. Here we go… The shed We bought a new house in October 2016 which came with a 6m x 7m aluminium frame double garage. My mind immediately started ticking over considering options for a man cave / tiki bar / outdoor room. Wall cladding and insulation After experiencing one summer in the garage with 40+ internal radiating heat I knew I would have to do some insulating before even considering building anything internal. I opted to clad the internal walls with Yellow Tongue Flooring. It's pretty heavy and dense but it came in the perfect size sheets (3600x900x19) for minimum wastage. I could fit 6 full sheets along the back and 6 sheets on either side using the offcuts for other bibs and bobs. I figured with the density I wouldn't need wool insulation between the boards and outside aluminium sheeting. The yellow tongue also allowed the boards to click together flush. Here's some pics:
The wall cladding was pretty tough work. I mostly did it myself with some help from my wife when it came to lifting the more dangerous pieces. The yellow tongue is 19mm thick which is more than strong enough to screw into when it comes to decorating. I was pretty happy with the result Building the bar Next I tackled the actual bar. I planned to put it in the corner on wheels so it could be dragged in an out as needed. The idea was to make the bar the depth of normal shelves (540mm) so it wouldn't stick out to far.
Bar Shelving Part of the indoor reno involved removing some old shelving. Rather than throw it out I kept it for the shed. I'll eventually trim the bar with bamboo and add lighting. More on the lighting coming up.
Lighting I started searching for lighting on Gumtree and Facebook marketplace. I found some small bamboo tub lamps that I thought could do with some love. Insulating the ceiling Like I said at the start… the shed gets HOT! It's basically a giant heat sink that radiates down the stored heat from the sun. I considered a couple of options but in the end settled on Foilboard. Basically it's 25mm of polystyrene covered with foil. It acts as a reflective barrier and insulation. At $AUD50 a sheet it was going to be pretty expensive so I looked around and found it cheaper online. Bunnings matched the price and gave me 10% off which reduced the price to more like $AUD35. This was one material I didn't want to skimp on as I knew it would have the largest impact. The number one reason why I chose Foilboard was becuase it was light and I could install it myself. I ended up using tech screws to attach directly to the top hats. Adding the foilboard made a huge difference to the internal temp. It still gets hot on a 40℃ day but it's bearable. Truth be told on those days we'll probably be inside in the air conditioning. The only downside is that now I couldn't see where the top hats where so I'll have to get creative and use a pin to poke through when it comes to attaching the matting. Dividing the shed At some point it occurred to me that I didn't want to sit and look at all the workshop stuff while having a drink so I decided to halve the shed somehow. We had some crappy old rubber backed curtains replaced inside the house. We were going to throw the old ones out but I rescued them (after they sat out in the rain for a week). Unfortunately they were getting mouldy so I put them through the washing machine with bleach to kill the mould and freshen them up.
Still I pressed on. My idea was to paint the curtains in a giant mural. I found some inspiration online and some really cheap and nasty pink paint from Bunnings.
More lighting I'm a web developer in my day job and I've always like building things out of raw materials with my hands or software with my brain. A friend of mine is mad into Christmas lights so I asked him about it and he gave me a RapsberryPI and some individual addressable LEDs.
I plan on building multiple lighting sequences with xLights and controlling playlists with Falcon Player. Curtains Part 2 After playing with lighting for a couple of days I came back to finish the curtains.
Remember when I said that:
Well I went back and decided to straighten the tracks.
That brings me to today If you've read this far thank you. I hope you've enjoyed the journey so far! Let me know if there's anything you would change or I could have done better. There's plenty more photos in the Google album which I'll continue to add to as I post more. I'm also adding stories to my instagram if you want to follow that: https://instagram.com/leevigraham My TikiBar build: Leroys Luau Lounge [ Edited by: leevigraham 2020-03-19 04:26 ] [ Edited by leevigraham on 2022-03-13 20:38:02 ] [ Edited by leevigraham on 2022-03-13 20:39:00 ] [ Edited by leevigraham on 2022-03-13 20:47:04 ] [ Edited by leevigraham on 2022-03-13 20:56:37 ] [ Edited by leevigraham on 2022-03-13 21:31:02 ] |
|
D

Donovan
Posted
posted
on
Tue, Jan 29, 2019 6:05 AM
Quite the undertaking. Great to see another enthusiast pursuing the Tiki dream. Keep us updated! |
|
L
leevigraham
Posted
posted
on
Tue, Jan 29, 2019 6:07 AM
Yeah there's a lot of work. It might be done before 2020 :) |
|
S

Sandbartender
Posted
posted
on
Tue, Jan 29, 2019 7:20 AM
Great progress so far. What are you thinking for stain for the bar? |
|
MM

Mariner Mike
Posted
posted
on
Tue, Jan 29, 2019 10:08 AM
Ahoy from (almost) the other side of the world, fellow mustachioed tiki-ite! First off, kudos on your amazing use of bamboo! I absolutely love the bar facade, it's got a perfect weathered look to it, like it's been in service for years. The cross hatching on the ceiling is a great touch too. I'd love to hear more about your process working with it, bamboo is one of the things I'd love to be able to make better use of. Any plans to darken up the space during the daytime? Maybe hang some thick curtains behind the garage door (if you can without interfering)? In my first bar I had these heavy duty burlap-y curtains up because there was a lot of natural light, since I've moved to a basement it's an entirely different feel that's really let the lighting shine, if you'll pardon the pun. Of course, nothing wrong with taking advantage of the fact you live in the literal south pacific and just let the natural light dictate the brightness! The weathered bamboo look works great in the full sun so I think you're in a great spot either way. It's clear how much work you've been putting in on this from the sequence of photos, and it really shows in the product. I often feel that the best tiki pieces are the ones we make by hand, both because then we've got a deeper connection to them and also because they have all the tiny details that make things interesting. The mural curtain is a great example of that. I don't know that I'm brave enough to have gone with the pink myself, but I certainly can't argue with the results. Fantastic job with everything you've done so far, it's already a great space and it still has tons of potential to be even better, depending on how far down the decoration rabbit hole you want to go. |
|
L
leevigraham
Posted
posted
on
Tue, Jan 29, 2019 1:57 PM
Probably a clear varnish… maybe a light coat of honey stain first. I replaced a bench inside the house and did the same stain: https://photos.app.goo.gl/D7jMhzB3R3W9DJUG6 I'll probably trim the edge with thick rope to catch any spillages. Happy to hear any suggestions! |
|
L
leevigraham
Posted
posted
on
Tue, Jan 29, 2019 2:11 PM
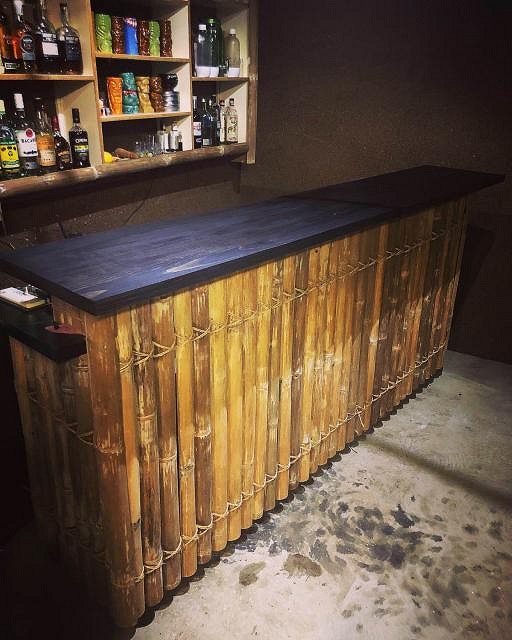
Thanks! I actually kicked off the project by buying 140 bamboo halves for $50 from a local swap and sell site. They were pretty banged up so I've spent a lot of time sanding them back to remove the varnish. I started hand sanding then after about 10 poles went out an purchased a belt sander which made life sooooo much easier.
Depending on the heat I plan to keep the tikibar roller door closed. People will enter through the other garage door, close the door and then walk through the curtains. That should keep most of the natural light out. I'm also thinking of adding a water tank outside and hooking up a sprinkler system on the roof. That should keep the heat down and make it sound like it's raining outside.
The arts and crafts part of tiki is a huge draw card for me personally… as well as the drinks.
It was / is an experiment. The curtains are recycled and the paint only cost about $70 all up. It was worth a shot. When I light the bar if it doesn't look good then I'll probably reconsider and maybe change to roll up matchstick blinds like the roof. [ Edited by: leevigraham 2019-01-29 14:12 ] |
|
L
leevigraham
Posted
posted
on
Sat, Feb 2, 2019 9:33 PM
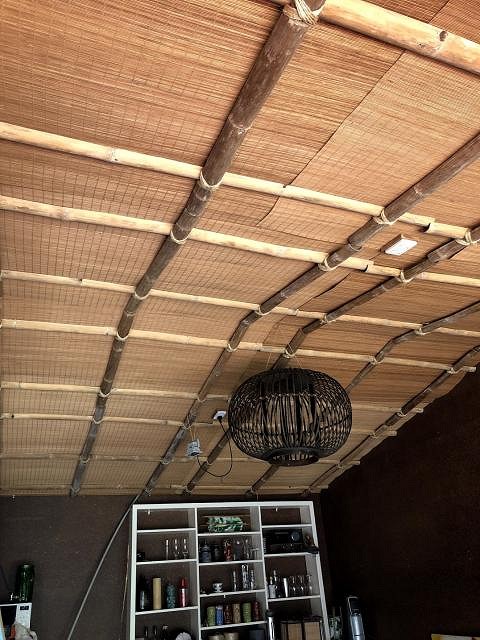
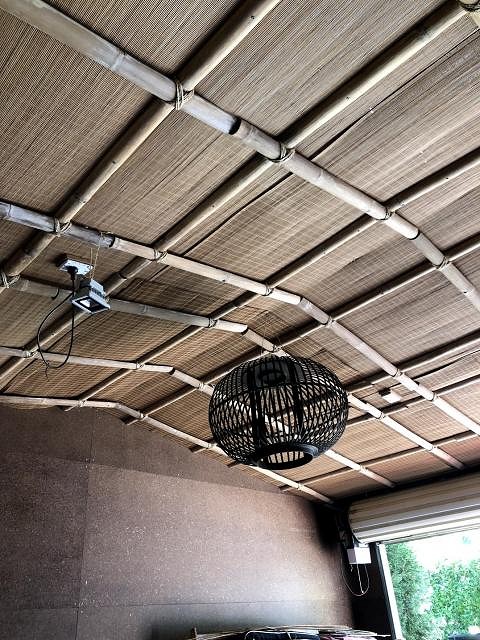
Ceiling update I started working on covering the ceiling before the last post but the photos didn't upload. The plan for the ceiling is / was to cover the whole ceiling with some kind of matting hiding the silver foilboard. I considered a couple of options but finally settled on bamboo matchstick blinds from Spotlight. I chose these becuase a) they come in 1800mm x 2100mm size which means I would only need 6 It turned out that they only had 4 1800mm x 2100mm which meant I needed to get 3 smaller widths to finish the job.
Taking some inspiration from BambooBen I wanted to add a bit more texture to the ceiling and give me a place to hand lamps and oddities.
I replaced the fluro globes with power points which were unsupported so I build a couple of quick mounting boards out of spare yellow tongue and trimmed them with bamboo. I probably cover the points with a vinyl wrap so they blend in more during the day. Lighting update I moved the raspberryPi and lighting controller out the the shed to start testing the lighting. I ended up back lighting the bar first… which will probably change.
There's more pics in the gallery if you're into detail. Next steps are to finish the bamboo on the ceiling. I have to sand another 22 poles which I am not looking forward to. Cheers Leevi [ Edited by: leevigraham 2019-02-02 21:35 ] |
|
PP

Prikli Pear
Posted
posted
on
Sun, Feb 3, 2019 8:31 PM
Great progress! I'm enjoying your creative solutions to the challenge the shed space is offering. Please keep sharing! |
|
L
leevigraham
Posted
posted
on
Sun, Feb 3, 2019 10:50 PM
A challenge indeed… but it is essentially a blank slate! |
|
L
leevigraham
Posted
posted
on
Mon, Feb 18, 2019 2:36 AM
Ceiling - Done! This weekend I finally finished off the matting and bamboo on the ceiling. I had to sand another 18 half poles which was starting to get very tiresome so I built a simple sanding rig.
I also had 10m of led strip delivered which I thought I blew up immediately becuase I plugged a 5v strip into 12v… luckily I was able to fix them by cutting off the first LED… more on that next week. [ Edited by: leevigraham 2019-02-18 02:48 ] |
|
L
leevigraham
Posted
posted
on
Sat, Jun 15, 2019 7:51 AM
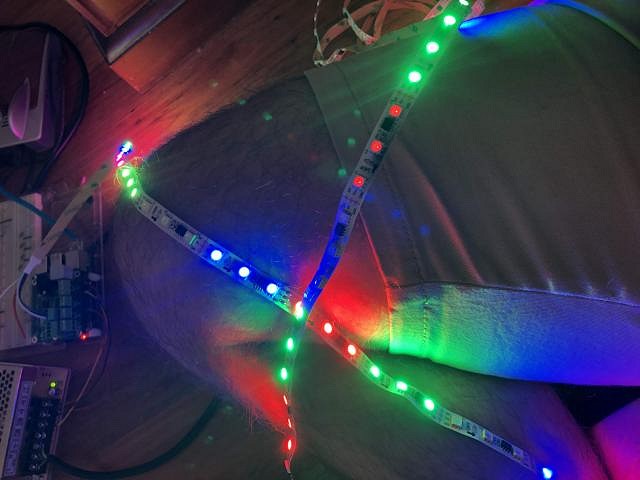
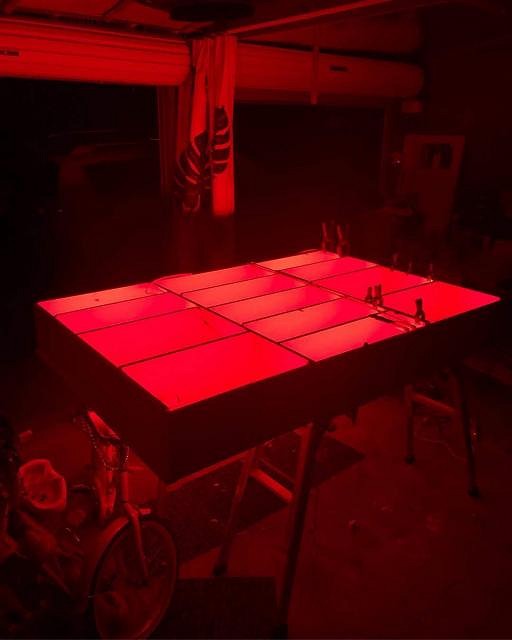
Hi all, The build has continued and it's time for an update! The last four months have focussed on lighting and finishing off the bar and shelves. LED Lighting Oh man have I learnt a lot about led lighting. Luckily I have a friend who is crazy about christmas lights who helped me out with some hardware and a lot of advice. I started with a 2x 5m 5v programmable led strips, a Raspberry Pi and a RPI-28D lighting controller which runs Falcon Player. I'll eventually be using xLights for light sequencing and show scheduling First pass was to test the strips in my bedroom.
Here's a short video of the lamp testing.
Next test was to move the strip into the bar. I looped it over the top and ran a simple rainbow pattern (video).
Then I tested adding a short strip to the shelving.
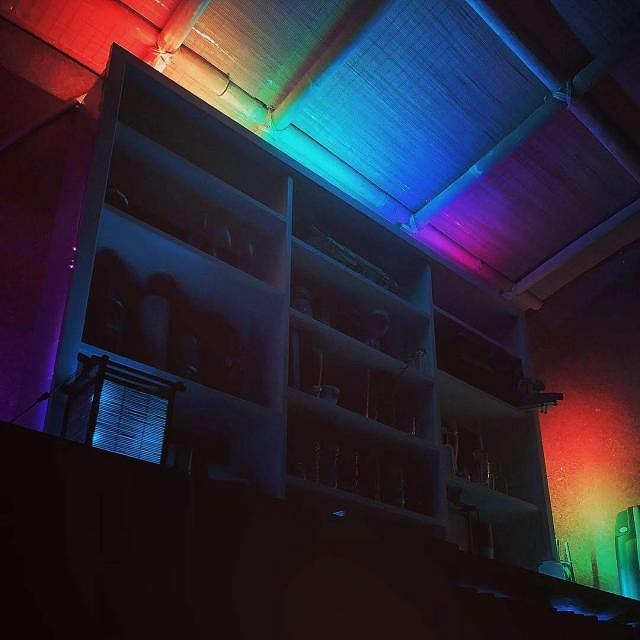
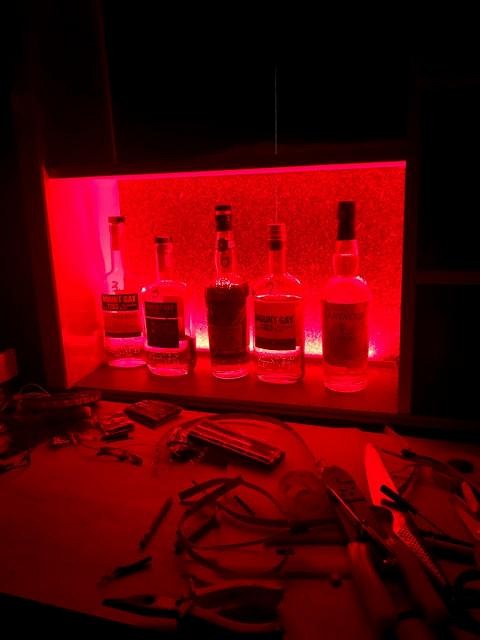
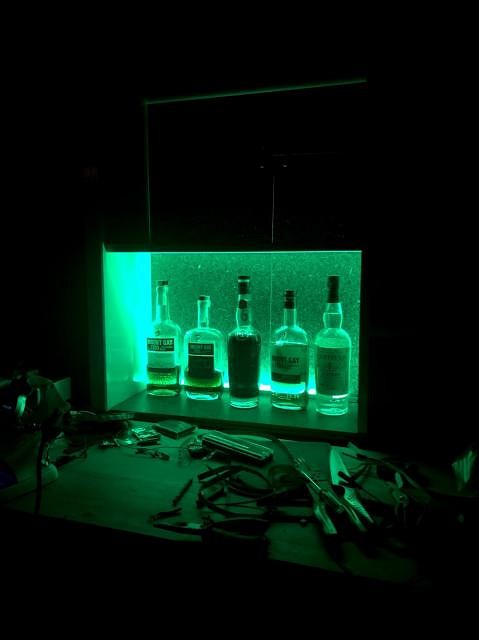
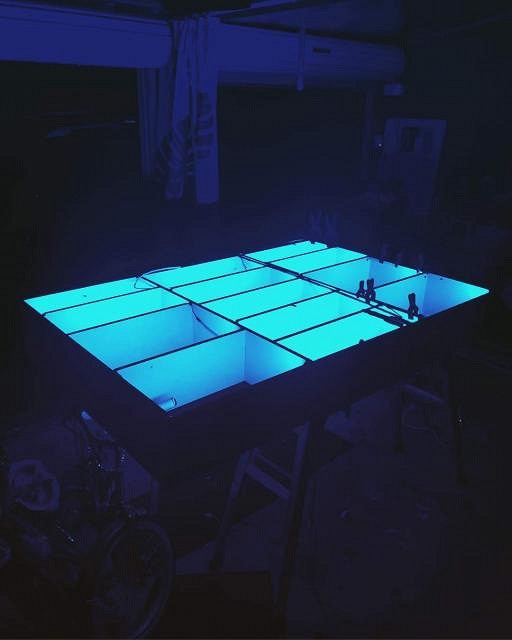
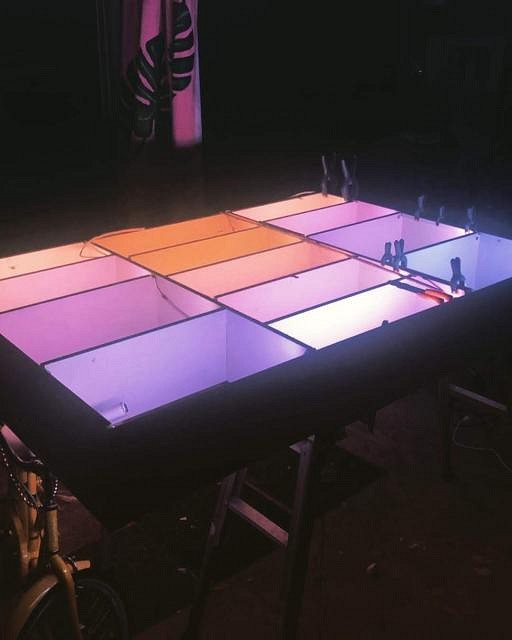
Once I was confident with the electronics (I fried a few leds getting the voltage wrong), I took the shelves off and added strip to each individual shelf.
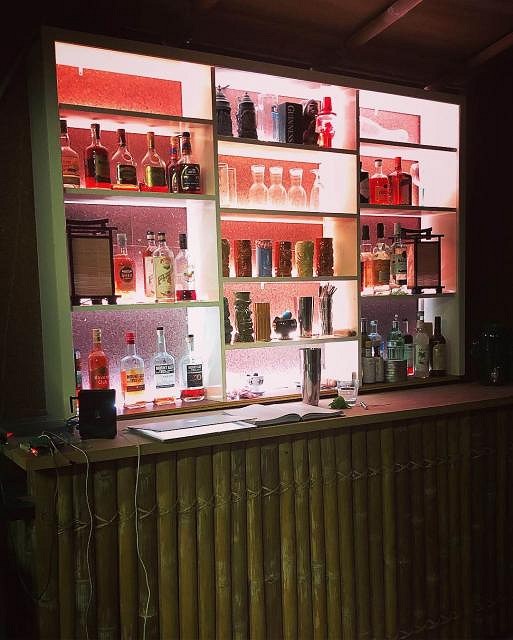
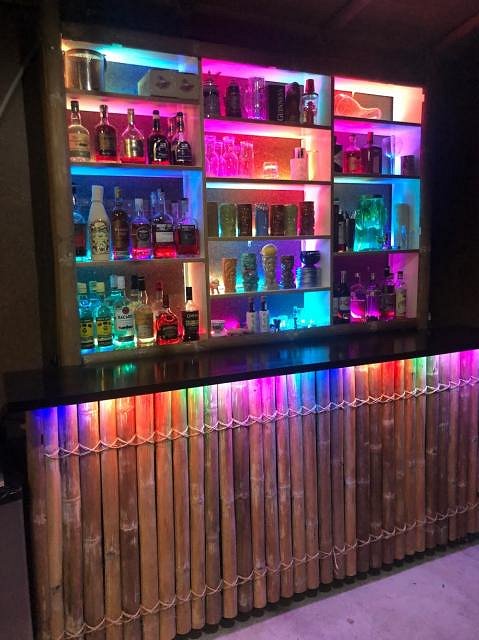
It was a real challenge to keep the voltage up over the whole strip length. The shelves have 420 leds… all individually programmable. I ended up injecting power for each stack of shelves. Here's a video of a test sequence. I also started experimenting with a fire sequence. Here's a video of testing xLights and the result Eventually I got the shelves back on the wall:
and then I enjoyed a Mai Tai
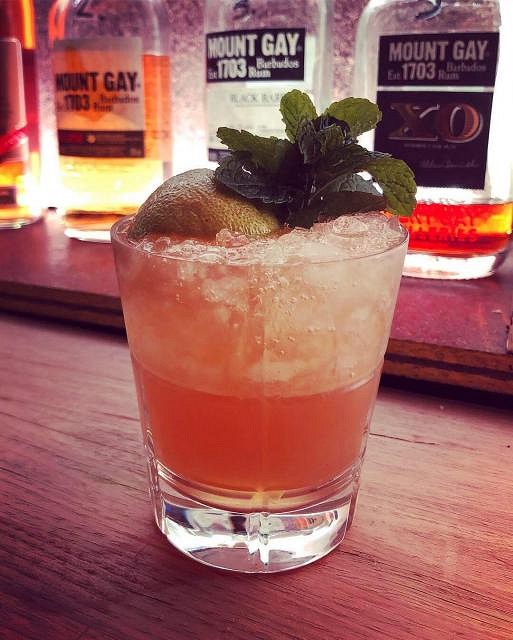
Research I was lucky enough to head to the UK for a month where I visited Trader Vics and The British Museum. Of course I had to try a Mai Tai and a Suffering Bastard.
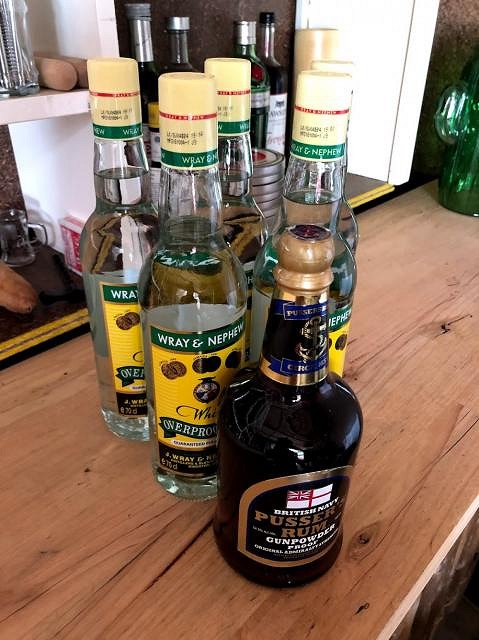
I maxed out my duty free limit on J.Wray and Nephew OP.
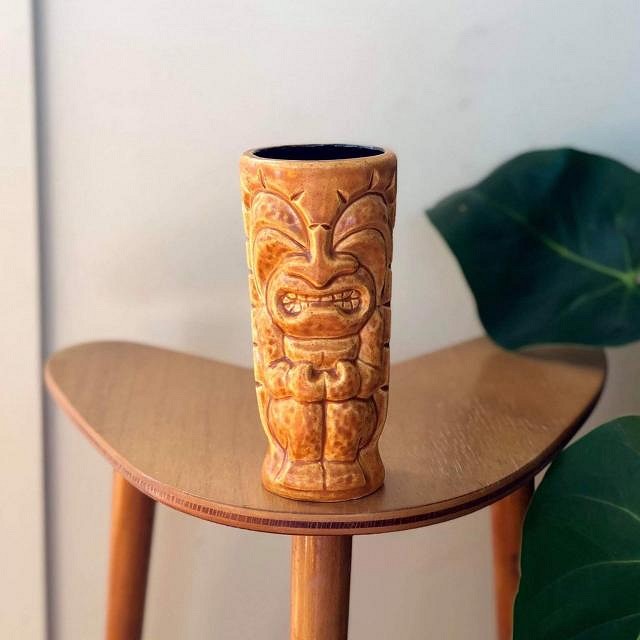
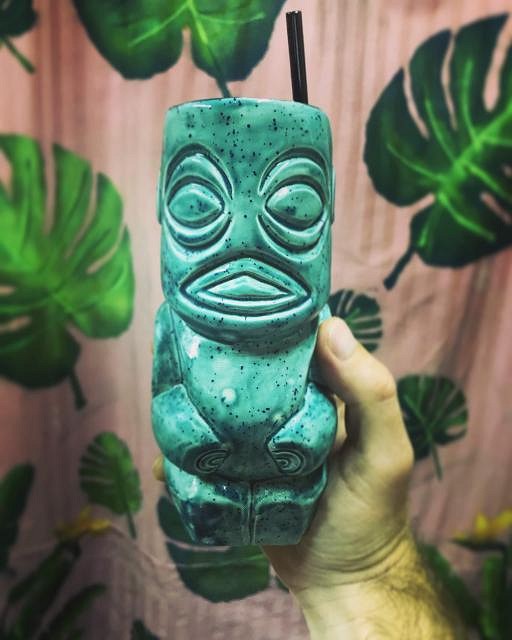
Back home in Aus I ordered a Tiki Dylan mug before I left and it arrived while I was away.
It goes perfectly with my other Tiki Dylan mug
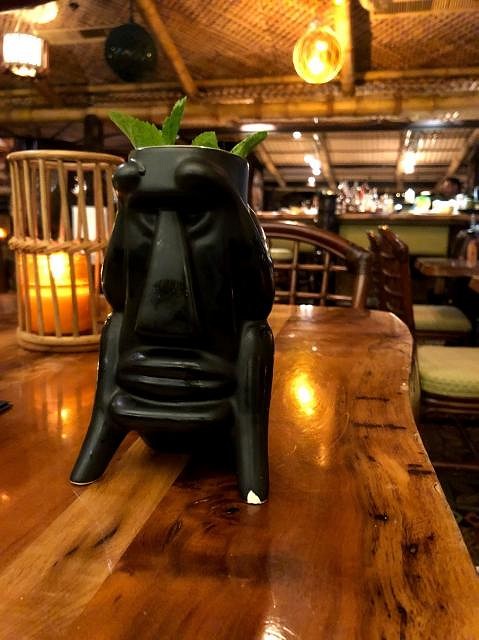
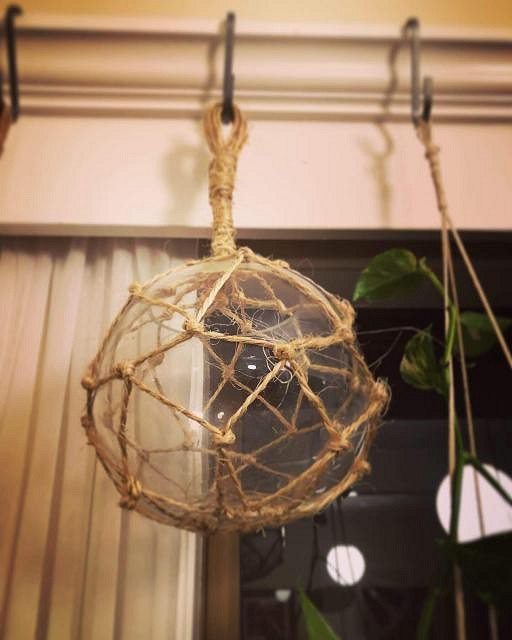
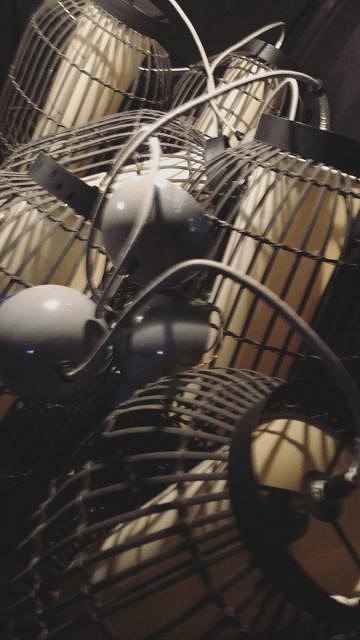
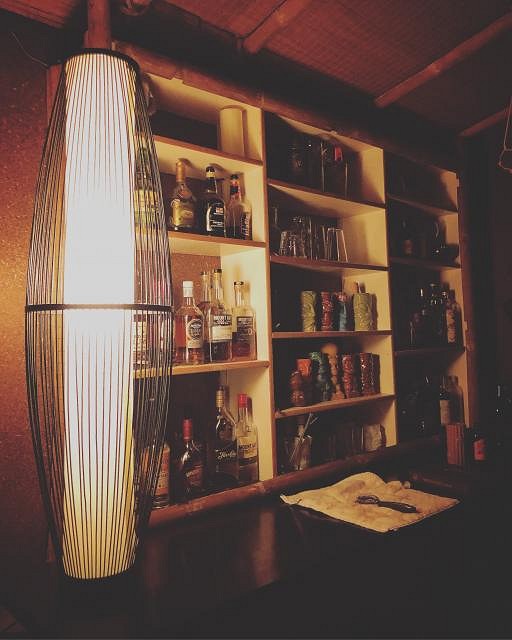
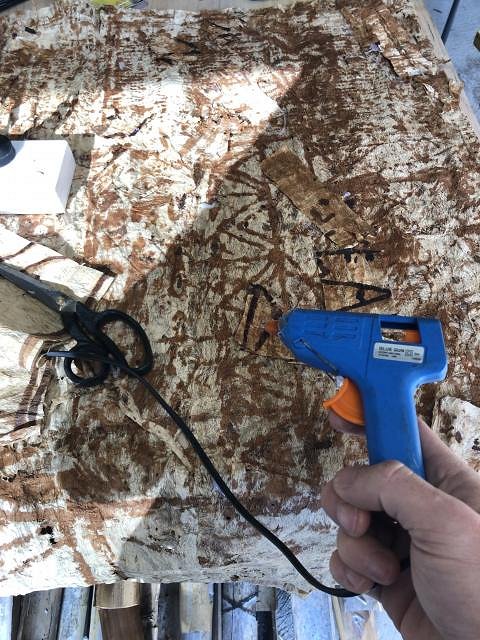
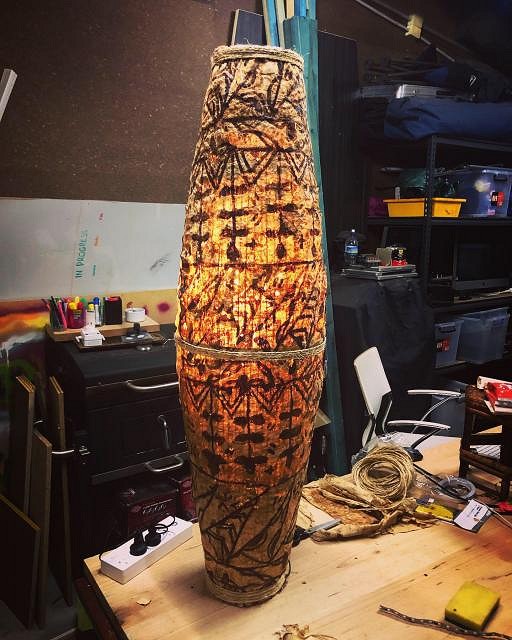
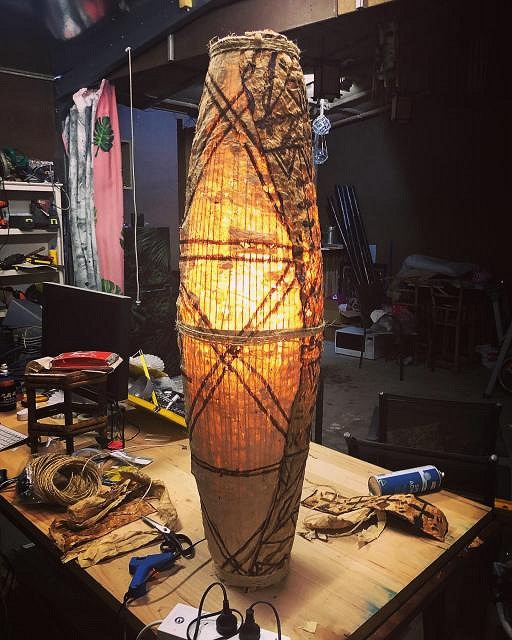
I've started to collect a few different lights for the ceiling
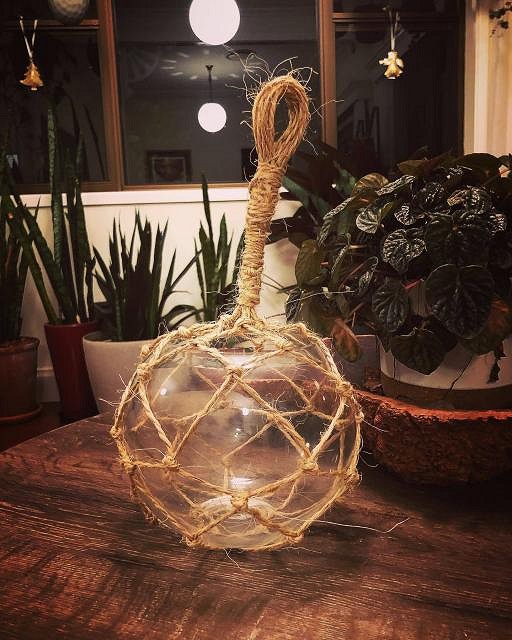
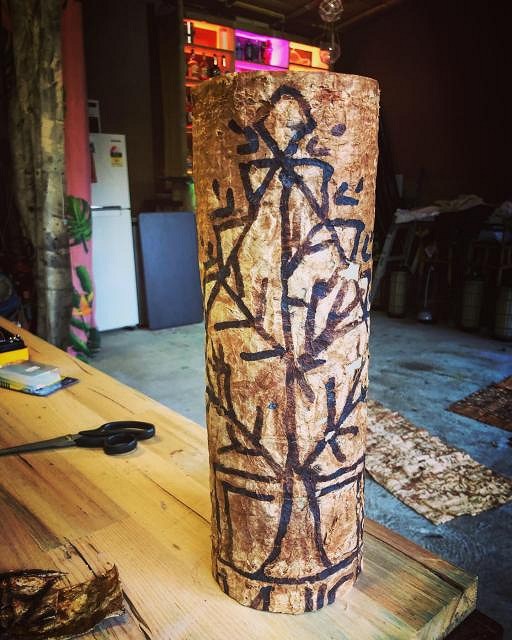
including making my own glass float (I bought 8 bowls from a local website)
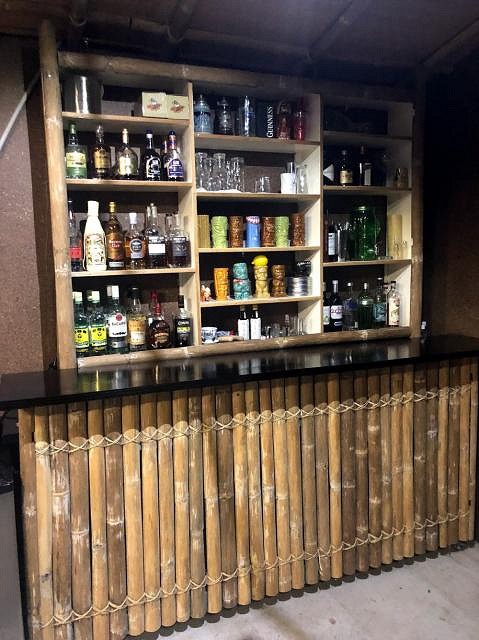
With so many moving parts I knuckled down and finished the bar top. I used a japan black stain and couple coats of varnish to add some protection. I also added trim to the front of the shelves.
While I had the stain out I ran a couple of tests on a few spare pieces of bamboo.
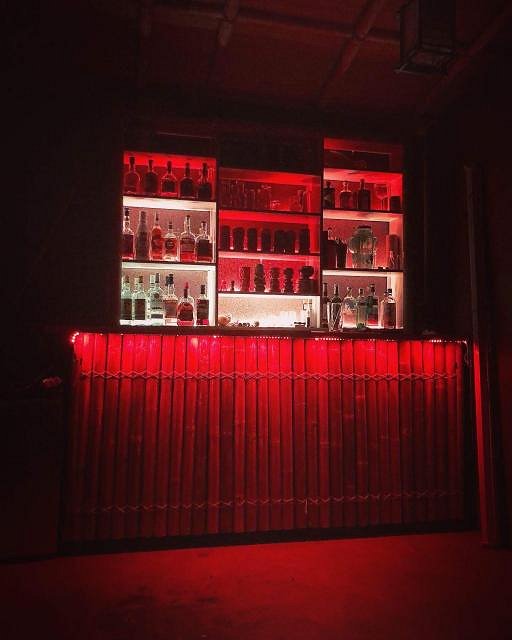
It's all coming together The last step to finish off the bar and lighting was to add under bar lighting.
Pushing the rainbow for testing…
Here's a video of the fire effect and one of a reveal effect Next steps Now the base of the lighting is done i'm going to start working on the ceiling lighting. Stay tuned! My TikiBar build: Leroys Luau Lounge [ Edited by: leevigraham 2019-06-15 07:58 ] |
|
T

Tikifrog
Posted
posted
on
Mon, Jun 17, 2019 9:05 AM
Looking good! I love the backlighting. |
|
H

hiltiki
Posted
posted
on
Mon, Jun 17, 2019 9:24 AM
Great looking bar. |
|
S
Sandbartender
Posted
posted
on
Mon, Jun 17, 2019 10:48 AM
Groovy light effects! Very festive. |
|
L
leevigraham
Posted
posted
on
Sun, Jun 30, 2019 6:03 AM
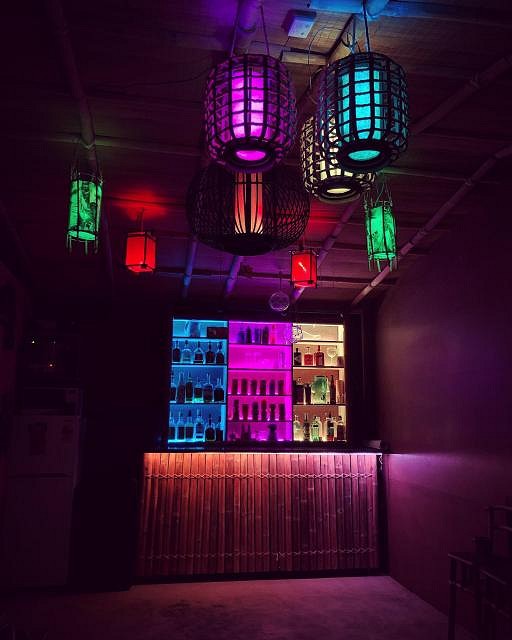
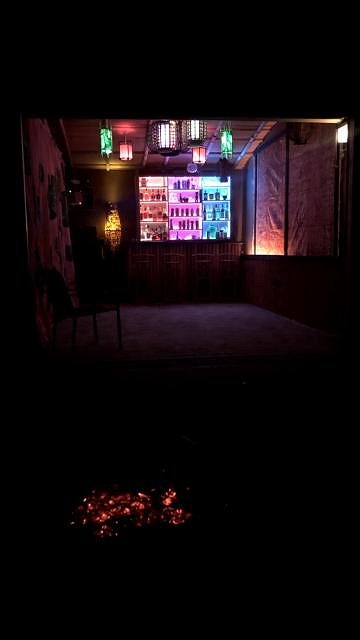
Today I hit another milestone at Leroys Luau Lounge… Lighting is all wired up!
Here's a video of the room and one walking around the corner. I made few lampshades for lights
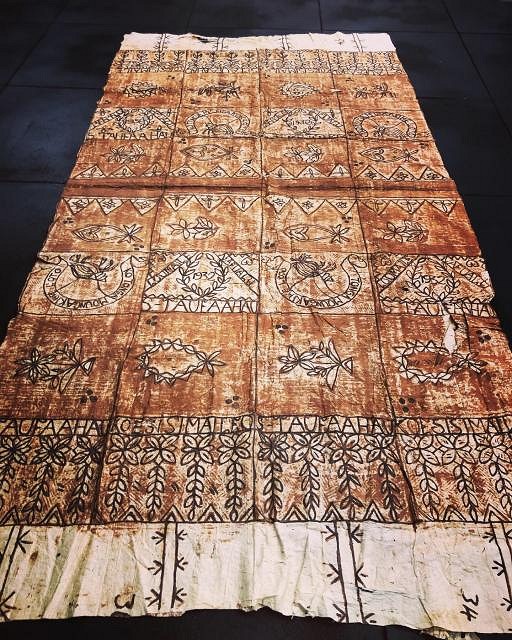
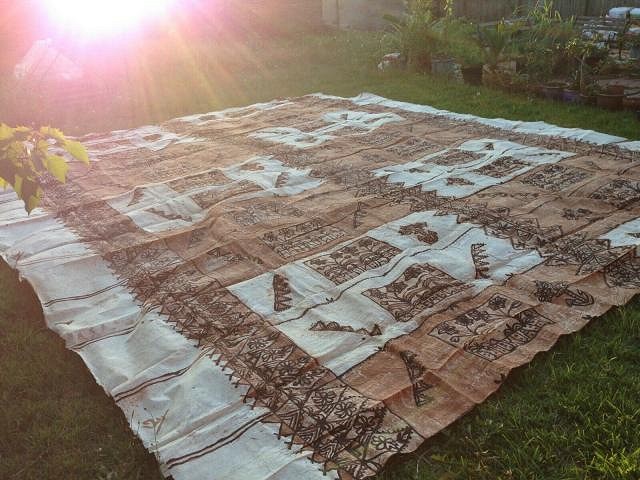
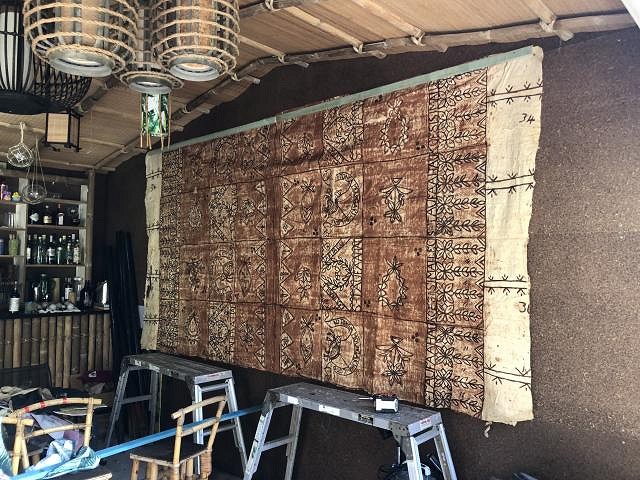
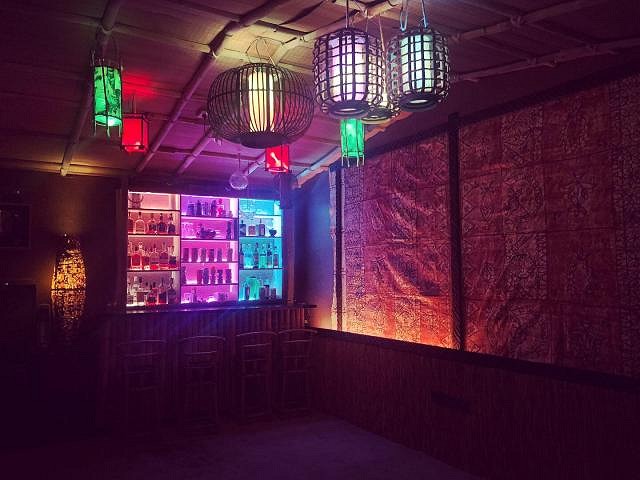
Next steps are to start programming some lighting sequences and hang a few glass floats. I also managed to find an original tapa cloth from 1932. I'm planning on mounting it on the wall with a bit of focus lighting.
[ Edited by: leevigraham 2019-06-30 06:16 ] |
|
BS

BIG SMOOTH
Posted
posted
on
Tue, Jul 9, 2019 2:45 AM
Hi Roy. Love your bar! Fantastic work! Where did you get your LED’s from? I’m building a bar myself at the moment in the uk and I love the way you can program your lights! |
|
L
leevigraham
Posted
posted
on
Tue, Jul 9, 2019 6:10 AM
Hey BIG SMOOTH, Here's a list of my setup and hot tips (in no particular order #braindump):
That shoud be enought to get started. Let me know if you have any specific questions. [ Edited by: leevigraham 2019-07-09 06:11 ] |
|
BS
BIG SMOOTH
Posted
posted
on
Tue, Jul 9, 2019 6:25 PM
Hi Roy thanks for the info and the links. So Much useful much needed information. Il keep posted on my progress. |
|
W

W8N2Surf
Posted
posted
on
Wed, Jul 10, 2019 11:12 AM
Really nice tapa! |
|
S
Sandbartender
Posted
posted
on
Wed, Jul 10, 2019 12:26 PM
Love the lighting! But seeing how involved it is I think I'll just stick with the LED tape that's controlled by an infrared remote. LOL |
|
L
leevigraham
Posted
posted
on
Wed, Jul 10, 2019 3:54 PM
It was a learning experience that's for sure. The end goal is to have a lightning / thunder storm roll through over the top of the music. I'll need to strobe the lights and then turn fade the music down and the rainstorm sound effect up. Also planning on adding a volcano, red lighting and smoke effects. |
|
L
leevigraham
Posted
posted
on
Wed, Jul 10, 2019 3:55 PM
I'm planning on mounting it on the wall but it's going to take a lot of wall space. I need to figure out how to hanf things on top of it without damanging it too much. |
|
PP
Prikli Pear
Posted
posted
on
Thu, Jul 11, 2019 8:48 AM
Gorgeous lighting, but I'm really, seriously, blown away by that amazing vintage tapa. Wowzers! That's definitely a showpiece. |
|
L
leevigraham
Posted
posted
on
Thu, Jul 11, 2019 3:58 PM
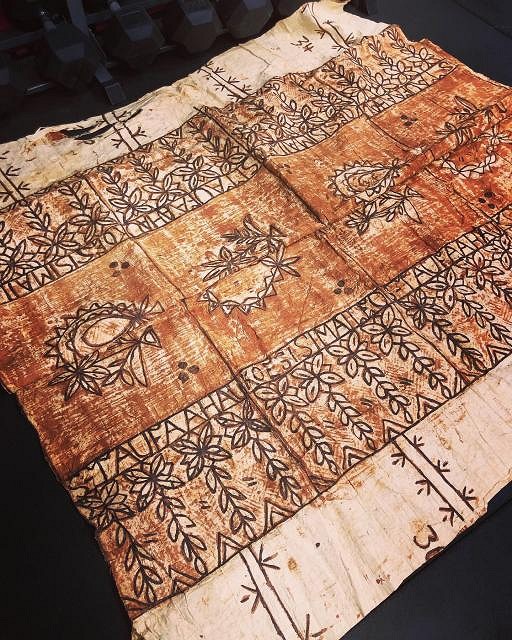
There's very few vintage tiki mugs in Australia from the early tiki-pop days… however we're very close (relatively) to the pacific islands so there is always real pacific island arts and crafts for sale. Here's another tapa I'm looking at… it's 460cm x 580cm :o
|
|
S
Sandbartender
Posted
posted
on
Thu, Jul 11, 2019 5:14 PM
HOLY CROWS! That is gorgeous! |
|
L
leevigraham
Posted
posted
on
Sat, Jul 20, 2019 12:59 AM
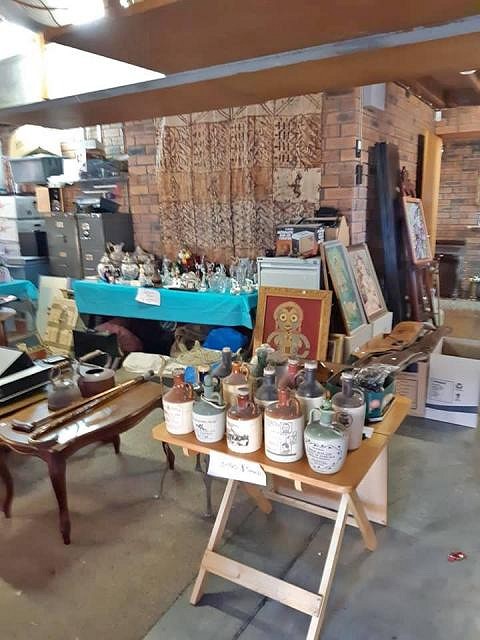
A quick update, Searching through Facebook Marketplace I saw a local garage sale which had this photo:
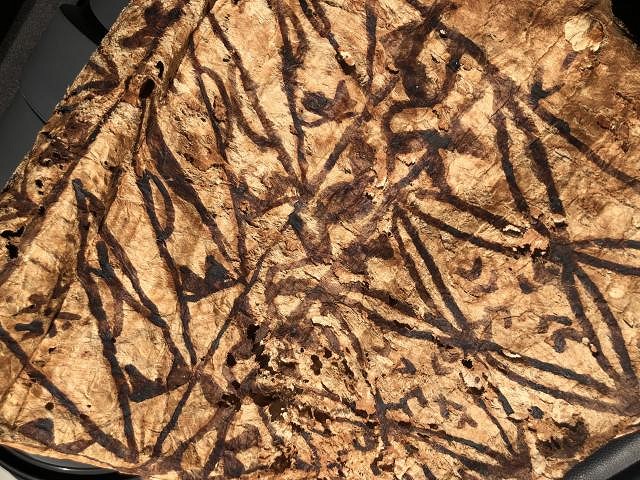
I saw the tapa and asked how much… the lady said I should see it first which was a good call becuase it had heaps of holes from bugs eating it. Clearly it had been stored in the garage for over 50 years. Regardless I offered $20 (probably $10 too much) and it was mine.
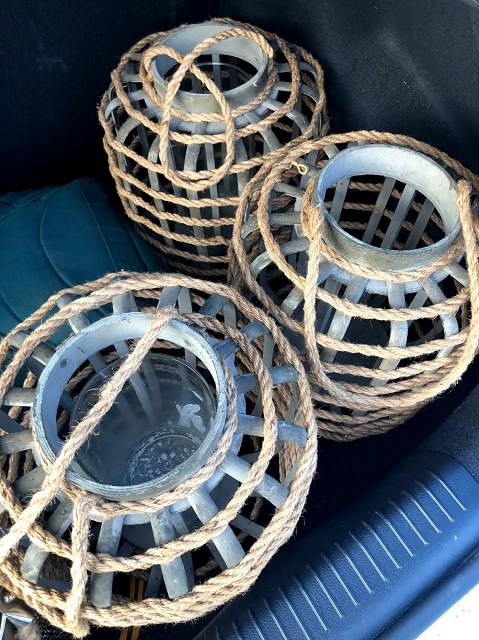
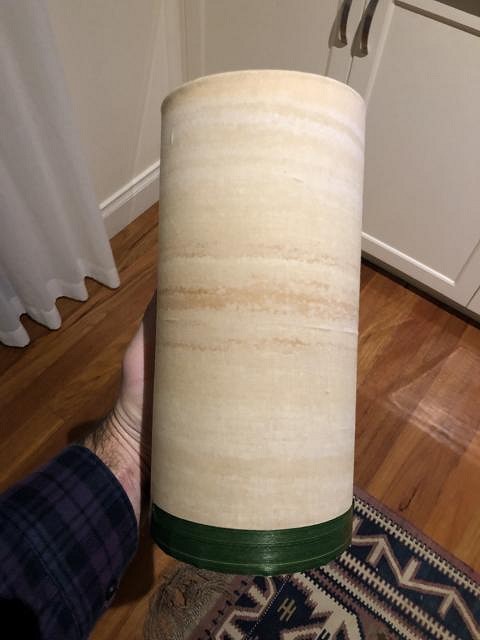
Last week I bought 6x cane lamp shades for $50 bargain*. The plan was always to give them a tiki upgrade. Here's what they looked like:
I pulled out the internal cylinder, trimmed up the tapa and stuck it on.
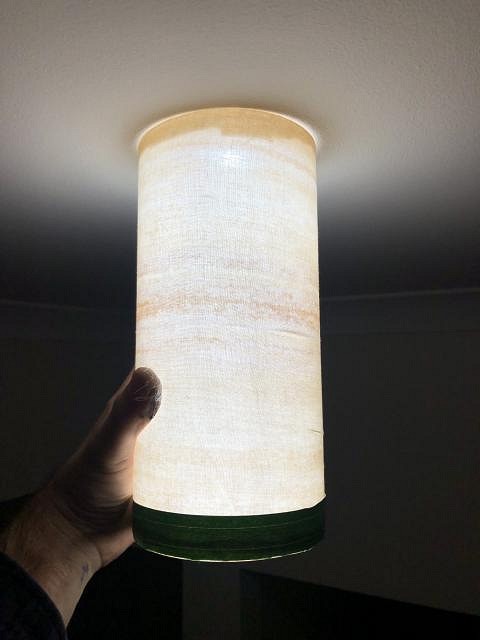
Here's the final result all lit up:
The holes can be clearly seen and the pattern isn't super strong but for $70 all up for 6x lights I'm still happy. |
|
L
leevigraham
Posted
posted
on
Sat, Jul 20, 2019 3:37 AM
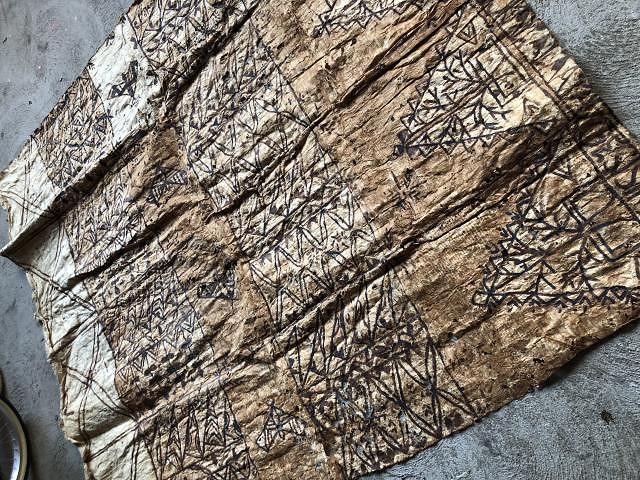
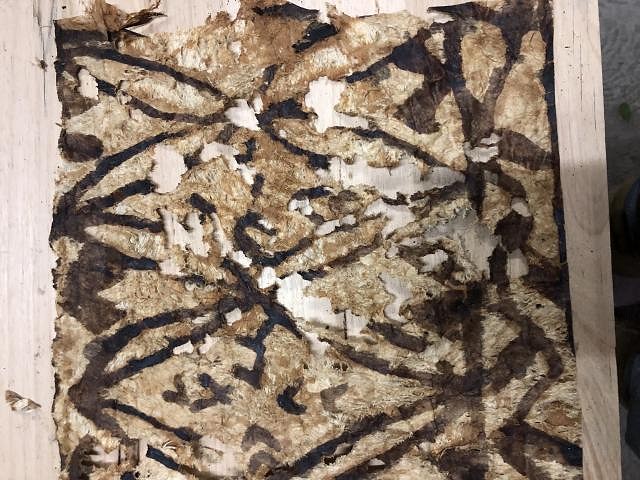
Another quick update. I decided to double down and complete all 6 lamps. Here's a close up of some of the damage to the tapa:
I used the damaged pieces as scrap and tried to fill in the holes by glueing them on to the back of the better pieces. Here's the result… all 6 done and dusted. Now to hang them and wire in more LEDs.
[ Edited by: leevigraham 2019-07-20 03:38 ] |
|
S
Sandbartender
Posted
posted
on
Sat, Jul 20, 2019 6:42 AM
scoring a damaged tapa is probably the best way to chop one up. I'd feel terrible hacking apart an intact and vintage piece. :) Great new lights, really nice work. |
|
L
leevigraham
Posted
posted
on
Tue, Jul 30, 2019 3:31 AM
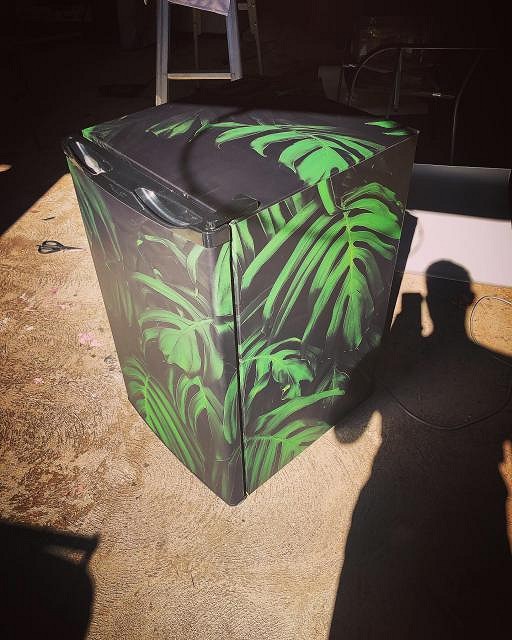
A quick mid week update. I have two fridges in my tikibar atm… a large fridge (white) and mini bar fridge (silver). Even with the lights off a big white box is a bit of a distraction. I contacted a friend of mine who owns a print shop and she printed me a few really large vinyl stickers to wrap the fridges. They turned out amazing and I can't wait to get them on this weekend. Mini fridge:
Large fridge:
|
|
L

littlegiles
Posted
posted
on
Tue, Jul 30, 2019 6:04 AM
Nice solution! Much better than the coat of paint I slapped on mine. :) |
|
L
leevigraham
Posted
posted
on
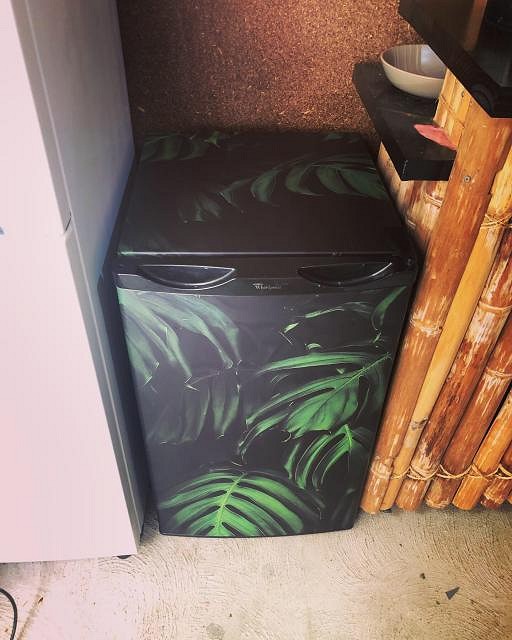
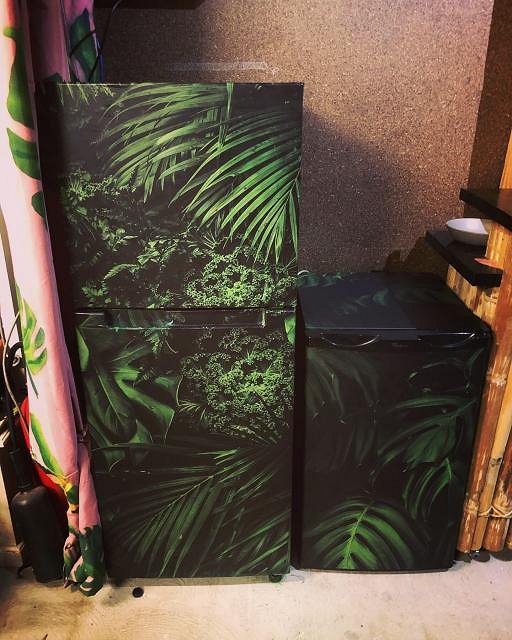
Sat, Aug 3, 2019 5:18 AM
Fridges are done! No more white-white goods. Minibar was a good test run.
Then I worked on the main fridge. The deep handles were a challenge but nothing some spray paint and off cuts couldn't fix.
|
|
C

Commodore
Posted
posted
on
Sat, Aug 3, 2019 7:33 AM
those fridges turned out really well - and that's a great solution. I may have to sue that idea - well done! |
|
S
Sandbartender
Posted
posted
on
Sat, Aug 3, 2019 7:33 PM
The fridges look great! |
|
L
leevigraham
Posted
posted
on
Sat, Aug 3, 2019 11:53 PM
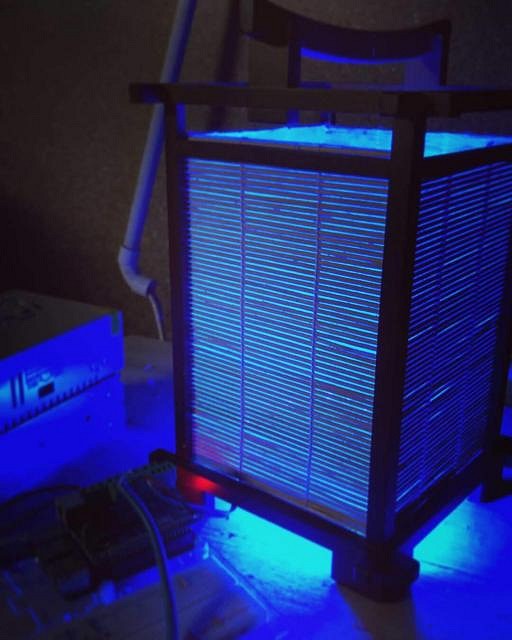
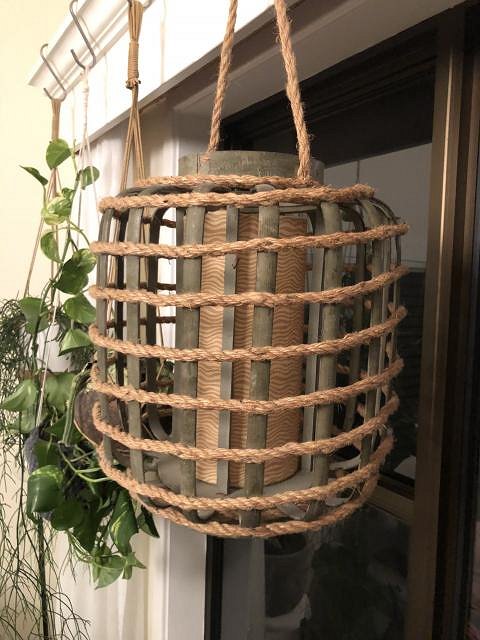
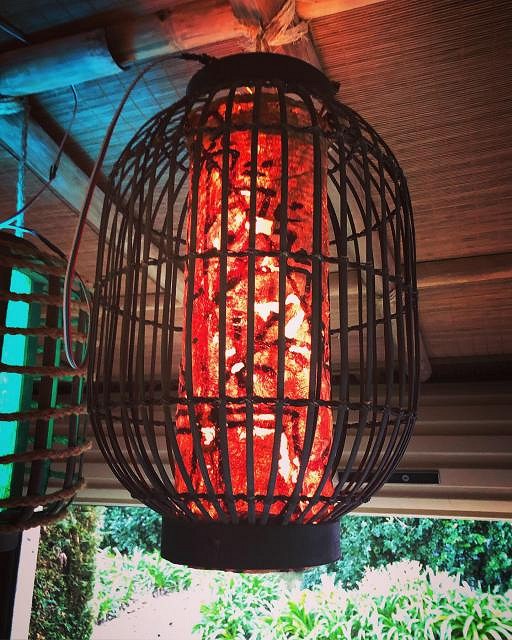
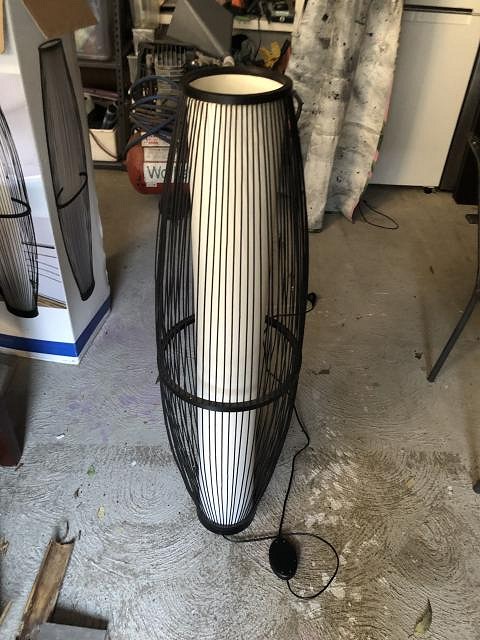
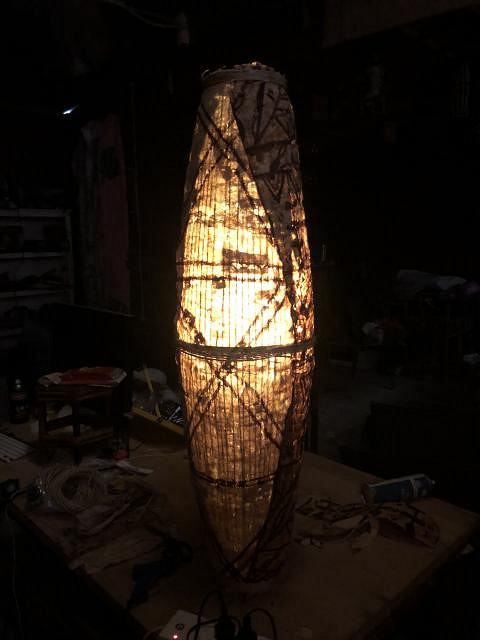
Another day in Leroys Luau Lounge… I decide to tackle a new light I bought of Facebook for $10. It's a fish trap style and I wanted to use the last of the old beetle hole tapa. Here's the light in it's original state:
Not bad but we can do better. First I made some repairs hot glueing offcuts to the back to cover the holes:
It's quite large so I had to do a bit of floor work to get started:
Lights up ok when there's other light in the room. I like that I can see the print as well as the illumination.
In pitch black I think I need stronger lighting for the bulb… The main issue is the overhang on the joins.
Regardless I'm pretty happy with the result. A little jute twine to bind everything together and…
|
|
L
leevigraham
Posted
posted
on
Sat, Aug 3, 2019 11:57 PM
Another milestone today… hanging the tapa… we'll kinda…
Plan it to carve some trim with a router and frame it all up… that can wait for next week tho. Time for a drink. |
|
L
leevigraham
Posted
posted
on
Sun, Aug 11, 2019 2:42 AM
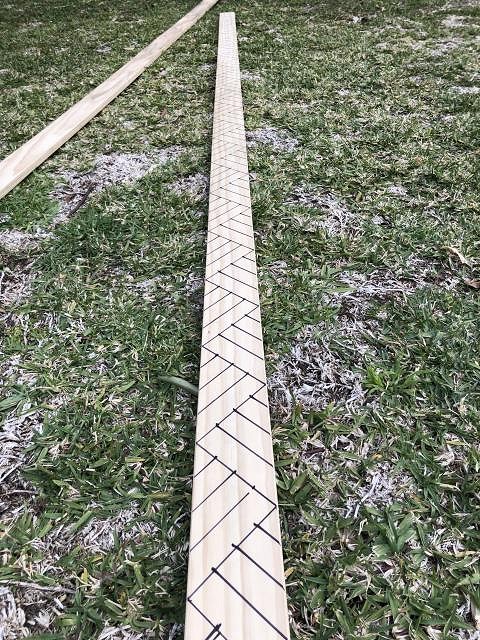
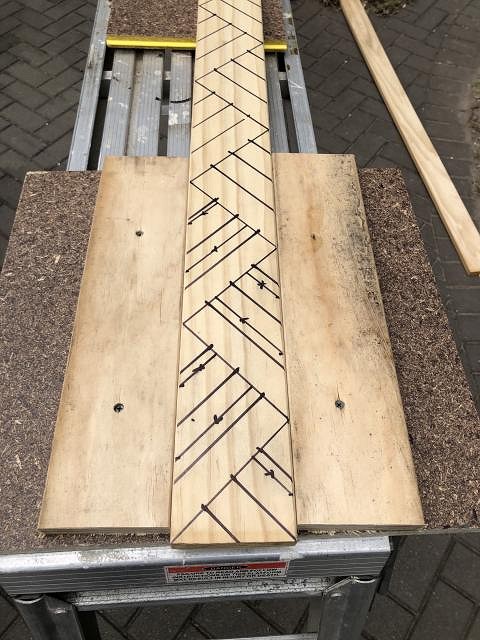
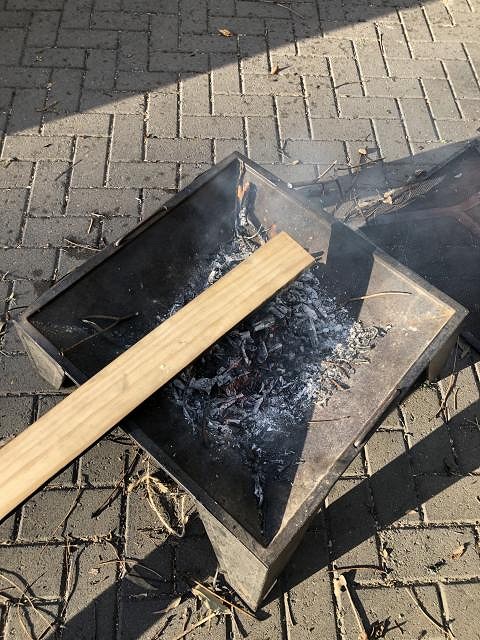
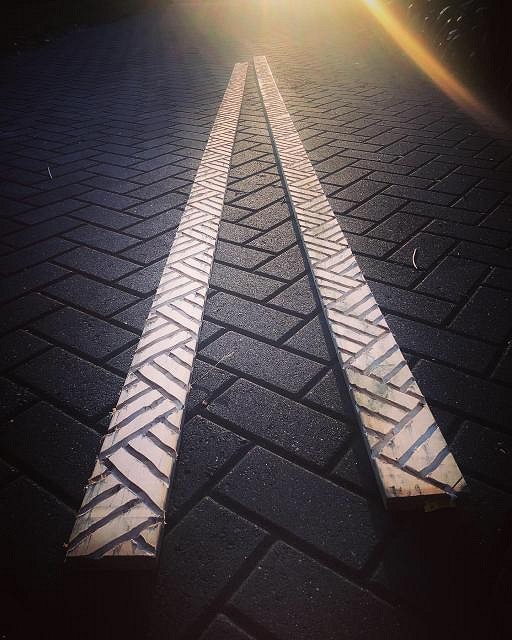
This weekends goal was to frame the tapa from last week with some custom trim. I started with some NZ pine fence timber (4.2m in length) which a friend gave me. I drew out a simple geometric pattern and got to work with the router.
I created a simple jig to keep the base of the router flat near the edges.
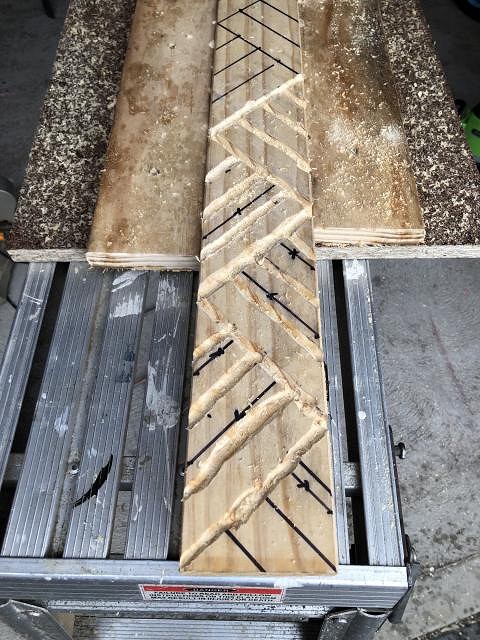
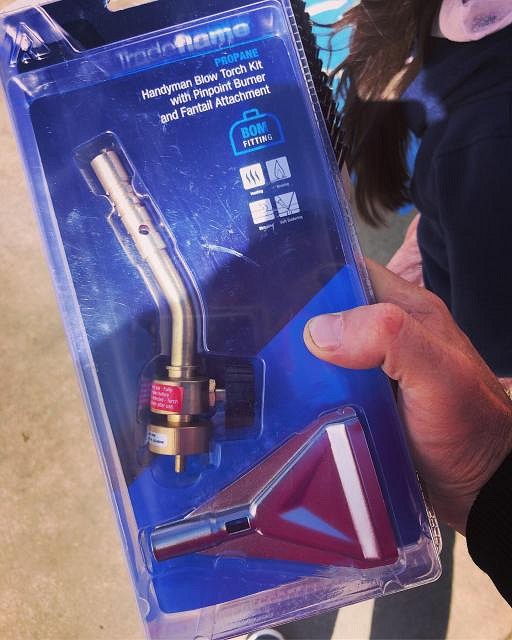
The first couple of attempts were a bit wobbly but I figured with the eventual burning it would be ok. My plant was to use a propane torch. We don't use roofing torches in Australia so the best I could find was a welders brazing torch at the local hardware store.
Unfortunately the torch didn't make much of an impact on the wood. It would have taken ages and cost a bomb in propane bottles. I returned the torch and got a refund.
Next idea was to get creative and use an old camp cooker to slowly burn the wood.
It worked ok… but it still would have taken too long and again cost a bit in butane canisters.
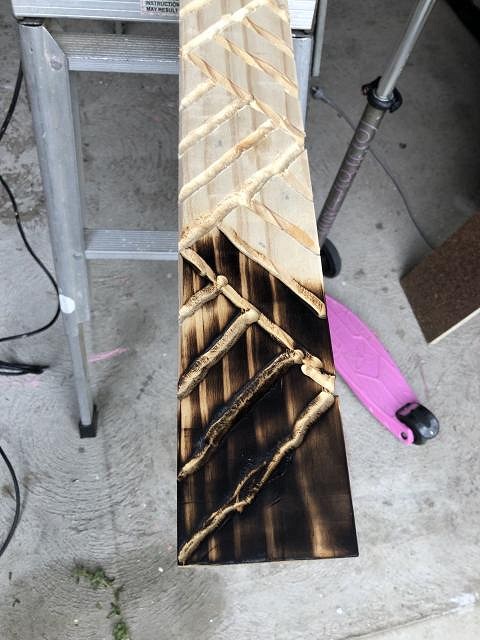
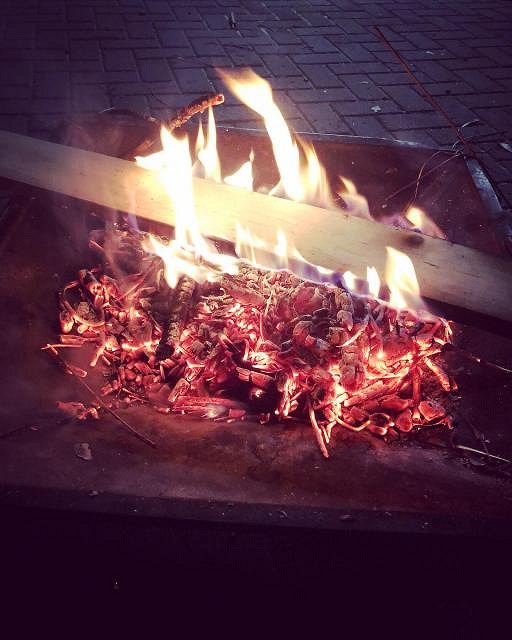
Time to go old school… Real fire to burn timber… who would have thought.
I ran the board over both hot coals and flame a few times
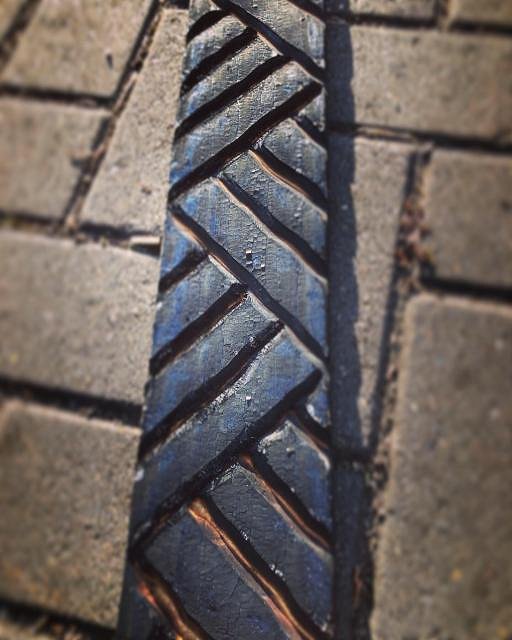
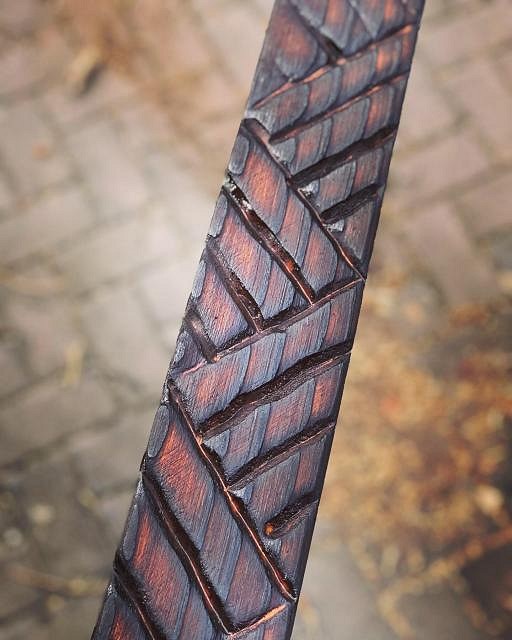
It seems the hotter the better. Flames really help get into the router lines, heat really chars the timber and brings out the grain. Here's the result after the burn:
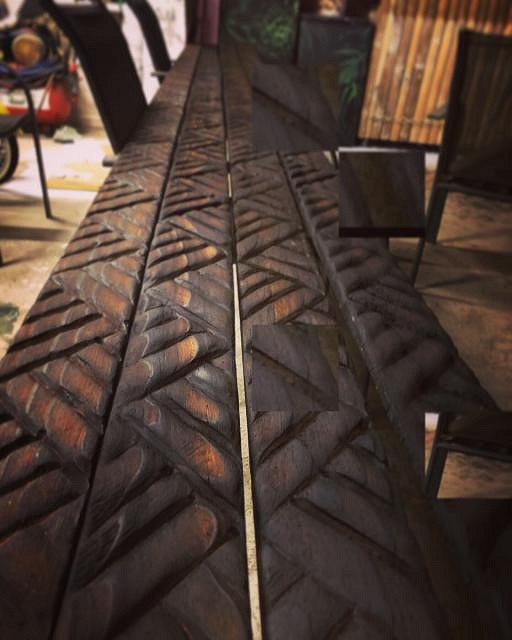
I then hit the whole thing with a wire brush which softened all the edges:
Final step was to give the whole thing a diluted coat of Jarrah stain and varnish. Another quick wire brush to bring out the ridges and boom…
Can't wait to get this up on the wall. |
|
H
hiltiki
Posted
posted
on
Sun, Aug 11, 2019 8:53 AM
Nice work, looks great. |
|
L
littlegiles
Posted
posted
on
Mon, Aug 12, 2019 6:29 AM
NICE! Love the ingenuity in finding a solution. In this case it just required going back to basics and it turned out beautiful. |
|
C
Commodore
Posted
posted
on
Mon, Aug 12, 2019 6:53 AM
Nice work all around - really like how your tapa light came out! thanks for sharing! |
|
J

jimsflies
Posted
posted
on
Thu, Aug 15, 2019 12:56 PM
Looks great. Might have to do the firepit on my next round of trim. The torch takes too long! |
|
L
leevigraham
Posted
posted
on
Thu, Aug 15, 2019 5:37 PM
What kind of torch do you have? I was still considering buying one to speed things up even more… but you said it still takes a long time. |
|
L
leevigraham
Posted
posted
on
Sun, Aug 18, 2019 4:47 AM
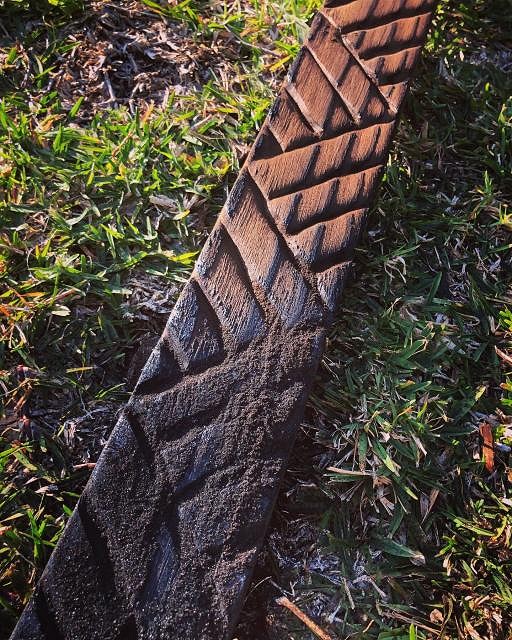
This weekend invloved another round of carving and burning. I got pretty effiecient and managed to knock out about 8m of trim on a couple of hours just before the sun went down.
Sunset is the perfect time to light a fire and burn back the trim
I tried a few different burn techniques… in the end I think the best outcome came from the hottest flame and rotating the board 45 degress so the flame travelled up throught the routing groves. I also sprayed the board with water as soon as it was out of the fire to stop the edges burning too much.
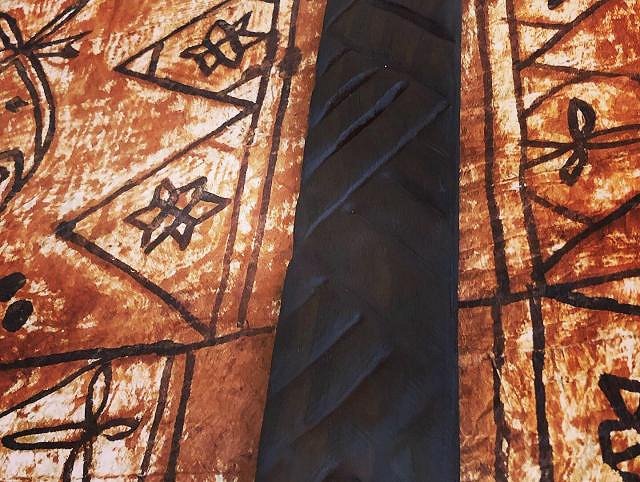
My acual goal was to frame the tapa so I woke up relatively early (I won't say what time) and got to work.
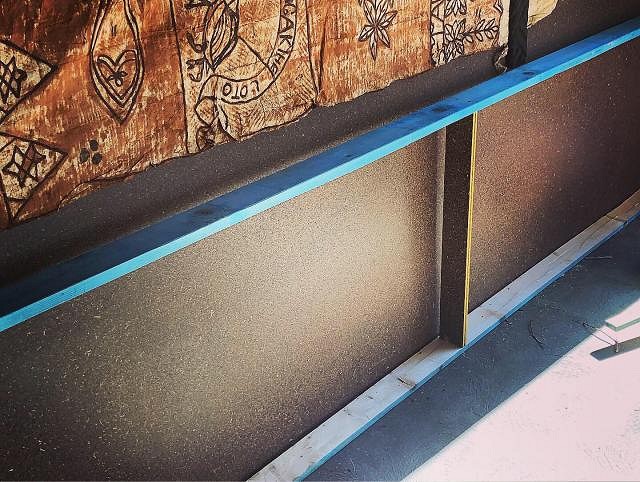
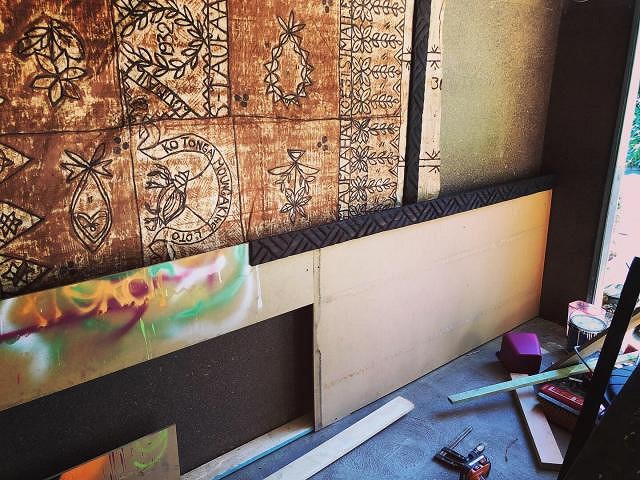
I removed the placeholder timber and started from the top to support the tapa. The center post helped spread the tapa and kept it taught without stressing it. I also did some repairs with a waterdowned wood glue. I figured that given tapa is mulberry bark a wood glue would bind the fibres well. Hopefully ti doesn't discolour the tapa too much. I got the tapa mounted pretty quickly so I pushed it and decided to build out the next part of the project… a thin box to hide some lighting and fake plants. I started with a frame made from scrap.
I squared everything up with some mdf board. I planned to use the board as backing for a covering. I wanted to get some Lauhala Matting for the box but it's really exoensive in Australia and hard to find so I went to the local hardware store and found some reed privacy screen. I really don't like the reed screen… every time I've seen it on a fence it looks cheap (it is) but I decided to take a chance and thoight that if double it over it might be ok. The mdf board was covered with spray paint (project with my daughters) and I didn't want that to show through so I bought some cheap black weed mat and covered everything.
I stapled the reed screen on trying to make sure any gaps where filled.
I then put the two boxes back in place and sat back for a r(hum) and ginger beer. After a little bit of "inspiration" I decided to complete the goal and add the recessed lighting. I think it worked out well
|
|
S

SassyPonyPants
Posted
posted
on
Sun, Aug 18, 2019 6:35 AM
Those fridges look awesome, very clever! I recently was given a mini version of that tall fish trap light and now I might modify it, haha. |
|
D

danlovestikis
Posted
posted
on
Fri, Aug 23, 2019 10:38 AM
I love all the lighting colors. Thank you for the time and effort to show us your work. You are a professional now. Good work, Wendy |
|
L
leevigraham
Posted
posted
on
Sat, Aug 24, 2019 9:02 PM
Thanks Wendy! Coming from such a legend that means a lot. :) |
|
L
leevigraham
Posted
posted
on
Sun, Aug 25, 2019 3:47 AM
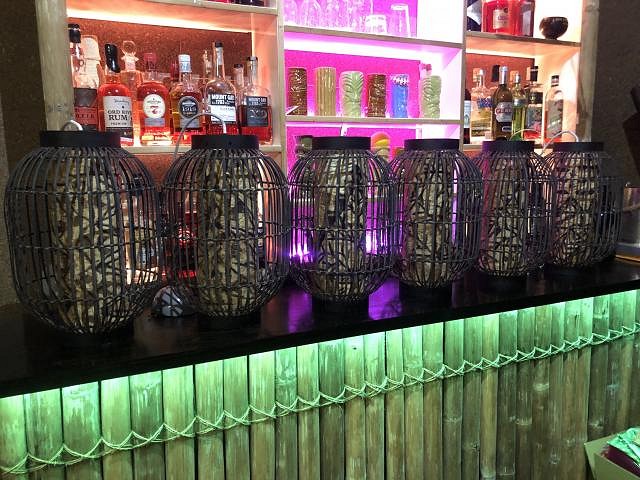
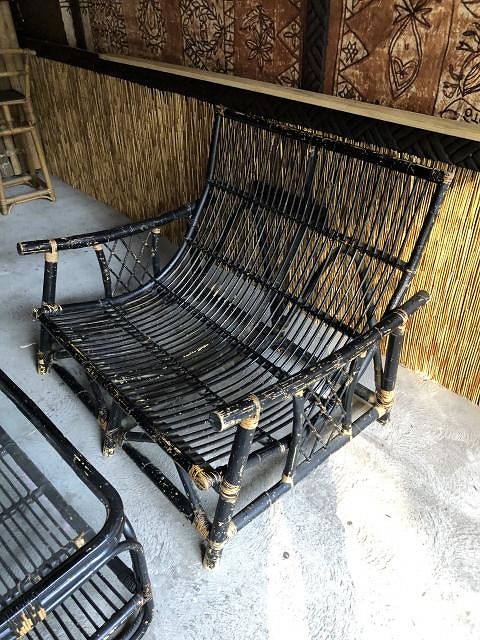
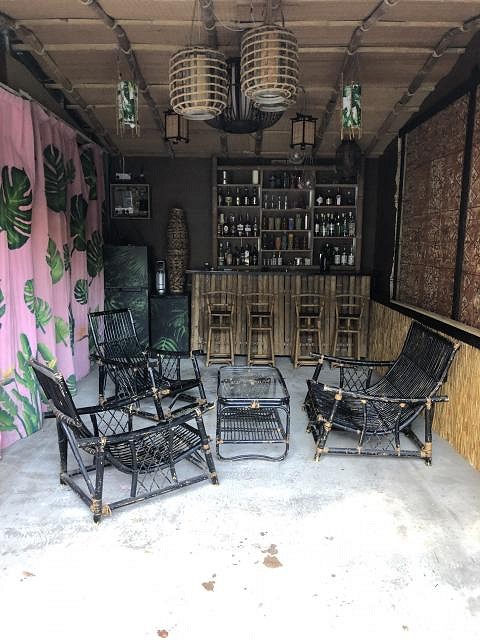
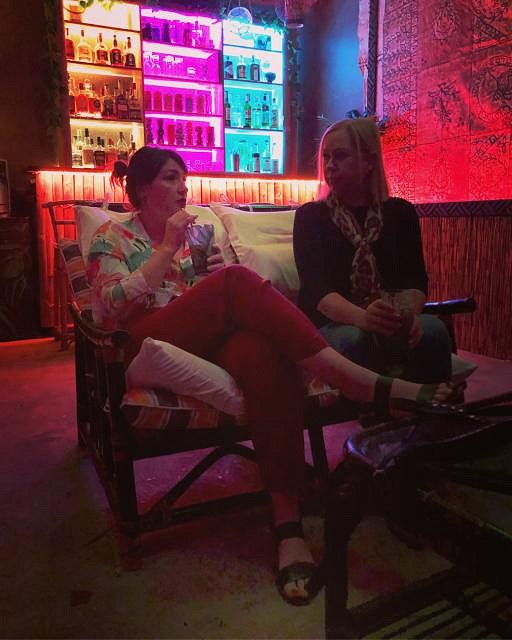
A few updates from this weekend. I found some old cane / bamboo furniture on Facebook Marketplace listed at $AUD 40 (about $US 27) which was an absolute steal. It filled out the space and made everything a bit more comfortable.
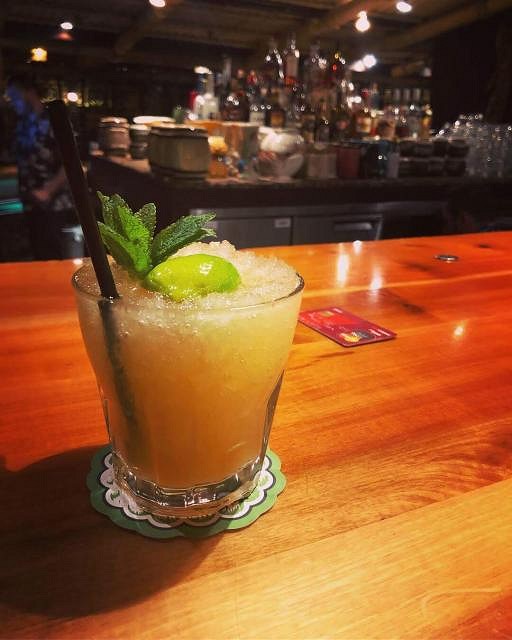
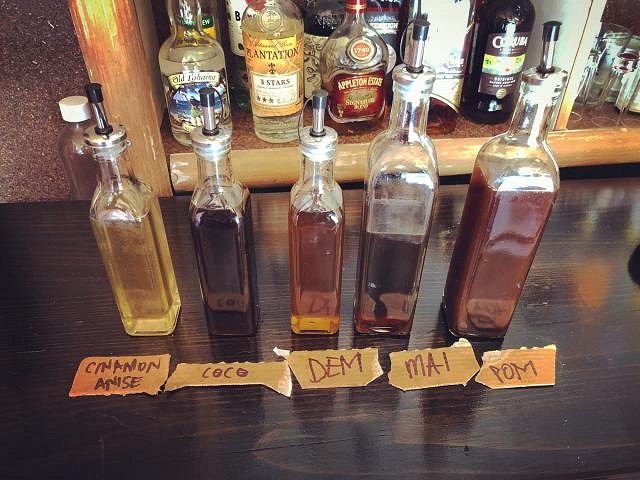
I expected that I would be entertaining a few friends so I prepared a few home made syrups:
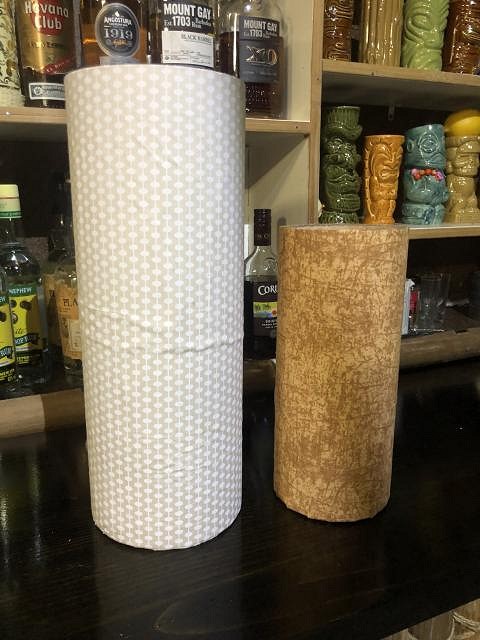
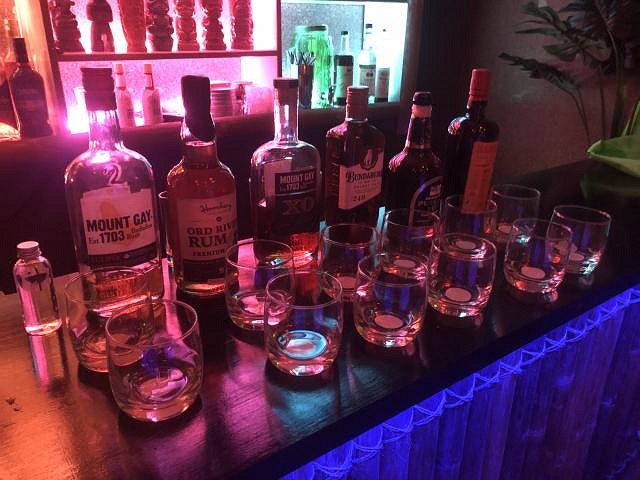
I also organised a little rum tasting with a selection of rums in the bar which was quite fun.
It also turns out my wife is now coming around to the idea of a tiki bar and has requested we have friends around for her birthday in a few weeks :)
|
|
H
hiltiki
Posted
posted
on
Sun, Aug 25, 2019 9:39 AM
Love that furniture. |