Tiki Central / Tiki Carving
A-A… Some Stuff I'm Working On
Pages: 1 2 3 4 5 6 7 8 9 411 replies
|
AA

Aaron's Akua
Posted
posted
on
Mon, May 16, 2005 12:39 PM
Darn, FD. I can't make that one either :) I posted my Visit to S.C. Tikis in the Main Discussion Area. Check it out and enjoy. A-A |
|
P

Polynesiac
Posted
posted
on
Mon, May 16, 2005 1:04 PM
aaron, that tiki is looking very cool! You are very talented, my friend. I think any of sams art would make for cool carvings - but that hypnotiki is coming out great! can't wait to see it done. Carving pendants is the same as carving the big ones...only smaller |
|
CK

Coconut KC
Posted
posted
on
Mon, May 16, 2005 2:51 PM
AA, that tiki looks smoother than a....well you know, great work, can't wait to see the finished product. I'd love to be at the water cooler when your friends see you in the park from their office window: "There's that crazy Tiki guy again." |
|
PT

Palama Tiki
Posted
posted
on
Mon, May 16, 2005 6:02 PM
A-A.. i'm impatiently awaiting seeing hypno-tiki all finished... once again, primo job! |
|
AA
Aaron's Akua
Posted
posted
on
Fri, May 20, 2005 10:41 AM
Mahalo Polynesiac, Coconut, & Palama. Monkeys in my opinion don't make good pets. Something about the feces flinging thing, I guess. I used to have a parrot, though. |
|
AA
Aaron's Akua
Posted
posted
on
Fri, May 20, 2005 10:43 AM
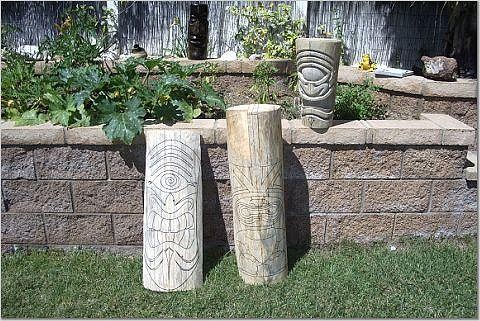
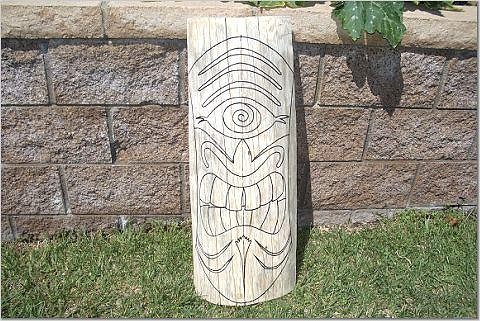
Here's some more ongoing work shots.
I've made some small progress on Hypno-Leroy, but also decided to add a little more detail. Hopefully he'll be all detailed, sanded, and ready for finishing in a week or so.
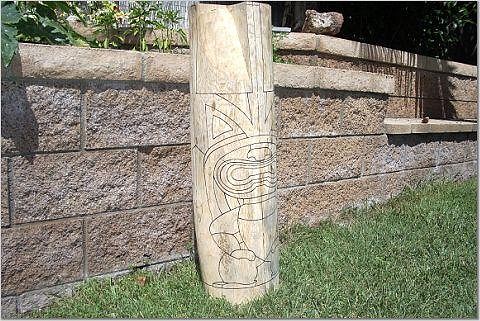
+++++++++++++++++++++++++++++++++++++++++++++++++++++++++++++++++++++++++++++++++++++++++++++ Got all the line art laid down for a couple more projects that I'll start as soon as Will's cyclops tiki is done. Here's Lono.
Most of these lines will disappear once I start carving, but I just wanted to see how it would look. This is my first full body tiki, and I gotta tell you, it's already screwing with my head. So many angles to figure out - much harder than a stand-alone tiki head. I think I'll get rid of the extra wood on the sides first, then try to figure out the side view. If anyone has any thoughts on carving full body tikis, I'd love to hear them.
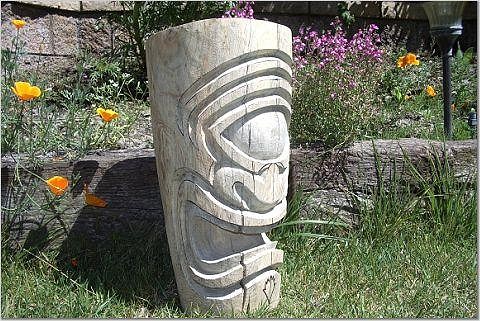
Sam Gambino already gave me the go ahead to carve an exact replica of his painting if I want. It just so happened that Will gave me a mask blank cut from the side of a redwood log. So one thing led to another, and now I've got Sam's painting all laid out for a 3-D copy.
The front of the mask is all white sapwood, but turn it around and you can see the beautiful heartwood on the inside. The trick will be to dig down deep enough to show the heartwood through the cut features on the front. Similar to the way Will does his, but I'm trying to apply my own style here, whatever that is.
More pics to come as they progress. Thanks for looking and for all the great TC feedback. **Cheers! A-A**
[ Edited by: Aaron's Akua 2006-10-25 12:48 ] |
|
JT

Jungle Trader
Posted
posted
on
Fri, May 20, 2005 11:00 AM
Arrrrrr, old one eye. Nice work braddah. Good to finally meet you at T05. BogTrader |
|
M

Monkeyman
Posted
posted
on
Fri, May 20, 2005 11:15 AM
Super clean.... Really nice. Your sketchwork on the log is super symmetric. |
|
B

Benzart
Posted
posted
on
Fri, May 20, 2005 11:46 AM
As usual Aaron these are lookin Extra good, I Love how you are doing sams. |
|
P
Polynesiac
Posted
posted
on
Fri, May 20, 2005 1:43 PM
Heya aaron - looking real good. Thant Leroy hypnotiki is coming out real nice. will is gonna be happy. For the full body, benz is right. It has to be drawn 3D on the log too. The side of the log should be drawn to reflect the side of the body. It's just like the faces/heads that you have mastered, everything needs to wrap around the log if you want the 3D effect. and remember to cut DEEP and get rid of all that non-tiki wood. but you already know that. good luck and have fun! those tikis are going to be really nice! |
|
R

Raffertiki
Posted
posted
on
Fri, May 20, 2005 2:07 PM
I noticed that Hypnotiki developed a sizeable split. Splits look good on tikis, but if you don't want them you good swab glue onto a sliver of wood, hammer it into place, and carve/sand it back down. It looks really good as is. I'm just offering up a tip. |
|
SG

Sam Gambino
Posted
posted
on
Fri, May 20, 2005 2:58 PM
Hey AA - These things are looking FiiiiNE! You are really outdoing yourself on these with such clean lines. Good old Hypno never looked so good! |
|
AA
Aaron's Akua
Posted
posted
on
Fri, May 20, 2005 4:02 PM
Mahalo all you guys - I know I can always count on feedback from "the regulars"! Jungle, TO5 was a blast. Maybe I can get one of those mugs of yours next time we hook up. Looks like I missed ya in Santa Cruz by about a week or two. Have fun surfing! Thanks MonkeyMan. It helps to be really anal! Now I've got lots of carving to do to catch up with all the line art. So bummed that I'll be missing the carving party next weekend. Great advice, Benzart. I guess it just has to go a little off the front, little off the side, work it as you go. On another subject, I love how my Benzart Lono is coming. Those pearly white molars blow me away! That is one carving that has me in suspense! Keep posting progress, please! Thanks for the advice also, Polynesiac - I was going to PM you on it, because that full body tiki of yours is looking really nice. I guess just plan ahead, start carving, and logic will dictate like any other carving. Hey, Raff. Good advice all around. I'll have to think about that one. Wood just splits & I usually carve around it & let it go. My last "Leroy" carving looks like frankenstein with a 1/2" split down the middle. But then again it looks okay... Who knows! And Sam, thanks to you most of all. I always learn a lot when I try to carve a replica or something inspired by another artist's work. Aaron |
|
F

freddiefreelance
Posted
posted
on
Tue, May 24, 2005 10:03 AM
I wonder why more carvers here don't do more Tiki/Monster/Hot Rod crossovers, the painters seem to like them but the carvers seem to like the Traditional style or Florida/Cartoon style. Same with masks, most of the carvers either do heads or full bodies. |
|
S

SCTikiShack
Posted
posted
on
Tue, May 24, 2005 7:36 PM
A.A., Alright, you are already getting into your Redwood supply. Great work, you have become a great artist. It was fun meeting up with you and we will have to do it again sometime. Will |
|
H

hewey
Posted
posted
on
Tue, May 24, 2005 8:25 PM
That hypno tiki is coming along quite nicely. Those new designs look super clean. I am sure that they will be even cooler in sweet 3d action. I agree with freddie! More hot rod tikis! |
|
AA
Aaron's Akua
Posted
posted
on
Fri, May 27, 2005 10:32 PM
Aloha, Freddie. I'm open to carving all different styles at this point. I'm really a beginner still and won't be settling into any particular style for a long while. But I am leaning toward some traditional style carvings in the near future if only to get the basic Polynesian style down before I start elaborating on the theme. And you just hit that one on the head about the painters. I think we carvers, in some cases might tend toward the "safer" side, because the medium is so permanent. Paint can be applied over and over till the look is just right. There's some wild paintings here on TC for sure. Our tiki painters are a great source of inspiration. And masks, well I'm planning a few more of those. Next weekend PolyPop, Spermy, and I are going to go pick up some beautiful burly Cherry wood. The largest piece is about 4' long x 30" diameter. I'm gonna slice that one lengthwise down the middle and make a couple of large masks or wall mounted tikis. Too many projects! Will - yes, you are spoiled! Redwood everywhere, washing up on the shore ready for the taking! Well, I can't wait to start cutting deep into some new redwood tikis. Hey, congrat's on the new Smashmouth CD cover. That's my little son's favorite band (The "Shrek" song). Can't wait to see the Photos. When does it come out? Hewey, mahalo for the vote of confidence! I am going to try to make it as 3D as possible, with a nice side profile & everything. It'll be a while, though. Lono comes first & that will take some time. Hey, I love your line art - especially the tiki delivery service. BTW - I got my amazing Benzart #61 Lono today, and feeling totally inspired! Talk about Ben ending that thread with a bang! Cheers, and have a great Memorial Day weekend everyone. A-A |
|
S

surfintiki
Posted
posted
on
Sat, May 28, 2005 3:02 PM
God-dang, look what I miss when the waves come up! AA your stuff is lookin spectacular. I love all the progression you've done, getting into some cooler and cooler designs. I'm excited to see how your Lono comes out. |
|
AA
Aaron's Akua
Posted
posted
on
Fri, Jun 17, 2005 5:06 PM
Thanks SurfinTiki! ++++++++++++++++++++++++++++++++++++++++++++++++++++++++++++++ A little more progress… Here’s my newest tool acquisition, a 750 watt power inverter. Now I can use pretty much any of my power tools on my lunch breaks at the park, except the chainsaw.
No problem powering the orbital sander.
Here’s the final sanded piece. I’ll be applying some spray lacquer over the weekend, then a little paint for the main features.
More pics to follow soon. I’m anxious to get this one finished and move onto the next. **Cheers, A-A**
[ Edited by: aaron's akua 2006-10-31 13:01 ] |
|
R

rodeotiki
Posted
posted
on
Fri, Jun 17, 2005 5:12 PM
Holy crap is that cool!! |
|
T

Thanatos
Posted
posted
on
Fri, Jun 17, 2005 7:49 PM
Ok now I can die happy. Saw the eye. AA great work... Just stunning. So how many hour do you think this one took? |
|
B
Benzart
Posted
posted
on
Fri, Jun 17, 2005 7:58 PM
AA, Looks like the one eyed jack is getting very close to done. He looks Super great, Sam WILL BE PROUD., Hell I'm proud. I see that redwood coming round the corner, can't wait.Thanks for sharing , we Love you so much when you do. I won't say about how we fel when you don't. |
|
S
SCTikiShack
Posted
posted
on
Sat, Jun 18, 2005 10:45 AM
A.A., I love it! Every time I see this tiki it is looking better and better. You are a true tiki afficiando, It is great how you fit in whatever precious time you have to carve, even though you might be missing out on some pastrami sammies. The little set up with your car and the transformer is cool. It beats hauling around a noisy smelly generator. Take care and keep carving. Will |
|
S

Swanky
Posted
posted
on
Sat, Jun 18, 2005 12:05 PM
AA, how did you do this exactly? Is this chiseled down at an angle from each side, or across left to righ, a 1" flat... What did you do? |
|
P

pariartspaul
Posted
posted
on
Sat, Jun 18, 2005 12:20 PM
Absolutely beautiful work man! Truly some of the nicest tikis I've seen - I like the graphic style. Perfect! |
|
SG
Sam Gambino
Posted
posted
on
Sat, Jun 18, 2005 10:26 PM
This is ABSOLUTELY BEAUTIFUL, AA. What a fine job! This is such a high compliment...It puts a lump in my throat... The lines and everything are so clean and tastefully done. Now go have a pastrami, you've earned it! :) Ben's right... I am proud!!! Now, I can't wait to see him varnished.... |
|
C

congatiki
Posted
posted
on
Sat, Jun 18, 2005 10:55 PM
great tiki A-A...and great progress pics... |
|
AA
Aaron's Akua
Posted
posted
on
Mon, Jun 20, 2005 12:37 PM
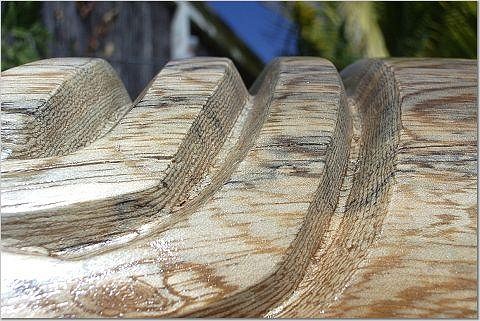
Rodeo, it's funny - I see the same joggers, frisbee players, park workers, etc. all the time. Some stop by to chat once in a while & check progress on whatever tiki I'm working on. No crowds though - if anything I'll be running them off with my power tools now. You come to the park for a little peace & quiet, and hey... what the hell is this guy doing!!! Thanatos, It's hard to gauge. I started this post on 4/20. I haven't had much weekend carving time, and even during the week sometimes I'm out at meetings & whatnot so I can't carve then. I'm guessing maybe 20, 25 hours? It's not the most efficient use of time - setting up, carving, and breaking down all in about 40 minutes of so. Mahalo, Ben and Will. This tiki is taking way longer than I expected. But like Ben says, sometimes the tiki just doesn't want to be done yet. Swanky, I used a ½” or ¾” flat carpenter’s chisel to cut the grooves. I followed the line on either side cutting at an angle down toward the center of the “V”. I think the more experienced carvers would use a "V" chisel and go left to right, but I have only a 90 degree "V", which is no bueno for that. Ben mentioned a 70 degree V, which I think would work well for that method. I've got lots to learn on chisel technique. That's why I was so bummed to miss out on the recent carving party at Alnshely's.
After the rough chisels cuts were done, I used a pointed burr with the die grinder to clean up the cuts and the bottom of the “V”.
Then I sanded the inside of the grooves with 60 grit using these rubber wedge things. Best 3 or 4 bucks I’ve ever spent. I sanded all the grooves using 60, 100, then 150 grit. Between each grit, I used a random orbital sander to do the top, bottom, and sides of the tiki.
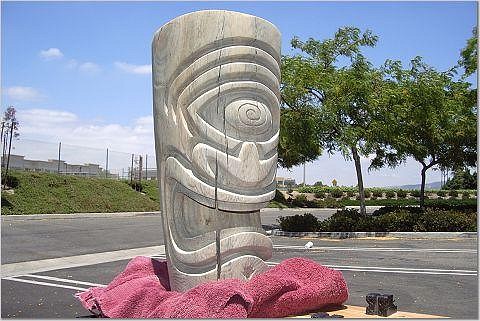
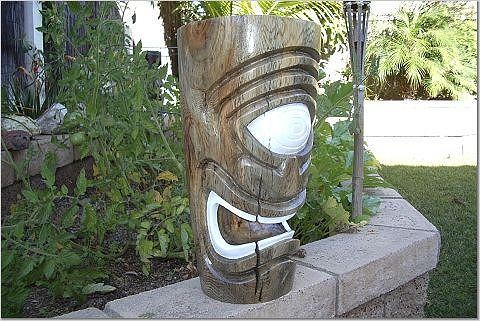
Thank you Pariartspaul, Sam and Conga. Soon to be completed. Don't know what it's going to look like, I'm experimenting a bit with paint, which is a new medium for me. +++++++++++++++++++++++++++++++++++++++++++++++++++++++++++++++++++++++++++ Here’s what I got done this weekend. I checked with Will on whether this would be an inside or outside tiki. Since it will be an inside tiki, I decided to use another finishing method. Spar varnish took me 48 hours between coats to get it dry enough for sanding with 220 grit. This spray lacquer takes only 30 minutes to dry. And the drips just disappear somehow. So I was able to get this guy all lacquered and ready for painting in about half a day. So much easier! The brushed on spar varnish method would take me about 10 days total to get this far.
Here it is all sprayed up. I didn’t use any stain, because I didn’t want to hide the beautiful spaulted grain. It was almost worth all the cracking. This was the same log as my other Leroy tiki, which also cracked like a sumbeach.
Next came some paint for the eye and teeth. I used some acrylic gloss paint and artist’s brushes. This was not easy. I’ve never painted a tiki before, and trying to get a clean line on the edges was tough. This has given me a real respect for Sam and the other painters who do this stuff all the time.
Here’s Hypno after a few coats of paint. I need to add a few more coats of the white, then clean up the edges with an exacto knife. After that, I’ll paint the crazy eyeball swirl “v” cut and the goatee with some bright red.
Once it all looks right, I’ll hit it with a few more coats of gloss and post the results. Thanks for the "EYEBALLIN'"!!! A-A
[ Edited by: Aaron's Akua 2006-10-31 13:07 ] |
|
R
rodeotiki
Posted
posted
on
Mon, Jun 20, 2005 12:44 PM
I cant wait to see this done. I love the natural wood combined with painted features. Nice work AA. |
|
F

finkdaddy
Posted
posted
on
Mon, Jun 20, 2005 1:41 PM
Wow Aaron! That looks wonderful. My boss always wants me to make a painted tiki, but I keep blowing him off. Maybe I should give it a try. |
|
S
SCTikiShack
Posted
posted
on
Mon, Jun 20, 2005 2:32 PM
A.A., Sweet, look at that tiki!! Thank you for all the hard work and effort that you put into making this sweet, slightly ferocious, little guy. Anytime you need redwood, I'm your man. A salvage logger friend of mine is always looking for special logs and burls that would make killer tikis. Keep up your excellent, painstaking carvings, they are looking killer. Will |
|
B
Benzart
Posted
posted
on
Mon, Jun 20, 2005 3:29 PM
Aaron he Really looks Awesome.He has what is turning into Your "Typical" clean,Crisp. smoothe, perfect finish. It really shows that you are a perfectionist. Your wife must have a difficult time living with you. (joking) |
|
S
surfintiki
Posted
posted
on
Mon, Jun 20, 2005 7:29 PM
This thing is gonna look SINISTER!! Can't wait. |
|
CS

Capt'n Skully
Posted
posted
on
Mon, Jun 20, 2005 9:17 PM
Even the grain is hypnotizing.. Can't... Stop... Starring... |
|
P
Polynesiac
Posted
posted
on
Tue, Jun 21, 2005 8:31 PM
lookin good aaron! thanks for all those close up shots and technique and tips. It worked fine for indoor tikis and bamboo lamps n' stuff - but the outside stuff lost it's luster quick. reapplying is no problem, but just annoying. man...that hypnotiki is COOL! santa cruz boy is lucky! |
|
TG

Tiki G.
Posted
posted
on
Wed, Jun 22, 2005 6:59 AM
Nice job A.A. I't great to see people spending more time to detail rather than just knocking out a hack job..... G. |
|
H
hewey
Posted
posted
on
Wed, Jun 22, 2005 7:45 PM
That is one gorgeous tiki. So damn clean and tidy! Then the detail of the eye and the teeth! So damn cool man. Can't wait to see it in the completed form. Awesome! |
|
M
Monkeyman
Posted
posted
on
Wed, Jun 22, 2005 10:24 PM
Aaron, thats REALLY turning out nice. Well done. |
|
S
Swanky
Posted
posted
on
Fri, Jun 24, 2005 9:12 AM
And did you actually completely cut out the mouth with this saw, or just the depth? The next shot has the nice smooth rounded cut and I am wondering how you did it with that saw... |
|
AA
Aaron's Akua
Posted
posted
on
Sat, Jun 25, 2005 10:42 PM
Rodeo, Finkdaddy, Will, Benz, Surfintiki, Skully, Polynesiac, Gary, Monkeyman & Swanky (whew!) - thanks for all the good thoughts & good vibes! Finky, the paint was the toughest part of this tiki. It would be harder on a really small tiki, but I've seen what you can do, so I say go for it! Polynesiac, I now see what you meant. I went through 2 cans of spray to get the gloss the way I like it. Okay, next time I'll try the spray-on spar varnish. If that doesn't work well, it's back to the brush. Swanky, I used the pull saw to make cuts along the top & bottom of the mouth, then just chunked it all out with a flat chisel. It seems like a fast way to remove lots of wood. Once the cuts are made, you don't have to worry about being too careful with the flat chisel. That shot was after I cleaned it all up with a big gouge. Well, Hypnotiki's finally done - you can visit him in my finished projects thread. In the mean time, I've gotten back on my Lono carving.
Thanks for your input & I'll keep you all posted as this thing moves forward (slowly as always). :) Cheers, A-A |
|
R
rodeotiki
Posted
posted
on
Sat, Jun 25, 2005 10:47 PM
Damit , why is the sketch on the side of the log have to be so good. You keep raising the bar on us newbies (one day I will have to stop calling myself a newbie) |
|
H
hewey
Posted
posted
on
Sun, Jun 26, 2005 5:58 AM
cool work. Can't beleive that you do your carving in the carpark of park! |
|
B
Benzart
Posted
posted
on
Sun, Jun 26, 2005 7:05 AM
Really lookin good Aaron. Careful, how small you make those ankles and shin bones. Start out larger and pare it down or he will need crutches.. He looks Dynamite though, can't wait to see him. |
|
AA
Aaron's Akua
Posted
posted
on
Mon, Jun 27, 2005 12:54 PM
Hey Rodeo - I'm a "newbie" too. The sketch looks tight only because I printed a paper template on a large scale plotter, then transfered it to the log. Hewie, I was out there running an angle grinder off my car battery that day and no one seemed to notice. Strange... Ben, I've had the same concern, so I was going to leave some extra wood on those shins & feet, then carve them down a bit & add some detail. Maybe even toenails. I wanted to start with the basic sketch just to wrap my mind around it. So I sketched it out on the side of the log like you & Polynesiac suggested. It definitely helps. Now I'm just going to dive in. I know the headpiece looks a bit thin compared to your style, but I'm basing the whole thing on an "authentic" carving that I found on the web. Compare my sketch with the pic below and you'll see how it will match. I just want to rough the whole thing down the way it needs to go, then start to elaborate and add some of my own styling to it. The lines I've laid down so far are just to be used for basic guidelines. Here's the original Hawaiian carving that I used for this Lono design. It's a great website with descriptions of the gods and lots of other artifacts & info on the ancient Hawaiians: *Name: Lono In the esoteric tradition LONO represented the mental consciousness, or what in modern terms could be called the "conscious mind." In Hawaiian culture, hair is a symbol of thought. On this LONO figure the hair is piled high on top and does not extend all the way to the ground. This symbolizes imagination and abstract thinking, which is not necessarily based on direct physical experience. Name: Ku In the esoteric tradition KU represented the body consciousness, or what in modern terms could be called the "subconscious." In Hawaiian culture, hair is a symbol of thought. On this KU figure the hair is short on top and extends all the way to the ground. This symbolized memory thinking, which is based on direct physical experience. Kanaloa Name: Kanaloa In the esoteric tradition KANALOA represented a state of total confidence, or what in modern terms could be called "inner authority." In Hawaiian culture, hair is a symbol of thought. On this KANALOA figure the hair is piled high on top and extends all the way to the ground. This symbolizes the integration of imagination and memory, or the integration of body, mind and spirit.* Kanaloa's cool! I'll have to carve this guy someday. All of these can be found at a website called Hawaiian Hall. Mahalo guys - love the dialog! Aaron |
|
AA
Aaron's Akua
Posted
posted
on
Mon, Jun 27, 2005 12:56 PM
Hey, Ben. Is it okay to mix varnishes? A painter friend of mine said it's okay to put spar varnish over lacquer, but not the other way around. I was too chicken to try it. Do you have any experience with this? |
|
B
Benzart
Posted
posted
on
Mon, Jun 27, 2005 1:46 PM
Aaron, I'm NEVER Sure about mixing finishes. I know you can't mix acrylic with oil based. The only thing you can do is try it on a scrap piece of wood and then you will know and you can post it here so we'll all know where to look for it when we forget next time. |
|
AA
Aaron's Akua
Posted
posted
on
Sun, Jul 10, 2005 9:14 PM
A bit more progess... I think I'm more comfortable with the full body part now. The first cuts were the hardest to figure out, but it got progressively easier from there on. It's kind of like putting a puzzle together by subtracting the pieces. I guess clay sculpture would be the opposite. The barrel chest & chubby features will leave some room for detailing later. I'm going to leave the body as it is for awhile, & concentrate on roughing out the face. Then some work on the headpiece to make it proportional to the roughed out face. I also left room for some kind of hair design on the back. I think I'm starting to get it. Just rough it all out gradually, then detail it, change it, sculp and mold the features as you go. Then add more detail. At least that's the plan... |
|
TSW

The Sperm Whale
Posted
posted
on
Sun, Jul 10, 2005 9:35 PM
Aaron- [ Edited by: The Sperm Whale 2005-07-10 21:36 ] |