|
S

SilverLine
Posted
posted
on
Sun, Jul 31, 2005 8:38 PM
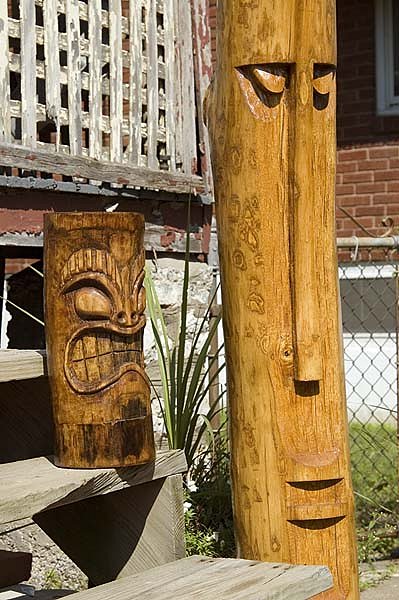
It was not completely finished in these pictures, but there was really very little left to do; trim the bottom flat and level and do the same for the top with a slight slope to the rear, which I’ve now done. And it still needs some kind of stain and finish. (Needs some kind of hair, too. Any ideas?) This was a real challenge for me. Having been a photographer for about 25 years now, visualizing things in 3-D was something new! I’ve NEVER done anything like this, and it was FUN! (I may be hooked!) The first two I carved were small (made from would-be firewood), and pretty awful, but not so bad that I thought I couldn’t do better. So why not try a big one?! (It’s just shy of 5 feet tall.) The design idea came from The Islands Menu in BOT. It’s an interesting design but still something I thought I could do. I like the long, stretched out look of it; thought it would fit my log fairly well, too. The wood is a Hackberry limb from a split-trunk tree in the neighborhood. It’s reputed to carve well and I can’t disagree. I did all the work with standard carpentry chisels and using a miter saw only for the mouth. Striped the bark with a 100+ year-old drawn knife. Took about two weeks to complete working only a couple hours a day. I used two large, but short, trunk sections as “sawhorses” to make things easier (a tip I learned reading this forum). Thanks for all the tips from everybody here! I’ve learned a lot, and have LOT to learn. Any suggestions for improvment would be GREATLY appreciated!
[ Edited by: SilverLine 2007-03-06 11:14 ] |
|
R

RevBambooBen
Posted
posted
on
Sun, Jul 31, 2005 8:46 PM
Cool! Needs an Afro Wig! |
|
S

saxotica
Posted
posted
on
Mon, Aug 1, 2005 6:38 AM
Nice job! That looks awesome.I never heard of hackberry but it looks good and smooth, kind of like crepe myrtle. |
|
8T

8FT Tiki
Posted
posted
on
Mon, Aug 1, 2005 5:45 PM
Looks GREAT!!! |
|
H

hewey
Posted
posted
on
Mon, Aug 1, 2005 6:17 PM
cool! Thats a cool looking tiki and i dont think i have seen that style before. cant wait to see more |
|
T

tikitammy
Posted
posted
on
Tue, Aug 2, 2005 8:25 AM
Nice Job! It will look great decorating any tiki spot. I would suggest that you spread the design to wrap around the log next time so that it will look good from all angles. |
|
S
SilverLine
Posted
posted
on
Tue, Sep 6, 2005 8:57 PM
Here's an update on #3 and a new #4. Stained and varnished the big guy and started on the little one about a week ago. The small one is from a pile of free firewood, so I have no idea what the wood is. It was a bit "punky" and hard to carve, so it looks rougher than I'd like, but what the heck. Still need to find some better tools. So long as they keep getting better, I'll keep trying.
|
|
P

PapeToaTane
Posted
posted
on
Tue, Sep 6, 2005 9:18 PM
Beautiful!! Love 'em both!! |
|
SG

Sam Gambino
Posted
posted
on
Tue, Sep 6, 2005 9:39 PM
That tall guy is way too cool! and a vintage design yet from an old menu... You nailed it. |
|
C

congatiki
Posted
posted
on
Wed, Sep 7, 2005 5:26 AM
nice effort on boff of em....especially like the big one... |
|
B

Benzart
Posted
posted
on
Wed, Sep 7, 2005 5:38 AM
Very interesting style Silverline. Very refreshing and diffrent, I love it. If you haven't yet, go through the "Tools Carvers Use" thread. There is great info there about tools. |
|
H
hewey
Posted
posted
on
Wed, Sep 7, 2005 9:52 PM
That lil one is cool too. Nice work |
|
S
SilverLine
Posted
posted
on
Thu, Oct 13, 2005 8:07 PM
Here's my attempted copy of the tiki in the very first photo in BOT, the "protagonist." I just gave this guy to my brother for his birthday. Three coats of marine varnish make him a bit glossy, but I have no idea what my brother plans to do with it.
[ Edited by: SilverLine 2005-10-13 20:12 ] |
|
8T
8FT Tiki
Posted
posted
on
Thu, Oct 13, 2005 8:48 PM
Well done Brad. You did fine work considering you only had a partial picture as your model. What type of wood and how tall is it? Before you give it to your Bro, get your picture taken with it and post here. Oh, and let's get together and share some ideas soon. |
|
PT

Palama Tiki
Posted
posted
on
Fri, Oct 14, 2005 5:36 AM
excellent job! |
|
M

McTiki
Posted
posted
on
Fri, Oct 14, 2005 6:22 AM
Nice work! |
|
P

pappythesailor
Posted
posted
on
Fri, Oct 14, 2005 7:03 AM
That's really great work. Love it. |
|
R

rodeotiki
Posted
posted
on
Fri, Oct 14, 2005 9:15 AM
Nice work. I wish you were my brother. |
|
S
SilverLine
Posted
posted
on
Fri, Oct 14, 2005 10:11 AM
Wish I'd thought of getting in a picture with it! Oh well, I took it to my brother last night and he seemed to like it. He's not far, so maybe I'll get a few more shots of it. The wood is Catalpa (very common around here). It has white sapwood and walnut-looking heartwood, so I stained the whole thing dark walnut. It's only about 30 inches tall. I finally bought some GOOD chisels for this one; a shallow gouge (#4 I think) a V-parting chisel, and a couple #1, single and double bevel. MAN that makes a big difference!! Thanks everybody for the kind words. I still have NO idea what I'm doing, but am having a blast figuring it out! |
|
S

surfintiki
Posted
posted
on
Fri, Oct 14, 2005 10:22 AM
Looks excellent for knowing what you're doing. I like the way the grain came out, in the eyes especially. |
|
K

kctiki
Posted
posted
on
Sat, Oct 15, 2005 6:17 AM
Those carvings have so much charisma. You & 8 ft. are going to put Kansas City on the map - tikiwise. |
|
S
SilverLine
Posted
posted
on
Tue, Dec 20, 2005 1:09 PM
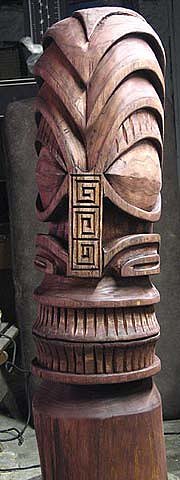
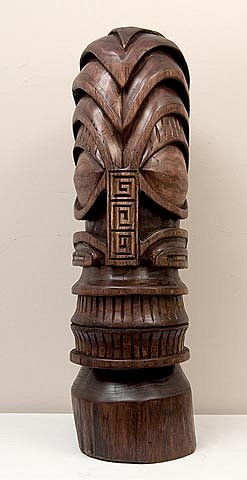
Catalpa wood, again. 30 inches tall. Meant to finish this one before Thanksgiving but the weather slowed me down a month. As always for me, it starts with a photo in BOT:
I think they're getting better, so I'm gonna keep trying. |
|
A

AlohaStation
Posted
posted
on
Tue, Dec 20, 2005 1:31 PM
Getting Better? Dude your there! This looks great nice clean lines and the color is fantastic. Keep em coming. |
|
S
surfintiki
Posted
posted
on
Tue, Dec 20, 2005 1:59 PM
Nice deep cuts. Looks GREAT. Nice n smooth, you really captured it all. That Catalpa wood seems to work real well, looks a little green, but didn't crack, I love when that happens. |
|
S
SilverLine
Posted
posted
on
Tue, Dec 20, 2005 2:14 PM
Yeah surfintiki, I just got lucky on the wood. Used what I had. It's from a tree I helped cut up on an adjacent vacant lot. Catalpa has really good stability, I found out. Here's more: Thanks for the kind words! [ Edited by: SilverLine 2005-12-20 14:15 ] |
|
O

OnaTiki
Posted
posted
on
Tue, Dec 20, 2005 2:18 PM
Sweet, really nice job..The marquesans are fun.. |
|
B
Benzart
Posted
posted
on
Tue, Dec 20, 2005 6:18 PM
Silverline, you too, Lookit what You got. Another Awesome carving. I think you have one extra tooth on the right top part, chack it out?? |
|
AA

Aaron's Akua
Posted
posted
on
Tue, Dec 20, 2005 9:45 PM
Whoa, Silverline! What a step up. This one is so deep and defined - and the wood is really beautiful. You and Onatiki must have telepathy, both working on the same tiki at the same time. Funny how different each carver's interpretations are. Both unique and totally killer! I really like this one! Aaron |
|
8T
8FT Tiki
Posted
posted
on
Wed, Dec 21, 2005 10:57 PM
WOW! I'd be proud to be the papa of that baby! You really are advancing several grades between carvings. This is one in BOT that I have also thought about doing. Great choice and fantastic result! See you soon. |
|
G

GMAN
Posted
posted
on
Thu, Dec 22, 2005 7:14 AM
Silverline, For a guy who says "I don't know what I'm doing, but I am having fun"...you sure seem to have a good idea how to get it done! Your Marq is top shelf. The wood is beautiful and your carving is terrific. Congratulations on creating a most excellent carving. -Gman |
|
J

JohnnyP
Posted
posted
on
Thu, Dec 22, 2005 11:31 AM
Nice and clean! Looks like you spent a lot of time on this one. Looks great. |
|
S
SilverLine
Posted
posted
on
Mon, Jan 9, 2006 8:54 PM
This winter weather is driving me nuts! I was really just getting started when the weather turned on me, and I can't take the cold like I used to. So I'm trying small stuff indoors. Here's my first. This little guy is smaller than my thumb, carved with an Exacto knife out of Harry Lauder Walking Stick sucker. Rough, but I'm encouraged. Exacto knives are NOT the way to go; they flex and tend to work out of the handle, so I've ordered some of the small carving blades and handles Benzart wrote about here. I'm also very seriously considering getting the Economy Flexshaft grinder Benzart mentioned here. Not sure if it's going to do what I want for this kind of tiny work, though. Any ideas? BTW, Benzart ROCKS! I would be NO WHERE without the information posted here by ALL the members!
[ Edited by: SilverLine 2006-01-09 21:04 ] |
|
KK

kaha kii
Posted
posted
on
Tue, Jan 10, 2006 9:03 AM
Aloha bruddah! Nice work! Malama Pono! |
|
B
Benzart
Posted
posted
on
Tue, Jan 10, 2006 9:12 AM
Excellent first small piece, Silverline, and More so seeing that you used Only an exacto blade! The Hook blades will make all the difference in the world. The economy flexshaft is an excellent deal for 67$ and it will help you tremendously. The only issue you will have is starting from scratch with your burr inventory. Go through the "Tools carvers use" thread to find more info on those. Welcome to a Different world of Carving...Small. You are gonna Love it. |
|
A
AlohaStation
Posted
posted
on
Tue, Jan 10, 2006 9:26 AM
This is a great start. Carving small stuff is alot of fun, but they tend to bite more than the larger tikis. I use an Xacto to carve as well and have found that the bend in the blades can actually work in my favor. I also use a Dremel with the flexshaft. I use the Dremel to rough out the features and finish with the Xacto and sandpaper. Keep up the good work! |
|
TBBMT

tiki beat by marcus thorn
Posted
posted
on
Tue, Jan 10, 2006 1:19 PM
I just love this this one you have really advanced. Keep up the good work. |
|
8T
8FT Tiki
Posted
posted
on
Tue, Jan 10, 2006 4:20 PM
Don't let him fool you. That's what's left of his wife's rolling pin he stole from the kitchen. Folks, ol' Silverline has gone a bit kooky since it turned cold here. I sure hope he hasn't slipped too far. I will do my best to pull him out of it. I'm sure a trip to Coon tiki for an intense carving session would cure him. I have a plan to introduce him to an angle grinder when the temps rise again. |
|
J
JohnnyP
Posted
posted
on
Thu, Jan 12, 2006 3:51 PM
Nice job with the Exacto blades. The standard pointed blades are a pain to carve with. But that tiki doesn't look anything like your thumb though. JP |
|
S
SilverLine
Posted
posted
on
Sun, Feb 26, 2006 9:46 AM
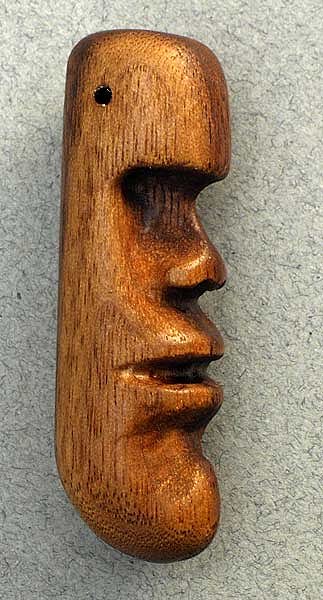
For my birthday last week, my brother bought me the Economy Flexshaft carver that Benzart mentioned in his carving lessons post a while back. WOW is that a slick piece of equipment! He also got me a set of diamond tip carving burs from Woodcraft (only $10 for 20 burs!) and I was off and running! Here's my first attempt: (This one is going to my brother.)
|
|
S
SilverLine
Posted
posted
on
Thu, Mar 2, 2006 8:21 PM
Having a LOT of fun with this flex-shaft carver! Here's another, same size as the little Moai in the previous post.
|
|
J
JohnnyP
Posted
posted
on
Sat, Mar 4, 2006 4:37 AM
The little stuff just looks impossible to me. How do you hold the piece as you are working on it? |
|
B
Benzart
Posted
posted
on
Sat, Mar 4, 2006 5:43 AM
Look at you Going to town with that new tool. Hooray for you and Hooray for us that get to see your new stuff!! |
|
S
SilverLine
Posted
posted
on
Sat, Mar 4, 2006 6:20 AM
I'm carving from a 2-foot walnut dowel, so I leave the piece on the rod until I'm nearly finished. MUCH easier that way! Ben, THANKS for the kind words! It really means a lot coming from you! (The master of tiny carvings!) |
|
S
SilverLine
Posted
posted
on
Mon, May 1, 2006 5:19 PM
I was going to wait until this one was finished to post this, but I'm at a crossroads and could use some input. Things had been really dry all last month (April) and I had some warm days to pull out this nice chunk of soft maple I claimed last summer. Well, now it's rained for 9 out of the last 10 days! 'Ol Tonga here has gotten soaked and all that nice sweat maple is molding up like crazy. I just tried the diluted bleach trick with no effect. The thing is, I could go either way with this one. The grain in this wood is really beautiful, so if I could effectively remove all this mold, stain and varnish him, he'd be fantastic looking. OTOH, I'm kinda likin' the old moldy look. My plan is for this one to take up residence on the lake house porch (enclosed) so it won't be exposed to the elements too much. Can you stain/varnish over mold? I would like to at least seal it up so it doesn't rot away completely. Or is there a better way to remove all this mold?? I'm far from done carving, so there's still time to do just about anything.
BTW, special thanks to BK for his advice on getting around the tighter points of this guy, and thanks also to Tiki Diablo for his pattern transferring technique he shared at Coon Tiki! |
|
C
congatiki
Posted
posted
on
Mon, May 1, 2006 8:05 PM
don't know anything about staining over mold...but I do know this is looking really |
|
B
Benzart
Posted
posted
on
Mon, May 1, 2006 8:51 PM
Silverline, this last one is really Nice, except for the mold. You need to dry it out before you put any finish on it. You can leave it out in the baking sun a few days. You can carefully heat it with a torch and after it is dry, sand the mold off. once you have it clean you can spray it down with a light mixture of bleach and water, say i part bleach and6 parts water. thoroughly soak it and then let it dry again and then you Should be able to stain and varnish him.Looks nice. |
|
8T
8FT Tiki
Posted
posted
on
Mon, May 1, 2006 10:28 PM
Hey buddy, lookin' good. I say lose the mold before doing anything else. Ben has it right. You gotta get it dry first and if that means bringin' it inside for a few days when it's raining, do it. Is it molding because it is green wood or is it all due to the wet weather? If you just have to leave a carving outside during the rainy times, get a good platic tarp and wrap it up good then secure with bungee cords. I have found this to work perfectly. He will be mighty nice at your cabin when completed. |
|
S

Swanky
Posted
posted
on
Tue, May 2, 2006 7:06 AM
Sweet Tang. Love it. Very sharp detail. |