Tiki Central / Other Crafts
Tiki mugs by hmc
|
R

rodeotiki
Posted
posted
on
Sun, Feb 19, 2006 7:02 PM
Silly question ? When you do the second pour , what keeps the plaster from sticking to the first pour ? And how do you get the 2 halfs apart after to get the silicone one out? Great job so far and thanks for the detailed photos. |
|
B

Bete
Posted
posted
on
Sun, Feb 19, 2006 7:17 PM
MauiTiki, that mug you did that you posted a page back just rocks, that design is so awesome! |
|
B
Bete
Posted
posted
on
Sun, Feb 19, 2006 7:17 PM
On a side note, this is a way cool thread, what talent you people have. |
|
M

MauiTiki
Posted
posted
on
Sun, Feb 19, 2006 10:32 PM
Helen, You've got us all fired up to try this on our own. I never thought about using someone elses kiln. I actually have a friend that has a kiln, so I may have to try this. There seems to be some interest in my mug, but only 4 were made. And they were not made by me, only the initial design (which I entered in the TC mug contest). I poured some cement into a plastic tiki wall hanging (you know the kind you get at Hilo Hattie for $5) that I had in the garage, and it came out great, so I'm ready for mold making. I may have some silicone questions for you in the next few weeks. Living on a rock in the middle of the ocean, I'm kind of limited on what I can get at my local art supply store. keep the photos comming!!! Will you be making enough to sell? |
|
H

hmc
Posted
posted
on
Mon, Feb 20, 2006 2:26 AM
teaKEY: The rewards ARE the best thing out of all this, you are right. A fired master (positive) probably would work, yes 2 less steps. You will however need to add a release agent or coat/finish the piece before pouring plaster onto it otherwise it will bond to the porous surface of you fired piece. Rather than explain the next steps to you now, I will be posting the pics and info within the next day or two (knowing me, probably tomorrow!). Suffice to say, there's no spinning or pumping or machinery. Just pour the ceramic slip mix into the gaping hole, let dry until the desired thickness is achieved - then pour it out. I'll explain why/how this works later. Thank you for your words of encouragement as well, I'm glad you are getting something out of this!!! rodeotiki: Not a silly question! I'm not sure if you need to put anything onto the first pour after it has hardened (maybe Rum Demon and Mrs Rum Demon can shed some light here). I couldn't find any info on it and the shop was closed the day I needed to find out. But rather than risk the two binding together, I just smeared some petroleum jelly over it and it didn't stick. I have a feeling I didn't have to do this, but I didn't want to risk it after so much hard work! MauiTiki: Wow, only 4 mugs of that wonderful design. I'm very happy to hear that my thread has inspired you to make more yourself!!! Considering you live on a rock :D just check out the Polytek website and see which location of theirs is closest to your rock, in case you decide to go down the silicon path. |
|
T

teaKEY
Posted
posted
on
Mon, Feb 20, 2006 7:59 AM
I see this thread as a HMC learning experience but also a place for all to join together to share the mug love. MauiTiki, with you having only four production made mugs, is that a record for lowest production # ever. I think thats cool. If I was the richest man I would have companies like Munktiki make a production number of three and then destroy the mold. I can only dream. I would love one of your mugs but its just as sweet having so few that they are so special. Rodeo, I was wondering that same question and forgot to ask. Hmc, I thought that you were going to make part of the mold(-) in silicone for the longer lasting effect? I have heard of a layer of silicone on top of a bed of plaster(the mother?) In my mind, it would make it very easy for "peeling" off the mold if necessary. Don't rush for us. Enjoy yourself out there. Ps I think I know what you are talking about for the next step |
|
RD

Rum Demon
Posted
posted
on
Mon, Feb 20, 2006 9:39 AM
HMC, you did the exact right thing putting vaseline on the first half of your mold. It does need something else the two sides will be nearly impossible to part and you'll end up chipping and crumbling your mold as you struggle to open the damn thing. There are fancy mold releases and silicon sprays you can buy for this step, but petroleum jelly works pretty well and is much cheaper. Have you opened the mold yet? I worry a bit about your keys. Instead of straight up and down, I use more of a tapered edged key: /\ If you've already opened your mold and all is fine, then it'll probably be ok. I just worry that one or two of your keys might stick and break off into it's "keyhole". I'm also curious to see what your pour times are like. Everyone else: Stone molds are dry and porous so when liquid clay is poured into them they immediately begin to pull the moisture out of your slip, leaving clay sticking nicely to it's surface. The longer you leave slip in a mold, the thicker the walls of your mug will be. My usual pour time is about an hour. I read it should only be 15 minutes or so, but found that to be terribly insufficient. There have been a few times where I've gotten sidetracked and left slip in for two hours or more. These are some HEFTY mugs! Also, I don't do much of anything to prepare the mold for the slip pour except spritz the inside surfaces with water to minimize bubbles. I'm told talc keeps the work from sticking to the sides but have never had a sticking problem. After pouring out the excess slip, I turn the mold upside down for a few minutes to keep the really liquid bits inside from settling too much to the bottom. Then I set the thing aside for about 12 hours or so, the clay dries and pulls itself away from the mold. I'm not saying that any of this is the RIGHT way to do things, it's just what I've found works. I know of people who pull the mugs right out, but mine always collapse and/or deform if I pull them out too soon. Then of course, you're on to cleanup...... So anyway, take lots of pictures of your next step! We all look forward to it! take care, |
|
B

badmojo
Posted
posted
on
Mon, Feb 20, 2006 10:01 AM
Maybe I'm missing something, but isn't the area below the side of the mouth going to be an undercut, and make it hard, if not impossible to remove the mug afterwards? |
|
T
teaKEY
Posted
posted
on
Mon, Feb 20, 2006 10:56 AM
Undercuts is a big deal and it does look that way with the mouth. I hope thats not the case. |
|
RD
Rum Demon
Posted
posted
on
Mon, Feb 20, 2006 11:36 AM
Good eye. Primo had some serious undercut problems at first. I grossly overestimated the amount that the mug would shrink in the mold. Scraping the trouble spots on the mold away with an exacto knife got rid of most of the problem, the rest is generally repaired in the cleanup phase. Yes, the better the mold the easier and quicker the cleanup. I was still sculpting Fred at this point and gave him the necessary adjustments to make for an easier pull. A good lesson learned. Meanwhile, Pina Diablo was made with a FIVE part mold! So no undercutting problems there. Coconut and Alien use four part molds. But that's a whole new story... The good news here is that HMC is using a silicon master and can just toss the mold if it sucks and try again, no harm done to the original art. -Joe |
|
H
hmc
Posted
posted
on
Mon, Feb 20, 2006 12:43 PM
badmojo: YES you are right! I either need to re-asses my part line or just clean up each mug after they've dried a bit. Doh! I haven't decided what to do yet.... |
|
C

cheekytiki
Posted
posted
on
Mon, Feb 20, 2006 1:01 PM
HMC, with the mold makers I have used they usually make a seperate part of the mold for the foot as that is an under cut in itself. |
|
H
hmc
Posted
posted
on
Mon, Feb 20, 2006 1:01 PM
OK, I have decided... I will adjust the first plaster mold as much as possible. I will also hack into my silicon guy. I am also going to make a second plaster mold to speed up the production line. Rum Demon: My keys are good, no problems there thank goodness! I didn't know what else to use to make the impressions. What do you use to make the / shape? |
|
H
hmc
Posted
posted
on
Mon, Feb 20, 2006 1:04 PM
Gees, a separate mold! That sounds awfully complex. I'm thinking the pineapple of Mrs Rum Demon's as a five piece is WAY too complex for my head to get around!
No no, don't think that you are. This is good and this is certainly the place to be adding your input! |
|
Y

yumyumkid
Posted
posted
on
Mon, Feb 20, 2006 8:04 PM
This is a great thread! Keep the pics/info comin. You can carve your keys into the first half of the mold. Then when the second half is poured you'll create the whole key. Another option would be to use something to make an imprint like you did. I have used a marble with one of the few molds I've made. Personally I would choose something round as it's less likely to chip and break over time. After some searching on the internet I found the name "Natches" for the little plastic keys that are used on some molds. Turns out they are hard to locate now...? I've never used these but it seems alot of people swear by them. This company name was given along with a phone number on a ceramic message board. The post was from March of 2004 so it may still be up to date: Again, awesome post. Looking forward to the finished product. [ Edited by: yumyumkid 2006-02-20 20:04 ] |
|
H

hewey
Posted
posted
on
Tue, Feb 21, 2006 12:59 AM
Ive got nothing of quality to add to this thread, just that I am loving watching it evolve and develop. |
|
A

atomictonytiki
Posted
posted
on
Tue, Feb 21, 2006 4:08 AM
As i thought the clay master would have to be a clay that remains pliable rather than a clay that gets solid, I've done a bit of casting like this for animation models and when i made little plaster tiki heads. When i made my moulds the mould making stuff is really hot and destroys modeling clay, so i thought your silicon moulding material might be the same stuff and that would be the reason you needed a ceramic clay original. |
|
H
hmc
Posted
posted
on
Tue, Feb 21, 2006 12:54 PM
Wrong - it does not "have" to be pliable. When I purchased the silicon, I had two choices to make the master - plaster or modeling clay. Neither of which are pliable. These two materials are also compatible with silicon, some materials used for masters will not allow the silicon to cure - you will need to check with your supplier if going down this path. My master would have come out easily if I had have made a 2-piece mold, although wanting to save money on the silicon I opted for the economical 1-piece mold.
Plaster does get hot, silicon does not. |
|
RD
Rum Demon
Posted
posted
on
Tue, Feb 21, 2006 8:34 PM
DON'T hack into your master silicon guy!!!!
Having said that, I've never tried to work silicon. Just never occured to me as a good idea. I'd try sanding and working the conical mold you made first just to see how the stuff responds to tools. I'd make another stone mold instead. See if you can't re-route your part line to accomodate the lips, it might just be possible, plus it's nice to have practice. Cheekytiki is right about the bottom bit. All of our mugs save primo have a bottom portion on the mold. It's really easy, just do your clay-up with the mug touching the bottom of the box. Proceed as normal, then turn the thing upside down, build walls for the bottom piece and pour away. Of course putting keys wherever necessary. Hope it's all working out. Best of luck. -Joe |
|
I

ikitnrev
Posted
posted
on
Tue, Feb 21, 2006 9:24 PM
I just discovered this thread. I feel somewhat like the young city kid who vists his farm-dwelling cousin, and gets all excited when he sees real chickens laying real eggs. "So thats how those things are produced!" I've consumed so many drinks from so many tiki mugs, and I don't think I'll be able to have another tiki drink without thinking about this thread. So, we've seen instructions on how to carve tikis, and now lessons on how to make tiki mugs. Soon all we will need is someone to show us how to distill and make premium rum, and how to grow cotton and make various dyes and mix everything together to create Hawaiian shirts, and we'll be all set. I have visions of a half dozen or so people from Tiki Central secretly becoming contestants for the Survivor TV show, and then forming their own tribe, voting the non-tiki wimps off the island, and then evolving into a fully self-supportive tiki community. Forming a tiki utopia, one step at a time, one tiki mug at a time. Vern [ Edited by: ikitnrev 2006-02-22 05:31 ] |
|
H
hmc
Posted
posted
on
Tue, Feb 21, 2006 9:29 PM
Vern/ikitnrev/verntiki, You my friend, are an absolute crackup :lol: Thanks for posting such a great thread and making my day. :drink: Cheers! |
|
T

tikigap
Posted
posted
on
Tue, Feb 21, 2006 10:17 PM
Ha ha Vern! That's exactly right! I've been watching this very phenomenon myself, here at TC - it truly is amazing. There's a heck of a lot a talent here... I have a book on distilling spirits... like rum. I'll have to look into that. |
|
T

TikiJosh
Posted
posted
on
Wed, Feb 22, 2006 12:16 AM
Survivor: Tiki Island?!? I like the sound of that! I'm trying to convince my wife right now that what we need to start doing is making tiki mugs. Maybe a few more weeks of constant pestering and she'll give in.... |
|
H
hmc
Posted
posted
on
Mon, Mar 13, 2006 9:53 PM
Sheesh, 20 odd days since my last update. I have actualy finished the mugs (only 8 of them) but have been too busy to post pics and write up information. I hope to get the next update out by end of this week!!!! |
|
KT

Kane Tiki
Posted
posted
on
Mon, Mar 13, 2006 10:12 PM
i was wondering what happened to these. can't wait to see what they look like. by my reckoning these will be the first known professionally done australian tiki mugs! the shag/outre gallery ones don't count cos obviously they were designed and made outside of oz. [ Edited by: Kane Tiki 2006-03-13 22:14 ] |
|
H
hewey
Posted
posted
on
Tue, Mar 14, 2006 4:11 AM
Looking forward to em HMC |
|
Y
yumyumkid
Posted
posted
on
Wed, Mar 15, 2006 11:42 PM
Bumb....cuz this thread is too cool. HMC, any new pics headin our way? :) |
|
H
hmc
Posted
posted
on
Tue, Mar 21, 2006 2:26 AM
Okily-Dokily... Finally more pics and information! Ceramic slip - I used Mid-Fired White Eathernware. This slip is ideal for mugs, it's durable and strong for those times of chink-chinking and washing up hazards. Pouring in the ceramic slip. As you leave the ceramic slip inside the mould, it starts to dry and you can see the edges forming a wall. By tilting the mould you can see how thick the mug is getting. I leave mine for approx 20-30 minutes: Then tip it over and pour him out (do the hokey pokey): Let it drip for about 15 mins: The ceramic slip includes a content called "defloculant" which helps the ceramic slip stay put and not ooze to the bottom in a heap of mush. The top can be cleaned up at this stage and the edges can be tidied up after you pull him out as he's still soft then: As it dries (I leave mine for a minimum of 2 hours before pulling out) the mould sucks the moisture away from the ceramic slip making the mug shrink. The mug continues to shrink as it dries completely (hence needing to create a mould about 10% bigger than the finished size). You can see the size differences in this row of mugs: [ Edited by: hmc 2006-03-21 02:53 ] |
|
H
hewey
Posted
posted
on
Tue, Mar 21, 2006 3:36 AM
Cool! Nice mugs Helen! That mold did a good job, cant wait to see em with glaze |
|
T
teaKEY
Posted
posted
on
Tue, Mar 21, 2006 10:50 AM
??????????????????????????????????????????????????????????????????????????????????????? HMC comes along... LightBUlb. I always wondered about the slipcast sticking to the walls. Thanks for solving life's great mysteries. Hey, anyone want to know the meaning of life? |
|
P

PockyTiki
Posted
posted
on
Tue, Mar 21, 2006 12:24 PM
Meaning of Life = To sit with one's self at thine computer. Forever contemplating the meaning of life. Very cool design on your mugs! Those are sweet. |
|
T

tikiracer
Posted
posted
on
Tue, Mar 21, 2006 1:52 PM
thanks for the 'how to', the mugs are looking great, can't wait to see them finished and full with booze |
|
T

Tikiwahine
Posted
posted
on
Tue, Mar 21, 2006 1:55 PM
Looking great, thanks for the wonderful thread! |
|
S

Sneakytiki
Posted
posted
on
Sun, Mar 26, 2006 5:56 PM
Those are some great designs, very inspiring, one hot tiki! |
|
B

Benzart
Posted
posted
on
Sun, Mar 26, 2006 6:39 PM
I think you have done this before.... What a great lesson thread from beginning to end. can't wait to see the rest. Excellent! |
|
A
atomictonytiki
Posted
posted
on
Mon, Mar 27, 2006 12:36 PM
Did the shrinking of the mugs solve the problem with the lip undercut? or have you hacked at your silicon master to improve the molds. |
|
P

poptiki
Posted
posted
on
Fri, Apr 21, 2006 5:39 PM
M [ Edited by poptiki on 2022-10-12 04:50:12 ] |
|
A
atomictonytiki
Posted
posted
on
Sat, Apr 22, 2006 10:34 AM
exactly how did you glaze them? where did you fire them? i need closure on this thread |
|
H
hmc
Posted
posted
on
Thu, Jul 20, 2006 1:14 AM
Apologies for the massive delay in posting the final stage! I've been busy making little arms, legs, ears, eyes etc in my belly for the last 5 months!!! And I guess because I have seen the outcome I have been slack in sharing it with you guys. So, here's the line up of mugs to be fired (first firing):
They took about 2-3 days to dry at the point where they could be fired. Depending on the weather and room temperature - this may differ. Once I got them back home - it was time to glaze them. I gotta say, although the glaze colours were (supposed to be) honey and the other a dark choc brown, I really loved the charcoal velvet look of the un-fired glaze. The instructions state to add 3 generous coats... I add what I think is 3 generous coats....
They were then sent for their 2nd firing (if they survived the 1st one, it doesn't mean they are safe to survive the 2nd!). As you can see in the outcome, the glaze is not even nor is it "thick". The honey looks "honey-ish" and the dark choc brown... well - what colour do you think we can call it?!
But, on the bright side - they do look very antique-y, like the first "un-earthed" tiki mugs... in Australia! So the next time I do this (will be next year after we settle in with the new addition to the family) I will certainly give these little suckers 3 GENEROUS coats of glaze :D Thank you all for your enthusiasm in this thread - and your patience! |
|
H

harro
Posted
posted
on
Thu, Jul 20, 2006 3:55 AM
finally the update we've all been waiting for hmc. |
|
B
Benzart
Posted
posted
on
Thu, Jul 20, 2006 4:54 AM
Excellent How-to post HMC, Thanks for taking the extra time to show us how to make our own mugs. |
|
A
atomictonytiki
Posted
posted
on
Thu, Jul 20, 2006 2:59 PM
You say the mugs might not survive the 2nd fireing, so what if you cast ten mugs are you going to have ten mugs or are you looking at loosing half in the process? |
|
T
Tikiwahine
Posted
posted
on
Thu, Jul 20, 2006 3:05 PM
Congratulations on the progress of both your mugs and your little 'tiki'. I love how both are a surprise when they come out, you don't really know what they will look like! |
|
P
poptiki
Posted
posted
on
Thu, Jul 20, 2006 6:09 PM
M [ Edited by poptiki on 2022-10-12 04:37:07 ] |
|
T

ToonToonz
Posted
posted
on
Fri, Jul 21, 2006 4:50 PM
Very interesting topic. I enjoyed all the photos and the "play-by-play" descriptions. |
|
H
hewey
Posted
posted
on
Fri, Jul 21, 2006 7:45 PM
Congrats on the little one! :) Thanks for posting pics of the mugs, as folks have already said its a great thread. |
|
H
hmc
Posted
posted
on
Wed, Nov 15, 2006 8:01 PM
My 'other' creation has been finished! It was supposed to be ready 1 week earlier and when it eventually 'came out', it was well and truly cooked :D Here is our joint effort - little tiki "Xavier James McLean"...
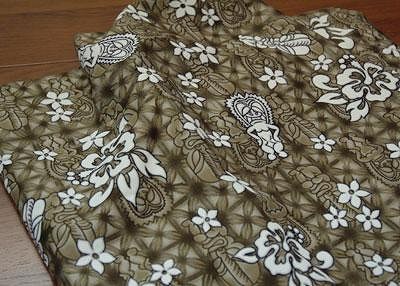
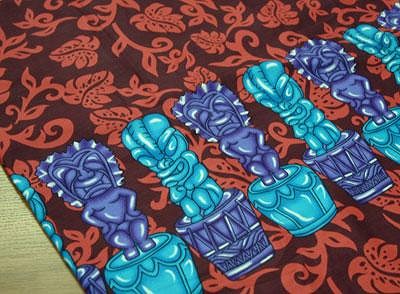
Next on the to-do-list is to create little shirts for him using my tiki fabric purchased from Samoa mid this year:
|
|
H
hewey
Posted
posted
on
Thu, Nov 16, 2006 4:37 AM
congrats - definitely a cutey :) |