Tiki Central / Tiki Carving
Cheeky Girl's Carvings
|
C

CheekyGirl
Posted
posted
on
Tue, Sep 18, 2007 10:52 PM
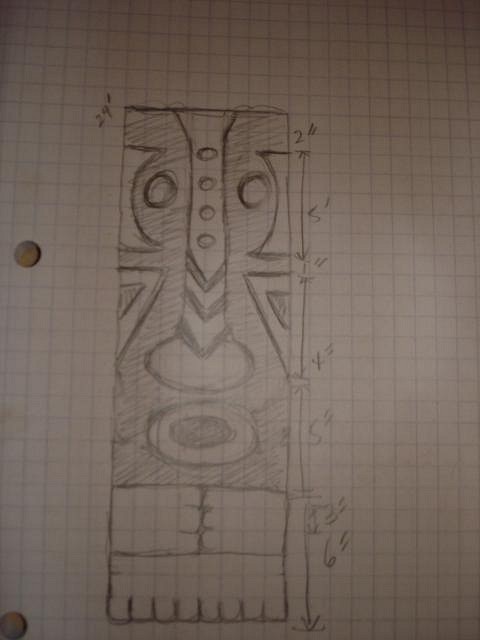
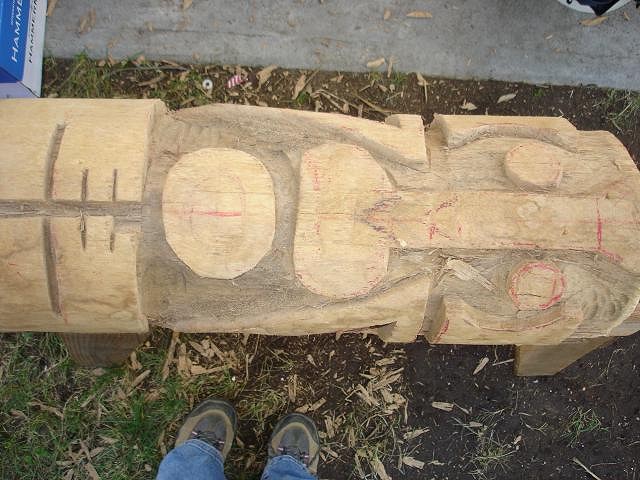
My next tiki was inspired by a Westwood ashtray. Thus the name of my new tiki: The "West Cheeky Tiki". I have this ashtray in my collection. This design can also be found in the book, Tiki Quest, page 148. The inspiration:
Unlike my first tiki, this time I measured the log and drew up a more detailed sketch, instead of just eyeballing it and/or free-hand drawing directly on the log. The initial sketch:
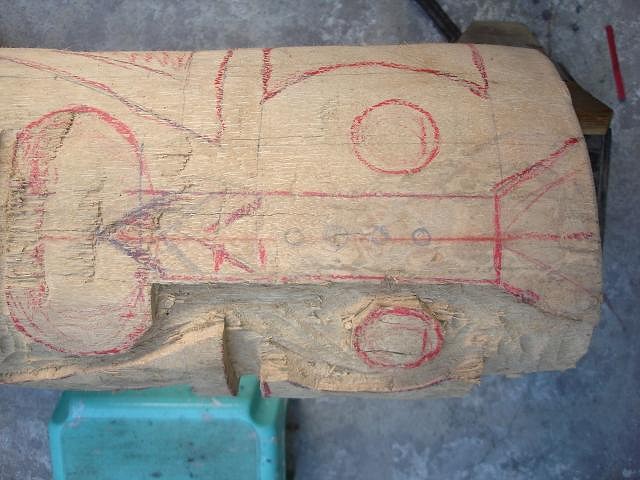
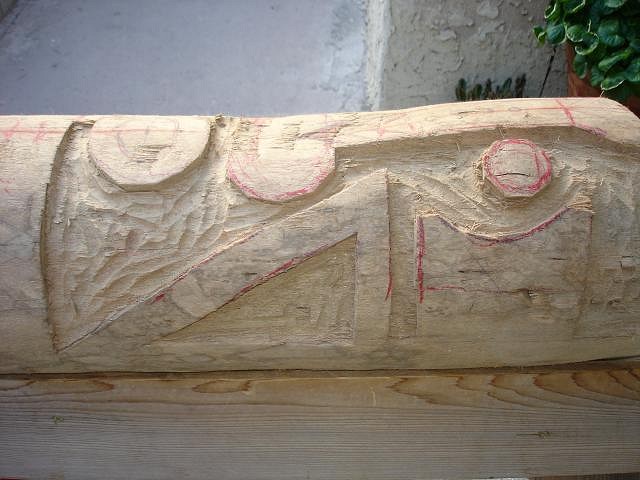
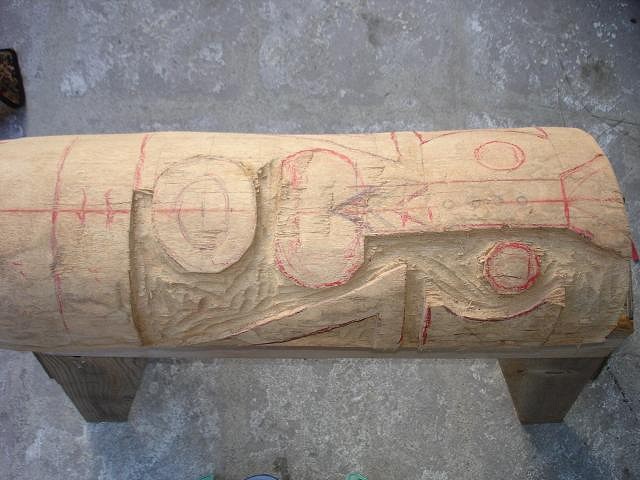
I hand striped my new log with my brand new sharp draw knife, sanded and carved all in one afternoon. BayPark Buzzy's tips with respect to measuring and transferring the design onto the log were instrumental in how much I was able to accomplish in one afternoon. 4WDtiki also showed me a thing or two about power tools. They aren't so scary anymore. This is as far as I got in the July 2007 Chop in Oceanside:
|
|
S

suburbanpagan
Posted
posted
on
Tue, Sep 18, 2007 11:27 PM
Nice work cheeky! I look forward to seeing how this one shapes up! |
|
T

TheBigT
Posted
posted
on
Wed, Sep 19, 2007 10:53 AM
Cool and different design. Looks even better on the log! :) |
|
C
CheekyGirl
Posted
posted
on
Tue, Jun 24, 2008 1:49 PM
I've finished the WestCheeky...I really got to update this post with some pictures. I started a new one as well called the "Tipsy Tiki"...updates to follow.... |
|
B

Benzart
Posted
posted
on
Wed, Jun 25, 2008 3:26 AM
Cheeky-girl, Nice ooking tikis, your new one looks like you have learned a lot. Keep up the good work and Practice, practice, Practice! |
|
T

Tikilizard
Posted
posted
on
Wed, Jun 25, 2008 10:03 AM
Really nice start. Looks like you are a natural and already ahead of the learning curve. Can't wait to see the next pic's. Have you decided on a stain yet? Happy carving! |
|
S

seeksurf
Posted
posted
on
Thu, Jun 26, 2008 9:48 PM
Nice Work. The lay out is very well done. |
|
CF

Captain FOREMAN
Posted
posted
on
Tue, Jul 8, 2008 4:53 PM
Chisels are fine and dandy for straight edge work, butt to really good features without the aide of mallets and such, I'd suggest investing in the basic mallet tool set that is sold by Flexcut, I use mine extensively and the best thing about those tools is that you don't need a sharpen stone or grinder, they sell you a strop to maintain the polished edge and they can flex while you carve. Also to carve faster consider investing in the power carver that the company Arbortech sells, it's very noisy, butt you can really hog out wood with it, both companies can be easily found on the web. Happy carving! -Captain FOREMAN |
|
C
CheekyGirl
Posted
posted
on
Mon, Jul 14, 2008 4:19 PM
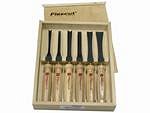
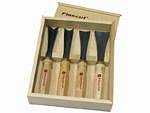
CaptanForeman -- Doh! Sorry about the confusion, my bad, I’ve lumped my tools into one general category of “chisels”. I’ve been using the “straight-chisels” and the “mallet tools”. The mallet tools have been absolutely essential in carving. I love FlexCut and have the 6 piece Starter set and the 4-piece Sculptor set. I have also purchased several other 60 degree V mallet tools as well as a few others. Flex Cut Starter Set
FlexCut Sculptor Set
Thanks for noticing and helping me clarify this! |
|
C
CheekyGirl
Posted
posted
on
Mon, Jul 14, 2008 11:20 PM
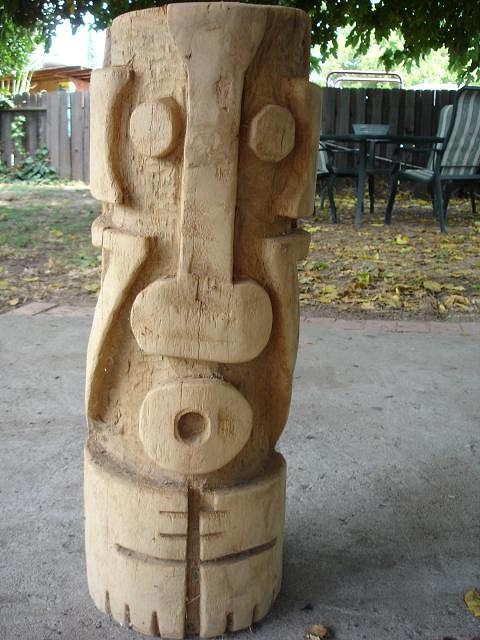
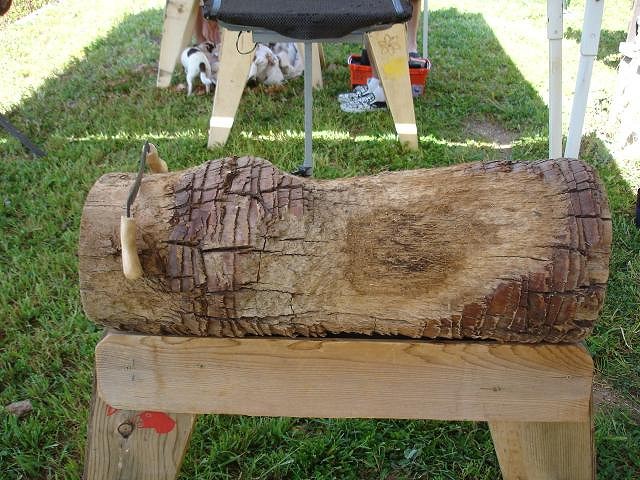
Finally took some photos of the WestCheekyTiki. It was an accident, I chopped off one of the fingers. Ouch!
Decided not to glue it back on.
I've given it a quick sand--haven't decided on a stain. I think I just might keep it natural and just put a quick coat of a protective sealant.
As you can see, I just dug a little deeper and gave it a little round mouth. The nose is not symetrical, but I like it with all it's imperfections. The "West Cheeky Tiki" is done! (well except for the protective sealant...) |
|
V

VampiressRN
Posted
posted
on
Tue, Jul 15, 2008 5:23 AM
You go girl!!! Those Tikis are going to get better and better...and the missing finger just adds character to that guy. Keep up the great work. :) |
|
S

surfintiki
Posted
posted
on
Tue, Jul 15, 2008 8:52 AM
WOW! Love it! I like how you went all the way from inspiration to design, to the finished piece. Well done. You now have every carvers dilemma, stain it, coat it, leave it? You'll just have to make more, so you can try out different looks. |
|
A

AlohaStation
Posted
posted
on
Tue, Jul 15, 2008 11:01 AM
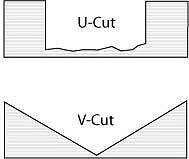
Cheeky, Great tiki for #2. Sorry - I have to vent here for just a moment and your tiki is a perfect example. I have noticed that most novice carvers have the same technique. I am guilty myself - so I'm not picking on any one person. When you first pick up the chisels and start choppin you have no idea how tools are designed or how they perform, so we just start hacking away at the vision in our heads. The vision is usually something scribbled on paper that has a very defined design. We then start by outlining and start cutting "straight" into the wood creating what I call a "U" cut. U-cuts are when vertical cuts are made and the negative space is removed to reveal a flat surface. Consists of 3 edges. This is a very difficult cut. Its not the vertical cuts, but the removal of the negative space. To get a consistent depth and smooth surface is almost impossible for a novice. Marquesan tikis often have this type of cut. I have found that creating "V" cuts is the solution. Simply find you edge and cut at more of an angle till the 2 edges meet. The angles of the "V" do not have to be even but they also do not have to be flattened or smoothed. They also allow you to cut deeper and produce a more natural look. Look at alot of tikis and you will see the cuts very rarely have more than 2 simple angles. The simple angles also allow for easier sanding - thats the biggest bonus!!
Again I'm NOT trying to pick on anyone just passing a little knowledge. Good luck on the next one. |
|
T
TheBigT
Posted
posted
on
Tue, Jul 15, 2008 12:00 PM
Cool! Looking good. Now you're ready for number 3. But I would vote for stain on this one instead of natural. I think it would look killer with a really dark stain. :) |
|
B
Benzart
Posted
posted
on
Tue, Jul 15, 2008 5:30 PM
Cheeky, Really looking Great and Excellent choice of tools, I can see you are Serious and that You mean Business. Look out Logs, here comes the Cheeky Girl. Can't wait for the next batch.! |
|
C
CheekyGirl
Posted
posted
on
Tue, Jul 15, 2008 5:46 PM
Ben - Thanks, I'm trying! And AlohaStation, yup, it's very difficult! As you can see I'm still getting the hang of some of my mallet tools and chisels. Getting that "rounded" look comes from getting more experience with the "V" cuts and practice. You are absolutely right, I kept of removing material (especially on Tiki #1) in order to create depth. My tikis are still very one-dimensional. A few chops ago, Buzzy, gave me another lesson in creating depth and the technique you described above, but it's really hard! That's why I bow down to the really talented and experienced carvers. I'm working on my Twisted Tiki right now after that I want to attempt a Moai in order to get the hang of rounding technique. And heck no -- no offense taken, you're just passing on some wisdom and tips! Mahalo! |
|
S
seeksurf
Posted
posted
on
Tue, Jul 15, 2008 7:05 PM
Nice work yes you on fire. Only #2. |
|
C
CheekyGirl
Posted
posted
on
Tue, Jul 15, 2008 9:29 PM
Here's the beginning of Tiki #1 - Twisted Tiki. The log was kind of hacked up from the start. I cleaned up the sections I wanted stripped, and decided take a direction the log seemed to want.
This is how far I got that day. Unfortunately, I haven't touched it since. Got side-tracked on another project.
|
|
C
CheekyGirl
Posted
posted
on
Wed, Jul 16, 2008 8:30 AM
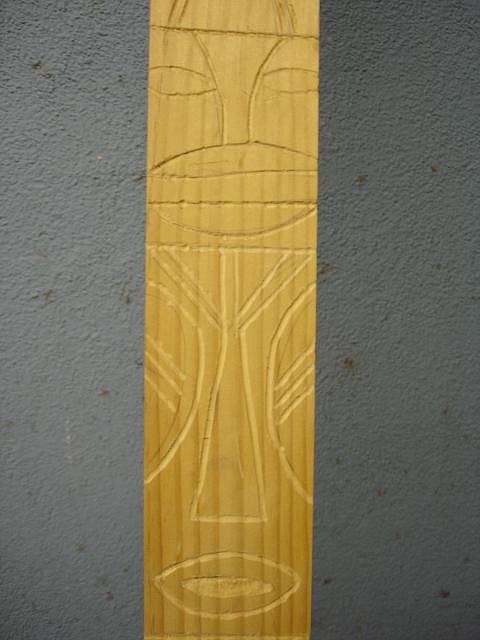
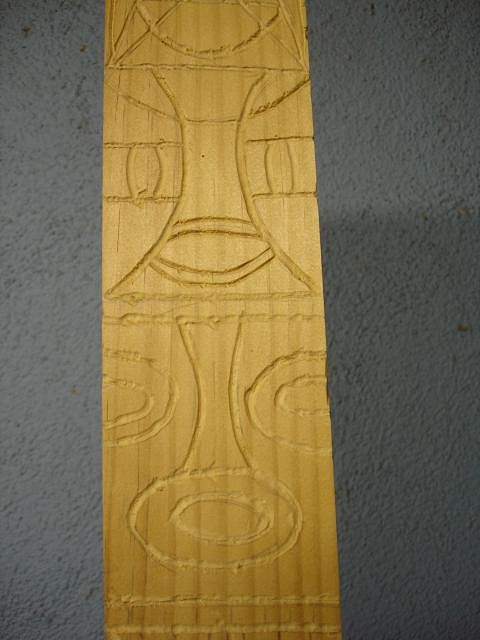
Here's the project I got side-tracked on. I'm making post covers for my tiki bar. This is #1 which I started at the last chop. I free-handed some designs, some of which were lifted right out of the Tiki Modern book. Others, my own. I started with hand tools and then deepened the lines with a router. The dremel didn't seem to have the umph I wanted, so I just bought a Bosch Colt Palm Router. Here's the start, hopefully, I'll get back to Tiki #3 soon.
|
|
C
CheekyGirl
Posted
posted
on
Mon, Sep 1, 2008 3:29 PM
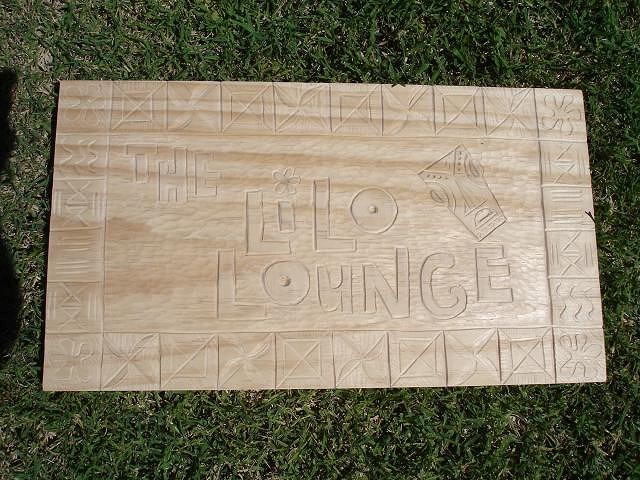
Got side-tracked again with a small sign I was working on at the Tiko Oasis 8. Here's the drawing.
Here's the unstained carving.
I inadvertently made it a couple of inches bigger. Thus that little empty stop in the lower left-hand corner. |
|
J

JohnnyP
Posted
posted
on
Tue, Sep 2, 2008 2:52 PM
A carver getting sidetracked with a different project, no, that wouldn't happen.... Just don't let the tiki be the start of Cheeky's box. Nice sign, If you wouldn't have told us, we wouldn't have notice the spot in the left corner wasn't supposed to be there. |
|
S
seeksurf
Posted
posted
on
Tue, Sep 2, 2008 5:11 PM
Right On looking good the tiki bar will be cool. |
|
C
CheekyGirl
Posted
posted
on
Mon, Jun 15, 2009 6:22 PM
Finally getting around to posting my projects again. I don't want to double-post, so here's the link for the sign and panel/posts above. http://www.tikicentral.com/viewtopic.php?mode=viewtopic&topic=27422&forum=18&start=15 |
|
C
CheekyGirl
Posted
posted
on
Mon, Jun 15, 2009 6:32 PM
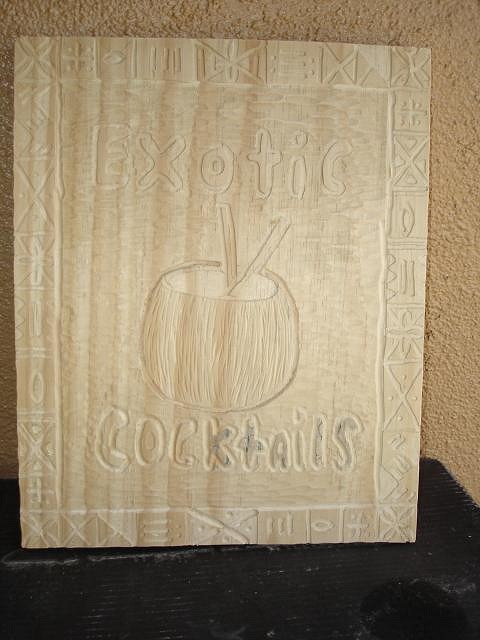
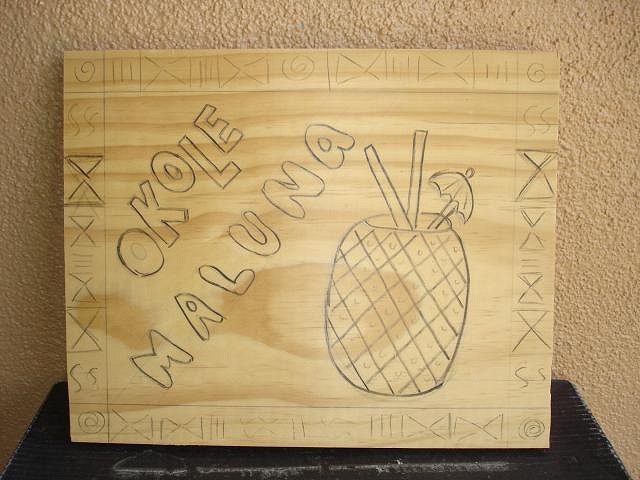
I've kind of put away the tiki logs for now, and have been working on smaller projects. I had some scrap wood, so started making a few signs: Exotic Cocktails Sign with a coconut drink.
Okole Maluna Sign with a pinapple drink.
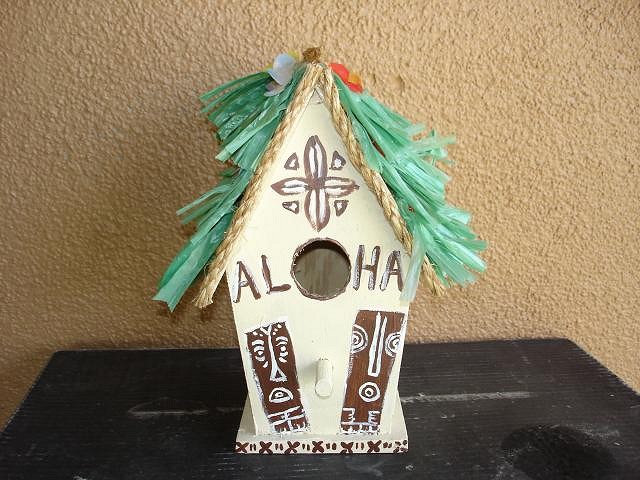
I had a couple of wood bird houses around the house and decided to decorate them, here's the first one. I recycled the little grass skirts that Princess Papule put around her drinks during the the last crawl.
|
|
C
CheekyGirl
Posted
posted
on
Mon, Jun 15, 2009 6:35 PM
And I just thought the way the sun looked as setting on my WestCheekyTiki.
|
|
H

Hilander
Posted
posted
on
Mon, Jun 15, 2009 9:16 PM
Most artistic of you to catch the lighting that way; looks like WCT is saying "Oooh look at the pretty sunset." |