Tiki Central / Other Crafts
Volcano Progress - pics and FIRE !!!
Pages: 1 26 replies
|
C

Choptop
Posted
posted
on
Fri, Jun 8, 2007 9:54 PM
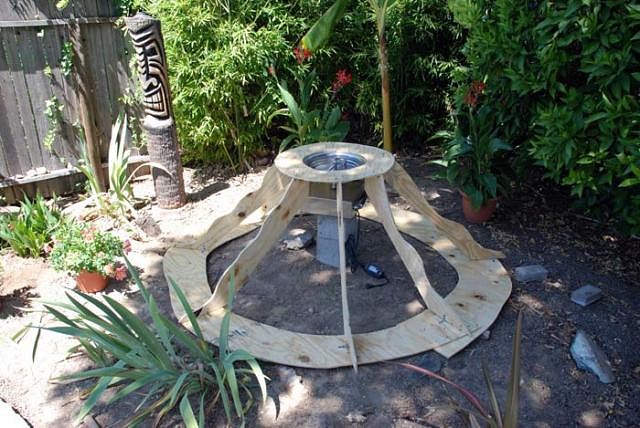
Ok, so its been a while since I posted on the build up of the sacred Tiki Mt. Unbangee.... But there has been progress. The backyard is now plumbed for gas, water, power, etherenet and cable TV. COOL. Lots more cement has gone in and the plants have gotten revamped... but the best part is I got to spend all day working on the VOLCANO !!! I framed up the buck from 3/8ths ply, looking back I would probably go a little thicker but its what I had on hand so its fine. It used up 3 sheets. The next step will be to cover the framework with chicken wire and then cover with burlap. The whole thing then gets a coating of spray on cement (Spray-Top by brand name). This will allow me to mix in colors and stains as it goes on. COOL. I'll put in a couple of "vents" that will have tubes leading down to a fog machine for periodic bursts of smoke. After I got done framing up the buck, I put a couple coats of Thompsons Waterseal on it and set it aside to dry. The wood will be covered but parts of bare wood will be touching the ground and this will be a year around outdoor fixture. The Thompsons will not completely prevent rot, but hopefully it will slow it down. Once that was done I rigged up the gas and power. Pretty simple really. Get black gas piping from Home Depot. Use lots of yellow teflon tape and pipe wrench to assemble, plug in the Fire Pit kit from Yardiac, connect to power and WOW... instant glosing fire from the heart of the mystic Mt. Ubangee. The flames are hot enough close to the fire pit that I will line the mouth of the volcano with automotive exhuast pipe wrap before I spray on the concrete, but thats no big deal. lots more the report... but I'm whipped. here are a couple of pics. More to come. :D
[ Edited by: Choptop 2007-06-08 21:59 ] |
|
SD

Savage Daddy
Posted
posted
on
Sat, Jun 9, 2007 5:41 AM
Very cool! Or as Paris would say (from behind bars) :lol: "That's Hot!" :drink: [ Edited by: Savage Daddy 2007-06-09 05:42 ] |
|
V

VampiressRN
Posted
posted
on
Sat, Jun 9, 2007 9:25 AM
:lol: ditto on what the savage said. That is way kewl. Mysterious and exotic looking in the dark...nice job. |
|
T

trasenstine
Posted
posted
on
Sat, Jun 9, 2007 4:06 PM
That is supa-hot! :D Very neat idea. |
|
H

Hakalugi
Posted
posted
on
Mon, Sep 27, 2010 8:47 PM
You need to post some photos of the completed volcano! |
|
C
Choptop
Posted
posted
on
Mon, Oct 11, 2010 4:12 PM
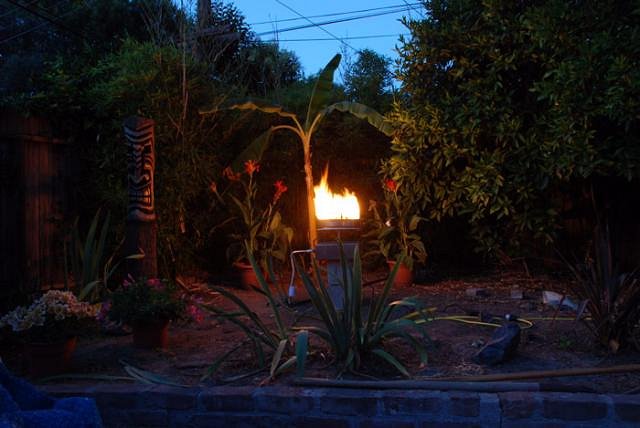
ok... sorry for the YEARS delay in getting pics up... but I've had LOTS going on in the past couple of years :D but I'm back in the tiki scene. here is a night time pic of the Mountain of Mystery, Mt. Ubangee (with Saul the Benevolent looking on, eyes ablaze) this is the "finished" pic (at least for this phase, phase 2 will add a water fall and Sound FX features) [ Edited by: Choptop 2010-10-11 16:14 ] |
|
C
Choptop
Posted
posted
on
Mon, Oct 11, 2010 4:24 PM
resizing the build process pics... should have them up soon. |
|
T

TikiG
Posted
posted
on
Mon, Oct 11, 2010 4:40 PM
Cool (I mean HOT!) Nice project, man! |
|
C
Choptop
Posted
posted
on
Mon, Oct 11, 2010 4:46 PM
here is the "skeleton" of Ubangee. I just cut non matching wavey patterns on the outside edge of the plywood legs, screwed them to a ring on top and a larger ring on bottom. I then put a couple LIBERAL coats of Thompsons Water Seal on it to try and offer a little but of rot resistance to the wood.
I then covered the sides with chicken wire and burlap (sorry, dont have pics of this stage). I just construction staple gunned them to the wood. Shaping the chicken wire as I went to give it a little bit of a "volcanoey" look. The burlap was then covered with a matting, and I cant quite remember the name of the product right now... will look it up and post it.. but its a cement absorbent batting looking stuff. Over this a first coat of epoxy cement was used as a base. Think of this as a "primer" coat.
after this we mixed up some "Spray Top" first a little thin to serve as a harder base coat. all of us applying the "base" coat then we mixed up a thicker batch to act as a texture coat. We troweled this on in "artistic" fashion to give some texture... again, trying to make it look "volcanoey" let all that dry overnight and then start staining. We used a variety of acid stains and straight up concrete stains. Some give BRIGHT colors, others stain everything under it (unlike other stains that are more like paint and just cover the underlying colors). We just went to town until it looked good. and after numerous applications of stains and acid stains. [ Edited by: Choptop 2011-06-12 10:37 ] [ Edited by: Choptop 2012-06-06 11:35 ] |
|
C
Choptop
Posted
posted
on
Mon, Oct 11, 2010 4:52 PM
looking into the mouth of the beast... I had to trim away some of the material and let the fire box sit a little above the opening in the mouth (it doesnt poke out above the rim of the "caldera" though. Before I put on the cement I lined the whole mouth area with exhaust header wrap (available at your local hot rod shop) for a little bit of fire resistance. This area does get pretty hot. But its held up fine through years of use and has caught fire... yet :D. Will post up some pics of the area as it is in service.
|
|
C
Choptop
Posted
posted
on
Mon, Oct 11, 2010 4:58 PM
will get some pics of Mt. Ubangee a couple of years in... the Banana trees are MUCH larger and we've done some more landscaping in the area. LOTS more to do though, and right not the area hasnt been tended to in a while, so its not the prettiest... but it will give ya'll an idea of how this kind of thing holds up... which is VERY well. for added effect I put a halloween fogger in the base of the mountain (its all hollow underneath) and set it to go off every so often... the fog leaks out around the base of the mountain and fills the area behind the volcano on still nights. Throw a red back light in there and it looks REAL nice. |
|
RH

Robb Hamel
Posted
posted
on
Mon, Oct 11, 2010 5:09 PM
Choptop - the volcanoes' lookin' nice. I bet the fog looks great and atmospheric, can you get a pic of it too? |
|
C
Choptop
Posted
posted
on
Mon, Oct 11, 2010 5:21 PM
i'll try... right now the fog machine is burned out. Need to buy a new one... plus its a little windy right now, not the best conditions for a fog machine. but will give it a shot when I can. but yes, it does add quite a bit. a $100 fog machine adds a lot of atmosphere. |
|
M

MadDogMike
Posted
posted
on
Mon, Oct 11, 2010 6:15 PM
Looks great! What did you use for a burner set-up? Sound FX - I made a volcano sound effect a few years back by taking an explosion wav file and slowing it down by 4x or so. Then ran it thru an amplified sub-woofer, it made the ground shake :D They have cheap fog machines at WalMart now for $20. I'm sure they aren't as good as a $100 one, but you can buy 5 of them for $100 |
|
C
Choptop
Posted
posted
on
Tue, Oct 12, 2010 10:29 AM
for the burner I used the guts from the firepit I got at Garden.com. It wasnt cheap... ~$800 if I recall correctly. But then again I didnt see this as an area to skimp on the project. It has electronic ignition and a thermocoupler that will try for a set period of time to re-ignite the flames should they go out for whatever reason, after that it shuts down and shuts off the gas. When you turn on the power to it the ignition system kicks on and instant flame. Pretty cool. It also means it can be controlled (on and off wise) via a remote switch, or even better, remote control (putting a remote control receiver inline with the power supply). Will look into the SFX option. The slowed down explosion is a good idea. A friend is pretty heavy into the "haunt" business and I should be bale to come up with good little sound players that can be hidden in the base of the volcano and play back sound files. Headed to Walmart today to pick up a couple of cheap foggers. Ubangee will smoke again soon!!! :D |
|
D

danlovestikis
Posted
posted
on
Tue, Oct 12, 2010 2:46 PM
Super fun to have met you on the Sacramento Crawl and to now see your terrific volcano. It looks wonderful and fun. Time to start a crawl in your area so we can all come and see it work, Wendy |
|
C
Choptop
Posted
posted
on
Tue, Oct 12, 2010 5:08 PM
thanks a ton. Talked with Matt on the crawl about doing a monthly pot luck in the Sac area.. our backyard and hosue isnt quite up to the level of amazingness we saw on the crawl, but its open to all that would like to partake in the mysterious rights that surround the lighting of the volcano. We are right around the corner in Carmichael if anyone would wants to come by and check it out. Yer all welcome anytime... I hvae the mother of all blenders and make a mean tropical drink (virgin or otherwise). [ Edited by: Choptop 2010-10-12 17:09 ] |
|
TT

Trailerpark Tiki
Posted
posted
on
Fri, Nov 4, 2011 8:04 PM
Awesome volcano. You're giving me new inspiration. Who wouldn't want a volcano in their back yard? |
|
C
Choptop
Posted
posted
on
Sat, Nov 5, 2011 9:49 AM
Mt. Ubangee 2.0 will have channels cut in the side of it with molded/slightly melted plexiglass in the channels to carry water from a pump hidden inside. The channels will be backlit with a series of DMX controlled LED lights that can change colors. Think, blue during "normal" volcano operation, then changing to red when the volcano "erupts" so it looks like lava flowing down the sides. DMX controlled smoke machine and SFX generator are in the plans as well. If i really get crazy with it, an animatronic Tiki or skull will be in the show as well. |
|
T

tigertail777
Posted
posted
on
Sun, Nov 13, 2011 3:48 AM
Hey Choptop, glad someone can use the model railroad waterfall tutorial for inspiration. Sounds completely awesome what you have planned be sure to get some good pics I can't wait to see it. Love your volcano as it already is, but your plans for it are going to make it off the map incredible. :) |
|
C
Choptop
Posted
posted
on
Sun, Jul 7, 2013 2:33 PM
so its been a number of years since I built the Great and Mysterious Mt. Ubangee... So here is an update. the structure of the volcano is holding up well. The plywood that sits exposed and in contact with the dirt at the rear of the structure has rotted some, but the internal structure is fine. the firebox thermocoupler gave out a few years back. I replaced it but could never get it to act QUITE right... so after much fussing I id away with the fire feature. I was sad to do it and didnt want to spend the ~$1800 for a new fire box... So I went with a professional grade smoke machine and a color changing LED light. The smoke machine is DMX controllable (so I will be able to use it in the whole backyard tiki show I have planned). The smoke actually looks a little better than the fire in my mind. Its nice to be able to change the color of the eruption. its pretty hard to get a good pic of the mountain... but here is a decent one..
|
|
D
danlovestikis
Posted
posted
on
Sun, Jul 7, 2013 2:51 PM
It was wonderful to see it in action at the last Sacramento Crawl. It's a great volcano. Wendy |
|
C
Choptop
Posted
posted
on
Sun, Jul 7, 2013 8:47 PM
I think it might ad some metal flake and glitter to it. :D |
|
HT

Hale Tiki
Posted
posted
on
Mon, Jul 8, 2013 7:47 AM
I assume you mean in the lava. And no joke, that might actually look cool at night. It'll reflect the light well and light it up some. Though myself, I'd use some white acrylic and individually addressable LED strips to make it look like it's flowing. (Also DMX controllable, of course) |
|
C
Choptop
Posted
posted
on
Tue, Jul 9, 2013 7:50 AM
thats been turning over in my pea brain. how to make convincing "lava". The clear panels in the side of the mt. are the way to go... but I think that after that it might need to be a water sfx light shining on the back of it, or a wrinkled gel roller... dont know. Embedding metal flake in the clear portions might be a good idea... will have to make up some test panels for that. |
|
HT
Hale Tiki
Posted
posted
on
Tue, Jul 9, 2013 7:54 AM
Actually, I have a lot of ideas for that. I'm typing this from work right now, but when I get a chance, I'll post my thoughts on the subject here. I make things for a living, check out Inventionland. By things, I mean any and everything. This type of thing is right up my alley. I'll try to throw up some thoughts at lunch, if I can wait that long. Hahaha. So many ideas racking around in my head. |
|
C
Choptop
Posted
posted
on
Tue, Jul 9, 2013 8:36 AM
coolio. I have one of these I use for the pool... http://www.youtube.com/watch?v=1XZoP-NeE0w the problem is that it doesnt really read "red" (that can be fixed with a gel though) and that its a little bit of a BIG efx for such a small area (as the lava "channels" would be. I'm thinking some clear resin, cast up all lumpy, with some embedded red and orange metal flake, with an efx light behind it might be the way to go. Or some sort of scrolling led strip that could have chasing red and orange lights. |


Pages: 1 26 replies