Tiki Central / Tiki Carving
My first pieces . . . and pekapeka updates
|
K

kiwishaman
Posted
posted
on
Thu, Jun 21, 2007 8:08 PM
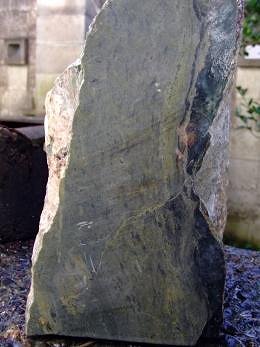
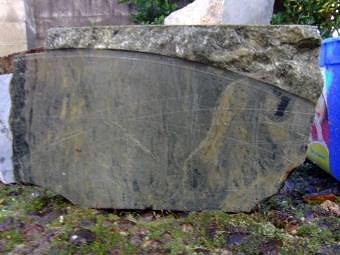
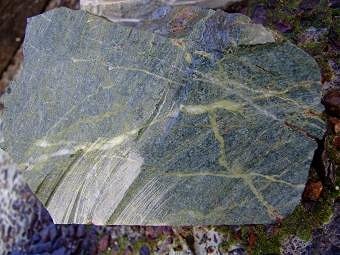
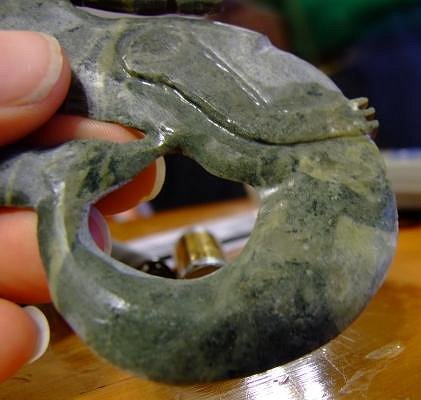
Got myself some Aussie jade to try and practice on. Decided practicing on something that was not destined to become anything was a waste of time. So here goes. The jade
The piece I had cut off - then cracked while trying to slab it. I then bought a diamond blade to put on the drop saw, and did it properly.
Then I tried this
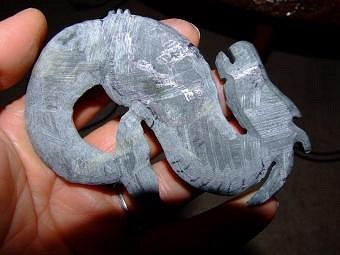
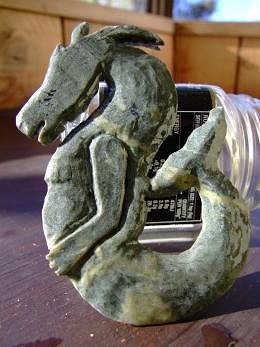
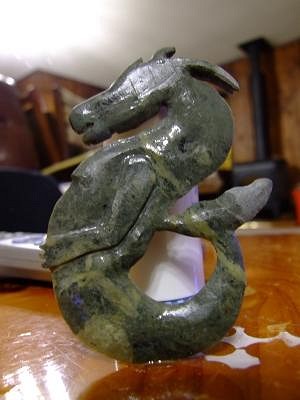
I put it away in my box of one :) untill I know how to remedy my errors. I learnt that I need to draw something that comes through me, not from my head :) Then I started working on a new piece, guided by my spirit guides. first I drew the image onto the stone, then I cut loose with the cut off wheel to remove excess jade. Next, out with the dremel tool. I ended with this after about 5 hours
Another 3 hours, and using the dremel tool at a slower speed
YOu can see that I have a bit of a tool ripple still. Do I just need to continue with the slow tooling to get rid of this? Can anyone tell me how I can now get rid of it? That aussie jade doesnt seem to have any translucence :( .And MAN that stuff is hard! Also, a question for Tama and Paipo, do you know what it is I have here?
and this
Cheers - and thanks for looking :) KS [ Edited by: kiwishaman 2007-07-16 16:00 ] [ Edited by: kiwishaman 2007-07-16 23:40 ] [ Edited by: kiwishaman 2007-07-21 22:54 ] [ Edited by: kiwishaman 2007-07-28 15:46 ] [ Edited by: kiwishaman 2008-08-04 15:09 ] [ Edited by: kiwishaman 2008-08-12 16:03 ] |
|
P

pdrake
Posted
posted
on
Thu, Jun 21, 2007 8:12 PM
it's crap. send it to me for proper disposal. that dragon is pretty sweet. you're doing a great job. the tool ripple is very common in the beginning. bigger bits will help. they cover more area. holding them with the long edge against the media helps as well. it just takes time to learn how to make it better. i'm learning as well and dealing with that problem. i can't believe how well you're doing. keep it up. |
|
K
kiwishaman
Posted
posted
on
Fri, Jun 22, 2007 2:26 AM
Thanks PD. It is very scary to put my art out there and come out of the closet so to speak. I have charcoal drawings, clay masks and other clay pieces, and mandalla's that I have made in the past. Some are on display in my home, others are hidden away. To post here where so many may view is a HUGE step for me. Just trusting in my guides. Thanks again for your kind words, I will try larger bits. KS |
|
B

Benzart
Posted
posted
on
Fri, Jun 22, 2007 7:19 AM
WOW KS, Mighty fine stuff there. This is an Awesome dragon for your second piece? Great hunk of Jade too. What tools are you using and are you running water on them while grinding away? You are definitely doing Something right to have come so far in so short a time. The ripples need to be gone over with Larger tools and try going from different directions, against the ripple so to speak. |
|
T

Tamapoutini
Posted
posted
on
Sat, Jun 23, 2007 2:54 AM
Gidday mate; sorry Ive taken so long to get back to you. I really like your sea-dragon design. A good adventurous project to start with (Ive always been an advocate of jumping in over your head; its the best way to learn - total immersion :wink: ) and it looks at though you are off to a great start. Pdrake is onto it: larger burrs should help to iron out some of those ripples although you should try to get as even a surface as possible (in the areas it can reach) with your grinding wheel - the largest burr of all. The pounamu you have appears (in the cleaner right side) to be an inanga or kokopu. Id avoid trying to work the black areas as they are probably patches of iron and soft horrible buggers to work! At least half of it looks ok though; slab 'er up..? The 'tangiwai' at the end seems kind of blue in colour - possibly aotea..?? A bit hard to tell from the pic. Do you know where it was found? Hope this helps. You're doing just fine for a newbie; keep it up! Tama :) |
|
K
kiwishaman
Posted
posted
on
Sat, Jun 23, 2007 7:54 AM
I wondered about trying the wheel - Im on to it :)
Alright - Thanks Tama. Have been doing that a bit (about 2-3hours) using rubber disks and diamond burrs, but with water. What difference does dry make?
Not sure yet whether I will slab it up or not, still tossing that one around. Thought I might try a sculpture from it. Kinda saving it till I know what I am doing! Even in a big chunk, that stuff looks absolutely beautiful. Have even entertained the idea of putting it on the kitchen table as is!
No idea at all. The guy down the road who cut my aussie jade peice in half so I could slab it, had it. It does have a blue/green cast to it. Is it serpentine then, rather than jade?
Thanks Tama. It helps alot, and I really appreciate the help you have given me up to this point, without it I probably would not have been brave enough to start. Kiaora. I find that once I have the dremel tool in one hand and the dragon in the other, time just slips away! I just dont want to stop. This stone carving is very addictive. I ... have ... to ... pace ... myself. The rock keeps calling to me - especially that pounamu. . . Well, racing over, time for some zd's. We lost to Alingi - but it was close nearly down to the finish line. See what tomorrow night brings . . . Go ETNZ! KS |
|
B
Benzart
Posted
posted
on
Sat, Jun 23, 2007 1:55 PM
I'm Rooting for the Kiwis too! |
|
K
kiwishaman
Posted
posted
on
Mon, Jul 16, 2007 12:17 AM
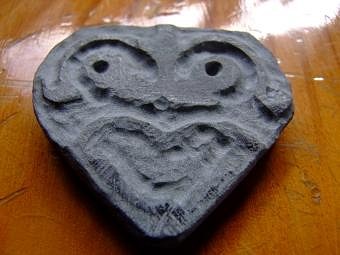
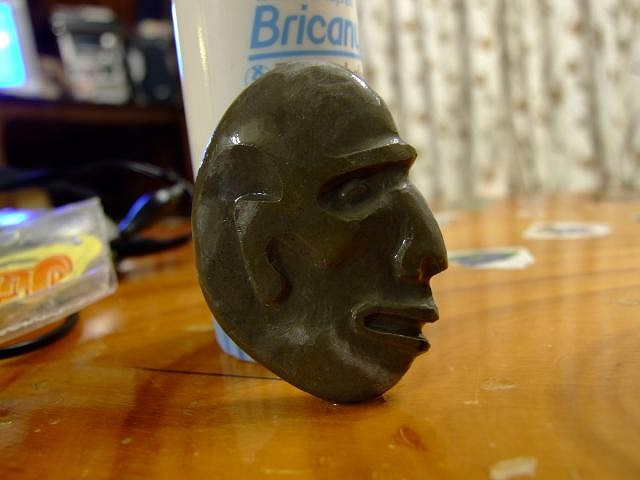
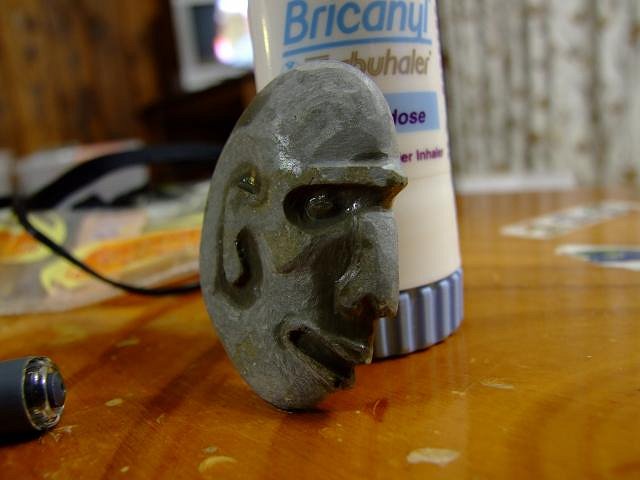
I asked the daughter of one of the ladies at work to pick up any interesting stones she found while on holiday on the east cape. She arrived at work the other day with a dozen stones in a bag. I had a good look at them, and one called out to be worked straight away . . . when I started working with the stone - this is what happened . . .
Just have to get some sandpaper and make him a bit shiney. Thought about adding some extra design to his face, but decided to stick with simplicity. What do you think? (Still working on the seadragon - more pics soon). KS |
|
K
kiwishaman
Posted
posted
on
Mon, Jul 16, 2007 10:30 PM
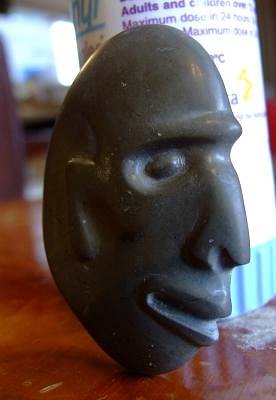
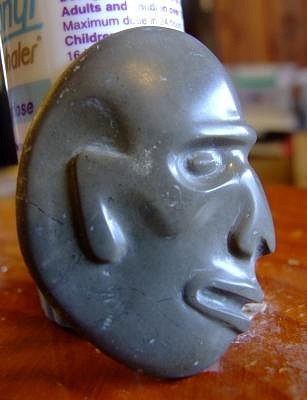
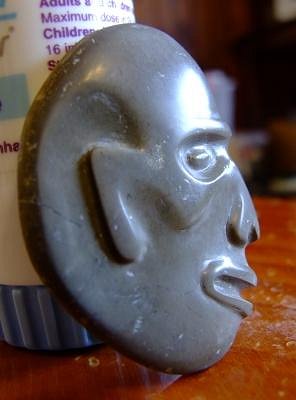
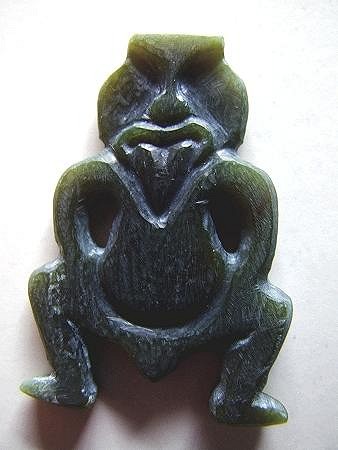
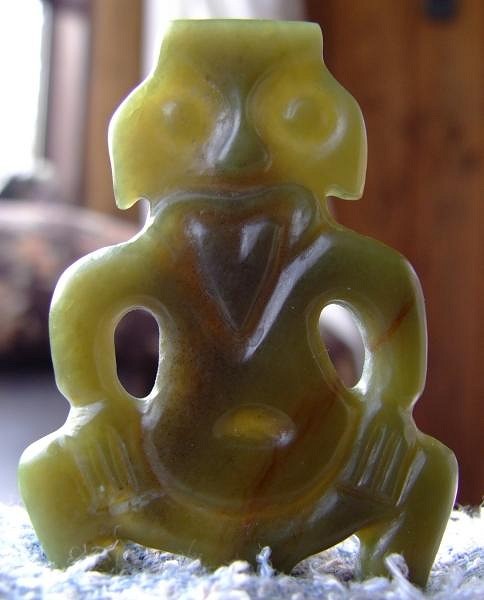
Well, he is finished. A few different views.
Critique welcome. KS |
|
K
kiwishaman
Posted
posted
on
Mon, Jul 16, 2007 11:46 PM
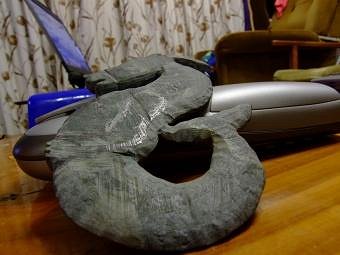
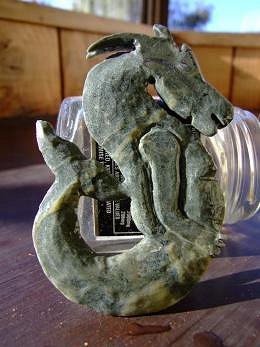
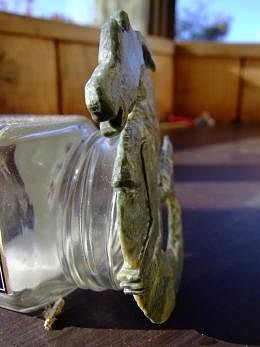
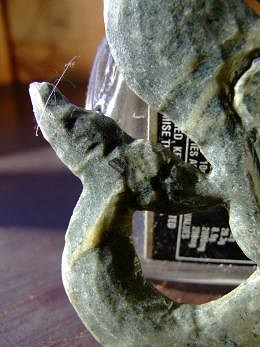
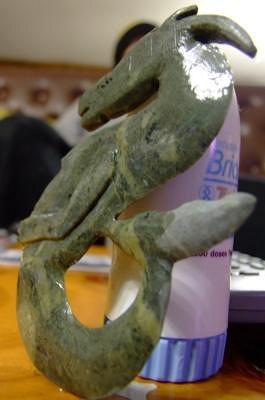
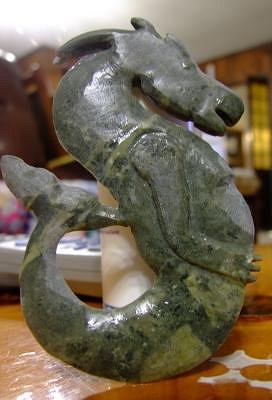
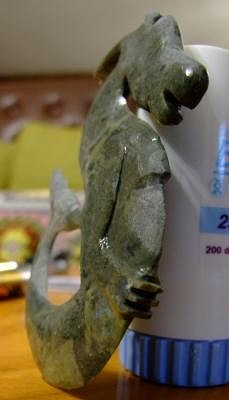
updated images of the 'seadragon' - he's not finished yet! I have been using the grinder (bench) alot - Thanks Tama :)
again - critique welcome - even encouraged. Cheers KS |
|
T

T_birdman
Posted
posted
on
Tue, Jul 17, 2007 1:20 AM
Damned nice dude! All you NZ stone cutters are making me look at some of the tools I have to see if I might cut me a few, it's been a while! You going to do any inlays? |
|
P

Paipo
Posted
posted
on
Tue, Jul 17, 2007 1:21 AM
Looking good shaman...just be careful with that tail! |
|
T
Tamapoutini
Posted
posted
on
Tue, Jul 17, 2007 3:28 AM
Kia ora KiwiShaman. Good to see you've found some time at the bench. The sea-dragon is looking much better, smoother/crisper. Its amazing just what/how much you can achieve on the main grinding wheel eh? Just a matter of gaining a bit of confidence & experience on them. I remember just how alien it felt when I first started; the tendancy is to think they are too large/brutal to produce anything fine and to spend far too long doodling around with the handpiece, trying to achieve tasks that could be done very quickly on a wheel. You're doing it! :D Tama |
|
K
kiwishaman
Posted
posted
on
Tue, Jul 17, 2007 3:55 AM
Birdman - thanks - inlays are still a foreign language to me :). The sandman will stay as he is, and the dragon, well, we will see - tho I dont think inlays would suit him. I do have some nice MOP and Paua here tho, so one day it may be an option. Paipo - it is an honour to receive praise from such a master as you. As I was working away at the dragon, I could see that if I were to go too much further - he may loose his tail. I think the tail is about done, except for some polishing, and some engraving. More detail to be added to the neck, abdomen and head. Tama - I like that - "doodling around with the handpiece" - exactly what I was doing! Mind you, I think I was impatient to get started with my new mini grinder :) . The new fella - sandman as I called him - is soft like a sandstone - scratchable with almost anything - not quite soft enough for my nail to scratch tho. I had fun with him, he was rather fast to do - 5-6 hours? I intend to give him to the woman who spent her holidays combing east cape beaches for stones for me :). And - btw Tama - it is also an honour to have positive feedback and praise from you. If only one day I could be as good as either you or Paipo (or Both! - I'm not fussy :) ). I guess if I went to Jade school for two years, I might have a chance? Looking forward to getting into some more carving soon. Watch this space. . . |
|
K
kiwishaman
Posted
posted
on
Sat, Jul 21, 2007 10:53 PM
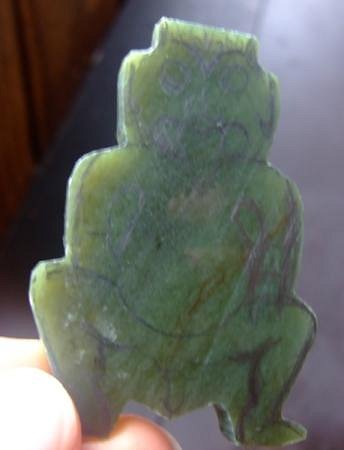
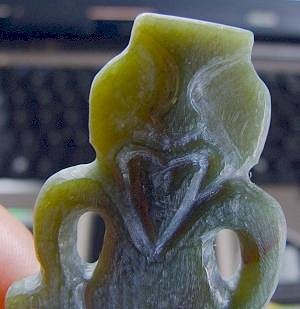
Got started on a new piece - my first tiki - from the NZ jade chunk I showed earlier in this topic, I bought myself a cold chisel and broke it up, then cut a couple of slabs - then started to remove excess jade with my new diamond grinding wheel - man that thing is fast! This is what I have so far:
Next I need to make a few holes to remove excess jade from the pendant - hopefully will get another chance at it before too much time elapses :) . Raining now, so it may be difficult as I work outside. Do you know what sort of pounamu it is Tama? (rather pretty!). KS [ Edited by: kiwishaman 2007-07-28 15:45 ] |
|
K
kiwishaman
Posted
posted
on
Sat, Jul 28, 2007 3:49 PM
bump :) |
|
T
Tamapoutini
Posted
posted
on
Sat, Jul 28, 2007 5:11 PM
Kia ora KS. - missed this last piece. A Tiki!! Yay! Im afraid it's a bit hard to tell what sort of jade you have there. Keep more piccies coming as there is progress & I might be able to tell you. It may be some months before your new wheel calms down a bit; good chance to grunt some really heavy forms out though.. Keep that wheel spinning! Tama :) |
|
K
kiwishaman
Posted
posted
on
Sun, Jul 29, 2007 10:39 PM
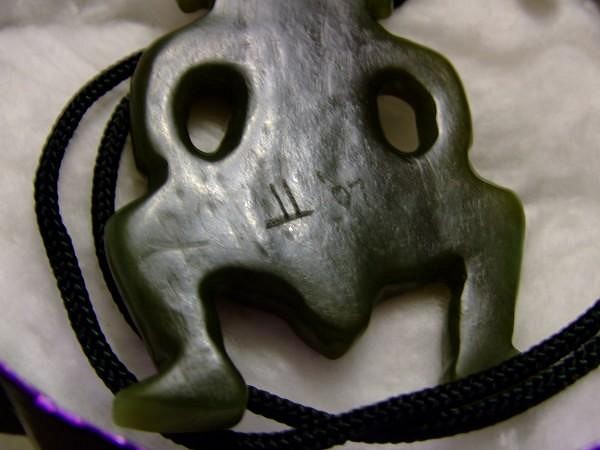
Aloha everyone. Thanks Tama for your feedback. I managed to get some more time at the bench today. Feeling reasonably happpy with progress :
His mouth seems a little lopsided . . . tomorro - some rounding I think, before I get into further detail. Some deeper cuts too, and further material to be removed. It is interesting how the form changes as you work it huh? Till next time KS |
|
K
kiwishaman
Posted
posted
on
Mon, Jul 30, 2007 9:41 PM
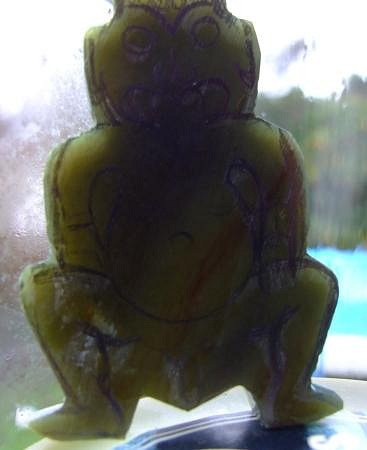
Some more time at the bench today.
Some rounding and smoothing.
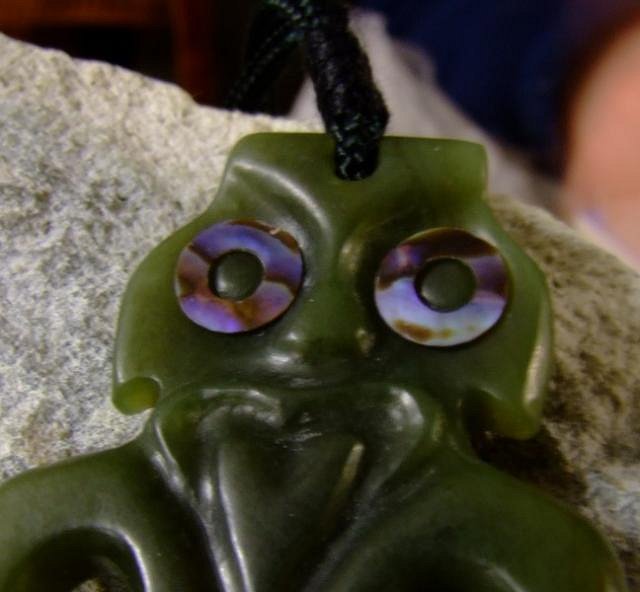
Trying to decide what to do with the eyes - I was going to make them almond shaped, but they seem to want to be round. And the ears - I dont think he wants any now. What do you think about his eyes? Big round google eyes, or slanty eyes :)
Still more smoothing and rounding to do, make the hands, and maybe the toes. I was going to decorate him with swirls and spirals, but I am liking him as he is.
Critique not only welcomed, but requested :) KS |
|
T
T_birdman
Posted
posted
on
Mon, Jul 30, 2007 9:57 PM
I like the sumo dude, he looks really well thought out and well done so far! Do you plan on doing any attempts at inlays, I know you said you were unfamiliar with it but try practicing on some other rocks till you feel confident enough to do it on him. I haven't tried any stone cutting of late, but watching Tama and Paipo, and all the other great cutters, I bought some core drills, a grinder, and some other tools to give it a go. I know I'll practice on some cheap rocks till I get the hang of it, but you've already got the jump, so dive in bro! Looking good! |
|
K
kiwishaman
Posted
posted
on
Wed, Aug 8, 2007 2:39 AM
Alright, I am now ready to drill the hole to support him from. do I just drill it through the middle of his forehead? Or try to drill through the top to the back - that clever wee trick you pro's do? If so - what is the secret, I would hate to stuff him up at this point. Will post a photo of him - once I have found him. He has gone missing, as soon as I said to him, lets take another picture of you. (he he he). Here wee tiki tiki tiki. . . . |
|
P
Paipo
Posted
posted
on
Wed, Aug 8, 2007 3:08 AM
No reason not to go through the front...you've got plenty of space there and a hole will reinforce the vertical line that runs through the nose and tongue. You can just countersink your hole (a must to avoid cord wear n tear) and / or run a groove from this hole to the top edge (following that line) if you want your cord to sit flush against the surface of the carving. |
|
T
Tamapoutini
Posted
posted
on
Wed, Aug 8, 2007 3:16 AM
Man, how do I keep missing your updates? Sorry brother, Id totally missed this. He's looking cool eh? Good pose and nice looking stone!! He's going to be a character for sure! Tama :) |
|
B
Benzart
Posted
posted
on
Wed, Aug 8, 2007 7:52 AM
WOW, KS, How did I miss This much of your Thread? I go away for a week and miss a Month? I see you are going Crazy and doing Very will with your tools. You don't seem to have much problem at all now with the Ripples and you are getting the finished look down pretty we.. I like the Stone man you did from the bag of stones given you. Popped that right out like it was soap or something. Your Dragon is also looking mighty fierce, careful you don't get him too thin, Very nice detail. Can't wait to see how this last guy turns out. keep on Truckin' |
|
K
kiwishaman
Posted
posted
on
Wed, Aug 8, 2007 3:08 PM
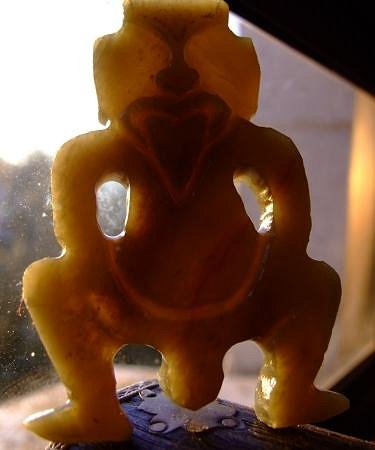
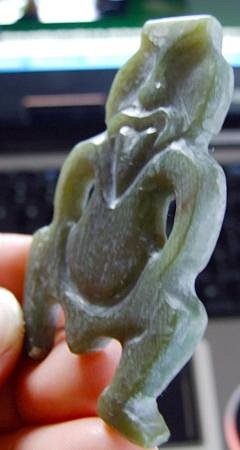
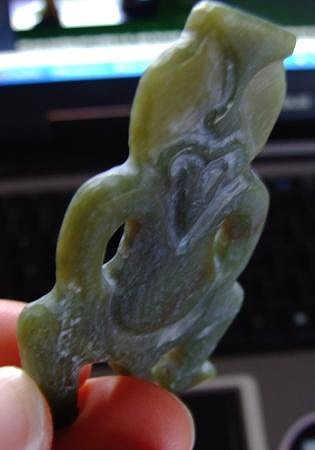
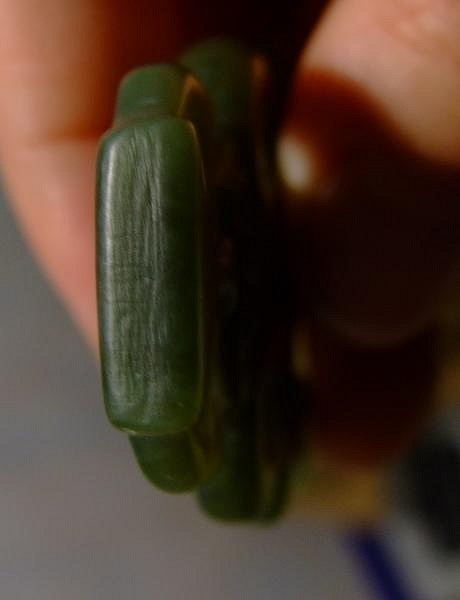
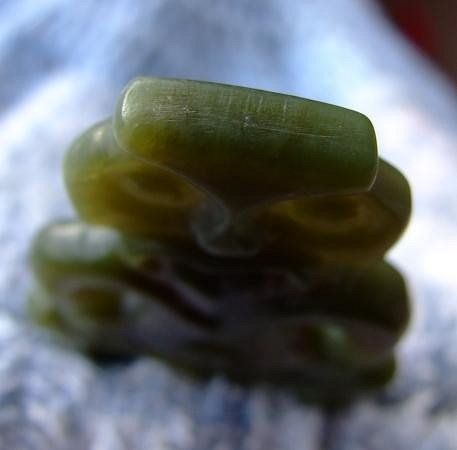
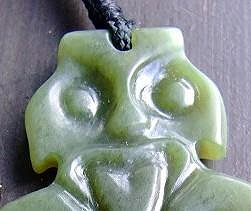
Progress shots (yes I found him at long last, he was hidding on the bed!)
As you can see, he does not have a lot of depth to the top of his head - design fault :)
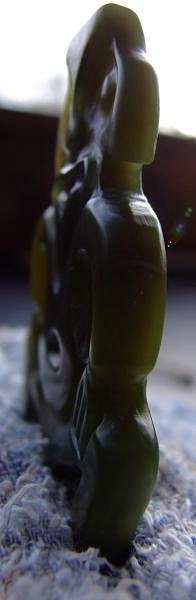
side view
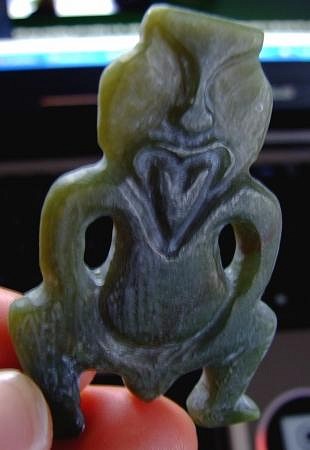
full frontal :)
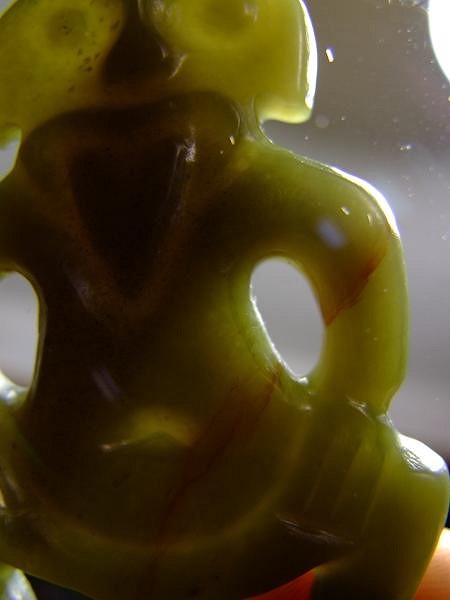
and a real close up of his colour
Thanks for your comments Paipo,Tama and Benz. I will just punch a hole through his forhead, and slope it back as you suggest Tama. And also, as you suggest Paipo, give him a wee groove up his forehead, extending the line. I can see there is yet more scritchy scratchy to do then . . . |
|
B
Benzart
Posted
posted
on
Wed, Aug 8, 2007 5:04 PM
He's Looking great KS, You got him smoothed down in a Hurry, would you show us the tools and burs you are using? I'm Always looking at tools trying to see what everyone uses, in fact I think I'm gonna open another "Tools carvers use" thread . Keep up the good work. |
|
K
kiwishaman
Posted
posted
on
Sat, Aug 11, 2007 7:34 PM
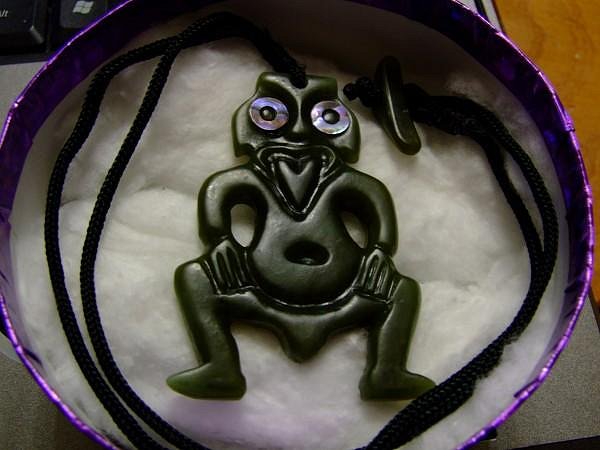
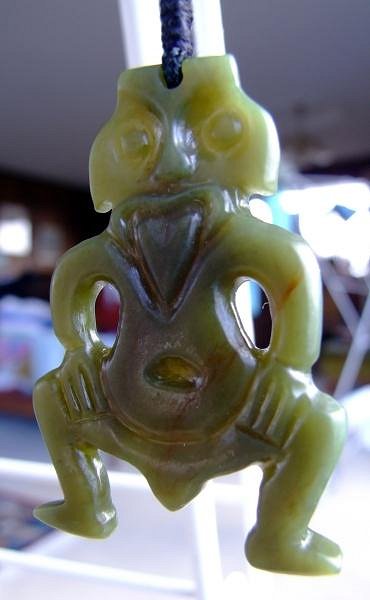
Hi Benz - I will take some pics of the tools I am using - but they are just as you have all reccommended to me. I look at what I want to do, then at the tools, and think - which tool will do this? I hold it up to the piece, and envisage what effect it will have on the piece, then use the tool I think will do what I want. Tama, thanks for your advise :) Finished - tho I am playing around with some paua I have here - if it works out okay, I MAY do some inlays (just for you Birdman :) )
Cheers, and thanks for looking KS |
|
QK

Queen Kamehameha
Posted
posted
on
Sat, Aug 11, 2007 9:11 PM
wow, very impressive and different Amy |
|
T
Tamapoutini
Posted
posted
on
Sun, Aug 12, 2007 1:10 AM
My advice is: keeping doing what you're doing! Your approach (above) is the smartest one - the tools are what do the carving; get to know them well. They have no 'right' or 'wrong' application (only 'safe' or 'unsafe', so do take care). Give yourself a pakipaki, you carved yourself a Hei-tiki in Pounamu!! - and a large and unique one at that. No mean feat brother! (thinks: oh no, another T.Me rival...) :wink: Rock on! Tama :) |
|
K
kiwishaman
Posted
posted
on
Sun, Aug 12, 2007 4:29 AM
Have no fear (yet :) ) - the ancients keep showing me what they want me to make, and who for. I am not allowed to sell any yet! In fact, it is going to be very hard to give this one away - hard to explain - a part of me goes with him. Still, a REAL gift is one you would keep yourself - no? Cheers Tama - your praise is high, You are the master, and have little to fear from this here wee apprentice :) . |
|
K
kiwishaman
Posted
posted
on
Mon, Aug 13, 2007 1:42 AM
with inlays or without Comments appreciated KS |
|
T
Tamapoutini
Posted
posted
on
Mon, Aug 13, 2007 3:44 AM
A definate "with"! T :) |
|
R

Robin
Posted
posted
on
Mon, Aug 13, 2007 6:31 AM
Definitely inlay. It looks fabulous! Really brings it to life. |
|
T
T_birdman
Posted
posted
on
Mon, Aug 13, 2007 8:02 AM
Told you! |
|
T
T_birdman
Posted
posted
on
Mon, Aug 13, 2007 8:02 AM
Told you! |
|
K
kiwishaman
Posted
posted
on
Mon, Aug 13, 2007 7:46 PM
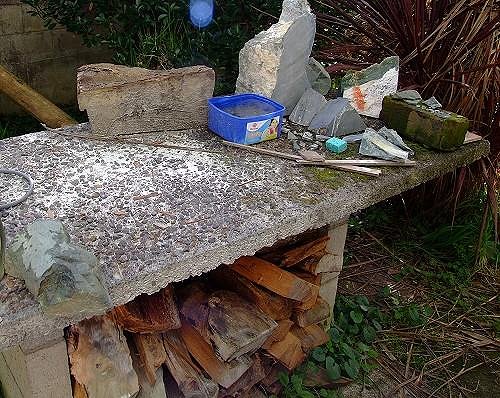
For you Benz, a post about the tools I use. I guess it starts here - on my bench
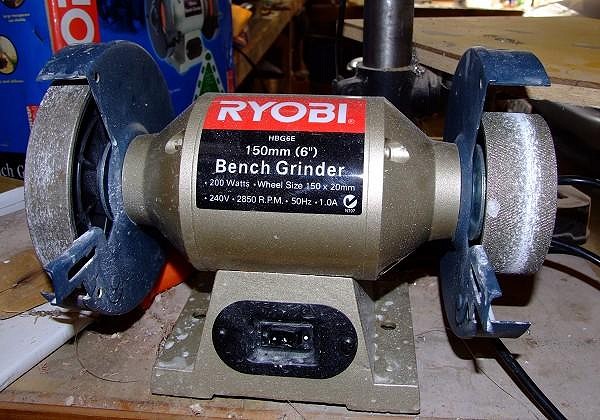
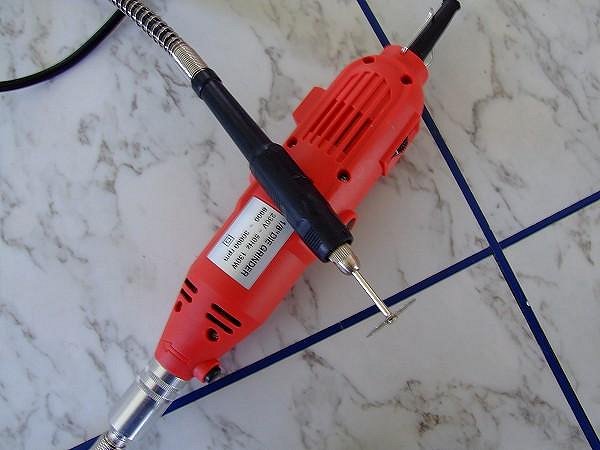
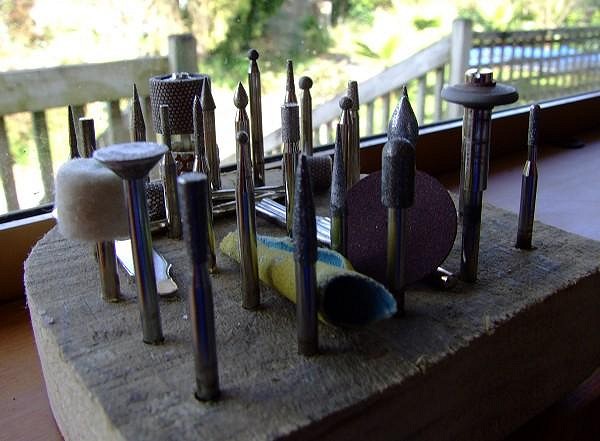
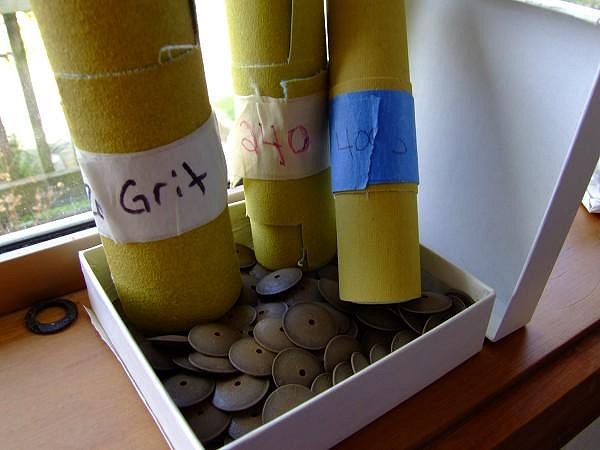
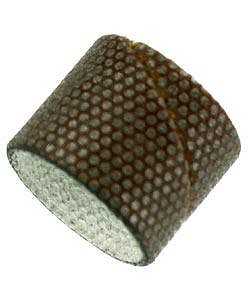
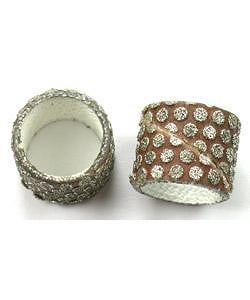
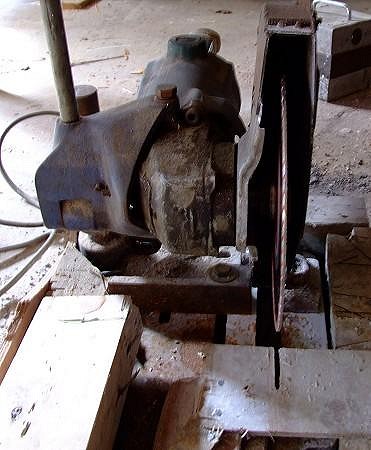
Then I drag this out next, out comes the bench grinder to rough out the piece then I get my wee die grinder with a selection of burrs to shape and define Then the sanding and polishing utensils Thats it really. Eyeing up the drill press in the garage now too - figure I could use some bigger burrs with that! Turn it on its side like Tama or Paipo (I dont remember who has that in his workshop?) :) Hope that answers some of your questions Benz :) KS |
|
K
kiwishaman
Posted
posted
on
Tue, Aug 14, 2007 2:12 AM
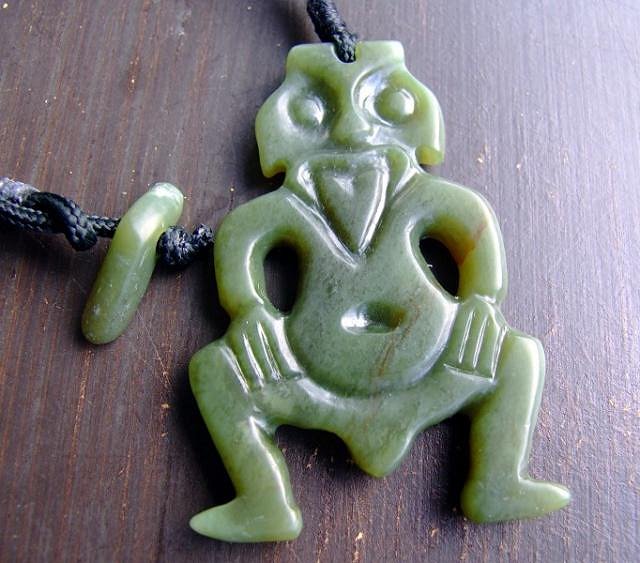
finished and signed - my sig is the ogham letter for oak - my totem tree since forever :)
and boxed up for his trip to Coolangatta, Gold Coast, Qld.
Thanks everyone for all your encouragement, and tips, especially Tama, without whom, this wee man would not exist. Am off Tomorrow to deliver him in person - so will be back upon my return. (2 1/2 weeks). Ciao KS |
|
T
Tamapoutini
Posted
posted
on
Tue, Aug 14, 2007 4:28 AM
Credit where credit is due - I never laid a finger on him. Thats entirely your own work brother. Looking good! Have a good trip - Let us know how the recipient enjoys his/your first! Tama :) |
|
R
Robin
Posted
posted
on
Tue, Aug 14, 2007 7:41 AM
He looks just great! Can't believe you pulled off an inlay to boot...on your first piece! It will be interesting to see what #2's gonna be. Have a safe trip to his new home. |
|
TD

Tiki Duddy
Posted
posted
on
Tue, Aug 14, 2007 8:29 AM
whoaa! that is your FIRST piece? very impressive. hope to see more soon |
|
Y

YankeeAirPirate
Posted
posted
on
Tue, Aug 14, 2007 8:50 AM
Wow. I'm always impressed by the work I see in this forum. |
|
B
Benzart
Posted
posted
on
Tue, Aug 14, 2007 9:55 AM
Excellent work KS and Thanks for the tool tour. It took me awhile to get past your "Bench" page, looking at all that green looking stuff laying there. You have all the right stuff and it's Tama with the sideways Drill Press. I Can't wait to see how # 2 is gonna turn out as the #1 is really Excellent. Have a safe trip. |
|
K
kiwishaman
Posted
posted
on
Tue, Aug 14, 2007 11:36 PM
Thanks Tama, Robin, Tiki Duddy, and Benz for all your kind comments. I am off in 30 mins - without my die grinder. Dont think I wont be looking for interesting stones - already have an appt lined up to look at some :) Kia ora, catch you all when I get back. KS |
|
P
Paipo
Posted
posted
on
Wed, Aug 15, 2007 4:39 AM
Bon Voyage - I forgot to add my vote for "with eyes", so I'm glad he got his paua peepers anyway. Great first piece and a nice satiny finish too! |
|
K
kiwishaman
Posted
posted
on
Sat, Aug 25, 2007 1:13 AM
A short update. The delivery went well, and the recipient was VERY happy with the gift. (whew). Pity about the weather . . . came home to enjoy some sunshine. Glad to be home, and looking forward to some time at the wheel (babysitting duties this weekend). Its funny how you miss it huh? (I mean the wheel!) :) KS |
|
K
kiwishaman
Posted
posted
on
Mon, Sep 3, 2007 4:24 PM
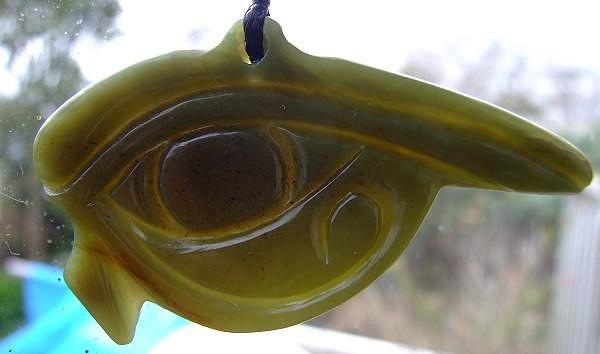
Not quite tiki - but my latest piece - a gift for an aunt who lives in Egypt:
The toggle is a pyramid. Thanks for looking. KS |
|
B
Benzart
Posted
posted
on
Mon, Sep 3, 2007 4:57 PM
WOW KS, those are some pretty Bold cuts for a beginner..(Somehow I just don't see you as a beginner?) I'll bet your Aunt will Really be Stoked to get this piece, I would. Most Excellent work sir! |
|
R
Robin
Posted
posted
on
Wed, Sep 5, 2007 5:32 PM
Hi KS...sorry I didn't post sooner, I looked the other day in a hurry, and then forgot! This is an image I've always liked. You did a great job on this Egyptian Eye. I'm sure your aunt is gonna love it. Rock on! R. |


 and cut myself a slab or two.