Tiki Central / Tiki Carving
My first pieces . . . and pekapeka updates
|
B

Benzart
Posted
posted
on
Thu, Aug 28, 2008 5:05 AM
Hey hey hey, Looks like you have hit the Jack Pot there except for that funny thing on the end of the wire? Are sure you didn't get ripped off? :P Nice tool. You're in trouble now. |
|
K

kroozzn62
Posted
posted
on
Thu, Aug 28, 2008 5:24 AM
great progression cant wait to see whats next |
|
K

kiwishaman
Posted
posted
on
Sun, Aug 31, 2008 10:13 PM
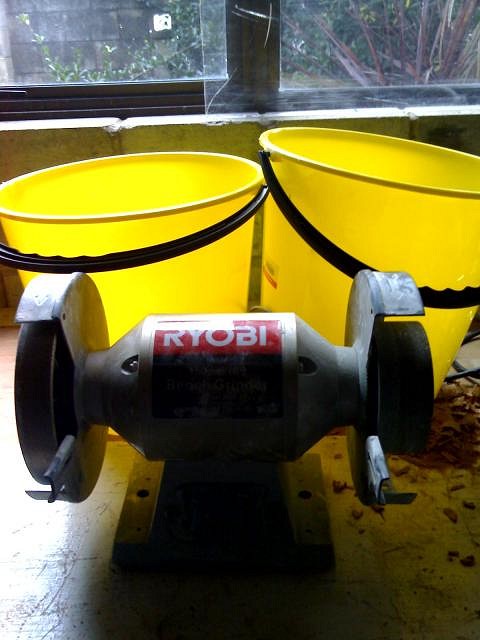
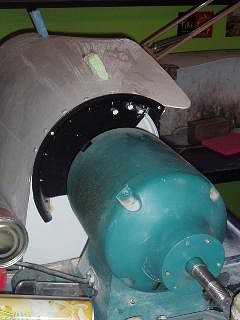
ok - I have some questions for those amounst us who are knowledgable about such things I am setting up an inside wet bench :lol: I have the grinder . .
and I have the buckets . . .
but as you can see - I am now kinda lost . . .
stumped even. (did someone mention stumps???) :lol: any pointers gladly accepted! Thanks for stopping by. . . KS PS - an update on the 21st key for you Benz
:D |
|
B
Benzart
Posted
posted
on
Mon, Sep 1, 2008 2:31 AM
Thanks for the update, looks like the sicknes is taking you over completely, not long now before you'll be looking for excuses to avoid all manner of household duties to enable more carving time. Pretty sure you will have everyone in the house assisting your every chip removal and tool purchase! :P |
|
K
kiwishaman
Posted
posted
on
Tue, Sep 2, 2008 2:47 AM
No suggestions? Hmm - I am after affixing those buckets somehow to the grinder, so I can set it up in an inside wet area. Any suggestions muchly appreciated. KS |
|
P

Paipo
Posted
posted
on
Tue, Sep 2, 2008 2:54 AM
Are the guards on your grinder screwed on or permanently attached? I did have pics somewhere of a semi-pro bucket job, but no luck...will have a dig through the backup folders.... |
|
K
kiwishaman
Posted
posted
on
Tue, Sep 2, 2008 3:01 AM
TY Paipo it is a ryobi, and the guards are held in on the motor side of the wheel, by afixing the wheel - I think - any way to remove them i have to remove the wheel I have removed some part of them - thats right - the outside bit, only the inside bit is still attached - the diamond wheels were too fat for the outer guards. I was thinking of bolting them on, with the head of the bolt on the inside of the guard, but to get my fat wee fingers in there, with the wheels on, may be difficult, also getting the wheel back on with the buckets on could be difficult. very happy to try and make a bracket to affix it, if you have ideas on how. KS |
|
T

Toataiaha
Posted
posted
on
Tue, Sep 2, 2008 3:08 AM
Try taking the inner metal guards off KS , and use the mounting holes to attach the buckets . |
|
P
Paipo
Posted
posted
on
Tue, Sep 2, 2008 3:15 AM
You can use the guards that come with the grinder, but you need to cut them down so you have access to more of the front and underside of the wheel. You really only need the top and back covered to direct the water into your sink/s.
[ Edited by: Paipo 2008-09-02 03:19 ] |
|
K
kiwishaman
Posted
posted
on
Tue, Sep 2, 2008 3:18 AM
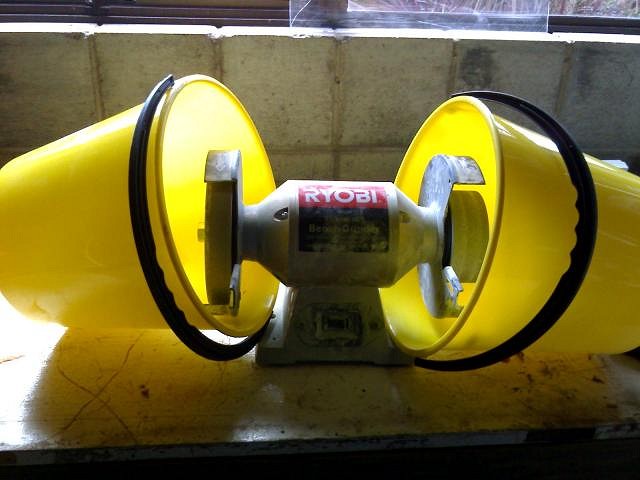
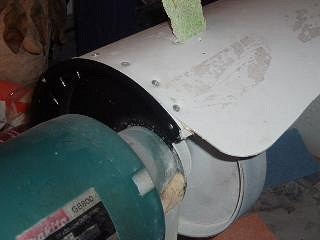
just a shot front and back of the guards and how they attach front back ty KS |
|
K
kiwishaman
Posted
posted
on
Tue, Sep 2, 2008 3:24 AM
wow - what a cool double sink bench!!!!!!! excellent - so I remove my guards, and use the bucket instead, and cut it away to suit. Thankyou thankyou thankyou Paipo Now just to sus the getting water to the tools thing - and I know that requires a large bottle with grauating smaller tubes to the place where you want the water, and a bigger bottle underneath the sink lol. In the case of the grinder - a sponge works a treat - but the dremel is a bit trickier . . Hoping to get the sink unit at the end of this week - to install next week - to quote Benz "happy happy happy" KS |
|
T

Tamapoutini
Posted
posted
on
Tue, Sep 9, 2008 4:29 AM
Sorry for the delay Merran - I took these pics several days ago but have only just found time to post them! On 2008-09-02 03:15, Paipo wrote:
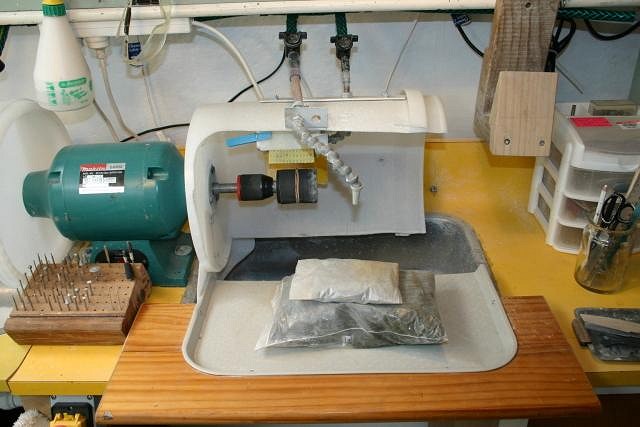
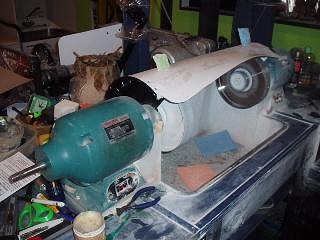
Heres a few shots of my water shield illustrating the method Paipo describes above. The first shows approximately how much needs cutting off the original spark-guard in order to minimise waterspray but also allow vision. As well as reshaping Ive also flipped mine backwards to flare away from the wheel (instead of enclosing it in two halves as they originally come) to allow that little extra room to work with when attaching the new plastic shield:
This shot shows how the flipped and chopped guard is now used to secure the plastic shield which reaches between two grinding machines and over the entire sink: I lined two identical machines up either side of the sink and attached the sheild the same way to each machine: Hope this helps. -- quoting myself:
I found the things I was talking about. A bit larger than I remember & most likely too big for your 21st key project, but I can see a smaller set of these being great fun for sculptural work. I did experiment with using these for limestone carving a few years ago, held in an ordinary electric drill. The shape of the drill and sideways rotation didnt really do it for me but if a grunty enough handpiece could be found.. Keep up the good work! |
|
K
kiwishaman
Posted
posted
on
Thu, Sep 11, 2008 7:22 PM
Now there's an idea - two machines!!!! hmmmm what could I use the other end for? At the mo, I have but one machine, and will need to move it out of the way to use the dremel in my sink. will post shots soon - almost got the sink sorted - came up against a lack of man strength to use a silicon gun today - personally - I think it is a faulty tool, either that, or I used to be much stronger than I am!!! All set to go but for siliconing the thing in, and letting it set and dry, and putting the water supply and catchment buckets in place, then my workspace will at last be ready! And the real bonus? Having my own space means I can walk away and return and pick something up again, rather than have to set everything up from scratch each and every day. been working on workspace setup, and my regular job, (oh - and sailing - saw Orcathe other day), so havent been doing much carving - a bit more on the 21st key, need to get that done, and a couple of other wee things need finishing. Will post pics when there is something to show! Thanks Tama, and Paipo, for your feedback re guards - went with a system like the one Paipo showed. Excellent shots btw - would love to have seen more of the water supply! Cheers Brothers KS |
|
B
Benzart
Posted
posted
on
Fri, Sep 12, 2008 3:42 AM
Congrats on the Orca sighting experience, the world comes to a stop for a moment hey? |
|
R

Robin
Posted
posted
on
Fri, Sep 19, 2008 9:48 AM
Wow KS...very impressive. I love the way you jump right in and go for it....this work is great! I'm pretty jealous. |
|
K
kiwishaman
Posted
posted
on
Fri, Oct 3, 2008 4:55 AM
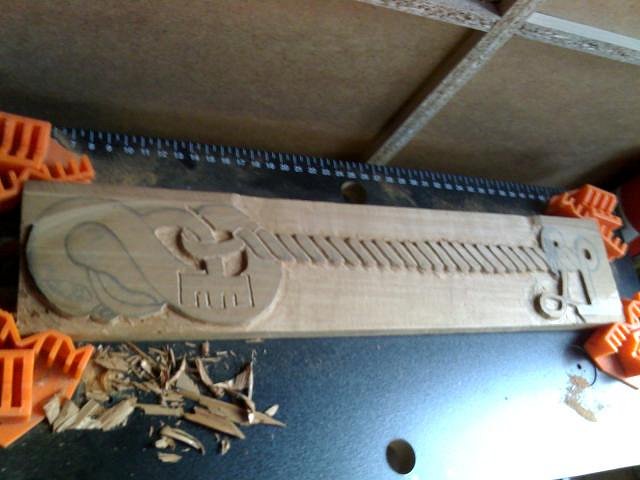
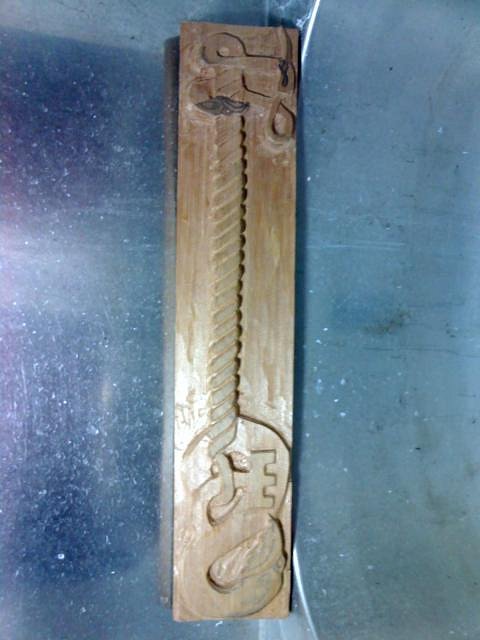
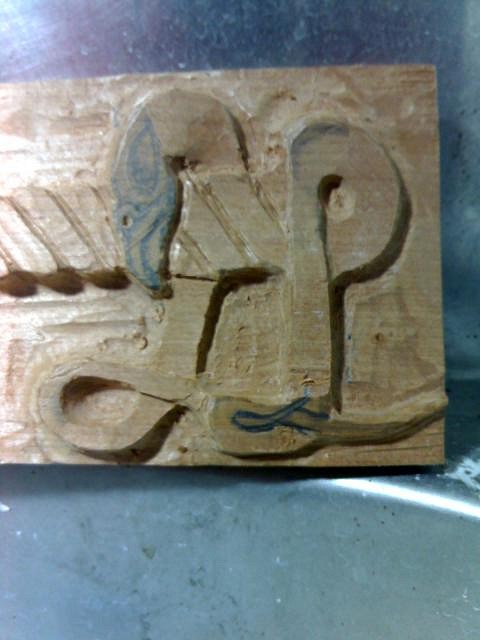
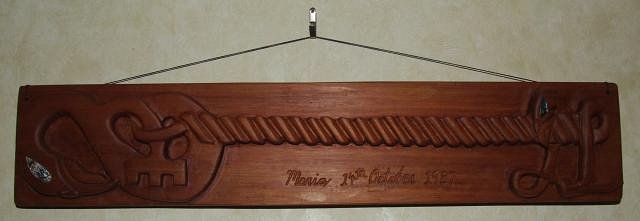
Hi all an update from my bench Manaia key
the head end
and the tail end
still a long way to go - but starting to get there with the 3D!! thanks for looking KS |
|
B
Benzart
Posted
posted
on
Fri, Oct 3, 2008 5:32 AM
Well this is definitely looking better! It has come a Long Way from Here: |
|
K
kiwishaman
Posted
posted
on
Mon, Oct 6, 2008 4:14 AM
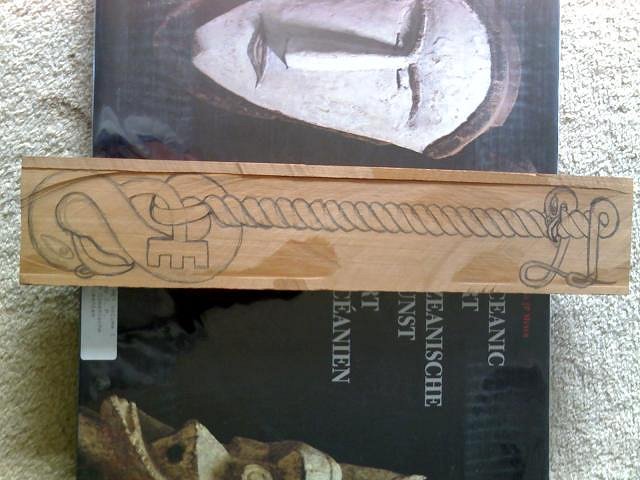
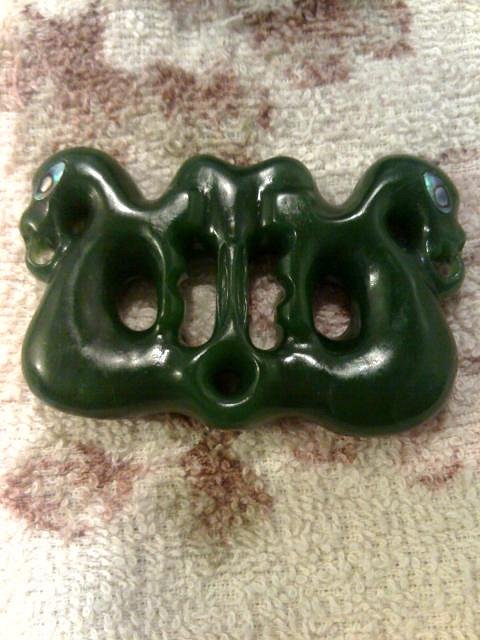
Peka peka nearly complete - just the lashing to do . . . drop off tomorrow morning
thanks for looking KS |
|
S

surfintiki
Posted
posted
on
Tue, Oct 7, 2008 1:44 PM
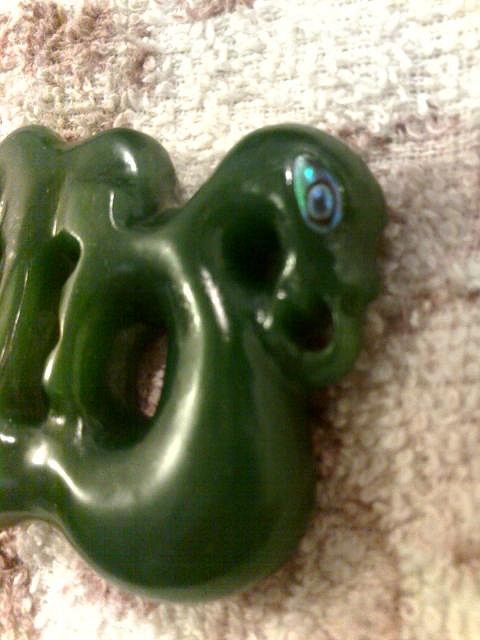
OOooooohh! Very nice. I'd love to see how you're cutting the abalone shell, and glueing I presume. What kinda glue? |
|
T
Toataiaha
Posted
posted
on
Tue, Oct 7, 2008 5:11 PM
What kinda glue? chewing gum :D sorry , couldn't resist that one ......:lol: In the heart of my soul . I would that I had been born in Celtic lands [ Edited by: Toataiaha 2008-10-07 17:11 ] [ Edited by: Toataiaha 2008-10-07 23:39 ] |
|
K
kiwishaman
Posted
posted
on
Wed, Oct 8, 2008 3:02 AM
Well, just using a cut off wheel to get the rough shape, then shaping with the bench grinder, then finer shaping with the dremel tool with small sanding drums. Simple really Chewing gum would work tho - so long as you chewed it until it was soft and gooey, then placed it ever so carefully into the space, pressed the shell into it, then left it till it was hard. . . I wonder if it would soften again at body temperature? Any takers? :) I do believe they used to use wax. Where they got that from I truely do not know - the native bees of NZ dont really have hives?? Any one know about that one? Cheers Surfin and Jock, and you too Ben :) (been doing some sanding today :) ) TFL KS |
|
K
kiwishaman
Posted
posted
on
Wed, Oct 8, 2008 3:13 AM
edited - double post - sorry guys :) "Open your heart to me slightly, and I will show you the World" The Zohar [ Edited by: kiwishaman 2008-10-08 03:17 ] |
|
T
Toataiaha
Posted
posted
on
Wed, Oct 8, 2008 3:13 AM
Wax , KS ? do you mean for the eyes ? In the heart of my soul . I would that I had been born in Celtic lands [ Edited by: Toataiaha 2008-10-08 03:16 ] |
|
K
kiwishaman
Posted
posted
on
Wed, Oct 8, 2008 3:19 AM
|
|
T
Toataiaha
Posted
posted
on
Wed, Oct 8, 2008 4:54 AM
The red wax eyes in tiki with are from the 19th cent , the wax that is , some of the tiki may be older . Paua inserts had a hole in them and they jamfitted over the pupil stub , maybe backed up with some gum . Where I say 'was' and 'had' , you can read 'do' and 'have' , 'cos they still get done that way . Were red eyes and paua eyes combined on the same tiki ? I don't know . All of the above is me going on my memory of what I have been let in on , verification won't go astray , |
|
K
kiwishaman
Posted
posted
on
Thu, Oct 16, 2008 9:06 PM
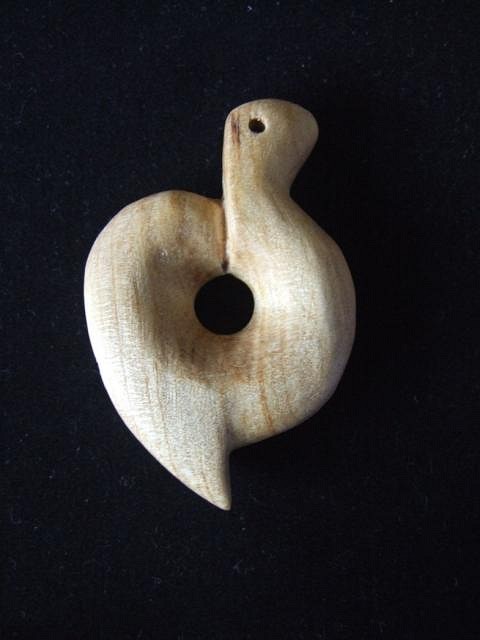
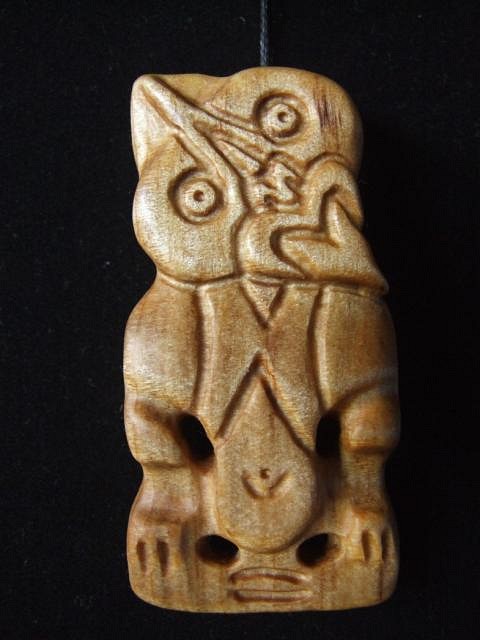
Happy Happy Happy :) Went on an epic road trip on the weekend, and came back with some ? NZ Kauri?? So, got it home, cut one piece into two poles, and a slab, then cut some blanks from the slab. Made a Hei Matau, and a Hei Tiki - to see if it really is Kauri - what do you think? The matau has been finished with Danish Oil, and the Tiki with Linseed oil. . . Hei Matau
Hei Tiki
Thanks for looking!! KS |
|
T
Toataiaha
Posted
posted
on
Thu, Oct 16, 2008 11:05 PM
KS , Thats a fine bit of wood too If I may suggest a change of oil next time . n/n |
|
K
kiwishaman
Posted
posted
on
Fri, Oct 24, 2008 1:49 AM
Ok, mania done and ready to go. . .
thanks for looking!! :) KS ps - I see the lighting is really not that great - will try and get a better picture in better light - after the weekend lol. KS |
|
B
Benzart
Posted
posted
on
Fri, Oct 24, 2008 4:54 PM
Really nice job KS, I know you worked on this one a long time. Was this your first wood carving when you started it? |
|
K
kiwishaman
Posted
posted
on
Mon, Oct 27, 2008 11:40 AM
Thanks Benz for the comps. :) KS |