Tiki Central / Tiki Carving
MauiTiki's Attempt to carve a Tiki
|
M

MauiTiki
Posted
posted
on
Thu, Jul 12, 2007 10:29 AM
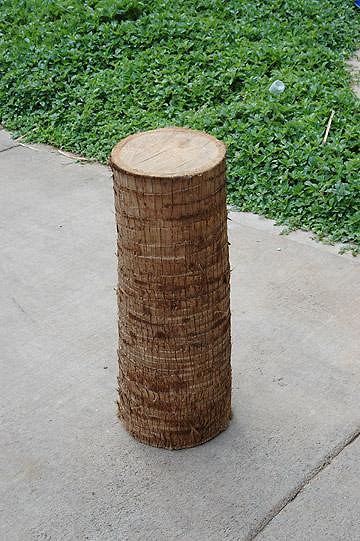
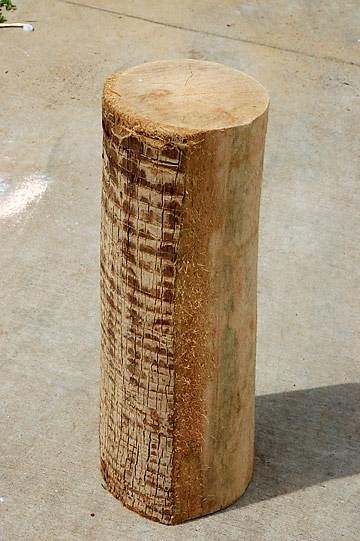
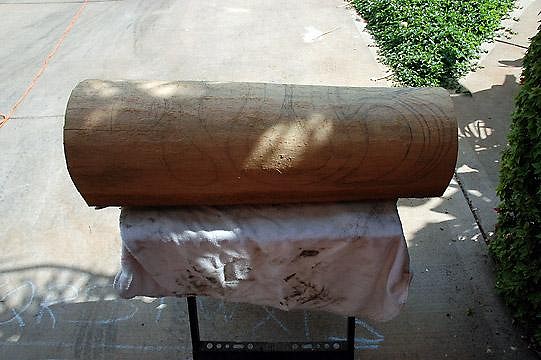
Well, Bay Park Buzzy has gotten me all inspired to carve a Tiki. I don't have a stash of Palm Logs laying around, so I've been keeping any eye out to see if I could find a downed Palm tree somewhere. I don't have a chain saw so I'm not sure what good it would do me to find one. The Tiki Gods must have been watching over me because on my latest trip to dispose of my yard waste (I have a Big Yard) at the "Green Waste" dump, there it was. A perfectly cut 3 foot section from a Mexican Fan Palm sitting at the bottom of the pile. I unloaded my load and when the attendant wasn't looking I threw it in the back of my truck. I got home and read through another 20 pages of Buzzy's tips and tricks before I took a blade (box cutter) to the harry, messy thorny, log.
I made a huge pile of trash from the trimmings, got pretty scratched up, but I'm pretty happy with the results.
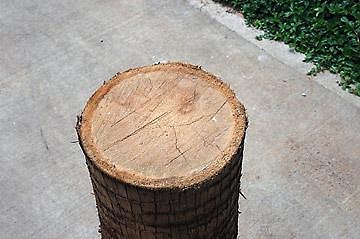
There are some cracks in my log, hopefully they won't cause a problem down the road. Hmmmm.... What next? I guess I better get some Chisels. What I learned? 1. Go to the green waste dump after you've skinned the trunk. |
|
M
MauiTiki
Posted
posted
on
Thu, Jul 12, 2007 10:32 AM
OK, So I've ordered a brand new set of Chisels. "Buy it now" on eBay for $16, not bad. Neither of Maui's 2 hardware stores carry carving chisels. Seems kind of cheap, but hey I'm not getting into the tiki carving profession and I may never find another log. Hopefully the will do the job. MauiTiki [ Edited by: MauiTiki 2007-07-14 11:41 ] |
|
T

tikifreak1
Posted
posted
on
Thu, Jul 12, 2007 11:27 AM
Good luck! I'm on my first one too. It's a blast! Craig |
|
T

tikiwinebear
Posted
posted
on
Thu, Jul 12, 2007 11:37 AM
Go to it, Rob! Take lots of pictures for us. When we were on Maui last November, they took down 2 palms at the condo complex we were staying. They made 20-25 perfect 2-3 foot segments so they could haul the trunks out easily. I was so wanting to find some carving tools and just have some fun at a tiki with those pieces they were hauling off. One day I will find a section up in this area and try to carve something too. Good Luck!! |
|
H

Hiphipahula
Posted
posted
on
Thu, Jul 12, 2007 11:58 AM
Good luck Rob, looking forward to seeing how ya come along in your ventures show us pics! :) |
|
M
MauiTiki
Posted
posted
on
Fri, Jul 13, 2007 9:42 AM
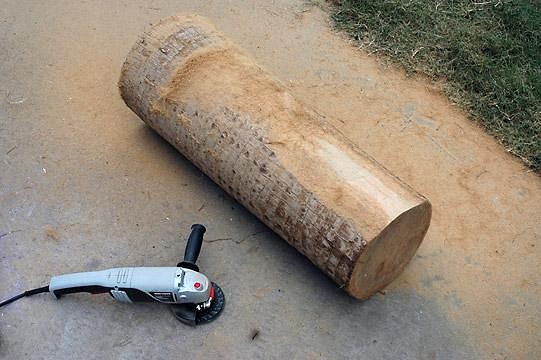
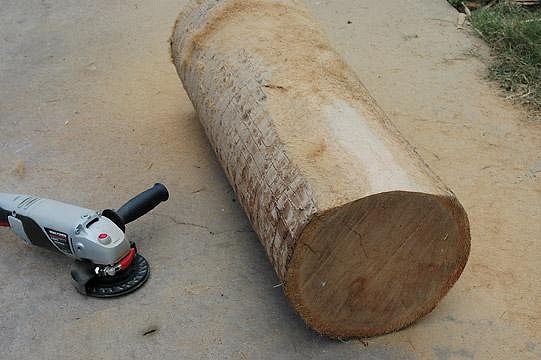
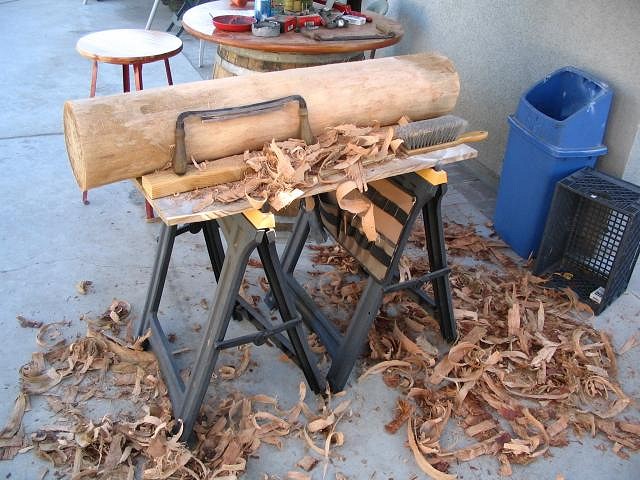
Bay Park Buzzy uses a planer to "skin" his logs. I checked the hardware store and the things cost well over $100, so I thought I'd try some 65 grit sand paper in my angle grinder.
It works great and fast. Good think I picked up a dust mask and some safety goggles. They are definitely needed for this stage of the carving.
I have sanded off the outer layer of soft bark down to where the wood is firmer. About an inch. I think I'll leave the backside with the bark on, as I don't plan on carving all the way around.
I think I am ready to come up with the design! |
|
T

T_birdman
Posted
posted
on
Fri, Jul 13, 2007 10:22 AM
I don't know if you have a Harbor Freight Tools there, but they have a cheap planer for about $40., or if you like more physical removal, check Ebay for a Draw knife. I picked one up for $23.00 shipping included, about a 25-30 year old tool that slices through palm like butter! Saw the same style draw knife at Rockler for $75. but the old ones have more character. The Birdman |
|
M
MauiTiki
Posted
posted
on
Sat, Jul 14, 2007 11:11 AM
Birdman, Thanks for the tip! I don't know if I'll do many more, so the little extra time it takes with the grinder is fine for me. Everything seems to cost a little more over here, sometimes ebay is the best solution. |
|
M
MauiTiki
Posted
posted
on
Sat, Jul 14, 2007 11:26 AM
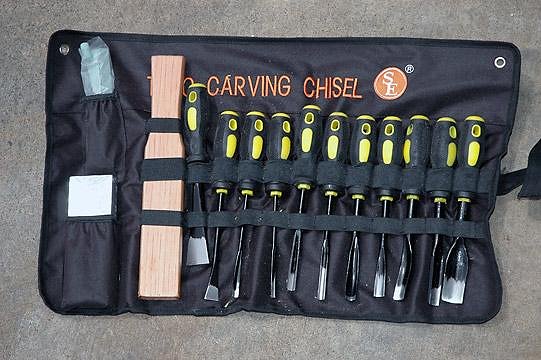
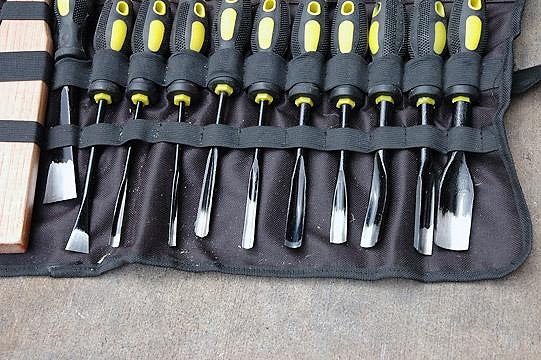
WhoooHooo, My $16 chisel set has arrived!
Looks like I'll have a good variety of shapes and sizes to choose from.
I have been scanning through Tiki Magazine and have been getting ideas for my design. I have sketched in pencil a simple design to get me started...
More photos coming soon, wish me luck! |
|
B

benella
Posted
posted
on
Sat, Jul 14, 2007 11:56 AM
A super design you're going to carve, so good luck :) Benjamin. |
|
B

Benzart
Posted
posted
on
Sat, Jul 14, 2007 4:54 PM
Good luck Maui, If it comes out half as good as the drawing it will really be great. Now get to work with those new chisels. Let us know how sharp they stay. |
|
M
MauiTiki
Posted
posted
on
Sun, Jul 15, 2007 11:36 AM
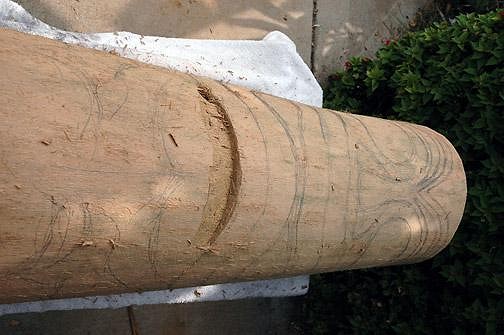
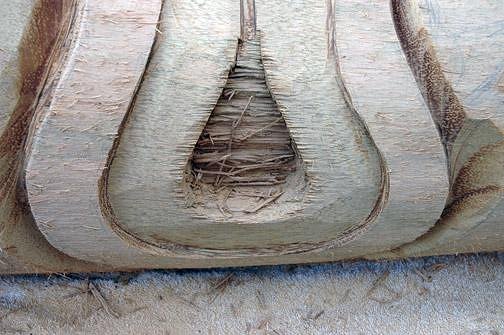
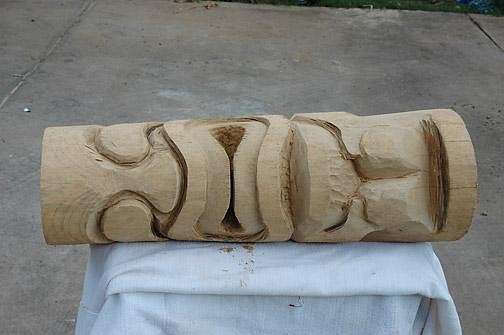
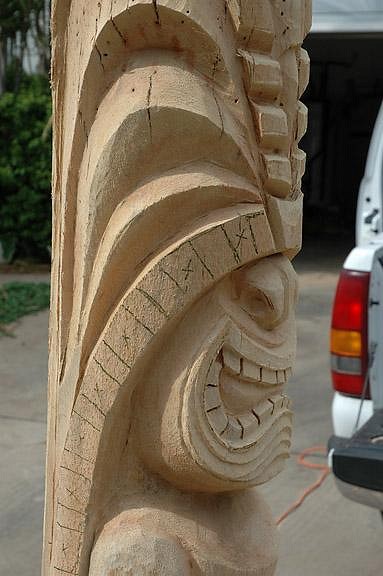
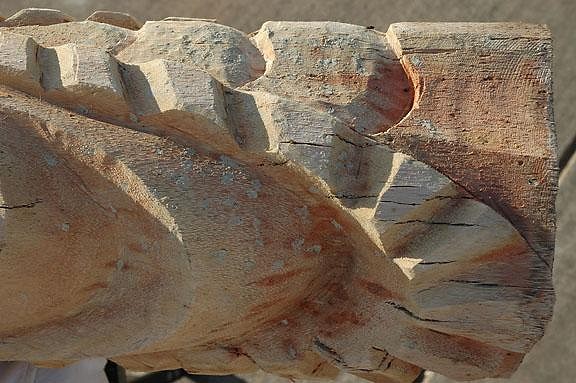
Carving Palm wood with Chisels was not really what I expected. I've watched the Tiki carvers around Maui carving our neat little slices (out of hard wood) with their chisels. When I try to carve, the wood splinters. I've had to start each carve by putting an end made with a flat Chisel so that my carve will stop where I want it to. I'm starting on an area where I know I'll go deep, So I can't really mess it up.
After playing around with several of the chisels (different sizes and shapes) I thought that my grinder worked so well at cleaning up the log, why not use it to get some of the shape started?
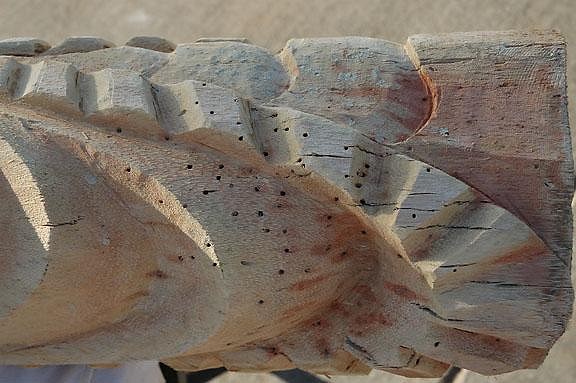
The grinder sure is faster. It seems to be burning along the edge. I need a new piece of sandpaper. I'll need to use the chisels for the deeper, smaller places. You can see how the wood is splintering in this photo. Do I need to dry the wood more? It appears it gets harder the deeper I go.
I'm learning... |
|
T

tikidreams
Posted
posted
on
Sun, Jul 15, 2007 12:14 PM
Putting an end cut with a straight chisel is the method I´ve been using aswell, It´s the way to go. |
|
M
MauiTiki
Posted
posted
on
Tue, Jul 17, 2007 9:57 AM
My chisels are brand new, wouldn't they be sharp? The seem really thick, are true professional chiseld thinner? They came with sharpening stones. I've sharpened one of them after I droped it. Seemed to work quite well. |
|
M
MauiTiki
Posted
posted
on
Tue, Jul 17, 2007 10:08 AM
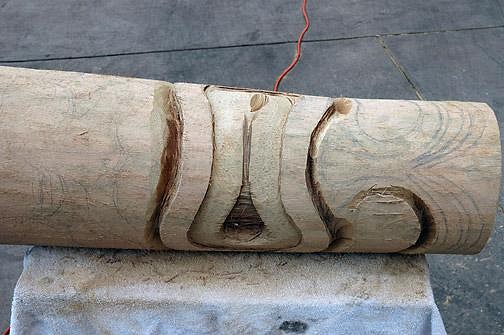
So there I was carving and grinding away when the neighbor lady stopped by to see what I was doing. Before I knew it she was back with her chainsaw. The thing hadn't run in a few years and she said it may be dull. I thought it would be perfect for getting the line between the teeth cut deep. I could use it to make a couple cuts down where the legs will be too. After getting it started, I found that it was very dull. I thought this palm wood would cut easily with a chain saw. It took some time to get the 3 cuts how I wanted them and the saw spit oil all over the tiki.
I was able to spend more time grinding and chiseling. I think I'm getting the hang of it. Using the chisels more and more as I get deeper into the design.
Any tips from you pros? |
|
G

gordon58
Posted
posted
on
Tue, Jul 17, 2007 12:41 PM
Not a pro. Not a carver at all. But I do think you are getting the hang of it and it looks great!!!!! |
|
O

ootwoods
Posted
posted
on
Tue, Jul 17, 2007 1:20 PM
Unless you bought extremely high end chisels, they probably need to be sharpened "properly" before they will perform well. Most things bought "for cheap" as it were, come with a finish that means some guy waved them across a high-speed grinding wheel to put a basic bevel on them. That usually leaves a somewhat jagged (at the very small level) edge, which will not slice as cleanly as a finished edge. you want to use a fairly fine whet stone or diamond hone to refine the edge (follow the bevel that is already there, until you get an extremely fine, bright, even edge) and then a strop or something to remove the wire edge that forms on the opposite side (which you can usually feel with the tip of your fingernail). After that, they should cut really nicely. Occasionally, touch them up with an ultrafine stone or a strop (you can find nice power-strops out there.. basically a revolving soft leather wheel that you put rouge on) to keep them at top sharpness. I learned that valuable lesson with wood-turning tools. They come "edged" but certainly not "sharp". Even my Marples Blue-Chip Chisels required a finish honing when I got them home. |
|
SD

Savage Daddy
Posted
posted
on
Tue, Jul 17, 2007 1:53 PM
It looks to me like you're doing great for your first tiki. Just keep going. I'm looking forward to seeing this one finished.. |
|
M
MauiTiki
Posted
posted
on
Wed, Jul 18, 2007 10:23 AM
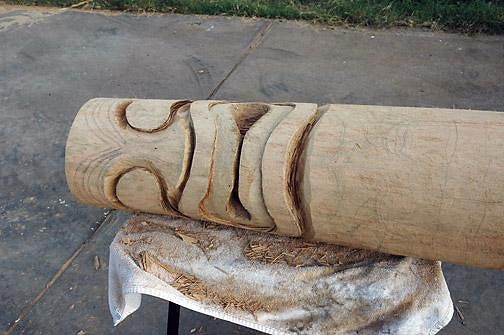
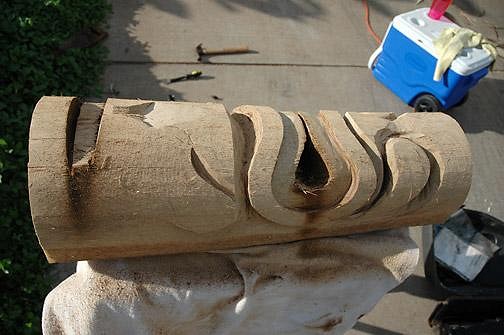
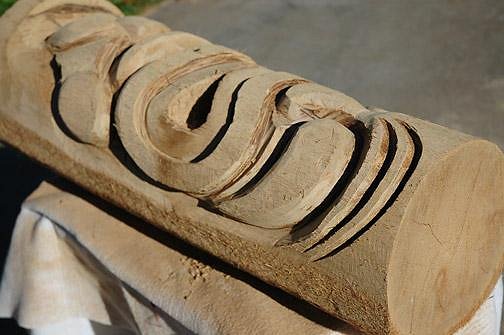
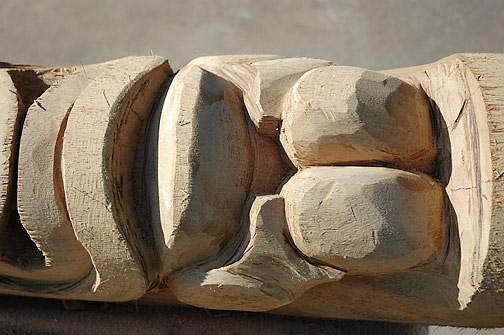
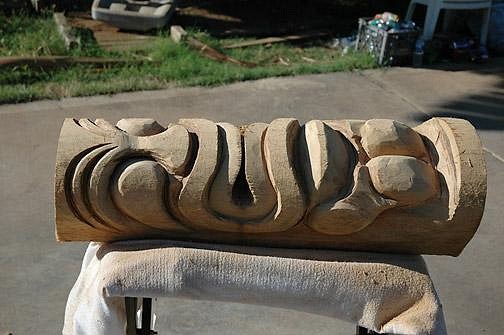
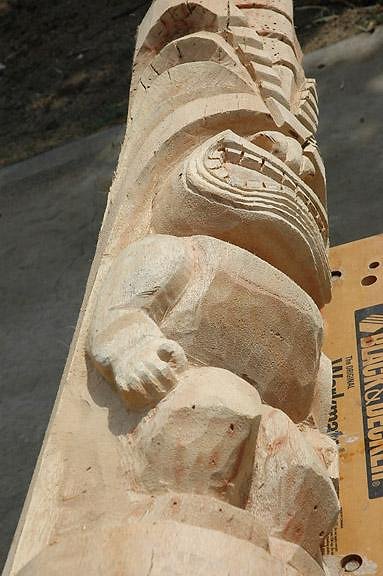
Using the grinder more to get the carves deeper, but still chiseling the smaller areas. I think I'm going to keep the back just the bark. I didn't plan far enough ahead to carve it full 360 degrees.
Working on the hands and legs...
I've got to get his nose some detail and get his feet started. More photos coming soon! |
|
B
Benzart
Posted
posted
on
Fri, Jul 20, 2007 5:06 AM
Lookin Good MT, I LOVE how you (Properly) have the hands on the thighs. That looks so good. The rest is following along too. |
|
T
tikifreak1
Posted
posted
on
Fri, Jul 20, 2007 5:12 AM
WOW, that looks awesome!!! Looking good man! |
|
M
MauiTiki
Posted
posted
on
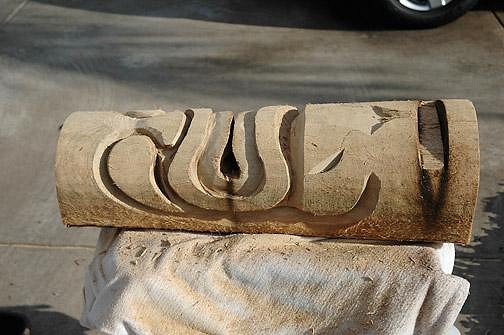
Fri, Jul 20, 2007 11:46 AM
Thanks! I've gotten a little further along. I'll have more photos for you this weekend. |
|
M
MauiTiki
Posted
posted
on
Thu, Jan 10, 2008 11:31 AM
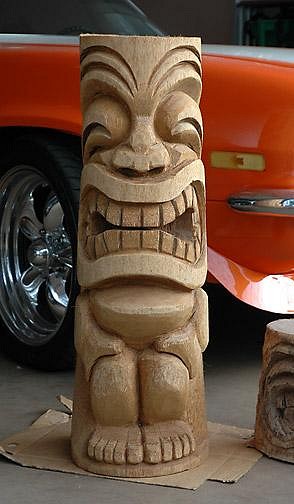
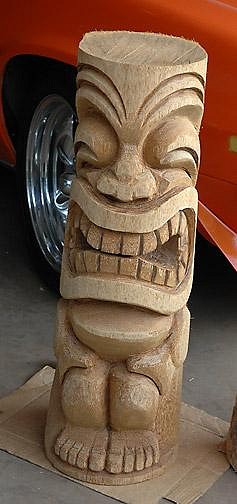
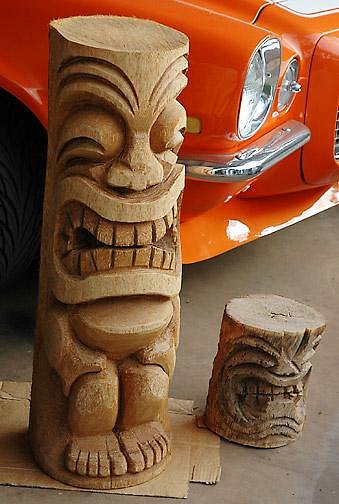
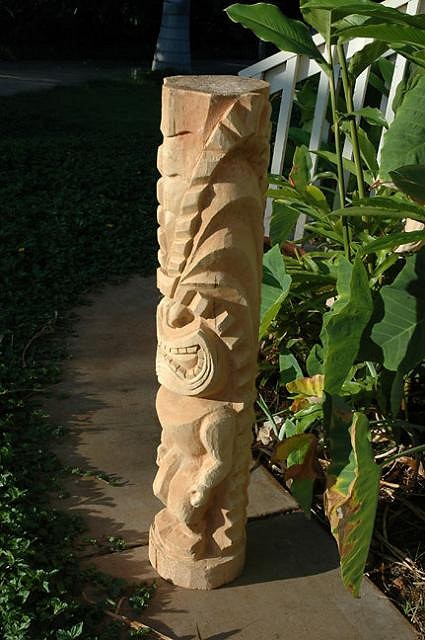
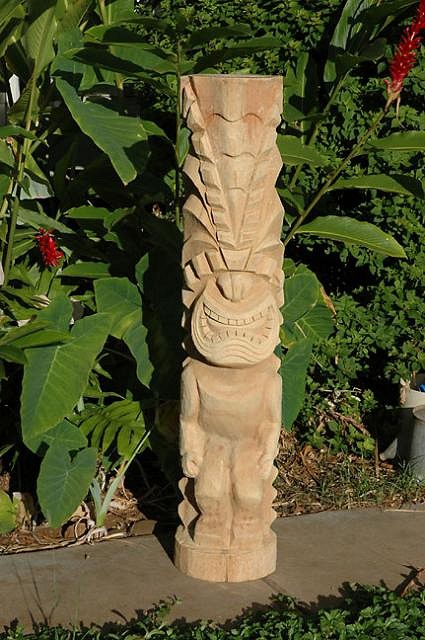
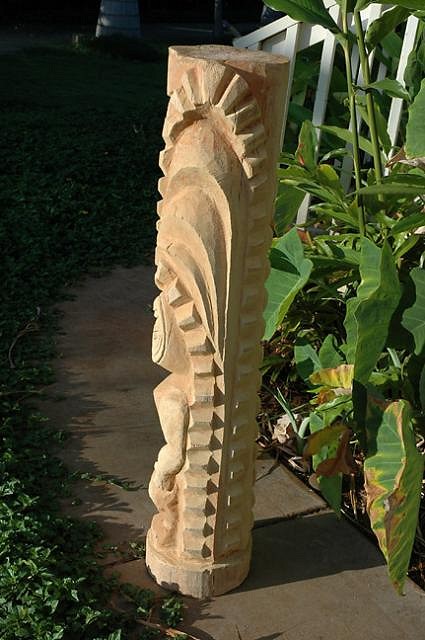
Sorry for not keeping up with the photos, but I've finished my first (and second) Tiki. Here are some photos... The little one I did in about 15 minutes with just the grinder... Super soft palm wood.
Since I took these photos in the garage where the stain on the big one is still drying, I'm certain some of you'll be asking to see the car behind them. This is my 1971 Camaro, I've had for the past 25 years.
I just got two more Mexican Fan Palm logs from my neighbor that are easily twice the size of my first one, so I'm looking forward to getting started on my next TIKI! |
|
T

TheBigT
Posted
posted
on
Thu, Jan 10, 2008 12:08 PM
Wow, first tiki!? Good grief that rocks! You got really nice depth on that and finished it up really nice as well. Oh yeah, nice car too... damn you. :lol: |
|
T

Traderbob
Posted
posted
on
Thu, Jan 10, 2008 2:11 PM
Wow ! If that's your first attempt I can't wait to see more. Keep it up ! |
|
S

seeksurf
Posted
posted
on
Thu, Jan 10, 2008 5:16 PM
Very Nice carve. crisp and clean lines nice job! |
|
P

pappythesailor
Posted
posted
on
Thu, Jan 10, 2008 6:10 PM
Nice tiki carvin'! |
|
M
MauiTiki
Posted
posted
on
Thu, Jan 10, 2008 6:38 PM
Thanks for all the positive feedback! Seeksurf - The car turns enough heads with out a Tiki attached to the hood. Aloha! |
|
T

Tahitiki
Posted
posted
on
Thu, Jan 10, 2008 8:07 PM
Excellent Tiki, love it. |
|
M

MBL
Posted
posted
on
Fri, Jan 18, 2008 10:09 AM
Dude!?!? Way COOL! I might do one like this. |
|
M
MauiTiki
Posted
posted
on
Mon, Dec 15, 2008 2:09 PM
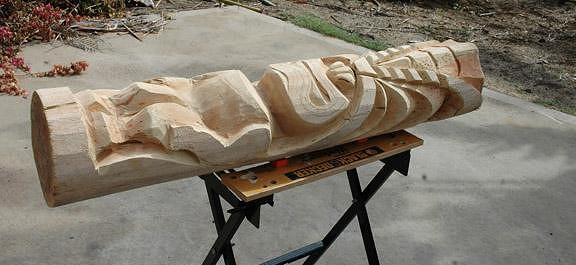
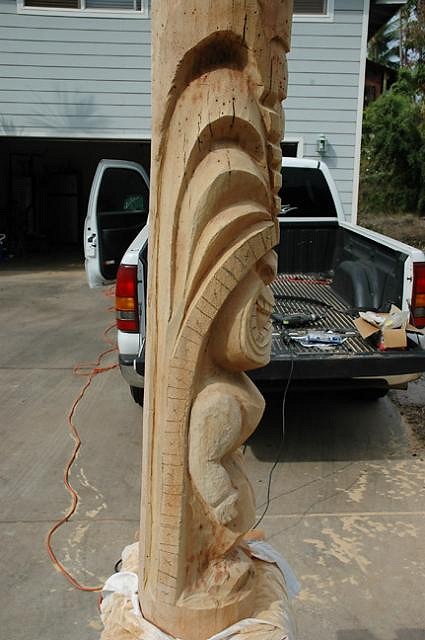
I typically stick to "Tiki Marketplace" and "Collecting Tiki" threads, but I stumbled back to the carving threads and came across Bowana's Tikis. WOW! I have a couple Palm logs that have been outside drying for nearly 10 months. When I got them they weighed 100 lbs plus, now I can lift them easily. With Bowana's permission I've taken on the first log and am going to use his design that inspired me to start carving again. The Log is so soft and light I'm going to only use power tools for this one. I made a couple big cuts with my electric chain saw, then have gone to my angle grinder. I'm using a small sander attachment for my drill and a dremmil tool as well for the detail and finish sanding. Here is where I'm with the Tiki so far. I have about 6 hours into it at this point. It carves like butter with the power tools and sawdust goes flying everywhere! I'm finding that I should have studied Bowana's tiki better and spent more time on my drawing.
Getting the hands and body figured out... I have the Tiki marked up for the next step.... You can see the the log has/had termites, so I may plug the holes with some wood filler before staining it. Any suggestions for wood filler and staining it with something to protect it from the elements and more bugs? More photos to come soon. |
|
B

Bowana
Posted
posted
on
Wed, Dec 17, 2008 6:58 AM
Hey I know that guy! |
|
B
Benzart
Posted
posted
on
Thu, Dec 18, 2008 4:31 AM
Well MauiTki, for a "I'm not a tiki carver guy" you are doing Super with your first ones and learning many lessons it seems. Keep up the great stuff and you'll be a pro before you know it. |
|
S

sasquatch
Posted
posted
on
Fri, Dec 19, 2008 3:53 AM
... inspirational! I've got some equally cheap chisels coming as an Xmas Gift! ... I'll be chuffed if mine are half as good as yours! Nice work. |
|
D

drgoat456
Posted
posted
on
Fri, Dec 19, 2008 7:13 AM
Benzart is right.....that's one impressive first carve. Lots of character & looks 'professional'. I'd have that in my home in a second. My first stab at it isn't half as nice. Good luck and have a great holiday. |
|
M
MauiTiki
Posted
posted
on
Fri, Dec 19, 2008 11:15 AM
Thanks everyone for the comments... JohnnyP gave me a tip that I thought I'd share... "Since you live in the tropics you know better than us in the north on how to deal with bugs and termites, but put a little bug killer in each of those holes, then use the plain old Elmers wood filler (or any other kind of light colored filler). Take some of the sanding dust from this tiki and mix it to a really thick paste with the wood filler and press this mixture into those holes. Let it dry, then sand the surface smooth. I use a pencil or permanent marker to make matching grain marks in the filled spots before I finish stain the carving. I've found that the wood dust mixed in the woodfiller allows the stain to match, otherwise the wood filled spots really stand out." I'm definitely going to pick-up some Wlmers wood filler and mix it with some sawdust to fill the holes. I'll post more photos tomorrow. |
|
A

AlohaStation
Posted
posted
on
Fri, Dec 19, 2008 1:08 PM
Another good tip for bugs is to put the wood in an enclosed space and set off a couple bug bombs. Then fill. I had an ant pile that did a pretty good job on some beetle larvae. It was kind of entertaining as well watching the grubs struggle as the ants carted them off for dinner!! |
|
H

Heath
Posted
posted
on
Fri, Dec 19, 2008 3:24 PM
This is the product I use. I like it because it's not pressurized and it doesn't leave any residue on the carving that may react with a stain. |
|
M
MauiTiki
Posted
posted
on
Fri, Dec 19, 2008 4:42 PM
Looks like I'll be hitting the hardware store for some Raid and Elmers, while out Christmas shopping this weekend. Thanks for the tips! |
|
HOK

HOUSE OF KU
Posted
posted
on
Sat, Dec 20, 2008 8:41 PM
Aloha Rob! Anti termite chamber Fogger location Good luck and Happy Holidays! Freddie |
|
B
Benzart
Posted
posted
on
Sun, Dec 21, 2008 3:28 AM
Looks like a Sure fire Bug killer there Maui, can't wait to see that tiki all finished as it seems you've added quite a bit of inlays there. |
|
M
MauiTiki
Posted
posted
on
Sun, Dec 21, 2008 11:19 PM
OK, I "bombed" the Tiki (and my next log) in my downstairs bathroom. Then I filled all the holes and finished the carving. Now I got to stain it. Photos to come... |
|
S

sungod
Posted
posted
on
Mon, Dec 22, 2008 5:36 PM
Sounds funny when you don't read the previous replies. Not the type of "bomb" I was thinking. |
|
M
MauiTiki
Posted
posted
on
Mon, Dec 22, 2008 7:21 PM
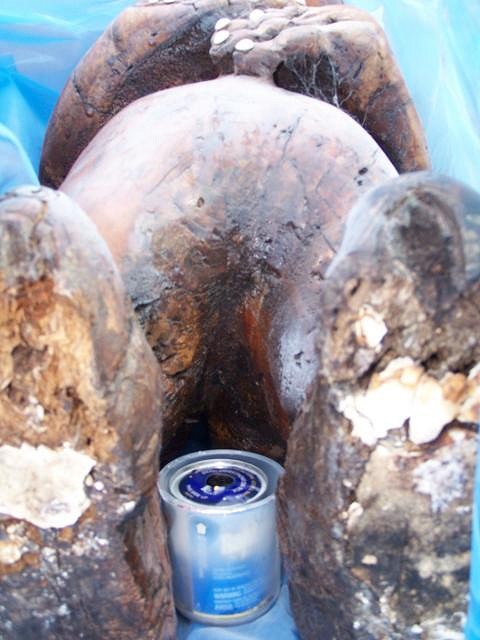
OK I have more Photos... here is what it looked like before I got started with the wood filler to fill the termite holes.
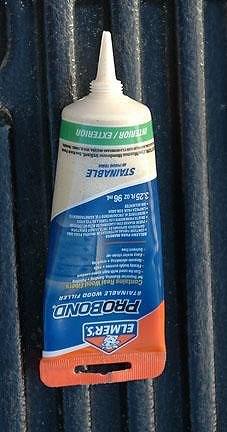
I bought some "Stainable" Elmers Wood Filler...
It works pretty good, although I think the tube I bought was old and kind of dried out. It was difficult to get out of the tube. here is the result...
I like the cracks, I think they give it character. I could fill them with the wood filler if I wanted. More photos in a few minutes. |
|
M
MauiTiki
Posted
posted
on
Mon, Dec 22, 2008 7:26 PM
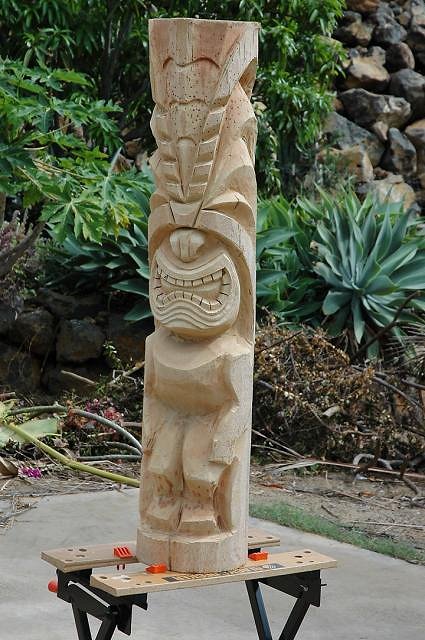
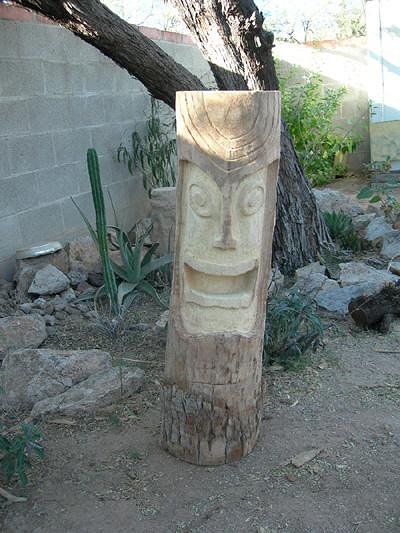
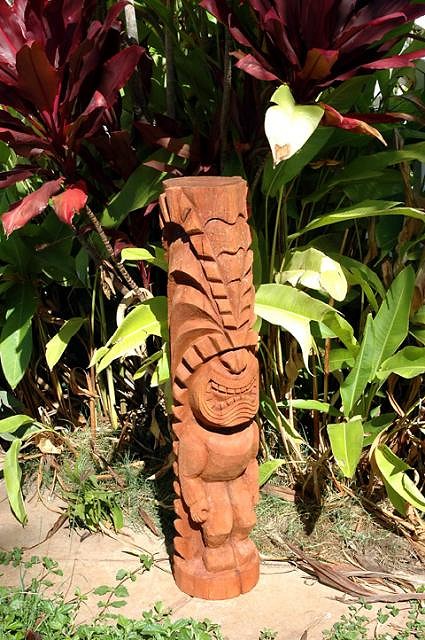
I think I'm done carving. Here is the result. I never touched a chisel. It's all done with power tools. Next step will be to stain it. I'm thinking of using some wood hardener in the top and bottom to help protect it. Here are the photos. They were taken early before the sun was high in the sky. I think the contrast would be better later in the day with more shadows showing the detail.
and rear view...
I'll post more after I stain it. |
|
S
seeksurf
Posted
posted
on
Mon, Dec 22, 2008 9:30 PM
Nice work you have a classic carve there and |
|
M
MauiTiki
Posted
posted
on
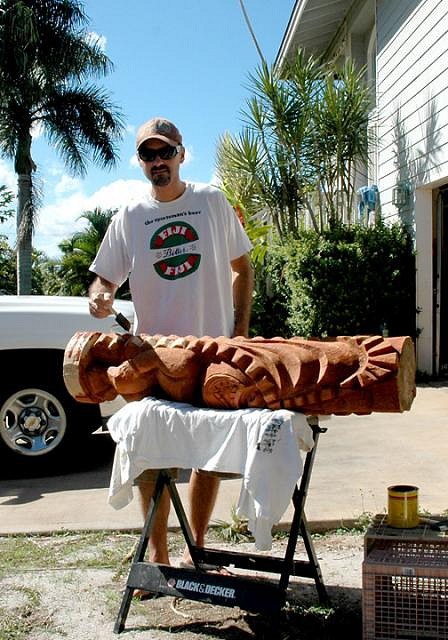
Thu, Dec 25, 2008 4:06 PM
here is the finished Tiki! I may add some varnish and possibly re-stain some areas to bring out the detail. Here I am staining it in the yard...
I've got an even Larger Palm log to do next! |
|
S
seeksurf
Posted
posted
on
Fri, Dec 26, 2008 10:48 AM
Right On! you are on fire love this classic look Looking fwd to the bigger one. |