Tiki Central / Other Crafts
Backyard Tiki Hut - Deck finished! Pg. 3
Pages: 1 45 replies
|
T

TikiMike
Posted
posted
on
Thu, Jul 19, 2007 9:40 PM
I haven't posted in quite a while... been pretty busy working on my backyard tiki hut (in progress). The main structure is done, now I'm starting on the fake boulders and stone waterfall that will eventually be in the back corner. Once those are done, I'll put a wood deck underneath the hut. Let me know what you think... I'm always open to suggestions too! Location chosen Oleanders removed Applying patterns to beams (thanks surf-n-turf!) Pattern drawn Carving (routing) done Corner posts in place (they've been stained and marine varnished) Closer look at carvings Even closer look at carvings Beams in place A-frame and center beam in place Joists in place Roof completed Lauhala mat ceiling (you can see the mister tubing here too) Tricky corner for the mister tubing (I got those lights at Target) Mister drain valve & closer view of rope lashing (for looks only... the beams are all bolted) Float light... I had to re-rope the light and hanger. I need to cover up those hose clamps! Light switches and outlet (you can also see the beginnings of some faux boulders) Faux boulders begin with piles of the old pavers (this is where I will plant a palm) [ Edited by: TikiMike 2007-07-19 21:41 ] [ Edited by: TikiMike 2007-07-19 21:42 ] [ Edited by: TikiMike 2007-07-19 21:43 ] [ Edited by: TikiMike 2007-08-08 08:54 ] [ Edited by: TikiMike 2007-09-19 13:31 ] [ Edited by: TikiMike 2008-09-10 17:37 ] |
|
C

closettiki
Posted
posted
on
Thu, Jul 19, 2007 10:30 PM
wow....this is cool....i dig the look......this will look awesome when done...i can just picture it at night with torches lit and the bar open....it will have a small bar.....right..... |
|
M

McTiki
Posted
posted
on
Fri, Jul 20, 2007 3:08 AM
Looks very familiar! Awesome detail work and no fear of the huricanos in AZ! That will be a killer hangout. Mahalo McTiki [ Edited by: McTiki 2007-07-20 04:31 ] |
|
C

croe67
Posted
posted
on
Fri, Jul 20, 2007 4:41 AM
Wow - that is very cool - I look forward to seeing how you further finish it off & will it up with tiki "stuff"! |
|
T
TikiMike
Posted
posted
on
Fri, Jul 20, 2007 6:18 AM
Oh yes it will have a bar! :) |
|
T
TikiMike
Posted
posted
on
Fri, Jul 20, 2007 6:21 AM
Thanks McTiki! Yeah... I watched the progression of your hut, which turned out awesome. I definitely took some cues from your project! We're right in the middle of monsoon season here too (had a doozy of a storm last night) and everything is holding up to the elements! [ Edited by: TikiMike 2007-07-20 06:25 ] |
|
M
McTiki
Posted
posted
on
Fri, Jul 20, 2007 6:47 AM
Flaterred here! Ok, gotta ask....Monsoon season ???????? in AZ ???? lol Mahalo McTiki |
|
T
TikiMike
Posted
posted
on
Fri, Jul 20, 2007 9:28 AM
Haha... strange but true! We get some crazy weather here in the summer. Check out these videos: http://www.youtube.com/watch?v=jDZqvfKOBDc http://www.youtube.com/watch?v=1QtEBWn1Ris http://www.youtube.com/watch?v=Jjl3uOzjfTw http://www.youtube.com/watch?v=pnvx9iQdNIU http://www.youtube.com/watch?v=zs__vfnqZ9Y http://www.youtube.com/watch?v=xp4lHmYt6AE |
|
M
McTiki
Posted
posted
on
Fri, Jul 20, 2007 9:41 AM
:o |
|
CH

cheeky half
Posted
posted
on
Fri, Jul 20, 2007 9:54 AM
Hey that looks great TikiMike! Just let us know if you want some help christening that bad boy. cheeky half |
|
AJ

Aloha John
Posted
posted
on
Fri, Jul 20, 2007 10:02 AM
My God TikiMike that is KILLER! I feel like you have practically created the A frame hut that I have in my head, and on various scraps of paper. I too found inspiration from McTiki's. Great job!! I just sent Lake Surfer a message about those stencils too. Are all of the carvings on your posts from his stencils, or just the one pictured? All done with a router too? What type of wood did you use, redwood? Is there some plywood or something above the lauhala, it looks like it is pretty flat, relative to the spacing on the joists...I'd expect it to sag if wasn't glued or stapled to something? Nice job on the mister lines too. When I bought my float light from Polynesiac and mentioned I wanted to hang from an A frame beam, he mentioned the need to keep water out of it, for electrical reasons. I know we both live in arid climates, but did you do anything to waterproof the electrical in the light? -John |
|
T
TikiMike
Posted
posted
on
Fri, Jul 20, 2007 11:57 AM
Thanks! Once it's complete we plan on having a christening tiki party. I'll keep you posted! :) |
|
T
TikiMike
Posted
posted
on
Fri, Jul 20, 2007 12:33 PM
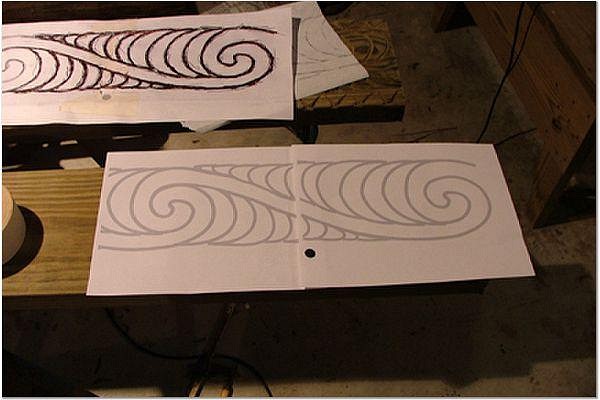
Thanks John! Yeah.. I had it all worked out in my head too. I didn't really make detailed plans, just took measurements and sort of winged it.
I made up/found the other patterns from other places. The one LakeSurfer used was trickier, so I used Adobe Illustrator to draw it out & print it, then used carbon paper to transfer the deisgn to the beams. I started with chisels but ran out of patience. Most of it was done with a router.
The wood is just treated Douglas Fir from Home Depot. I used a dark stain and McClosky's Man-O-War marine varnish (satin) on all the beams and joists. You're right, the roof is 3/4" plywood. I put the plywood sheets up on the joists, marked and cut them to fit, and then took them all down. I then used contact cement to attach the lauhala matting. Then I put the plywood back up on the roof. It was a huge pain in the ass to put them up twice, but I wanted the seams/edges of the roof panels to line up along the joists to keep the lauhala edges from coming loose. Plus it gives a more "seamless" look. On the top of the roof I used self-adhesive stips of roofing membrane to cover the plywood seams, then went over the whole roof with roofing sealer. Finally the thatch went on top of that.
Thanks... the misters have already come in handy. It was 113 degrees here last week! I bought the float on ebay, but there weren't any holes in it. I had a local place, Artistry in Glass, cut a hole on top, large enough to get a bulb/socket in there. Plus I had them cut a small "weep" hole (dime size) on bottom to let any possible moisure drip out. They did all the holes with a sandblaster, so I had them frost the inside of the float to give that nice glow, and make the outline of the actual bulb less visible. To keep water out I used a 1/8" thick sheet of rubber from Ace Hardware to make about a 5 or 6 inch disc. I poked a hole through it to run the power cord through and then sealed it to the float, over the large bulb hole, with some silicone sealant. It'll take a bit of work to change bulbs, but it's waterproof (I actually tested it in the rain the other day!) I had plans to snap photos along the way, but I got too excited to finish it. Let me kow if you want some detail photos of the finished product. [ Edited by: TikiMike 2007-07-20 13:37 ] |
|
T

TikiLaLe
Posted
posted
on
Fri, Jul 20, 2007 2:06 PM
|
|
V

Vinman
Posted
posted
on
Fri, Jul 20, 2007 3:26 PM
Wow, nice job on the hut. I really like the patterning you did with the router. I can't wait to see the progress on the faux boulders. |
|
U

ualpow
Posted
posted
on
Fri, Jul 20, 2007 6:15 PM
That is awesome use of that corner. Your attention to detail is what really sets this "hut" apart,it looks very authentic. You have inspired me get moving on the rope and carvings to the posts on my own "hut". |
|
T

TikiPhil
Posted
posted
on
Wed, Jul 25, 2007 2:06 PM
Great Job! Keep the pictures coming. I'm really interested in how your faux boulders turn out. |
|
T
TikiMike
Posted
posted
on
Wed, Jul 25, 2007 6:48 PM
I've made some progress on the fake boulders. Let me know if you have any questions on the process! I started by covering the piles of old bricks & rubble with concrete Next, I covered the surface with a mortar mix (I used Quikrete "Pro Finish"). This is where I shaped the boulder using a scredriver for cracks. I also pushed real rocks into the surface to create ridges and textures. I sprinked off white and charcoal color hardener to create a speckled effect. Next, I rubbed on an off white color-hardener mixed with water. I just loosely rubbed the surface with my hand to hit the high points. Now the same process with a terra cotta color Now a tan color Next, I used a liquid color tint mixed with water to create a color wash. This color is "buff", basically a red/orange. I just splatterd it on with a paintbrush. Next was the same liquid wash process using a charcoal color. I did this in several applications to keep them from getting too dark too fast. This step knocks down some of the color and accentuates the cracks and textures. Finally, I used a "natural look" (no gloss) acrylic sealer on all of the boulders. Now I need to get some plants in there! |
|
F

frostiki
Posted
posted
on
Thu, Jul 26, 2007 6:43 AM
Wow, that's a lott of steps. The boulders look great. Oh yeah that othere thing turned out ok to. I guess if your into cool places to hang out and enjoy a Mai Tai. |
|
V
Vinman
Posted
posted
on
Sun, Jul 29, 2007 11:01 AM
Great job on the rocks, the texture, paint and weathering look awesome. My wife and I took a class here in Riverside that covered some of the same techniques and I hope to employ them around our pool soon. What kind of router did you use to do the patterns on the hut posts? Keep the pics coming, you are doing a fantastic job. |
|
RH

Rum Hunter
Posted
posted
on
Sun, Jul 29, 2007 1:10 PM
TikiMike, Looks great! Give us an update when you make more progress. |
|
T

Tiki-Atari
Posted
posted
on
Mon, Aug 6, 2007 7:29 PM
Gorgeous! |
|
H

Howland
Posted
posted
on
Tue, Aug 7, 2007 7:20 PM
Nice going! Looks vaguely familiar. |
|
T
TikiMike
Posted
posted
on
Wed, Aug 8, 2007 8:53 AM
Haha... yes, thanks for the idea surf-n-turf! This pattern turned out great on your project, so I had to give it a try! |
|
TZ

Tiki Zen
Posted
posted
on
Wed, Aug 8, 2007 2:11 PM
I'm about to start building my bar, so hurry up and post some photos of yours - I need inspiration. |
|
CH
cheeky half
Posted
posted
on
Wed, Aug 8, 2007 2:42 PM
We're definitely getting thirstier...... |
|
E

EdsGoneTiki
Posted
posted
on
Sat, Aug 11, 2007 10:28 PM
Fantastic job on the Hut! It looks very well built, love the routered posts! I've been planning a hut of my own (don't we all!) and although it will have four posts, |
|
DT

diesel tiki
Posted
posted
on
Sun, Aug 19, 2007 9:53 AM
Did you burn the carvings or did the definition come from the stain itself? It looks awesome and I want to try it! |
|
T
TikiMike
Posted
posted
on
Mon, Aug 20, 2007 10:22 AM
I actually just used a router with a V-groove bit. The stain was darker in the grooves which helped give some definition. Also I used a satin varnish, so the reflected light from the edges really helps define the patterns. Update: I finished all of the electrical wiring for the lights, so I'll be posting some night photos pretty soon. Also, work has begun on the waterfall for the back corner. I'm snapping progress photos and should be posting some this week. We've been having wet weather and I've had a multitude of house guests recently, so progress has been kind of slow lately. Thanks for the feedback everyone! |
|
H

harro
Posted
posted
on
Tue, Aug 21, 2007 4:46 PM
Brilliant use of the space, and great how-to posts. Can't wait to see how its looking. I'll be coming back to this thread if and when I ever get to build my own dream bar. Keep the progress posts coming!! |
|
T
TikiMike
Posted
posted
on
Tue, Sep 18, 2007 9:51 PM
Sorry about the time lapse... time flies when you're at your real job. Just a quick update on the faux boulders. I finally started the large waterfall in the back corner of the tiki hut. This is basically the same process as the smaller boulders except I constructed a metal lathe shape using metal construction studs for the framework. That bump-out on the front is where I ran 3" PVC tubing in order to provide access for the water tubing and the power for the underwater lights. There will be four large boulders making up the waterfall when it's done. Let's hope my next post doesn't take so long! :)
|
|
BS

bamboo stu
Posted
posted
on
Tue, Oct 2, 2007 12:03 PM
Wow, professional looking work! This was exactly what I needed to see, I wasn't sure how to make standard fir dimensional lumber look good. Never thought of using a router for pattern carving. |
|
T
TikiMike
Posted
posted
on
Sun, Sep 7, 2008 5:46 PM
Wow, it's been a while since I've posted pics of my backyard tiki hut (yet to be named). I have an excuse though, I've been working on one of these. Cole will be soon able to enjoy the fruits of my aching back! So I finally got the deck built, and I sanded it all down today. I plan to stain and seal tomorrow if the weather looks good. I'll have more pics and details soon of the waterfall feature in the back corner.
|
|
S

surfintiki
Posted
posted
on
Sun, Sep 7, 2008 6:16 PM
Suuuuuure, it was all just a shameless plug, for a shot of the baby!! :lol: |
|
V

VampiressRN
Posted
posted
on
Sun, Sep 7, 2008 6:36 PM
Congrats on your little one and he is lucky to have such a talented Dad...the deck is awesome. |
|
T

TikiTres
Posted
posted
on
Mon, Sep 8, 2008 8:30 AM
I'm re-roofing my patio and incorporating an A-frame and thought I did a lot of oddball saw cuts last weekend, but it was nothing compared to your project! You don't hardly have two boards that are the same length! You've obviously got a LOT of time in on that. It looks great! |
|
T

TheBigT
Posted
posted
on
Mon, Sep 8, 2008 8:42 AM
WOW! This is awesome. You've got some serious skills. The stone work looks so real! Thanks for posting! |
|
TT

Tucson Tiki
Posted
posted
on
Mon, Sep 8, 2008 10:17 PM
Looks great. Would love to see it in person sometime. |
|
T
TikiMike
Posted
posted
on
Wed, Sep 10, 2008 5:35 PM
Thanks for the positive comments! Here is the deck with dark walnut stain and sealed with DEFY clear epoxy sealer
|
|
H

hewey
Posted
posted
on
Thu, Sep 11, 2008 4:18 AM
Looks great. Love the way the deck works around the rocks |
|
S

sasquatch
Posted
posted
on
Thu, Sep 11, 2008 7:18 AM
... stunning! A great post thanks for sharing [ Edited by: sasquatch 2008-09-11 07:33 ] |
|
S

shampoovta
Posted
posted
on
Fri, Sep 12, 2008 6:53 PM
Wow that is sweet. So meditative. |
|
S

sneakyjack
Posted
posted
on
Fri, Sep 12, 2008 7:51 PM
good times ahead! |
|
TT

Tiki Trav
Posted
posted
on
Fri, Sep 12, 2008 7:54 PM
NICE ROCK! |
|
T

tiki-smith
Posted
posted
on
Sun, Sep 14, 2008 11:35 AM
Wow! Simply incredible work! The 'stones' are truly amazing! |
|
TT
Tucson Tiki
Posted
posted
on
Mon, Sep 15, 2008 10:43 PM
Tiki Mike! I'm in your town! Look at my post to see what I can do and let me know if ya "NEED" an awesome tiki to enrich our backyard decor. I can deliver! Let's hook up since were so close. I am not a freak. Well, maybe just a little. TT |


Pages: 1 45 replies