Tiki Central / Other Crafts
Plaster Mold Making & Some Ceramics
|
M

MadDogMike
Posted
posted
on
Sat, May 24, 2008 11:59 PM
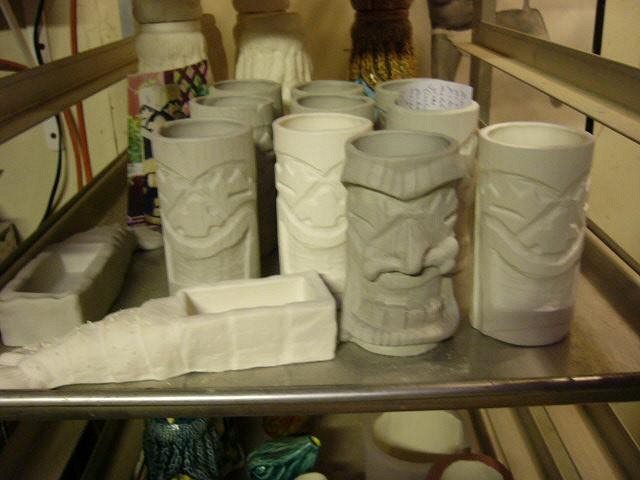
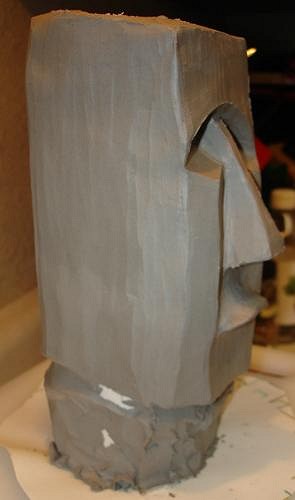
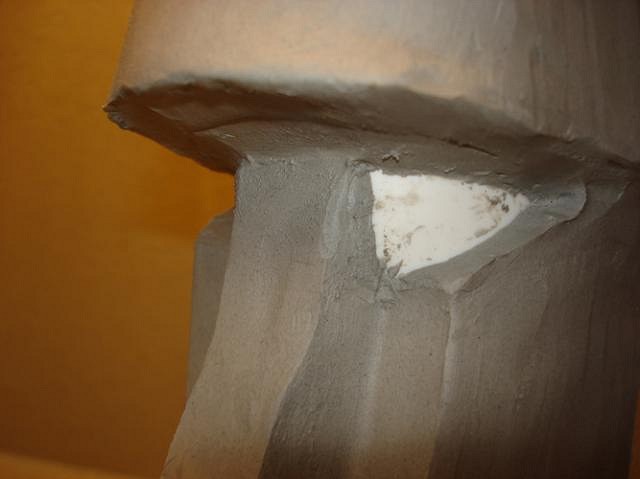
Clarita, I'm afraid you mold won't qualify as the ugliest because mine has yours beat! I don't follow directions very well and tried to take some shortcuts. As a result my mold broke in 2 places. But I had all the pieces so I just rubber-banded them together and cast some mugs. I had never done anything like this but it was surprizingly easy with Bowana's & Babalu's great directions and pictures. If you have ever wanted to design your own mug, now is the time to jump in and get your hands dirty. I cast a handful of mugs and Babalu has graciously offered to fire them for me. Here's my pitiful mold:
Clarita, good luck with your molds. I guess it's winter in Argentina, it may take several days for your mold to dry. |
|
B

Babalu
Posted
posted
on
Sun, May 25, 2008 6:37 AM
You two are so COOL! I've been playing with Mike over here at my studio some...he's hooked. Claria, I am soooo proud of you! You keep charging forward like this kiddo. Good things are going to happen. Good job you two!...CHEERS to you both!! |
|
O

OceaOtica
Posted
posted
on
Sun, May 25, 2008 6:51 AM
That is pretty cool to see, congrats on your first molds! Babalu, Bowana nice tutorial you have going here. It is nice to see others picking up this art form. Have spoken to two others starting to take their hand at it as well. Just remember not to let any frustrations stop you in your tracks, when you have your first cocktail out of a mug that you made, everything else will not matter. Aloha kaua [ Edited by: OceaOtica 2008-05-25 07:54 ] |
|
B

Bowana
Posted
posted
on
Sun, May 25, 2008 7:48 AM
:) :) ! All right Clarita and Maddog! Don't be too concerned if your mold is ugly. If it's functional it's a good mold. Clarita, give yours a few days to dry out a bit then give it a try. You can put it near your heater, but don't get it too hot. Mike, from what I can see, yours just looks like it could have been a bit thicker where it broke. Thank you both for posting, it makes it all worth it for us. Bowana |
|
B
Babalu
Posted
posted
on
Wed, May 28, 2008 10:24 PM
Sir B, Check out some of mad dog's first slip cast mugs from his new mold....nice work MD.
|
|
C

Clarita
Posted
posted
on
Thu, May 29, 2008 11:10 AM
Hey MadDogMike, congrats on the ugliest mold :D!! But the copies look great! |
|
M
MadDogMike
Posted
posted
on
Thu, May 29, 2008 4:58 PM
Thank you BigBopBabaluPop, now I just gotta get up there and glaze them. Clarita, those look great! Yeah, I had to do a lot of cleanup too :) Anything worth doing, is worth doing to the point of wretched excess. [ Edited by: MadDogMike 2008-05-29 17:08 ] |
|
C

Cammo
Posted
posted
on
Thu, May 29, 2008 6:50 PM
How cool is it to make your own mugs for your tiki bar? Congrats!!! How good will that first drink taste, dude!!!! |
|
B
Bowana
Posted
posted
on
Thu, May 29, 2008 9:00 PM
Clarita, I always let my castings dry for a few weeks, but if the weather is damp wait a little longer. They will feel dry to the touch when ready. Any further insight on that, Sir Babs (or anyone else)? If you've got one casting thicker than the other, it will take a little longer to dry. Other than that it's okay. You must have left the slip in the mold for a longer period of time before pouring it out. The longer it's in, the thicker the casting. Again, don't be too concerned about making a pretty mold. Concentrate on a functional one first. They will get prettier as you get more experience. Since both of you (Clarita and Mike) were able to get successful castings, you are already ahead of the game. Your grades: Advance to the front of the class and receive your graduation with honors! :) Bowana |
|
V

VanTiki
Posted
posted
on
Thu, May 29, 2008 9:08 PM
Man - this has become one of my favorite threads!
I've never slip cast clay - but a good rule-of-thumb that I use for my hand-built stuff is that when you hold the piece to your cheek (or the back of your hand) it should not feel cool. Seems to work great for me. Lots of times I think things are dry - but when compared to pieces that have had a day or two longer on the drying shelf they will be noticeably cool while the older greenware is room temp. Hope that helps - and the mugs look great! Henrik |
|
B
Babalu
Posted
posted
on
Thu, May 29, 2008 9:23 PM
YAY!!! Thump, thump, thump (as Mr. Jones would say) :) :) Way to go Ms. Clarita! I agree with Sir B, You two should move to the front of the class with top honors! Ms. C...I see from your post that you 2 castings are of different thicknesses....that's ok, your just experimenting with the amount of time you want to leave the clay slip in the mold before you pour it out...Obviously, the longer you leave the slip in the mold the thicker the walls of the mug will be...thing is, each mugs walls will be the same thickness all over, so you can just leave it to dry out right after you have cleaned them up. If you don't have time to clen them right after you have pulled them out of the mold, put them in a plastic bag to stay moist until you are ready to clean them. A good general way to tell when they are dry enough to fire is to touch the mug to your cheek (the face one)...if it feels real close to the room temperature, she's ready to fire. Be careful, clay, when in it's bone dried greenware stage, is very fragile and can break easy...if your in a real humid area, I might do a slower bisque...candle the firing for just a bit longer. PS..Oops..Henrik jumped in as I was writing and posting the above...:) [ Edited by: Babalu 2008-05-29 21:25 ] |
|
C
Clarita
Posted
posted
on
Fri, May 30, 2008 9:53 AM
Oh ok so I apply it to my cheek(Butt?), and it doesn't have to feel cold, I get it :)! |
|
M
MadDogMike
Posted
posted
on
Fri, Jun 13, 2008 10:06 AM
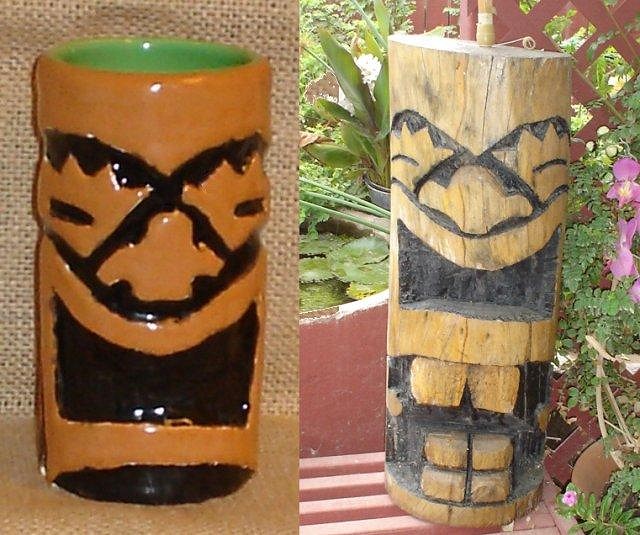
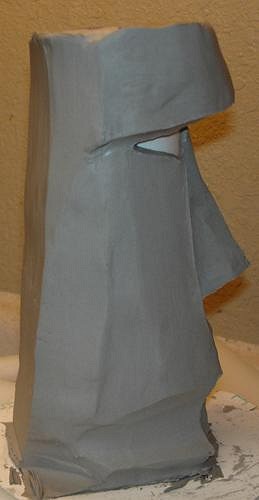
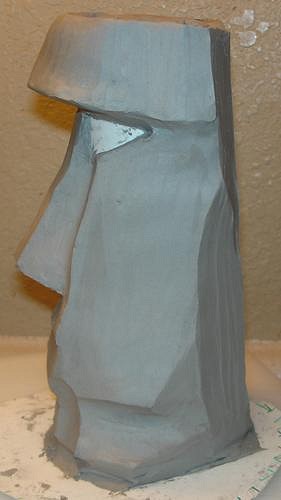
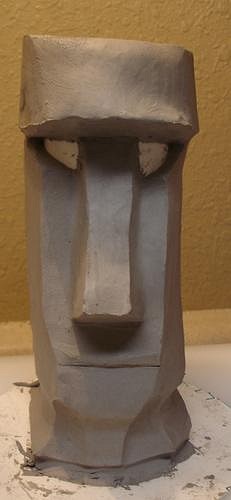
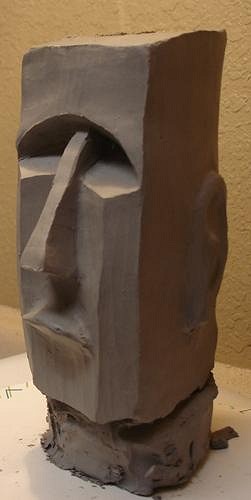
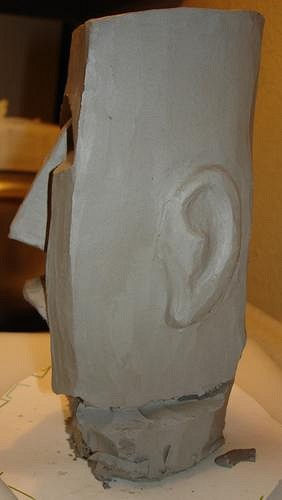
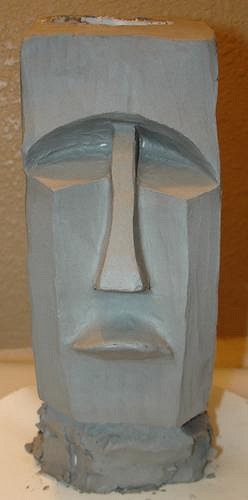
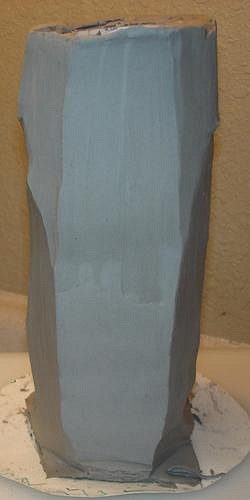
Working on my next slip-cast project, not exactly "tiki" but I guess it's Polynesian Pop. This is actually the model, hope to make a mold from it. After making my model, I did an internet search and found someone had beat me to it (again) Mauna Loa already made one. I guess mine is an updated version. |
|
P

Paipo
Posted
posted
on
Fri, Jun 13, 2008 6:18 PM
Sorry to be the bearer of bad news, but someone beat you to the updated version too.... |
|
M
MadDogMike
Posted
posted
on
Fri, Jun 13, 2008 9:05 PM
OK !!!! Moving on to the next project! Anyone ever work with alginate? EDIT - That's funny; I thought about adding a cross to the bone pile and calling it "Missionary Stew" - the "Cannibal Pot" has a cross in the bone pile too. [ Edited by: maddogmike 2008-06-13 21:10 ] |
|
T

teaKEY
Posted
posted
on
Sun, Jun 15, 2008 4:35 PM
Sorry to be the bearer of bad news, but someone beat him to it still The first in a long time No one is laying to calm the idea and saying that no one else can make one, just showing that others had the great ideas to make one first. [ Edited by: teaKEY 2008-06-27 06:49 ] |
|
S

Sneakytiki
Posted
posted
on
Tue, Jun 17, 2008 12:27 AM
"But someone him to it still" ????????????????????????????? Its not like its an original idea period! It's been drawn more times than tiki mugs have been sculpted. The idea that anyone can lay claim to this idea is as ludicrous as someone saying they created the first stacked totem mug. Nice sculpt MadDM! To drown sorrow, where should one jump first and best? "Certainly not water. Water rusts you." -Frank Sinatra [ Edited by: Sneakytiki 2008-06-17 00:27 ] [ Edited by: Sneakytiki 2008-06-17 00:29 ] |
|
M
MadDogMike
Posted
posted
on
Tue, Jun 17, 2008 5:11 PM
Thanks for the input folks and for the kind words SneakyTiki. I'm afraid my design has more than just a passing resemblence to Rum Demon's even though it was an "independent discovery". Maybe I'll make up a few for personal use, maybe I'll just move on to my next design. |
|
T

tikitony
Posted
posted
on
Wed, Jun 18, 2008 11:05 AM
Wow, great thread here. That Okidoki mug is AWESOME!!! On my molds, I forgot to put in a funnel, so the rims of my mugs end up being a pain to fix. Great job on the photos and process. Makes me want to get started on my next mug! I was able to make a master mold by putting the plaster pieces in a box, with flatsides down for an open faced mold. I clear-coated the plaster, then sprayed Mold Release, and I then poured $150 worth of mold making latex over the four pieces. I had a 4 piece plaster mold, so I put two pieces in a box, then the other two in another box. After the latex dried, I just popped out the plaster mold from the latex. This plaster mold was unusable because it had been clearcoated, which stops the absorption of water. I then mixed a lot of plaster for 2 days straight, pouring mold making plaster into the latex molds and in two days, I had 5 working molds for a mug! A few of the mold pieces had gotten warped, but a master mold maker friend soaked them in water with the rubber bands on tight, and was able to fix them so no clay slip leaked out anymore! |
|
M
MadDogMike
Posted
posted
on
Thu, Jun 26, 2008 9:35 PM
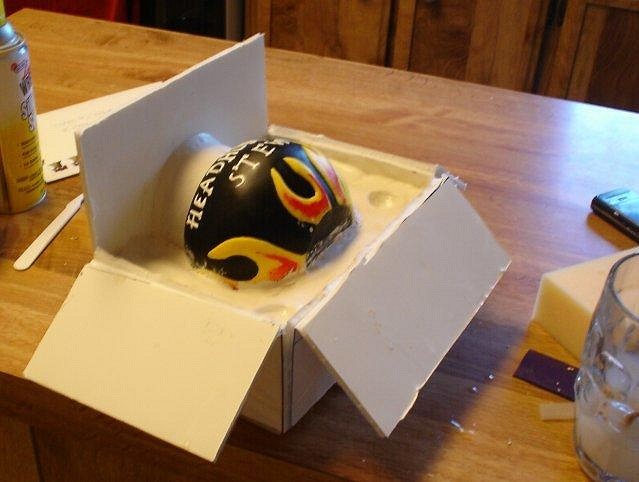
Babalu, if you run off and leave your thread unprotected, there's no telling WHO might post here :P Last time I had trouble working with the clay at the separation line because it was down inside the mold box and I couldn't get to it very well. This time I tried something new. I made the mold box out of foam-core board. I scored the sides and folded them down so I could work the clay. When I was done I folded them back up, sealed the corners with clay, taped the heck out it and poured in the plaster. Seems to have worked well I'm out of slip, will pick up some next week and see what happens. |
|
B
Babalu
Posted
posted
on
Fri, Jun 27, 2008 7:21 AM
Tiki Tony - Wow, we are honored that you jumped in...Thanks so much for describing how you created multiple molds from one master. It's a great thing for folks to be able to see how others have problem solved these processes too. One really needs multiple molds if they are planning on making a large run of mugs...it's just to time consuming with just one mold. And thanks for commenting on Cammo's Oki Doki design too...I can see why you like that one; I think that you and Cammo have some things in common...You both have this wonderful since of whimsy in your works that I really enjoy. I can't wait to see what you bring to Oasis this year! I still need to add a Tiki Tony mug to my little, but growing, collection of mugs. Mad Doggie, Your just on fire brother! Have you tried to pull a casting yet from your bowl, or are you totally out of slip? It looks like you are planning on having the bottom of your bowl to be flat, which is fine, you just won't be able to glaze the bottom unless you use stilts to fire the mugs on. Are you going to glaze fire the bone pile into place at the bottom of the mug? Be sure to look for undercuts on that bone pile before pouring your mold. I guess I will see you over here on the 3rd...you'll have some mugs to glaze up :) |
|
M
MadDogMike
Posted
posted
on
Fri, Jun 27, 2008 6:14 PM
I didn't understand why TikiTony was making multiple molds of the same mug but didn't want to open my mouth and show my ignorance. Now I understand. I could ask this question in person, but maybe someone else wants to know... how does not glazing the bottom of the mug affect things? Yes I think I'll glaze fire the bone pile in place. I had first thought I would add it to the bottom when the mug was fresh out of the mold to make it all one piece. But it would be difficult to glaze the individual bones white down in the bottom of the mug. Bubalu, I will call you this evening |
|
C

cheekytiki
Posted
posted
on
Fri, Jun 27, 2008 11:40 PM
If you glaze the bottom of the mug the glaze will fuze to the Kiln shelf and you will end up in a big mess and possibly having to replace the shelf. |
|
M
MadDogMike
Posted
posted
on
Sat, Jun 28, 2008 9:21 AM
At least your mug wouldn't tip over with the kiln shelf glaze fused to the bottom of it :) What I meant was, what are the ramifications of not glazing the bottom of the mug? |
|
B
Bowana
Posted
posted
on
Sat, Jun 28, 2008 9:39 AM
Well done, MadDog! |
|
M
MadDogMike
Posted
posted
on
Sat, Jun 28, 2008 2:38 PM
Thank you Bowana |
|
M
MadDogMike
Posted
posted
on
Sat, Jul 12, 2008 1:17 PM
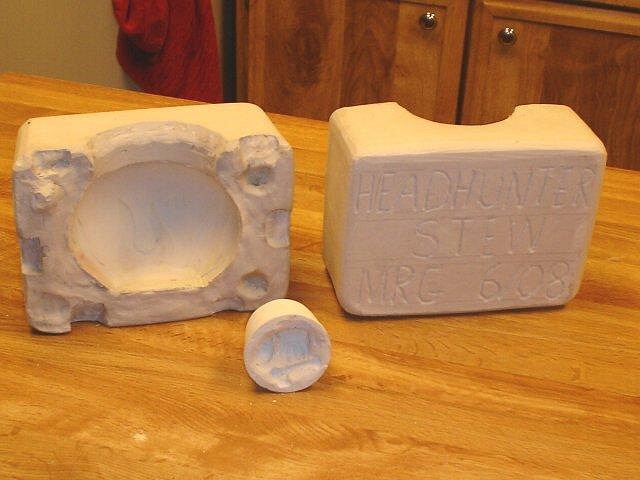
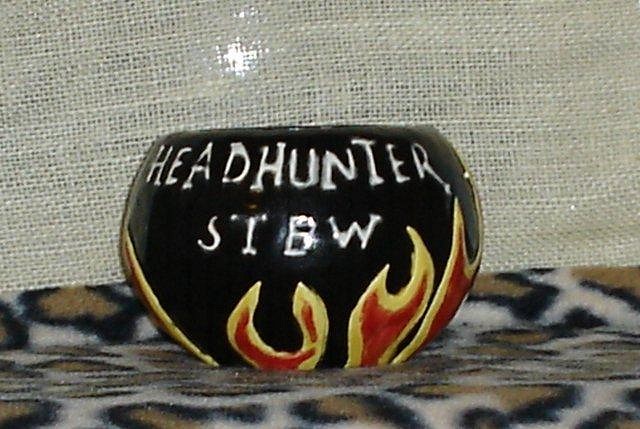
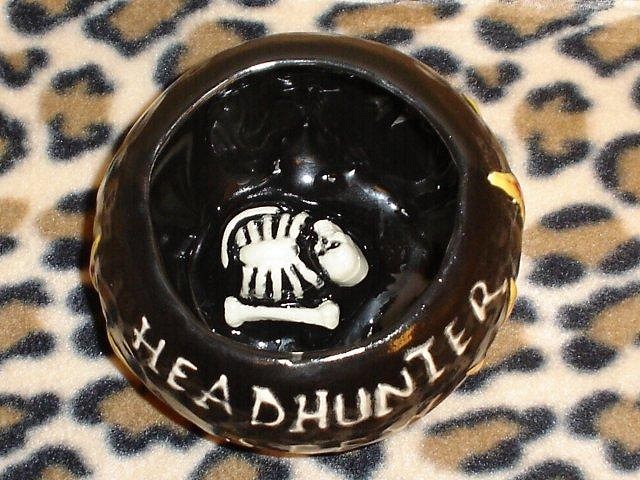
I have stood on the shoulders of giants and created my own Tiki Mug! Thank you HMC for a thread about a year ago that peaked my interest. Thank you Bowana and Babalu for this thread. Thank you so much Babalu for all your help and time in your studio. My mug is kinda flat and 2D but it matches my first tiki (which is also kinda flat and 2D). My plan was to make a "mascot mug" ala Mr Bali Hai. Of course, it doesn't hold a candle to some of the mugs I've seen posted here, but it's my first mug and I'm not ashamed of it :) I'm bisque firing today, some "Headhunter Stew" mugs and I got 2 or 3 mugs floating around my brain right now. I think I'll have fun with this for a long time Again, thanks to everyone for your help and input. |
|
B
Bowana
Posted
posted
on
Sat, Jul 12, 2008 3:59 PM
Right on, MadDog! You've picked up the ball and carried it for quite a distance! |
|
B
Babalu
Posted
posted
on
Sun, Jul 13, 2008 7:55 AM
Mike, Very nice job! The two mugs I have over here that you glazed turned out just like these. Dude, I am quite impressed with your "go for it" style. For those of you who may not know Mike, he is just a great guy....plus he takes the snap and runs full tilt boogie with anything you can throw his way. Most importantly, he's not afraid to fail. Mike lives out in the middle of bum f**k nowhere...when he can't find a store (all he has is a Walmart and a Target) that sells something he wants, he improvises, and with great success I might add. Mike you are a true ceramicist in the making...I'm extremely happy that this thread could benefit you. Your blazing trails brother! Best to you and your wife...Have a killer time on your vacation!
[ Edited by: Babalu 2008-07-13 08:05 ] |
|
M
MadDogMike
Posted
posted
on
Sun, Jul 13, 2008 9:43 AM
You're makin' me blush :blush: Thanks guys! |
|
M
MadDogMike
Posted
posted
on
Thu, Jul 17, 2008 6:52 AM
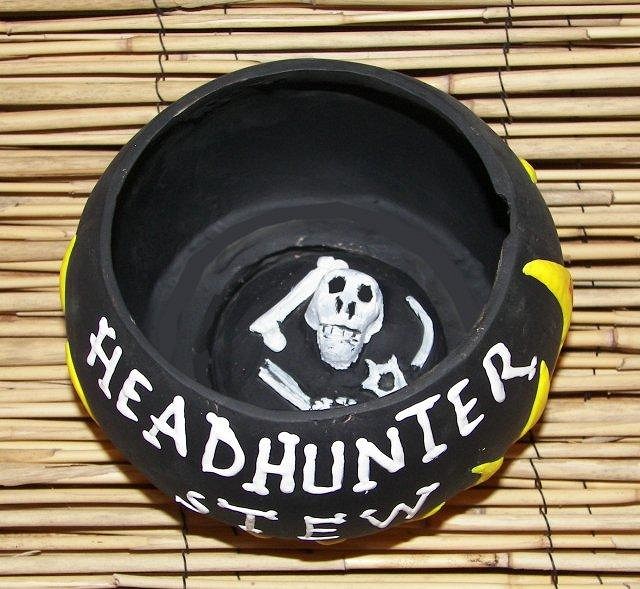
This "Headhunter Stew" mug was inspired by "Dani's Deep Sea Barrel". I know now that this is a knock-off of Rum Demon's "Cannibal Pot", but I didn't know that when I sculpted my model. So I went ahead and made up a few (for personal use only) because I needed the practice. I learned a few things on this project: I learned you can't leave unfired clay outside to dry when there's a thunderstorm on the horizon, it melts in the rain. I learned that you can glaze-bond something to the bottom of a mug, but if you get too much glaze on the inside walls it "slumps" down. I glazed and fired the bones, lettering and flames first, then went back and applied the black glaze. It was easier to wash off any mistakes that way, then I refired it for the black glaze. I guess after I make a few more ceramics pieces, I'll have to make my own thread and stop glomming on to this one :) Anything worth doing, is worth doing to the point of wretched excess. [ Edited by: MadDogMike 2008-07-17 11:49 ] |
|
P

pwest71
Posted
posted
on
Tue, Aug 26, 2008 12:14 PM
If anyone is interested, I've taken most of the basic info in this post, along with the images and created a print friendly version, just PM me with your email address and I'll send it on. Thanks by the way for all the great info in this post, it's inspiring me to give making my own mug a shot... Paul |
|
GT

GO TIKI
Posted
posted
on
Tue, Aug 26, 2008 3:27 PM
Hey MadDogMike, Thanks for mentioning us as an inspiration, Go Tiki's "Dani's Deep Sea Rum Barrel" Keep it up and have fun! Gogo
[ Edited by: GO TIKI 2008-08-26 15:28 ] [ Edited by: GO TIKI 2008-08-26 15:28 ] |
|
M
MadDogMike
Posted
posted
on
Tue, Aug 26, 2008 3:37 PM
You're most welcome :) |
|
T

Tiki-Atari
Posted
posted
on
Mon, Mar 2, 2009 12:02 PM
My wife and I just decided we're going to pick up mug making as a hobby for awhile and see how it goes. Any comments or advice on these, our freshman attempts? Hers In particular, do you think the eyes will be able to slip cast? How about the lips? How can I make this waviness smooth out? Is that the "thumbiness" that window screen can help with? Thanks for looking! |
|
O
OceaOtica
Posted
posted
on
Mon, Mar 2, 2009 12:58 PM
Hey Atari, the first question i have is are you going to mold this to pour up? I see you have a pvc piece in side, so it is a bit confusing as to whether you intend to fire the finished sculpture or this is a master sculpture to mold. [ Edited by: oceaotica 2009-03-02 13:22 ] |
|
P

poptiki
Posted
posted
on
Sat, May 9, 2009 8:48 PM
M [ Edited by poptiki on 2022-10-12 03:44:13 ] |
|
M
MadDogMike
Posted
posted
on
Sun, May 10, 2009 10:23 AM
This thread is an awesome resource for anyone wanting to give slipcasting a try. But seems like, since Babalu converted everyone to handbuilding, there hasn't been much casting going on. :) |
|
P
poptiki
Posted
posted
on
Tue, May 12, 2009 2:28 AM
M [ Edited by poptiki on 2022-10-12 03:42:21 ] |
|
M
MadDogMike
Posted
posted
on
Tue, May 12, 2009 6:44 AM
It is very rewarding to make yourself a set of 8 matching mugs, but hand building appeals to my sense of "instant" gratification. In as few as several days, you can go from "lump of clay" to "finished product" whereas sculpting a master, forming a mold, waiting for the mold to dry, etc seems to take so much longer. "Lord, grant me patience...RIGHT NOW!" |
|
B
Babalu
Posted
posted
on
Tue, May 12, 2009 7:38 AM
and boy howdy do you ever do it well! :) Yes, I think we should keep this thread going. I know Bowana just made a new mold, and I'm working on the master for a new one now...I have to head out of town tomorrow, but I'll post a little in here when I get back. Pops, I have to be at a wedding in Boulder on June 27th...I was thinking of gathering some old clay pals of mine together for a Clay Jam in Denver somewhere around that time...you interested? Just drop me a pm if you are. It will be fun! These are some really great people. I'm sure you and I can learn a great deal hanging out with them even if its for a day. [ Edited by: Babalu 2009-05-12 08:08 ] |
|
N

NOTCH
Posted
posted
on
Tue, May 12, 2009 8:28 AM
Hey Babalu! Thanks for all your info on making slip casting Molds, Ive been workin in my laboratory I will post some pictures of Molds and mugs I made using your techniques very soon |
|
B
Babalu
Posted
posted
on
Tue, May 12, 2009 9:31 AM
That's so cool NOTCH...I can't wait to see what new epic goodie you have come up with this time! and thanks for the props, but really, I am a newbie to mold making as well...I only helped to documented the things that Sir B - Bowana (the man) showed me and a few others how to do. I don't know if you have seen Dave's new mold yet on his carving thread? He sculpted this on a spray paint can :) Go to - http://www.tikicentral.com/viewtopic.php?mode=viewtopic&topic=22368&forum=7&start=420 [ Edited by: Babalu 2009-05-12 09:31 ] |
|
M

mp
Posted
posted
on
Fri, Jun 19, 2009 10:20 PM
Hey It's MP. I just wanted to give a shout out to Babalu, Bowana and everyone involved in the making of this
2012's "Royal Gaurd" by MP [ Edited by: mp 2013-05-22 01:35 ] |
|
P

pdrake
Posted
posted
on
Fri, Jun 19, 2009 10:49 PM
good for you. it takes a lot of effort and fortitude to do all that work yourself. (and pretty much for yourself.) nice stuff man. PM me when you start selling. CLAY ON WIT' YO' BAD SELF'! |
|
M
MadDogMike
Posted
posted
on
Sat, Jun 20, 2009 10:32 AM
Very cool MP. 5 HOURS POUR TIME!!! :o :o :o They must be almost solid! I tried something new with a mold, Master Squid and Master Bowana said it was legit, it might help someone on their next mold. Instead of adding an extra mold piece to make the concave "foot" at the bottom of the mug I tried something new (or at least new to me). I just made a 2 piece mold with a flat bottom. After the piece was pulled from the mold and still soft, I gently pushed the clay up to make the foot. Seems to have worked well.
|
|
CP

Cap'n Pharaoh
Posted
posted
on
Fri, Jul 24, 2009 8:09 AM
hope this is in an appropriate thread ...couldn't find a just glaze one. Okay So I've dove in and have been doing some slip casting myself ..but the biggest problem I have is not with the casting but the... Glazing. I have a small kiln 10Amp 240 Volt that can regularly fire to 1060c or about cone 04. I cast using a comercial slip that fires cone 04 I have been using all commercial glazes and slips (not home mixed) from a company here in Australia called Keane ceramics. PREPARE TO BE BOARDED! [ Edited by: Cap'n Pharaoh 2009-07-24 08:34 ] |
|
M
MadDogMike
Posted
posted
on
Fri, Jul 24, 2009 4:30 PM
I'm no expert and you may have already tried these but here's some suggestions: Get some witness cones to be sure you are firing to the desired cone. Be sure the bisqued ceramic is clean when you glaze it, no dust, oil, fingerprints etc. Same with the brushes. It's possible that your underglaze and clear glaze are not compatible, especially if they are not the same brand. Too thick of a layer of ungerglaze will cause crawling, try thinning the underglaze with water or using less coats. Seems like the glazing is the most troublesome aspect of ceramics. I have been using mostly Duncan glazes with a few Maycos. The only problem I had was shivering when I mixed low-fire and high fire clays. Maybe someone else will chime in with some more good ideas |