Tiki Central / Other Crafts
Plaster Mold Making & Some Ceramics
|
B

Babalu
Posted
posted
on
Tue, Apr 15, 2008 6:16 PM
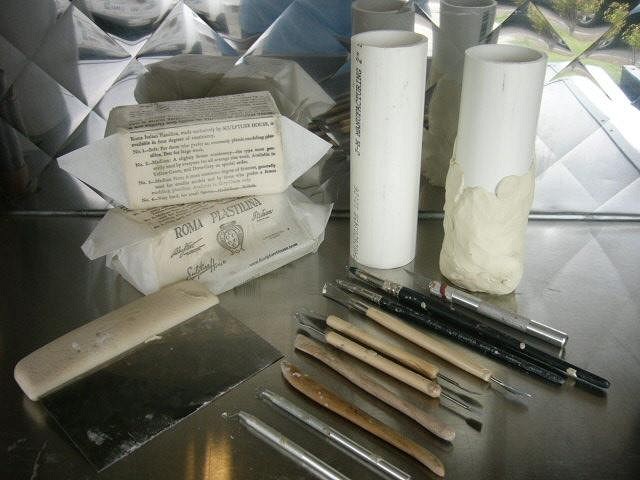
Hello All, Both Bowana and myself have had several folks ask us if we could share a little of what we know on how to build plaster molds for slip casting ceramics. We talked about it, and would love to share some pointers. There are a few few other threads on TC that talk about how to build plaster molds, but I guess one more isn't going to hurt anything. I personally have been playing in water based clays for many years now, but I had no hands on experience with plaster mold making until Bowana did a demo over at my house during one of our "Chop" events. I did take several pictures of the demo that Bowana and I did for this Chop event which should work as good aid in explaining the processes. It may take several days to get all this information posted on this thread, but I think it will be fun for you, if you find this type of topic of interest. Well, to start off, a good thing to talk about might be what type of materials can one make a plaster mold from? The answer is basically anything...fired ceramic, wood, plastic, found objects...as I said, most anything, and/or a combination of materials. In this demo I choose to do my cast master form out of an oil based clay called "Plasticine, or Plastilina". This type of clay does not need a mold release agent (mold soap) added to the outside of it in order to pull away from the master mold as the oil in the clay won't stick to the plaster. Plus, one can get some really fine detail in the plastilina, and not have to worry about the clay drying out on you like you would with water based clays. Also, as Bowana put it "this is the way the pros do it" :) For the master sculpt, I used a 2" diameter PVC pipe as a core material and added the oil based clay to it. This had a few advantages for me...1. I did not have to use so much clay...2. It gave me a nice round shape and predetermined height in and armature to add the clay to. Pictured below are some of the tools that I choose to use when sculpting in the plastilina. "Roma" brand plastilina is a fine choice when choosing a brand of clay to sculpt with. Number 2 Roma is a little softer and has been used mostly for sculpting busts. Number 3 Roma was a little harder and my personal favorive to work with. Number 4 Roma is harder yet...some people like this feel. Please see picture below...Bowana, can you show some of those cool tools you use to work in Plasticine? Please correct me Bowana if you notice me missing steps, or anything elase as we move forward.
[ Edited by: Babalu 2008-05-04 12:22 ] [ Edited by: Babalu 2008-05-04 20:43 ] [ Edited by: Babalu 2008-05-05 20:43 ] |
|
R

Robin
Posted
posted
on
Tue, Apr 15, 2008 8:04 PM
Whoa! This is gonna be great! Thanks for doing this Bowana and Babalu!!!!! |
|
C

Clarita
Posted
posted
on
Thu, Apr 17, 2008 6:55 AM
Oh! great thread Babalu, I'm going to stay tuned for sure! Thanks! |
|
F

frostiki
Posted
posted
on
Thu, Apr 17, 2008 8:41 AM
Thanks guys this is a great thread, I've picked up a few boos on mold making and none of them compare to what you have posted right here. SImple to understand for simpletons like me. We've been wanting to try our hand at slip casting and this is a push in the right direction. Mahalo, Frostiki |
|
B
Babalu
Posted
posted
on
Thu, Apr 17, 2008 3:30 PM
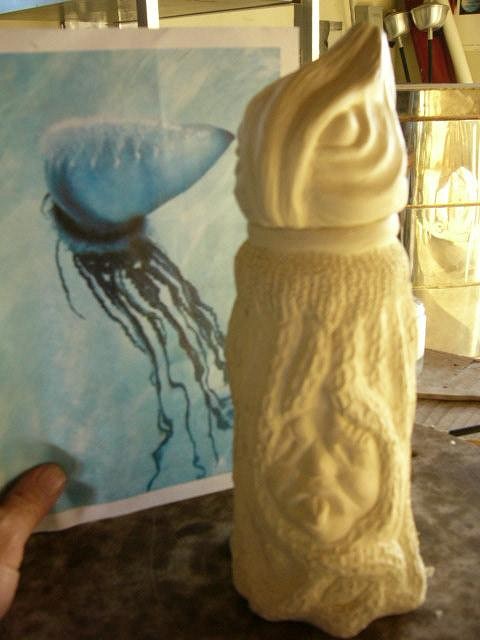
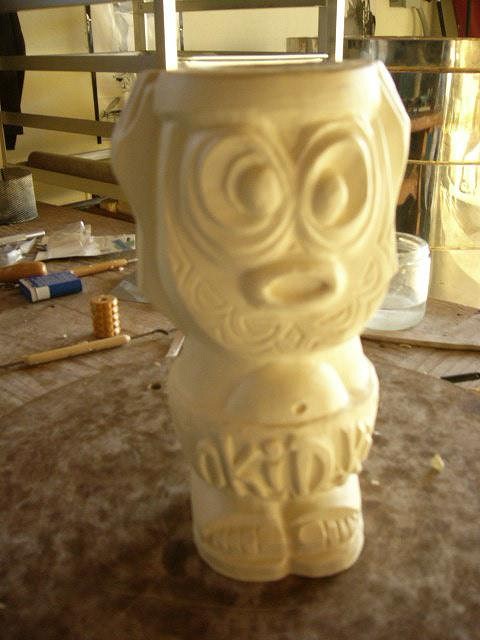
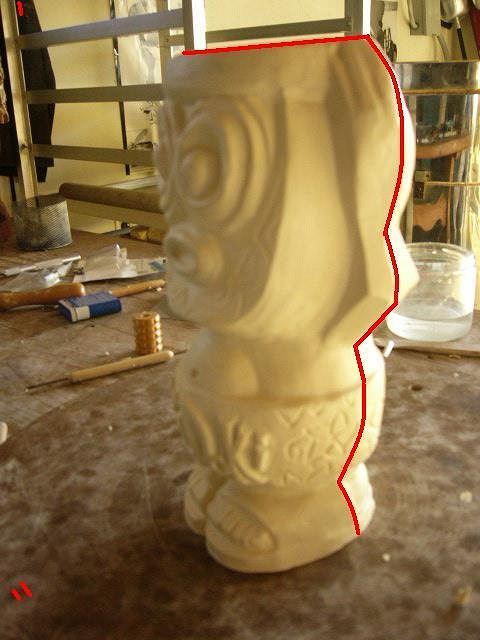
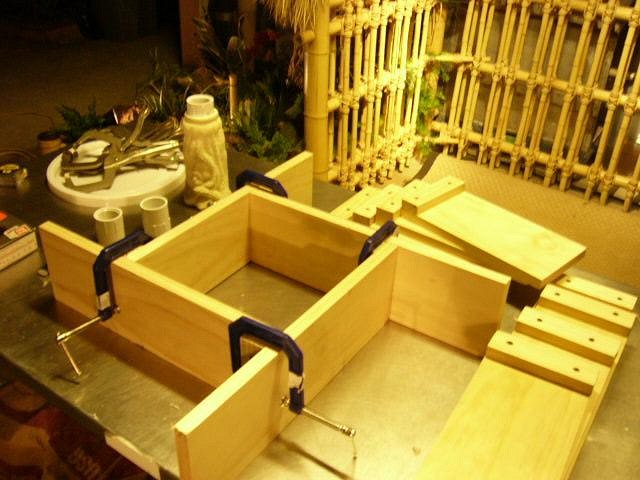
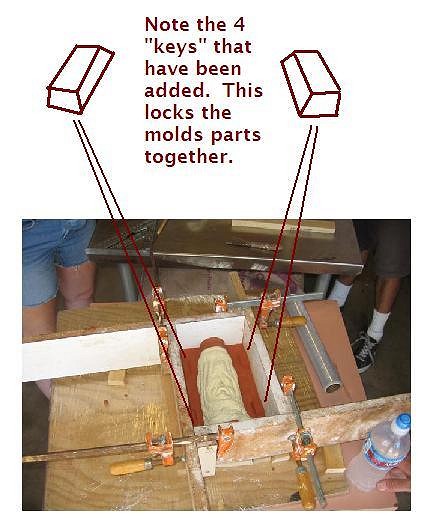
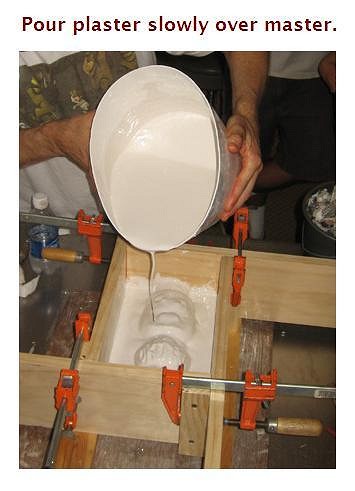
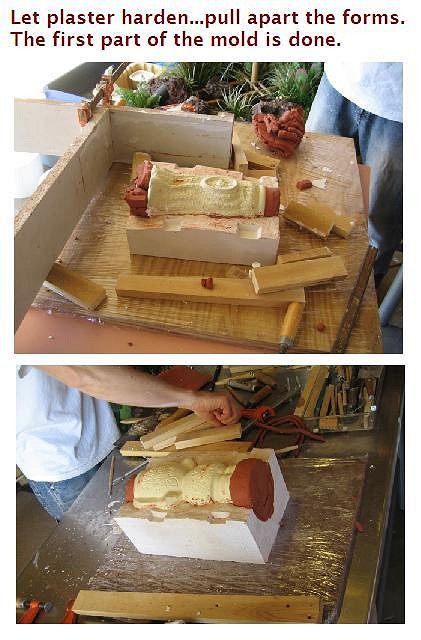
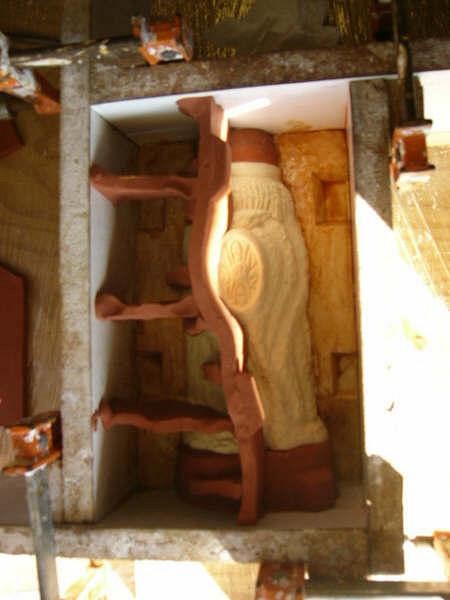
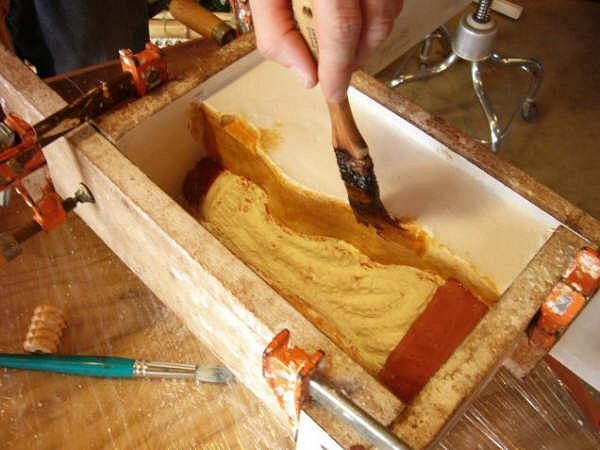
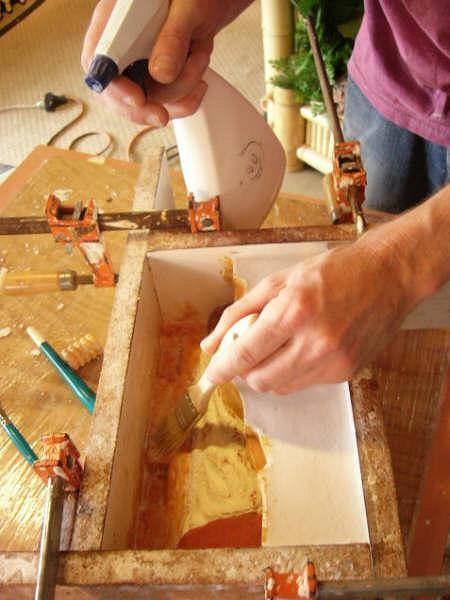
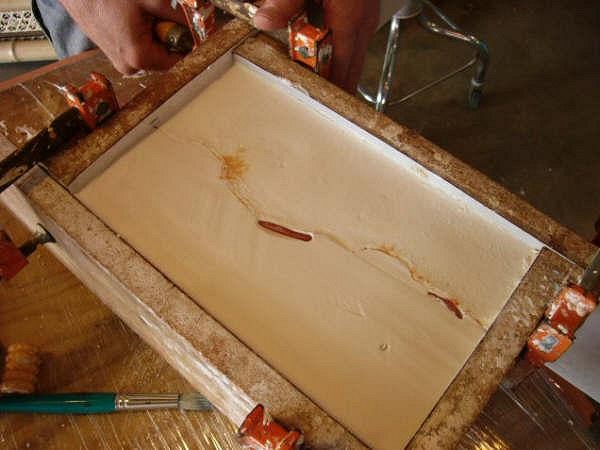
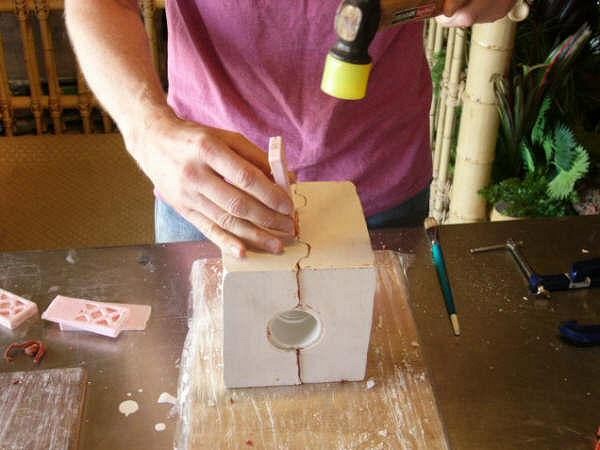
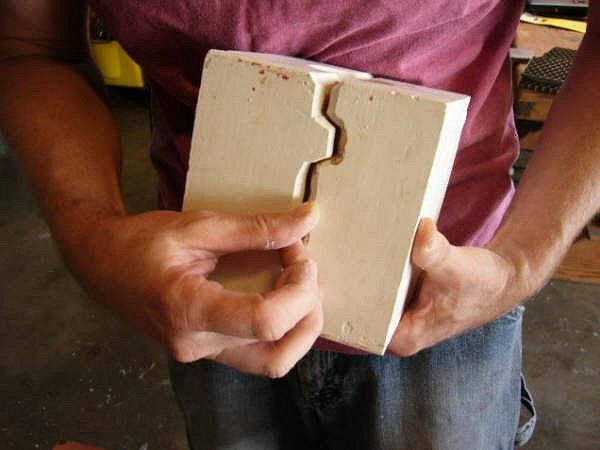
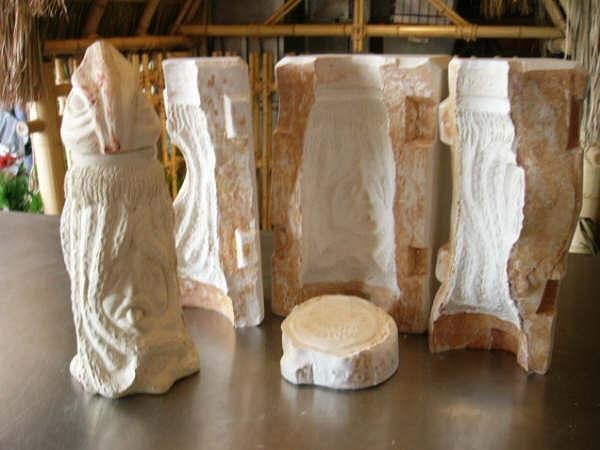
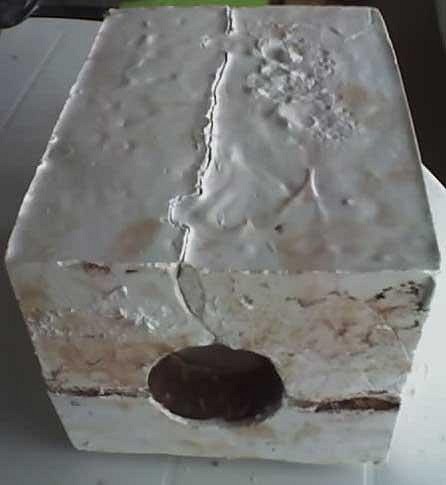
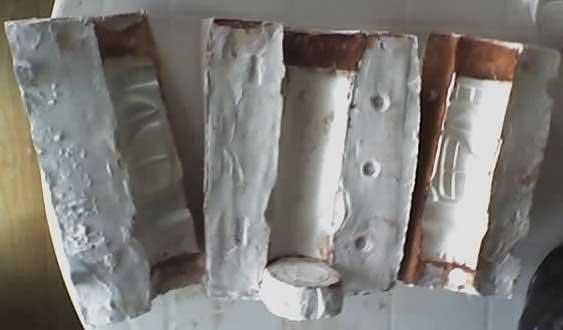
Ok gang, here we go...These were the finished oil based clay sculptures that we started with (the masters). When you sculpt your design you want to make sure you have designed in no undercuts on the master as your plaster molds will need to pull away from the slip formed clay inside the mold when is broken apart. If you have undercuts in the design, it will rip the the clay where the undercuts are located. The Man of War mug shown here is a 4 part mold for the bottom part, and a 2 part mold for the lid. The Oki Doki mug (also shown) is a 3 part mold. As you are sculpting your master, you want to always work thinking about where you want to make your part line on the mold as you go...note the red line on the Oki Doki mug.
I made these simple wood forms. This design makes it easy to be able to adjust the size of the form, and can be used multiple times, for many molds. You want to coat the inner sides of the wood forms with mold soap, or a wood floor soap which will act as a releasing agent...the dried plaster won't stick to the wood.
Next, we started adding a softer cheaper brand of oil based clay(found this stuff at Arron Brothers) to build up on the inside of the form. This will be the first half of the MOW mug. Note how Bowana put some small strips of wood on the bottom which acted a filler so we didn't have to use so much of the soft oil based clay. The clay was built up to our choosen part line on the master.
Note how clay was added to the base of the master and to the top. Bowana...anything you can add to these steps? |
|
G

greentikipat
Posted
posted
on
Thu, Apr 17, 2008 3:47 PM
awesome, guys! this will be a much visited thread for me. well put and great pics. |
|
B

Bowana
Posted
posted
on
Thu, Apr 17, 2008 10:42 PM
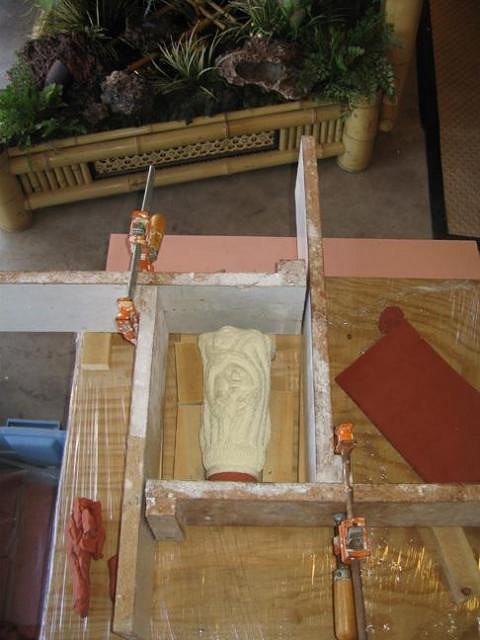
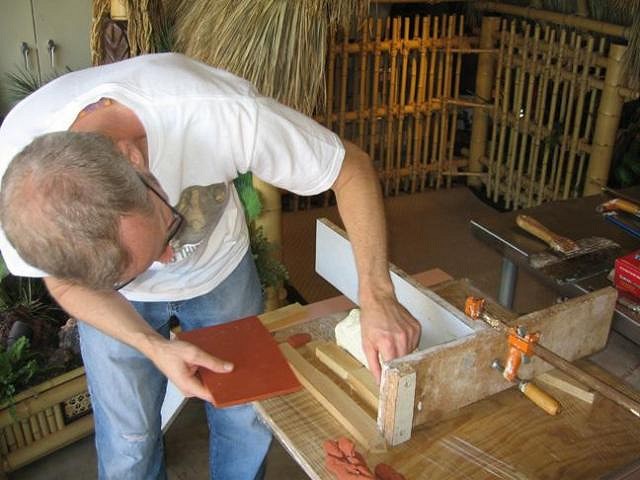
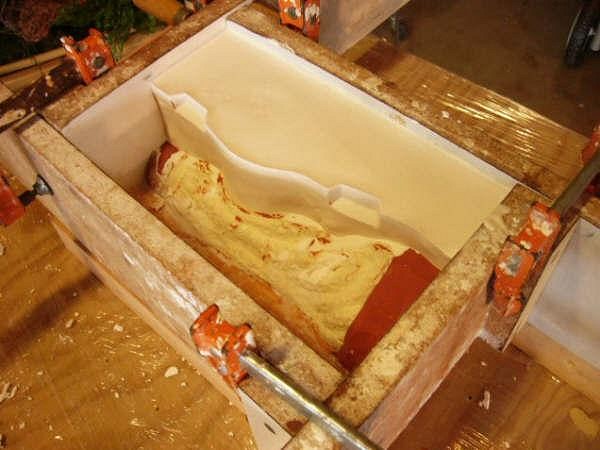
Sure, Babalu! Pass the mic! Here is a small, but important thing to consider when designing a slip cast item. The bottom of most mugs, cups, vases, ect. are generally dished in like in this picture. The raised rim around the edge keeps the piece from rocking when sitting upright.
A separate mold part will need to be made to accommodate the undercut caused by the raised rim.
More on how this is done coming up! |
|
B
Babalu
Posted
posted
on
Sat, Apr 19, 2008 3:22 PM
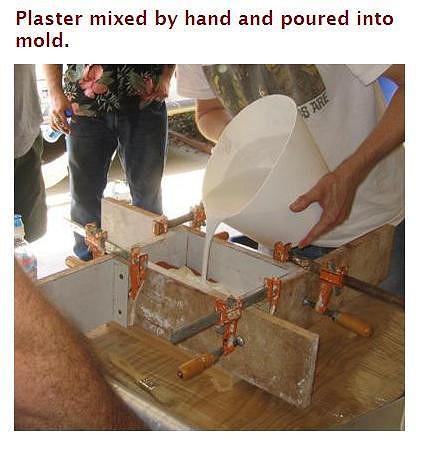
Ok Sir Bowana...your up. What type of plaster did we use? I don't have access to the name brand from where I am at right now. Plus I can't remember about how long it takes for the plaster to harden...1 hour? |
|
B
Bowana
Posted
posted
on
Sun, Apr 20, 2008 7:54 PM
We used Puritan Pottery Plaster. It takes 30 minutes to an hour to set up hard enough to make the next piece. Hydrocal is also an excellent type of plaster to use in mold making. |
|
H

harro
Posted
posted
on
Thu, Apr 24, 2008 7:58 PM
Great thread! Imagine how many cool mugs will be inspired by the instructions contained here. If only I had all this stuff I'd probably give it a go myself! Who knows, maybe one day. We are all grateful for you guys taking the time to share this valuable information. cheers. |
|
P

Paipo
Posted
posted
on
Thu, Apr 24, 2008 8:40 PM
I know I'll be one of those who'll be putting the knowledge in here to practical use. I have questions already, but I'm gonna hold off until I can relate them to what I'll be making...first off I need to get me some clay toolz. |
|
B
Babalu
Posted
posted
on
Fri, Apr 25, 2008 7:47 AM
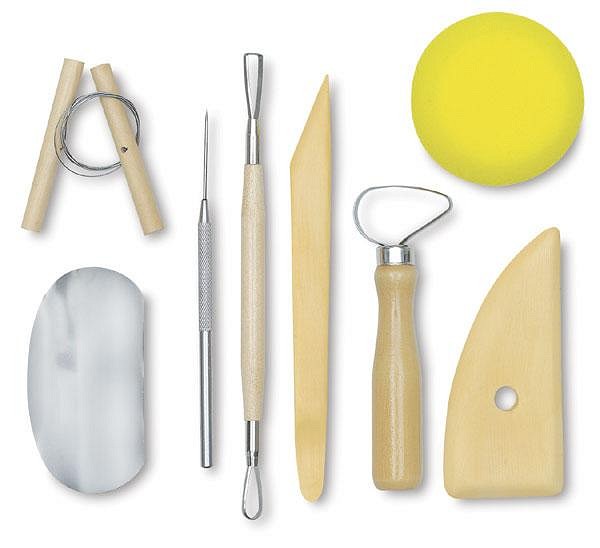
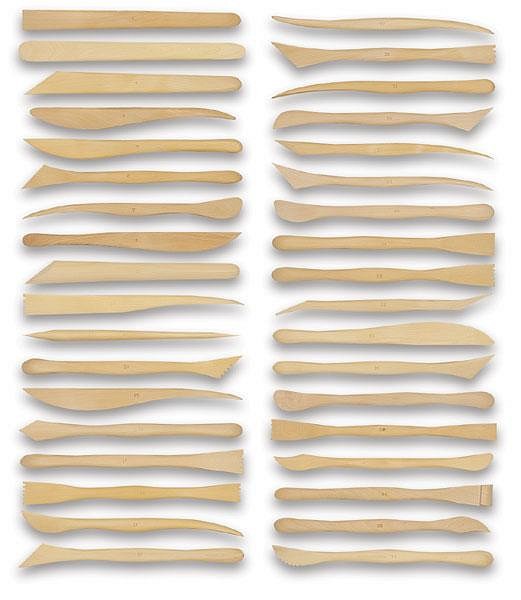
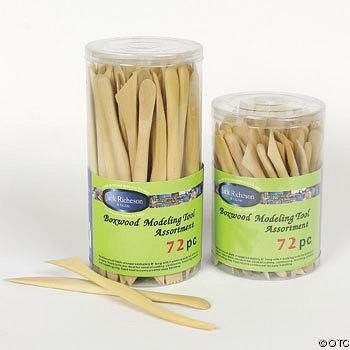
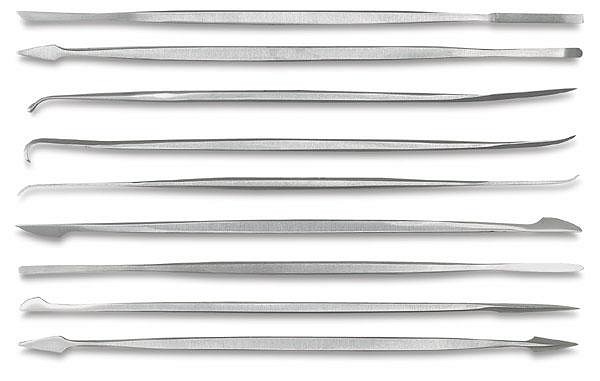
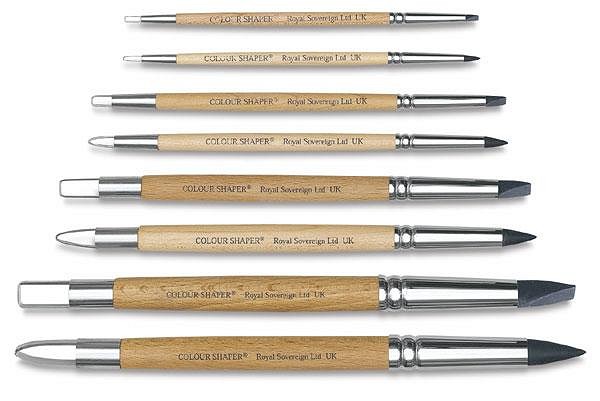
Thanks guys. Sorry it has taken me sooo long to get back to this thread...I'm just settling back in from that darn trip. Anyway, "what tools to use" is a good question and one that many wonder about. There are many Sites to buy tools, just Google "Clay Modeling tools" or the like. I pull some pictures from Dick Blick It's funny, but at one time or another, I have probably brought all these tools on this Site and I find that there are maybe 1 or two from each grouping that I really use. I think each person is different...they like different tools in their hands. Thank goodness clay tools are fairly cheap. Even though I might have brought a pack of tools and only used a few from that grouping, the few that I might have discovered that I liked are worth the cost of the grouping to me. This is a basic ceramic tool set...clay 101 if you will. Some good tools here. The wire is a must for cutting into blocks of clay(you can make that too).
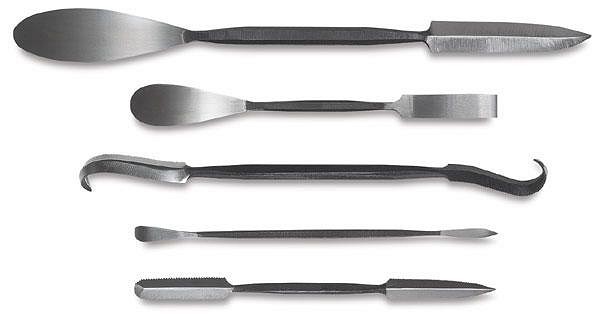
These wood tools are standard ceramic tools as well, but I also think they work nicely with the oil based clays too.
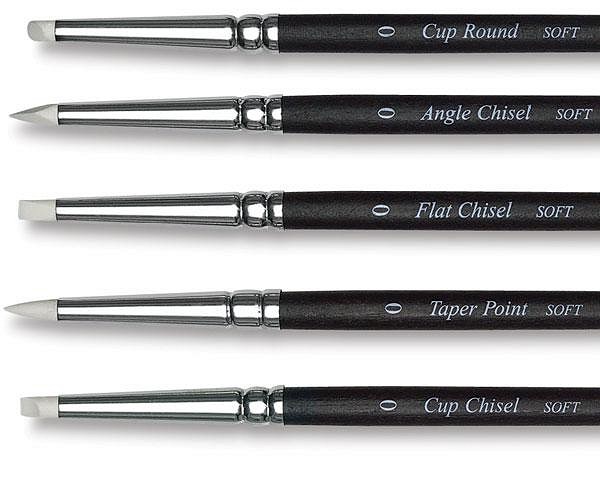
These metal tools are designed more for oil based clays. I don't have many of these, but I like them...I want to try some more of these here that I don't have yet.
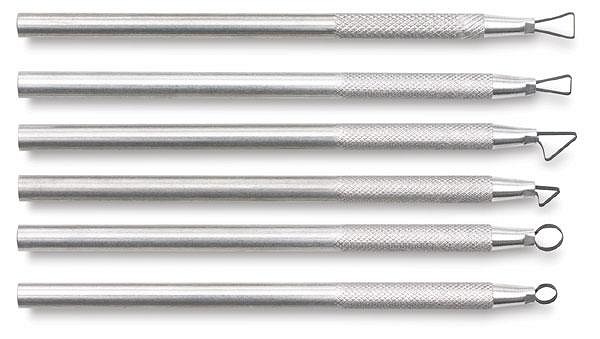
Loop types tools are good all around for removing. I also like to take these and alter (bend) the shape of these to suit my needs.
These rubber tipped tools are great for all around smoothing...love them. When your working in oil based clays, try using just a little "Mineral Spirits" too. This really helps to smooth as well.
Bottom line, there are a shit load of tools out there...you do not need them all! Some of my favorite tools are tools that I made and not ones that I brought. A question was asked about using a turn table, or lazy susan...yeah, I like these...I tend to use it all the time for all kinds of applications...not just clay. Well, that was kind of long winded there...hope it helps. I'm going to let Sir Bowana have some fun too...he is pictorially going take this thread home...Sir Bowana...enter stage right :) |
|
M

MadDogMike
Posted
posted
on
Fri, Apr 25, 2008 9:17 AM
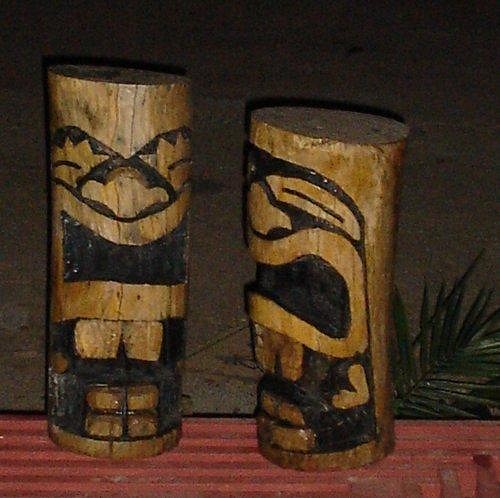
Guys, thanks for the tips! I am in the process of trying one myself. I've never tried any ceramics before, we'll see what happens. I want my mug to be a miniature of my first carved tiki (on the left), which is somewhat simple and crude. |
|
LLT

little lost tiki
Posted
posted
on
Fri, Apr 25, 2008 10:51 AM
BabsBowanabraniacs! |
|
B
Bowana
Posted
posted
on
Sun, Apr 27, 2008 8:14 AM
First of all, I just want to say that this is my 500th post on TC! Yay! :) MadDogMike, and anyone else in the SD area: check out Free Form Ceramics in National City for your ceramics needs http://www.freeformclay.com/ They've got clay, plaster, tools, kilns, glazes, and a plethora of other supplies for the ceramicist.
We're almost done now! There's still a few little tricks left that we'll cover when we continue, but for now these are the basics of mold making of this type. Robin, Clarita, Frosty, Pat, Harro, Paipo, MadDog, LLT, we are expecting to see some cool ceramics from you all in the future! :) Bowana |
|
R
Robin
Posted
posted
on
Mon, Apr 28, 2008 8:40 AM
Thanks you guys, this is great! I've tended to stay away from plaster...I'm the kind of worker who gets stuff everywhere...floor, walls, hair, eyes, mouth,etc....working in clay made that problematic. I didn't notice to much mess around in your photos....maybe there's hope. Seriously though priceless tips and photos...thanks so much for doing this...it's a great reference. |
|
M
MadDogMike
Posted
posted
on
Tue, Apr 29, 2008 6:09 PM
OK Bowana & Babalu, I'm heading back to SD Thursday to pick up some slip from Freeform. I made a model out of wax, somewhat crude but it will work for a first try. I made a 3 piece mold, also somewhat crude. I didn't do a very good job on the parting line, I'm afraid I'll have lots of fettling to do (is that the right word). If this mold doesn't work out, I'll make a new one and be more careful this time. |
|
M
MadDogMike
Posted
posted
on
Tue, Apr 29, 2008 6:38 PM
Hey, what should I get for slip? (Brand? Color? Cone?) |
|
B
Bowana
Posted
posted
on
Wed, Apr 30, 2008 7:17 AM
MadDog- Good separation lines are very important. Take as much time as you need making them. You'll learn as you make more. Bowana |
|
G

GROG
Posted
posted
on
Wed, Apr 30, 2008 8:18 AM
GROG not remember you guys mentioning "shrinkage". Shouldn't your sculpt be a little larger than what you want the final ceramic size to be? If GROG remember GROG' ceramic-making correctly, after the mold is made, the slip is poured into the mold, and once hardened enough it is removed from the mold and is called greenware. As it dries it shrinks. Then, when it is fired it shrinks some more if GROG remember correctly. Thus, your finished ceramic will be smaller than your original sculpt. About what percentage of shrinkage can you expect? |
|
G
GROG
Posted
posted
on
Wed, Apr 30, 2008 8:27 AM
An example of shrinkage. The greenware on the left is darker and taller because it is fresh out-of-the-mold, and hasn't dried much. The greenware to the right is lighter and shorter because it has shrunken as it dried.
[ Edited by: GROG 2008-04-30 08:31 ] |
|
B
Babalu
Posted
posted
on
Wed, Apr 30, 2008 11:02 AM
Grog is sooo right! This should have been discussed in the beginning. As you are sculpting your master you will need to take into account that clay shrinks as it dries...it also shrinks during the firing process. A typical shrinkage rate (depending on your clay body) is between 4% and 10% as the green ware (unfired clay) dries. Clay can also shrink as much as 8% in the firing of the clay. Some clays have more "grog" (no pun) added to them which will reduce the shrinkage rate during firing. Grog is is finely ground bisqued clay that has been added to the clay. This added grog not only reduces shrinkage, it also makes for a more sculptural clay, and helps with the thermal shock of the firing. Most of the mugs that you guys like are made with low fire (cone 04) slip. This type clay shrinks a bit, but one can also get some really nice store brought colors with the low fired glazes (cone 06) that are available for this type of cone 04 clay. I would venture to say that this mug of mine shrinks a total of approximately 12-14% during the drying and firing. I know Bowana still has some "how to" mold making photos to post yet. After he has done that I will dive a little into glazing and firing for you. Thanks Grog for catching the shrinkage thing... |
|
M
MadDogMike
Posted
posted
on
Thu, May 1, 2008 7:52 PM
Back to the drawing board! Well I got some slip today (Laguna S695 white stoneware, cone 5) and cast my first mug. Everything went well except the bottom of the mug tore when I took it out of the mold (Other than that Mrs. Lincoln, how was the show?) I made the rim and concave bottom, but didn't heed the advice to make a separate piece of the mold for the bottom. Now it seems there's no way to remove the mug without tearing it. |
|
B
Babalu
Posted
posted
on
Thu, May 1, 2008 9:46 PM
Hey Mad Dog, That a way to go! Don't get discouraged. Keep after it. It will happen. I notice that you mentioned that you brought a Cone 5 slip. This slip fires quite a bit hotter than the cone 04 slip that Sir B and I are using...Cone 04 = 1940 degrees Fahrenheit...Cone 5 = 2185 degrees Fahrenheit. Just make sure when you buy glazes that you have them show you to the glazes that are compatible to your slip. These days they make quite a few colors for cone 5 - cone 6. Do you have your own kiln? |
|
M
MadDogMike
Posted
posted
on
Fri, May 2, 2008 7:28 AM
Freeform had lots of cone 5 glazes. Do you know of anyone in SD area that will fire pieces for a small fee? There is a local woman here who will do a kiln-full for $40, but that's only ecomonical if you fill the kiln. Freeform had a small used 110v kiln for $150 and there's a medium-sized Cress LT-4K 220v that I know of avail for $200. |
|
B
Babalu
Posted
posted
on
Fri, May 2, 2008 10:14 AM
Hey Mad Dog, I would be happy to toss a few of your mugs into one of my firings if you like, however, everything I'm firing right now is low fire. If you bring your new mold over, I have quite a bit of the cone 04 slip you can try in it. It sounds like you didn't buy to much of that cone 5 slip? That's probably a good thing. |
|
TK

Tiki Kaimuki
Posted
posted
on
Fri, May 2, 2008 10:38 AM
I haven't had much luck with the Laguna Cone 5 white stoneware. I'm switching to morrocan sand and will probably add a bit of grog for more strength. Babalu, do you mix your own slip or do you buy premixed? |
|
C

Cammo
Posted
posted
on
Fri, May 2, 2008 11:03 AM
I think Babalu should come up with a small per-mug fee for firing, we figured it isn't too expensive, but there is a cost involved in electricity at his end. Shrinkage - When I made my Oki Doki mug, I made it extra BIG because I thought it would shrink like crazy, both in the drying and in the first firing. But it HARDLY SHRINKS AT ALL! I ended up with a giant 24-oz mug that was WAY bigger than I thought possible. It shrinks, but our final glazed mug measured to 94% of the original. We're using the Freeform white slip; Babalu has the exact cone info. So don't sweat the shrink. And - go crazy with glazes. Try everything. Lots of transparent colors. Try stuff on top of stuff, and take notes. (Number your mugs to help you do this.) We've been experimenting for a long time and have barely started yet. If you layer two glazes they form amazing colors unlike either of the glazes themselves, and burst out in cool looking hues... [ Edited by: Cammo 2008-05-02 11:18 ] |
|
M
MadDogMike
Posted
posted
on
Fri, May 2, 2008 12:33 PM
Babalu, thanks for the generous offer, but you have to promise not to make fun of my lack of sculpting ability :P |
|
B
Bowana
Posted
posted
on
Fri, May 2, 2008 8:56 PM
GROG pretty smart for caveman. Bowana think GROG not Neanderthal any more. GROG move up one rung on evolutionary ladder to Cro-Magnon Man with knowledge of ceramics. :) Sorry to hear about your mold, MadDog. Try it again! You'll just keep getting better.
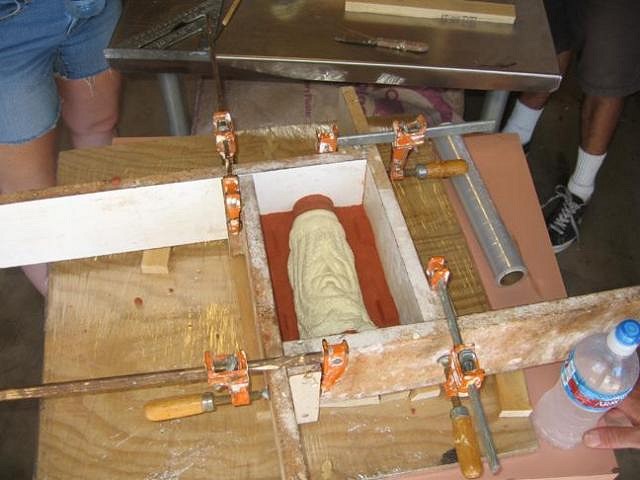
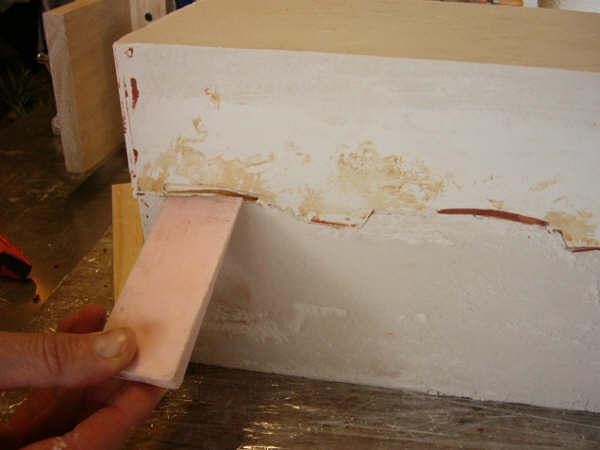
I use these plastic wedges from bought at Free Form to open the mold. The wedge is inserted into the shallow depression left by the clay worm in the previous picture. This gets the wedge started on the opening process much easier than if it were to be driven straight into the plaster. It's like giving it a bit of a head start.
Take the mic, Babs... |
|
O

OceaOtica
Posted
posted
on
Sat, May 3, 2008 9:29 AM
Great thread guys! I have been messaged with a few questions as well so will tack on some info here. i usually use Lagunas water based (em210?) white clay for building a separation wall. When using water based clays for sculpting or molding purposes, there is always the fine line of too wet too dry. One technique that helps in the last final smoothing your piece or parting wall is to use 99% alcohol (or 70% is thats what you can get) instead of water. This will not saturate the clay like water, will evaporate faster, and helps to prevent sludging the surface. A great tool for smoothing water based clays is a foam rubber cosmetic sponge. When bulking out the form and getting to the early steps of smoothing before final detailing, a powder puff with water is a great tool. Hope this is clear helpful info, and answered some PM's. [ Edited by: oceaotica 2008-05-04 10:19 ] |
|
B
Babalu
Posted
posted
on
Sun, May 4, 2008 12:21 PM
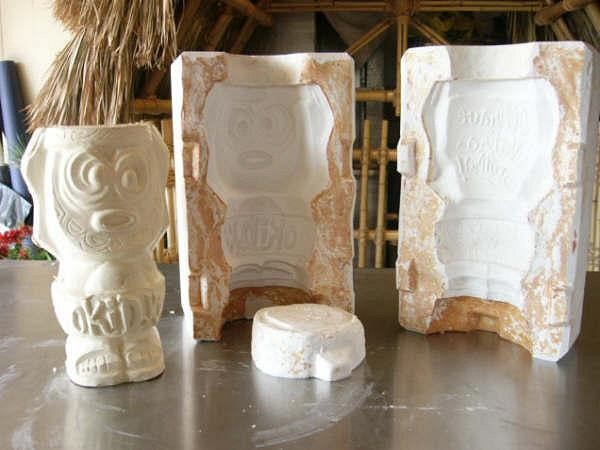
OceaOtica - Really good post! I'll have to remember to try the alcohol thing. I love the fact that other folks are jumping in and sharing their own knowledge. In fact, and I'm sure Bowana would agree, I'm going to change the thread name to "Plaster Mold Making & Ceramics Information" in hopes that other TC'ers will follow your lead. Also, I totally agree with you that it would be really helpful for beginning sculptures to start out playing with regular water based clay first...Hell, for that matter, there is no reason you can't make a mold off of a glaze fired ceramic work too. You might loose a little detail this way, but hey... If you are just beginning to play with sculpture, you might also consider jumping into a beginning clay class at your local community college. These classes are always fun, and I think one tends to learn quite a bit in them...Plus they are cheap! One of the best teachers I ever had was in a community college setting...For me, I feel I learned just as much there about clay as I did in the grad school I transferred to later on. Cammo, your right. Your mug shrunk only 6%. I hadn't put a ruler to it before...it just felt double that to me. I put the master sculpt of Oki next to a fired finished Oki here so you can all see what 6% looks like. A 6% reduction in size may be a concern to someone whom needs a mug to hold a specific amount of liquid. Like you said, it's really up to the person. Henrik and Kaimuki, I would bet your are seeing a higher shrinkage rate than this 6% as your final firings are much hotter? A really, really important point to consider when sculpting your master is "how does it feel in your hand"...how will it feel when it shrinks a little? This picture below is also a good picture, because it shows how the master oil clay sculpt weathered the whole mold making process. Not bad, huh...one could quite easily do another mold from this master without having to do much to repair it. I have seen where other people are using their master sculpt to cast a harder master resin copy first. This way, one could build multiple plaster molds for mass production. There is a good thread showing this somewhere on TC...hopefully someone can post a link to it on this thread? I can't seem to find it.
Another thing, If you look back on the pictures, you will see that we built the finished master up around the top with our oil based clay. This extra space added is needed. When you pour your slip into the molds it shrinks down from the top as the clay is starting to settle and harden in the mold. The clay thins in this "extra space" area. After you have pulled the slip casting from the mold take a knife and trim this extra off the lip of the mug. Dip your finger(s) into some water and smooth out the rim. Be gentle...keep your rim rounded. Remember liquid needs to pour from your mug and look good doing it.
Kaimuki - Love your new mug! You might also want to test a lower fire slip too? What type of problems are you seeing with the cone 5 slip? "Babalu - do you make your own slip" - Nope, I didn't make my own slip for these mugs...I guess the reason is because, it's really easy to just go buy the pre-made slip quite cheaply, and this store brought "pre-made" seems to be always made well. Cammo found some gal here locally (San Diego) that is making slip for a reasonable price too. I think if I were really into to punching out a large number of mugs (100's), then I might make my own slip as well as making multiple molds to use for one design. Mad Dog - No worries at all. I think it's cool that someone has starting giving this whole mold making thing a shot. I did a quick online search for a simple tell all about loading a kiln, firing, trouble shooting glazing, etc...I grabbed these two without looking around too much...there is tons of info online these days about ceramics. We are only just touching the surface.... http://www.clay-king.com/conefire.htm |
|
G
GROG
Posted
posted
on
Sun, May 4, 2008 12:55 PM
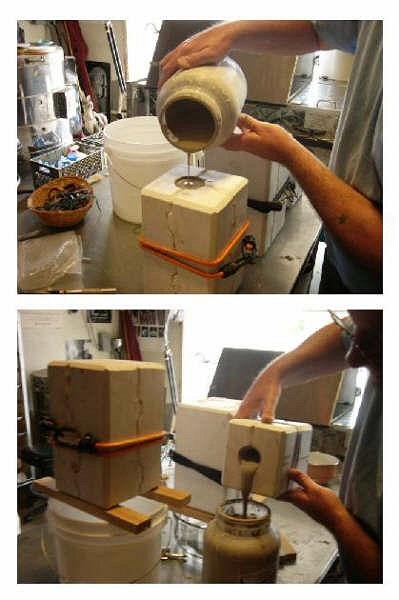
GROG see in the pictures that you poured the slip in the mold and then poured the extra slip out of the mold once the slip hardened enough to give the mold some thickness. About how long should the mold sit for the slip to set up before you pour out the extra slip in order to get a nice wall thickness for the mug without making it too thick or too thin? Now, the slip dries around the outside of the mold inside the impression area because the mold draws the moisture from the slip, thus forming the wall thickness of the mug. Does the room temperature and humidity make a difference in how long it takes for the slip to set up? After the extra slip is poured out, how long should the slip dry inside the mold before you can remove the greenware? How long should you let the mold dry out before you do another pour? |
|
B
Babalu
Posted
posted
on
Sun, May 4, 2008 8:38 PM
Hey Grog, Love the humidity question...I can tell you have done this before :) It takes longer for clay to dry in humid conditions verses dry conditions. Those of you who live in places like Florida, where you can cut the water in the air with a knife, are going to find that you have a harder time drying work than those of you living in say...Denver, where the air is very dry. I grew up learning about clay in Colorado...Things dry super, super fast there. Not sure about the temperature part of your question Grog, but I can imagine that you would not want to try doing a casting where it might be too cold...no freezing temperatures. Time it takes for the slip to harden in mold:
Time to let the slip cast dry in the mold:
When is it time to dry molds:
Richard Burket is head of the Ceramics Department at SDSU...cool dude. Took one class from him when I first moved to So Cal...here's what he has to say about the topic... Richard Burkett - SDSU 1993
Richard's web Site - http://www.richardburkett.com/ |
|
M
MadDogMike
Posted
posted
on
Mon, May 5, 2008 8:44 AM
What I'm doing will never pass as art but hey, I'm having a good time! I made a new mold with a separate bottom piece to accomodate the undercut rim on the bottom of the mug. When I tried to remove my model from the mold, the mold broke :( But it broke "cleanly" in half in the same direction as my separation lines so I said "What the heck? Now I've got a 4 piece mold instead of a 3 piece mold". I cast a mug last night and it seems to have come out OK. I'm still using the Cone 5 slip (since I already have a gallon of it) so I won't be able to have Babalu fire it for me but I have other options available. Thanks for the input guys, I'm ready for you to post about glazes. |
|
R
Robin
Posted
posted
on
Tue, May 6, 2008 10:30 AM
Great info....mold making is an art in itself eh? Nice battalion of tools you showed us. Thanks for doing this, I've learned a lot. You didn't make it look easy, but easier than what I knew. The little bit of experience I had making molds ( and I had help) We would pour the mold, and set a timer. then take the piece out and cut it in half to check the thickness. Then do it again until it was what we wanted. I always wondered about the timing and the absorption as the mold got wetter....how to account for less and less absorption if doing multiples in a day. |
|
R
Robin
Posted
posted
on
Tue, May 6, 2008 10:35 AM
oops double post [ Edited by: Robin 2008-05-10 18:56 ] |
|
M
MadDogMike
Posted
posted
on
Sat, May 10, 2008 1:33 PM
Bowana had recommended a lowfire Cone 04-06 slip so I took the middle ground and got some Cone 5. I just found out that Cone 5 is not the same as Cone 05, Cone 05 fires at a much lower temp. I've been building an army of mugs that need to be fired on the surface of the sun! No big deal, slip is cheap! EDIT - Maybe we can have a quick lesson in the differences in types of clay? Advantages and disadvantages between lowfire, midfire, and highfire? Anything worth doing, is worth doing to the point of wretched excess. [ Edited by: maddogmike 2008-05-10 20:09 ] |
|
B
Bowana
Posted
posted
on
Thu, May 15, 2008 10:15 PM
You'll save a ton on your electric bill using low fire clay instead of high fire! I'm not really sure myself about the other aspects. Sir Babalu? |
|
B
Babalu
Posted
posted
on
Thu, May 15, 2008 11:18 PM
Sorry Mad Dog, I didn't see your question before. Your cone 5 slip will shrink more than the lower fired slip, but it will also tend to be a stronger mug than the low fire ones will be. There is not a ton that is different, cone 5 clay will be more vertrifyed and will not be able to handle all the different colors that a lower fired clay will. Below is a discription of clay bodies that I pulled from an old Clay 101 class I had on file...kind of long...but hey, I guess I will see you at my studio sometime this weekend. Clay is a compound of minerals and organic material resulting from the natural decomposition of certain igneous rocks (for example, feldspar and granite are two common sources of clay minerals). As these mineral deposits age and get moved around by natural forces (wind, water, glaciers), chemical changes occur which cause the materials to become clay. The two major classes of naturally occurring clay deposits are primary clays and secondary clays. Primary clays are those that remain at the physical location where the parent rock decomposed. These clays tend to be the most pure, but tend to be less plastic than secondary clays. Secondary clays are deposits that have been transported by wind, water, or glacial activity. These clays, while still very pure, generally have had other materials introduced into their basic composition that change their performance characteristics (color, plasticity, etc.) Types of Clay Clays can be grouped or classified several ways: according to the way they are found in nature, by their physical and chemical properties, by the way they are used tomake finished properties, and so on. One of the first ways to classify clay is by the methods used by Mother Nature to create clay deposits. The major types of naturally occurring clay are as follows: Kaolin or China Clay Chemically known as Al2O3-2SiO2-2H2O this clay is almost pure white as a primary clay and slightly less white but more plastic as a secondary clay. These clays are a major component of most high-fire porcelain clay bodies and are frequently used in stoneware to lighten the fired color. Ball Clay These are secondary clays that have been transported to swampy areas where organic acids have broken down the mineral particles to ultra fine size. These clays are extremely plastic – if used alone they will shrink quite a bit, causing severe cracking. Earthenware Clay Earthenware is the most common surface clay found throughout the world. These clays usually contain high amounts of iron, which gives the fired wares the characteristic terra cotta color. True earthenware clay cannot vitrify, which means the clay body remains porous after firing. Stoneware Clay Stoneware tends to be kaolins that contain more impurities - usually calcium, feldspar, and iron - resulting in clays that have finer particle sizes and higher flux content. The flux materials cause the clay to vitrify at lower firing temperatures. Fire Clay Similar to stoneware clays, fire clays generally contain less flux (especially calcium and feldspar). Fired alone these clays won’t fully vitrify – even at high fire temperatures. Bentonite Clay Bentonite is formed from the decomposition of volcanic ash. Bentonite has the finest particle size of any natural clay. It is very useful as a plasticizer but it must be used in moderation – too much of it in a clay body will result in cracking during the drying process. Slip Clay These are naturally occurring clays that have a high iron content. At high temperatures these clays melt to form a glaze; no additives needed. Pure natural clays almost always have shortcomings – in a potter’s eyes. The production processes and ultimate use of the piece dictates the properties the clay needs to have – either during the forming stage or as a finished piece. Aclay body is a mixture of clay and other materials designed to meet the needs of the user. Design objectives for a clay body may involve making it more plastic during the throwing stage, improving the body’s stability in large-scale work, helping the body resist thermal shock from firing, and improving general properties such as vitrification and density. The “other materials” in a clay body perform a specific function to make the final product work better for the clay user. Ageneral description of each component and its purpose are discussed below. Components of a Clay Body All clay bodies involve combining clay (many recipes call for several types of clay) with non-clay additives. The basic types of additives and the purpose for each are as follows: Flux These materials act as melting agents, helping to lower the maturing temperature and assist in the formation of glass - the essential binder in all ceramics. Some clay contains higher concentrations of fluxes naturally–feldspar and iron are the most common. Glass-Formers These materials react with fluxes to form glass. The most common glass-former is silica. Pure silica melts at very high temperatures – the proper mix of flux materials and silica allows for glass to be formed at more manageable temperatures. This balance must be carefully achieved – too much flux produces a weak glass, too much silica can lead to reduced thermal shock resistance. Refractories These materials stabilize the body, providing the physical Hope you can make since of all this... |
|
M
MadDogMike
Posted
posted
on
Fri, May 16, 2008 7:40 AM
Thanks Babalu, very informative. As I understand, the higher fire clay is more like glass - strong but brittle, and glazes are limited in higher fired clays. I will give you a call sometime this week. |
|
B
Babalu
Posted
posted
on
Fri, May 16, 2008 3:39 PM
Hey Maddog, Sorry man, no, there are a kazillion + 1 glaze choices for high firing clay, and many out there feel that high firing clay is the only way to fire. Low firing "up to" cone 6 offers up some very bright coloring that is harder to achieve in higher fire scenario (over cone 5-6), but that does not make low fire any better... Gas firing kilns and reduction can act differently than firing with electric kilns..I will try to explain more when we hook up this weekend. Call first before coming over, Amy's bro is in town this weekend and there is a chance that I might have stepped out for a minute. Best... |
|
LLT
little lost tiki
Posted
posted
on
Sat, May 17, 2008 1:59 PM
Babs! |
|
C
Cammo
Posted
posted
on
Sat, May 17, 2008 2:54 PM
When we made the Oki Doki mug, I basically just wrote all the drying and firing info that Babalu told me on the side of the plaster mold with a sharpie pen. It's still there, scratched and smudged. The best way to learn all this stuff is to just full speed ahead do it yourself. Mistakes are fun! How do ya think Muntiki did those zombie skull mugs? I was thinking - what about a mug making workshop at Oasis this year? We could do every stage from sculpt to mold to pour to fire, once a day, three days in a row. We could take pictures and post daily... |
|
B
Babalu
Posted
posted
on
Sat, May 17, 2008 9:48 PM
I got to meet Mad Dog Mike this morning...nice mugs mike! Look forward to what you come up with this week. LLT - Thanks for jumping in...you need to come down and make a big clay canvas to paint on. I need to make the trip up to your place too...I have to see your little center of the universe first hand. Cammo - That Oasis demo thing is quite possibly the best worst idea I have ever heard...did you take your meds this morning brother? :) |
|
M
MadDogMike
Posted
posted
on
Sun, May 18, 2008 9:04 AM
I traveled over 100 miles through the vast desert wasteland to seek ceramic enlightenment. Many of the great mysteries of clay were unveiled to me when I entered into the revered Babalu Tiki Mug Studio & Place of Other Great Unknowns. |
|
B
Bowana
Posted
posted
on
Mon, May 19, 2008 1:03 PM
Ha ha! Good one, Cam! :lol: ...you're kidding, right? :o |
|
C
Clarita
Posted
posted
on
Sat, May 24, 2008 1:32 PM
...Well here is my ugly version of Bowana's plaster mold :)! |