Tiki Central / Tiki Carving
Kountzyro Shows off his Polystyrene Tikis
|
K

kountzyro
Posted
posted
on
Wed, Jul 2, 2008 2:31 PM
Hello This thread will showcase some of my sculptural creations. I work as a scenic artist building displays, props, and scenery for a variety of clients from museums, to department stores, restaurants and theme parks. So I have some access to materials to create some side-projects for myself. Here then, over the next few posts, are a few that I've built beginning with "Stoney":
Stoney is 11" tall, carved from white bead-foam, coated with a stippled and sanded application of Roscoe "Foamcoat", and painted with various layers of dry brush and wash techniques to give him a rough granite like appearance. [ Edited by: kountzyro 2009-12-27 20:16 ] [ Edited by: kountzyro 2012-05-11 22:27 ] |
|
K
kountzyro
Posted
posted
on
Wed, Jul 2, 2008 2:41 PM
This is Woody:
Woody is 8 1/2" tall, constructed in the same fashion as Stoney, except for a smooth finish. He is give |
|
P

Paipo
Posted
posted
on
Wed, Jul 2, 2008 2:46 PM
Welcome to TC! Stoney looks great - I love the Hawaii / Rapa Nui stylistic crossover you've got going on. |
|
K
kountzyro
Posted
posted
on
Wed, Jul 2, 2008 2:59 PM
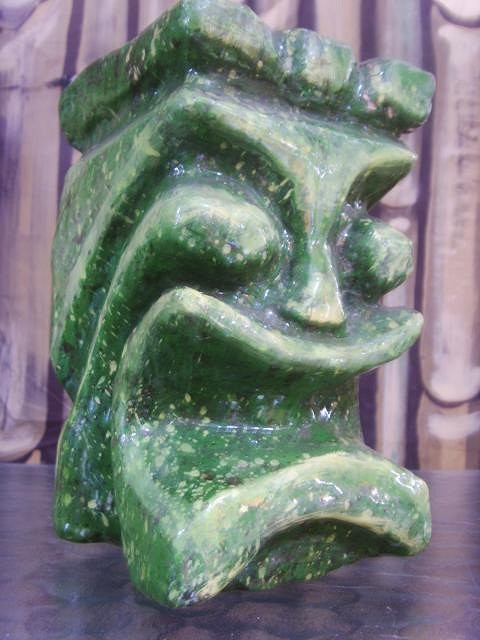
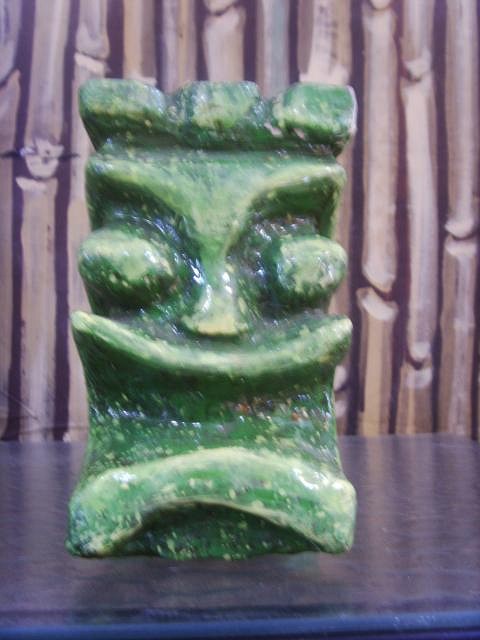
This little guy has a futuristic quality to him that some friends of mine feel is like a robot/tiki hybrid.
At a mere 6" tall, R'Oboo, is the smallest of my hand crafted tikis. With the paint effect I was trying for the look of some unknown, exotic, gem-like ore, perhaps like an alien hybrid of jade and marble. Also, I just wanted to have another blue tinted tiki, outside of my mug collection. [ Edited by: kountzyro 2008-07-02 15:01 ] |
|
K
kountzyro
Posted
posted
on
Wed, Jul 2, 2008 3:15 PM
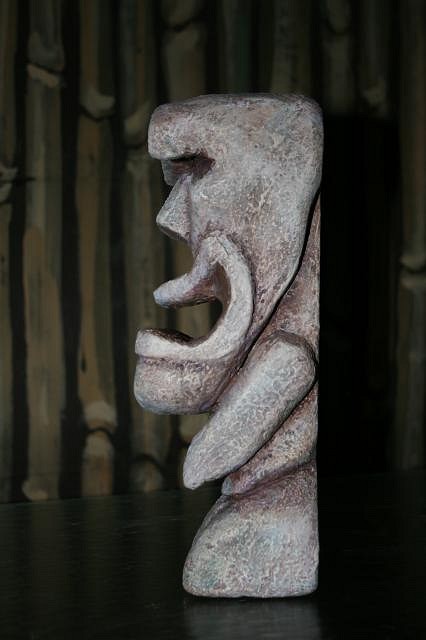
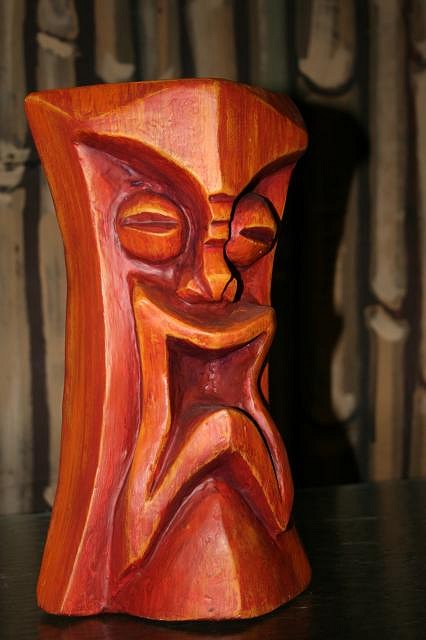
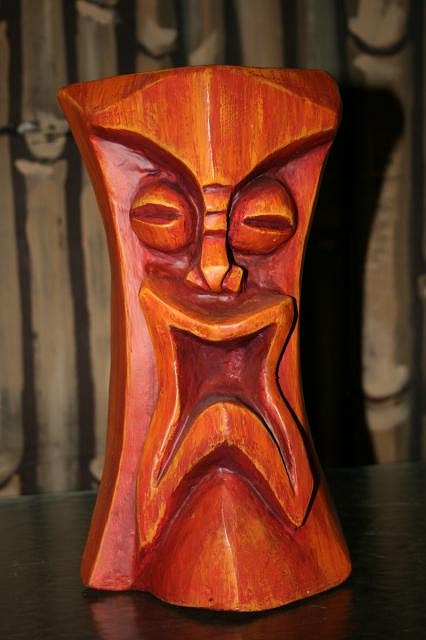
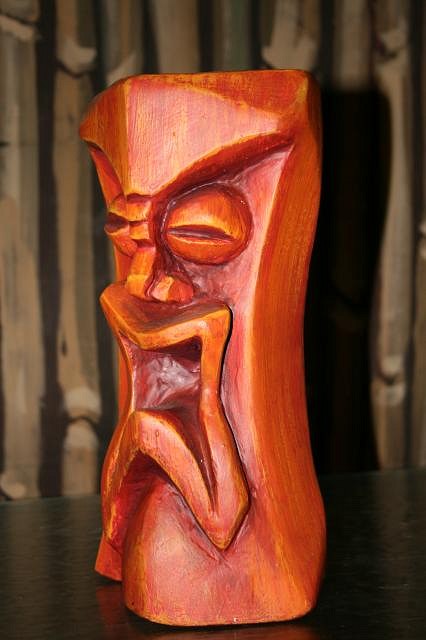
Here we have a guy who reminds me somewhat of the famous Edvard Munch painting. I call him the Screamer, for no other reason than that, and the sad fact that I have a hard time naming my pieces.
The orange paint-job was applied in a faux-woodgrain fashion, though the brilliant colors remind me somewhat of flames. He is 12" tall. |
|
S

seeksurf
Posted
posted
on
Wed, Jul 2, 2008 4:51 PM
Nice work. I like how they are sorta abstract and |
|
K
kountzyro
Posted
posted
on
Wed, Jul 2, 2008 5:07 PM
Thanks Paipo and Surfseek! My main influences are pop-polynesian mug styles, so I definitely go for a "modern" look when carving. |
|
B

Benzart
Posted
posted
on
Wed, Jul 2, 2008 5:13 PM
Hey Kount, Welcome to TC, Come on in and stay awhile. Nice stuff you have here, and like Paipo, I'm partial to your Moai guy, I think he has a nice personality. The Futurstiki tiki is cool too. |
|
M

ManoKoa
Posted
posted
on
Thu, Jul 3, 2008 9:50 PM
Hello and welcome - How strong is that foamcoat? I have some foam I have been planning to carve but I just don't know what to do to finish them. MK [ Edited by: ManoKoa 2008-07-03 22:30 ] |
|
K
kountzyro
Posted
posted
on
Fri, Jul 4, 2008 10:58 AM
Thanks for the kind encouragement, Benzart. Manokoa- Foamcoat is fairly durable. But it can be punctured. I am not certain how it would hold up under exterior conditions. The good thing about it, other than it being water-based, is that it has some flex to it. Foam being soft, gives way under most hard coatings upon impact which can cause fractures in the exterior. I have used fiberglass on some larger projects, but that requires first coating the foam with plaster, or foil. Fiberglass, however, has very little give and cracks rather easily due to the soft nature of the foam interior. Poly-urea is a rather toxic iso-polymer spray that is used to cover exterior architectural elements. It is very durable and has a good amount of give. But this product is hard to come by unless you have access to those who use this coating professionally. Of the options fiberglass is the cheapest and most durable. Foamcoat, and a few other specialty products like it, are rather expensive, but provide good results and are easier to work with. I have also coated foem sculptures with a plaster/drywall compound mixture, but that makes for a rather fragile coating. Foamcoat is available here: -though maybe you can find it elsewhere as well. It retails for just under $50 per gallon. I have also used a construction industry product called Dryvit which is like a fibrous type of quick drying concrete, but it is usefull only for rough textures. Hope this is helpfull. I know of some other products as well, and can give you some more finishing tips, dependant upon the product you choose. Just holler at me and I'll be glad to share some more info! |
|
K
kountzyro
Posted
posted
on
Sun, Jul 6, 2008 12:48 PM
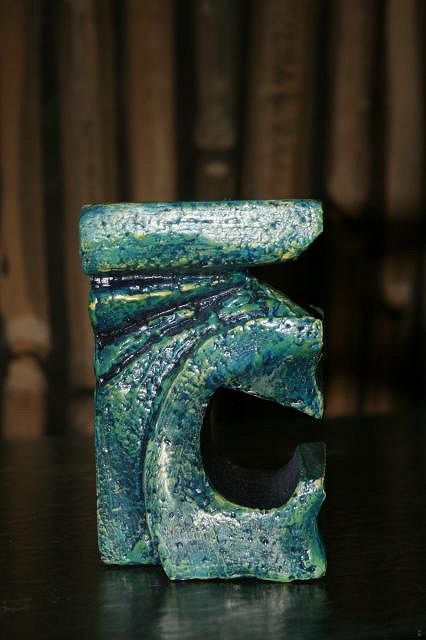
This tiki was coated with a plaster and drywall compound mix and then painted. The final protective layer was
For the paint "look" I decided that the high gloss finish of the marine epoxy gave the piece a ceramic type quality, so I used a paint spatter technique that reminded me of those huge old '60's era ashtrays my folks used to have around the house. He's 7" tall. [ Edited by: kountzyro 2008-07-06 14:06 ] |
|
H

hiltiki
Posted
posted
on
Mon, Jul 7, 2008 8:27 PM
Kountzyro, you have a very nice style to your pieces, I like how they are so different from a lot of other pieces here on TC.I really like the last piece, the green colored one. Post some more pictures for us when you can. |
|
K
kountzyro
Posted
posted
on
Sat, Jul 12, 2008 4:12 PM
Thanks Hiltiki! There are more pics coming soon. Some older pieces and works in progress. Thanks for your appreciation of my personal stylization. I suppose my tikis look the way they do because of the raw materials I use. A block of foam has a very different potential from a log so when I seek to release the tiki form from its raw material I am most likely trying to find inspiration in my natural relationship to the material's strengths and weaknesses. My mantra is that the block of foam wants to be a tiki and I am merely there to assist in the birthing process. :lol: |
|
K
kountzyro
Posted
posted
on
Tue, Jul 15, 2008 6:56 PM
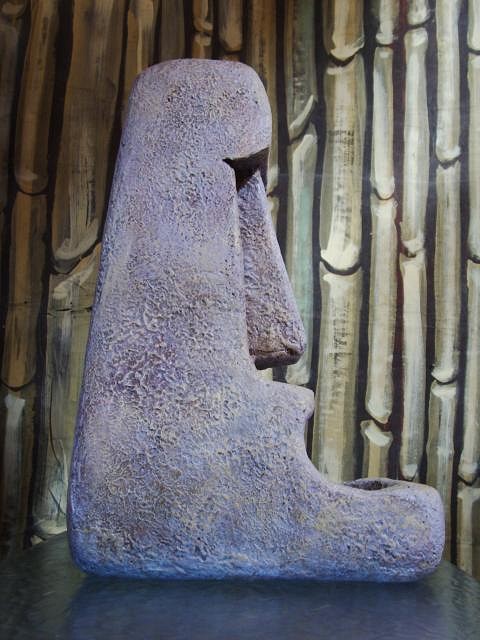
Here's an older tiki of mine. He's 16" tall and coated with a very durable polyurea/elastomer finish. He was then painted to resemble a stone carved object.
|
|
S
seeksurf
Posted
posted
on
Tue, Jul 15, 2008 7:03 PM
Nice work sure looks like stone to me. |
|
K
kountzyro
Posted
posted
on
Sun, Jul 20, 2008 7:19 PM
Thanks for the comment Seeksurf, it's good to know my illusory abilities as a paint slinger are effective. The technique I use works well over a porous textured surface. Basically its a build up of three subsequently lighter dry brushings of raw umber or warm grey applied in a manner that covers less and less of the surface area which has an initial deep brown base coat, then everything is pushed back and/or tinted with a build up of washes. Here's a new work in progress, still in the raw foam phase and ready for hard coating. He'll have a similar look to Stoney in my first post, but will be keyed to a slightly cooler hue:
I am also considering putting one of those flickering cellophane "flame" lights in his lower jaw opening. [ Edited by: kountzyro 2008-07-20 19:26 ] |
|
G

greentikipat
Posted
posted
on
Sun, Jul 20, 2008 10:57 PM
real nice stuff, Count- definatly a fresh style; harking back to true polypop! thanks for the informative bits- foam seems to be an expensive material, nevermind the finishes. i've been waiting to carve a very large moai fountain for my backyard, but just can't come off the prices i find. your tips on different finishes are already a great step foreward! |
|
K
kountzyro
Posted
posted
on
Sat, Aug 2, 2008 11:33 AM
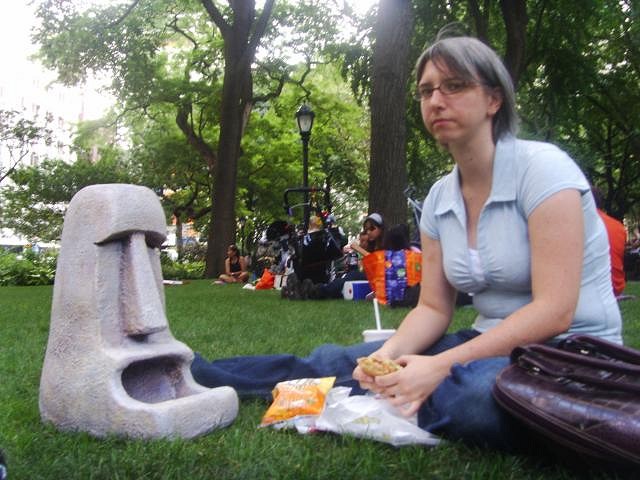
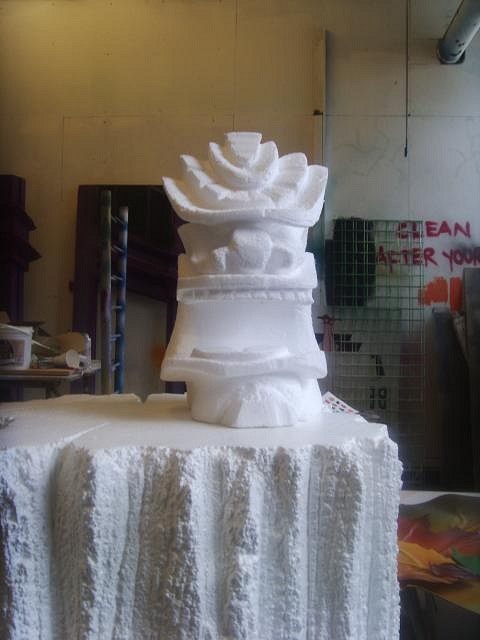
Hi Greentikipat, You might try using re-bar, pencil rod, stucco lathe and a spool of wire, to build an armature structure for your exterior tiki fountain. If the structure is not too large or complex you could get by without welding the armature just by tying the bent re-bar and pencil rod together with a thick enough gauge of wire in the right spots. You then cut peices of the lathe to form the surface areas connecting wire frame outline. The next step is to trowel on layers of cement. The hardened cement will ultimately give the structure its stability in the long run, as long as its not supporting too much weight. This would be the cheapest method for making a decent exterior tiki, and the way I myself would attempt going about it. When I think of concrete tikis in your area I immediately recall the giant moai at Polynesian Putter ("Home Of The Tiki")! I lived in St. Pete for a while in the late '80's, before moving to Ybor City. I have very fond memories of Tiki Gardens, and all the great thrift stores and flea markets, especially the Sunshine Drive In at six a.m. on Wednesdays!! Here's an update on the finished look of my latest Moai inspired piece:
This is how the figure looks with its under-painting. As I described previously, it is a deep brown base coat with three dry bushed layers of consecutively lighter valued, tinted raw umber. I then applied colored washes for variations in hue and to delineate shadows. Everything was finally pushed back with multiple white washes to give the overall grey stone appearance.
Skeptical during our lunch outing, my girlfriend Nicole is non-plussed at this time about having yet another Tiki moving into our living room, but it is a spacious tiki-themed loft, so there is little she can effectively object to in the long run... [ Edited by: kountzyro 2008-08-02 14:31 ] |
|
K
kountzyro
Posted
posted
on
Sun, Dec 21, 2008 9:14 AM
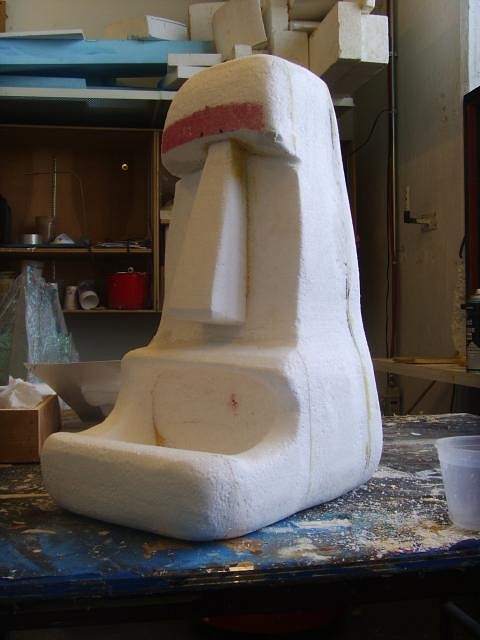
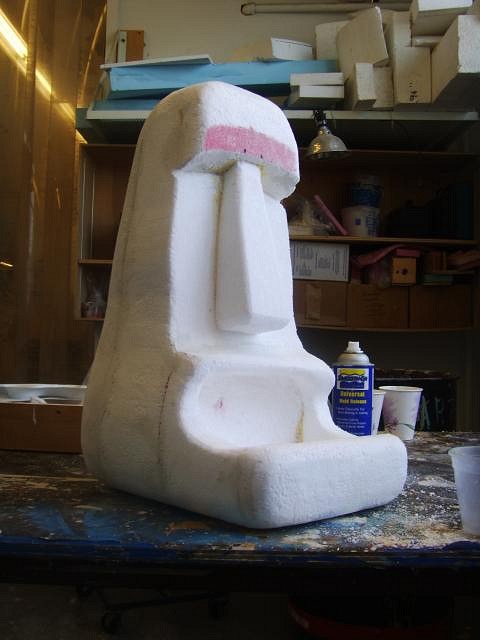
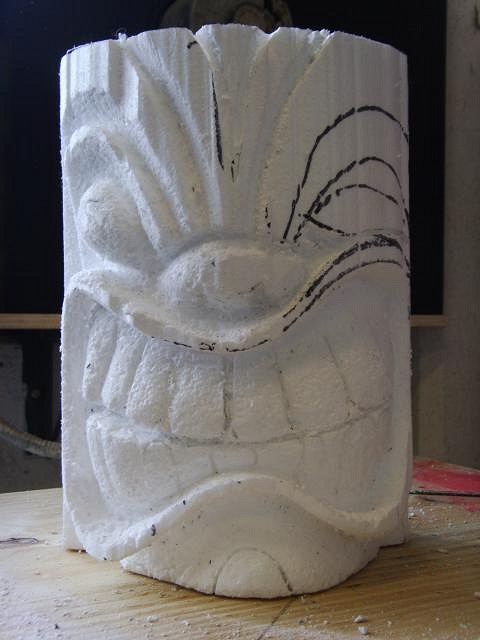
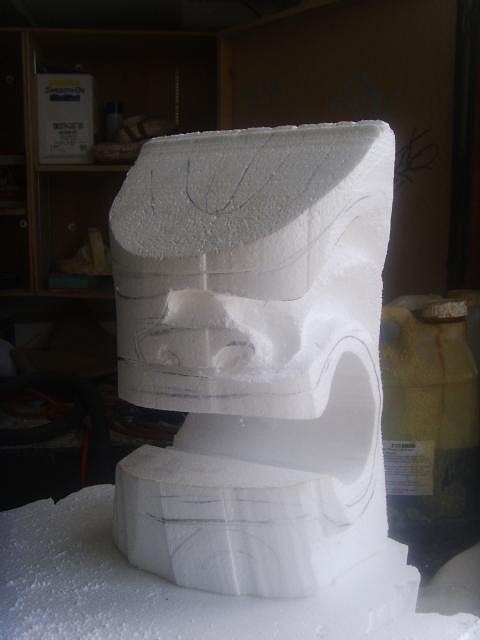
Hello again. I've finally had some free time after months of overtime at my job and was able to knock out another foam sculpted tiki. Here's a photo of the sculpt after hard-coating and before it was painted:
Thanks for your attention and I'll be posting some pics of the finished object soon. |
|
S
seeksurf
Posted
posted
on
Mon, Dec 22, 2008 9:37 PM
Nice! I like the large bold lines you come up with. |
|
G

Grapa-RuHa
Posted
posted
on
Tue, Dec 23, 2008 1:06 AM
Love your work, that BIG mouth Moai is great. A couple of led lights emulating a lava like glow would make him a centerpiece. Maybe you should have put some flowers in its mouth before presenting it to your girlfriend :wink: |
|
T

TikiMango
Posted
posted
on
Tue, Dec 23, 2008 7:22 AM
Very nice work! Keep those creative juices going. |
|
K
kountzyro
Posted
posted
on
Fri, Dec 26, 2008 9:23 AM
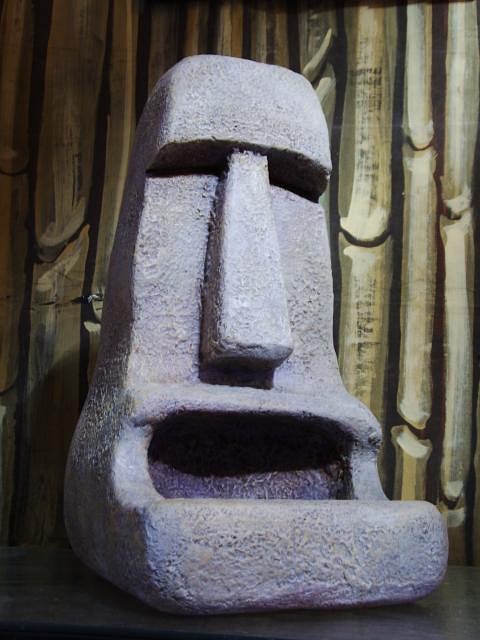
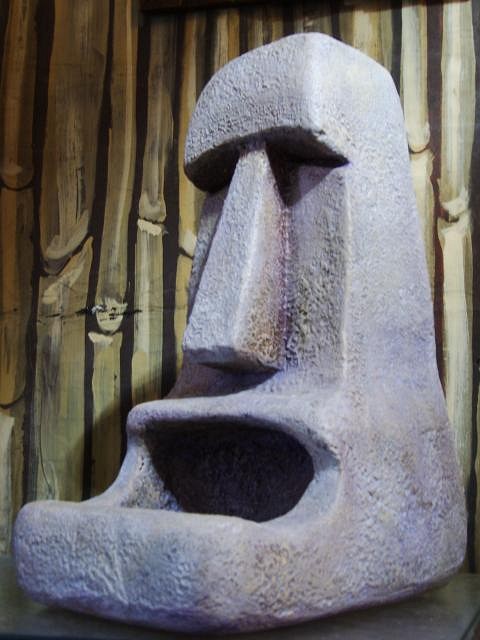
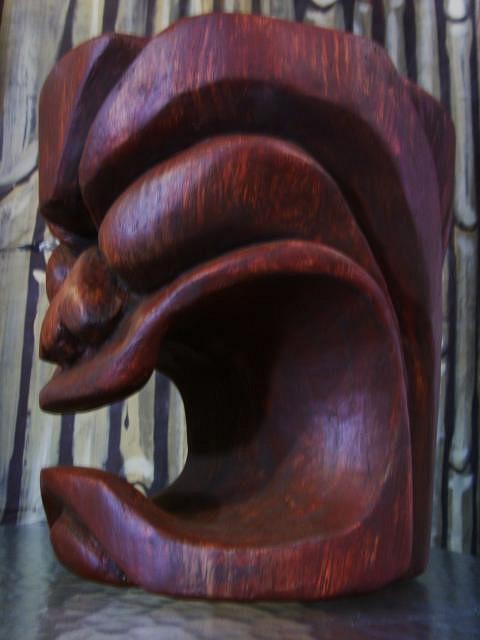
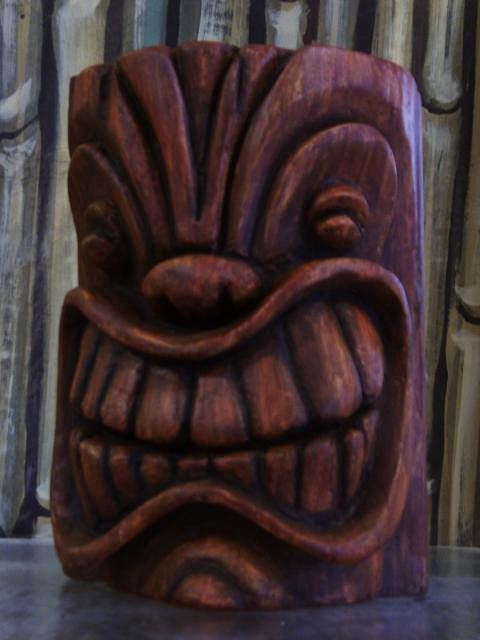
Grapa-Ruha, Seeksurf, and Tiki Mango, thanks for your kind words of encouragement. Many of my friends seem to like my work, but real validation truly can only come from other tiki-philes! It is my hope that by sharing my work I can provide some inspiration to you all, my virtual peer group. So, anyhow, here's my latest piece with his wood-grain paint job. Basically my technique is to base coat the object in a light, warm, neutral color. Then, in this case, and voila!
|
|
S
seeksurf
Posted
posted
on
Fri, Dec 26, 2008 10:42 AM
Nice work on the stain color looking good. |
|
K
kountzyro
Posted
posted
on
Sun, Feb 22, 2009 2:16 PM
Hi. Here's the beginning of a new white bead-foam tiki:
Updates to follow. And, as always, thanks for looking! [ Edited by: kountzyro 2009-02-22 14:20 ] |
|
BD

big daddy
Posted
posted
on
Mon, Feb 23, 2009 6:06 AM
i can see where your scenic artist talents come into play with your painting technique. very nice. the big mouthed moai looks like he's getting ready to steal your girlfriends lunch! do like the simplicity and lines of your pieces. nice work. bd |
|
T

TheBigT
Posted
posted
on
Mon, Feb 23, 2009 1:47 PM
Wow, great designs and absolutely amazing painting and texturing skills! Some of your work really does look like old weathered stone. |
|
K
kountzyro
Posted
posted
on
Tue, Feb 24, 2009 3:56 PM
Thanks BD and BT! I try and post a bit of a "how - to" when showing my paint finishes. And my years in the business have shown me that almost anyone can be taught some basic scenic painting techniques. That being said folks can feel free to P.M. me with some specific questions or requests for pointers. Mahalo. |
|
S
seeksurf
Posted
posted
on
Tue, Feb 24, 2009 5:02 PM
foam must be a bitch to cut into? |
|
K
kountzyro
Posted
posted
on
Tue, Feb 24, 2009 5:31 PM
On the contrary, foam is quite easy to carve. The real hassle is all of the mess that it makes! Much worse than sawdust! Bead particles get EVERWHERE and they have an annoying static charge that makes them love to cling to stuff. A good shop vac and an air nozzle from a compressor are a must for cleaning up. I use a variety of tools easily found at your local hardware store: snap-off blade box cutters of various sizes, wire brushes, shaping rasps, and sand paper. Larger sculpts can see me using reciprocating saws or even chainsaws. And nothing beats a good band saw for getting basic component shapes knocked out. Also I use hot wire kits that melt the foam away. Always with very good ventilation and a respirator as the fumes are highly toxic. Here's a hot wire foam cutting kit: http://hotwirefoamfactory.com/product.php?productid=16139&cat=0&bestseller=Y |
|
B
Benzart
Posted
posted
on
Tue, Feb 24, 2009 6:54 PM
Nice Stuff Kountzero and I even like the one that looks like wood! You pulled that one off pretty well. |
|
A

Aweulekuula
Posted
posted
on
Fri, Feb 27, 2009 7:39 AM
I love the funky facial expressions you give them. They just give me a warm smile whenever I look at them. Aloha! Marcus |
|
K
kountzyro
Posted
posted
on
Wed, Mar 4, 2009 8:37 PM
Thank you Benzart, always good to get encouragement from one of the masters. And Aweulekuula, glad that my creations can give you a smile or two. I have a background as a cartoonist as well so exaggerated forms and a good bit of humor just seem to naturally translate to my work as a tiki carver. Plus, they are meant to give myself some joy with their presence in my home, so its good to know that its obvious to others that they radiate some good vibes! Now here's some progress photos:
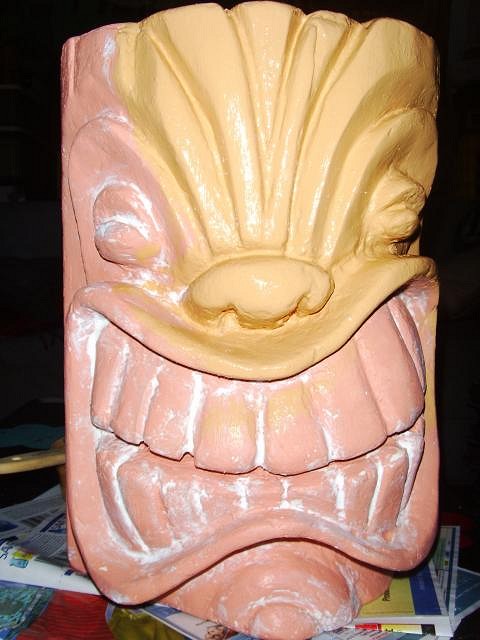
Here you can see the form after it has been hard coated. I tint a primer coat and that way when I skim coat a white plaster/joint compound mix over the surface to cover imperfections I can more easily define where and when to stop sanding and determine if I need more fill. In this case the deep recesses are filled with some painters caulk. And also you can see the raw umber base coating that will form the under layer for the wood graining process.
Next in these two photos you can see the wood grain application. Burnt Umber watered down to an inky consistency and applied with a cheap 2 inch "chip brush". The next step will be a glaze coating of burnt sienna over the whole surface. Then finally some burnt umber and black washes to push back the areas I want to deepen, and to generally tone down some of the burnt sienna's redness. Finished pics soon. |
|
K
kountzyro
Posted
posted
on
Fri, Mar 13, 2009 3:12 PM
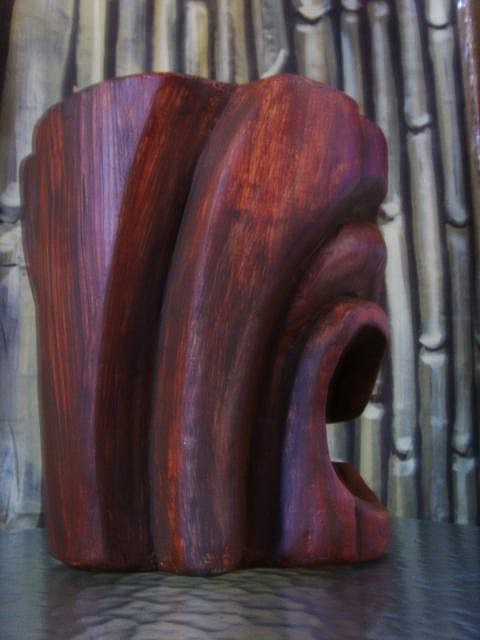
Here's the final paint finish:
|
|
D

drasticwagon
Posted
posted
on
Fri, Mar 13, 2009 6:51 PM
Nice Job |
|
S
seeksurf
Posted
posted
on
Fri, Mar 13, 2009 7:48 PM
Cool! looks like wood. Yes the hot tools would |
|
K
kountzyro
Posted
posted
on
Tue, Dec 1, 2009 7:27 PM
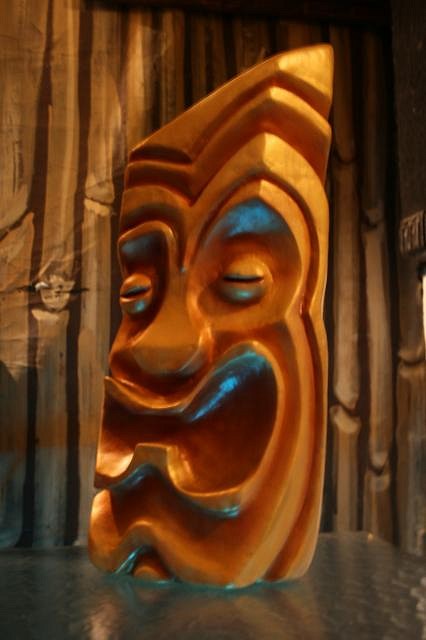
Hello again! Its been quite some time since I was last able to do a carving! Fortunately I've gotten a free moment lately and was able to slip a new project through. So, in time for the holdays, when some folks carve a turkey - I carve a tiki! Here's a few photos of my latest foam creation. This time I chose to make a "golden idol" by painting him with two different metallic gold acrylic paints. I then glazed in a couple of colors on top to deepen the shadows. I've just gotten him home from the shop and am experimenting with how he photographs in the low light of my night-time apartment. I'll post a daytime shot or two when can later to see the difference. I'm also going to add at least three layers of a high gloss clear-coat. Check him out:
[ Edited by: kountzyro 2009-12-01 19:28 ] |
|
K
kountzyro
Posted
posted
on
Mon, Dec 14, 2009 6:53 PM
Well, I've started another one.
I'm not sure how I'm going to paint him yet. But here's a progress shot that shows the foam carving with the first rough layer of hardcoating that I'm just beginning to sand. Next comes a skim coating to even out indentations and imperfections in the base coat. |
|
A
Aweulekuula
Posted
posted
on
Thu, Dec 17, 2009 5:41 PM
Oooooh! That is really amazing how you can texture that paintjob to come out like that. It really DOES look like wood. I also love the way you modulate the lighting to get the tiki to express such different "moods". Aloha! Marcus |
|
K
kountzyro
Posted
posted
on
Fri, Dec 18, 2009 6:07 PM
Thanks for the kind words Aweulekuula! I find your own work to be quite unique and love the smooth curvatures that you pull from natural sources. They look like they would feel great in one's hands! Now here's an update on my latest carve:
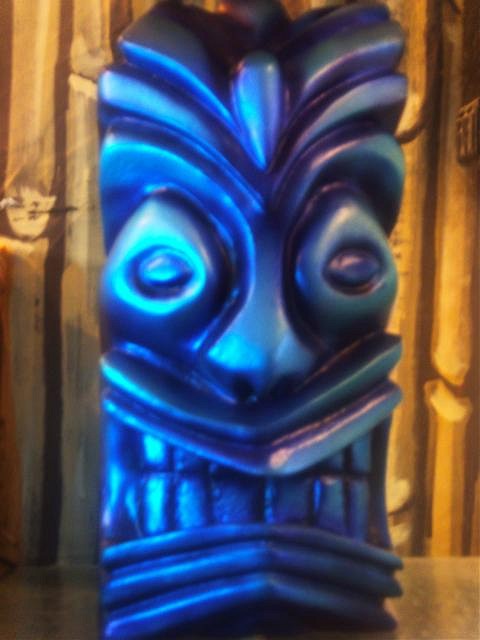
I based him out in blue so that I could see the areas that needed filling and sanding better. Plus I gave him some teeth, though it looks like in this photo that he's missing one. Since I snapped this shot, I've primed him again and after one more slight skimming he'll be ready for his paint job. At this moment I'm thinking of a silver metallic base with several shades of blue and violet glazing. We'll see how it turns out... |
|
K
kountzyro
Posted
posted
on
Sun, Dec 27, 2009 11:53 AM
So, here's my latest sculpt rocking a metallic paint-job:
He was based out in Modern Masters brand metallic silver and then glazed over with several different colors. The glazes, teal, pthalo blue, blue-violet, and, violet-black, were created by adding Cal-Tint brand coloring to satin poly-acrylic. They were then sprayed on using an airbrush. Lighter colors were applied first and then the darker ones applied successively, covering less surface area and used to push back the recessed areas. |
|
K
kountzyro
Posted
posted
on
Thu, Jul 22, 2010 4:21 PM
Hi everyone. I'm back after a bit of a hiatus and ready to make a new tiki!
I'm excited to be carving again. |
|
4

4WDtiki
Posted
posted
on
Thu, Jul 22, 2010 4:43 PM
Great start! |
|
L

leleliz
Posted
posted
on
Thu, Jul 22, 2010 8:40 PM
Wow I love all your work! I hope you post more often. Do you sell your tikis? |
|
K
kountzyro
Posted
posted
on
Fri, Jul 23, 2010 2:15 PM
4WDtiki- Thanks for the encouragement! Leleliz - Very much obliged for your kind words. I haven't tried selling anything yet. But I'm open to the idea of doing commissioned pieces. And now here's today's update:
(He's sitting atop a fake tree stump I'm working on for a department store display window.) |
|
T

tikigodz
Posted
posted
on
Fri, Jul 23, 2010 6:41 PM
Really cool idea |
|
S
seeksurf
Posted
posted
on
Mon, Jul 26, 2010 7:37 PM
Looking good. They are coming along very nice. |
|
K
kountzyro
Posted
posted
on
Tue, Jul 27, 2010 5:14 PM
Seeksurf, thanks as always for your continued support! Its good to be back here among so many carvers sharing inspiration and good cheer. And, Tikigodz, well, here's today's update with some of my tools thrown in the mix. As you can see, I've primed my sculpt with a tinted primer. As for the tools you asked about, here's the list. He's sitting on a large hotwire table, which I used to cut out the rough cylindrical shape. I usually use a band-saw for that on other occasions. The table wire was also used to cut out the large mouth shape. Most of the carving was done with those snap-off blades you see there and the SureForm rasp. Also the sand paper is very useful. The other hotwire wand was used to lay his teeth in and also his tongue. It's a little easier than using the small snap-blade, but either takes about the same amount of time. Other than that the japanese saw and the regular hand-saw are just used in this case to give me the initial block that I worked on the table wire. And the wire brush is a great foam working tool, that I use for other projects. I also have a few other specialty rasps and smaller wire brushes I'll try to get around to posting pictures of with future projects that I amy be using them upon.
More to come... |