Tiki Central / Tiki Carving
Bosko patio project- 07-07-10 update
Pages: 1 47 replies
|
T

TikiTres
Posted
posted
on
Wed, Jul 16, 2008 11:10 AM
UPDATE 08-04-08- I've revised the title of this thread to more accurately reflect the random projects I'll be posting here. The "end goal" (if it ever ends) is a tiki-themed patio and pool area. Hey all, I searched and tried to find this specific info on these forums already, but didn't have much luck. I'm going to be making a wall sconce and plan on doing raised grain on it similar to a Witco piece. I'm not trying to duplicate the Witco look and probably couldn't even if I wanted to, but I am trying to get that raised grain appearance. I've been playing with some scrap poplar, the best results I've gotten so far were from burning with a torch and then hitting the wood with a cone shaped wire brush ("fine" version) chucked in a hand-held drill. It raises the grain pretty well, but the wire brush leaves behind a lot of scratches in the wood. I tried following this up with sandpaper, but due to the raised grain it's not possible to sand down between the grain and remove the scratches. I would appreciate any feedback from the many masters around here :) Thanks! [ Edited by: TikiTres 2008-10-13 13:18 ] [ Edited by: TikiTres 2010-07-07 13:19 ] |
|
J

JohnnyP
Posted
posted
on
Wed, Jul 16, 2008 11:44 AM
You could try a power washer to remove the softer grain, the harder grain will remain raised. Or you could try a sanding mop, similar to page 14 of the tools carvers use thread, to remove the wire wheel marks. |
|
4

4WDtiki
Posted
posted
on
Wed, Jul 16, 2008 1:24 PM
Sandblasting. At work, we on occasion bring new fireplace mantels to the local sandblaster, and it works great! |
|
T
TikiTres
Posted
posted
on
Wed, Jul 16, 2008 1:40 PM
Thanks for the tips!! I actually looked for a sanding mop when I was at Lowe's yesterday (having seen it in that thread), they didn't have one so I ended up getting something that looked close to it. But it didn't work. I'll try the powerwashing, I can get my hands on that whereas a sandblaster is just one other thing on my long-term wish list :) |
|
BS

bamboo stu
Posted
posted
on
Wed, Jul 16, 2008 2:09 PM
Part of the problem is with the poplar you're practicing with. It has a very homogenous grain, by which I mean that the growth rings that alternate hard and soft aren't very different. A wood that might work better is douglas fir because the darker rings are hard and the lighter rings are quite soft. Find any old dry fir 2x4 and go nuts. You might try the blowtorch again, and see if the soft grain burns faster than the hard grain, and then brush away the charcoal with a wire brush. |
|
T
TikiTres
Posted
posted
on
Wed, Jul 16, 2008 3:48 PM
Thank you, I was wondering about that. I have some scraps of cedar that I was going to play with this evening just to see if it is easier to work. I'll try some fir too. I have some pine, but the grain is too far apart for the look I had in mind. I appreciate it! |
|
T
TikiTres
Posted
posted
on
Wed, Jul 16, 2008 6:01 PM
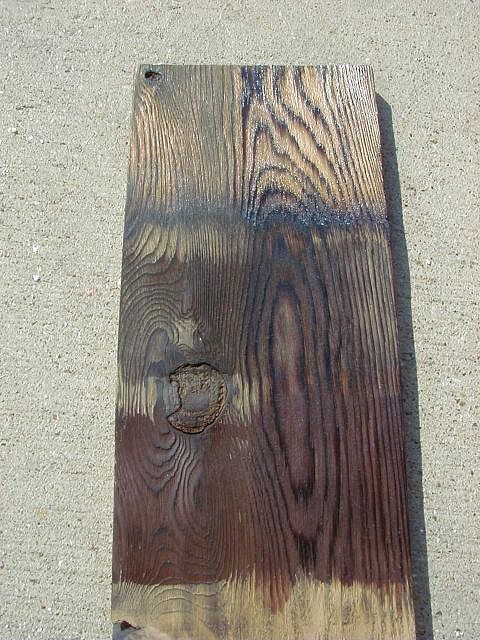
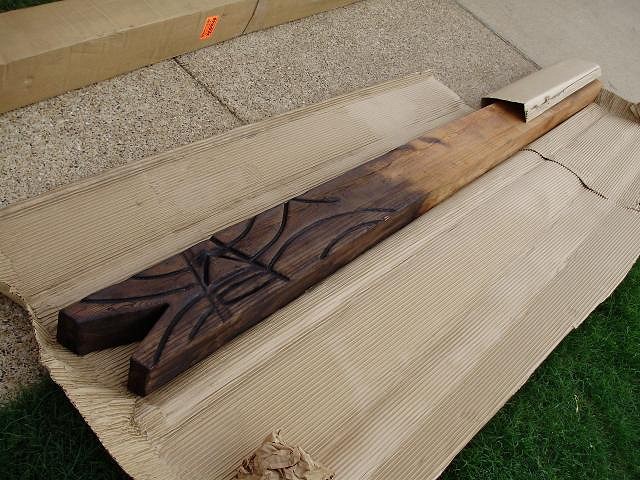
Well since I started this thread I'll toss my test runs into it in case anyone else decides to give this a go. I did a cedar sample this evening and it is much easier to work than the poplar. The grain relief is deeper and the raised grain stands up to wire brushing/ sanding better (doesn't scratch). The softer wood between the raised grain still scratches, but it's an interesting effect. The left board in the pic below is the cedar (piece of an unused fence picket) and the right is the previous poplar test. The cedar has the following sample finishes (single coat): Top- Behr "cedar naturaltone" sealer The stain completely covers the darkened raised grain, so that's out. The others are all decent, but not exactly what I had in mind. I'm going to get some darker toner sealers tomorrow and try some more tests. I'm also going to put a 2nd coat of each on this evening to see what that does.
The poplar has 4 test finishes as follows (all 2 coats): Amber varnish I'll also get some pine and fir to try out. Might as well get them all tested before I jump into the sconce project :) UPDATE 07-19- Here's another set of finish tests on cedar: Surprisingly the gray stain looks very gray on the brush and not the least bit gray on the wood. These stains were small samples from Lowe's I decided to try, but I still don't like stain (makes the wood too dark). I'm going to stick with just clear semi-gloss poly for this project. [ Edited by: TikiTres 2008-07-19 15:44 ] |
|
T
TikiTres
Posted
posted
on
Thu, Jul 17, 2008 6:48 PM
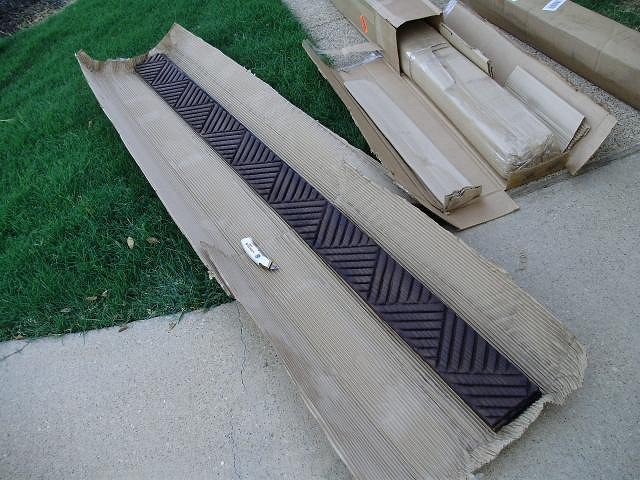
OK, here's some more testing (I didn't find fir yesterday, so I didn't try it). The left board is pine, the middle is red oak and the right is cedar. The pine grain is too far apart and burning doesn't soften up the wood between the grain very well. The red oak grain is way too tight for what I wanted. Cedar it is!
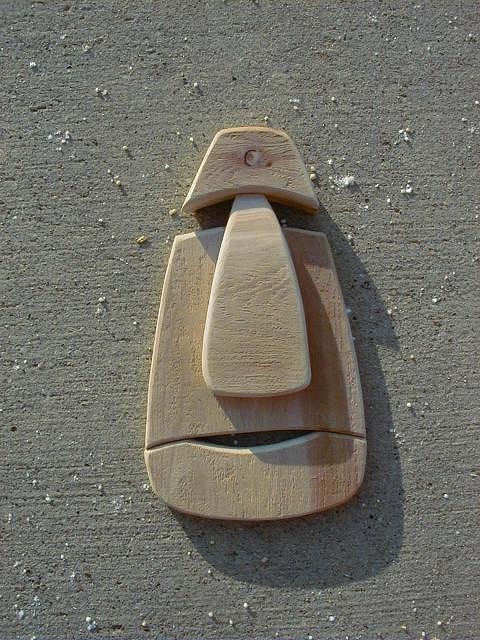
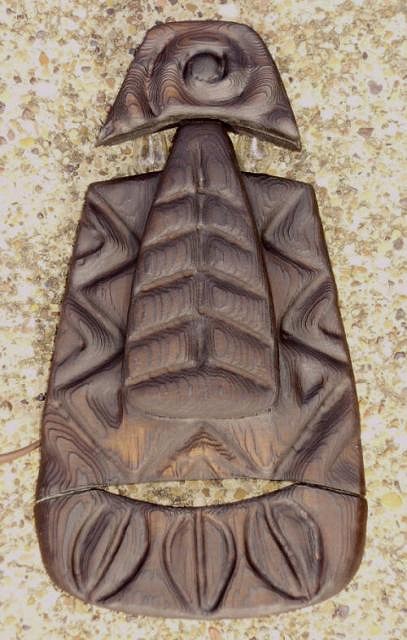
So I went and bought a cedar plank for my sconce project. First step was to lay the pattern on tracing paper. I struck a centerline so I could fold the paper over and trace the pattern from one half to the other to keep it symmetrical.
Here are the pieces cut out, note the totally intentional knot location in the middle of the forehead (evil eye effect):
And here they are routed and sanded, ready to burn:
That's as much as I could stand to do in the 95 degree evening heat! Plus I had to wash my car. As soon as I finish posting this I'm jumping in the pool! The sconce will be mounted to a center frame that will space it off the wall. There will be lights in each eye and another just above the mouth to project light through the mouth. The bulbs will also cast light to the sides of the sconce. The idea came from a person that posts eBay auctions for wood tiki-themed sconces, I really liked them but unfortunately the ones he makes are twice as big as what I can fit on my patio. More to follow :) |
|
4
4WDtiki
Posted
posted
on
Thu, Jul 17, 2008 7:33 PM
That looks great already! Can't wait to see what you'll do with it. |
|
T
TikiTres
Posted
posted
on
Thu, Jul 17, 2008 9:29 PM
Thanks Bill! I've really been inspired to try something by your thread and the many others on these forums. I actually tried carving a small tiki out of an old 4x4 and let me tell you, it's a quick way to gain appreciation for just how talented you guys are, LOL! I'm really amazed at how fast you can crank your tikis out!! |
|
B

Benzart
Posted
posted
on
Fri, Jul 18, 2008 3:07 AM
TikiTres, Thanks for taking the time to post your question, your findings , and your project. I Love your thought process and how you have tackled your questions, and your tiki sconce project is Really neat. I can't wait to see the finished piece and I have a feeling these little guys will be showing op in a Lot of TC'rs homes soon. It's great that you didn't just "Make do" with the first wood you tried and that you Knew the look you wanted and weren't going to stop until you found the wood that could provide it. |
|
T

TheBigT
Posted
posted
on
Fri, Jul 18, 2008 8:44 AM
I always wondered how Witco did this. Thanks for posting!! |
|
S

surfintiki
Posted
posted
on
Fri, Jul 18, 2008 6:43 PM
Yes! I really appreciate when peeps do this kind of thing, we ALL benefit off your wood tests. Thanks! Keep 'er coming. |
|
T
TikiTres
Posted
posted
on
Sat, Jul 19, 2008 3:57 PM
Benz, thanks for your kind comments! I hope this sconce ends up being worthy of all the praise it's currently getting, LOL! BigT, it's my pleasure! I've tried digging up as much Witco finish info as I could, but it apparently was a pretty closely guarded secret as no one seems to know exactly how it was done. They probably did burn the wood, but beyond that I suspect they either power-washed or sandblasted. I'm sure they didn't brush it like I'm doing because it would have been far too time-consuming for the scale of their projects and it's difficult to get consistent results. Ken Pleasant probably knows more than anyone about how it was done. I have one of his pieces and it is truly beautiful, it's nicer than the Witco I've seen so he may even have figured out how to improve upon their process! Surfin, thank you! Since you guys are so encouraging I'll make sure to take pics of the rest of the process as well. Speaking of which, I got to spend a little time on it today burning and brushing, here's a progress pic:
The nose and brow pieces are cross-grain to the face, I thought it might add some interesting texture variation. I left some of the burn in place around the edges, in the eye sockets and on the bridge of the nose to (hopefully) give it some character. I've got to run and buy some construction adhesive and the electrical components after while. I'll glue it up, then put the poly on it, then wire it up and it'll be done! If anyone's curious, below is a pic of the tools I'm using, all simple stuff. An inexpensive portable torch that I've had for years for solder work, a 3" wire brush in a cordless drill and of course a dustpan for all the sawdust, LOL!
|
|
4
4WDtiki
Posted
posted
on
Sat, Jul 19, 2008 4:13 PM
I wonder how Witco got the deep grain, too. I use a wire wheel, and it takes forever. I've never used cedar though, just doug fir. Cedar is supposedly softer? I've seen 4x6 beams of doug fir after sandblasting, and it does 'witco-ize' it. |
|
T
TikiTres
Posted
posted
on
Sat, Jul 19, 2008 8:10 PM
I don't think Witco used cedar, I read that they used another type of wood that is not widely available like it was back then. It was something unusual, like cyprus or sycamore or something. Maybe it was in one of BigBro's books that I saw that, I'll have to go back and look. The marlin I have that was done by Ken is cedar, plus I have a couple of carvings by Bosko that are cedar. They both got a lot deeper cuts into the grain than I did and they are much smoother too. I'm going to test a power washer, I'm thinking that when the wood gets wet it softens the wood between the grain and gives it that deeper "cut". I'll try to borrow my neighbor's washer tomorrow and give it a try. |
|
BTP

blindy the pirate
Posted
posted
on
Sun, Jul 20, 2008 9:38 AM
Witco used cedar. It was a kind of cedar called 'swamp cedar'. It is very soft and isn't very good for construction purposes, but good for carving. |
|
T
TikiTres
Posted
posted
on
Sun, Jul 20, 2008 6:45 PM
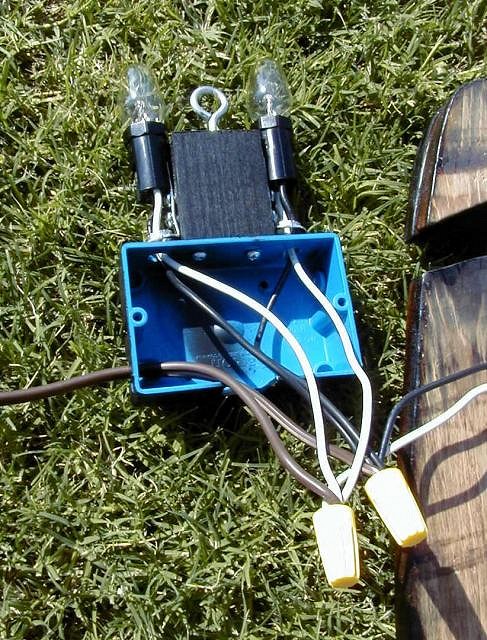
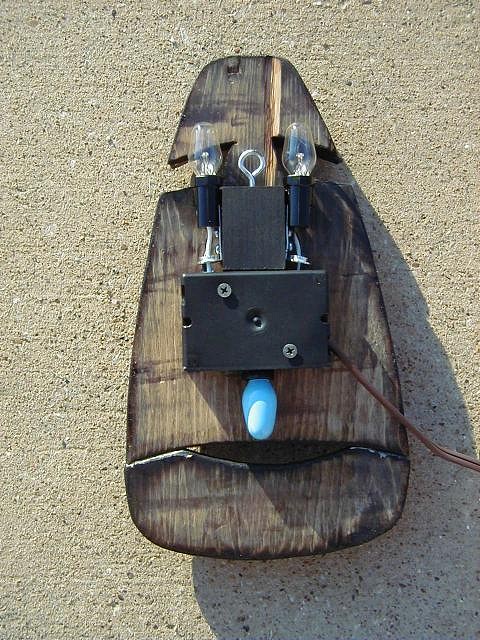
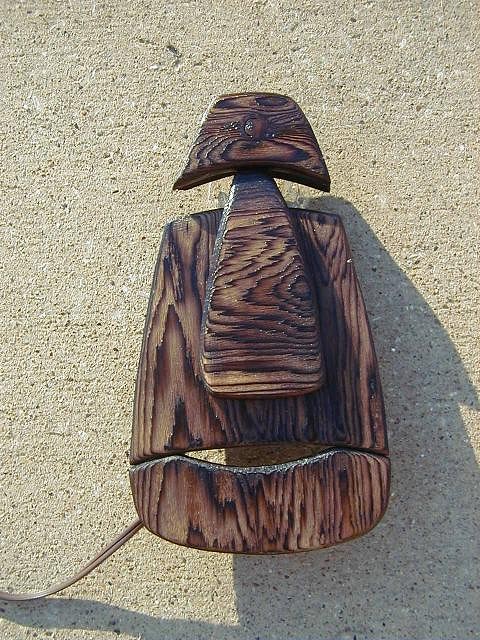
Thanks Blindy! I looked it up and apparently "Swamp Cedar" is the same thing as "Eastern White Cedar". Not sure what it's availability is in other parts of the country, but around here we mainly get Western Red Cedar. I'm not done with my wood testing, but I decided to go ahead and finish up the sconce today as I hate half-finished project laying around :) Here are some pics: All the lights are candelabra bases. I drilled two holes in each of the metal supports and screwed them into a wood block. The wood block in turn was screwed to a plastic j-box (the thinnest profile box I could find). Eventually when I get my tiki patio remodel complete this will be mounted directly to a j-box in the wall, but for testing purposes I wired it up with a plugged cord. The mouth light was screwed to the back of the sconce and a notch was cut into the j-box to fit around that base. All the wires were wire-nutted together, pushed into the box and the box was screwed to the back of the sconce. Closeup... Back with box in place... Front view... Hanging in the garage over the shop bench for now... Bosko is carving me some columns and an A-frame beam, once those get here the patio remodel can get underway in ernest :) Until then I'm going to try and do some more wood testing because I have another project to work on- a couple of moai supports to go under a wall-mounted bar countertop. I'll post more pics as I go! |
|
BS
bamboo stu
Posted
posted
on
Sun, Jul 20, 2008 7:21 PM
Wooh, intense eyes, are they as bright as they look? BTW, the "tightness" of the grain on the oak is because the face of the board was cut perpendicular to the growth rings. When we woodworkers desire such a grain, we order boards that are "rift" or (for the tightest grain) "quarter" sawn. For less vertical grain, we order "plain sliced", this is what you're seeing on the cedar. Quarter sawn wood produces the most waste in milling, so it always costs a lot more. You definitely made the right choice of wood, it's very "witco-esque". |
|
T
TikiTres
Posted
posted
on
Sun, Jul 20, 2008 10:48 PM
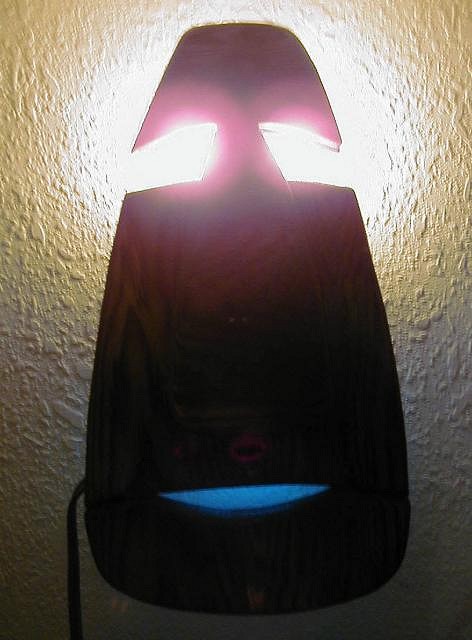
Hey Stu, thanks for the refresher on wood cuts :) I had to learn all that back when I was in school (for architecture). Hard to get the "good" cuts of wood these days, it doesn't just grow on trees like it used to.... oh wait, never mind :wink: Another thing I noticed (too late) is that of the two boards I'm playing with one has significantly harder "standing" grain than the other. Of course the board I cut the sconce from is the less desirable (softer) of the two, Murphy's law in action! The brightness of the eyes is completely inaccurate, I have a really craptacular camera that takes barely adequate photos in broad daylight and really bad photos in low lighting. They are 4 watt night light bulbs so they just put off a soft glow. I will be replacing my camera any day now because it is also having some electronic issues. I'm not happy with the finish on the wood on this one, but I wanted to go ahead and put it together to make sure the wiring/ lighting worked as planned. There will be a sconce #2 after I get the wood technique dialed in. [ Edited by: TikiTres 2008-07-20 22:50 ] |
|
T
TikiTres
Posted
posted
on
Sun, Jul 20, 2008 10:49 PM
Oops, double post. [ Edited by: TikiTres 2008-07-20 22:50 ] |
|
T
TikiTres
Posted
posted
on
Tue, Jul 29, 2008 9:43 AM
A quick update.... I'm still in the testing stages and have been playing with different techniques on scrap cedar. I discovered that simply brushing the wood by hand (with a nylon brush) after flaming it does a decent job of exposing the hard grain while keeping the soft wood between unscratched. I recently scored that old book that Westenhaver wrote ("Fun and Profitable Chainsaw Carving") and in it he discusses the burning technique... sure enough that's all Witco did was brush the wood off by hand. More pics to follow. |
|
S
surfintiki
Posted
posted
on
Tue, Jul 29, 2008 3:43 PM
Man that is kewl! It looks the heavens shining out of his eyes. Too cool. |
|
S

shampoovta
Posted
posted
on
Tue, Jul 29, 2008 6:42 PM
Look at this guy, wiring shit up and everything. Killer job. :) |
|
S

seeksurf
Posted
posted
on
Tue, Jul 29, 2008 9:14 PM
Nice1 the light touch is so cool! |
|
T
TikiTres
Posted
posted
on
Wed, Jul 30, 2008 8:17 AM
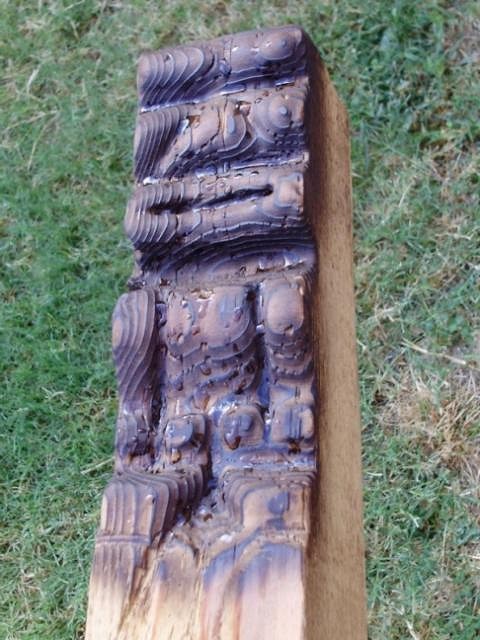
Thank you, I appreciate the kind words :) Once I get this wood thing figured out I'll do another sconce that will hopefully look a little more true to the Witco style than the one above. Speaking of which, I snapped a quick photo this morning of last weekend's experiment, this is a 4x4 that I butchered with a chain saw (much as I love power tools I feel like a freakin' ape with a chainsaw in my hands). It was then burned and brushed by hand with a nylon brush. Sorry about the drops (it got rained on this morning), this is mainly to show the hand-brushing versus the drill-brushing I was doing previously.
|
|
T
TikiTres
Posted
posted
on
Fri, Aug 1, 2008 10:35 AM
Truus just emailed me; the columns, beam and trim that Bosko has been carving for my patio remodel are done and on the way! Woohoo! I'll post pics when they arrive. |
|
T
TikiTres
Posted
posted
on
Mon, Aug 4, 2008 6:53 PM
These are the latest in my continuing efforts to try not to ruin too much wood in an attempt to create something moderately painless to look at:
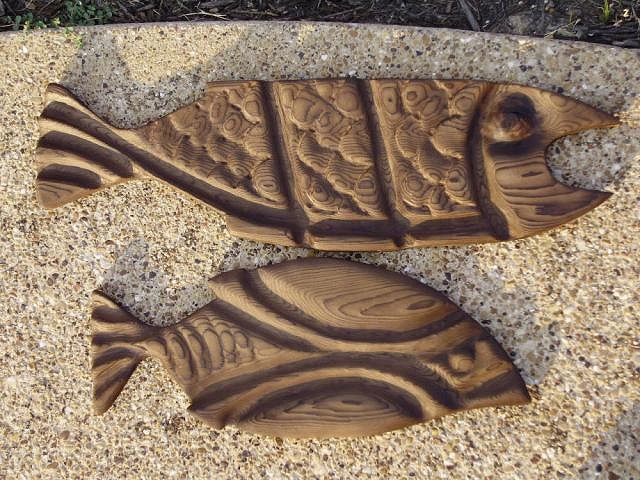
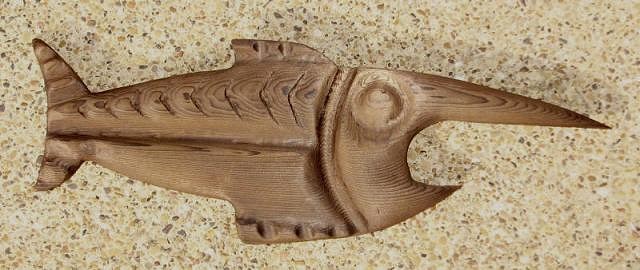
The larger of the two is 22" x 7". I was perusing some photos I've saved to my hard drive from various TC posts and ran across one of a trio of fish that I believe are Witco. They may not be "hardcore tiki", but I liked how they looked (except for the garish paint) and decided they'd be a good next step in my very green carving skills. I did take some artistic liberties with them and added some extra detail because I didn't want to paint the bright colors on them that the Witco versions have. They're not finished yet, I'm leaving them out in the sun a few days to lighten the color and will then either bee wax them or hit them with some matte poly. These were carved from 1x cedar and are therefore single-sided. Next up I'm going to see if I can get some 2x cedar or redwood so I can carve some in the round to suspend free-hanging from the ceiling of the gazebo. |
|
S
seeksurf
Posted
posted
on
Mon, Aug 4, 2008 9:10 PM
I like them! good flow and texture in there. |
|
T
TikiTres
Posted
posted
on
Wed, Aug 6, 2008 8:41 PM
Thanks Surf! I went to Lowe's today to attempt to order some 2x redwood and cedar, and much to my surprise they had 2x8 cedar in stock so I picked up a couple of 8' lengths and will try some fully carved fish with it. The redwood ain't gonna be that easy though, they didn't even know if they could order it. On another note, my order of Bosko goodies arrived today! Woohoo! Bosko and Truus were a pleasure to buy from, they gave me a schedule which they met to the day and they did an excellent job on everything! I'm excited to get this patio remodel project underway, all I need is some relief from the 100+ weather we've been getting :o Here are some pics: There are two of these columns, both 6" round and 8' tall (that's a tall 7' fence it's leaning against). They are not carved all the way to the top because they will lag bolt behind an existing beam, so there's some overlap.
The columns have 3 stacked tikis, here's a closeup of #1:
#2:
#3:
This is a custom carved 4x beam that Bosko did to my spec's, this will be my A-frame beam with the bird-mouth pointing out. I LOVE how it turned out!!
This trim (2 pieces like this) will be installed over the existing horizontal cedar beam:
And finally this will go in the center of the existing beam under the A frame and will have lights in the eyes:
|
|
B
Benzart
Posted
posted
on
Thu, Aug 7, 2008 2:53 AM
LOOKIN' GreAT! |
|
T
TikiTres
Posted
posted
on
Sun, Aug 10, 2008 3:27 PM
Thanks Benz! I thought there would be more of a reaction to the Bosko goodies, maybe they'll make more sense once people see them installed on the patio. It probably won't be for a few weeks, I'm not going to start that project in the current 100+ weather! Well I've been staring at the tiki sconce in the garage for a while now and just did not like it as-is, so this weekend I did a little more carving on it. I put a coat of amber varnish on it afterwards, but it was too shiny so I hit it with matte lacquer. The finish is darker than I wanted, but I'm going to call this one done. I also carved another fish, this one is from 2x cedar and is carved both sides: The camera's fill flash came on and washed out the shadows, it's actually carved pretty deep. I'm going to let it "season" in the sun a bit before putting a finish on it. It'll probably get marble eyes too. I got Lowe's to order some redwood for me, it'll be here Wednesday. I'll carve another fish from that to see how it compares to the cedar. |
|
TL

Tiki Lee's
Posted
posted
on
Sun, Aug 10, 2008 4:44 PM
Good to see that you re-worked the sconce. As it was, you just did not go deep enough with the burn. It looks GREAT now and the scrimshaw adds a whole new level of "cool" to it that it needed. The fish are cool too! Good stuff! |
|
M

mieko
Posted
posted
on
Sun, Aug 10, 2008 6:11 PM
Great stuff here! Love the new carving on the sconce, looks really great. I really dig your fish too, very neat looking. Thanks for the detailed pictures on the cedar tests - it's really making me want to pick up some cedar and see what I can do! I especially like how the grain showed up on that one fish with the scales, it gives me a bunch of ideas! |
|
T

Tikilizard
Posted
posted
on
Mon, Aug 11, 2008 10:13 AM
Hey TikiTres, Great work on the raised grain and lighting. Have you ever tried a burl like a black redwood burl? Keep up the great work and happy carving. Black Redwood Burl: Redwood Burl: |
|
T
TikiTres
Posted
posted
on
Sat, Aug 16, 2008 4:26 PM
Lee, thanks very much! I started out pretty wimpy on the burning for sure, I've been hitting it a lot harder lately. It's surprising that you can really torch the heck out of wood and it doesn't burn more than the outer surface. Mieko, thank you! I like those scales too, I've been messing around with carving different shapes/ patterns to see how they turn out. In most cases I can't even tell what it's going to look like until it's burned and brushed though! Tikilizard, ooooooh purty wood :) I haven't tried burl, so far I've just been using what I can get at Lowe's. Where do you get big blocks like those? Here's a few new pics:
Here are a couple of new ones, the bottom one is a whale that I patterned after a Witco whale. The middle one is the same one posted earlier after a couple of days of sun lightening. The top one is one I just finished today, it's the first one I've done out of redwood. The wood handles the same as cedar. The biggest difference is the grain (ring thickness in section) is a lot wider. Here's an angled shot of the above showing the thickness. They're all 1-3/4" thick, carved both sides. These will suspend from wire in our gazebo. There will be 2 or 3 more fishy "companions" to the above, but I've got another project brewing. My Van Tiki skull tiles finally arrived and are going to get built into a table. Pics to follow! |
|
T
Tikilizard
Posted
posted
on
Sun, Aug 17, 2008 11:55 AM
TikiTres, Your fish cavings are great! The grain on the fish scales is exceptional. Getting the grain to flow with the fish is a real talent. For the type of work I do I get exotic wood blocks from ebay and they not that expensive. I do a search under "wood" +lumber, blanks or "burl" +lumber, blanks. Much larger access to different wood then Lowes. Happy Carving. |
|
T
TikiTres
Posted
posted
on
Sun, Aug 31, 2008 9:14 AM
Lizard, many thanks for the compliments, and for the tip on eBay! As much time as I spend there it never crossed my mind that I could get wood there too! I finally finished up the VanTiki tile table... well it's almost finished anyway. Once the grout cures I'll seal it and then it'll be done. Below are a couple of pics, it's still wet from the last sponging but it'll look close to that once sealed. This project started when I bought the tile trio from DVA Gallery, they are called the "Quiet Guardians of the Golden Idol". I set out looking for a table to set them in and finally found this one at Garden Ridge. It had a frosted glass top in it originally, that was removed and replaced with 3/4" exterior grade plywood painted with several coats of gloss paint for added protection. The tile trio was set on that and then the tumbled slate went around them. Grout is black sanded. I put it poolside for the pics, but it will stay under a covered patio out of the elements. |
|
T
TikiTres
Posted
posted
on
Fri, Sep 5, 2008 7:51 AM
Wow, no love for the table at all? I thought it turned out decent. Maybe if I carved it out of a palm log it would be more widely received here :) I started the "Bosko" patio project yesterday (see previous photos), got the A-frame beam hung. Hopefully my schedule will allow me some time to work on the decking this weekend. |
|
V

VanTiki
Posted
posted
on
Tue, Sep 16, 2008 6:57 PM
Hey man - |
|
H

hewey
Posted
posted
on
Thu, Sep 18, 2008 6:23 AM
Wow, that table is gorgeous :D Very nice use of the tiles |
|
T
TikiTres
Posted
posted
on
Thu, Sep 18, 2008 7:38 AM
Thanks Henrik! Welcome back from your vacation :) Hewey, thank you! The tiles are really cool-looking, hopefully some day I can wade through the throngs of bidders on Henrik's eBay auctions and emerge victorious with a mug to keep them company :D I am still working on the patio structure, it has been slow going because of hurricane Ike. Luckily it weathered Ike in it's half-finished state, but I had to let it dry before resuming the roofing work. At this point the A-frame (with Bosko beam) is done, all the decking is done, the sheet metal roof trim is done, roof is felted and about 15% of the shingles are down. I need to install the two skylights before continuing with the shingles. I haven't installed the Bosko columns or trim yet, I'll wait until the end to do that so they don't get damaged. Then I'll finally have some pics to post :) |
|
T
TikiTres
Posted
posted
on
Mon, Oct 13, 2008 1:16 PM
The Bosko patio conversion is just about done... well the first phase anyway :) Earlier in this thread I posted pics of the items that Bosko and Truus made for me including a pair of carved columns, a carved A-frame beam, the trim along the top of the cover and the skull in the center. Let me take a moment to praise Bosko and Truus, they were wonderful to work with and created these items exactly to my spec's and shipped them quite quickly considering the effort required to make them! The patio structure was something I built around 8 years ago; I pulled off the old plastic roofing and decked it, built the A-frame, roofed it with asphalt shingles (required by the neighborhood ARC), installed a pair of skylights and finally installed the carved trim and replaced the existing 4x4 columns with the new carved totems from Bosko & Truus. It's taken many hours to get to this point! I still have a lot of remodeling to do under the cover including building some wall panels clad in Lampac and Palm matting with recessed mug shelves, doing some kind of finish on the slab (slate maybe) and doing some electrical work. I have some cool carvings, a tiki bar and other goodies that will go in once the wall finishes are done, but until then here are some pics of this phase:
|
|
T

tikipaka
Posted
posted
on
Mon, Oct 13, 2008 2:30 PM
Wow, so far so good. It looks great. Can't wait to see it when you've completed it. I'm loving that beautiful pool you have there also.. Nice.. |
|
T
TikiTres
Posted
posted
on
Fri, Oct 17, 2008 10:45 AM
Thanks so much! The pool was a project from earlier this year, it was completed in March. Then we had a gazebo built (pic below), then we put in the landscaping, then did the remodel of the patio cover. I'm going to do all the above-mentioned work under the patio cover next and then I've got to do the Koi pond that will wrap around the gazebo, then the bridge connecting the patio to the gazebo. Not sure what after that, but I don't think this will ever be completely done! I didn't expect much of a reaction here because it's probably not "tiki" enough for most people here, but we're very happy with everything.
|
|
T
TikiTres
Posted
posted
on
Wed, Jul 7, 2010 1:59 PM
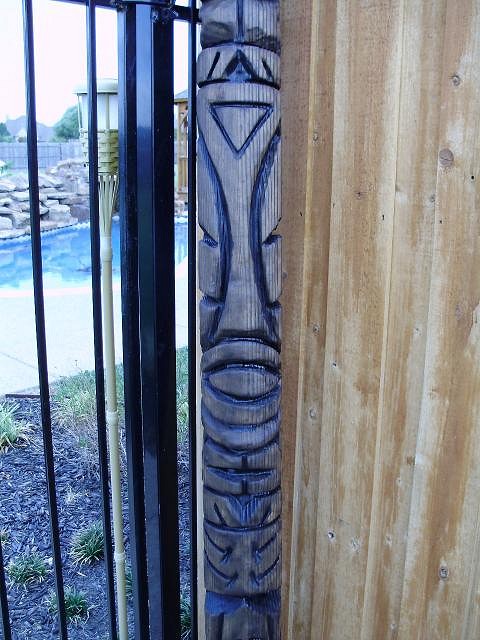
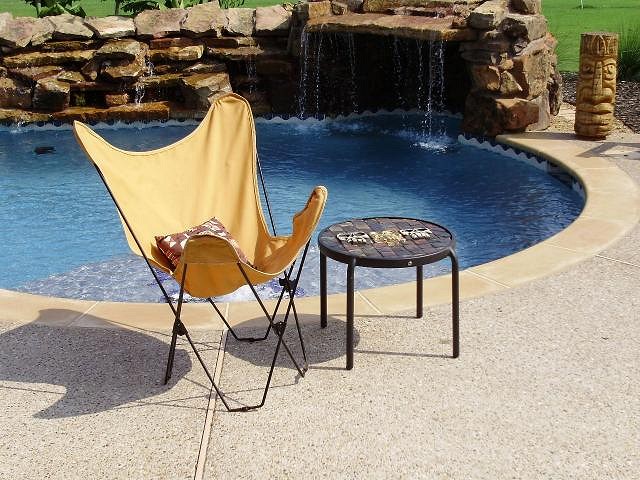
It's been quite a while since I updated this thread, but embarrassingly I haven't really done a lot to it in the last couple of years! I've been tinkering with it again this summer though. Still a lot of work left ahead, but here are some progress pics. In this first pic you can see I finally moved the old Tiki Farm bar out of storage and onto the patio. I did a little burning on the bamboo on front of the bar to add some interest, also coated it with amber varnish. It's being staffed by our new bartender, an awesome Ku carved by Bosko :) The tiki next to the bar is a neat little stained concrete fountain by Chic-E-Tiki, on the bar is one of Bosko's "desktop idols". We also added this great cedar Moai pole by Bosko next to the pool (excuse the lack of growies in the background, we had an ugly winter that wiped out all our tropical stuff): Here's a shot from a little farther back: My big project last weekend was to clad the underside of the patio canopy with bamboo blind material (from Lowes): I also did some chainsaw-carved (then burned & brushed) wood trim to case the skylights and my wife pitched in and sealed all the wood trim with polyurethene. I carved some Moais onto the side trim to mimic the ones Bosko did on the A-frame beam: The next project is to build the wall panels under the canopy, then next will be to put slate down. Hopefully it won't be another 2 years before that gets completed :) |
|
M
mieko
Posted
posted
on
Thu, Jul 8, 2010 1:00 PM
Wow! I really like how your patio turned out - I don't think I ever saw the finished pictures. Where are your fish?? |
|
T
TikiTres
Posted
posted
on
Fri, Jul 9, 2010 11:04 AM
Thank you! The fish are sitting in the garage, waiting patiently to be hung :) We have a gazebo next to the pool, the fish are going to be hung under it. I've got a really cool marlin that Ken Pleasant carved that will go under the above patio canopy as well as a few other things, but I need to get the wall panels built first before moving the rest of the stuff out there. |


Pages: 1 47 replies