Tiki Central / Tiki Carving
KINO's carving thread....
|
K

Kino
Posted
posted
on
Sun, Aug 16, 2009 8:15 PM
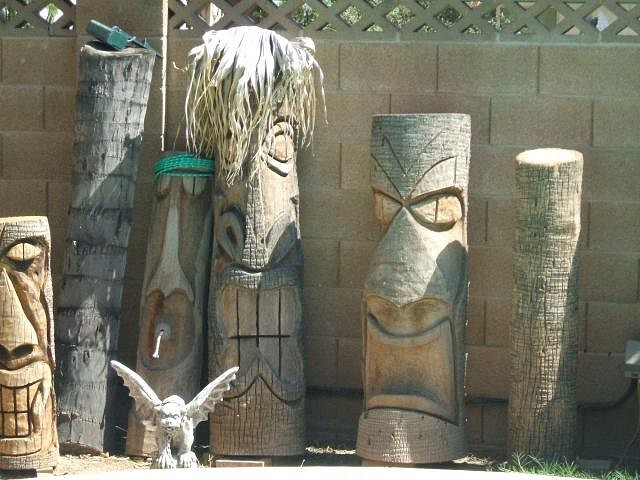
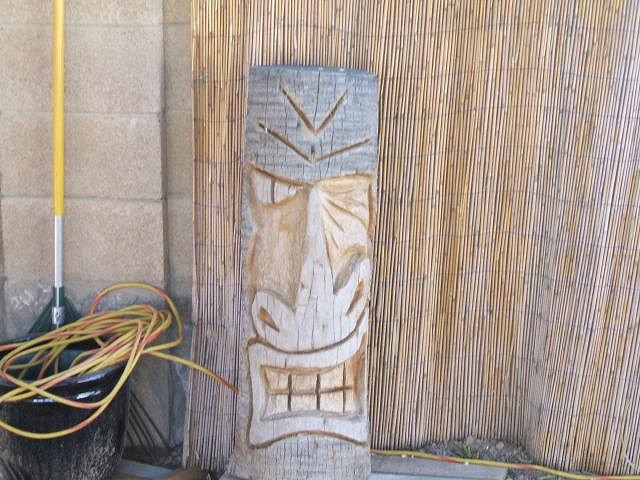
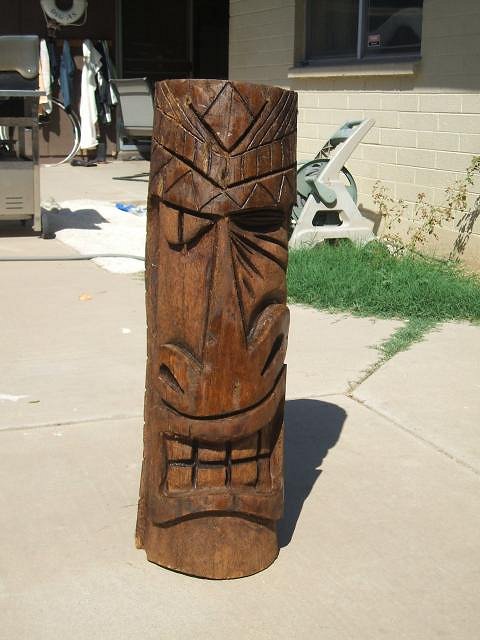
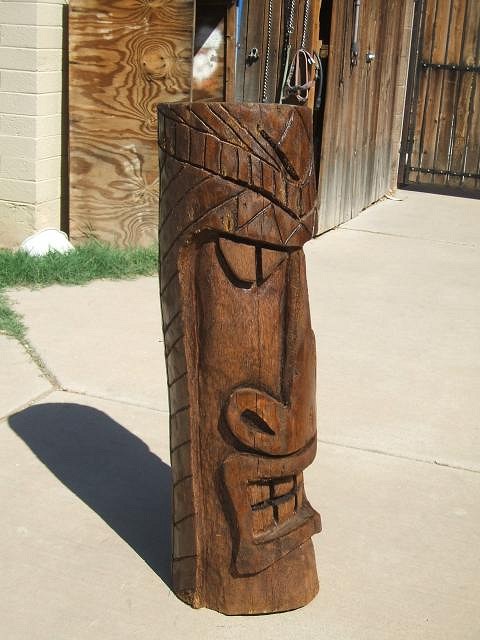
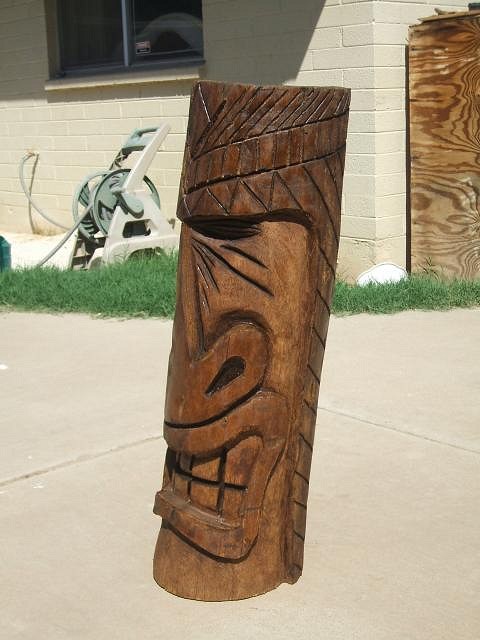
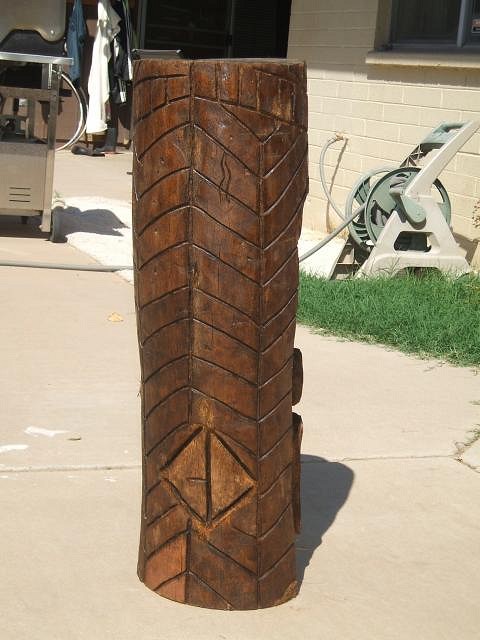
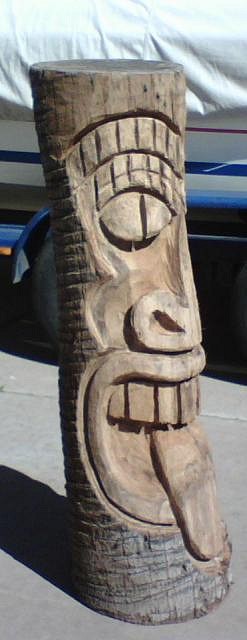
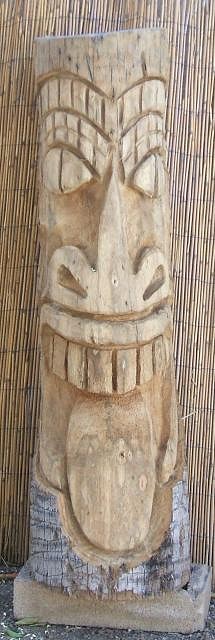
Hey all !! What you tink ? these da first few
these are the last couple I did
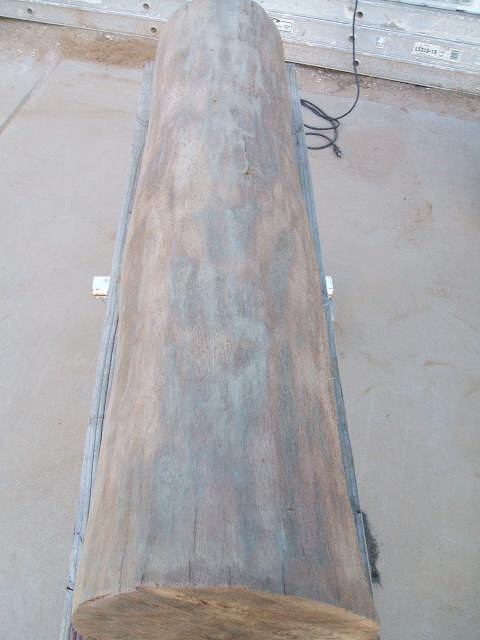
this one is a dead trunk my friend wanted me to carve.(still in ground) [ Edited by: Kino 2009-11-17 11:20 ] [ Edited by: Kino 2009-11-18 12:08 ] [ Edited by: Kino 2010-02-03 15:14 ] [ Edited by: Kino 2010-11-12 12:18 ] |
|
K
Kino
Posted
posted
on
Sun, Aug 16, 2009 8:27 PM
can somebody tell me why some post i go to i can not see the pics ? :( |
|
L

laojia
Posted
posted
on
Sun, Aug 16, 2009 8:54 PM
Hello Kino! Welcome on board! Nice palm carve you have! Keep good time with carving and share your work! J. |
|
K
Kino
Posted
posted
on
Sun, Aug 16, 2009 10:03 PM
thanks, I'll be having some new ones soon cuz I got fresh logs |
|
B

Benzart
Posted
posted
on
Mon, Aug 17, 2009 4:45 AM
Kino, Welcome to TC, Glad to have you here and Really happy that you seem to be Bitten by the Tiki Bug. Once you carve a few you are under the spell and can't get away. These first ones are Excellent for beginnings and it looks like you have done this before? Yes, the older posts with the thumbnails or Tiny pic's are Aggravating but there's not much can be done. We Used to use Shutterfly a lot to store and post images. They suffered growing pains a couple times and renamed all their master files to the extent that all the stored photos were renamed and thus failed to show anything more than a red X or sometimes a thumbnail. Some artists posted links to shutterly as I did if you look on page one of my thread. But, alas, it isn't the same and would be nicer if the links actually worked... |
|
K
Kino
Posted
posted
on
Mon, Aug 17, 2009 7:10 AM
Benzart, thanks for looking. Now , I have a connection for some logs and want to make a whole army of TIKIS. |
|
H

hodadhank
Posted
posted
on
Mon, Aug 17, 2009 8:56 AM
Aloha Kino! I can almost here the chainsaw rumble as i look at these toothy fellows. Where in NM are you? I spent ten years in the Burque where I curated a gallery on route 66. I sure miss the smell of green chile's roasting!- Hodaddy |
|
T

TheBigT
Posted
posted
on
Mon, Aug 17, 2009 9:07 AM
Nice works Kino. Are they carved completely with the chainsaw? |
|
K
Kino
Posted
posted
on
Mon, Aug 17, 2009 11:46 AM
hodadhank, I have to change my location, I was just being creative (although I did live in ABQ for 2 yrs myself) I'm actually in - The Valley of The Sun BigT, I wish I was that good with a chainsaw ! I use the Arbor Tech carving tool. |
|
T

Tikilizard
Posted
posted
on
Mon, Aug 17, 2009 1:19 PM
Welcome aboard Kino. Glan to have you joining TC. Your work looks great! You can't be a first timer? Great depth and nice flow already. Your a natural! Keep them coming and happy carving. |
|
K
Kino
Posted
posted
on
Tue, Aug 18, 2009 7:41 PM
Thanks for all the kind words. I have noticed that some have actually drawn lines on the palms. In the begining Thanks in advance |
|
WP

Watango productions
Posted
posted
on
Tue, Aug 18, 2009 9:56 PM
Kool stuff Kino,Look'n good! |
|
T
TheBigT
Posted
posted
on
Wed, Aug 19, 2009 7:55 AM
I use the Sharpie brand markers (they're permanent), but haven't drawn on palm. Don't think it would be any different though. |
|
H

Heath
Posted
posted
on
Wed, Aug 19, 2009 8:11 AM
I use chalk or pencil since they both clean up easily. The chalk comes off with a stiff bristle brush and the pencil erases with a light sanding. Cheers. |
|
K
Kino
Posted
posted
on
Wed, Aug 19, 2009 12:52 PM
watango- thanks for looking and kindness Big T- thanks for the input Heath- I kinda found that adding detail was hard when dryer. (not that I have a lot of detail in the first place) It seems the palm wants to fray more the dryer it gets. I am getting ready to start another piece and after browsing here on TC I have grown fond of the more traditional (?) styles of TIKIS. Stay Tuned...... |
|
S

seeksurf
Posted
posted
on
Tue, Sep 8, 2009 9:39 PM
Welcome! fine looking first tikis your a natural. |
|
K
Kino
Posted
posted
on
Fri, Sep 11, 2009 11:17 AM
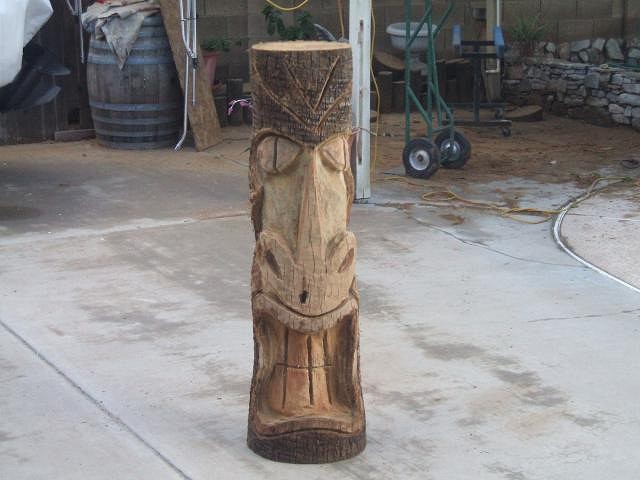
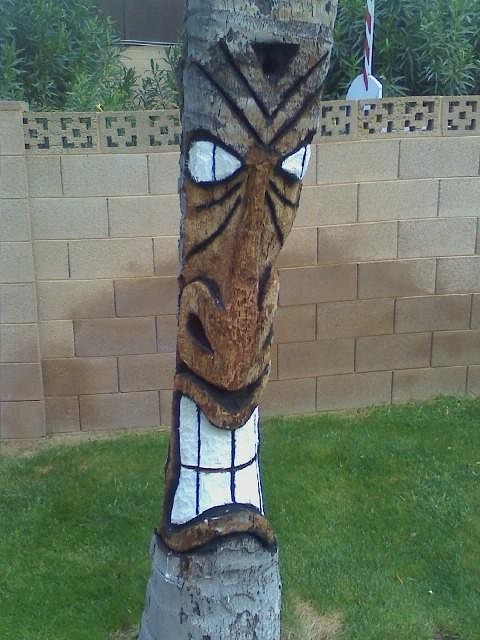
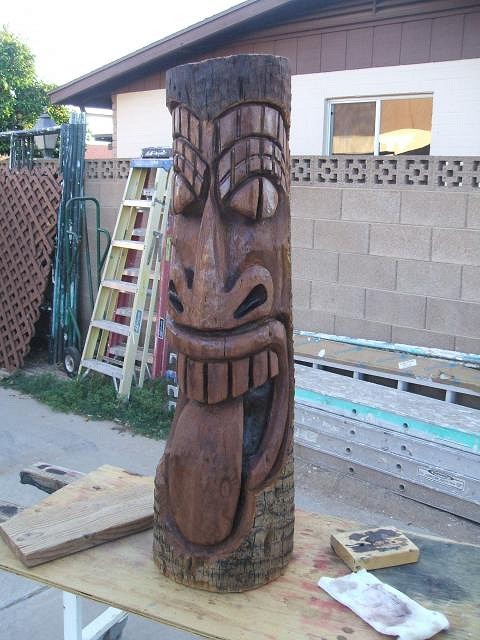
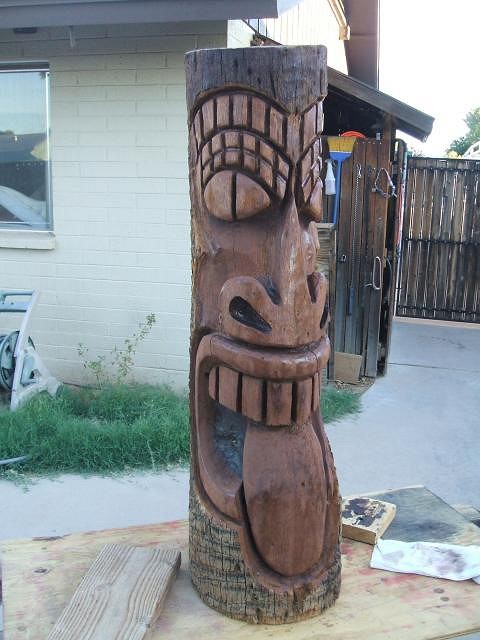
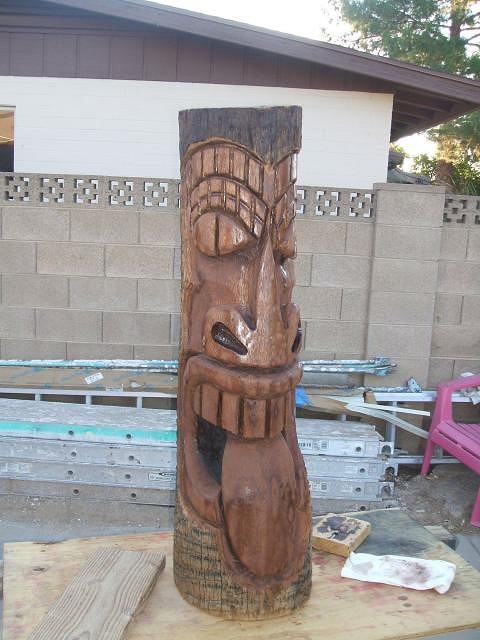
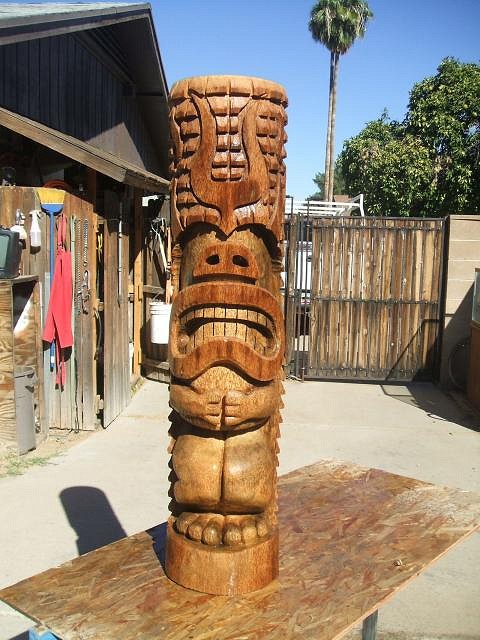
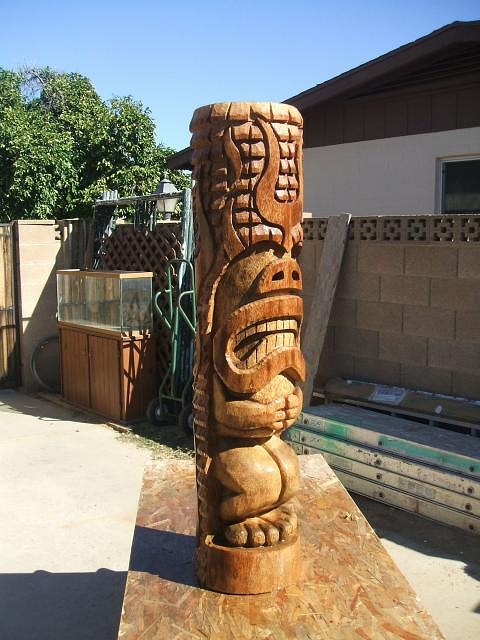
Aloha All, Basically, I took an older TIKI I had and added a little more detail and put a headress on him. I call him Winker. Any way here are the before and after pictures. Here he is before the remodel. Originally I did no sketching on the log,
here is the remodeled Winker
The logo on the back is my signature (initials) |
|
K
Kino
Posted
posted
on
Tue, Sep 15, 2009 7:08 AM
sanding=nofun |
|
T

TikiMango
Posted
posted
on
Tue, Sep 15, 2009 8:05 AM
Sanding is your friend... along with stain. Keep 'em coming! |
|
T
TheBigT
Posted
posted
on
Tue, Sep 15, 2009 1:14 PM
LOL, I second that! Good job. |
|
K
Kino
Posted
posted
on
Thu, Sep 17, 2009 12:03 AM
I'm trying to find the time to get started. Thanks BigT, but I have a lot of room for improvement compared to Kino Thanks You [ Edited by: Kino 2009-09-17 00:05 ] |
|
K
Kino
Posted
posted
on
Fri, Sep 25, 2009 7:52 AM
I'm back.
|
|
B
Benzart
Posted
posted
on
Sat, Sep 26, 2009 5:57 AM
Kino, Every tiki looks Better and better, Keep up the progress. I wish my first few were as good as yours but I had to do MANY to get half that good!. Just keep carving and posting, thats how you learn. |
|
K
Kino
Posted
posted
on
Sun, Sep 27, 2009 4:32 PM
Thanks Ben, and everyone for da kind words. Those first ones ( about 15 or so total ) I just look at the log and get a vision [ Edited by: Kino 2009-10-09 21:50 ] |
|
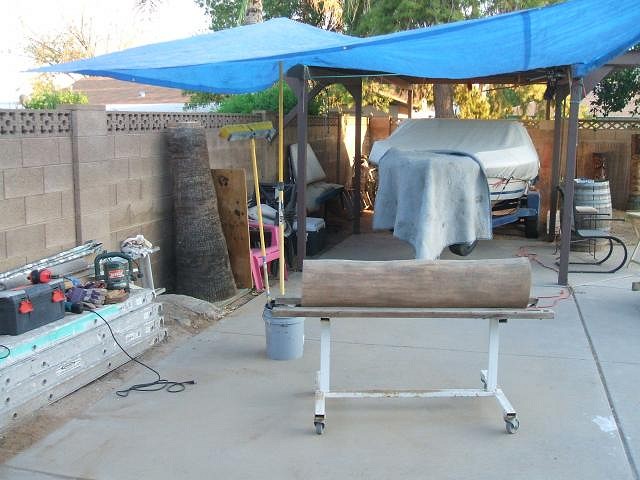
K
Kino
Posted
posted
on
Sun, Sep 27, 2009 5:41 PM
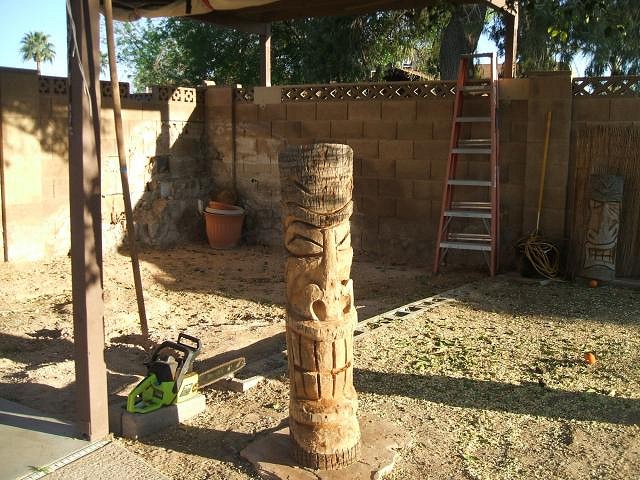
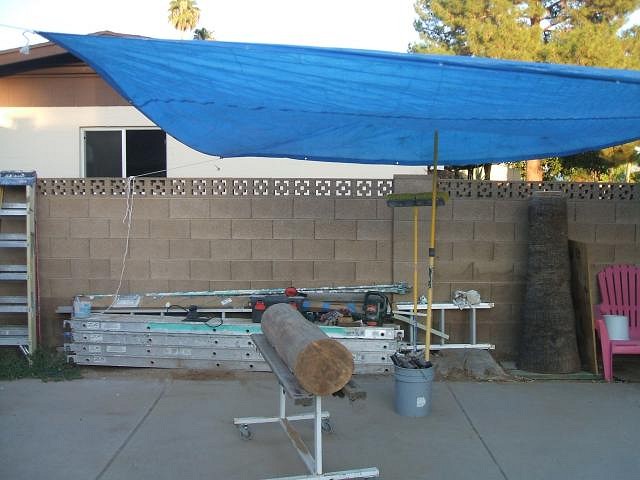
I set up a shade area so I could start something.
|
|
T
TikiMango
Posted
posted
on
Mon, Sep 28, 2009 4:17 AM
Put your 6yr old to work on that tiki! I've let my 6yr son use a chisel and mallet on the non-critical areas of a tiki, help strip-off the bark, and even let him decide on some design elements. We both ended up having a great time. Just remember that your child is 6, so the attention span, strength, etc won't be there, but it is definitely one way to spend some quality time with your tiki... I mean your child. |
|
K
Kino
Posted
posted
on
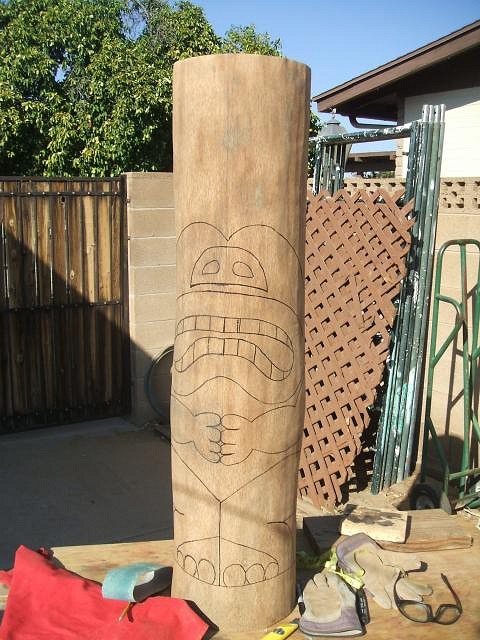
Fri, Oct 9, 2009 9:40 PM
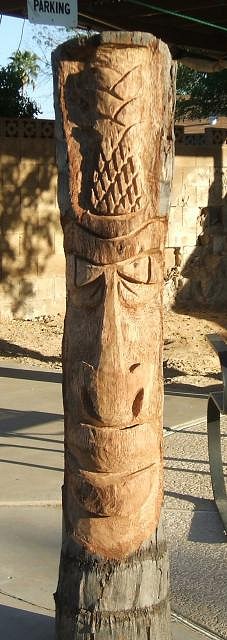
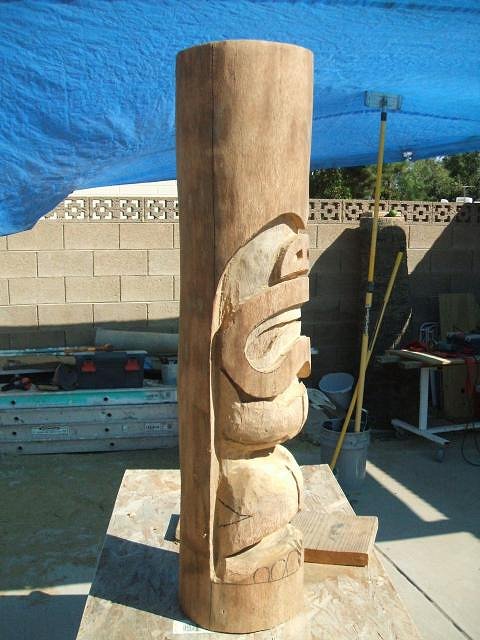
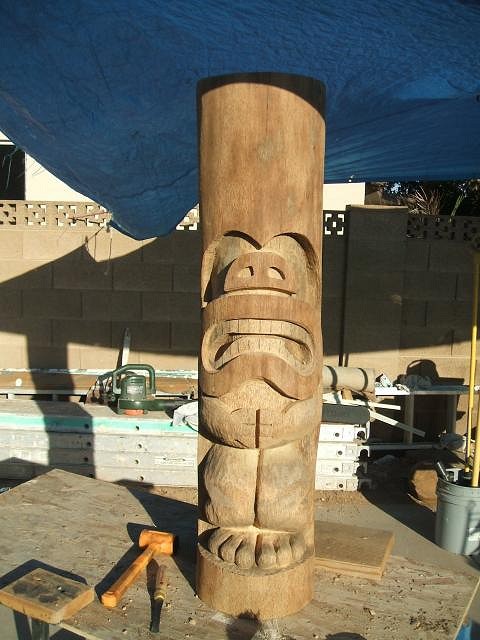
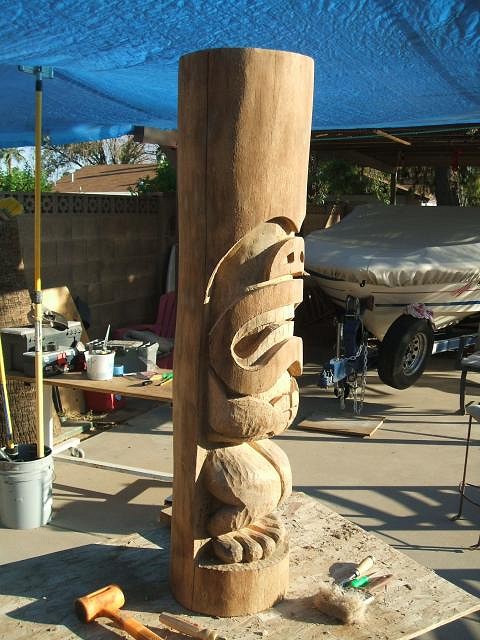
So here's my progress report. getting going on the face was easy cuz I have done those before
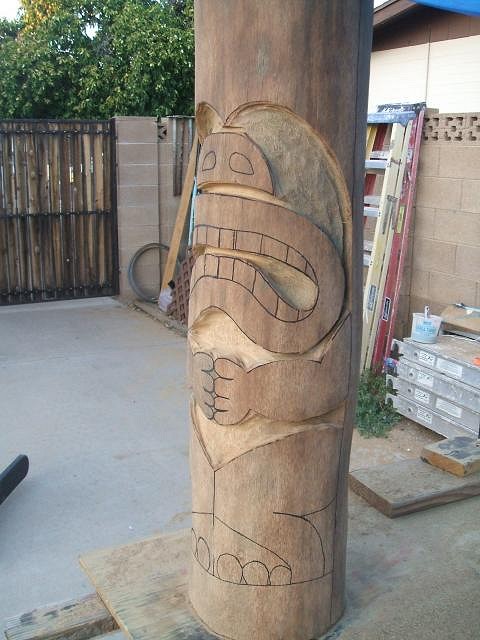
Roughing out the body was a bit slow. I didnt want to mess anything up. Then I knew I had to go buy something....
Prest-o ! Change-o !
There's a couple things I could have done better during the rough cut, [ Edited by: Kino 2009-10-09 21:51 ] |
|
C

congatiki
Posted
posted
on
Sat, Oct 10, 2009 6:03 AM
Nice work on this one so far Kino, I think he's gonna be |
|
BTS

BIG tiki scott
Posted
posted
on
Sat, Oct 10, 2009 6:41 PM
[ Edited by: BIG tiki scott 2009-10-10 18:42 ] |
|
BTS
BIG tiki scott
Posted
posted
on
Sat, Oct 10, 2009 6:44 PM
oops! hes realy lookinsweet man! your growin by leaps and bounds!!! |
|
BTS
BIG tiki scott
Posted
posted
on
Sun, Oct 11, 2009 4:28 PM
p.s. barney called and is vry proud of them feet!! way better than mine!! |
|
B
Benzart
Posted
posted
on
Sun, Oct 11, 2009 6:19 PM
Looking Great Kino, and I'm Loving that you are started down the right path. A FLEXCUT, Big Major step however the first big Step wasTHIS..... ""I have dedicated myself to better quality stuff by : With goals like that you are sure to advance in no time, however your pursuit of perfection is only a Lifelong journey because the Better you get the more you realize you need to be Way Better Yet! Congrats on taking the first Major steps, and pretty soon there will be No Looking back Welcome to the Club I Know you are going to enjoy it! :o :D |
|
K
Kino
Posted
posted
on
Mon, Oct 12, 2009 7:21 AM
congatiki- I want him to be the best, otherwise I'm not progressing Big tiki Scott- mahalo, and the feet were born out of neccessity Benzart - Before I landed here, I thought I was doing OK with my tiki's. Once again, Mahalo |
|
BTS
BIG tiki scott
Posted
posted
on
Mon, Oct 12, 2009 7:29 PM
and what a great nescessity they are luvem!!! keep it up!! cheers! |
|
T

tikigodz
Posted
posted
on
Tue, Oct 13, 2009 9:00 AM
with every new tiki theres something new keep it up awesome |
|
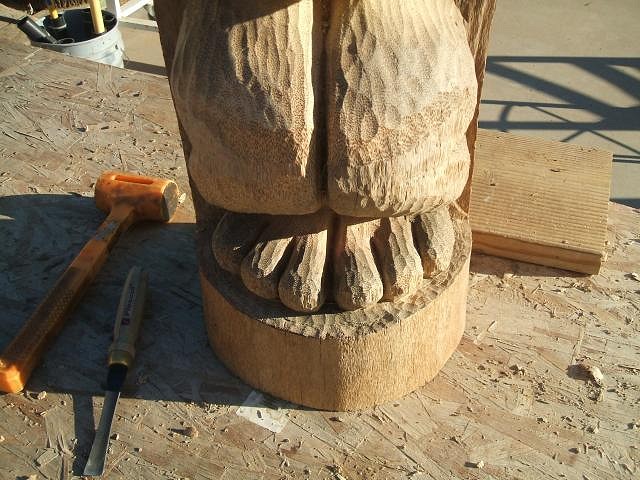
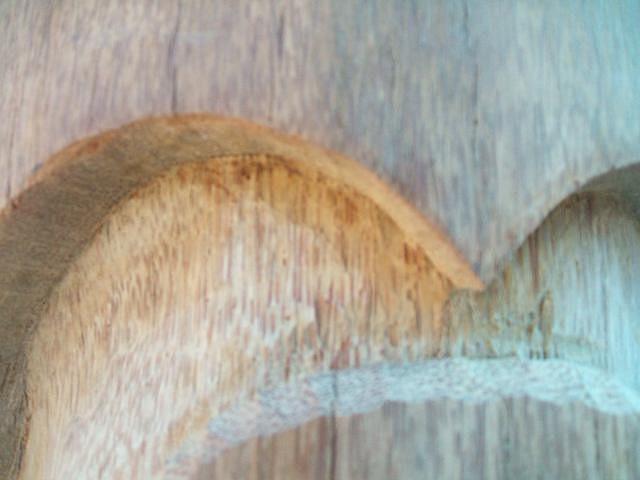
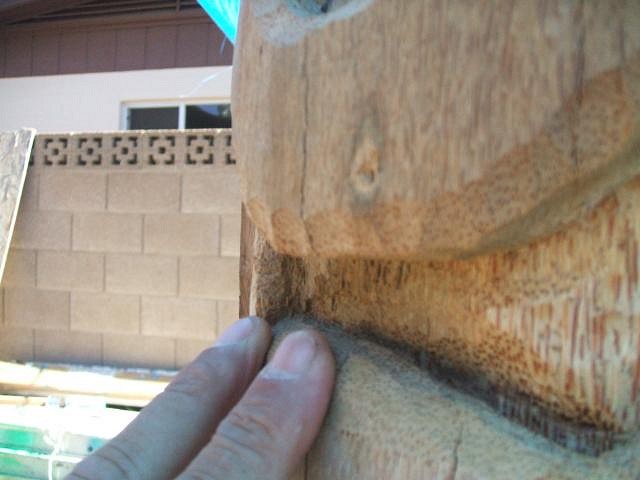
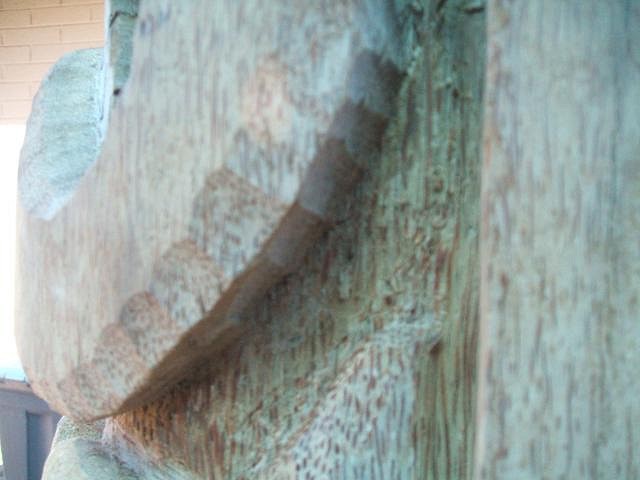
K
Kino
Posted
posted
on
Mon, Oct 19, 2009 12:34 PM
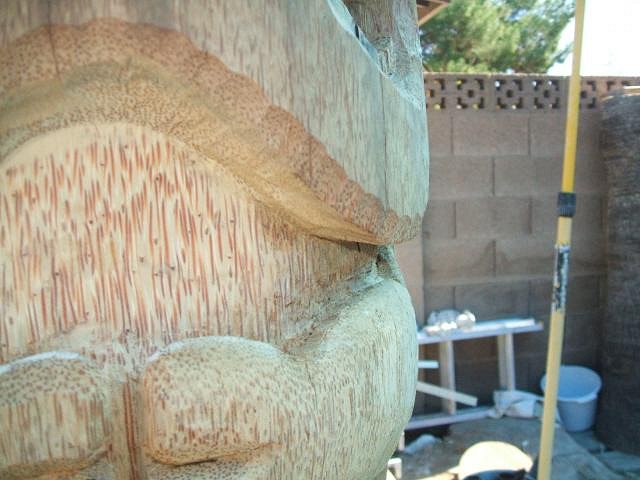
Hey all, Now, I need some Tiki help. here are some pics of the areas I am talking about. |
|
F

furball
Posted
posted
on
Mon, Oct 19, 2009 2:28 PM
Can you get at those areas with a dremmel? Maybe a sanding disc at medium-low speed? |
|
BPB

Bay Park Buzzy
Posted
posted
on
Mon, Oct 19, 2009 2:51 PM
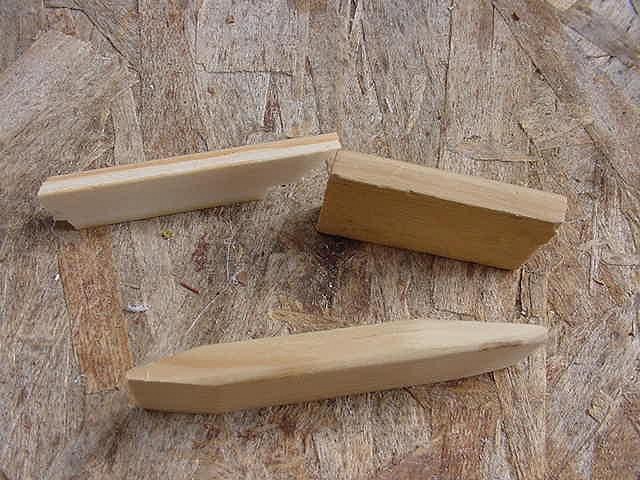
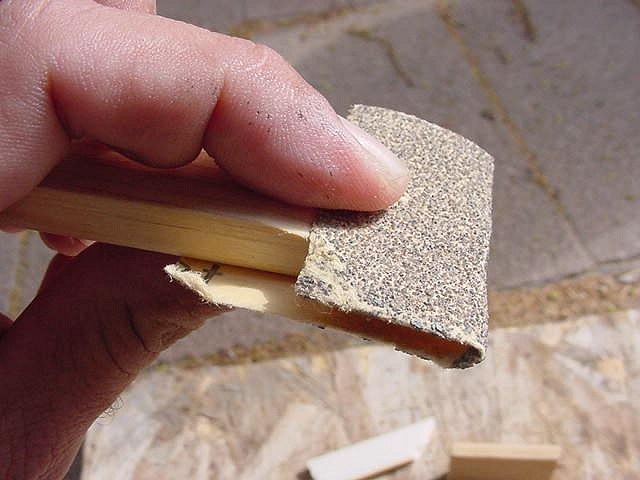
I use customized pieces of molding that I wrap sand paper around.Kind of like mini sanding blocks with angled edges to fit in the tight spaces:
rotary dremel won;t work that well on flat planes.It'll end up all bumpy and uneven.Good for a start, but not so forfinishing it up. Buzzy Out! |
|
BTS
BIG tiki scott
Posted
posted
on
Mon, Oct 19, 2009 5:51 PM
i agree w buzzy. hand sanding and sanding blocks or sticks if need be are about the only way to go. i have also "softened" areas by burning lightly then sanding. but this is only good in an area where you will burn or darkin the same area when finishing it as it will dis color the wood. hope this is helpful. lookin real good from what i can see cant wait man!!! cheerz! |
|
T
TheBigT
Posted
posted
on
Wed, Oct 21, 2009 1:07 PM
Yep, good tips from Buzzy. Over the last couple of tikis I've also gathered a handful of scraps from my scrap bucket to help with sanding. Mostly small straight pieces for getting into and flattening tight spots. Also I have a curved block of wood thats been pretty handy for sanding concave areas. |
|
F
furball
Posted
posted
on
Wed, Oct 21, 2009 2:50 PM
Great idea with the custom sanding blocks... hadn't thought of that. I'm going to make some tonight. :D |
|
K
Kino
Posted
posted
on
Wed, Oct 21, 2009 9:48 PM
Buzzy, Scott, Bigt - thanks for the tips Mahalo |
|
K
Kino
Posted
posted
on
Sun, Nov 1, 2009 10:38 AM
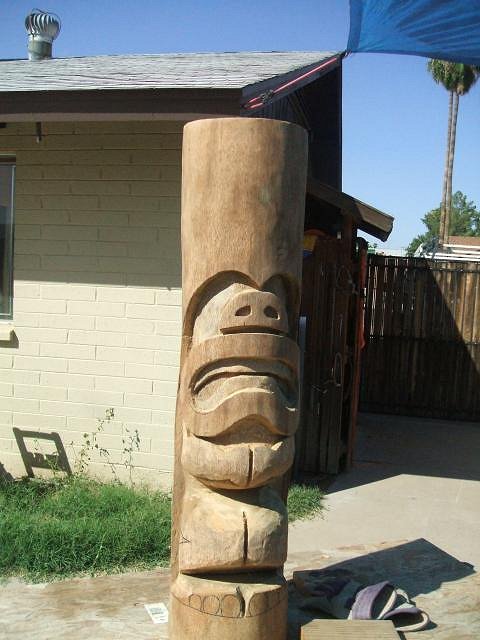
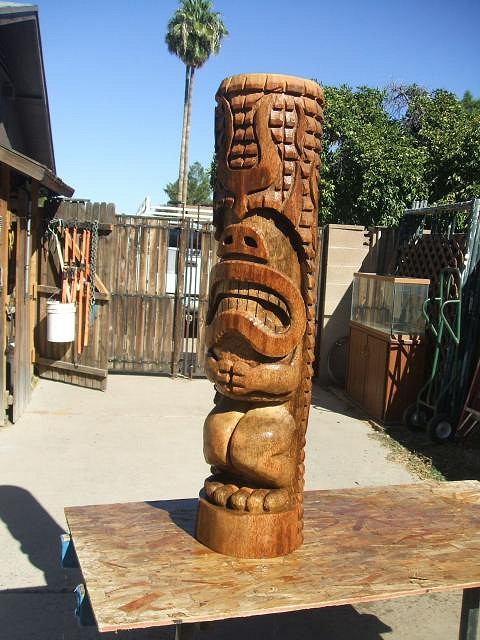
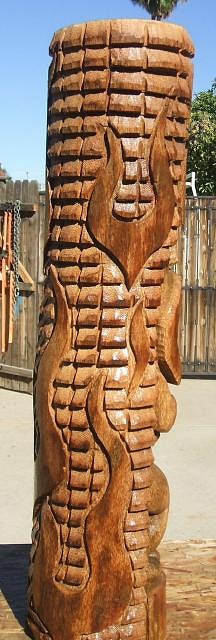
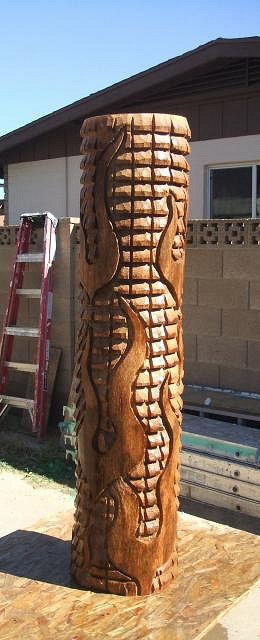
Here's my update... Whatcha tink ?
There is no finish on him yet , I just lightly sprayed him with the garden hose I am open to suggestions. |
|
B
Benzart
Posted
posted
on
Sun, Nov 1, 2009 11:24 AM
Excellent looking Tiki Kino, Personally I would just put several coats of varnish or poly and be happy. great Job |
|
S

SDshirtman
Posted
posted
on
Sun, Nov 1, 2009 11:38 AM
Great job. He looks awesome. |
|
T
tikigodz
Posted
posted
on
Sun, Nov 1, 2009 12:04 PM
Lovin the flames Kino!!! great idea. |
|
K
Kino
Posted
posted
on
Sun, Nov 1, 2009 2:44 PM
Benzart- I personally like the natural, 'ancient' feel also. Thats why my earlier pieces were pretty unfinished. I read somewhere on here to sand between coats, what will happen if I just put on 2 or 3 thin coats with no sanding ? (lazy) SDshirtman - thanks for the kind words , I love your sanding and finishing, but I haven't figured out how to do that very efficiently so I opted for the rough, hand chiseled look. Tikigodz - much thanks for looking, I was thinking you to be an amateur like myself, but from the looks of your fence and living room, me thinks you are many moons ahead of me. very nice stuff ! |
|
K
Kino
Posted
posted
on
Thu, Nov 5, 2009 2:25 PM
I am ready to put a finish on my latest piece, but I have some questions before I make some stupid mistake. I found this advice on a thread and would like to try it out on my carve ; " I used to brush on spar varnish, let it dry, and sand in between coats - pretty labor intensive process. Later (on Benzart's advice) I started using spray shellac first, then spray varnish second. I know those two work well together, and using spray instead of brush cuts way down on time. You can do the whole thing in one day with the coats totally dry in between applications, and no sanding. You'd have to try really hard to get drips with this approach. " Can any of you more experienced guys answer these questions for me ? 1- if I'm not sanding my piece will the above technique still have a nice look ? 2- how many coats of each product should I use ? 3- I carve palms, do I need to let them dry completely before the shellac/varnish ? 3a- if I seal them when they are still wet, will the moisture eventually dry out ?(slower maybe) 4 - what should I use to seal the top and bottom ? Thanks in advance |