Tiki Central / Other Crafts
Noobs and Mug Making! (new stuff!)
Pages: 1 26 replies
|
W

Weitz
Posted
posted
on
Wed, Jun 23, 2010 10:28 PM
Hi everyone, So I've been lurking like crazy for a couple of days now (instead of writing this awful New Media paper) and I'm very, very interested in making mugs! The problem is, I haven't found one good tutorial on this website (augh!). I was hoping, since it seems this forum is full of people posting their beautiful mugs, that I should ask! Some stuff you should know: Also, I want to make one-of-a-kind pieces, I'm not really interested in making molds. I reeallly like Vantiki's stuff. And I'm kind of nervous about using wheels. Is there a way to construct drinking vessels without it? Like rolling out panels, cutting them, and curling them together. So yeah, I've done a little research, but I would really love a tutorial, one with pictures would be great. And advice about what kind of clay to use (real confused here), glazes, what drying/firing stages are. How to layer details on a base mug to get some intense stuff going on. [ Edited by: Weitz 2010-08-02 23:55 ] [ Edited by: Weitz 2011-02-05 11:19 ] |
|
M

MadDogMike
Posted
posted
on
Wed, Jun 23, 2010 10:42 PM
Weitz, welcome to TC. There is some good info in here, lot's of it in Babalu's thread, let me dig around and see what I can find for you. Your best bet is to take a beginning ceramics course there at the college. It will teach you the basic types of hand building like pinch pot, coiled form, soft slab, hard edge slab, etc. It will also get you going in the basics of joining pieces with slip, texture, glazes. Yes, it will take some time but it will save you endless hours in failed experimentation (I know :) ) |
|
R

RevBambooBen
Posted
posted
on
Wed, Jun 23, 2010 10:53 PM
Damn Kids nowdaze want everything for free! Finger it out on your own and GO!!! Arrrrrrrrr.!!!!!! |
|
W
Weitz
Posted
posted
on
Thu, Jun 24, 2010 12:48 AM
But mr. scary pirate man, it is so expensive. No, honestly, I could just go and pay the studio fee and putz around in there. That's what I'll end up doin, since my schedule doesn't really allow for me to take a full fledged class. I just don't want to waste the attendants time the entire session :/ ON the plus side, I did find this: |
|
ATP

Atomic Tiki Punk
Posted
posted
on
Thu, Jun 24, 2010 12:57 AM
Oh My! |
|
W
Weitz
Posted
posted
on
Thu, Jun 24, 2010 1:04 AM
Thanks for the advice. I'm really enjoying this thread. Been scanning through it up to page 19 now. Lots of good ideas. |
|
S

swizzle
Posted
posted
on
Thu, Jun 24, 2010 7:22 AM
I've been wanting to make my own mugs ever since I became interested in Tiki culture and I know I CAN and WILL someday soon. I just have to pull my finger out and get stuck into it. Anyway, when I first found this site I came across this thread. Hope this helps. http://www.tikicentral.com/viewtopic.php?topic=18329&forum=18&hilite=hmc P.S. Can someone tell me how I change the link into a heading title. Does that make sense? Never done it before and i'm curious. P.P.S. Ben is right though.:)
[ Edited by: swizzle 2010-06-24 07:26 ] |
|
M
MadDogMike
Posted
posted
on
Thu, Jun 24, 2010 10:13 AM
Swizzle, that is a great old thread, it's the one that first pulled me into making my own mugs and inspired me to join TC. The link code you are looking for is (bracket)url=http://www.whatever.com]Title[/url] Just replace the (bracket) with a [ Hope that makes sense, I can't type in the first bracket or it will display as a link :) |
|
BB

Bora Boris
Posted
posted
on
Thu, Jun 24, 2010 10:41 AM
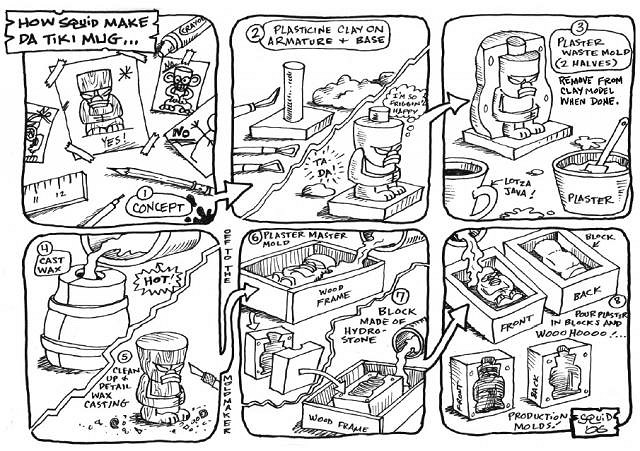
This How to comic used to be on Squid's website it tells you everything you need to know.
|
|
M
MadDogMike
Posted
posted
on
Thu, Jun 24, 2010 11:56 AM
Weitz, here's the plan for a basic mug; The clay you use will depend on the kiln and glazes you have available, check and see what they are using in your ceramics department. There are hundreds of clay mixes that all have different characteristics, Use a rolling pin to roll the clay out into an even thickness slab. A piece of 3 inch ABS or PVC pipe about 8 inches long makes a good form. Wrap a sheet of newspaper around it, then wrap the clay around the newspaper. Score and slip the seam and work the edges together well. Set the cylinder on a slab of clay and cut around it to make a bottom. Score and slip the bottom and attach it well to the clay cylinder. Let dry for a while (maybe an hour) until slightly firm, slide the pipe out of the mug and remove the paper. Now you have a blank mug form that you can add clay to or carve into. When you are finished sculpting, let it dry slowly over several days by wrapping it loosely in a plasic bag. When COMPLETELY dry (no longer cool to the touch) it can be bisque fired, glaze brushed, dipped, or sprayed on, and then glaze fired. This is, of course, an oversimplification - but it will give you a starting point. It is one of those things best learned from watching and doing, not from reading; make a friend in the ceramic department who can help you out :) |
|
W
Weitz
Posted
posted
on
Thu, Jun 24, 2010 12:08 PM
Yay! Thanks, for the advice. I'm going to run over to the ceramics place today and see if I can fineagle my way into a session there. This should become the begininer's attempt thread! We can all post stuff. |
|
T

tikitony
Posted
posted
on
Thu, Jun 24, 2010 11:06 PM
I posted a video on the "pinch pot" method for making a mug. I made a monkey with this, but it could be used for a tiki if you made it taller and skinnier. http://www.youtube.com/watch?v=aNxIqfYnZwo Good Luck, and remember to find inspiration in vintage and try not to copy living, working artists! You'll end up with a better, more original result if you look at Oceanic Art History books or images for inspiration! |
|
V

VanTiki
Posted
posted
on
Mon, Jun 28, 2010 9:24 PM
Aloha! Just got back from vacation and stumbled on this thread. I fully agree with what others have said - just get out there and start pushing some clay around! You can make mugs without a wheel very quickly (I don't have a wheel in my studio). That's not to say wheels are bad - you can do amazing things with them. I'd recommend checking out some hand-building books from the library or bookstore to learn the fundamentals of clay assembly. Tiki Tony - mahalo for the youtube shout-out! Love the video (and the monkeys)! I've got a few time-lapse videos of mug production here: and will soon be adding a tile-pressing video. Best of luck on the mugs - be sure to a) share photos, and b) be ready for kiln disasters :) Henrik "VanTiki" |
|
W
Weitz
Posted
posted
on
Tue, Jun 29, 2010 1:42 AM
Thanks everyone! |
|
W
Weitz
Posted
posted
on
Wed, Jun 30, 2010 12:20 PM
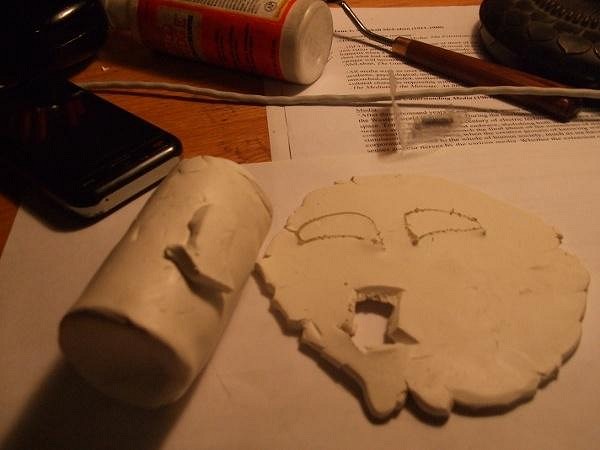
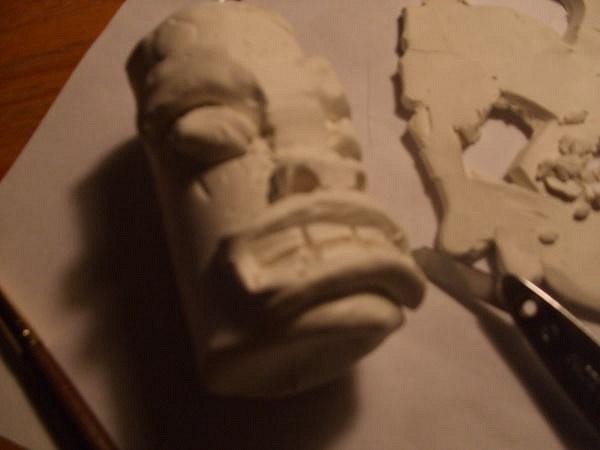
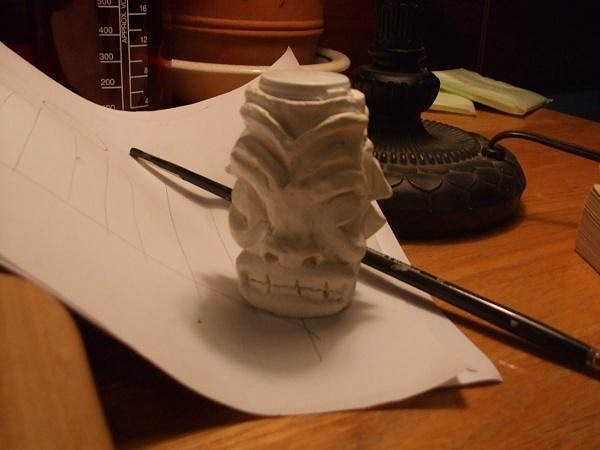
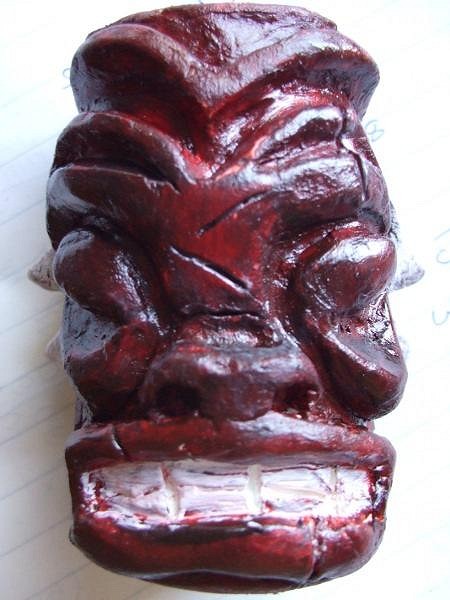
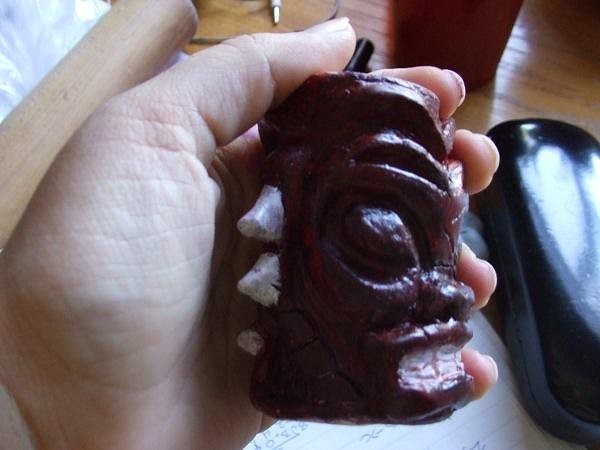
Alright, so like I said before, I had some sculepy III lying around. Here's basically what I did (for any one else that's learning and for picture-posty sake)!
Alright, so yay, my first tiki thing. It was fun to do this as a sculpting and carving excercise. But frustrating as well because I'm used to working with ceramics clay and this polyurethane stuff is SO hard. That and you need alcohol to smooth it. And it was so tiny that I really couldn't smooth it. |
|
A

amybean
Posted
posted
on
Wed, Jun 30, 2010 12:24 PM
So you smoothed it with.... RUM ? Don't forget to use metal tools w/Sculpey products! Wooden tools will make it behave like chewing gum. |
|
W
Weitz
Posted
posted
on
Wed, Jun 30, 2010 12:47 PM
Yes. Delicious 1970s British Royal Navy Rum :/ Or Isopropyl alcohol : D Also, this took so very long because I took a night out at Forbidden Island with some friends. A drinking partner abandoned me with Fugu for Two which is very delicious but not meant for one person. At the end of the night I was saying "I LIKE THIS FISH. IT IS PLEASANT TO TOUCH". I understand now why they take your ID when you get that bowl. I want a fish bowl. |
|
A
amybean
Posted
posted
on
Wed, Jun 30, 2010 1:33 PM
No kidding- those bowls'll get ya every time. Scorpion bowls 10 bucks off on Sundays at Forbidden Island. I like the spikey sides! [ Edited by: amybean 2010-06-30 13:35 ] |
|
M
MadDogMike
Posted
posted
on
Wed, Jun 30, 2010 4:55 PM
Very cool prototype Weitz, it's gonna make an awesome mug!. Did you end up leaving the vial inside? |
|
W
Weitz
Posted
posted
on
Thu, Jul 1, 2010 6:24 PM
Nope! I kept the vial in it til' baking time and took it out before the baking. If it was a big mug, would I have had to take it out earlier, or does it not matter? |
|
M
MadDogMike
Posted
posted
on
Thu, Jul 1, 2010 7:32 PM
Yes, you definitely have to take the form out soon. Depending on the thickness of the clay, the ambient temp and the relative humidity it will only take 30 minutes to 2 hours for the clay to dry enough to hold it's shape. Ceramic clay shrinks as it dries, it will crack if left on the form too long. |
|
W
Weitz
Posted
posted
on
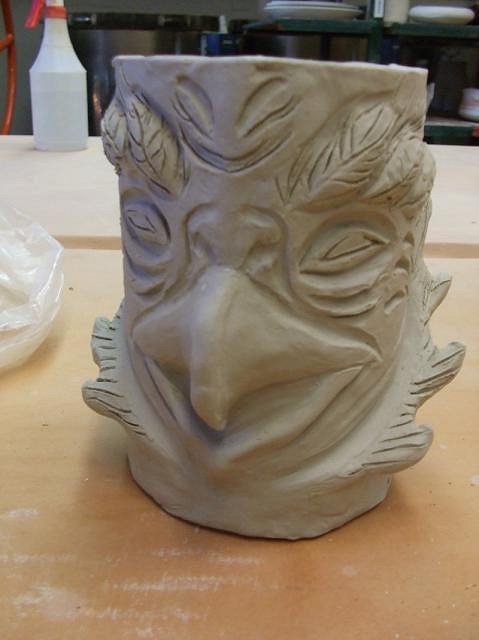
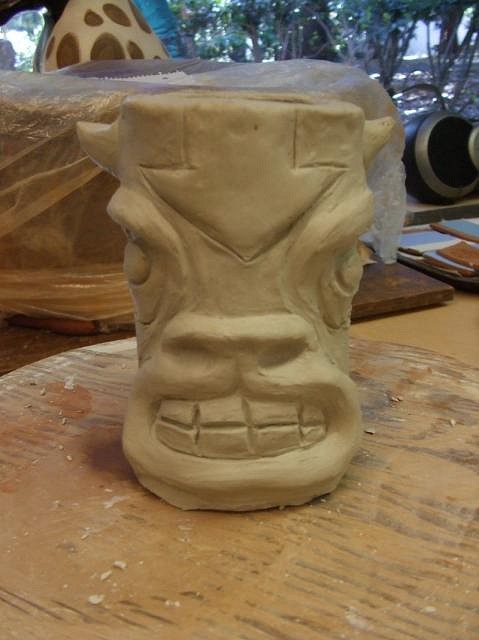
Mon, Aug 2, 2010 8:26 PM
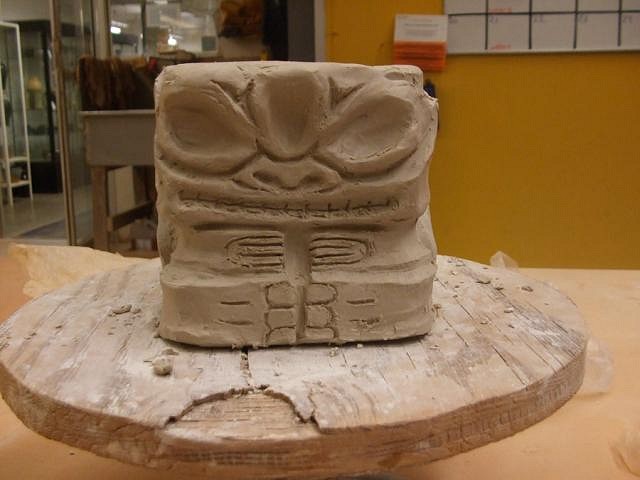
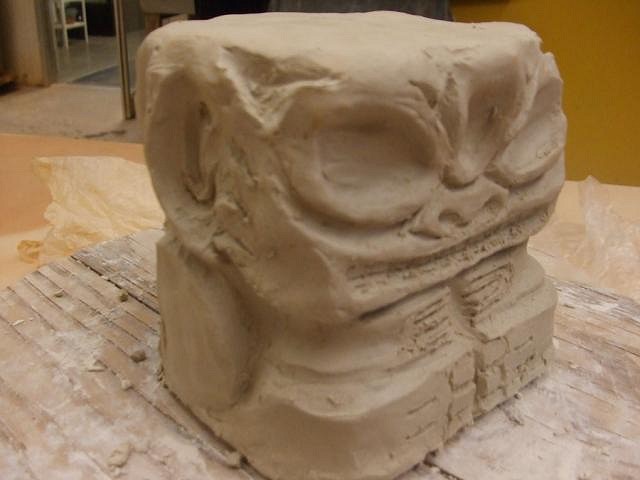
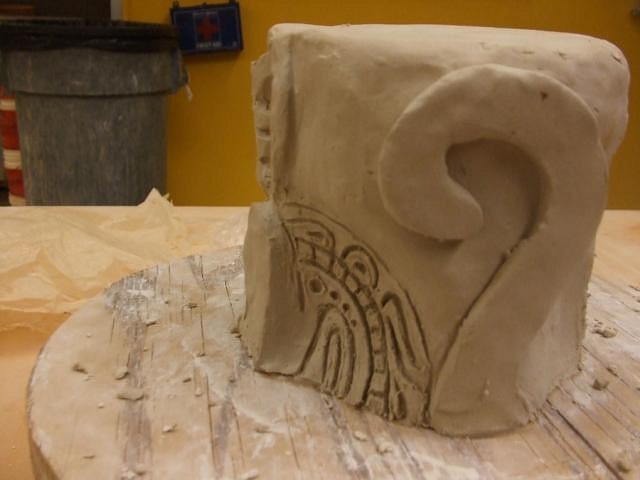
Alright! Here's my first mug, which is currently drying (it's for the bird of paradise trade. Looks more like a totem mug, lol) And my second, which is going to be an Appa (from Avatar, the Last Airbender) mug. He looks like this in the animated series: http://www.calinstitute.com/images/appa.jpg Still needs about two hours of cleaning up/carving before drying out time. yay! |
|
W
Weitz
Posted
posted
on
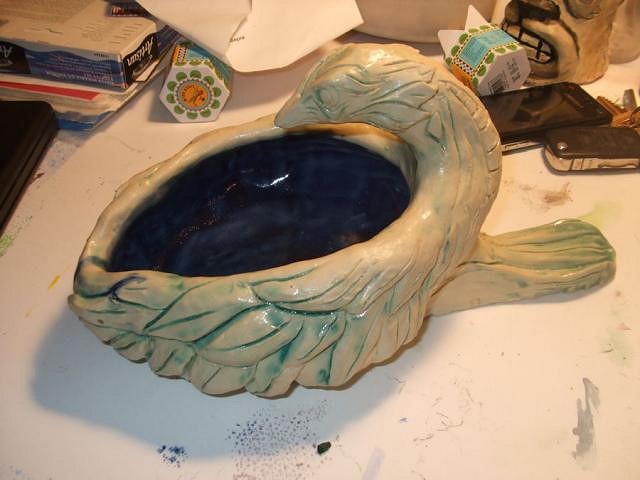
Sat, Feb 5, 2011 11:25 AM
Hi Everybody! So I'm back from Mo'orea/Australia/applying to graduate schools and back in the ceramics studio!
So yeah, few more hours of work on this guy, and then mold making on Friday. Fun times. |
|
W
Weitz
Posted
posted
on
Sat, Feb 5, 2011 10:20 PM
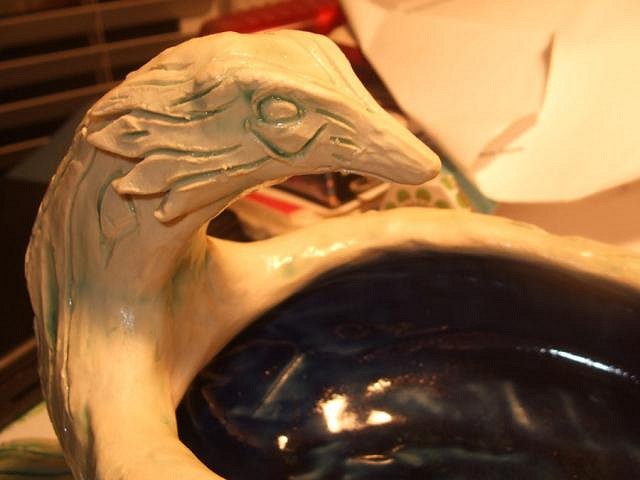
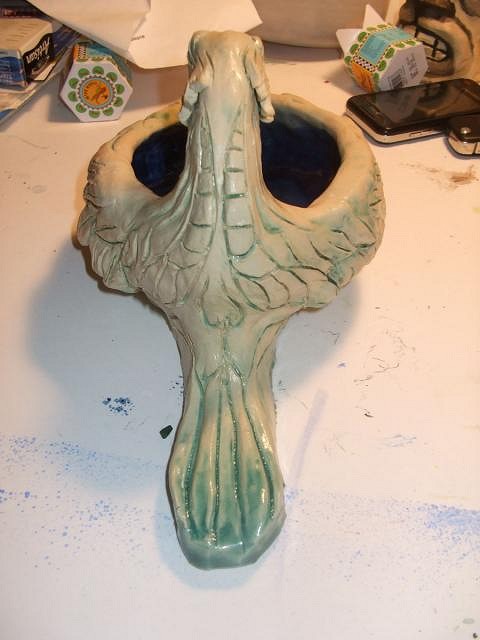
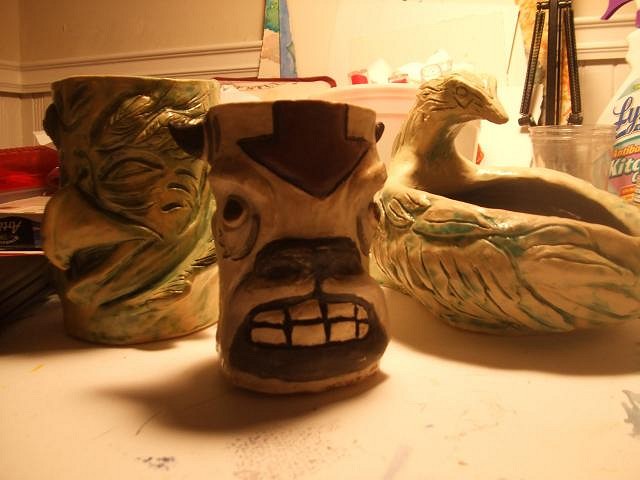
Ah, and I forgot some other stuff from the summer. I'm no good at glazing, so far. Oh well, more to learn.
Yup, very rough beginners stuff, but there you go. |
|
M

mp
Posted
posted
on
Sun, Feb 6, 2011 12:42 AM
Good job! Be proud of yourself. |
|
Z

Zinctiki
Posted
posted
on
Mon, May 2, 2011 1:09 PM
[ Edited by: Zinctiki 2013-10-04 14:14 ] |
|
M
MadDogMike
Posted
posted
on
Mon, May 2, 2011 9:17 PM
Love it ZincTiki. You should start up your own thread so we can see your progress :) |


Pages: 1 26 replies