Tiki Central / Tiki Carving
RIOTURBAN-Tiki carving process
|
WP

Watango productions
Posted
posted
on
Tue, Feb 26, 2013 6:01 PM
Nice work on the Marq. |
|
R

RIOTURBAN
Posted
posted
on
Tue, Mar 19, 2013 3:41 AM
hi folks, |
|
FTLOT

For the Love of Tiki
Posted
posted
on
Tue, Mar 19, 2013 8:03 AM
I enjoyed reading the article. The writer asked good interview questions about the creative process. Might be par for the course - being an "Art & Fashion" magazine.... but is definitely a plus when the interviewer has an appreciation & understands a head of time what they are writing about and then encourages the best responses from who they are interviewing. |
|
C

cy
Posted
posted
on
Tue, Mar 19, 2013 8:57 AM
Nice article RIOTURBAN, you're now famous! |
|
B

Benzart
Posted
posted
on
Sun, Mar 24, 2013 10:58 AM
Great article, it's Always nice to get that kind of recognition, |
|
T

Takatuka
Posted
posted
on
Sat, May 25, 2013 2:16 AM
@Rioturban: The big, great, beautiful tiki you have carved is made out of spruce, right? I have now a question on finishing the tiki. Wet wood is ugly to sand... Thank you very much! |
|
R
RIOTURBAN
Posted
posted
on
Sat, May 25, 2013 11:21 AM
Hi Takatuka, |
|
T
Takatuka
Posted
posted
on
Mon, May 27, 2013 5:10 AM
Thank you very much! I think you speak german? I have another question about the varnish. In the construction markets in germany the most varnishes are really expensive, so I am looking for a good alternative. |
|
R
RIOTURBAN
Posted
posted
on
Fri, May 31, 2013 3:43 AM
Hi Takatuka, |
|
T
Takatuka
Posted
posted
on
Fri, Jun 7, 2013 2:08 AM
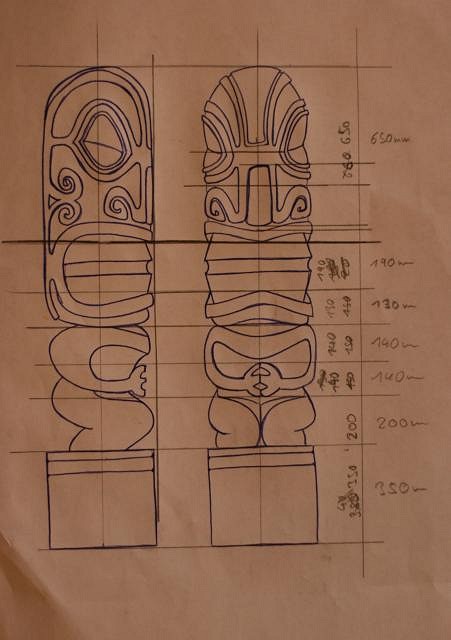
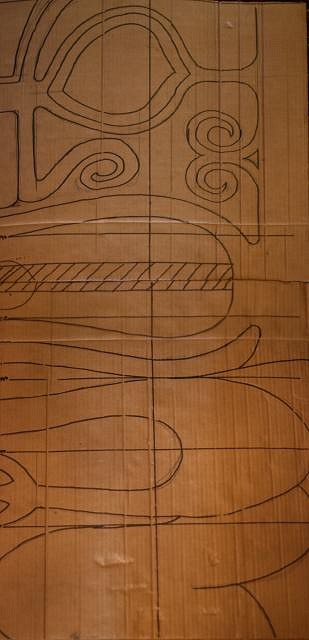
Hello RIOTURBAN, I have another question about your great work. To get the cylinder surface the frontal view and the side view must be combined in some way. Thank you very much! |
|
P

Polynesiac
Posted
posted
on
Fri, Jun 7, 2013 7:32 AM
That Marq is fantastic! Classic design with a modern touch, clean lines and great detail, not to mention a finish that makes that wood GLOW. Congratulations on the press as well! Very beautiful work, I look forward to seeing more! |
|
R
RIOTURBAN
Posted
posted
on
Fri, Jun 7, 2013 9:17 AM
Thank you Polynesiac! @Takatuka: |
|
R
RIOTURBAN
Posted
posted
on
Sat, Jun 8, 2013 1:11 PM
Two little pendants," New School and Old School "
|
|
R
RIOTURBAN
Posted
posted
on
Thu, Jun 13, 2013 2:58 PM
very little fella, eyes are 7mm in diameter
|
|
R
RIOTURBAN
Posted
posted
on
Mon, Jun 17, 2013 8:18 AM
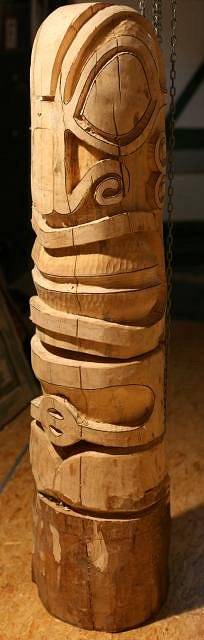
Hi Folks, first steps are the rough carving next step is to carve the the ornaments and last step is to put in the mother of pearl eyes and another layer of shellac.Boing!
|
|
C
cy
Posted
posted
on
Mon, Jun 17, 2013 3:08 PM
Cool small pieces Simon, I enjoy seeing the process. |
|
TG

Trader Gino
Posted
posted
on
Mon, Jun 17, 2013 5:18 PM
Can't wait to see that Maquesan done! Great body of work man. |
|
T

tikimecula
Posted
posted
on
Mon, Jun 17, 2013 6:59 PM
WOW, nice work RIO. Respect. |
|
H

hang10tiki
Posted
posted
on
Tue, Jun 18, 2013 5:41 AM
awesome..... jon |
|
T

TheBigT
Posted
posted
on
Tue, Jun 18, 2013 7:03 AM
Incredible work. That tattooing looks impossible at that size. I love seeing the progress pics. Thanks! |
|
R
RIOTURBAN
Posted
posted
on
Sun, Jun 23, 2013 1:54 AM
again the Marq, this time a compact process pic.i tried to get the pic displayed bigger,but its not working.
[ Edited by: RIOTURBAN 2013-06-23 02:04 ] |
|
A

amate
Posted
posted
on
Sun, Jun 23, 2013 4:56 AM
Very impressive work! |
|
G

GROG
Posted
posted
on
Sun, Jun 23, 2013 6:14 AM
Cut your image in 2 equal halves and make each half 8.89 inches at 72dpi. Post them side by side with no gap between the photos and it will appear this size. (blew up your small photo)
|
|
G
GROG
Posted
posted
on
Sun, Jun 23, 2013 6:15 AM
P.S. Nice Marq carving. |
|
R
RIOTURBAN
Posted
posted
on
Sun, Jun 23, 2013 6:50 AM
ah ok i give it a try-just a moment...
|
|
R
RIOTURBAN
Posted
posted
on
Sun, Jun 23, 2013 6:51 AM
well- good enough! thanx Grog! |
|
R
RIOTURBAN
Posted
posted
on
Thu, Jun 27, 2013 2:18 PM
me Carving a Moai, unfortunately no photos available,but a video! http://www.youtube.com/watch?v=wELpbR7Yf-8
[ Edited by: RIOTURBAN 2013-06-27 14:21 ] |
|
H
hang10tiki
Posted
posted
on
Thu, Jun 27, 2013 4:07 PM
Killer |
|
FTLOT
For the Love of Tiki
Posted
posted
on
Fri, Jun 28, 2013 6:48 PM
Another sweet tiki carving video and I like the Funkadelic music too! |
|
R
RIOTURBAN
Posted
posted
on
Sun, Jul 21, 2013 3:02 PM
crackhead tiki
|
|
AM

Atomic Mess
Posted
posted
on
Mon, Jul 22, 2013 6:10 AM
clean and simple, very nice. |
|
A

AlohaStation
Posted
posted
on
Mon, Jul 22, 2013 8:51 AM
Carve Deeper!! |
|
FTLOT
For the Love of Tiki
Posted
posted
on
Mon, Jul 22, 2013 7:06 PM
Nice symmetry & design. |
|
R
RIOTURBAN
Posted
posted
on
Sat, Aug 24, 2013 2:18 AM
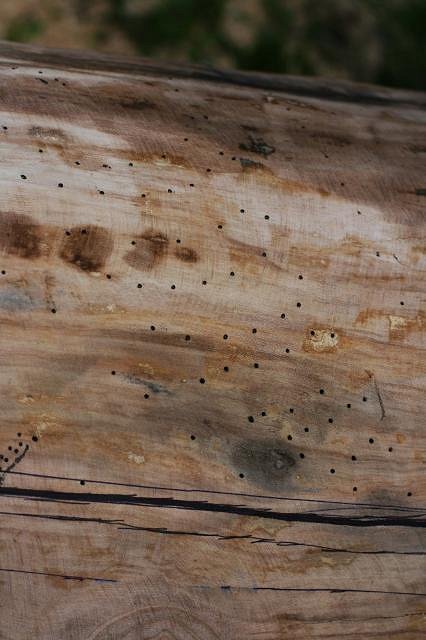
The old way of Copy&Paste,
now you have a lot of dots that you just have to combine
|
|
R
RIOTURBAN
Posted
posted
on
Fri, Aug 30, 2013 11:47 AM
|
|
C
cy
Posted
posted
on
Fri, Aug 30, 2013 12:01 PM
Most excellent Rio! |
|
T
TheBigT
Posted
posted
on
Fri, Aug 30, 2013 1:31 PM
NICE. Let's see some more pics of that guy! |
|
FTLOT
For the Love of Tiki
Posted
posted
on
Sat, Aug 31, 2013 4:30 PM
Thats sweeeeet.... and yes, more pics. |
|
T

Tikilizard
Posted
posted
on
Sat, Aug 31, 2013 4:45 PM
Sweet |
|
H
hang10tiki
Posted
posted
on
Sat, Aug 31, 2013 5:53 PM
Kool lines |
|
R
RIOTURBAN
Posted
posted
on
Sat, Sep 7, 2013 3:48 AM
Thank you my friends, |
|
C

congatiki
Posted
posted
on
Sat, Sep 7, 2013 5:32 AM
All of the above, cool, sweet, excellent, any other superlative will work too. |
|
P

pjc5150
Posted
posted
on
Tue, Sep 10, 2013 7:10 PM
I really like that! very cool brother! |
|
WP
Watango productions
Posted
posted
on
Tue, Sep 10, 2013 8:46 PM
Nice work on your last piece. |
|
R
RIOTURBAN
Posted
posted
on
Thu, Sep 12, 2013 12:50 PM
soooo , its finished !
|
|
P
pjc5150
Posted
posted
on
Thu, Sep 12, 2013 1:23 PM
oh wow... THAT is very cool bro... well done... |
|
H

hiltiki
Posted
posted
on
Thu, Sep 12, 2013 2:23 PM
Real nice work and nice finish. |
|
C
congatiki
Posted
posted
on
Thu, Sep 12, 2013 3:24 PM
Wonderful, inspiring piece. How tall? |