Tiki Central / Home Tiki Bars
Big Kahuna's Tiki Shack
|
AD

Aloha Daddy
Posted
posted
on
Sun, Aug 25, 2013 2:18 PM
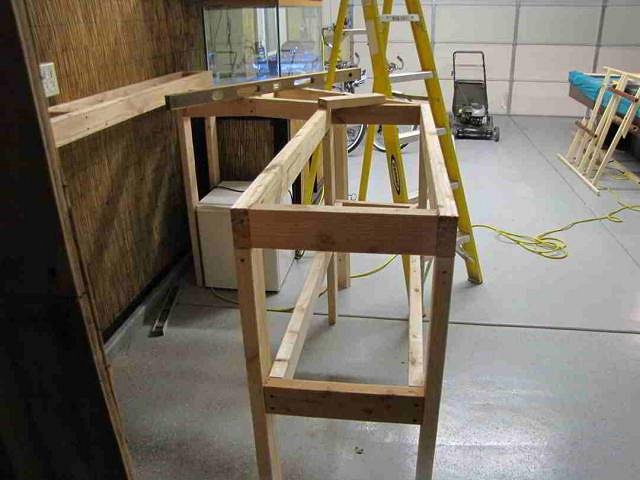
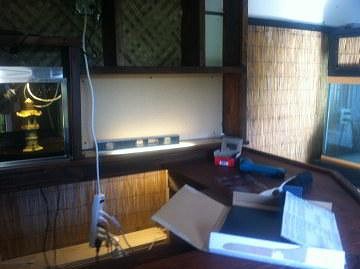
Aloha fellow tiki enthusiasts! I have embarked on building a modest little tiki bar in my garage or otherwise known as my guy lair. First a little history, I fixed up my garage with a pool table and a TV for my then teenage son for he and his buddies but he quickly outgrew it so I had to take over. First thing I did was to add bamboo fencing along all the walls and top it with a 1"x2" trim painted black. My saltwater reef aquarium soon was banished to the "Lair" so since it fit the theme, why not? Advance to now, I had always wanted my own little tiki hangout so I decided to search for the perfect place for it and staked out my guy lair as the perfect place. After designing how I wanted it to look, and extensive measuring, I found it would fit into the 3 car tandem garage and be the perfect addition to the lair. I started out building the 2x4 frames for the shelf along the wall and the actual bar structure that would come out from the wall and form the L-shaped bar. I added the legs and attached it to the wall.
Now, before you say anything, I know I'm not the best carpenter, but I do well enough to get myself in trouble, :), but it relieves the pressures of the day and I have fun doing it. So this won't be the best built bar in town but I think you will like it, it's a lot of fun. My plan is to cover the front with bamboo, have an A-frame roof and finish the bar top to look like a surfboard. We'll see how it turns out but I'm off to a good start. I want to be able to house my tiki mug collection, my hawaiian matchbook collection and my tropical swizzle stick collection and just have a cool place to hang with friends and family. I have actually already built a lot of this but I just decided to share it with the Tiki Central family, so here we go...hope you enjoy the journey! Mahalo! |
|
AD
Aloha Daddy
Posted
posted
on
Sun, Aug 25, 2013 3:56 PM
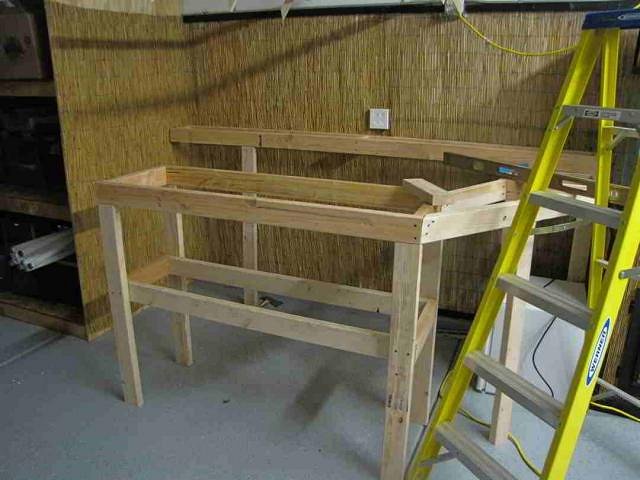
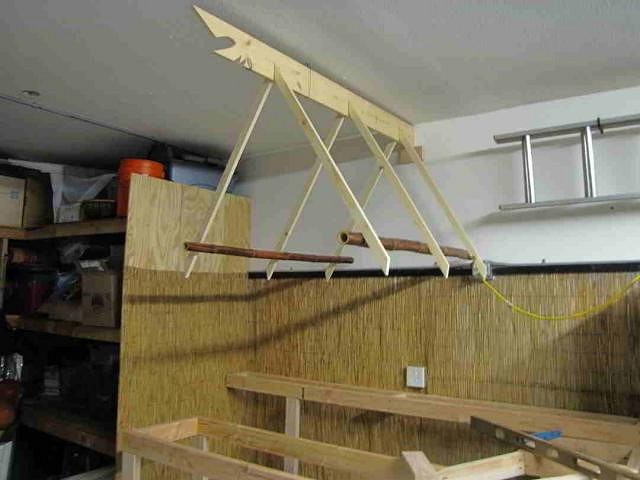
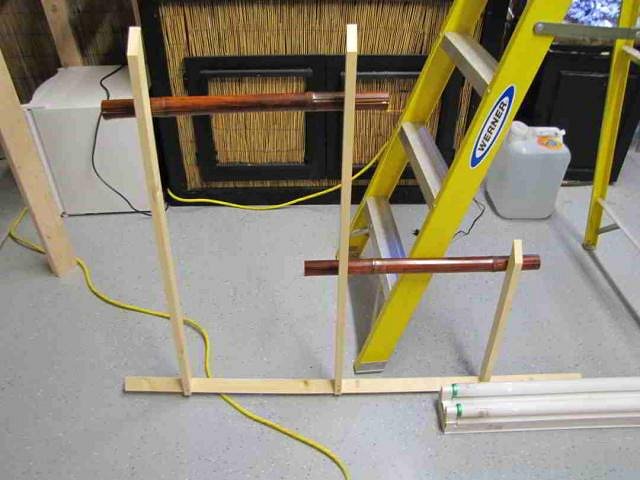
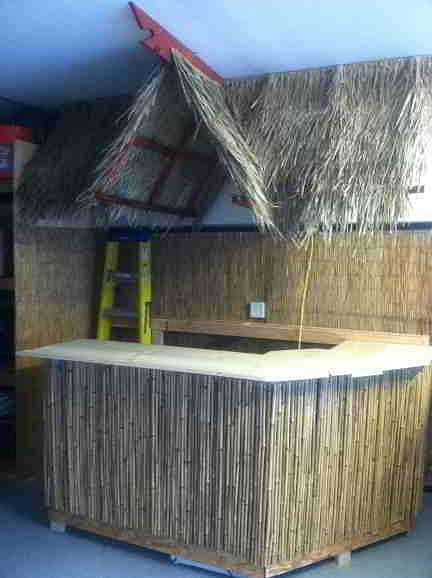
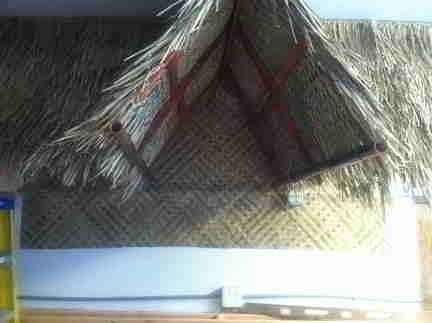
Okay, next step was I built the frames for the roof. I wanted the classic A-frame look and envisioned hanging a glass fishing float with a light in the apex. I also built frames for the side wings. For the A-frame I started with a 1x8 so I could cut out a design on the end, a classic polynesian look cut out. I attached 1x2s for the laterals coming down from the main ledger and attached bamboo poles at the ends to hold them together.
The side frames are constructed much the same way with 1x2s and the bamboo poles.
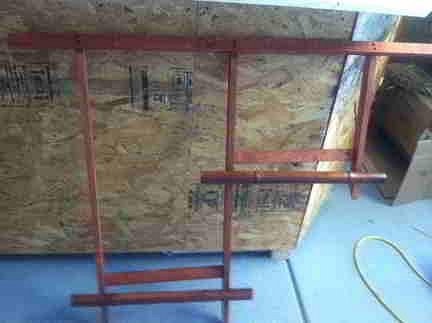
You may ask why I am using such small lumber and the answer is I didn't want to overpower the structure with the size of the lumber. This will be a fairly small structure and it will not be supporting anything heavy so I want to keep it light. I hung it to see how it looks and fits together and then took it down and stained the lumber. I decided on a red-ish color stain, so far I like the look.
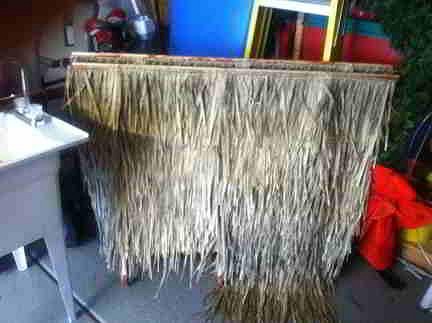
After staining, time to attach the palapa thatch to the frames! Now this is more fun! Starting to show signs of tiki!! I bought the thatch from Benson's South Seas Imports, they had the best prices and fast shipping.
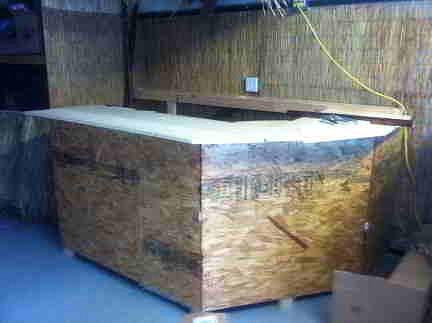
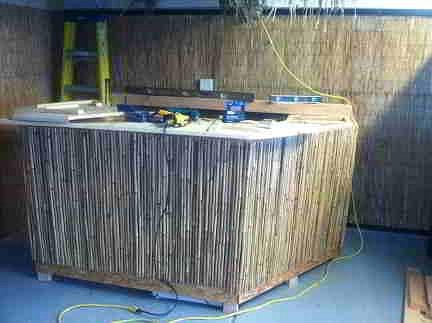
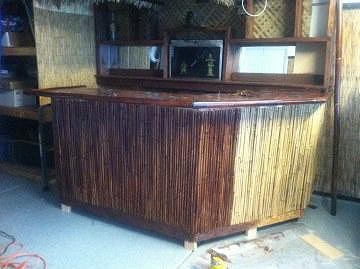
Also time to attach the plywood to the front of the bar structure. You can see now I didn't build just a straight L shape, it will have a 45 degree corner then return to the wall. I will attach the bamboo to this next. Starting to look more like a bar now.
|
|
R

rumackay
Posted
posted
on
Sun, Aug 25, 2013 5:24 PM
Looking really good so far. This has always been my favourite part of these threads, the construction pics. It's so very, very rewarding when you've finished (is a tiki bar ever really finished) and you are having your first mai tai. Plenty more pics on the way I hope :) |
|
BK

Big Kahuna
Posted
posted
on
Sun, Aug 25, 2013 8:03 PM
Nice Name! |
|
V

VampiressRN
Posted
posted
on
Sun, Aug 25, 2013 9:22 PM
Looks like you are off to a nice start and adopting some great style. Keep it up and post more pics as you progress!!! |
|
AD
Aloha Daddy
Posted
posted
on
Sun, Aug 25, 2013 10:21 PM
Thanks! I quite agree...love the original Gidget movie!!! 1994 is my daughter's birth year. She helped me come up with it. |
|
H

hang10tiki
Posted
posted
on
Mon, Aug 26, 2013 7:02 PM
Off to a great start Jon |
|
AD
Aloha Daddy
Posted
posted
on
Tue, Aug 27, 2013 3:09 PM
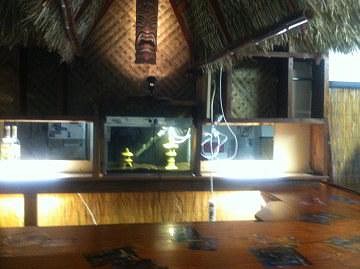
Thanks everyone, funny you should mention the fish tank, that is a 90 gal tank I am planning on turning into a saltwater reef tank. I already have a 35 gal on the other side of it and originally I had planned on leaving the 90 positioned along the wall but you will see as things progressed I ended up pulling it out from the wall so the end is against the wall and the tank juts out creating a divider of sorts. Kind of a nice way to section off the Tiki bar area from the rest of the garage. Also I am planning on featuring a classic 20 gal tall stainless steel tank I have as a centerpiece of the bar :). I am a fish-0-phile as well as a tiki fanatic, this same wall in my garage used to house about 30 aquariums as I raised tropical fish for years out there. So it just felt right to incorporate some of the little fellers in my tiki world. More pics to come... |
|
AD
Aloha Daddy
Posted
posted
on
Tue, Aug 27, 2013 10:01 PM
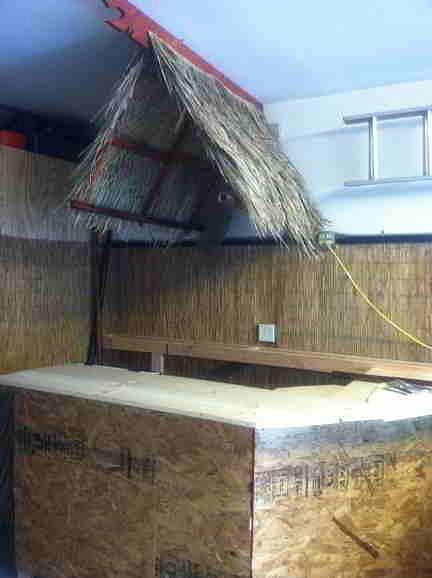
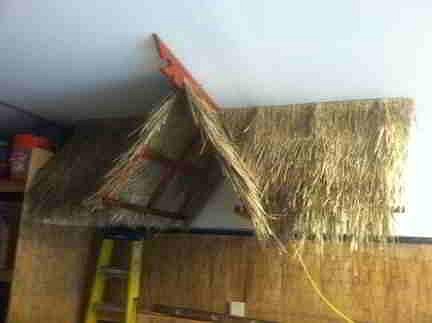
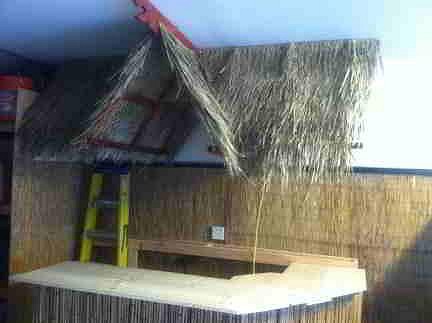
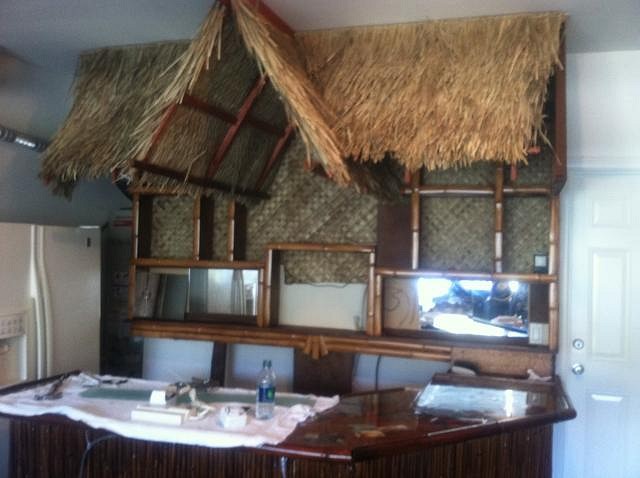
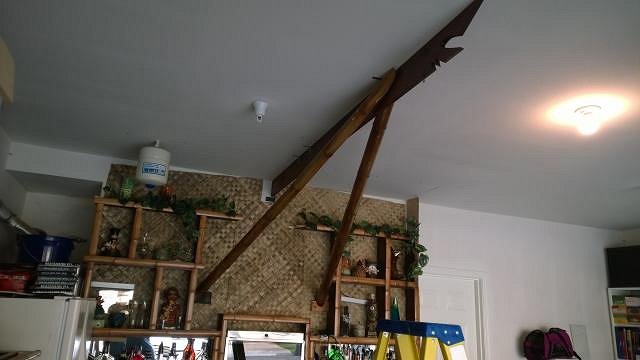
Now onto raising the roof, I was really looking forward to this part! After attaching the thatch to the A-frame portion of the roof, I actually hung the front portion of the roof to the ceiling and anchored the rear with a clete, so far so good. I am pleased with the result.
I couldn't resist seeing what my fav beer would look like on the new bar, :)
I then attached the thatch to the side panels.
then hung them on either side of the A-frame, starting to shape up!
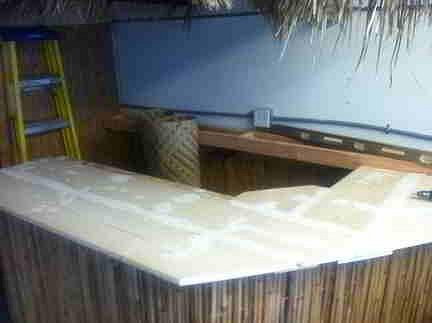
Time for attaching the bamboo screen to the front of the bar structure. I had a 6' tall screen that my neighbor gave me and I decided to cut it in half lengthwise with my circular saw, the heigth was perfect for the heigth of the bar.
I also added the bar top at this point, I used 1x pine and attached 2 pieces of 12" side by side for a nice deep bar top. I also added and strip of plywood on the inside of the bar at just the right depth for the spill mats.
I'm starting to get in the mood for that first Mai Tai at this point, :wink: |
|
T

TikiAno
Posted
posted
on
Tue, Aug 27, 2013 10:21 PM
Looking good- I have a similar bar design for one I'm thinking about building... Look forward to seeing it progress! |
|
TY

Tipsy Yeti
Posted
posted
on
Thu, Aug 29, 2013 9:32 PM
Looking great so far! |
|
M

Masher88
Posted
posted
on
Sat, Aug 31, 2013 7:29 AM
I love the A frame canopy! |
|
H
hang10tiki
Posted
posted
on
Sat, Aug 31, 2013 10:25 PM
Awesome build and beer Keep up the good work Jon Worst sound ever, slurp of an empty tiki mug through my straw!!! [ Edited by: hang10tiki 2013-08-31 22:26 ] |
|
FT

forgotten tikiman
Posted
posted
on
Sun, Sep 1, 2013 9:43 AM
Cool!! Loving the A-frame. Nice work so far. Now! Get those Tikis in there. :D |
|
AD
Aloha Daddy
Posted
posted
on
Mon, Sep 2, 2013 9:58 PM
Thanks everyone for the encouraging comments, I appreciate it! Next I had to work on the bar top, I had the idea to paint it like a surfboard with stripes and stained side panels, so I started by filling in the seam between the boards and any divots in the wood.
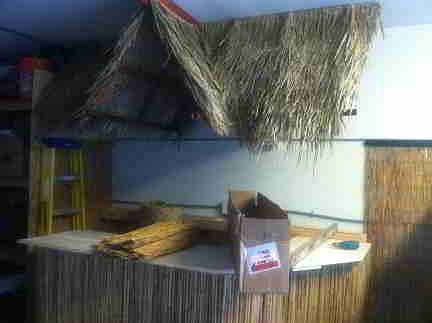
I received the woven thatch for the back wall of the bar underneath the roof. I had removed the bamboo screening from the wall in anticipation of putting up the woven material. I also plan on building shelves against the wall to display my tiki collection. I want to have the woven thatch behind the shelves.
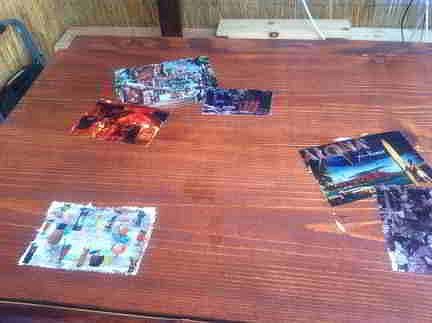
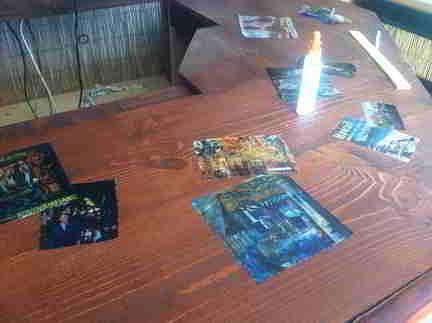
I then stained the bar top, I liked the look of the stain, a little on the red side but I like it. I decided against the surfboard concept in favor of another idea I had, memorializing photos of my favorite tiki places and memories on the bar top. I love the idea and started to scan and print all the photos I wanted on the top. My favorite place besides Hawaii is Disneyland and Walt is my hero so I had to have some photos of Walt in the Tiki Room, some concept art for the Tiki Room and the Tahitian Terrace Restaurant. Also I had to have a photo of Don the Beachcomber in Marina Del Rey, where my wife & I were engaged. Some photos from our Hawaiian vacations and a few more all made for a very personal and meaningful bar top.
I then attached a length of bamboo to the edge of the bar top to form a nice edge, I bevel cut the ends and tried to fit them together as best I could. Some matched better than others but overall, it is a great look. I wasn't sure how to attach the photos without ruining them so I just sprayed the backs with a spray adhesive then attached them to the bar top. I then started to apply one of several coats of clear varithane. The photos started to bubble up and the varithane was reacting to the spray adhesive and basically dissolving it. I ended up having to remove all the photos and had to re-print all of them, oh well, that's how we learn I guess. I found that good old white glue worked best, I used it sparingly and after using the Varithane, it worked just fine. I applied about 8 coats. I would have used a polyester or resin type of sealer but I am building this on a very tight budget so it will have to be Varithane.
This is what the top ended up looking like...and a little sneak preview of the shelves behind! I had something else bad happen that turned out good. I ran out of the stain and had to get more for the shelves. I decided on a stain that was more dark brown and after using it, I liked it so much that I spread some on the bar top to take away some of the red look. it turned out so well that I ended up staining all of the bar top with the brown and liked the look much better. You can see from the photo the end result with the photos and the varithane. I am very happy with how things are shaping up. I'll show you the shelves next. [ Edited by: Aloha Daddy 2013-09-03 20:33 ] |
|
H
hang10tiki
Posted
posted
on
Tue, Sep 3, 2013 7:45 AM
Lookin good |
|
A

AdOrAdam
Posted
posted
on
Wed, Sep 4, 2013 11:50 AM
The bar top suddenly makes it look much more complete - I like! |
|
AD
Aloha Daddy
Posted
posted
on
Sun, Sep 22, 2013 11:33 AM
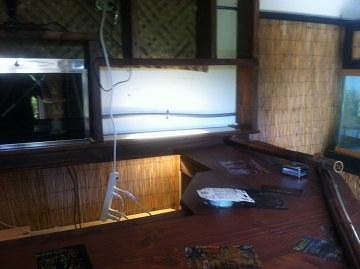
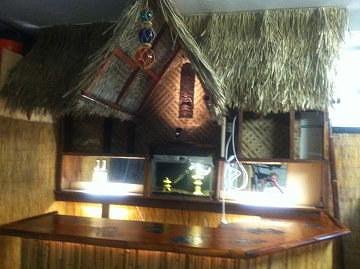
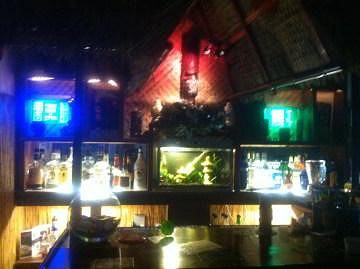
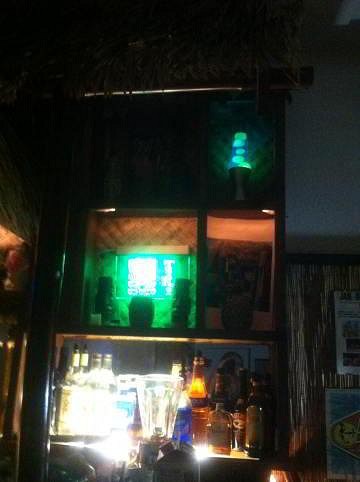
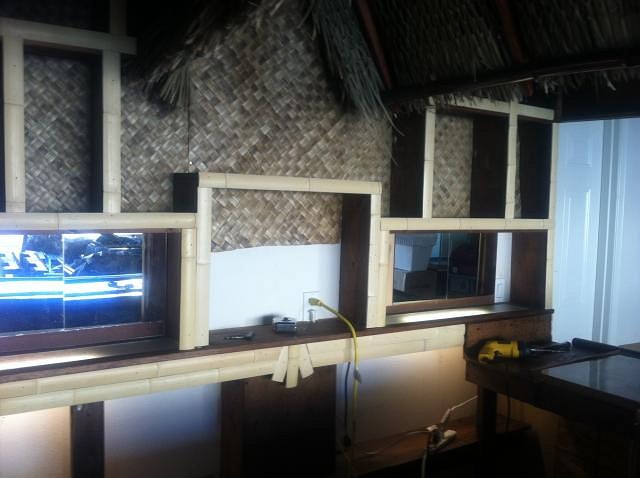
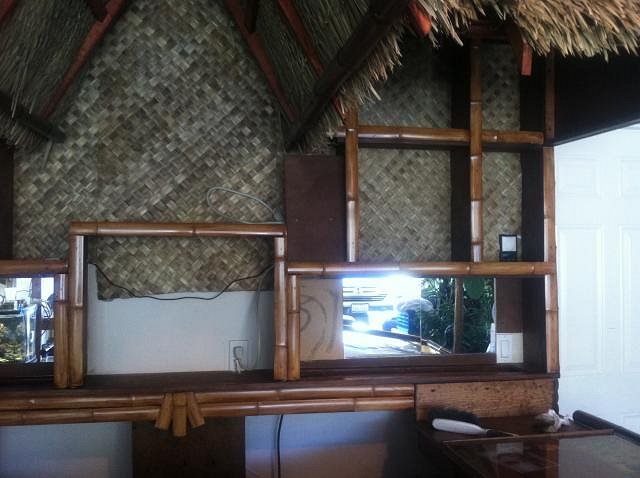
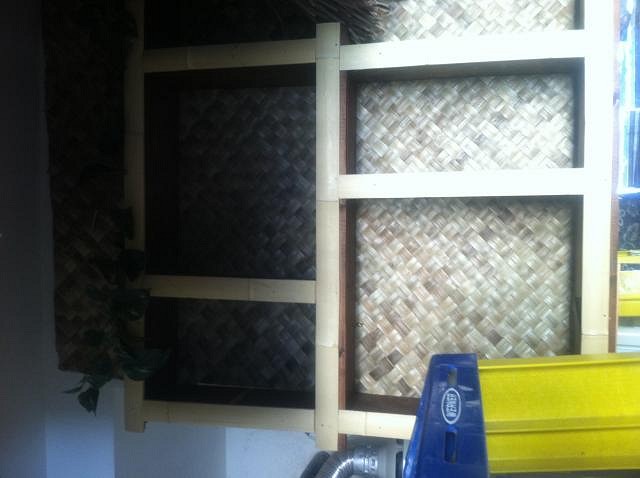
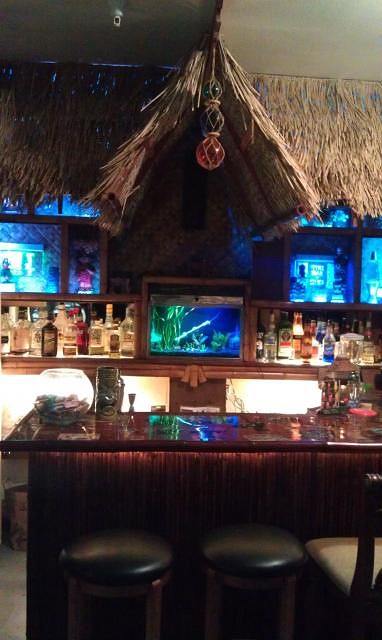
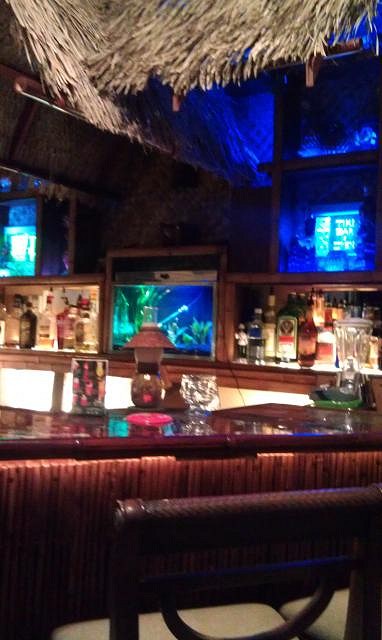
I started to work on the shelves along the back wall of the bar next. I wanted lighted glass shelves to place the bottles of booze on so I routed out the edges of the top piece of wood and inserted a glass shelf in the cutout on both sides. I have an old stainless steel aquarium, a 20 gallon tall, that I wanted to incorporate into the back wall. When building the shelves on the back, I built a center section that accomodated the height of the tank with enough clearance for me to open the top and access the tank, then dropped down for the bottle sections. So in designing the back, I placed the aquarium in the center and the bottle shelves on either side. I then installed florescent light fixtures under the bottle shelves so that the light shone up through the glass shelves as well as shine down on the as yet to be built shelf below.
I then built a whole series of shelves that extend all the way up the wall stopping about 18" short of the ceiling. I stained them all with the dark stain and really liked the results. The woven lauhala matting makes a nice background for the shelving. Next I installed the mirrors for the background of the bottle areas. I used the mirror squares from Lowe's as they are easy to install and economical. Again, I don't have a very big budget for this project so I am constantly looking for economical ways to build this but still keeping a nice look to it.
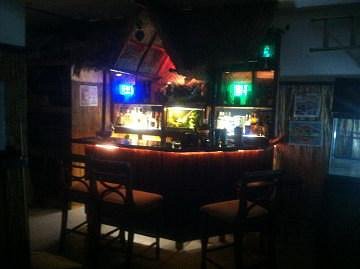
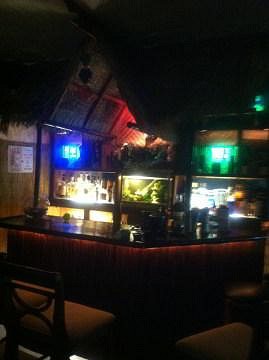
One thing that really was bothering me though was the look of the light bamboo that I had attached to the front of the bar. I preferred the look of the new dark stain I had used on the bar top and the shelves so I decided to experiment and try to use the stain on the bamboo and I was very excited to see the results, so I decided to stain all the bamboo on the front. I also installed clear rope lights under the bar top to shine down on the bamboo, not as bright as I would like but I like thee results.
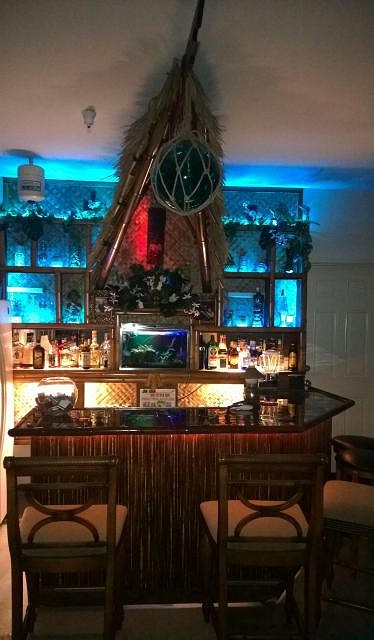
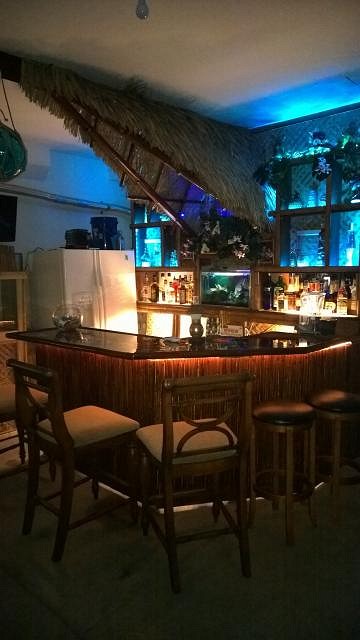
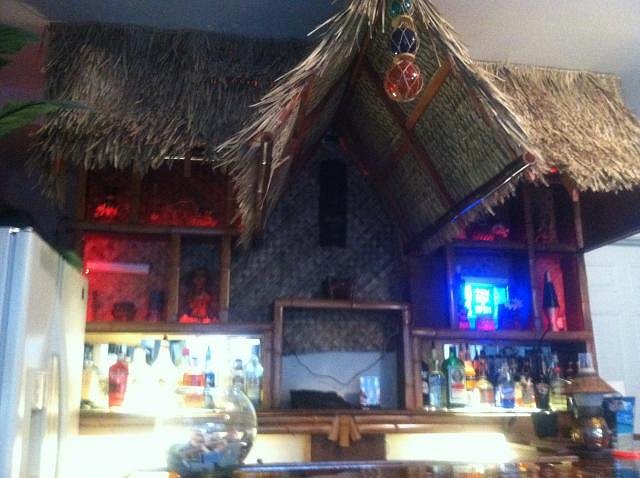
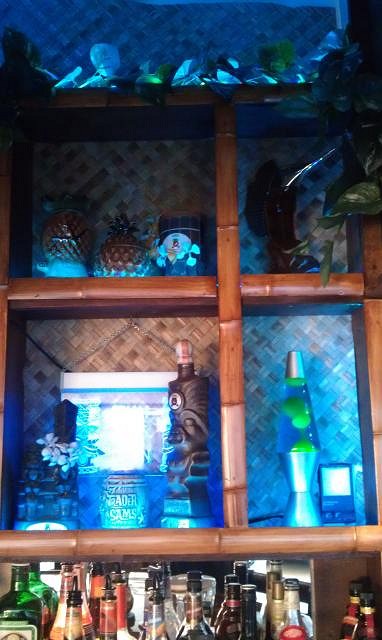
So I started to get really excited as I placed my tiki mug collection on the shelves and my hanging tiki on the wall. I bought a lava lamp on ebay,I had always wanted one but never had one. I placed all my liquor bottles and arranged my tiki lights and other torpical collections on the shelves. My objective for this bar was to go retro 50's-60's with a bit of Tiki Room nostalgia thrown in. I grew up in Orange going to Disneyland every chance I got so I have a great affection for all things that remind me of that time. Adventureland was always one of my favorite lands. My photography leaves a lot to be desired, I promise to take some better photos soon but here you can see what it looks like so far.
|
|
M
Masher88
Posted
posted
on
Thu, Oct 24, 2013 5:00 AM
Gee wiz that place looks swell!!! Nice job! |
|
T
TikiAno
Posted
posted
on
Fri, Oct 25, 2013 9:01 AM
Your bar looks great! Meant to comment on this a while ago but suppose I missed it. I'm working on a bar in my garage now, too, so great to look at this (again) and see the awesome work you've done. The lighting, especially the little spotlight on the tiki looks awesome. |
|
AD
Aloha Daddy
Posted
posted
on
Mon, Oct 28, 2013 9:07 PM
Thanks for the comments, been just enjoying the bar and not posting recent photos. We had a birthday party for my daughter and I thought it would be the perfect time to premier the bar. It was a great hit! Everyone loved it and it was so much fun watching it come alive with more than willing participants :) It's my fav hangout! I'll post more photos soon. |
|
T

ToddVegas
Posted
posted
on
Tue, Oct 29, 2013 1:11 PM
You built an A-frame roof over a tiki bar in your garage?! That's AWESOME! |
|
AD
Aloha Daddy
Posted
posted
on
Sat, Feb 22, 2014 5:14 PM
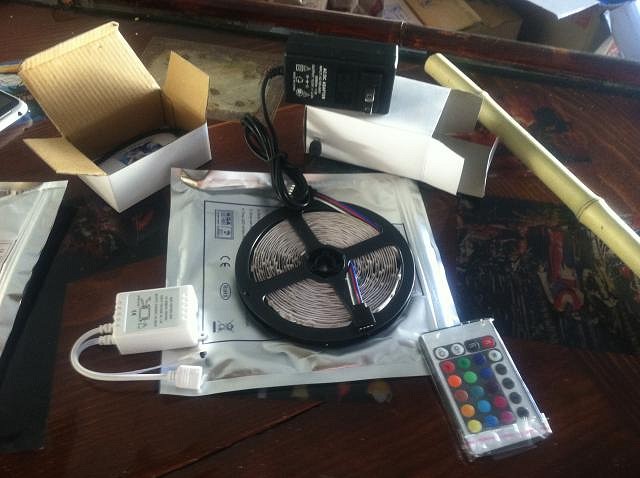
Aloha fellow tikiphiles, I apologize for being away, I moved over the Thanksgiving weekend and the Tiki Shack had to come down. I knew we would have to move when I built it so it was built with portability in mind. With the holidays over and all the pieces laying around in my garage, I could not wait to start putting it back together. And of course, I had to do all the upgrades to our new place for the lady first! :) But this time, I know what areas of the bar I was not satisfied with the first time, so I am able to build it a little bigger and better than before, yeah!!! My garage in this house affords me the opportunity to build it bigger and I like the way it it situated better. I will be posting pictures of my progress, one of the things I did better was pour a two part epoxy on the bar top. I found it at Lowe's and it was not too expensive so I went for it. I also decided to glue more photos on the bar top this time. I have a combination of retro Tiki Bar ads, Disneyland Tiki Room, classic surf movies, and Hawaii travel ads. All are encased in the epoxy. I love the look which is what I was hoping for with the Varithane but it just never got thick enough. I had only one issue with the epoxy, some of my photos lifted at the corners and so they stick up a little, but I am overall very happy with the result, it looks like glass and is very easy to wipe up messes. I also faced all of the shelves with Bamboo splits. I love the way this finishes off the fronts of the shelves. I have also discovered the wonder of LED lights. I bought a couple of strands of LEDs for my shelves, I had rope lights before but was never happy with the brightness or the stiffness of the rope which made it hard to bend and position without seeing the rope. I am installing the LEDs behind the bamboo facing since they are so small so you can't see the lights just the effect of them. They come with a remote control that allows me to turn them different colors, sequence, brighter or dimmer, or flash. I am so excited about this addition to the bar, I can't wait to install them. I am also going to re-design the fountain. I am thinking about gluing two bowls together, (back to back)and spraying them with foam which I will then sculpt into tiki designs. I found an LED fixture that I will be putting underwater to shine up into the fountain spray and it changes color. I am so excited about this new addition also. I'll keep you posted on this one as it evolves. I am so happy to have my Tiki retreat back, like having an old friend back! :) Oh! I almost forgot to mention something else that will make this bar better than the old. Our new place came with a fridge, so our old fridge ended up in the Tiki Shack! YES! No more runs to the freezer inside the house! Ice and cold juices right at my fingertips :))). I'll be posting photos soon, until then, thanks for reading and looking, and any and all comments are encouraged and appreciated! |
|
L

LoriLovesTiki
Posted
posted
on
Sat, Feb 22, 2014 6:59 PM
Aloha Daddy, Just reading your thread now. Love what you did at your last home and can't wait to see how your new version ends up! The bar top is killer! |
|
AD
Aloha Daddy
Posted
posted
on
Sun, Feb 23, 2014 9:27 PM
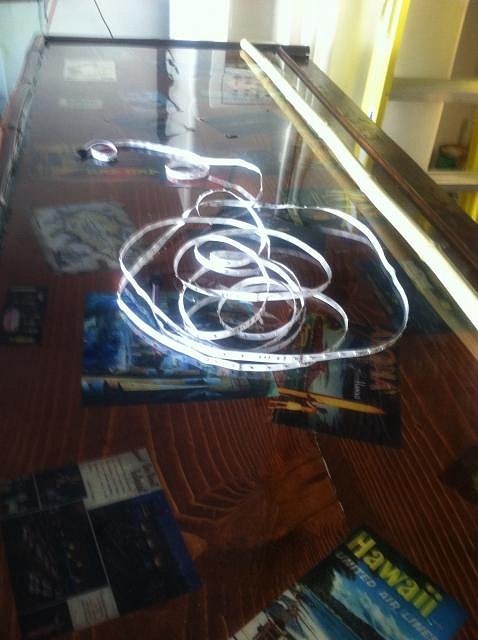
I am so excited about the progress I made today. I finished the bamboo facing and was trying to decide whether to stain it or leave it natural. My wife wanted to leave it but I thought it needed some stain. So I compromised and stained it then after a few minutes I rubbed the stain into the bamboo. The stain brought out the character of the bamboo and I am so happy with the results. See what you think. These are before and afters. Another new toy I found on Ebay is LED strip lights. I had rope lights to light up my shelves but I was not happy with how unflexible and dim the light was. I did not want to see the source of the light, just the light. I found the perfect solution in these LEDs. They are as big as a line of tape and the color combinations are endless! They even have an adhesive back, just peel off the backing and apply to where you want them to be. I am very stoked about the results. Now my reward, I get to unpack everything and put my bar back together! Can't wait to taste my first Mai Tai at my bar again! It's been 3 months!I downed half of that box of Thin Mints while working today, LOL! So happy with my progress this weekend, still have lots to do but at least it is now functioning and I can spend time at my Tiki Bar again! Thanks for looking! |
|
H

howlinowl
Posted
posted
on
Mon, Feb 24, 2014 1:10 AM
Thin mints.....mmmmmm.... Cool bar. When you first started putting the A-frame together, I wasn't sure I'd like it. But it came together quite nicely. howlinowl |
|
AD
Aloha Daddy
Posted
posted
on
Mon, Mar 3, 2014 9:17 PM
I know the pics are terrible, they really do not do this bar justice. I took them with my Iphone, we just moved and I packed my nice camera and I can't find it :( As soon as I find it I will take some better photos. This weekend I plan on setting up the aquarium that goes in the cneter of the bar on the back wall. I also decided to move my 90 gallon tank so it is next to the fridge. I will be making it into a planted discus tank, I think it will make a great addition to the tiki theme and add a lot of color. So much to do and so little time. I'm so excited about how this re-build is going. I also am planning on building a bamboo railing to keep my tiki mugs safe on the lower shelf in case of earthquake. It's been a while since we had a good shaker so I want to make sure not to get lazy and risk losing my whole collection. I'll post more photos this weekend. |
|
AD
Aloha Daddy
Posted
posted
on
Mon, Mar 3, 2014 9:20 PM
Oh and thank you Howlinowl, I am not finished with the A-frame, I am planning on dressing it up with some lengths of bamboo and toying with the idea of adding a small narrow piece of wood on either sides of the opening and painting a south pacific design on it. I am also thinking about designing a sign and mounting it to the roof. |
|
V
VampiressRN
Posted
posted
on
Mon, Mar 3, 2014 10:04 PM
Congratulations on the move. Wow...can't believe how much you have accomplished. It is really looking good and the bamboo stain is really nice. Looking forward to more pics. Have fun!!! |
|
PP

Pele Paul
Posted
posted
on
Tue, Mar 4, 2014 11:47 AM
can I have my B-Day party there????? Looks awesome!!!!!!!! |
|
FT
forgotten tikiman
Posted
posted
on
Tue, Mar 4, 2014 7:49 PM
Nice! :D. Looks great. |
|
AD
Aloha Daddy
Posted
posted
on
Tue, Mar 11, 2014 9:44 PM
Thanks for the nice comments, I gave the new bar a whirl last Saturday, my best buddy could not leave, he could not believe the difference! I am really enjoying the extra room inside the bar, it's amazing how much more room I have now from just adding a foot to the depth of the interior area. And it is so much more convenient having a fridge right there in the bar! I used to have to run to the kitchen inside to get ice and cold liquids. I got the aquarium up and running last Saturday, the tank itself is a vintage stainless steel 10 gal tank, very unusual in that it is very tall and narrow, cool. I plant on planting it with lots of plants and stocking it with some show guppies that are a beautiful blue color. I also made a decision to move my 90 gal tank right next to the bar and it will be a planted Discus tank, filled with amazon native tropical fish :). Sorry, I am a fish freak, I think it will be a great addition to the mood of the tiki theme, and very colorful. Next is re-designing the fountain. I have a design of a tiki holding up the fountain bowl. My thoughts were to spray liquid foam onto the base of the bowl and sculpting it into the tiki designs. Still developing that one but I'll keep you posted. |
|
AD
Aloha Daddy
Posted
posted
on
Thu, May 1, 2014 8:58 PM
Aloha!! It's been a while since I posted any progress on my bar re-build, because I've been busy! I'll post some photos here of the progress, I'm really stoked as to how it's coming along. Definitely appreciating the LED lights, not only the remote control ones that line my shelves, but the new one I got for my aquarium. The plants are growing like crazy and the blue tint to the light looks cool. I decided to do a total redo on the stand for the 90 gal fish tank. I was in a hurry when I did the original stand and I'm not really proud of it, so I am starting to use bamboo poles and the woven palm stuff (sorry, forgot the word for it!) all over the sides. anyway, here are the photos;
[ Edited by: Aloha Daddy 2014-05-01 20:59 ] |
|
AD
Aloha Daddy
Posted
posted
on
Thu, May 1, 2014 9:08 PM
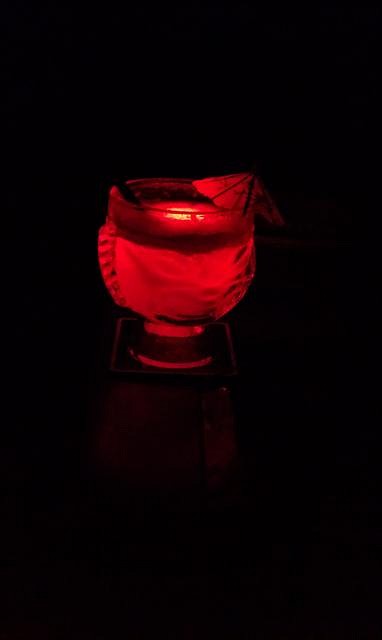
I have to submit a new use for lighted ice in Tiki drinks, a couple of weeks ago we had a big storm roll through on a Friday night and the lights went out. All the lights that is...except for the ones in our drinks!!! Nice way to light our way through the house! Dual flashlight and hydration :wink:
|
|
P

PabTiki
Posted
posted
on
Fri, May 2, 2014 11:10 AM
Woah, that bar looks amazing!!!! And lighted ice cubes?? I must find out about these!! (I found this link on Amazon: I have remote control candles for my tiny 200 sq. ft. apartment that glow bright red, but I always say you can never have enough cool lighting! Veering further off-topic, if anyone (else) is a fan of scented candles, I've been stocking up on the candles "Lanikai Coconut" from Bath & Body Works. They have a terrific beachy-smell, not too strong, like light coppertone with a hint of pineapple! Anyway, great bar. |
|
P
PabTiki
Posted
posted
on
Fri, May 2, 2014 11:12 AM
But obviously I wouldn't put candles anywhere near a genuine fiber canopy like that, ha! |
|
AD
Aloha Daddy
Posted
posted
on
Sat, May 3, 2014 11:58 PM
Mahalo! Those are the ice cubes, I actually got them from Trader Sam's at Disneyland. They are awesome, they can stay on one color, or turn from color to color. A must for any tiki drinks! |
|
T
ToddVegas
Posted
posted
on
Wed, May 7, 2014 11:03 AM
Your bar is a work of art! Nice job, sir! |
|
AD
Aloha Daddy
Posted
posted
on
Sun, Oct 19, 2014 9:23 PM
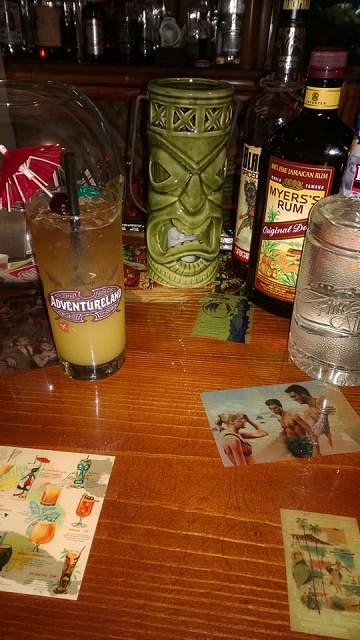
Aloha everyone, it's been too long since my last post, I've been laying low since I'm a landscape designer and summer is so busy. I was inspired at last weekend's tiki event at Don the Beachcomber in Huntington Beach. So many cool ideas and products brought out by everybody. I have not been happy with my roof design, I really want the peak of the roof to extend out more with bamboo supports coming into the bar. The side pieces also are too close in and don't give me enough room inside the bar area for lights, decorations, etc. So next weekend I am planning on tearing down the current roofs and re-building them. In the meantime, I'll just continue to practice making these concoctions and enjoy my new Adventureland glasses I bought at Disneyland a couple of weeks ago. |
|
L
LoriLovesTiki
Posted
posted
on
Wed, Oct 22, 2014 12:56 PM
Good luck with your roof redesign! I loved your bar before and new & improved version is terrific! |
|
V
VampiressRN
Posted
posted
on
Sat, Oct 25, 2014 5:10 PM
You are blessed to have building skills and to envision what the outcome will be. Love the lighting and the little alcoves. |
|
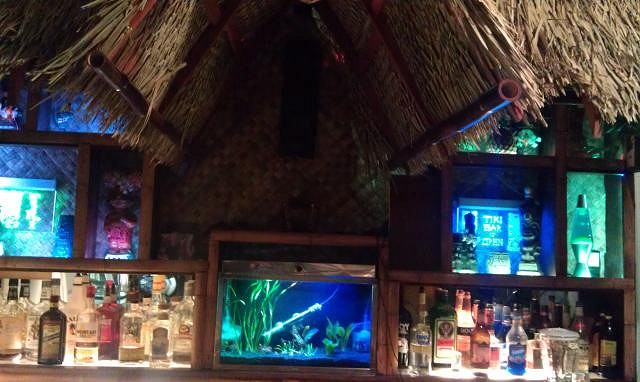
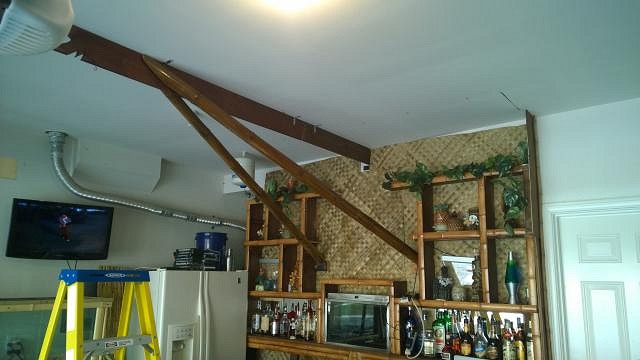
AD
Aloha Daddy
Posted
posted
on
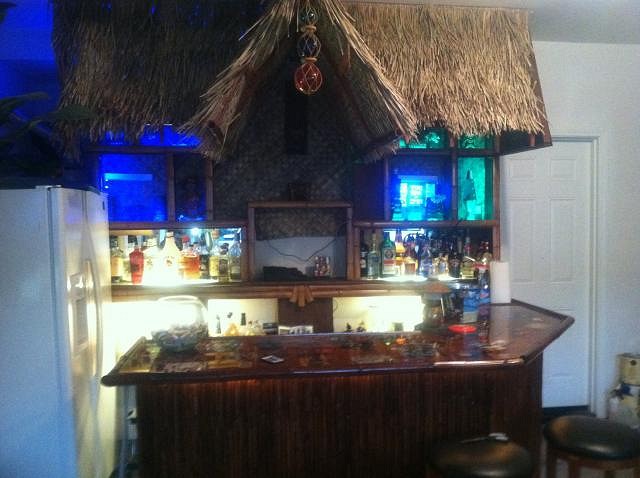
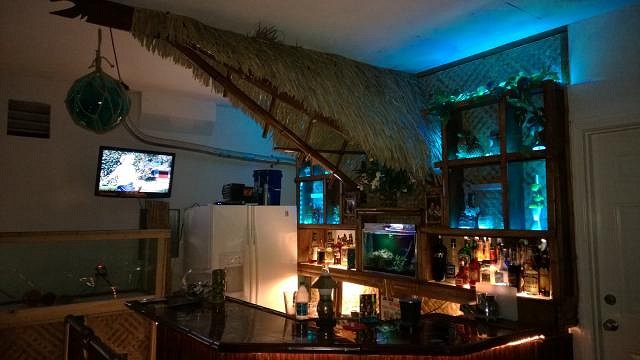
Mon, Nov 3, 2014 10:14 PM
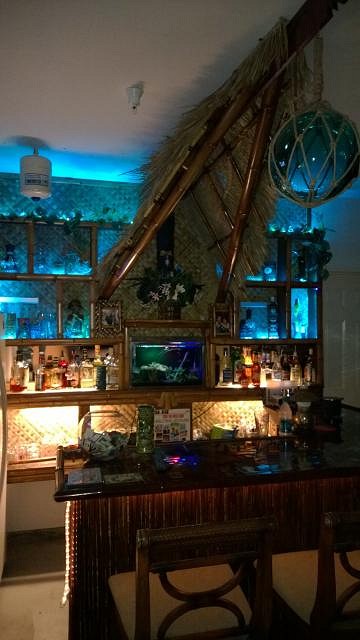
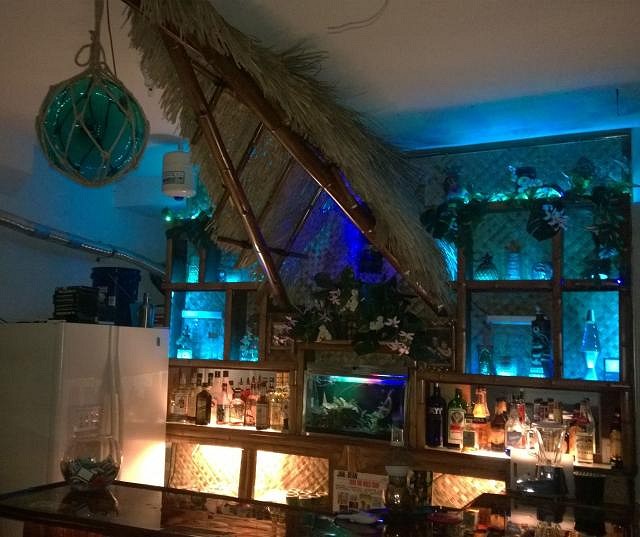
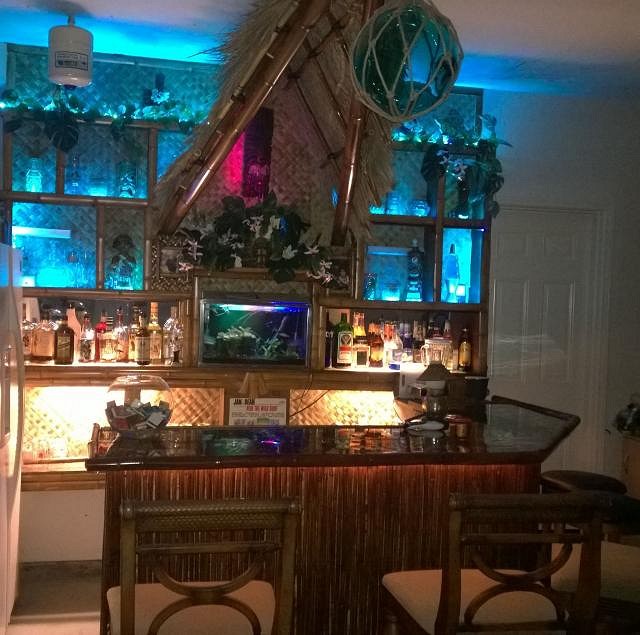
Thank you Lori & Vampiress for the nice comments. Well, I just about finished the roof re-design. After constructing the main roof extending out I re-thought the side pieces and decided not to put them back up. I like how you can see the shelves better now and it makes the whole back wall look larger. Also without the side pieces I can hang lamps up and hang nets and other decor. Let me know what you think. I'm so excited also as I just ordered a glass Japanese fishing float that I will place a light in and hang at the tip of the roof. I've always wanted one as it reminds me of all the Polynesian restaurants we used to frequent for dinner & cocktails. I think it will really be the finishing touch for the new roof. I'll take photos and show you once it is up. |
|
THI

Thurston Howell IV
Posted
posted
on
Fri, Nov 7, 2014 3:19 PM
Hey I really like that extended roofline. Great design reminiscent of the old Waikikian Hotel's Tahitian Lanai. |
|
AD
Aloha Daddy
Posted
posted
on
Sun, Nov 9, 2014 10:07 PM
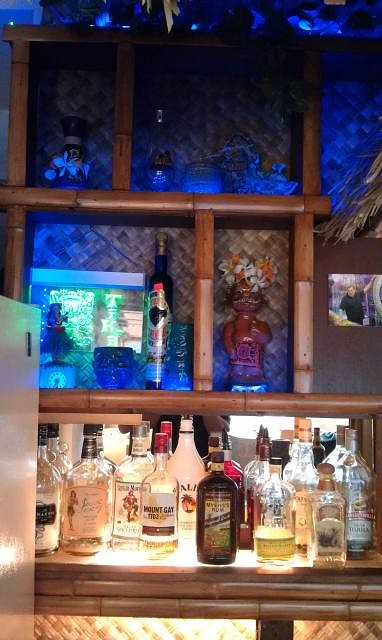
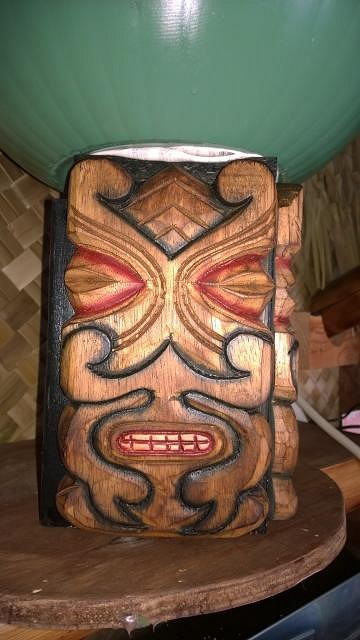
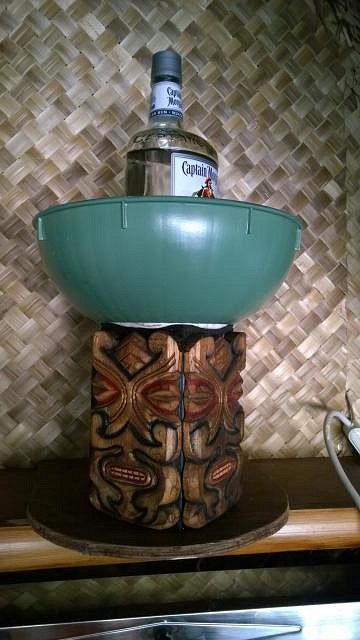
Aloha friends, I continued work on the new roof and refined some of the other areas of the bar, added some bamboo trim pieces, basically fixed some little things that were driving me crazy. Ordered my first Japanese fishing float, a 12" aqua colored one, I got so excited! I've always loved these and I've always wanted one ever since I built my bar. I went to the store to get a glass cutting drill bit and OMG! They are expensive! No wonder I read someone bought theirs on Ebay. I think I'll contact a couple of glass companies tomorrow and see if they will cut it for me. Can't wait to get it lighted! I'm really excited about my new fountain design. I bought a couple of tikis on Ebay and built a small pedestal about the same size as the tikis. I glued them to the front corner sides of the pedestal. I positioned it at an angle right above the aquarium. I made the basin out of a plastic salad bowl, spray painted it a medium green, and glued it to the pedestal with construction glue.
I hot glued the greens and flowers to the sides of the bowl, I really like the way it looks now. Next step will be to get a couple of styrofoam pieces and attach them to the base on both sides of the pedestal and fill the areas with greenery. I also bought an LED underwater light for the fountain. I need to buy another nozzle for it and I can then set it up. Really excited for all the work I got done, looking forward to finishing these areas up and a couple of new ideas I have up my sleeve.
|
|
E

ErichTroudt
Posted
posted
on
Mon, Nov 10, 2014 12:55 AM
Nice work. I totally can see a round tapa and bamboo fixture going around that water tank on the ceiling.... |
|
AD
Aloha Daddy
Posted
posted
on
Tue, Nov 18, 2014 10:09 PM
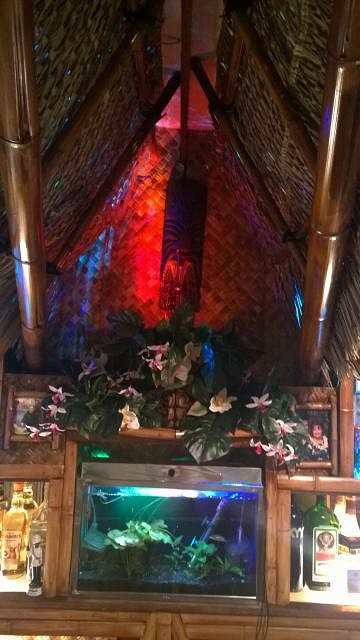
Aloha fellow Tiki people, I worked on the fountain and the shelf last weekend. I attached styrofoam to the shelf and inserted pieces of greenery and Orchids on either side of the fountain. I also installed the fountain pump and an LED light that can be submerged. I am pleased at the results except it is a little difficult to see the water, I would like to get a different fountain nozzle, one that has a single flow instead of the wide, multi-stream one I have now. I think I can have a single stream one go higher and be more noticeable.
I also finished off the top of the woven palm matting I have attached to the wall, I also added some bamboo slats to face more of the wood on the back of the bar. I am very pleased with the new look of the bar and celebrated with my buddy Casey. I found some new drink recipes that ended up being very old school. I am looking forward to adding various tiki lanterns to fill up the area above the bar. I bought my first Japanese fishing float, I have always wanted one but I am having a hard time finding someone who will drill a hole in it so I can add a lamp. Any ideas for inside the roof gable? I don't like how it looks, I was thinking about hanging a fishing net in there??? I also have a cool idea for behind the bar on the lower shelf to showcase some of my Grandad's exotica album collection. More on that after the first of the year. Aloha!!! |
|
M

matt-tiki-teo
Posted
posted
on
Sat, Nov 22, 2014 8:32 AM
Top notch work there - love the A-frame! As for drilling a hole in your fish float, I've had good luck using a circular drill bit designed for tile work like the picture below. Just add water and go slow. I've drilled holes in 5 medium-sized floats this way and haven't lost one. |
|
AD
Aloha Daddy
Posted
posted
on
Mon, Dec 1, 2014 10:18 PM
Thank you, I will definitely look into that bit, I am so looking forward to putting a lamp in the float. Mahalo!!! |


 ,
, 
 ,
,  ,
,