Tiki Central / Tiki Carving
Help tiki carving has broken feet!
Pages: 1 25 replies
|
F

Fastbackadam
Posted
posted
on
Fri, Sep 19, 2014 9:23 PM
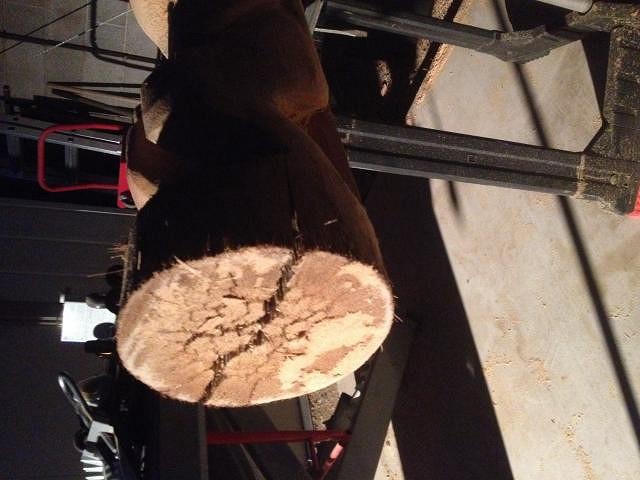
I hope this post is in the right spot, I've been super reluctant about posting my carvings. However, I was working on a full body 4.5" Ku, the first actual full body I've carved, and ran into a snag. Carving fan palm mainly with a chainsaw, the center of the wood still had moisture in it, and as a result after removing large sections of wood, the log has cracked as it dried. Now keep in mind I don't carve all day everyday or make a living carving, but I'm super bummed and looking for advice on how to fix this. I got the body mosty carved, and as I stood it up to take a look I heard a slight crack. The base(feet) cracked and is 90% broken off.. I don't really wanna cut the body off, or cut him off at the knees, but now he won't even stand on his own. Someone please give me advice! Thanks again, Adam
|
|
WC

Will carve
Posted
posted
on
Sat, Sep 20, 2014 4:50 AM
The Tiki looks good but, [ Edited by: Will carve 2014-09-20 04:51 ] |
|
N

nicework
Posted
posted
on
Sat, Sep 20, 2014 4:55 AM
Hello. I am new to tiki central and I to am trying to figure things out, but running into situtions like this as a carver. I consider it as a learning curb the head looks good and the bottom your having promblems well nature of carving they break, and split and i just move on. I keep it movin, looking forward to see other replies and see what they suggest. I am replying to let you know your not alone and you do not have to do this alone/ Have a great day Laz |
|
N
nicework
Posted
posted
on
Sat, Sep 20, 2014 4:57 AM
In the Ice buisness we call this Top Heavy |
|
F
Fastbackadam
Posted
posted
on
Sat, Sep 20, 2014 8:30 AM
Thanks will carve and nice work for replying. I guess what I need to know is what are my options before I lop the bottom off of it. If it was just any other carve I cut it up, but this one was a commissioned piece who requested a full body. I have a lot of time in it so I don't really want to start another one. I'm sure someone on here could carve this thing in a a lot less time, lesson learned leave more meat at the bottom to support the top. Also the top will have more wood removed making it lighter. Is it fixable? And how? Thanks again for the help Fastbackadam |
|
4

4WDtiki
Posted
posted
on
Sat, Sep 20, 2014 9:16 AM
There's a learning curve with carving, and with carving palm, and you're in it! I don't see a way to save this, sorry. Even if the wood was a choice solid piece, it would break there, you can't do a cut like that with palm. |
|
A

AlohaStation
Posted
posted
on
Sat, Sep 20, 2014 10:00 AM
Don't do anything till it breaks on its own. I suggest a dowel or two to hold the 2 halves together before it breaks. A common mistake when carving wet palm is allowing the wood to dry too quickly from carving deep. It still happens to me. |
|
F
Fastbackadam
Posted
posted
on
Sat, Sep 20, 2014 1:50 PM
Thanks, for replies again, I'm thinking about carving the top up more to make it weigh less, and then possibly glueing it with dowels and clamps. Not my choice by far but now I want to see if there is something that can be done before cutting his feet off. Haha. |
|
4
4WDtiki
Posted
posted
on
Sat, Sep 20, 2014 8:01 PM
With fan palm, and maybe with all palm but I only really know fan, the 20-30' below the top of the tree, the growing part, is unsuitable for carving. It has not compressed into solid choice 'wood'. (Wood is in '' because palm is really not wood, but tall grass.) Not trying to preach, just trying to educate. :) |
|
F
Fastbackadam
Posted
posted
on
Sun, Sep 21, 2014 10:03 PM
4wdtiki I look at it this way, there is some carvers on here who I truely look up to when it comes to carving and you are definitely one of them. I've spend hours and hours reading your posts and looking at pictures and have been inspired by them. So the fact that you took the time to actually educate instead of bein rude because I'm still learning means a lot to me, and I'm sure anyone else who doesn't fully know what they are doing. For me it's a learn as I go process and pretty much has been that way through a lot of stuff I do, not just carving. I haven't posted any other tikis, or tiki inspired carvings ( I see people get upset on what's tiki and what's not) yet but I learned a lot on this one, and hope to continue. Thanks Fastbackadam |
|
4
4WDtiki
Posted
posted
on
Sun, Sep 21, 2014 10:38 PM
All I know about palm, I learned the hard way, through trial and error over the years. I was where you're at, every carver has been. |
|
F
Fastbackadam
Posted
posted
on
Thu, Oct 2, 2014 11:25 PM
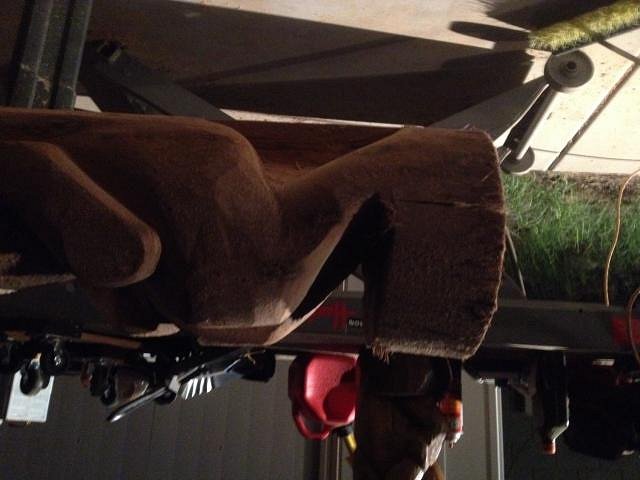
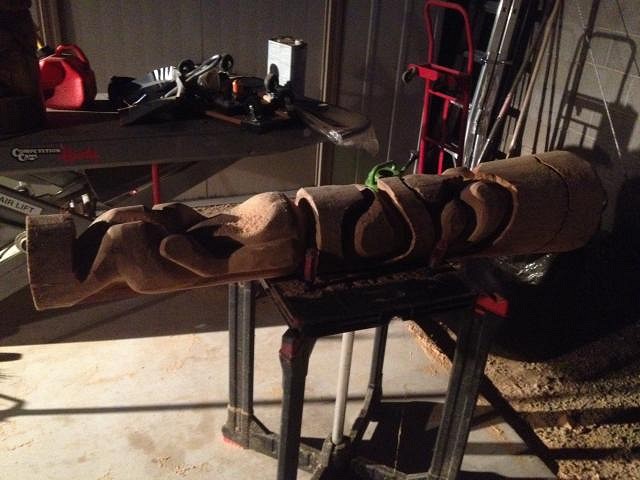
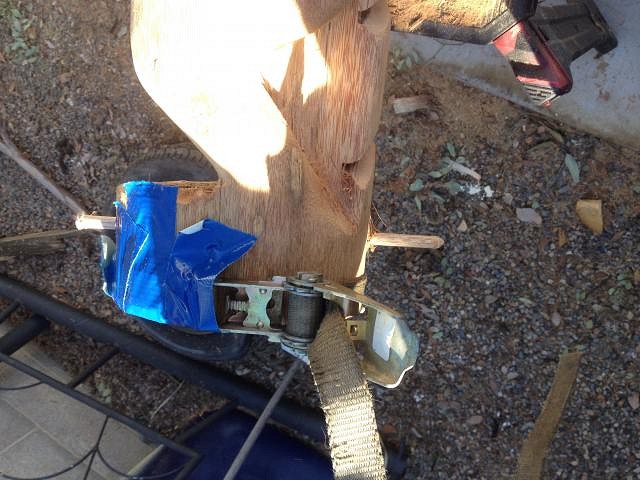
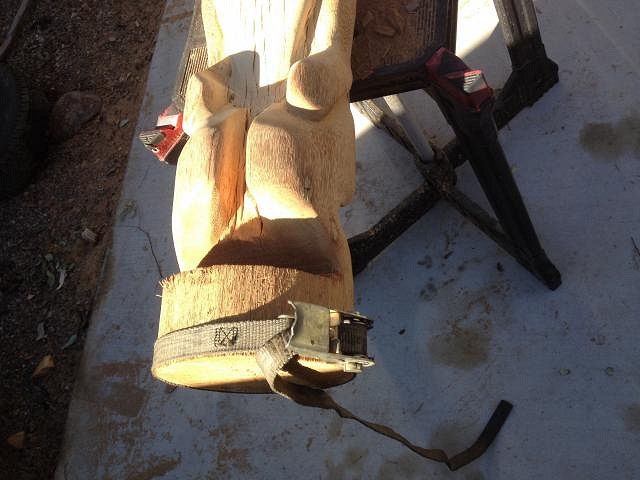
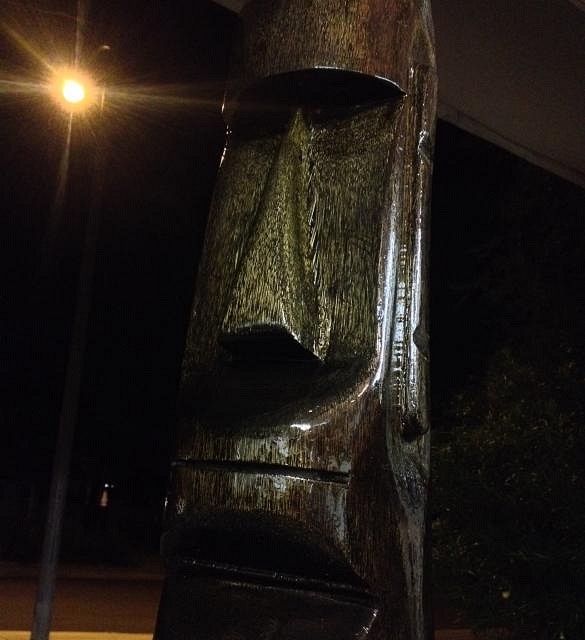
So just a update, I filled the broken part with wood glue, and put a ratchet strap around it, then drilled a hole through the two pieces, put glue in the whole and then tapped in a wood dowel.. Some glue ran out, but im hoping between this, and I plan on making a base for the bottom with some screws, it's save able... If it's no good I'm amputating his feet! I also did more carving on it in the mean time, trimmed the top up, and did the headdress.. I will also post a pic of the latest moai I carved, and finished... It's super glossy!
|
|
F
Fastbackadam
Posted
posted
on
Thu, Oct 2, 2014 11:32 PM
|
|
WP

Watango productions
Posted
posted
on
Fri, Oct 3, 2014 12:46 AM
Look'n good, hopefully he'll hold up |
|
P

pjc5150
Posted
posted
on
Fri, Oct 3, 2014 8:30 AM
very nice firstie.. If you use really thick dowels... like almost as big as a broom handle, it just MIGHT hold.. give it a shot & if it breaks, whack his head off an chuck the body.. :) |
|
T

tikiskip
Posted
posted
on
Fri, Oct 3, 2014 11:49 AM
I'm no carver but I do work with wood, don't know if palm is the same but, could |
|
P
pjc5150
Posted
posted
on
Sat, Oct 4, 2014 3:43 PM
oh my god,,, is that the "hanky the christmas poo" tiki, skip? :wink: |
|
F
Fastbackadam
Posted
posted
on
Mon, Oct 6, 2014 1:11 AM
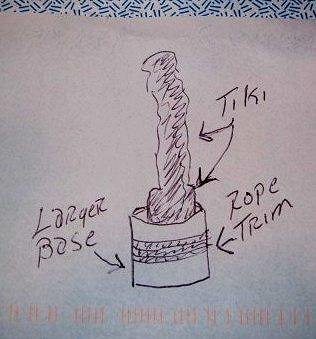
Watango, pjc5150, thanks for the kind words and replies, funny how you two and 4wd have all big a huge inspiration on my work, and tikiskip also thank you for the idea, never thought about the rope border, or using a better log for a base with a recess.. My latest thought was stand him up and use like 2 part clear epoxy, or better yet a 2 part resin and fill the bottom "feet" with it. When it dries it will be clear and glossy, just as the rest of the tiki will be after I clear it, actually got the idea from watangos moai. The resin I honk will make it stronger then regular wood anyway.. As far as the hankypoo goes I did just stain it with espresso so it is brown like poo. Hahaha! I'll keep ya posted and let ya know what happens.. |
|
T

TheBigT
Posted
posted
on
Mon, Oct 6, 2014 7:33 AM
Hey Adam, nice work! You might also try Minwax wood hardener in the ankles once you finish the gluing, dowels, etc. I used some on the palm tiki I did. Warning, it's expensive, so it might not be practical.
Lot's of great advice on palm here. So, 4wd, Aloha, do you guys say don't carve palm when it's wet or carve it slowly and allow it to dry out a little at a time? |
|
A
AlohaStation
Posted
posted
on
Mon, Oct 6, 2014 8:10 AM
Palm is tricky and it really comes down to where you live. My experience is in the tropic climate of South Florida. You can not wait for palm logs to dry, because they won't dry until you remove the outer bark, and if you let them sit they rot. When you start carving you have to be prepared for the Mold (and lots of it). Mold does not harm the wood and can be easily removed after drying occurs. I generally take my time when carving and a fresh log will be about halfway dry by the time I finish. I will leave it and allow if to finish drying before applying any type of stain/clear. Do not clear coat a wet log with mold - the mold will continue to grow under the clear coat. The strength of palm is in the vertical fibers. If you cross cut the vertical fibers you have to be aware that the remaining piece could be knocked off. Palm fibers are held together by cellulose - cellulose is neither strong or consistent. Cellulose holds the vertical fibers together - like padding - and gauges whether a log is good or bad. The cellulose is what holds the water, while the fibers transport the water. Solid palm has less cellulose, while stringy palm has more. Finding out how much cellulose is in a log is a learning experience for anyone that carves palm and can only be resolved through experience. If you carve too deep to get features like FEET, you have to be aware that the feet are weight-bearing and will need cuts that accent the grain not challenge it. I always approach palm with a degree of caution, because every log is different. |
|
T
tikiskip
Posted
posted
on
Sun, Oct 12, 2014 12:36 PM
Just got back on line, That larger base would also help weight the bottom if this tiki is top heavy. |
|
F
Fastbackadam
Posted
posted
on
Wed, Oct 15, 2014 1:34 AM
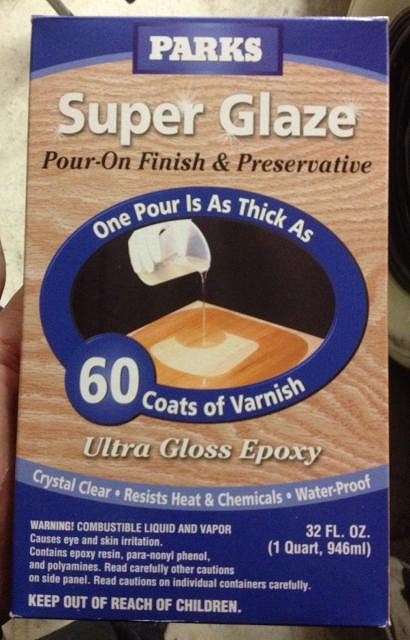
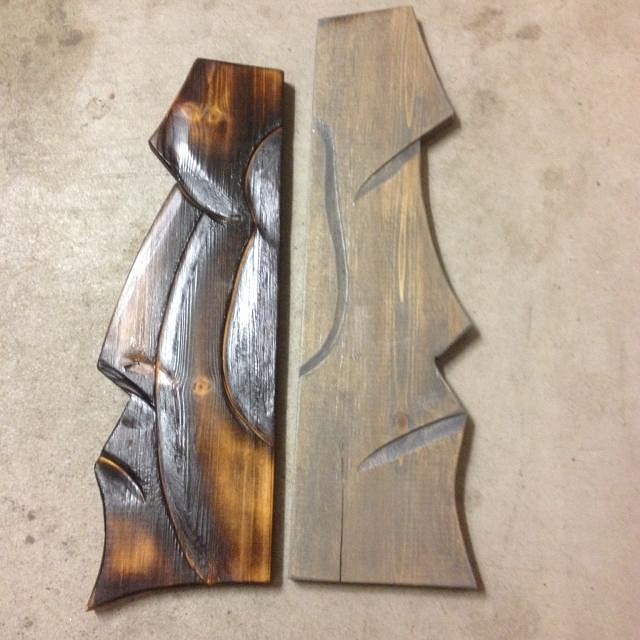
Tikiskip, aloha station and big t thanks for the advice and kind words,I will admit at first I was a little discouraged about my carvings, help, and carving palm in general. In the light of everyone's replies and suggestions and opinions, I went ahead and tried to save this thing. I mean hell, people build furniture using glue screws nails clamps saws etc, so why can't I make this guys feet hold him up. Removing more and more of the wood as I carved definitely helped lighten him up. After the glueing, and a ratchet strap and a drill bit and a dowel, and a lot of procrastinating I figured it's time to make a move and it will either work or it won't.. I cut the dowel, half ass sanded where the dowel went through and stood the guy up, and he stood on his own! After a little bit or sanding the base to make it a little more flat, I stained the entire thing with minwax espresso. After a couple days and researching glues, epoxies, considering fiberglass resin, and the minwax wood hardener, I saw something called epoxy resin. It's basically the stuff you see on bar tops, and tables. Looks like 100 coats of lacquer or poly is super hard and super glossy. I bought a kit at Home Depot as well as some pine to make a small bottom base to make him more stable, and also stiffen up the feet even more. A few well placed 2.5" screws and more glue, and epoxy resin I think it's stronger then the wood ever was! Now considering it was like $25 I figured it's worth a try, and I've always been curious what was on bar tops cuz it looks bad ass.. So I have it a go, and I must say I am impressed. I poured it in the cracks, and all over the base, leaving the bottom of this guy glossy, and the base epoxied to the screwed and glued tiki! I will attach some pics, an I also applied my first coat of poly tonight, but didn't want to cover te epoxy resin with poly until I make sure they are compatible as far( as adhesion goes). Again thanks for the help, and I can't wait to see this guy fully finished and in the sun. In the mean time I found some discarded pine boards and made a few moai cutout wall hangers. |
|
H

hiltiki
Posted
posted
on
Wed, Oct 15, 2014 6:37 PM
I love tikis with no teeth, great job on your last black tiki. |
|
T
TheBigT
Posted
posted
on
Thu, Oct 16, 2014 10:00 AM
Sounds like your fix is pretty strong. Looks good too. Nice Moai!! |
|
A6

akamu 68
Posted
posted
on
Tue, Oct 28, 2014 5:40 PM
Put a pole in the ground and attach it to the back of the tiki and put plants around his feet .Not the greatest but at least the whole body doesnt go to waste and it takes the weight off his feet. Just an idea. I had to do this in the past due to carving a termite infested Mexican fan palm log . Great job on the carving Cheers |
|
R

renaissancemanjoshua
Posted
posted
on
Sun, Jan 18, 2015 9:52 PM
Take a tip from boat building and repair things like this with epoxy. Go with something like the West Marine system a,dn you can thicken it up to suit your needs. On the bottem like that it should be totally hidden. |


Pages: 1 25 replies