Tiki Central / Other Crafts
Hypertufa Moai Easter Island Head Sculpture
Pages: 1 13 replies
|
W

Wavy_Davy
Posted
posted
on
Sat, Oct 25, 2014 9:45 AM
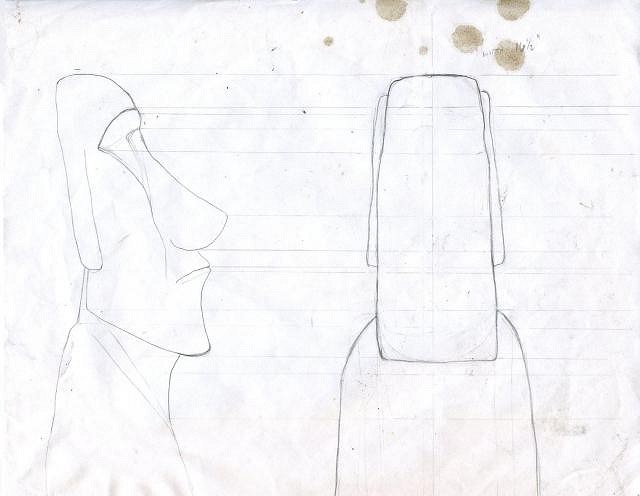
Aloha Tiki Central folks! I have followed this page for many years and have admired by many of the fine artistic works shown here. I also picked up lots of great tips as well. I live North of Boston and love all things Tiki. I am a part-time artist and dabble in painting, caricature, and sculpture, and I just like making cool things. From my honeymoon in Hawaii, to trips to this Caribbean and from my love of Disney Imagineering (especially the Polynesian Resort, Adventureland, and the Adventurers' Club I am frequently inspired to make my own art. This is my first post here on Tiki Central. I would like to share my Easter Island Head build with you. I built a large backyard tiki bar out by the pool years ago and, of course, every tiki bar needs an Easter Island head...right? Step 1. Design - It all starts with a drawing or two.
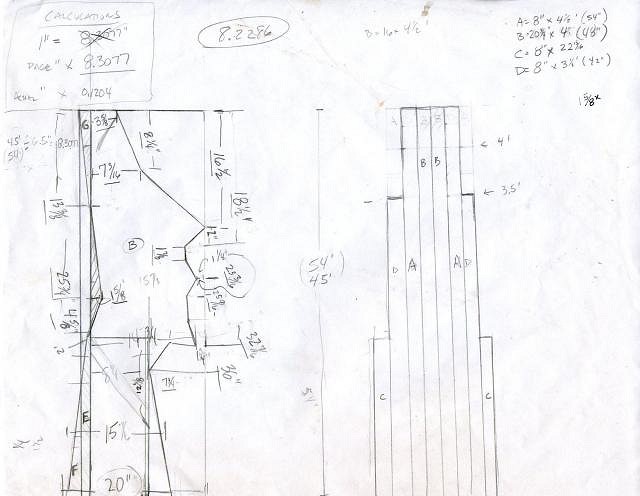
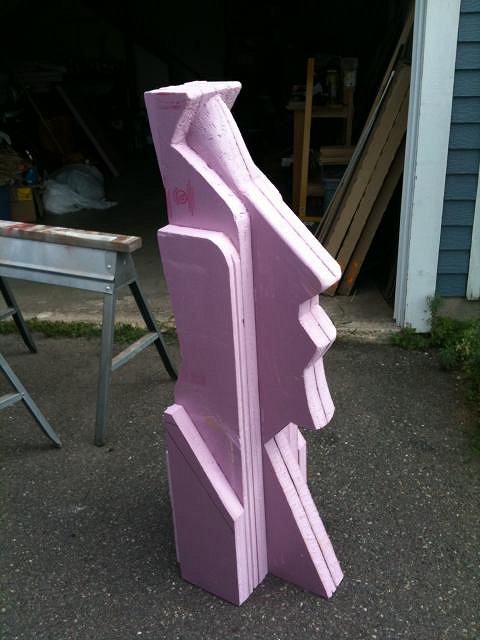
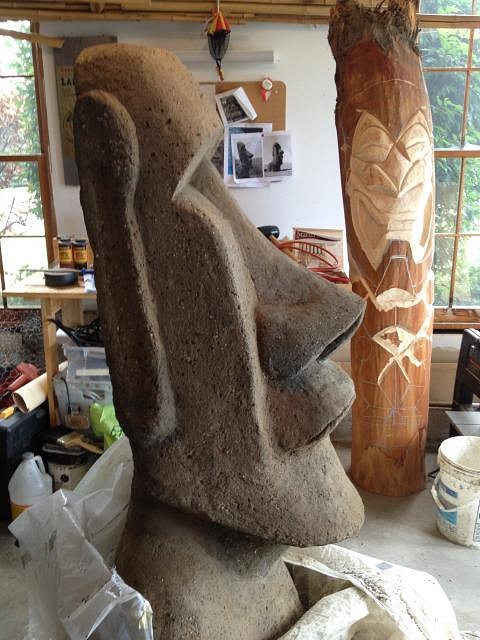
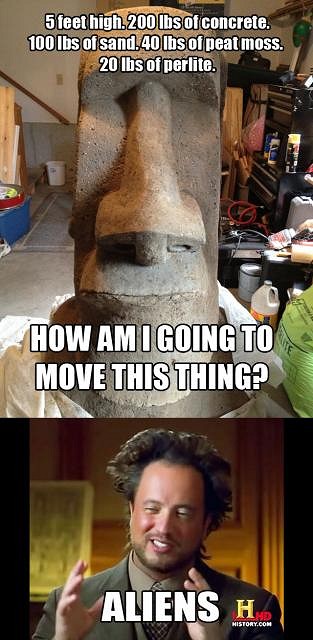
I had to figure out how to cut the foam insulation boards. This is a 5 foot sculpture. Step 2. Foam core armature made from pink insulation board and Great Stuff.
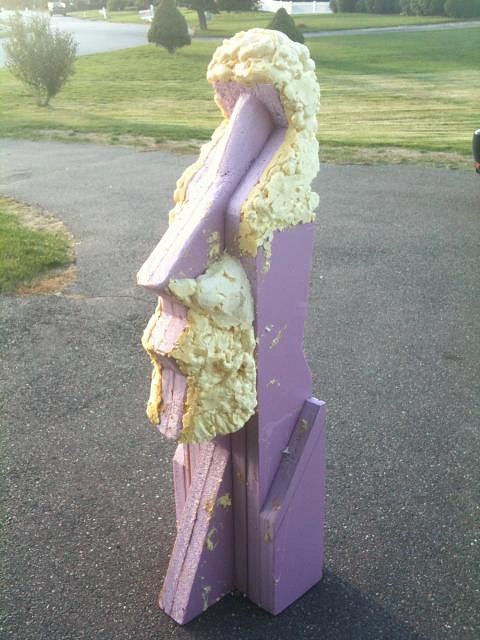
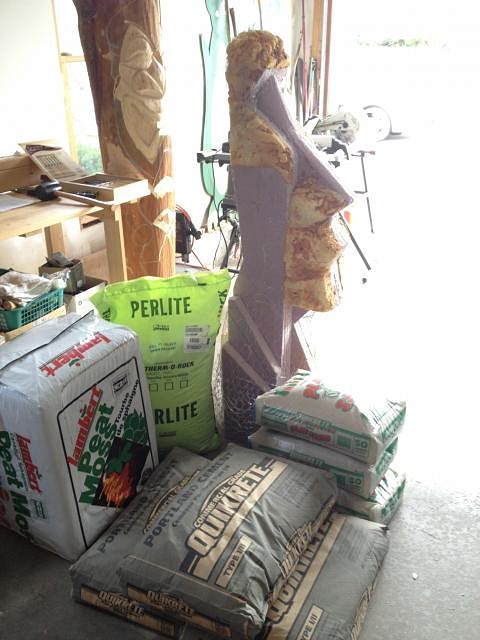
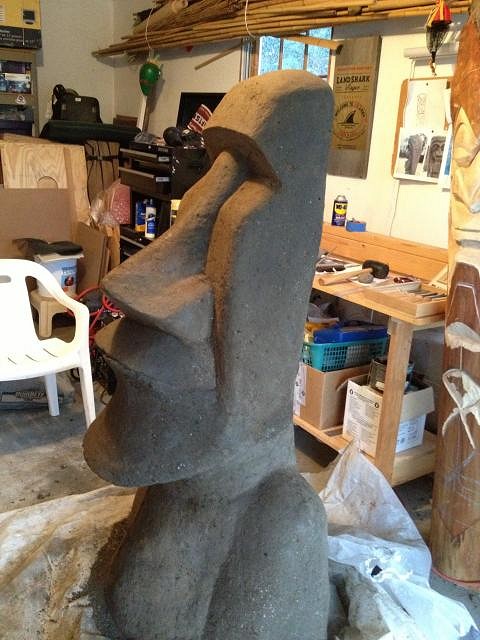
Step 3. Covering in chicken wire and then sculpting with hypertufa. I used a mix of portland cement, peat moss, perlite and little sand mixed with water to a mud pie consistency. I agonized about using vermiculite or perlite. I wanted some color variation but also wanted it to look like stone. I liked the results with the perlite.
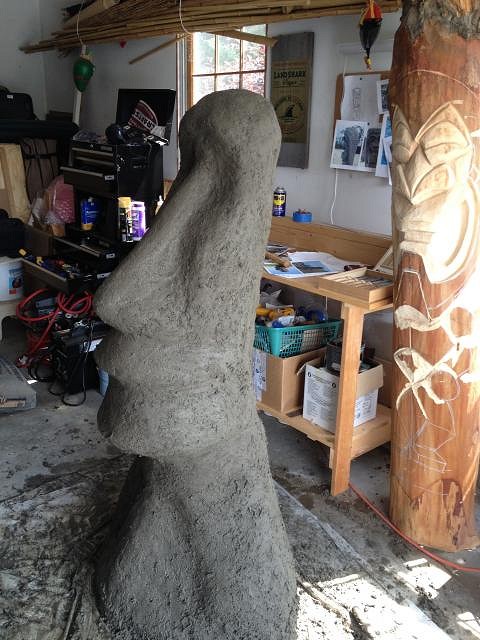
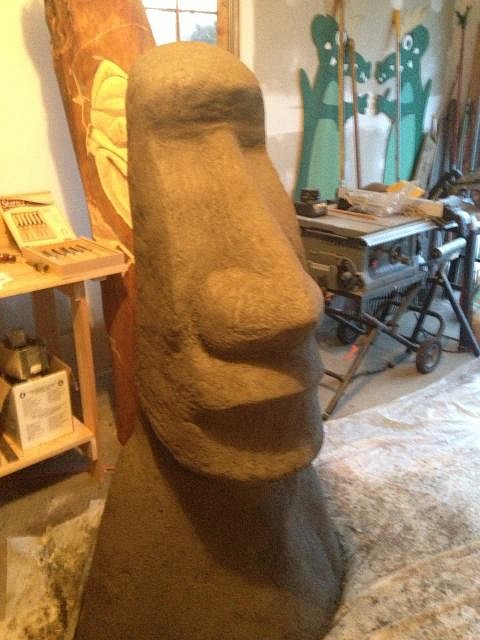
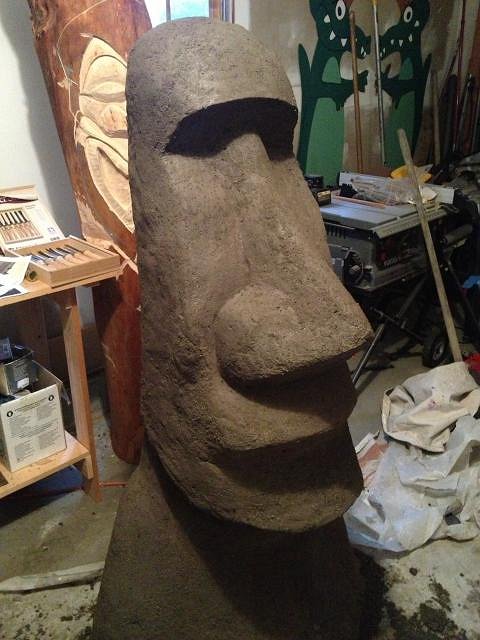
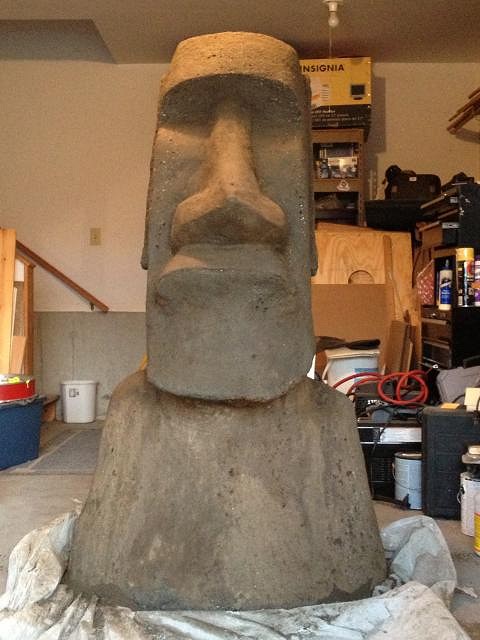
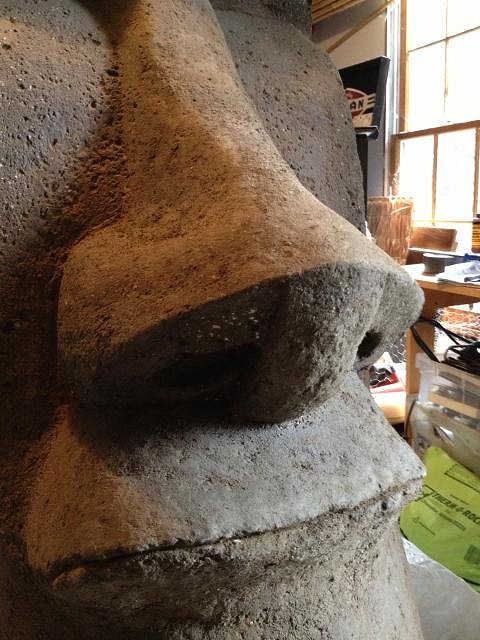
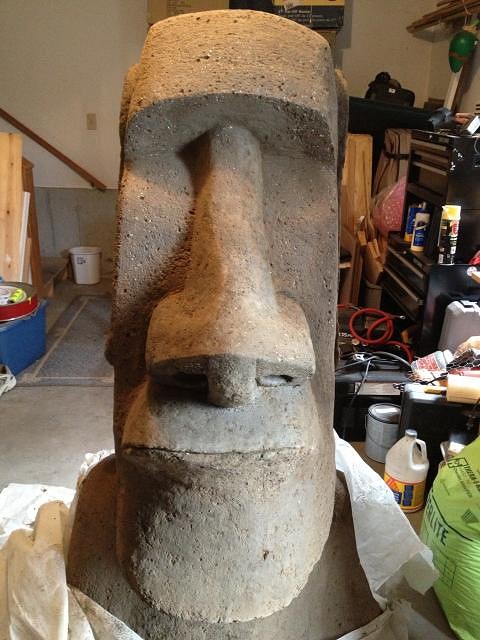
Time to get messy. This build took a total of 4 weekends. I slapped on the hypertufa mixture on a Saturday and refined the carving the following Sunday or Monday evening. I kept him wrapped in plastic between sessions. BTW, it was over 90 degrees during the entire project. Day 1. First coat of hypertufa. Day 2. Second application of hypertufa. Building up the shapes. Day 3. Refining the brow and nose. Day 4. Work on the chin and mouth area/ Day 5. Build up of shoulders and chin. During the build he becomes affectionately named "Moe". His full name is Morris Ignatius Head or Moe I. Head. Day 6. Moe's Rhinoplasty. The final sculpture! The move!
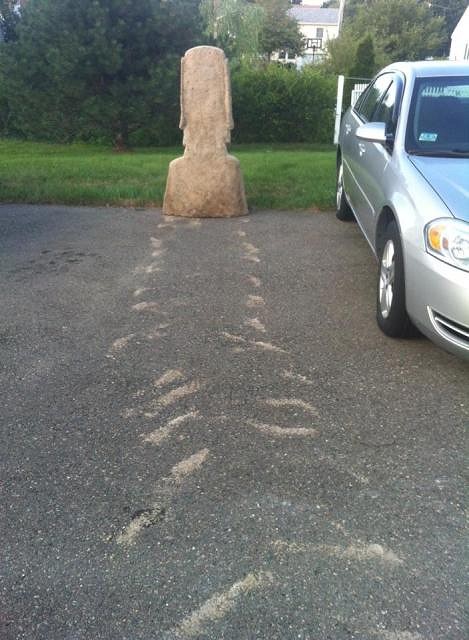
He walks! In my research I learned that the recent theory is that the Rapa Nui "walked" the Moai by pivoting them along the front arc of the bottom of the statue. By tipping him forward and rotating him along the front edge i was surprised to find that I could move him quite easily.
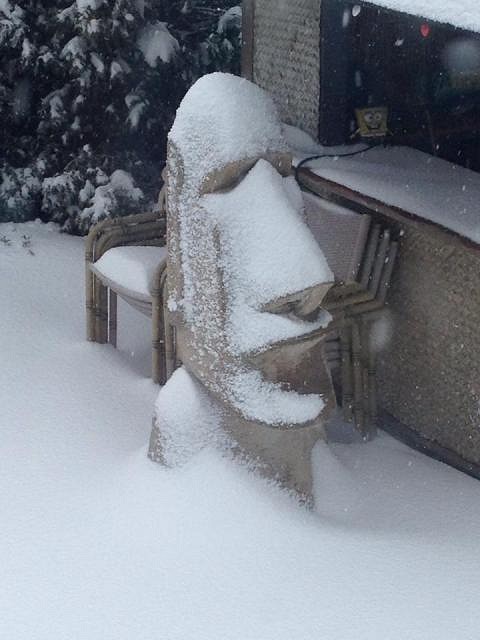
He spent the winter by the tiki bar and I recently moved him to a prominent spot by the pool. I found that that as the hypertufa cured and dried out it got very pale. I put a few color washes of concrete color (both terra cotta and black) to give him a nice, dark stone color.
This was a really fun and rewarding project and loved working with the hypertufa.
Thanks for looking. Dave [ Edited by: Wavy_Davy 2014-10-25 09:47 ] [ Edited by: Wavy_Davy 2014-10-25 09:48 ] |
|
EJ

El Jefe
Posted
posted
on
Sat, Oct 25, 2014 10:08 AM
Nice work. Welcome to TC. |
|
H

hang10tiki
Posted
posted
on
Sat, Oct 25, 2014 10:21 AM
Dude, freekin awesome Jon |
|
T

TikiAno
Posted
posted
on
Sat, Oct 25, 2014 10:29 AM
Congratulations on a fantastic build, and welcome to TC. Look forward to seeing more of your work! |
|
G

GROG
Posted
posted
on
Sat, Oct 25, 2014 11:50 AM
That turned out great. GROG like. |
|
D

danlovestikis
Posted
posted
on
Sat, Oct 25, 2014 12:53 PM
I love love love love this thread. I hope you continue and do more of them just so we can watch. Excellent job of teaching your baby how to walk. Wendy |
|
W
Wavy_Davy
Posted
posted
on
Sun, Oct 26, 2014 8:18 AM
Thank you for the kind remarks! I am very glad I could contribute to this great, creative group. While I was slapping concrete in the heat I was inspired by "Moe" to create a painting. I am almost finished and I will post it whenever I get it done. Mahalo! Dave |
|
L

LoriLovesTiki
Posted
posted
on
Sun, Oct 26, 2014 11:01 AM
This project has seriously been on my "to do" list since I dabbled in hypertufa last summer. A local nursery had a Giant plastic Moai that I wanted but it was way too expensive, thus the idea was born. Needless to say, I never did get around to making one and I'm so glad I waited because I'm going to use yours as my tutorial! Thank you so much!! I'm doubly excited to see another cold weather tikiphile with an outdoor bar. WTG! A million mahalos for your hard work and great pictures & directions! |
|
W
Wavy_Davy
Posted
posted
on
Sun, Oct 26, 2014 8:18 PM
Hi Lori! Thanks! I would definitely put this at the TOP of your To Do list. It was a blast to make and yours will be much better an more rewarding than anything you can buy. If/when I make another one there are a couple of things I would do differently.
I now have a small MIG welder and I would weld up a wire frame instead of using the foam. Just because we have to endure the cold Northeast weather doesn't mean we can't enjoy the Tiki lifestyle. Until I can move to a warmer climate I will have to improvise. When we put in a pool years ago there was no question that we needed a Tiki Bar. But I had to construct it to withstand the New England weather. It is 2x4 and 2x8 construction under some nice bamboo poles and covering. I got the bamboo and matting at Bamboo and Rattan Works in Lakewood, NJ. Sadly, I learned that they have now closed. I played a lot of Jimmy Buffett, Jim Morris and John Frinzi music during the build. I frequently open the bar in the winter months. Good Luck with your project and let me know if you have any questions. "I've got a far North latitude with a Margaritaville attitude" Dave |
|
M

MadDogMike
Posted
posted
on
Tue, Oct 28, 2014 9:23 AM
Wavy-Davy welcome to Tiki Central!!! We always need more creative people here. |
|
L
LoriLovesTiki
Posted
posted
on
Tue, Oct 28, 2014 4:18 PM
Hi again Dave, I did have one question, do you have the exact proportions for your hypertufa mix? I used hypertufa twice and used 2 different "recipes" and the 2nd one wasn't very good. Also, without a welder how did you attach the wire to the foam shape? Interestingly, I went to Lakewood last year to visit the Bamboo and Rattan place. They were super nice there and I was bummed when they closed. I actually called them their last month in business to see if they had any bamboo flats left but they didn't. |
|
W
Wavy_Davy
Posted
posted
on
Tue, Oct 28, 2014 4:56 PM
Thanks MadDogMike. It would have been better if those were rum stains on the sketch. :) I LOVE your Pirate Ship Tree House. Just awesome! ...and yes. We kept saying that "Moe" was PISSED about the snow. [ Edited by: Wavy_Davy 2014-10-28 16:59 ] |
|
W
Wavy_Davy
Posted
posted
on
Tue, Oct 28, 2014 6:19 PM
Hi Lori, I used equal parts of portland cement, peat moss, and perlite. The first big batch had equal amount of sand as well for strength. The additional batches had less sand and I kind of eyeballed it. Probably a little more than half the amount of the other ingredients. I used a big bucket that my pool chlorine came in as my measuring cup. It made it easy to keep the mixes consistent. A couple of tips.
To apply the chicken wire to the foam armature I bought a spool of standard heavy gauge craft wire at Home Depot, cut off long pieces and folded them over to make long staples. I just shoved them into the foam around the chicken wire. You can twist the chicken wire to give it shape. I used the wire to crimp and hold the shapes. I hope this helps. Good Luck! Dave |
|
L
LoriLovesTiki
Posted
posted
on
Sat, Nov 1, 2014 3:08 PM
Thanks again Dave! Excellent tips. This is definitely going to happen before next summer. No doubt. I've never heard of concrete adhesive but will look for it at the store. I am loving Mo more and more! |

Pages: 1 13 replies