Tiki Central / Tiki Carving
Bam Bam's carving thread
|
BB

Bam Bam
Posted
posted
on
Tue, May 17, 2016 10:23 PM
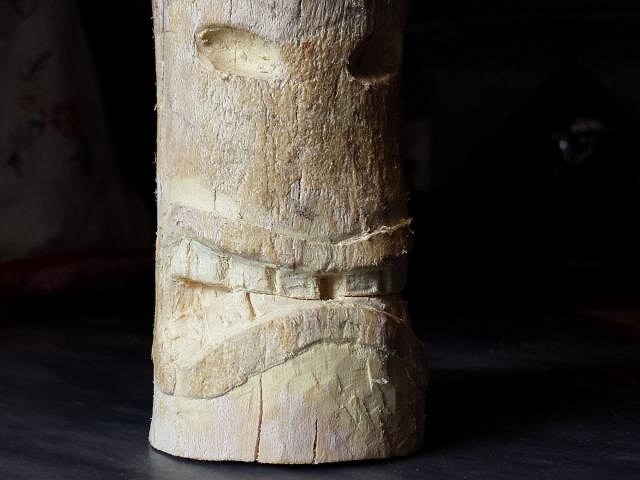
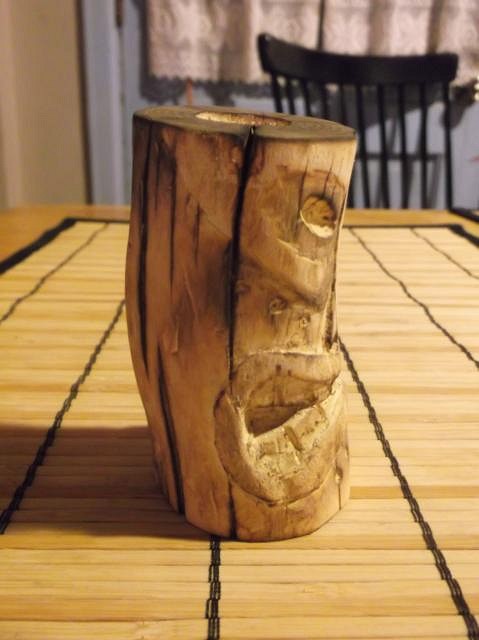
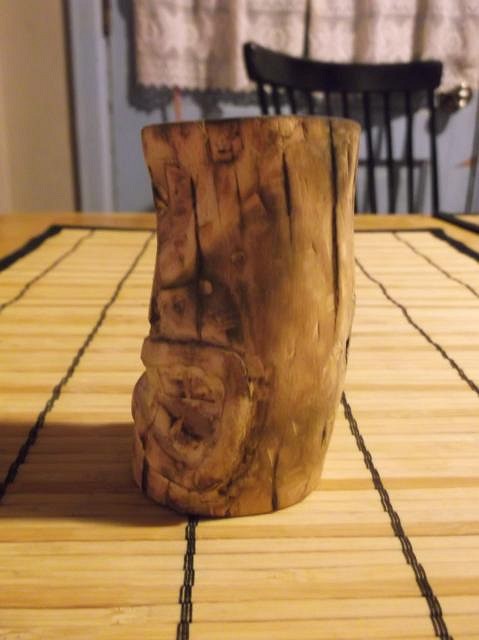
We have a gnarled Black Locust tree on the corner of the lot that had to be drastically trimmed last winter. Some of the smaller branches are just about dry enough to work, so I thought I'd try my hand at carving my first Tiki! I had a fist-sized chunk of wood set aside specifically for pipemaking, and it seemed logical to combine the two efforts. I'd not gotten a chance to work with Black Locust before now. I was surprised to find that the thin layer of sapwood was quite fibrous, and reminded me of palm logs I've seen used for carving.
Once you get past the sapwood, the heartwood is a surprisingly intense shade of yellow - and very hard. The change in color helps to offset those parts left from the sapwood even more. Fun fact: the dark heartwood fluoresces a bright neon yellow under UV light.
Once the exterior was finished, I took a blowtorch to the surface and sanded it back to add more color and contrast. Strike me dead if this wood doesn't smell like popcorn when you toast it. Weird wood...
The last steps will involve boring out the bowl and filling any of the deep cracks that run all the way through with JB Weld. More to come! [ Edited by: Bam Bam 2016-05-30 03:39 ] [ Edited by: Bam Bam 2016-08-21 08:40 ] |
|
H

hiltiki
Posted
posted
on
Wed, May 18, 2016 9:22 AM
Nice first tiki carving. Keep up the good work. |
|
M

MadDogMike
Posted
posted
on
Thu, May 19, 2016 6:13 PM
JB Weld? Hmmm... how does that blend with burning tobacco (or whatever you smoke in there)? |
|
BB
Bam Bam
Posted
posted
on
Thu, May 19, 2016 9:47 PM
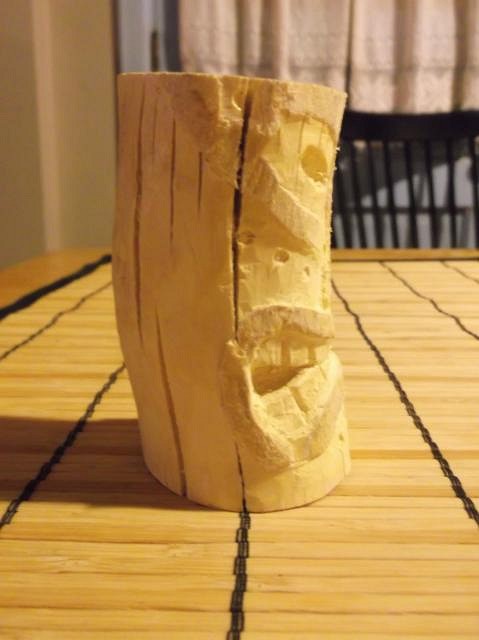
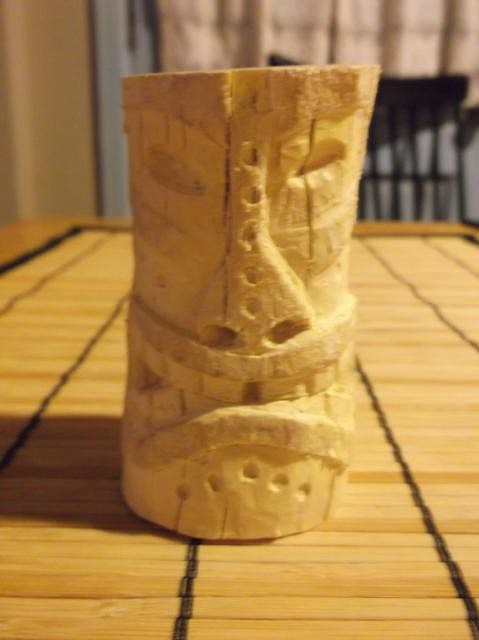
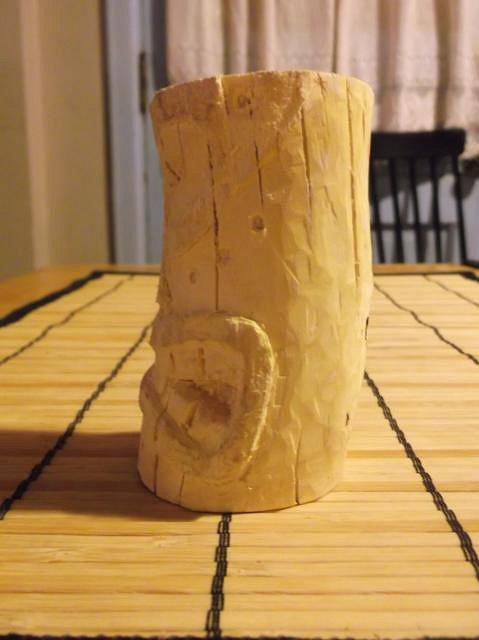
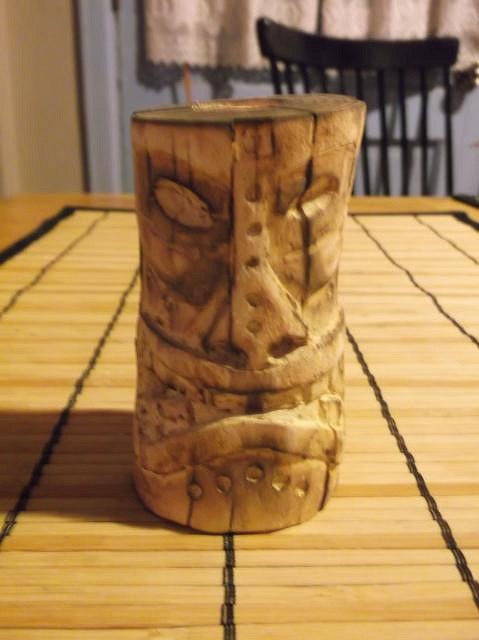
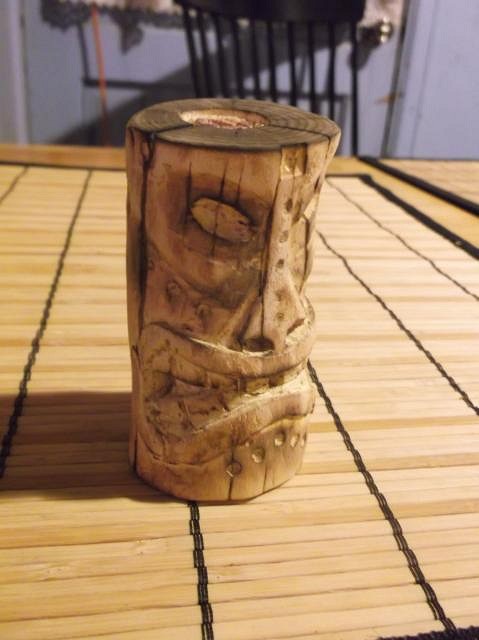
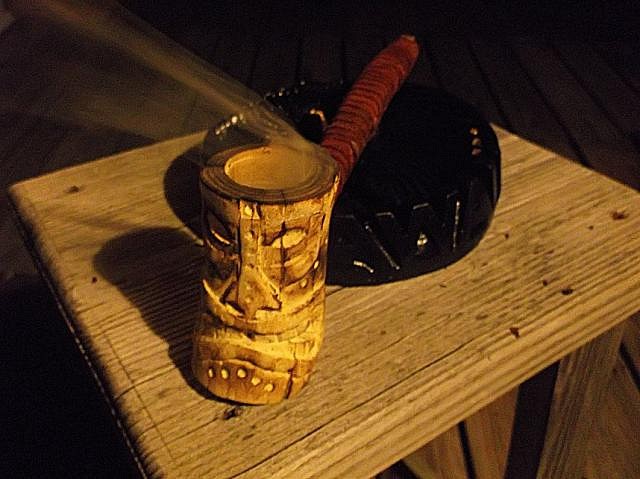
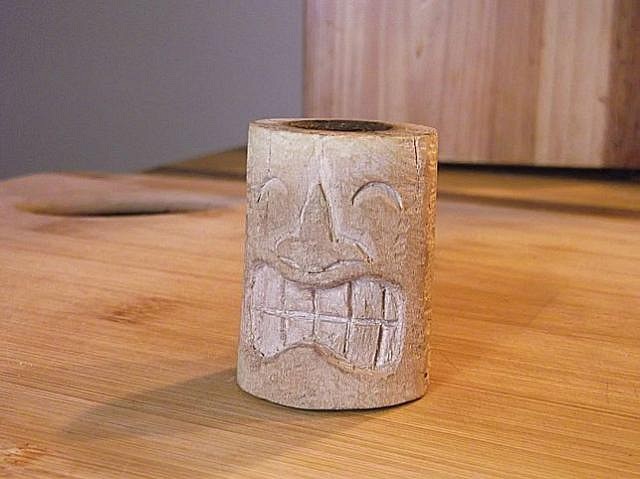
The pipe is finished!
The bowl is 1 1/8 inch across, and about an inch and a half deep. After several disastrous attempts at drilling out pipe stems for previous projects, I opted to go the Native American / bushpipe route by splitting the stem lengthwise, carving out a channel, and then binding the two halves together with a long strip of leather. The stem was then run under a hot tap to soak the leather, which with any luck will shrink slightly, binding the assembly even tighter. It smokes reasonably well, despite getting a hot ember sucked into the back of my throat on the first big draw. Now that I've figured out how it likes to be packed, it works pretty well all things considered.
It's my understanding that it's been an acceptable way to fill interior cracks from a burnout - where you wouldn't want fumes from the Superglue+Sawdust combination commonly used to fill exterior cracks. Supposedly it's pretty inert. I may not actually fill the cracks, after giving it a test drive. I can't honestly see myself filling the entire bowl (about a quarter-cup!) and there is just enough solid wood at the bottom to fill for an average sit-on-the-back-porch-and-stare-at-the-moon smoke. |
|
T

tikiskip
Posted
posted
on
Fri, May 20, 2016 4:53 AM
The pipe stem could be Bamboo. Looks great though! |
|
BB
Bam Bam
Posted
posted
on
Fri, May 20, 2016 4:02 PM
Thanks, Skip! I had considered a bamboo root stem, but there really isn't any readily-available source around here - other than the internet, that is. I've decided to give the bowl the JB Weld treatment in the end. In the light of day there was heat damage visible that wasn't quite so obvious by porchlight. Evidently, despite being quite a hard wood, locust is quite happy to char relatively easily. I figure: A) There have been resin and high-temp plastic pipe bowls used since the 60's, and B) if you pack correctly and take your time you should never even have hot embers in contact with the walls of the bowl in the first place. cake build-up over time would serve to protect it even more. |
|
M
MadDogMike
Posted
posted
on
Sun, May 22, 2016 6:36 AM
Good info, thanks |
|
BB
Bam Bam
Posted
posted
on
Sun, May 29, 2016 5:35 PM
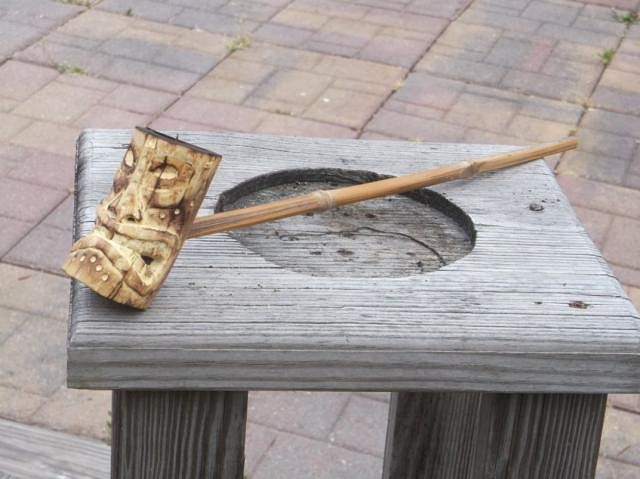
Update: Turns out I was able to find an easy source of stem-sized bamboo after all - Dollar Tree is selling butterfly nets with thin bamboo handles. Simply cut off the net, drill out the nodes and pith, and hello to the longest pipe stem I've ever used!
I didn't have to torch the stem, since it already had an aged finish. All I had to do was sand off most of the weathered grey surface, slather it in beeswax to fill any splits in the stem, and polish to match the bowl. I also ended up cutting a small bevel at the back of the bowl to allow it to rest with the stem down. As light as the bamboo is, it still is heavy enough to tip the bowl back.
I think I'm going to call this one finished. |
|
S

savoy6
Posted
posted
on
Fri, Jun 3, 2016 12:09 PM
very nicely done |
|
H

Hami-The-Tiki-Torch
Posted
posted
on
Sun, Jul 3, 2016 3:47 PM
yeah, that's cool...the progression was a cliff hanger! But alas, enjoyed the conclusion....way cool! |
|
BB
Bam Bam
Posted
posted
on
Wed, Aug 17, 2016 5:10 PM
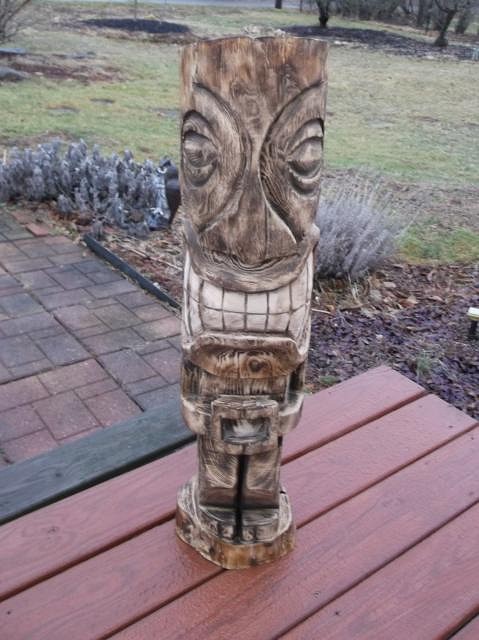
One final touch. I gave it some eyes:
|
|
BB
Bam Bam
Posted
posted
on
Sun, Aug 21, 2016 8:59 AM
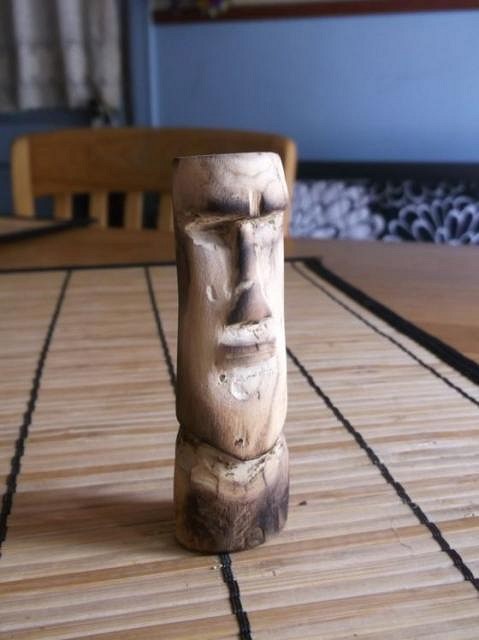
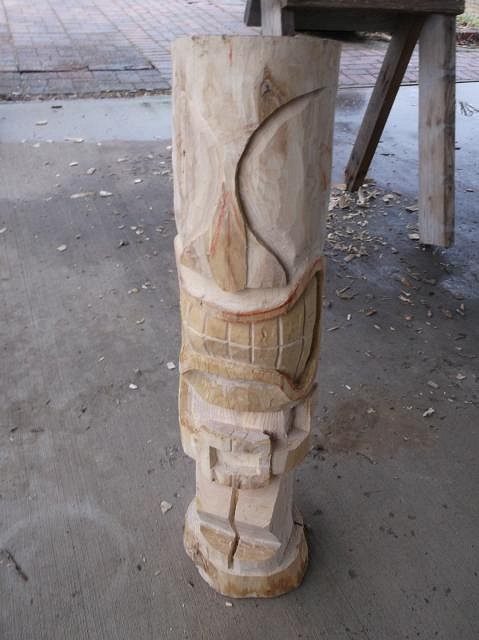
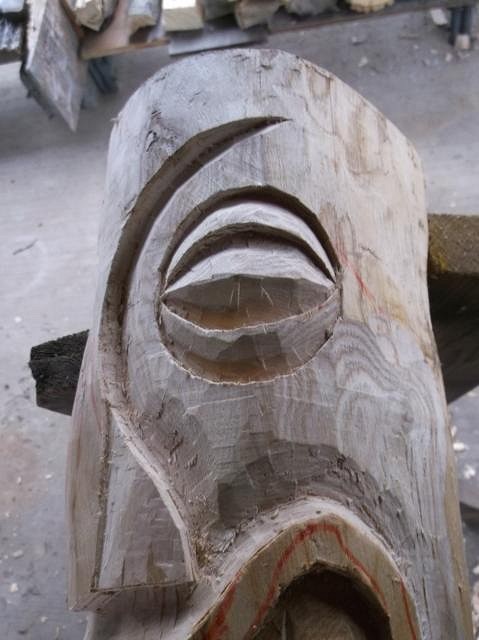
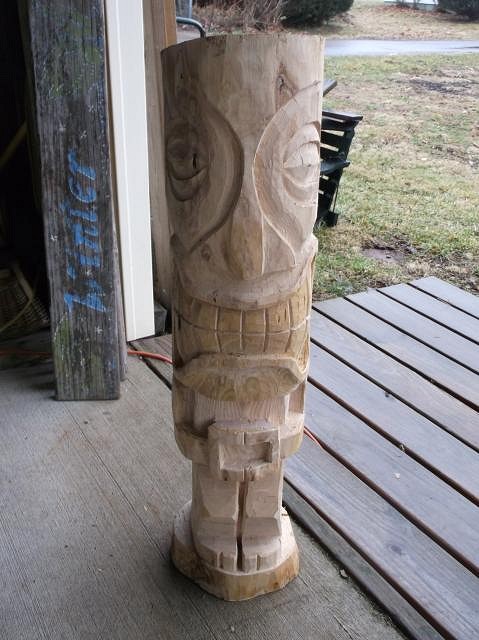
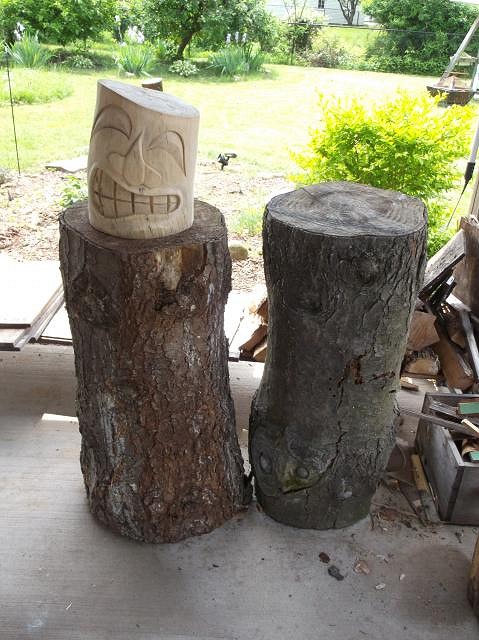
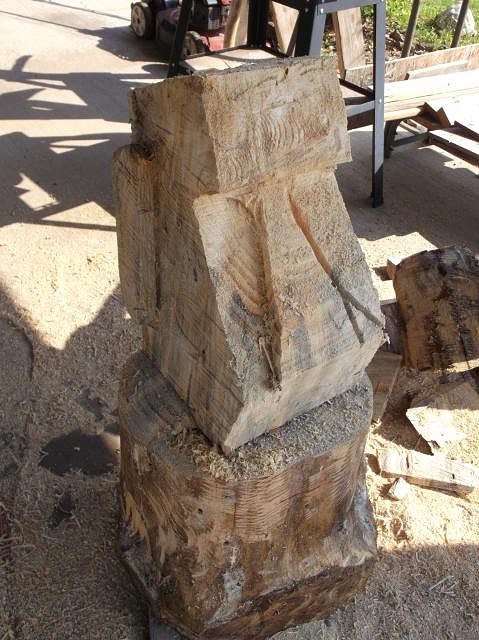
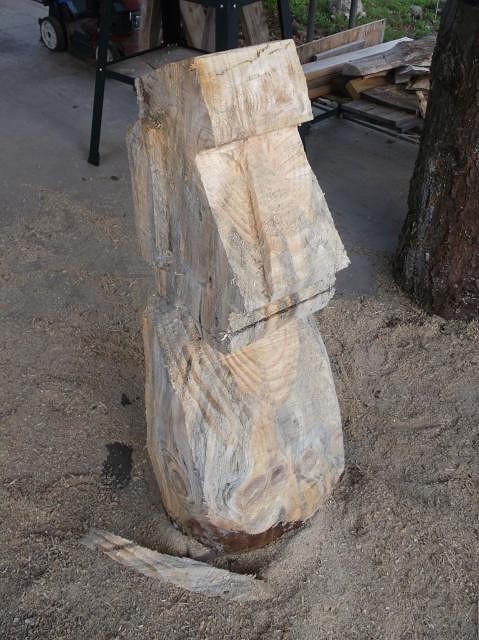
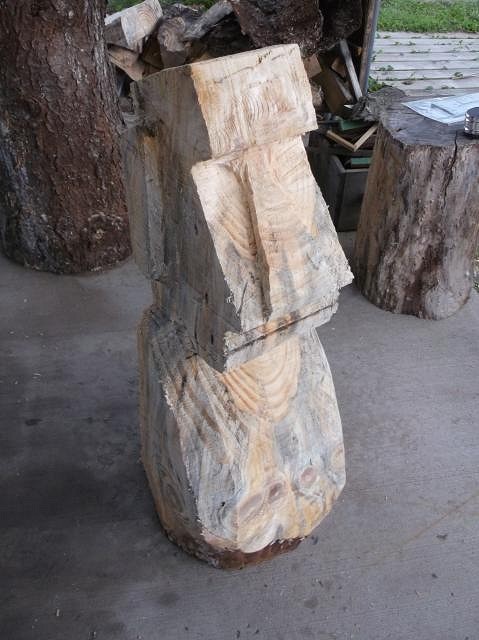
Some new, more experimental carvings - still from pieces of the same Black Locust tree. First attempt at a Moai. Didn't give myself a lot of depth to work with, so the nose is rather flat. There are also several worm holes passing right through the face, which made for some dangerous moments when the chisel hit the loose pockets of powdered wood. Tiki #2: Tiki #3: |
|
BB
Bam Bam
Posted
posted
on
Sat, Dec 17, 2016 11:41 AM
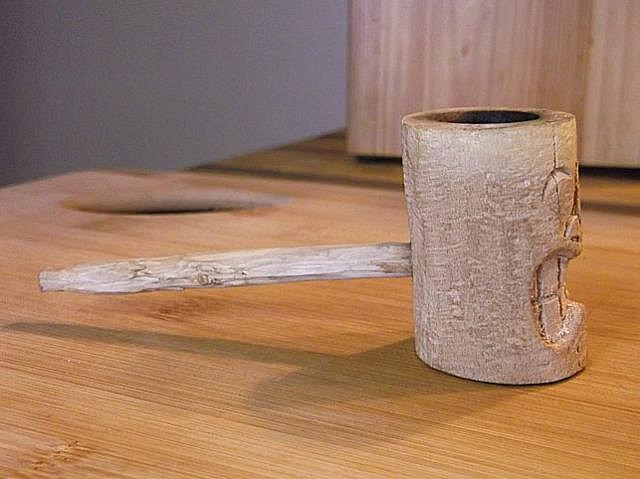
Update: I haven't stopped carving, just stopped taking pictures for a while. Here's the mini-tikis I've made in the interim. Unfortunately I've discovered my remaining stock is infested with woodworm, so I'll have to find something to use other than this Black Locust.
Also made another (smaller) pipe:
|
|
BB
Bam Bam
Posted
posted
on
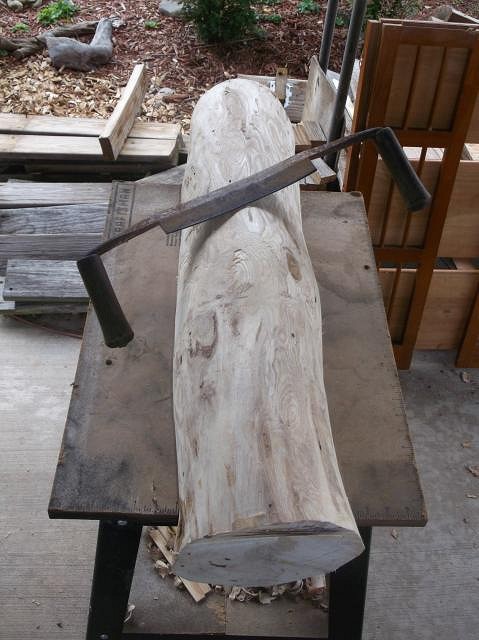
Fri, Jun 23, 2017 9:50 AM
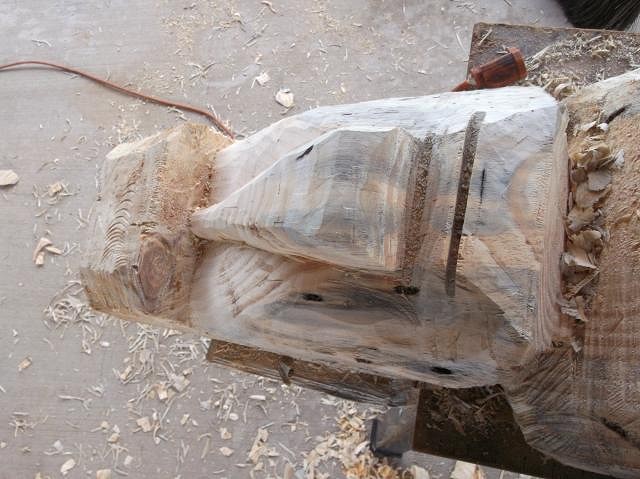
The log has been de-barked. Let's do this.
|
|
WC

Will carve
Posted
posted
on
Fri, Jun 23, 2017 1:43 PM
I would never challenge a guy who |
|
BB
Bam Bam
Posted
posted
on
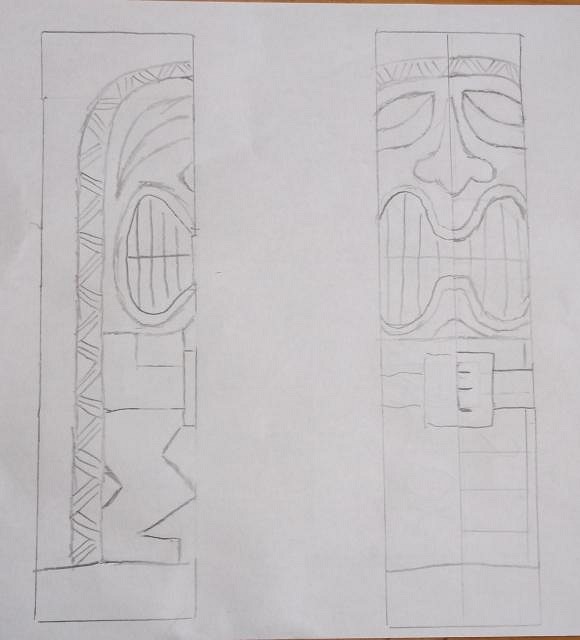
Sat, Jun 24, 2017 2:39 PM
My shoulders are still tight from using the draw knife. I oughta do this more often. Concept art. Hope it's not too ambitious! |
|
T

TheBigT
Posted
posted
on
Tue, Jun 27, 2017 10:33 AM
Ambition is good for a carver. Go for it! :D |
|
BB
Bam Bam
Posted
posted
on
Wed, Jan 3, 2018 4:59 AM
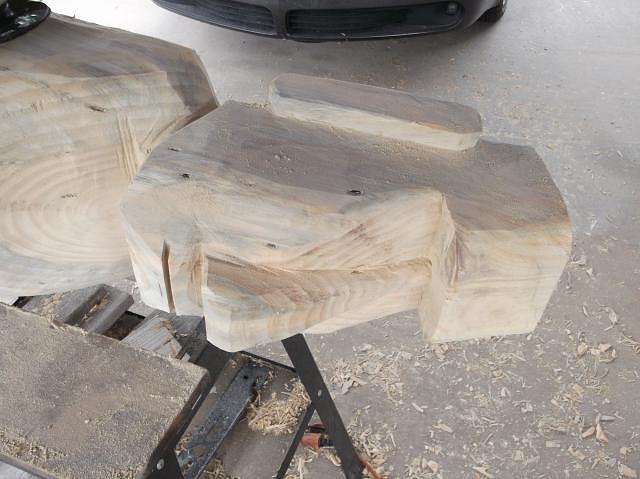
The big guy is in progress, but on hold for the time being. In the mean time, I realized it was far too long since I'd carved anything, so last night I grabbed a chunk of square pine stock and banged out a mini Witco totem. Destined for my desk at work. It'll be interesting to see if anyone recognizes the style.
|
|
T
TheBigT
Posted
posted
on
Wed, Jan 3, 2018 6:07 AM
Well the top face looks like a bosko... |
|
BB
Bam Bam
Posted
posted
on
Wed, Jan 3, 2018 11:31 AM
Yeah, the design of the top head strikes me as out of place with the others especially at this scale, but I'll defer to the original in this case. Had one coworker say it reminds her of the old Kona Kai in Philly, so that's something. |
|
BB
Bam Bam
Posted
posted
on
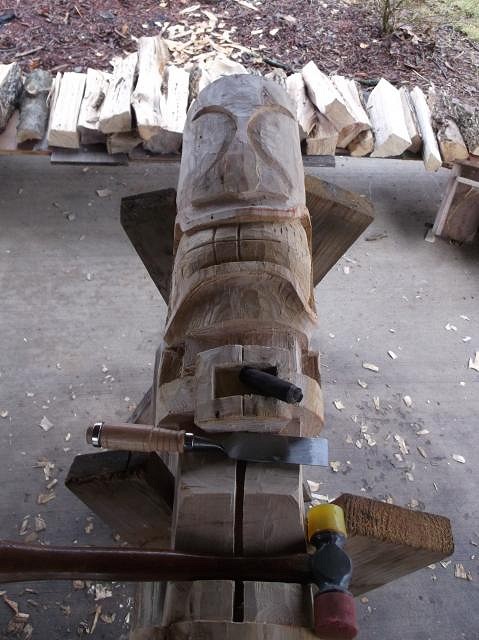
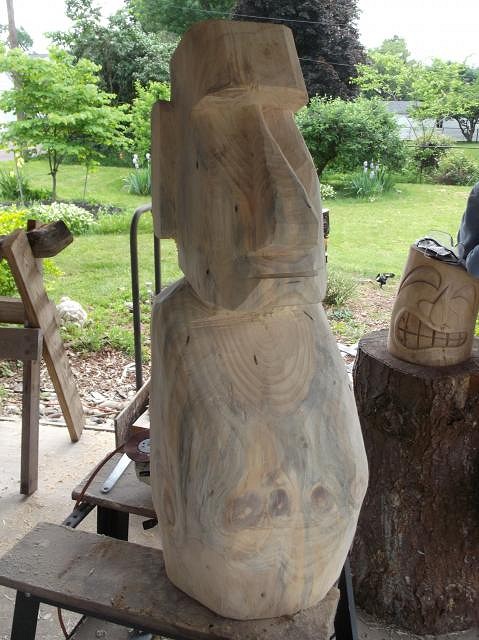
Sat, Feb 24, 2018 2:00 PM
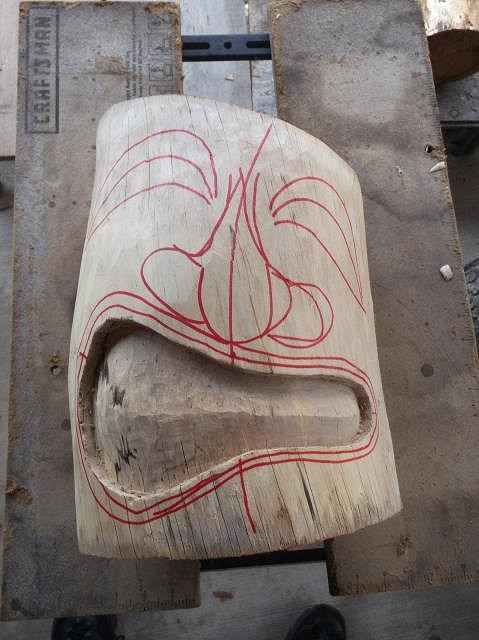
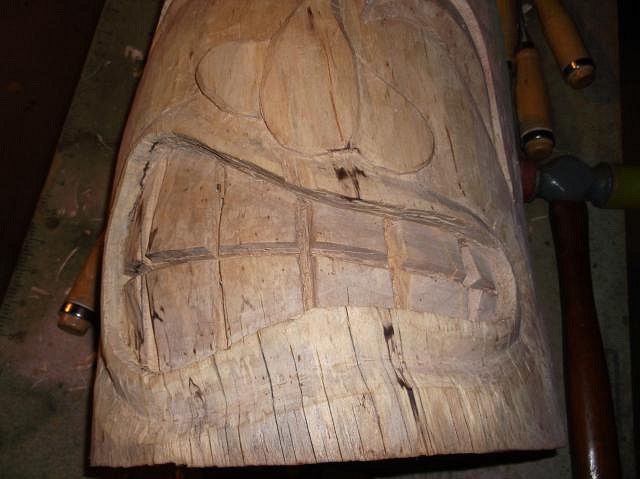
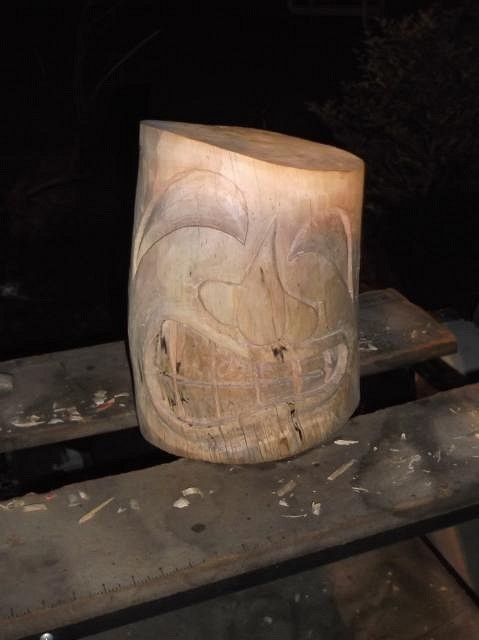
Back in the saddle again, and working on the log. Learned a lot from this, especially that oak doesn't so much like to cut as it does tear. Also that sharp tools make everything about 500% easier.
(Also, not to lay out your design in red sharpie, because that crap has to come off somehow, eventually.) |
|
C

cy
Posted
posted
on
Sun, Feb 25, 2018 2:29 PM
Your newer work is looking great, keep using the red marker, you can see it and is quickly erased with an angle grinder. |
|
BB
Bam Bam
Posted
posted
on
Sun, Feb 25, 2018 3:07 PM
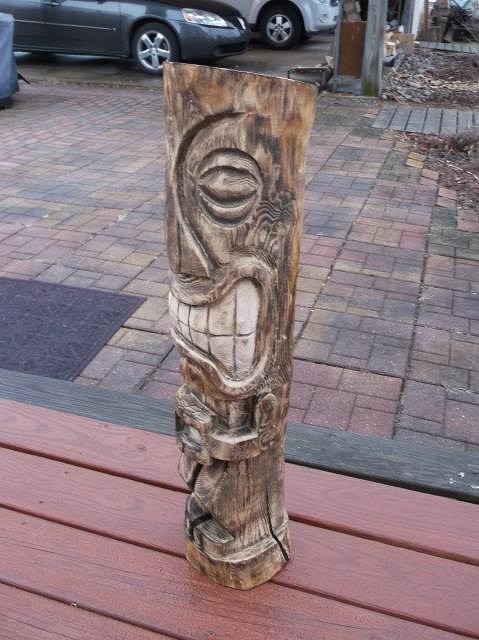
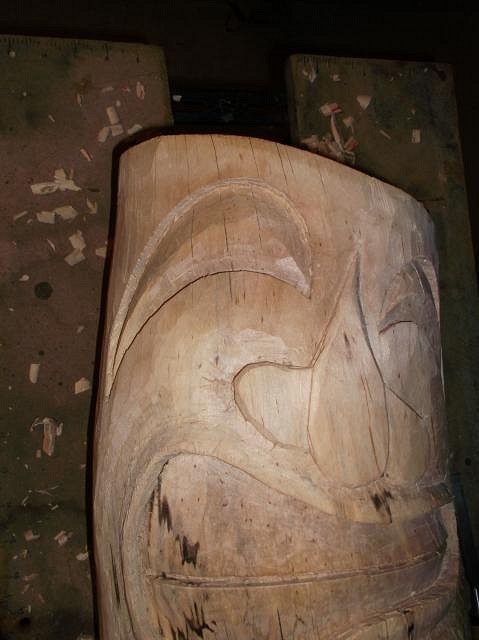
Thanks, cy, that means a lot. Before and after torching and brushing. Thinking of giving it a nice, dark stain and seal. Then it should be ready for the garden.
|
|
WC
Will carve
Posted
posted
on
Mon, Feb 26, 2018 9:15 AM
Good job. [ Edited by: Will carve 2018-02-26 09:19 ] [ Edited by: Will carve 2018-02-26 09:21 ] |
|
H
hiltiki
Posted
posted
on
Mon, Feb 26, 2018 9:19 AM
Nice work, looking forward to seeing the final project. |
|
BB
Bam Bam
Posted
posted
on
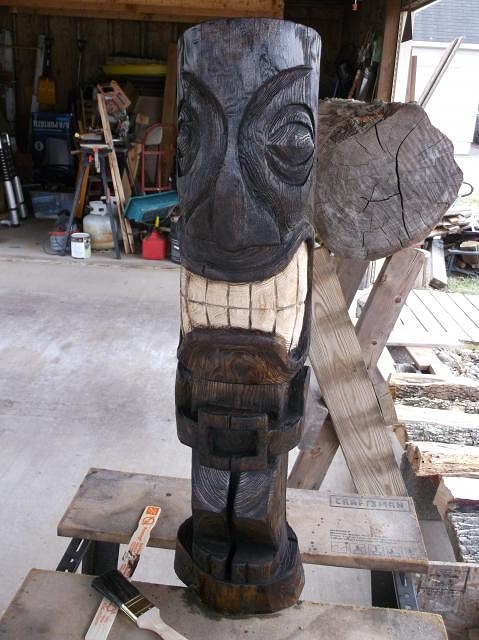
Thu, Mar 1, 2018 10:15 AM
And stained. It turned out a couple shades darker than what I was expecting, but I'm still happy with it. Did get some stain wicking its way up into the teeth. Live and learn.
|
|
BB
Bam Bam
Posted
posted
on
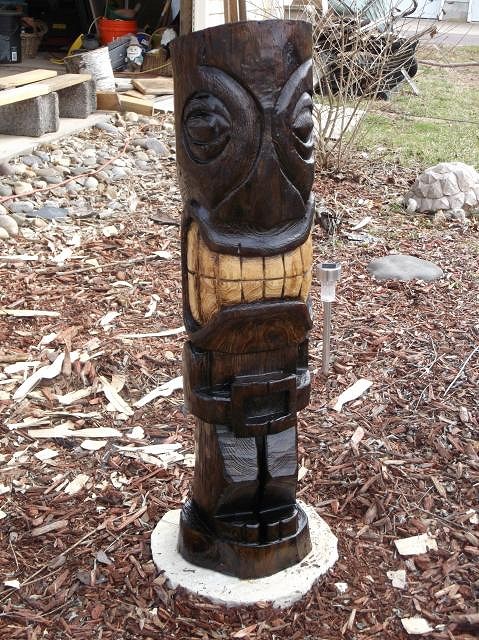
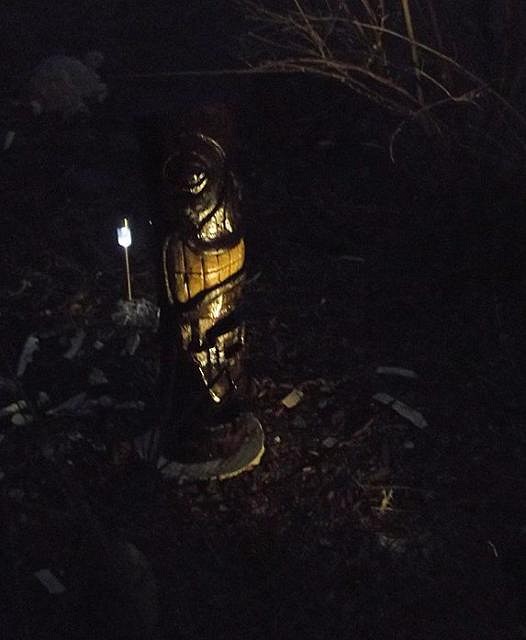
Tue, Mar 6, 2018 9:12 PM
Three coats of poly later, it's in place in the garden: Gratuitous nighttime shot: (lighting by a convenient and relatively inexpensive solar-charged spotlight) Now to move on to the next one! |
|
H

hang10tiki
Posted
posted
on
Wed, Mar 7, 2018 10:17 AM
KOol |
|
BB
Bam Bam
Posted
posted
on
Tue, May 15, 2018 10:03 AM
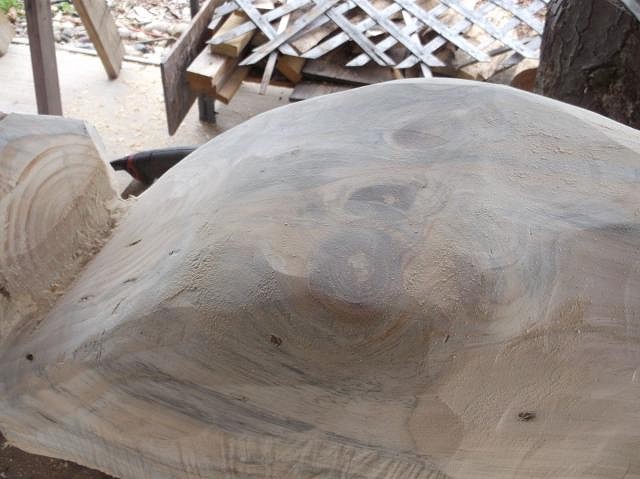
New log in progress. Spalted Birch - excited to see what kind of patterns this winds up with.
|
|
C
cy
Posted
posted
on
Tue, May 15, 2018 3:13 PM
You fit the design with the shape of the wood nicely BB |
|
BB
Bam Bam
Posted
posted
on
Fri, May 18, 2018 9:04 PM
Thanks Cy, I kinda just let the log speak to me. I briefly considered lopping off the top to make it flat, but that would be rather boring. Last piece I was fussing about symmetry - not with this one. Got really into the process last couple nights and forgot to get more progress pics.
And the left eye...
Teeth!
Lost a little piece of the upper lip once the outer layers started drying out and cracking. Tomorrow I go to Harbor Freight to see what they have in the way of a grinder and some sanding pads. |
|
H
hang10tiki
Posted
posted
on
Sat, May 19, 2018 9:24 AM
I like that smile Cheers |
|
BB
Bam Bam
Posted
posted
on
Sat, May 26, 2018 4:11 PM
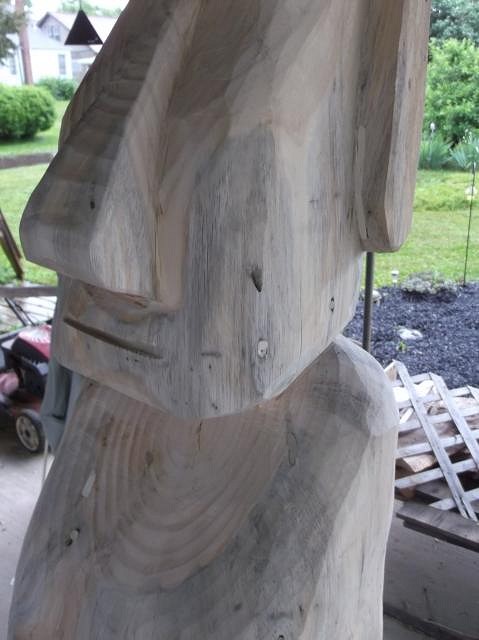
Thanks, hang10! Miraculously, I found the missing chip from the upper lip. Now that it's glued back into place I can think about finishes. Considering something light, to show off the black/blue colors in the wood. In the mean time, it's time to attack these two pieces of white pine that have been sitting idle since the tree was removed a couple years ago. I'm fighting against the forces of nature, too, since the dang carpenter bees have started boring into them!
First time roughing out shapes with the chainsaw. Surprisingly tough going. This stock chain / electric saw combo does not lend itself to cutting big swaths of log.
Memorial Day Moai.
Next up - the grinder! |
|
H
hang10tiki
Posted
posted
on
Sat, May 26, 2018 5:16 PM
Chainsaw |
|
BB
Bam Bam
Posted
posted
on
Mon, May 28, 2018 12:42 PM
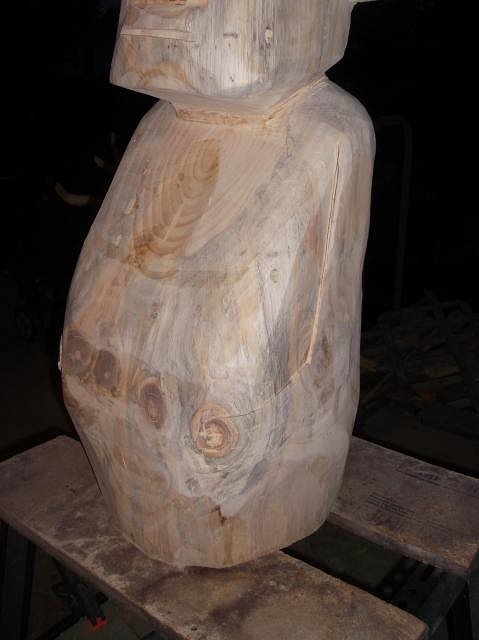
Refined the face a bit more with the saw and chisel before attacking the chainsaw marks with the grinder.
He cleans up nice. Except now you can really see the bee-holes.
|
|
H
hang10tiki
Posted
posted
on
Mon, May 28, 2018 12:51 PM
I dig the bee holes |
|
BB
Bam Bam
Posted
posted
on
Tue, May 29, 2018 1:04 PM
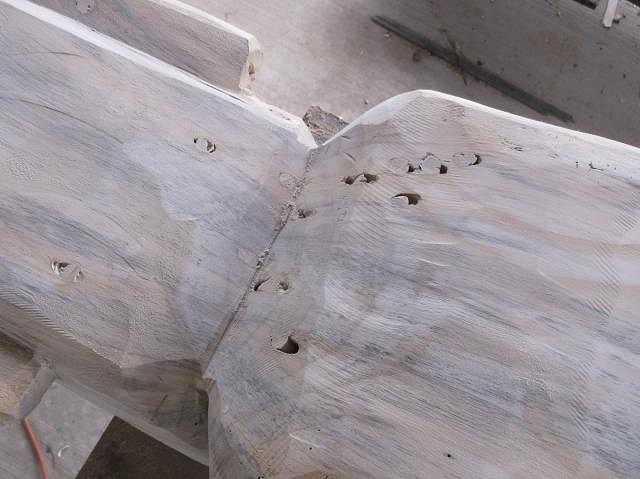
Augh! More holes keep appearing, and after catching one of the bugs in the act, it turns out it's not the wood bees but is instead a colony of Old House Borer Beetles that have probably been living in the log since it was cut 2 years ago, and are just now emerging in the hot weather. I guess now all I can do is wait until they're finished. |
|
H

Heath
Posted
posted
on
Tue, May 29, 2018 2:14 PM
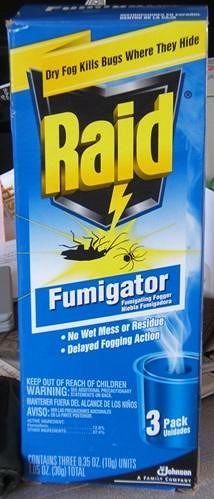
I had a problem similar to that and this is what I used. I got it at Home Depot in the pesticide area. Basically I just made a mini fumigation chamber. If the infestation is really bad, you may need to do two treatments. Cheers, |
|
BB
Bam Bam
Posted
posted
on
Tue, May 29, 2018 4:24 PM
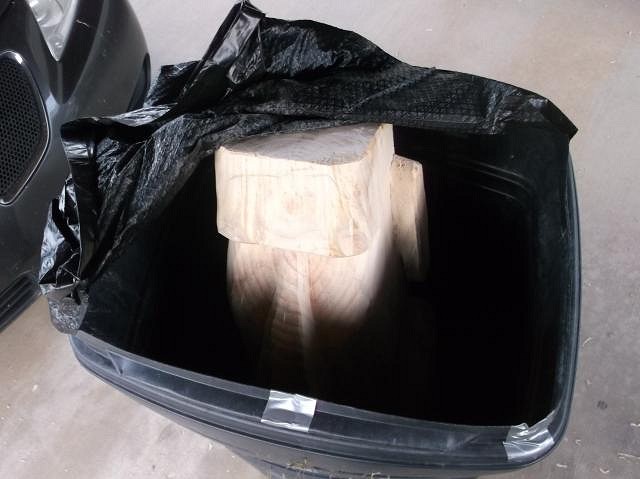
A capital idea, and I happen to have a spare trash can. Thank you! [ Edited by: Bam Bam 2018-05-29 16:26 ] |
|
T
TheBigT
Posted
posted
on
Sat, Jun 2, 2018 8:41 AM
Man, Im digging that moai. I hope there is some wood left when you're done killing bees. Hopefully it's bees and not borers. If it's borers, the spray may not kill them all and you could have adult beetles coming out months from now. Nice work though! |
|
BB
Bam Bam
Posted
posted
on
Sun, Jun 3, 2018 7:15 PM
Thank you, BigT, and yeah, that's my concern too. This was always going to be an outdoor piece, so if they're in there, at least they won't be emerging indoors. Tried the fumigation chamber with the garbage can. Left it sit for a solid 24 hours before checking on it. Didn't find any dead beetles afterward, but hopefully the fog permeated the wood enough that it will discourage them from eating to the surface if any grubs are still alive.
Spent some time filling the exit holes with dowels and glue. not the prettiest, but at least the damage won't be so obvious.
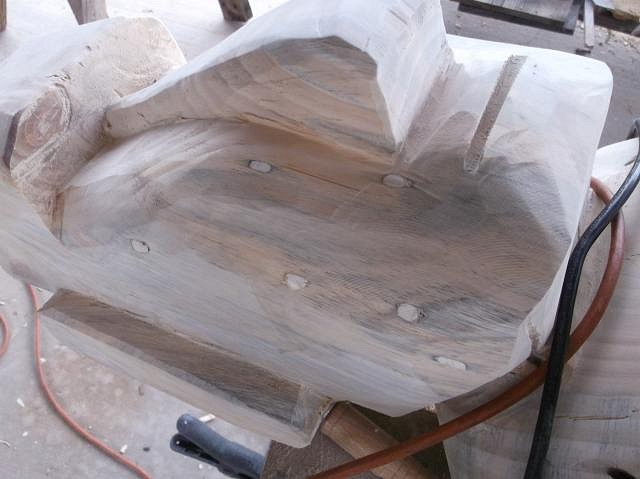
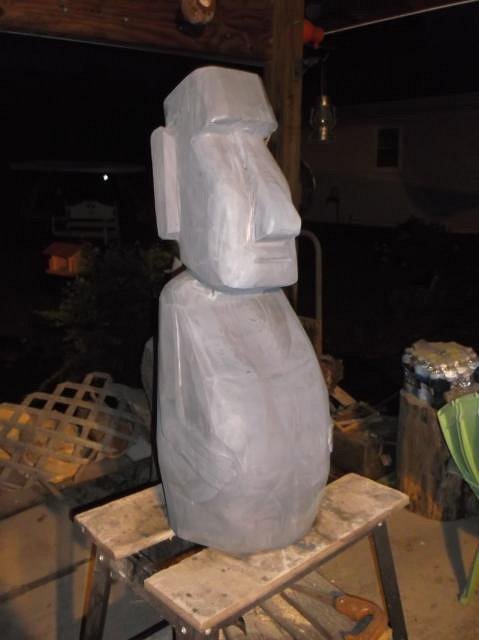
Arm and chest definition. Tried using the grinder for most of the work, with middling results. Need more practice with it. Also should probably get one of those router speed controls.
Finally time to stain - gray, of course! Wondering if I should do a wash with some dark stain to help define the edges a bit.
Next comes several coats of poly, and a prayer that all the damn beetles are truly dead and/or gone. |
|
T
TheBigT
Posted
posted
on
Mon, Jun 4, 2018 6:20 AM
It might be worth spending some time digging out the arms a little bit. Then wont have to use any shading. |
|
BB
Bam Bam
Posted
posted
on
Mon, Jun 4, 2018 8:18 AM
I think you're right. Besides, in the light of day I'm not happy with how the grey stain took to the surface. I was hoping it would make the wood look sun bleached and rain weathered, but instead it just looks smeared in some spots and too thick in others. |
|
T
TheBigT
Posted
posted
on
Mon, Jun 4, 2018 12:14 PM
Minwax has a Weathered Oak color that you may be interested in. As for blotching, you could try pre-stain conditioner. Although I never have much luck with that. Possibly because woodcarving exposes grain in many directions. I stained a Maple bookcase last year, used pre-stain conditioner and STILL had blotching. Alternatively try sanding sealer (which i think is really washed out shellac). My approach on the blotching would be several layers of different color stains. You can even do a clear shellac in between stain colors. You'll have to wait for successive stains to dry, as they won't absorb into the wood. |
|
H
hang10tiki
Posted
posted
on
Mon, Jun 4, 2018 12:35 PM
I liked all the holes |
|
BB
Bam Bam
Posted
posted
on
Mon, Jun 4, 2018 6:53 PM
Ha! I could have topped him with a fedora and called him Moai Greene. Got nice and deep on the arms with the ol' chisel, and while I was in there decided to re-work the hands.
Now he looks a lot less like a Weeble.
I think since he's already mostly covered in primer grey, I'm going to try for a faux stone finish. Stay tuned. |
|
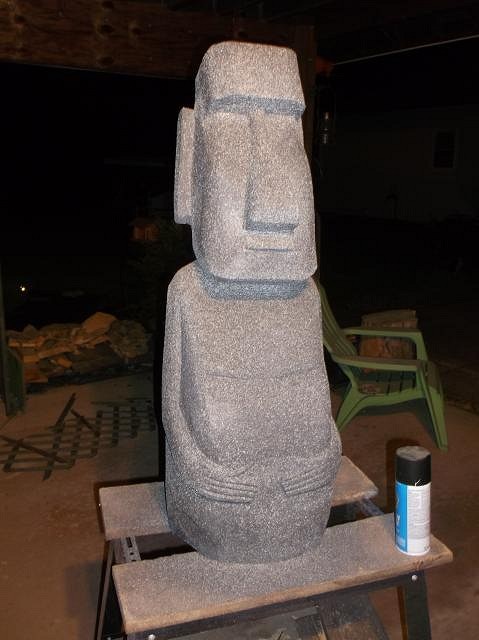
BB
Bam Bam
Posted
posted
on
Tue, Jun 5, 2018 8:35 PM
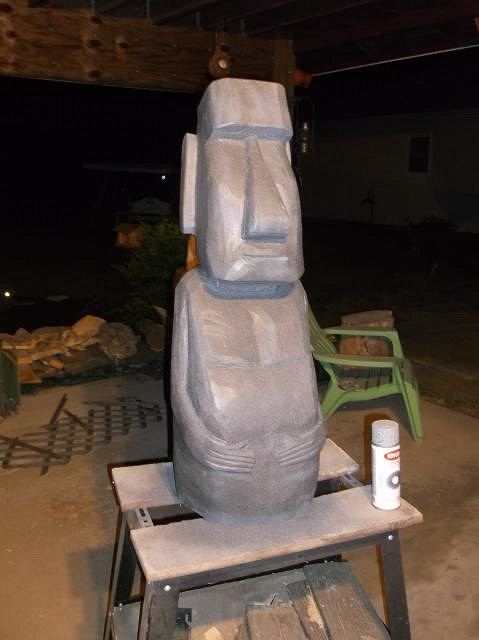
I was never very in love with the knotty grain, and since I ended up filling so much damage, stone it shall be! Primer.
Krylon Graphite
Krylon Black Granite
And some light touches with some basic satin black to tone down the bright, white flecks.
A couple coats of poly and with any luck it should look a bit like polished stone. |
|
H

Hamo
Posted
posted
on
Tue, Jun 5, 2018 10:06 PM
Looks great, and good idea to do deeper carving on the arms. |


