Tiki Central / Other Crafts
Joe vs the Volcano Inspired Hula Lamp - UPDATED!
Pages: 1 26 replies
|
A

absolute60
Posted
posted
on
Wed, May 31, 2017 8:50 AM
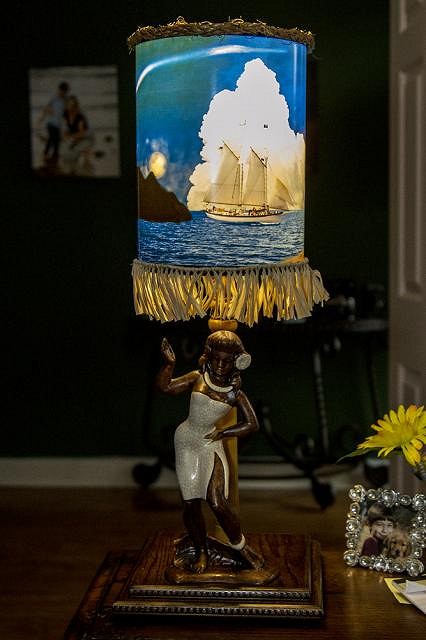
*As requested, I added a full 'how-to' on creating your own Joe vs the Volcano replica, complete with materials and photos :) Hi folks - I've been a long time lurker (15 years or so) and usually don't post much at all, but thought I'd share this little project of mine. One of my favorite movies is Joe vs the Volcano. In the movie there was this fantastic hula lamp that I had always wanted and had hoped that someone or a company would make as a prop replica. Well, fast forward many years, nobody had done so. So, I decided to take the journey of making my own. It took me months to source all of the parts and materials, but I finally finished the lamp a few months ago. Here's the end result:
The lamp shade doesn't turn like the movie version, but I installed a little music box in the base that plays Blue Hawaii. If anyones interested, I can post steps on how I made the lamp. -Davey [ Edited by: absolute60 2017-05-31 15:38 ] |
|
D

danlovestikis
Posted
posted
on
Wed, May 31, 2017 8:55 AM
Not only should you post how you made the lamp you should continue on with more tiki projects and share them here. We are so happy to have new people jump in. Thank you for sharing. Wendy |
|
JB

Jeff Bannow
Posted
posted
on
Wed, May 31, 2017 9:24 AM
Please post how you made it! |
|
C

CosmoReverb
Posted
posted
on
Wed, May 31, 2017 9:56 AM
Very nice. I saw a build thread for a "Joe" lamp on the Replica Props Forum a couple of years ago and have been intrigued with making one myself since them. Yours is super cool!! |
|
M

MadDogMike
Posted
posted
on
Wed, May 31, 2017 10:33 AM
Looks great! I'm all for a step by step. Even if no one else wants to make a Joe vs The Volcano lamp, some technique you used may spark inspiration for another project. |
|
A
absolute60
Posted
posted
on
Wed, May 31, 2017 12:25 PM
Thanks, guys! I'll put together a how-to of the build process. Cosmo, I actually posted the last lamp build on RPF :). |
|
PP

Prikli Pear
Posted
posted
on
Wed, May 31, 2017 1:40 PM
My wife SERIOUSLY loves that movie. Post your build pics. Or post that lamp for sale--either will work! :wink: [ Edited by: Prikli Pear 2017-05-31 13:40 ] |
|
A
absolute60
Posted
posted
on
Wed, May 31, 2017 2:56 PM
Okay, so here's the build process for this lamp. I'll start with the materials first. You crafty folks may already have much of this :) Materials: Lamp shade maker ($35): http://www.zazzle.com/diy_design_your_own_with_photo_and_or_text_d02_lamp_shade-256520145044808830 Hula Girl ($20-$60): 1950’s Treasure Craft figurine: ebay Hema Table Lamp from Ikea ($7): http://www.ikea.com/us/en/catalog/products/80149511/ Grass skirt fringe for base of shade ($25): https://www.amazon.com/gp/product/B000RHLLS6/ref=oh_aui_search_detailpage?ie=UTF8&psc=1 Hemp rope for shade liner ($10): https://www.amazon.com/gp/product/B00UO1LX42/ref=oh_aui_search_detailpage?ie=UTF8&psc=1 Reuge music box movement ($5-15): ebay Plywood base, top portion, 6”x6” ($10-$20 sheet) Pine wood base, bottom portion, (7”x7”): Hobby Lobby $4 Decorative wood trim ($10): Hobby Lobby Wood glue $6: Elmers from Amazon did the trick - https://www.amazon.com/Elmers-E7010-Carpenters-Interior-Ounces/dp/B0045PTHH8/ref=sr_1_5?s=hardware&ie=UTF8&qid=1496268533&sr=1-5&keywords=wood+glue Dark wood stain, your choice.... Bonding glue $6: https://www.amazon.com/E6000-237032-Craft-Adhesive-Clear/dp/B004BPHQWU/ref=sr_1_14?ie=UTF8&qid=1496268499&sr=8-14&keywords=bonding+glue Crafting glue gun with glue sticks, kit ($16): https://www.amazon.com/MELTOX-8-Inch-Adjustable-Temperature-Retractable/dp/B0197SVPWC/ref=sr_1_2?s=hi&ie=UTF8&qid=1496268603&sr=1-2-spons&keywords=glue+gun&psc=1 Poly coat for the wood finish ($9): https://www.amazon.com/Minwax-63000-Drying-Polyurethane-Clear/dp/B000C010J8/ref=pd_sim_60_2?_encoding=UTF8&pd_rd_i=B000C010J8&pd_rd_r=BTEQ3V2AF8BACBGK2YXW&pd_rd_w=HdWLx&pd_rd_wg=Pld8k&psc=1&refRID=BTEQ3V2AF8BACBGK2YXW Painters tape $3: https://www.amazon.com/3M-ScotchBlue-Painters-Tape-Multi-Surfaces/dp/B00004Z4BB/ref=sr_1_13?s=hi&ie=UTF8&qid=1496269401&sr=1-13&keywords=painters%2Btape&th=1
[ Edited by: absolute60 2017-05-31 15:42 ] |
|
A
absolute60
Posted
posted
on
Wed, May 31, 2017 3:02 PM
Build process: -I knew it would be too difficult to try and make the shade rotate and create the shimmer effect, so I opted to only add music. I purchased a German music box on ebay for about $15 and I think it's pretty neat. Anyway, here's the project steps. Created the base using two cuts of plywood for the top and a precut square base I picked up from the local hobby store. I glued the wood together and let is set for 24 hours using large clamps. Feel free to use what you have, heavy books, weights, etc. Then screwed in everything from the base after it dried. For the screws, I drilled a pilot hole first for each corner, 4 total. From the top of the base, I used a 1" spade drill bit and driledl a hole exactly in the center of the wood base, all the way through. This will allow the lamp pole to run through the center of the wood base. Be sure to use painters tape over the area you will be drilling through so that the wood does not splinter upon entry. The exit point doesn't matter... I cut out a section inside of the top portion of the base to place the music box inside of. I used a the Dremel for this, and it was sloppy. The cut out hollow space was approx 2"x3" in diameter, and about 1.5"-2" deep. I then took a couple paint sticks that I got free form the hardware store and cut them to size to reverse mount the music box onto. I added some decorative wood trim to cover up open areas. Sanded it down and added cheap dark stain…the stain I used is actually wood touch up oil for wood floors. Use whatever you have :)
-Now that the music box base was done, I needed to cut a half circle to the back of the hula figurine in order to make room for the lamp pole to go through. I applied painters tape to the cutting area, drew the cutout section and cut away with a dremel diamond coated cutting wheel, made for cutting ceramics. Luckily, no cracks! After cutting and sanding, it fit in perfectly. **Be sure to use painters tape (not pictured) over the cut out area. This will help to prevent cracking of the ceramic while cutting.
[ Edited by: absolute60 2017-05-31 15:21 ] [ Edited by: absolute60 2017-05-31 15:22 ] [ Edited by: absolute60 2017-05-31 15:46 ] [ Edited by: absolute60 2017-05-31 15:47 ] |
|
A
absolute60
Posted
posted
on
Wed, May 31, 2017 3:16 PM
-Onto the varnish. I used a spray on gloss varnish for the lamp shade. This is optional, the lamp shade was fairly mat and needed some heavy color pop and shine, just like the one in the movie. I applied 5 coats. The dimples you see flattened out for the most part after drying and it’s one of the things I love most about this lamp. Really finishes off the overall look.
-Added a fast drying poly coat finish to the wood base. Simple one coat, glossy.
-Time to figure out this crappy Ikea lamp assembly I bought from Goodwill. It's a crappy lamp and cheap and was difficult to work with. With some finagling, I was able to pull out the one way cable inserts with hobby pliers, and recut them again because I completely tortured the cable. This was almost the most delicate part of the project. I had to remove the bulb housing because it was the only way for me to run it through the wooden base I made. After disassembling and running through the base, I made sure to tie the electricians knot with the wires before final assembly. Be sure to not forget that. Voila, it worked. I used this particular lamp because it was the perfect height, and it mounted wonderfully to the wood base using bonding glue.
|
|
A
absolute60
Posted
posted
on
Wed, May 31, 2017 3:31 PM
-Final assembly The darn lamp shade from the manufacturer DOES NOT fit onto the Ikea threading at the base of the housing. Ikea went with some proprietary size! So...back to the ol' Dremel tool. I used a metal cutting wheel to cut out about 1/5" of metal from the inside of the shades mounting ring. I apologize for not getting any photos of this. Be sure to protect your hands, mouth/nose and eyes. Lots of sparks and fumes. After about 30 minutes of cutting out grinding away at the ring, it was large enough to fit over the shades mounting ring. Hallelujah!!
Now, onto the final touches. Glue. I glued the top part of the flat metal base of the Ikea lamp to the bottom of the wooden base I made. I used a permanent bond glue for this. Easy peasy. I did the same for the hula figurine. The bond takes 24-72 hours to completely dry.
-Now for the last part. The grass skirt fringe for the base of the shade, and the rope knot top for the top of the shade. From the cut piece of the original skirt, measure the length of the fringe from the shade. Cut to size and leave an excess of one or two inches in case you mess up. Same for the hemp rope. All you need for this is craft glue and a glue gun. Easy. Begin glueing the fringe to the are of the shade that has the dark joining seam where the shade is glued together. Glue a fine line of glue to the base ring of the shade and apply the fringing as you go. Do the same for the hemp rope. Sorry, no photos for this one either, but it’s pretty easy. * Be sure to IMMEDIATELY remove any excess glue that is exposed. When it dries, it looks unsightly and is difficult to remove as it has already dried. [ Edited by: absolute60 2017-05-31 15:51 ] |
|
A
absolute60
Posted
posted
on
Wed, May 31, 2017 3:35 PM
After that, the project is complete! After so many months of scouring the internet and thrift stores for the appropriate pieces, I finally have made my very own Joe Vs The Volcano Hula Lamp! I couldn't be happier with how it turned out. I wish the best of luck to all of you on creating your own and please feel free to ask me any questions about this project. -Davey
[ Edited by: absolute60 2017-05-31 15:36 ] |
|
D
danlovestikis
Posted
posted
on
Wed, May 31, 2017 7:12 PM
The amount of time it takes to post makes the effort a gift to those of us who stop to read and view. |
|
M
MadDogMike
Posted
posted
on
Thu, Jun 1, 2017 9:55 AM
Thanks for that step by step, NICE!!! I like that shade maker site, will tuck that away for future reference. |
|
H

hang10tiki
Posted
posted
on
Thu, Jun 1, 2017 3:02 PM
Wow Good job on that 1 |
|
A
absolute60
Posted
posted
on
Fri, Jun 2, 2017 6:17 AM
Thanks for the kind words, guys! |
|
B

bobtiki
Posted
posted
on
Thu, Jul 6, 2017 8:45 AM
Thanks for posting that! Great looking prop replica, and good to know about the custom lampshade possibilities. |
|
PP
Prikli Pear
Posted
posted
on
Sat, Dec 30, 2017 7:56 PM
Thanks to Absolute60's inspiration (and all those handy links) I crafted my own interpretation of the Joe vs. the Volcano hula lamp as a Christmas gift to The Wife. That's her favorite movie of all time. She liked the gift. I never could've done it without all the hard work folks like Absolute60 and Jintosh put into this on their own.
|
|
D
danlovestikis
Posted
posted
on
Sat, Dec 30, 2017 9:04 PM
Prikli Pear you are a wonderful and thoughtful husband. Nicely done. Wendy |
|
A
absolute60
Posted
posted
on
Tue, Feb 6, 2018 6:06 PM
ha! This is fantastic! Glad I could provide some help. Thanks so much for sharing! |
|
A
absolute60
Posted
posted
on
Tue, Feb 6, 2018 6:16 PM
I made another lamp, but with a few more bells and whistles. This one plays music (has a speaker built into the LED bulb) and a bulb that creates a shimmer effect inside of the shade. I had to do a lot more custom work on this one, but this one does everything I had wanted to do in my original build.
Here's some video of it in action! Thanks again guys :) |
|
H
hang10tiki
Posted
posted
on
Tue, Feb 6, 2018 7:31 PM
Awesome Cheers |
|
H

Hamo
Posted
posted
on
Tue, Feb 6, 2018 11:26 PM
This is a great how-to thread. Thanks for the video. I was just wondering whether those speaker lightbulbs would be an effective way to add ambiance to a tiki space. Maybe not music but bird sounds, rainfall, etc. What’s your overall impression of the speaker bulb? |
|
A
absolute60
Posted
posted
on
Wed, Feb 7, 2018 3:18 PM
I actually think the bulb would be perfect for that purpose. The sound carries well from inside of the lampshade at low levels, and exotica music sounded great from it. While I was making the lamp, I had envisioned how nice it would be if it were placed on an unassuming coffee table, playing exotica in the background while the soft colored lights changed from the bulb - would be perfect for get-togethers if that were your theme. |
|
G

grommom
Posted
posted
on
Thu, Jun 11, 2026 9:38 PM
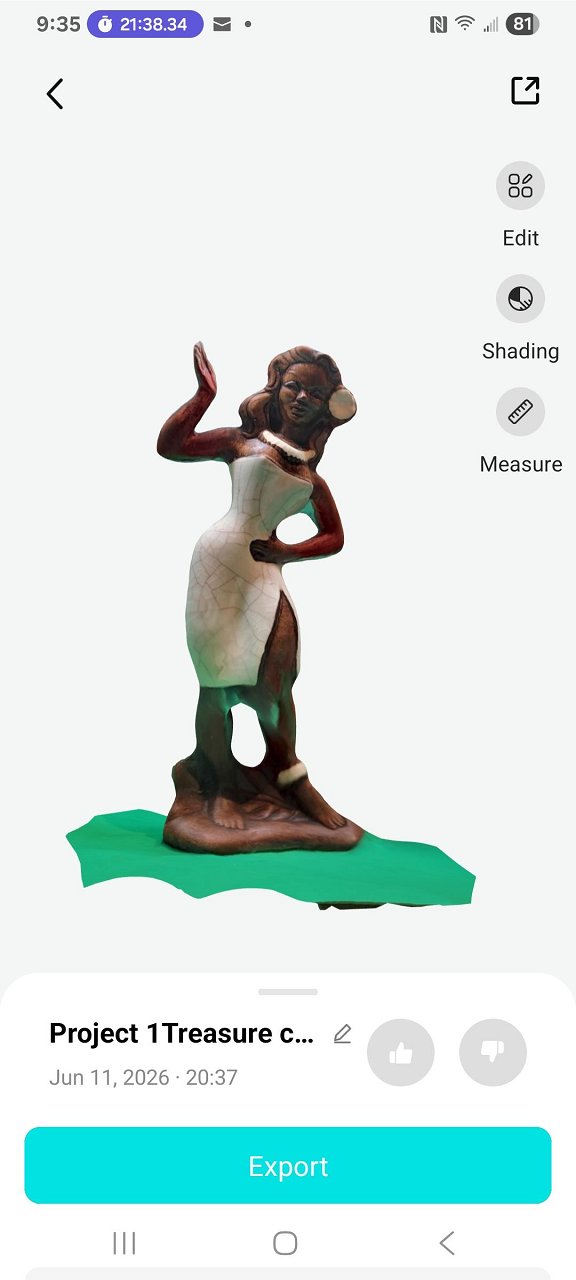
I wanted to thank the OP for this wealth of info on the Joe versus the volcano lamp. It's been a project I've been hoping to do for years. I have the treasure craft statue, but I've always been a little sad about the idea of cutting into it to put it on a lamp stand, so the other day I was thinking, why not scan it and 3d model it? I found this cool software and was able to model it just using my phone. I'm going to try to do a better scan tomorrow on a black background so that I don't have green reflections, but I'm pretty excited to see if this will finally kick start me into making my dream lamp a reality. I know the price of the statues is going up as time goes by, so it would be really cool to be able to make this into a resource for future builders who can't find a statue. |
|
D
danlovestikis
Posted
posted
on
Fri, Jun 12, 2026 10:24 AM
Your lamp is terrific. Best use of the Treasure Craft statue I've ever seen. I hope you make more lamps. |
|
H

Hurricane_ian
Posted
posted
on
Sat, Jun 13, 2026 9:58 AM
in reply to grommom
very nice. have you found some place to do the lamp shade? zazzle told me they cant do it because of copyright. i havent been able to find a place to get one made. i guess i could find a regular shade and have the image printed at a local print shop to make it myself. |


Pages: 1 26 replies