Tiki Central / Home Tiki Bars
Lanai at Windsong
|
T

tikitube
Posted
posted
on
Mon, Aug 7, 2017 9:36 AM
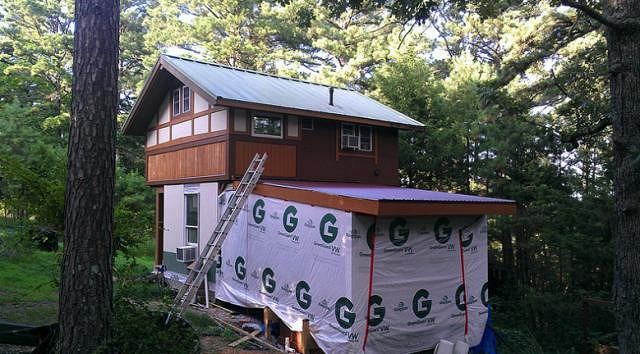
Hello all! I'm finally getting around to starting my very own thread about our tiki room build. I've enjoyed seeing everyone else's projects, and have gotten some excellent ideas and advice reading about your experiences. Thanks for all the inspiration! Our build is a bit different, in that it is a screened-in porch addition to our small, off-grid home. The style of our home is a hybrid of Craftsman, and Japanese, with a touch of Medieval/Tudor half-timbering. We designed it ourselves, and have been building it ourselves for over 6 years now. It's a never ending project! Our home is small - about 500 square feet. We live off-grid, so air conditioning comes at a premium...we have to run the generator. Living in the Ozarks, summers can be brutal. The humidity is high, and it doesn't really cool off at night like in other climates. I detest sweating in bed. Trying to stay cool is challenging...there are only so many layers of clothing you can take off! So, we decided to build a screened-in porch off the side of our home. Not only will it be great for parties and lounging space, but we plan to also sleep in it on those hot summer nights, hopefully catching the breeze. In addition to having enough space for two adults and two teenage kids to sleep, we also wanted to include a small bathroom, and room for a small washer and dryer (we've grown tired of using the laundromat). I also wanted a sunken seating area, with access to an old cistern buried below it, which we plan on outfitting as a storm shelter. We settled on a 12x16 footprint, which is tight, but won't visually overwhelm our small home. The idea of making the addition a tiki styled room didn't occur to me until after we had already designed the floorplan and started the framing, but once it took hold, well you know how it goes! My wife didn't grow up with the same tiki experiences that I did, so she wasn't quite as "gung ho" about it at first. She was worried that the style wouldn't fit with the rest if our home...that the often cluttered "flotsam" look of traditional tiki would just look bad next to the clean lines of our home. So, I promised to do my best not to make it look too dated and/or cluttered. Working together on it, I think we are finding a good balance, while still tying it into the style of our home. I've got photos of work that we've already done, and hope to continue to post progress pix as I find the time. Your feedback, and words of encouragement are always appreciated! Mahalo!
|
|
T
tikitube
Posted
posted
on
Mon, Aug 7, 2017 9:40 AM
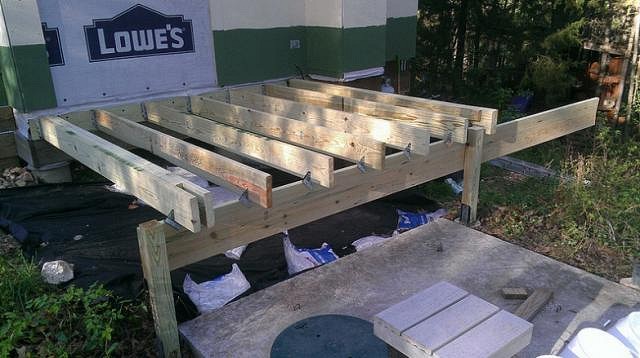
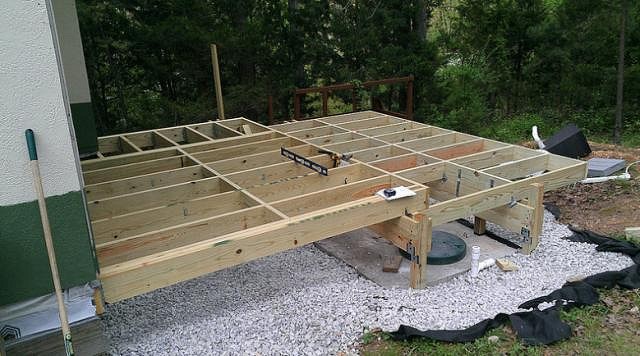
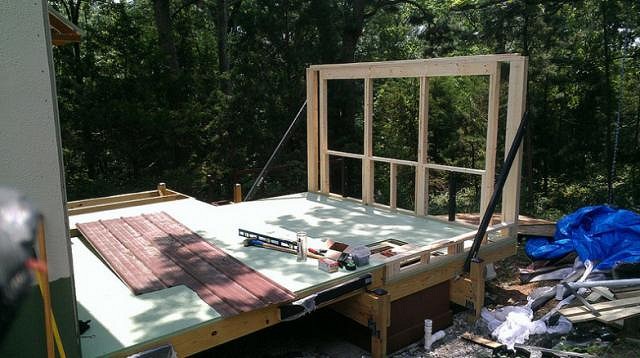
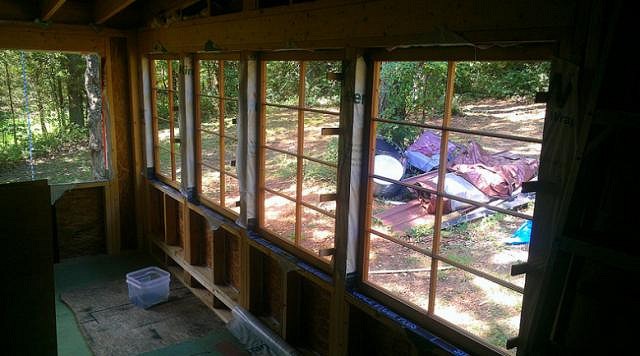
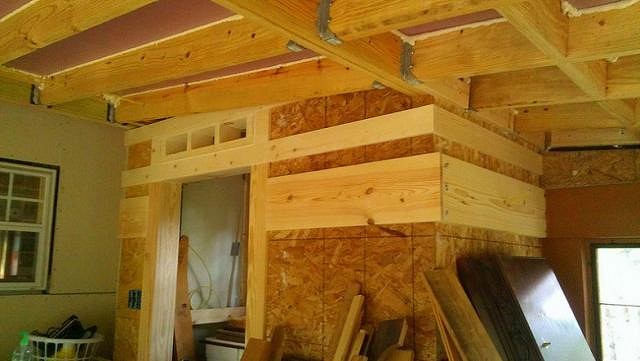
In this photo, you can see the floor framing for our addition.
[ Edited by: tikitube 2017-08-07 09:42 ] [ Edited by: tikitube 2019-07-07 14:02 ] |
|
T
tikitube
Posted
posted
on
Mon, Aug 7, 2017 9:47 AM
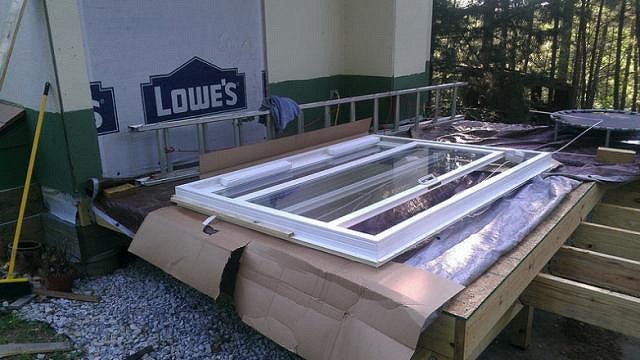
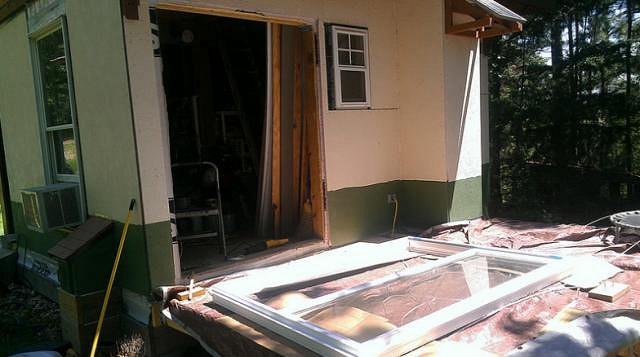
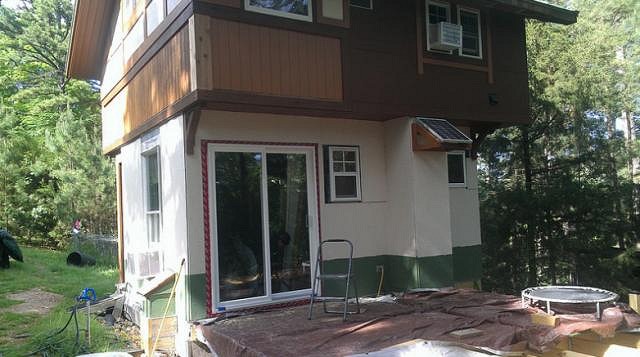
I would have liked to install a nice looking wooden patio door, but we didn't have the funds for it, so a cheap vinyl slider will have to do for now!
[ Edited by: tikitube 2019-07-07 14:04 ] |
|
T
tikitube
Posted
posted
on
Mon, Aug 7, 2017 9:55 AM
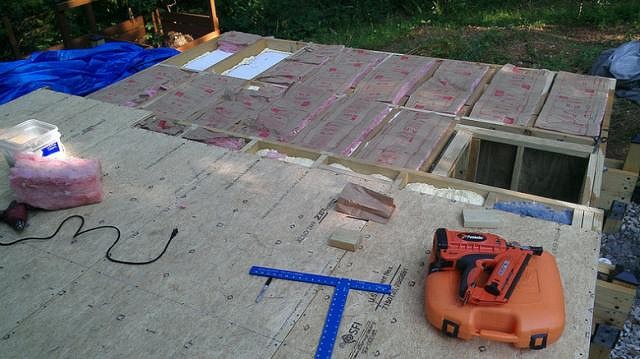
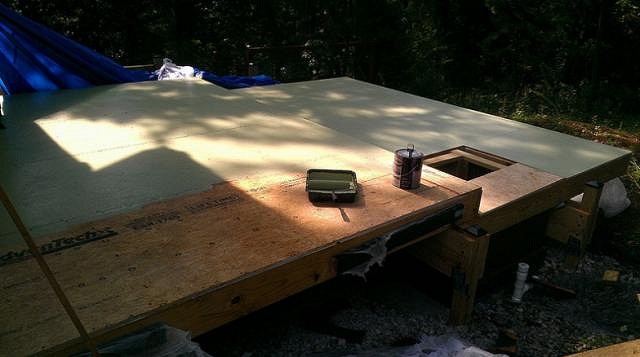
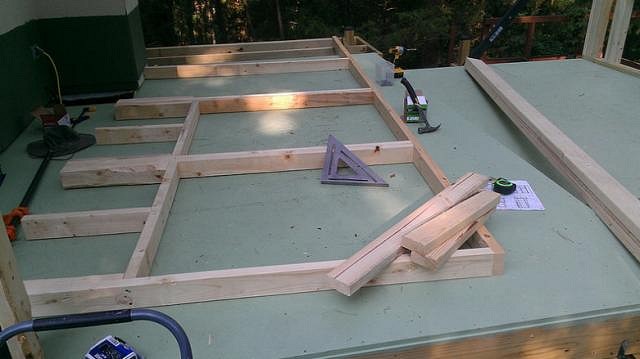
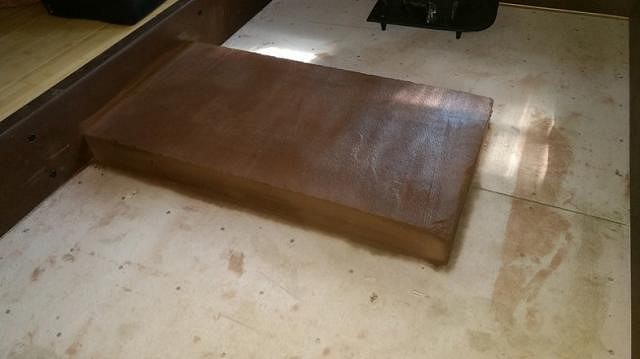
Insulating and installing the subfloor!
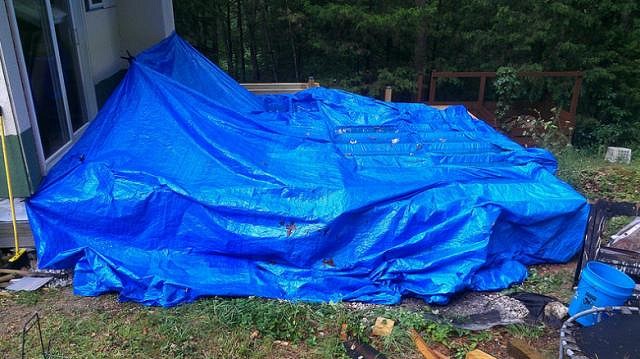
Aaargh!! Rainstorm!!
Although we've had pretty good luck with Advantech subflooring not swelling too bad (except at the seams), we decided to go ahead and give it a couple coats of paint, for additional protection.
[ Edited by: tikitube 2019-07-07 14:06 ] |
|
T
tikitube
Posted
posted
on
Mon, Aug 7, 2017 9:57 AM
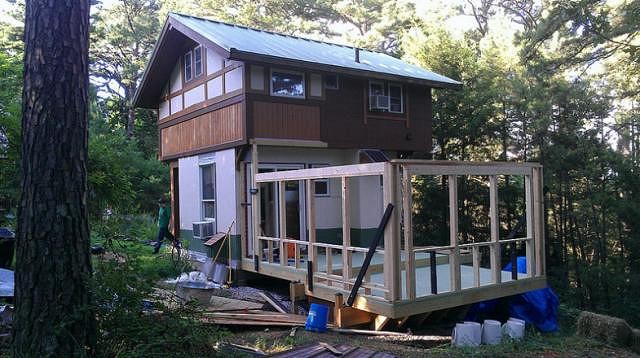
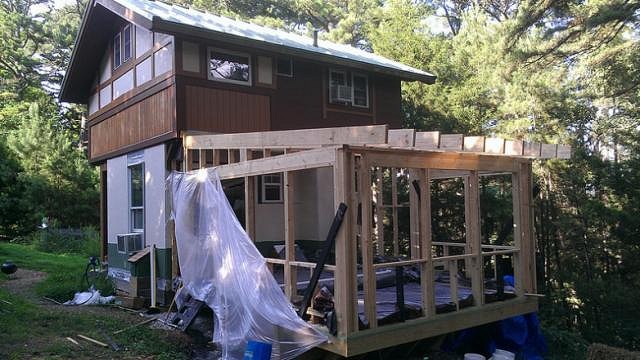
First wall going up!
Framing the next wall...
Tiki addition starting to take shape!
Roof framing:
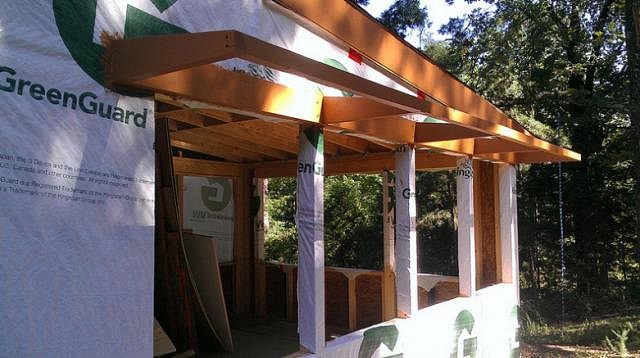
Housewrap and roofing:
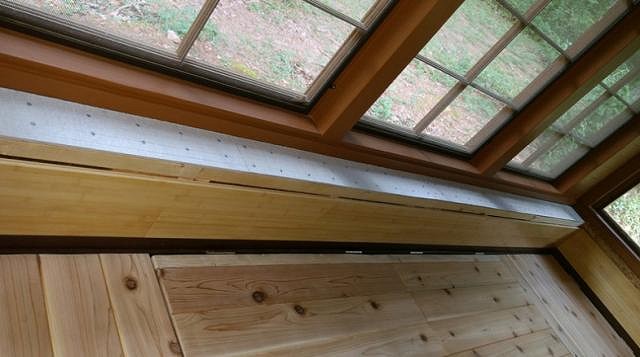
Building awnings over the windows:
I picked up these old window sash frames at my local lumberyard during their "yard sale". No glass, so I thought I would use them as frames for the window screens:
Here's what they look like installed:
Framed and sheathed an area for the bathroom:
Window frames and awnings installed:
Trimming around the windows:
[ Edited by: tikitube 2017-08-07 15:11 ] [ Edited by: tikitube 2019-07-07 14:12 ] |
|
T
tikitube
Posted
posted
on
Mon, Aug 7, 2017 3:24 PM
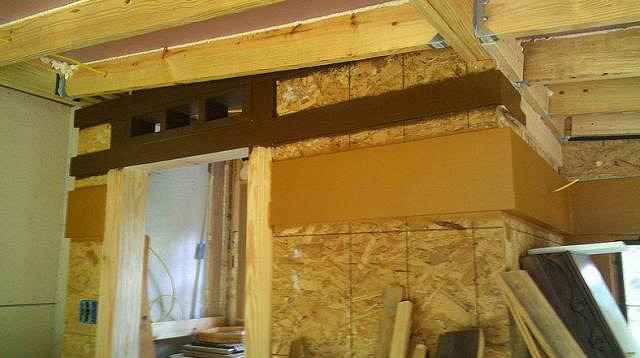
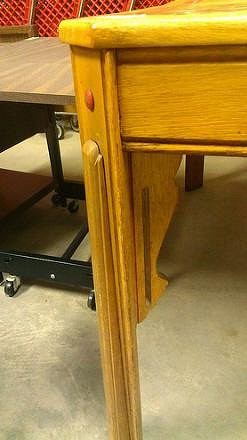
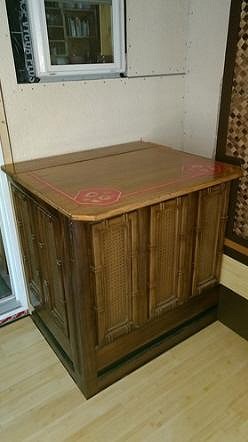
Soooo...a tiki room has gotta have a tiki bar, right? This was something that we hadn't really planned for in our original floorplan design, but once we decided on the tiki theme, I wanted to find a way to include space for a bar. Maybe not a full bar with me behind it, but at least a walk-up bar where guests could serve themselves. Seeing as I also didn't like the idea of the washer and dryer ruining the look of the room, I decided to build a tiki bar around the washing machine. I saw this retro headboard on Craiglist for cheap...it's sorta tiki-ish looking. Maybe I can make it work. First, I cut the legs short to get the correct height. Then I chopped it in half, and added some boards at the base for additional support, and to hide the washer. I painted the backer boards black: And, here it is installed, with the washing machine inside: I will install a bar top lid on hinges and shelving for glassware on the wall behind it! [ Edited by: tikitube 2017-08-07 15:42 ] [ Edited by: tikitube 2019-07-07 14:15 ] |
|
T
tikitube
Posted
posted
on
Mon, Aug 7, 2017 3:37 PM
Earlier I posted a pic of the bathroom. It basically looked like an ugly OSB box: Here we are adding some trim to it:
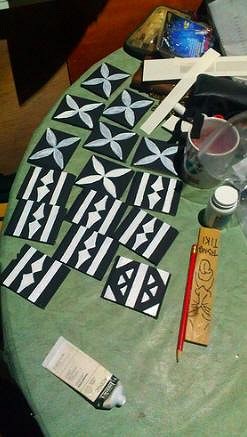
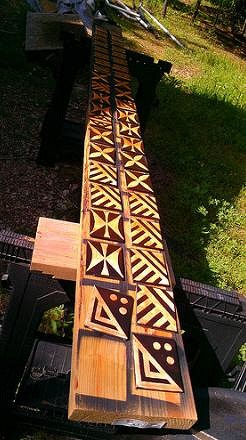
And then for a family project, I had a bunch of cut-off remnants of cedar closet liner...small pieces maybe 4" long. We decided to use these as an accent border around the outside of the bathroom. I recruited my wife and kids to help me paint tapa-like designs on them:
Then I gave them a stain and polyurethane coating: And here they are installed: [ Edited by: tikitube 2019-07-07 14:18 ] |
|
H

HopeChest
Posted
posted
on
Mon, Aug 7, 2017 5:15 PM
This is SO awesome. |
|
T
tikitube
Posted
posted
on
Tue, Aug 8, 2017 11:44 AM
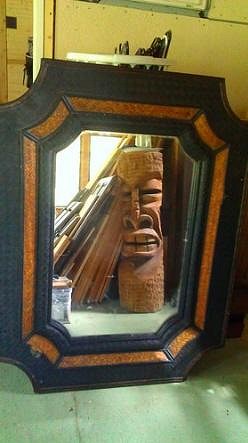
Thanks!! :) Thrilled to find this amazing mirror at Goodwill for only 10 bucks! We will use it in the bathroom, above the vanity. It's got black and tan braided leather and some intricately carved details along the outer edge. It needs a couple of repairs and some touch up paint, but what a killer deal. The woman at the checkout counter actually thanked me for buying it, as she said she was tired of moving it around the store. :wink:
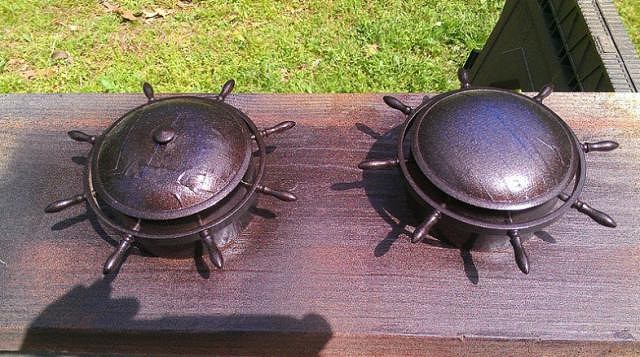
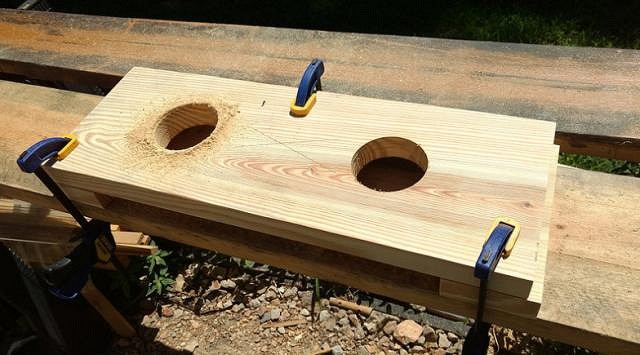
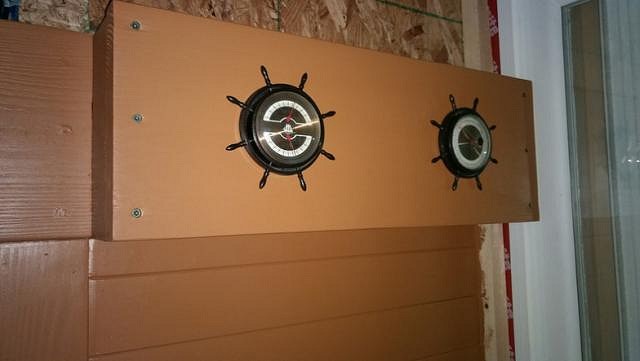
I also picked up these instrument gauges for cheap. I realize they are more "nautical" theme than tiki, but we always like to have a thermometer hanging on the wall, so I figured I would try to incorporate them into the tiki room.
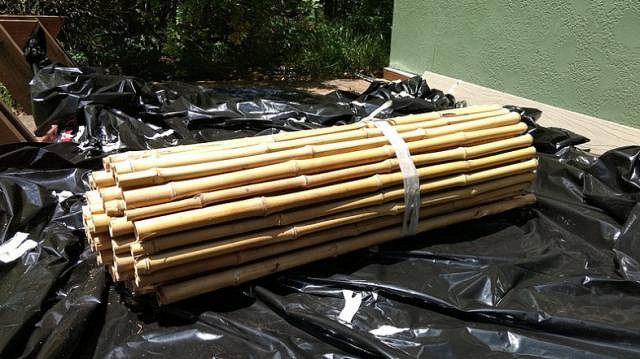
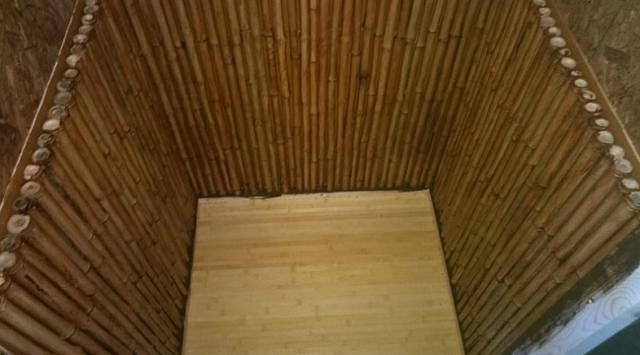
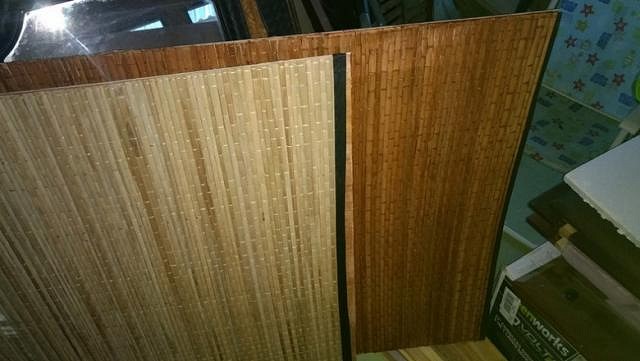
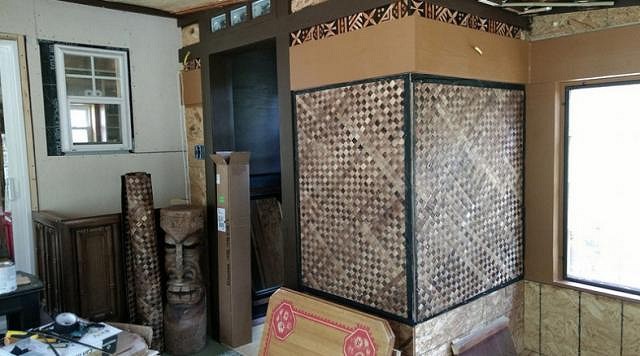
First things first, take them apart, tape them off, and give them a new paint job: Then, build a custom frame for them to sit in: Then I wrapped them in EPDM gasket material, and compression fit them into the holes: Next up, our first roll of bamboo!! This will be used as wainscoting on the lower wall of the bathroom: I didn't like the light tone, so I brushed on some "Polyshades" stain and polyurethane: Then, I built a small ledge for them to sit on, same depth as the bamboo, and installed them: [ Edited by: tikitube 2017-08-08 12:08 ] [ Edited by: tikitube 2019-07-07 14:22 ] |
|
PP

Prikli Pear
Posted
posted
on
Tue, Aug 8, 2017 12:01 PM
Tikitube, I have to say that looks fantastic! The new addition blends well, and looks like a natural extension of your existing home. The detail work is impressive--you got the family to help! That's something I've not quite managed with my build. That headboard is a terrific find, and you've put it to good use. What's more, those window screens look really smart the way you've installed them. If catching the passing breeze is the goal, I can't imagine a layout that'll do a better job. There's a reason pretty much every Southern home for the better part of the past 150 years have screened in porches! |
|
T
tikitube
Posted
posted
on
Tue, Aug 8, 2017 12:15 PM
Hey, thanks so much! That means a lot coming from you, as I was super impressed with your Lagoon build photos! In fact, you did such an awesome job with that trim work that I went out and bought the same exact mini router you showed. I'm going to try my hand at a few carved trim pieces. I also found your bamboo handles and those painted speakers ingenius. Your DIY approach is superkewl and inspiring. :) |
|
PP
Prikli Pear
Posted
posted
on
Tue, Aug 8, 2017 2:52 PM
I was using that little trim router last night, and was reminded how hot it gets. With a cheap trim router like that, you don't want to over-tax it. The key is to make multiple shallow passes so the motor doesn't overwork itself and burn out. And I like to take a break every 5-10 minutes to let it rest a bit. I don't worry about that kind of thing with my big, two-handed Skil router, but then again, it doesn't ever get hot to the touch. I don't expect I'll ever use the trim router much once all my baseboards are done, so I couldn't really justify the expense of investing in a quality tool! :lol: |
|
T
tikitube
Posted
posted
on
Tue, Aug 8, 2017 3:26 PM
Great tip, thanks. I have even turned it on yet. :) What kind of wood were you routing? I'm leaning towards cedar since it is pest/moisture resistant and was thinking that it might be easier on the router since it is so soft. Like you, a have a larger router - a porter cable- but I can't imagine trying to use it for anything super intricate. |
|
PP
Prikli Pear
Posted
posted
on
Wed, Aug 9, 2017 6:58 AM
I initially planned to go with Western red cedar for its decay-resistant properties, but found some nice ponderosa pine boards that were significantly cheaper and had a far nicer finish to them. Since these trim pieces are protected from the elements, for the most part, I went with the pine. That may prove to be a mistake in the long run, but I'm hoping several coats of spar urethane says otherwise. So, yeah, that pine is pretty soft. When the cuts start leaving a shredded edge along the top of the groove (unsightly, but easily sanded away) your router bit is getting dull and needs to be sharpened or replaced. Just FYI. Still not sure what I'll do with the cladding I plan to add to the vertical posts. They're at the edge of the covered area and get a lot of sun exposure and rain splash. Cedar's probably the way to go there, but it'll probably be winter or spring before I get to that stage. |
|
T
tikitube
Posted
posted
on
Wed, Aug 9, 2017 9:30 PM
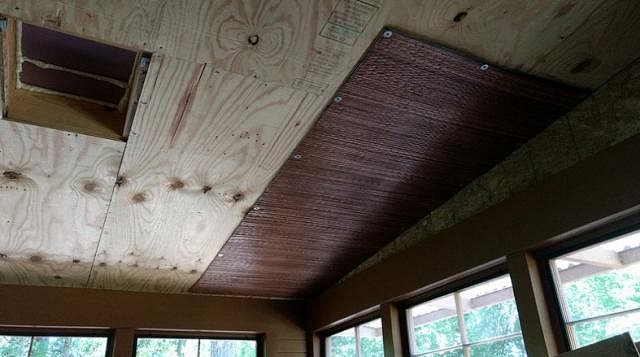
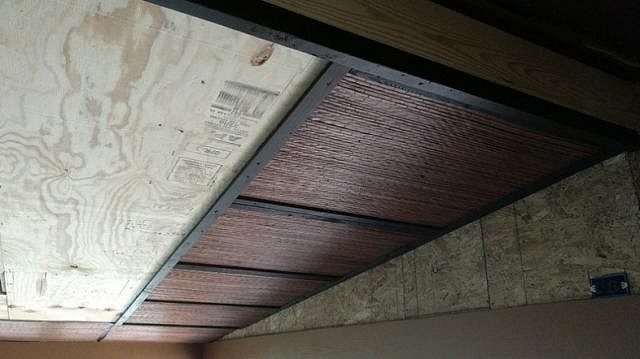
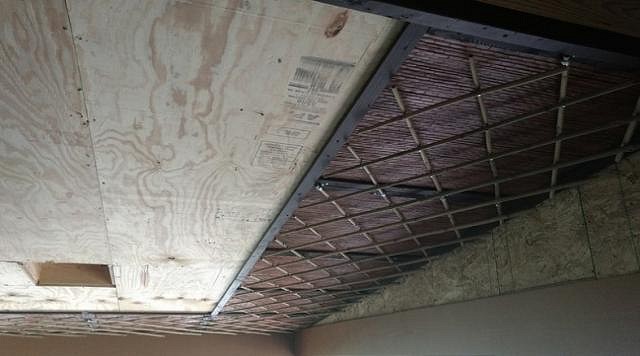
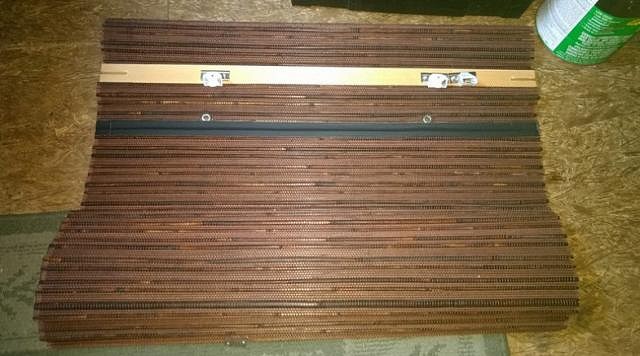
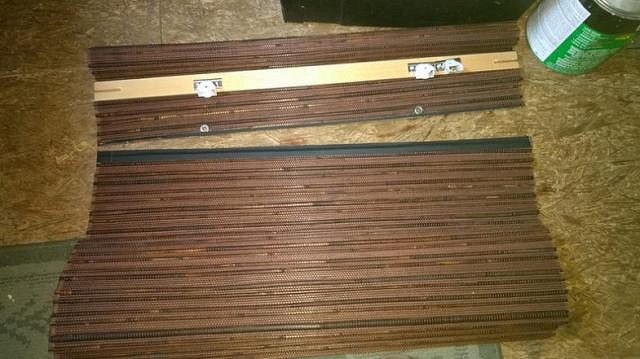
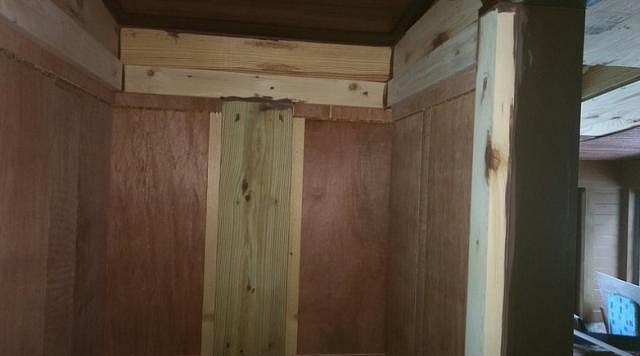
A few more pictures... Since we didn't decide on the tiki theme until we had already framed our addition, I realized too late that I would not have enough height to build the characteristic layered look of traditional tiki ceilings. I suspect that by the time you've got your matting and bamboo cross-members installed, you're dropping your ceiling height by at least 5 or 6 inches. Our ceiling is already low, but I was determined to find a way to add some layering without that much depth. We settled on some lampac matting, which we mounted to thin luan plywood. You can see the white contact cement in this photo: Again, I didn't like the light color of the raw material, so I then darkened it with a rub-on stain. I also sprayed it with some of that expensive fire retardant stuff, just in case:
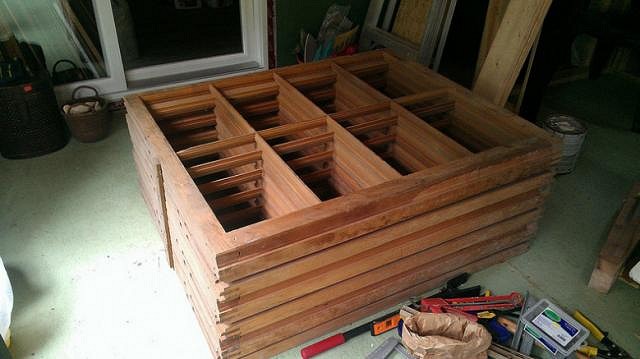
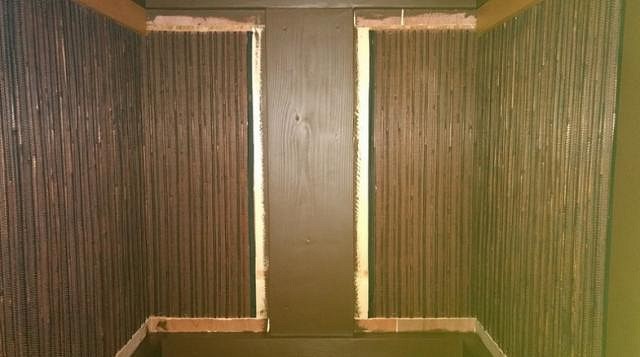
Here is the first sheet installed on the ceiling. I just used deck screws with washers: Then, we added a dark border around it, which also hides the screws: And we installed diagonal bamboo fencing over that: There will be a boxed edge around the bamboo that frames and divides it (visually) into sections. It also hides the metal pipe hangers that hold the bamboo in place, and will give me a recessed edge where I can tuck some LED rope lights. Overall, this drops the ceiling height by only about 2 inches, but still gives us the layered look we were wanting. :) I'm also hoping to try my hand at carving some decorative pieces of trim to accent these boxed ceiling panels. [ Edited by: tikitube 2017-08-09 21:33 ] [ Edited by: tikitube 2019-07-07 14:26 ] |
|
F

Fugu
Posted
posted
on
Thu, Aug 10, 2017 7:56 PM
Everything looks great so far! I really love that ceiling design. Very cool with the fencing over top. |
|
M

MadDogMike
Posted
posted
on
Fri, Aug 11, 2017 11:20 AM
Nice TikiTube! Great start! |
|
T
tikitube
Posted
posted
on
Sat, Aug 12, 2017 8:43 PM
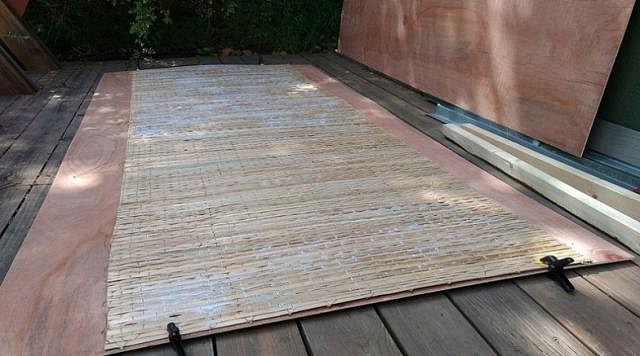
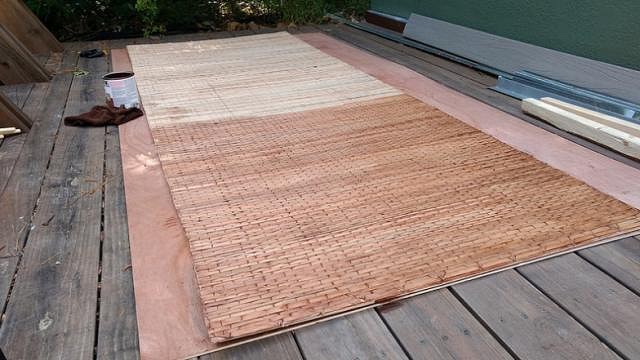
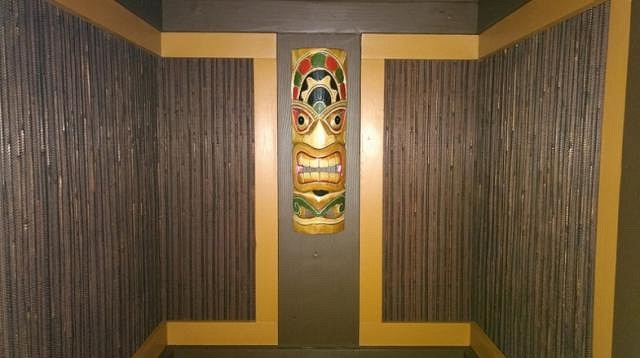
Thanks!! Here are a few more pix... I saw a pair of old bamboo roll down shades at the local thrift store for $6, and decided to give them a new life as wall covering in our tiki bathroom. First, I removed the cord and measured them to fit horizontally across the walls. I applied black gaffer tape where I cut them to keep them from unraveling before I installed them on the wall.
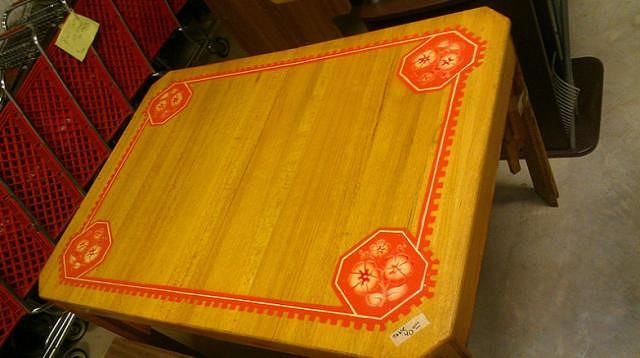
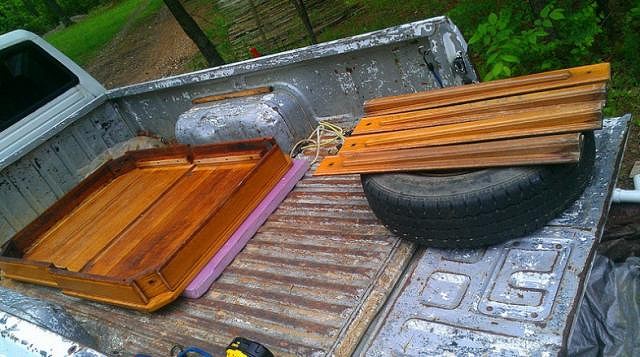
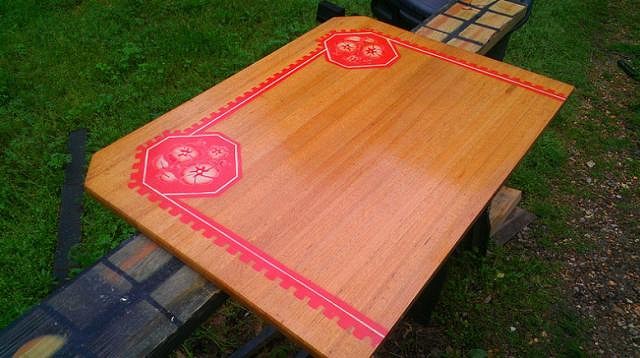
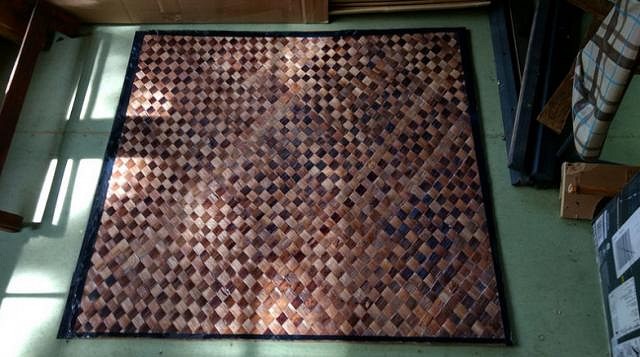
Then, we installed some luan on the walls, for the contact cement to stick to: Here are the shades stuck to the walls: And then I added trim around them, and a tiki mask: Next up, I picked up this inexpensive table at a second-hand store. It's got flowers that look a little like hibiscus, although the orange border feels a little Aztec to me. None-the-less, when I saw it I immediately thought that I might be able to make it work for the top of our tiki bar. It has interesting legs, too: Taking it apart: It looks like one half of the table top will work as a bar top: But first, we received a shipment of some bac-bac matting, so I switched gears to work with that! Like our lampac ceiling panels, I decided to first mount the matting to thin sheets of luan. As others have mentioned before, it was a challenge working with it, as it not very square. But I trimmed the edges and taped over them with gaffer tape. This will all get covered with trim, anyways. And here are the first two sheets installed on the outside walls of the bathroom: I'm digging this look!
[ Edited by: tikitube 2019-07-07 14:31 ] |
|
L

LoriLovesTiki
Posted
posted
on
Sun, Aug 13, 2017 5:40 PM
Looking good tikitube! Your build is looking fabulous! I haven't added anything to my tiki space in a while due to buying a second home but you're giving me the itch. Thanks for the inspiration. |
|
T
tikitube
Posted
posted
on
Mon, Aug 14, 2017 12:49 AM
Thanks, Lori! Happy to oblige. Cheers! Jeff |
|
PP
Prikli Pear
Posted
posted
on
Mon, Aug 14, 2017 9:45 AM
You are excelling at repurposing found items and making them look classy as all get-out. Excellent work. |
|
T
tikitube
Posted
posted
on
Wed, Aug 16, 2017 5:45 AM
Thanks, Prikli! Hoping to post some additional pix soon. We slept in there for the first time last night. :) |
|
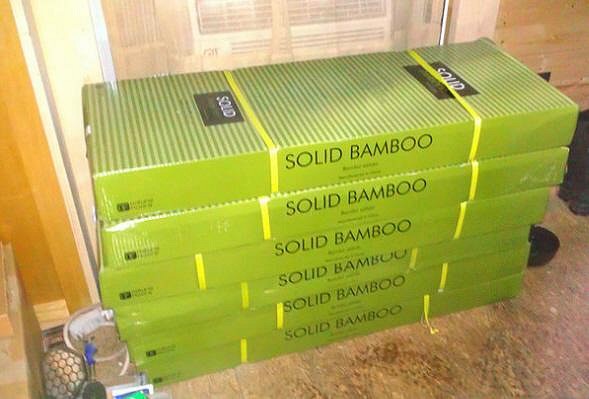
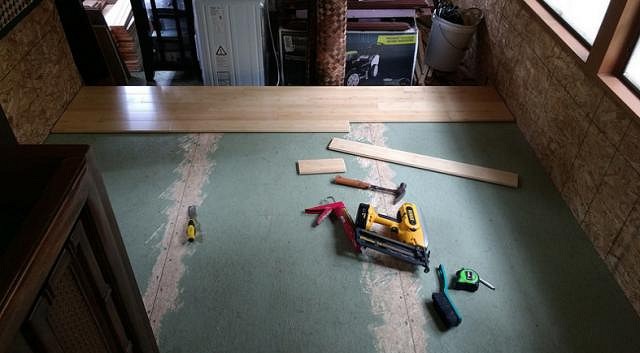
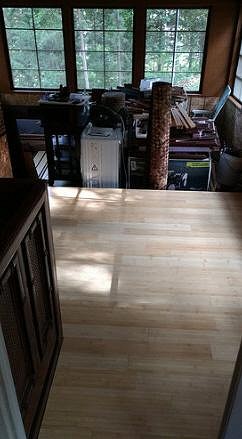
T
tikitube
Posted
posted
on
Fri, Aug 18, 2017 2:46 PM
Next phase...flooring! We decided on solid bamboo, as it should compliment the other natural materials and be relatively durable. The first step was to plane down the seams of the subfloor, and get a nice smooth surface. Although we did our best to cover everything with tarps before the roof was on, they still got wet and swelled a bit. After knocking down the ridges and cleaning up the shavings, the floor went down fairly quick and easy. I installed them with glue and blind-nailed the tongue where possible.
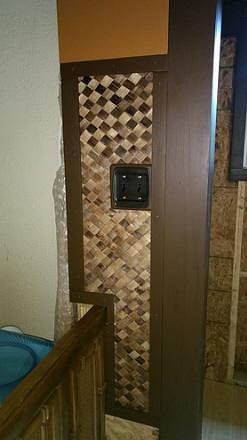
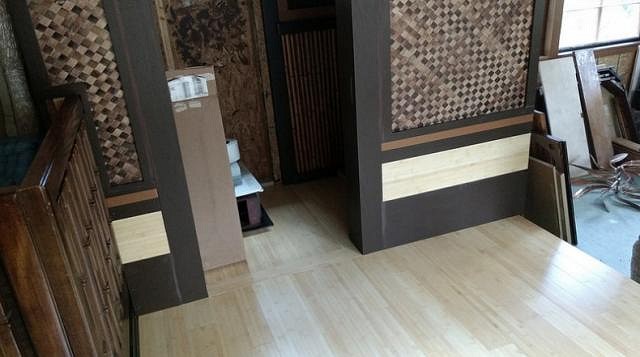
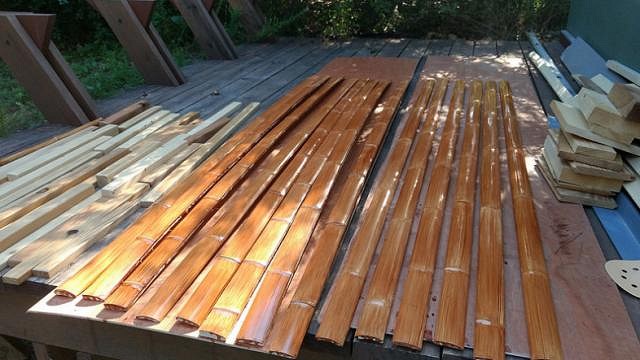
Then, I worked on the wall covering some more, and added a light switch cover. It was originally a golden oak and bright brass finish, so I toned it down and painted it to match the trim: I also trimmed up the wall some more, including using some of the leftover flooring. The darker trim seams are caulked and need touch-up paint in this photo, but you get the idea... Then, we ordered some of these bamboo strips on eBay. They were too light, so I immediately stained them: We are using them for parts of the ceiling, as well as accent trim here and there. The hardest part of using them in this location was cutting the tiny pieces at the correct size/angle on the chop saw. More to come...the humidity has been pretty unbearable these last couple of weeks, and it is making it difficult to do finish work with paints and stains. But I'm looking forward to our next part of this project...built-in seating! Cheers, Jeff [ Edited by: tikitube 2019-07-07 14:35 ] |
|
T
tikitube
Posted
posted
on
Mon, Aug 28, 2017 8:14 PM
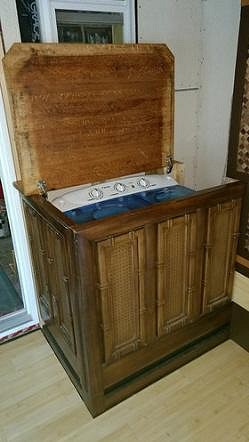
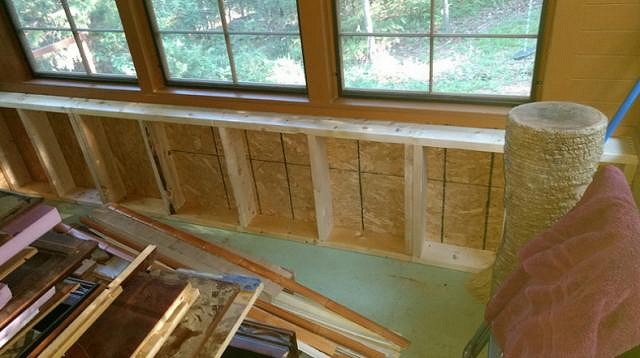
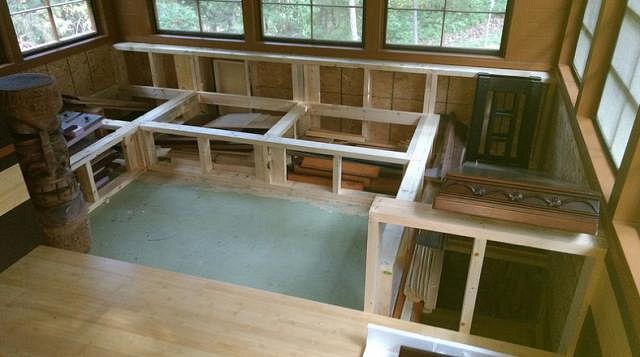
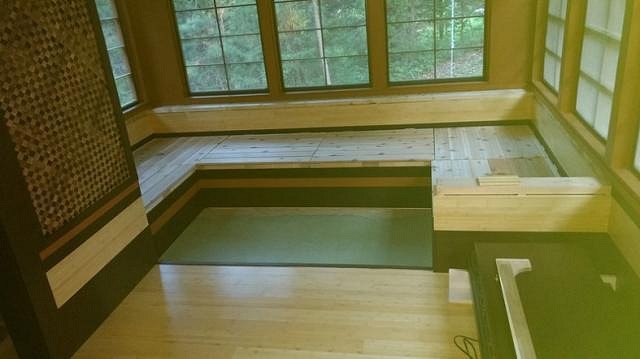
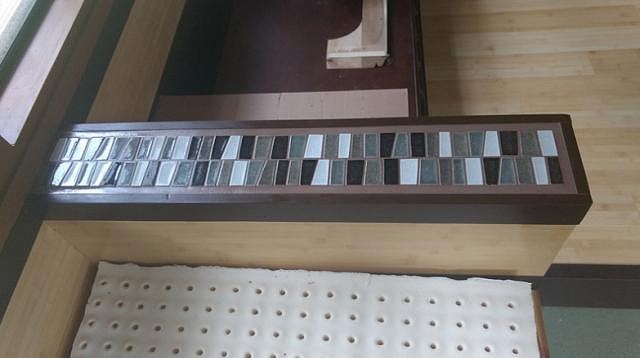
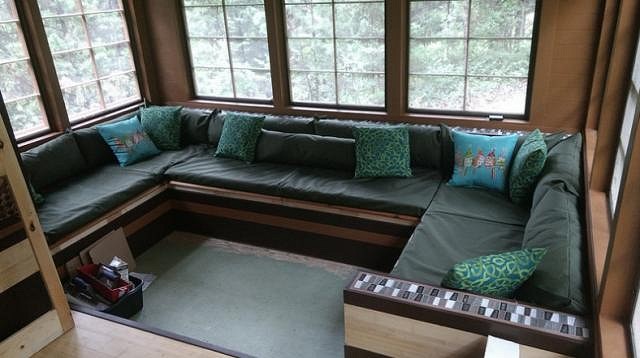
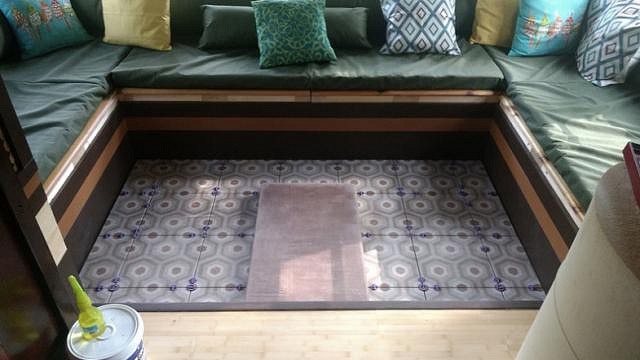
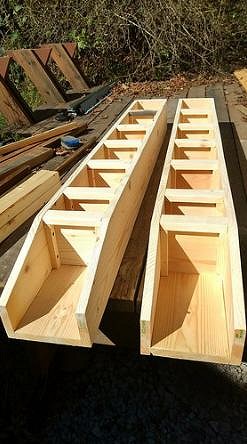
The weather has cooled down quite a bit, and the humidity hasn't been as hellacious, allowing for more finish work in our tiki screened-in porch. First, I finally got around to installing the top for our walk-up tiki bar. As I mentioned before, we didn't really have the space for a traditional tiki bar, so I decided to build one around the washing machine. I still have to build some shelves behind/around it for booze and glassware, but so far it works great and hides the washing machine well! Our next big project was to frame the built-in seating. I planned for a "sunken" area that is a step down from the rest of the room, where we wanted a U-shaped row of benches for guest seating. (I've always been attracted to "sunken living rooms" since some of my friends' homes had them in the 70's.) Each bench would have a flip-up top with storage space underneath, which will be a blessing in our small home. I also framed some narrow shelves for resting drinks nearby, since we don't have space for a coffee table. Here is the shelf that will run along the back of the seating facing south: And here you can see most of the rough framing completed for the benches. They're not even done yet, and I'm already sticking a bunch of lumber and scrap wood underneath - hehe. The bench tops are leftover tongue-and-groove cedar. I found some stainless steel hinges from a mobile home builder on eBay. I started adding painted trim to match the rest of the room and create continuous horizontal lines, which visually lengthens the perceived size of the space: Next up, some tile backer board for the "drink rest" shelves: First shelf with tiles and epoxy grout! The trapezoidal tiles have a bit of a MCM/atomic feel to them, which I love, but the color of the grout looks nothing like the dark brown it was supposed to be. Oh, well...it'll still work! Next up, I convince my wife to use her mad sewing skills to create some cushions for the benches! Thanks for looking, Jeff [ Edited by: tikitube 2019-07-07 14:39 ] |
|
M

MaukaHale
Posted
posted
on
Mon, Aug 28, 2017 8:20 PM
I'm looking forward to seeing the finished room. Its looking better with each new post. |
|
PP
Prikli Pear
Posted
posted
on
Tue, Aug 29, 2017 9:56 AM
Really liking the way the tile and grout have come out. That's one type of home improvement I've never tried to tackle. The concept just scares me for some reason. But you're right, it just cries out MCM and the earth tones mesh well with your tiki aesthetic. |
|
T
tikitube
Posted
posted
on
Thu, Aug 31, 2017 9:06 PM
Thanks! I only have a little experience with tile, but so far I've been fairly successful with it. Once you have the proper tools, it's not too difficult. I borrowed a tile saw from a friend. I use epoxy grout which is expensive and more difficult to work with, but it is nearly indestructible. |
|
T
tikitube
Posted
posted
on
Fri, Sep 22, 2017 12:24 PM
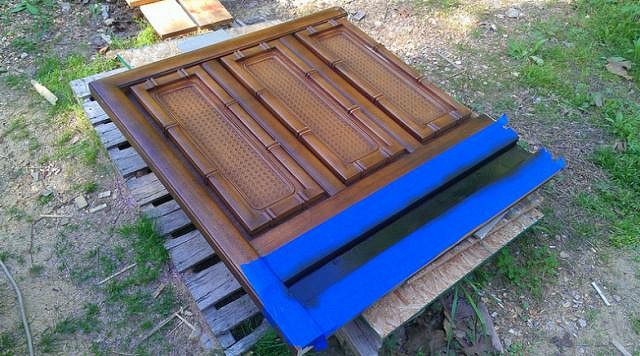
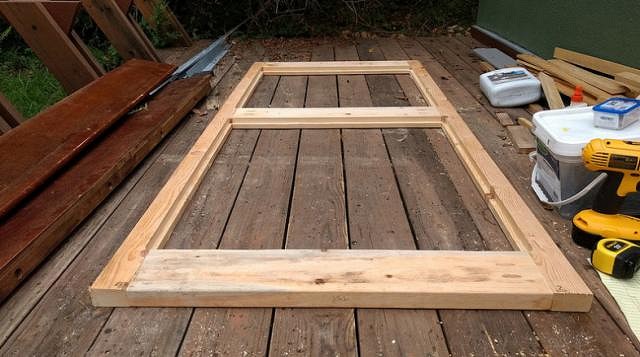
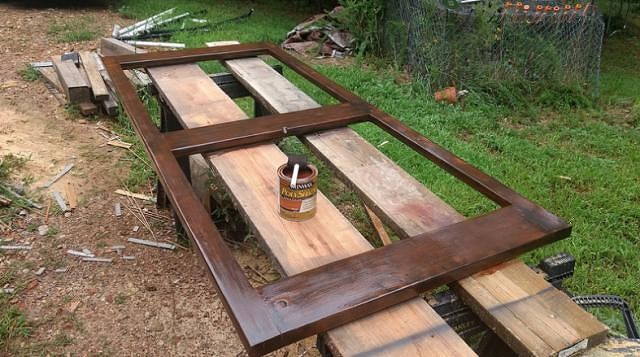
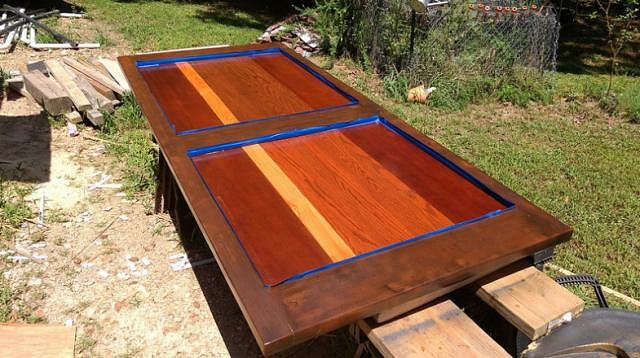
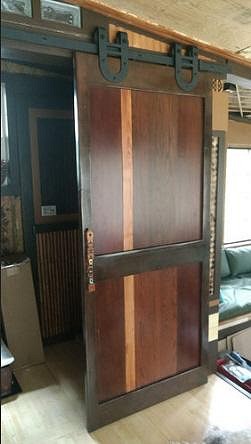
Been working on other house projects for a bit, but managed to finish a few more parts of the Lanai. First, we needed a door for the bathroom. Finding something "tiki" seemed like it would be impossible, so my first thought was to just find something older, with lots of character. The door will be on a sliding barn-door type track, so I wanted something made of solid wood. Unfortunately, people around here apparently think their old doors are very valuable. I didn't feel like spending $100 on an old door that I was going to have to refinish anyways. So...we decided to make one. Now normally, I wouldn't dare to try building my own door. I'm on okay carpenter, but getting a homemade door to swing and close properly in a homemade jam frightens me. The only reason we even considered this option is because it will be hung on a track. :) I decided to build the basic frame using a couple of 2x4 studs and some 2x6 scraps I had lying around. Then, I decided to fill the frame with wood from some old bed rails that I found lying in a trash heap on the curb in town. Here are the raw materials: Here's the frame, constructed using my pocket hole jig. If you've never used one of these before, I highly recommend them. They are pricey, but worth it, in my opinion. I used my router to make channels along the inside frame edges that the panels would sit in. Here is the frame after some faux finishing (paint, more paint, stain, and poly): And here it is with the panels going in. In addition to the bed rails that I cut down, I also cut up some old table extension leaves. Then, I had a small gap left so I stuck in a strip of yellow pine, just for contrast: Here is the door hung on the sliding barn-door rails. I'm not thrilled with the horseshoe shape, but they were a good value and very heavy duty. I do have a plan to make them more "tiki" someday. :wink: For the handle, I found this cheap little carved wooden flute on eBay: In addition to the bathroom door, my wife worked ten hours sewing up cushions for the built-in seating. They turned out fantastic. We used 3" natural latex foam inside them, which we found marked down on eBay as "blems". I also ordered some more appropriate pillow covers. Those celtic knots will get covered up soon enough. :) I can't wait to finish up the "bones" of the room and truly start the "decorating" phase, but at least now we have someplace comfortable to relax!
tikitube [ Edited by: tikitube 2019-07-07 14:42 ] |
|
T
tikitube
Posted
posted
on
Thu, Oct 12, 2017 11:18 AM
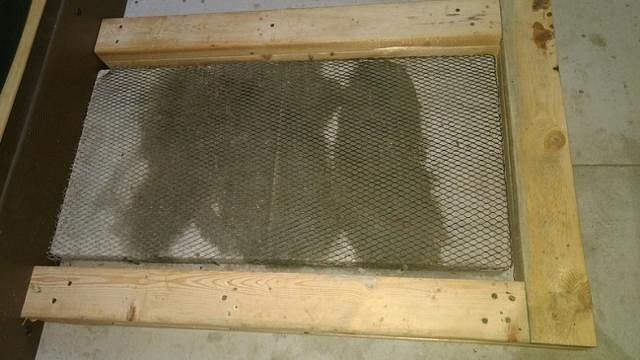
We've been super busy lately, so I just have a small update for now. We managed to tile the sunken seating area floor, and pour a small raised hearth in the center. We purchased a tiny wood stove that will go in the middle. It is very small - they call it the "Pipsqueak" - so it will be more for ambience than anything else, but should make the screened-in area more comfortable on slightly chilly days. First, we put down some tile backer board: Next up, framing the raised hearth area: Here is the brown-toned mortar in the frame: And with the frame removed! I could definitely use more practice in mortar work, but it will work... Here are the tiles we settled on. Again, more of a MCM feel that reminds me of the Polynesian Resort or something. I got these tiles for SUPER cheap marked down by the clearance rack at Lowes: [ Edited by: tikitube 2019-07-07 14:45 ] |
|
T

TabooDan
Posted
posted
on
Fri, Oct 13, 2017 8:27 PM
That's awesome man!! Coming along real good! TabooDan |
|
T
tikitube
Posted
posted
on
Sat, Oct 14, 2017 9:10 AM
Thanks, Dan! I just realized where I'd seen that tile pattern before, albeit in a different color palette...
:) Jeff |
|
PP
Prikli Pear
Posted
posted
on
Sat, Oct 14, 2017 10:09 PM
Well. That's a helluva thing! |
|
C

Cap'n_Crafty_McGrim_II
Posted
posted
on
Tue, Oct 31, 2017 7:01 AM
REDRUM! |
|
T
tikitube
Posted
posted
on
Tue, Oct 31, 2017 11:10 AM
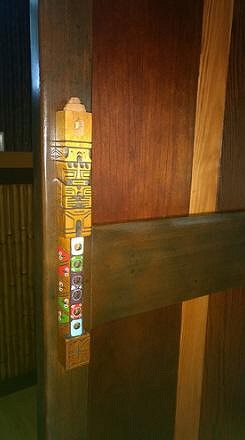
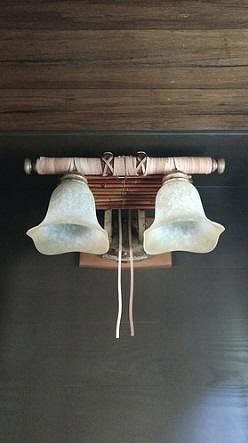
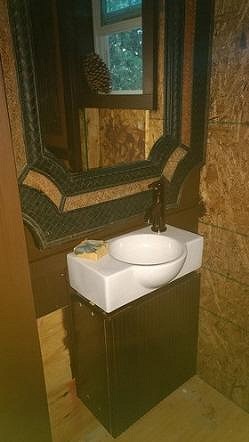
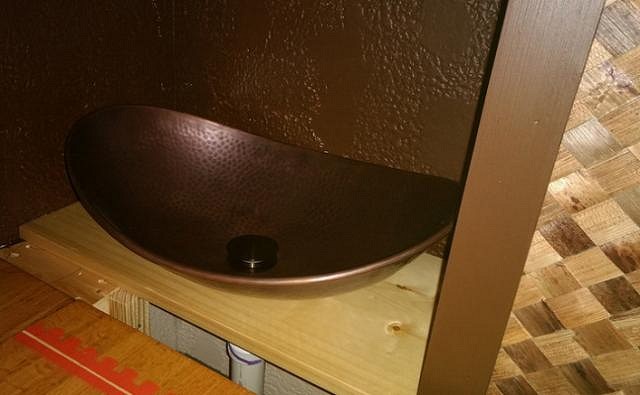
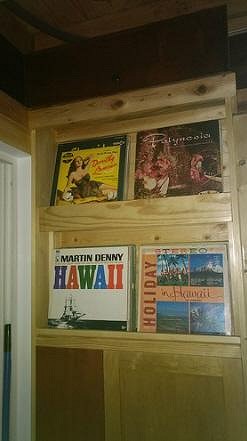
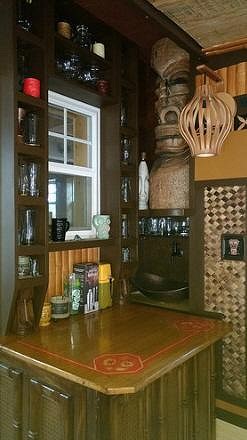
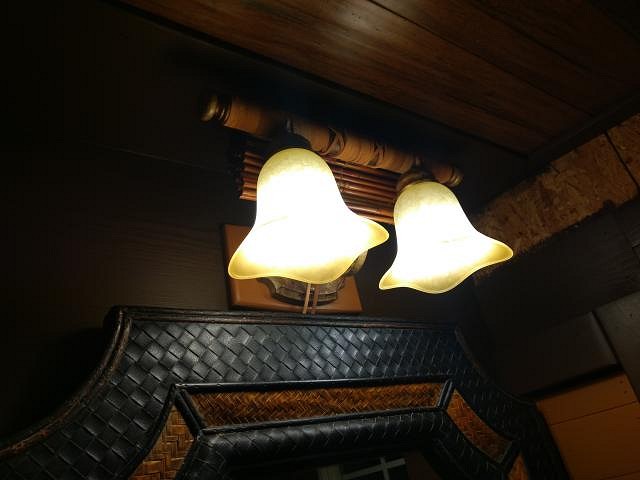
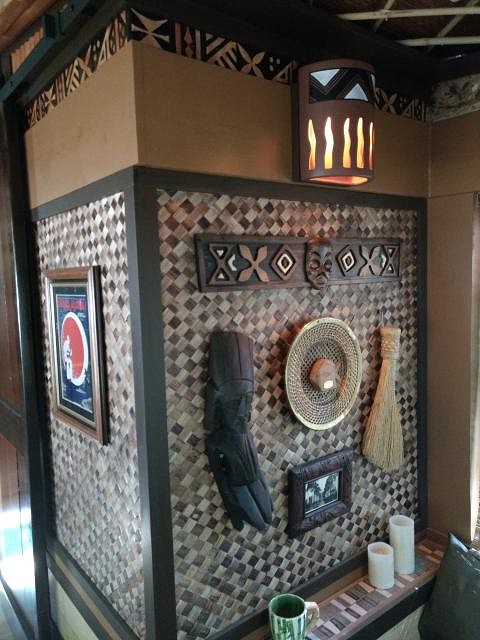
We managed to get a little more work and decorating done in the Lanai before the cold arrived. It figures that its nearly ready for visitors just as the weather turns. Oh, well! We found this fixture for above the vanity in the bathroom, and "tikified" it a bit by adding leather straps and bamboo: I managed to get this tiny little sink installed in the bathroom, along with the massive braided leather mirror we found at Goodwill for only $10. We also installed this hammered copper sink beside the tiki bar: I think I already posted this on the music forum, but here are a couple of shelves that sit at the entrance to the Lanai. The idea would be that guests could select something for us to play on their way inside. Next up, I decided to build some shelves for our glassware to go on the wall behind the tiki bar. We are limited in depth since I needed to allow the bar to be raised up (our washing machine sits inside). I built the frames out of pine, and painted them with the same dark coffee color we used for parts of the trim in the rest of the room.
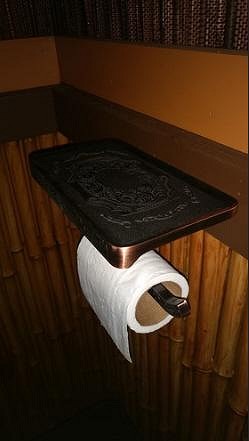
We installed an anchor shaped towel bar next to the bathroom sink, and found a toilet paper holder that actually has a cell phone shelf - hahaha: And even though we still have some major parts to finish (like the ceiling), we went ahead and hung some pictures: I doubt I'll be posting too many updates for a while, unless I find time to work on the days when we have warmer temperature. But I'm excited at how everything is turning out, and can't wait to get it done enough to invite people over! HAPPY HULAWEEN EVERYONE! Jeff [ Edited by: tikitube 2019-07-07 14:51 ] [ Edited by: tikitube 2019-07-07 14:52 ] |
|
PP
Prikli Pear
Posted
posted
on
Tue, Oct 31, 2017 12:12 PM
I really like how those vertical shelves turned out. Functional as well as stylish! Now you need to get that wood stove installed in the middle of the room so that you can continue working even when it's icy out! |
|
M
MadDogMike
Posted
posted
on
Tue, Oct 31, 2017 7:00 PM
Yes, brilliant idea to angle the bottom of those shelves |
|
T
tikitube
Posted
posted
on
Mon, Nov 6, 2017 9:04 AM
Tell me about it! :) Unfortunately, I have a few other house projects that are more pressing. But... hopefully soon!! |
|
T
tikitube
Posted
posted
on
Fri, Apr 6, 2018 10:11 AM
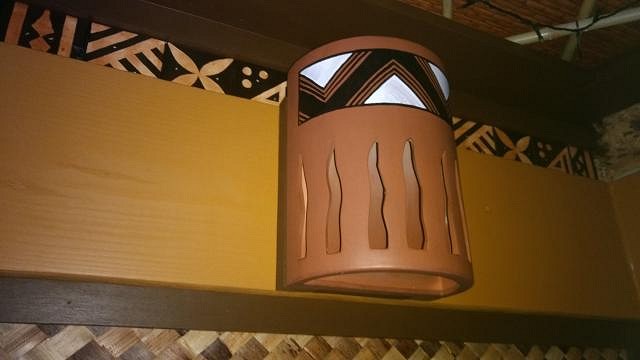
Just a brief update...the Lanai has mostly been on hold, but I did manage to get some lighting in there. First, I saw this ceramic sconce at Home Depot and thought the flame shaped cut outs might work for me. There was no price tag for it, and nothing was in stock. It was apparently a wall display unit that they hadn't sold for a long time and was forgotten. The employee on the floor literally pulled it off the wall (still wired hot!) and sold it to me for $10. After getting it home, I decided it needed some paint. And here it is installed: We recently got the power run to the tiki room, so we are literally seeing everything in a new light. Here's the light over the vanity in the bathroom, fully lit. It's difficult balancing visibility with tiki style lighting, since everything tends to be low light. In this case, we decided it was more important for guests to be able to see what they're doing in the bathroom! I'm hoping to get more work done this spring, but I'm tied up with our kitchen build out, which is no fun while you are living in it! Cheers! [ Edited by: tikitube 2018-04-06 10:12 ] |
|
L
LoriLovesTiki
Posted
posted
on
Sat, Apr 7, 2018 3:29 PM
Looking great! i'm jealous you have such a large space to work with and an extra powder room too! |
|
T
tikitube
Posted
posted
on
Sun, Apr 8, 2018 6:49 AM
Thanks, Lori! Since our home is only about 500 square feet, we definitely appreciate the extra entertaining space that our screened tiki room offers. Its pretty much our living room. And it's nice to have a bathroom so close by! |
|
H

hiltiki
Posted
posted
on
Sun, Apr 8, 2018 9:39 AM
I just finished looking through the entire thread, can't believe it escaped me all this time. Love what you have done with this addition to your house and keep those pictures coming. |
|
T
tikitube
Posted
posted
on
Tue, Apr 10, 2018 9:58 PM
Thanks, hiltiki! Hoping to get more work done in the next few weeks once I've finished our kitchen. Cheers! |
|
T
tikitube
Posted
posted
on
Thu, May 17, 2018 1:22 PM
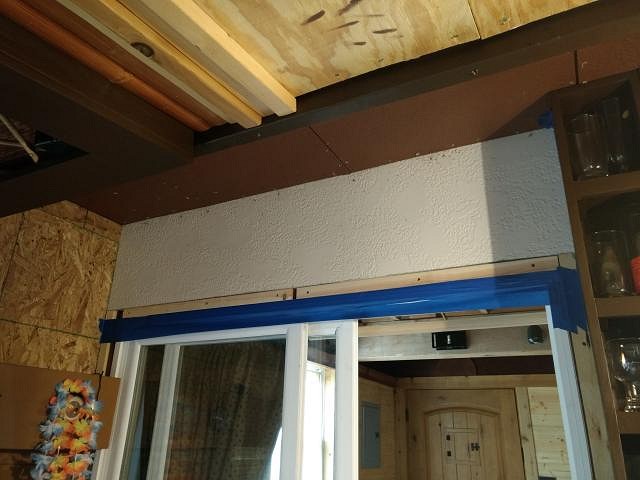
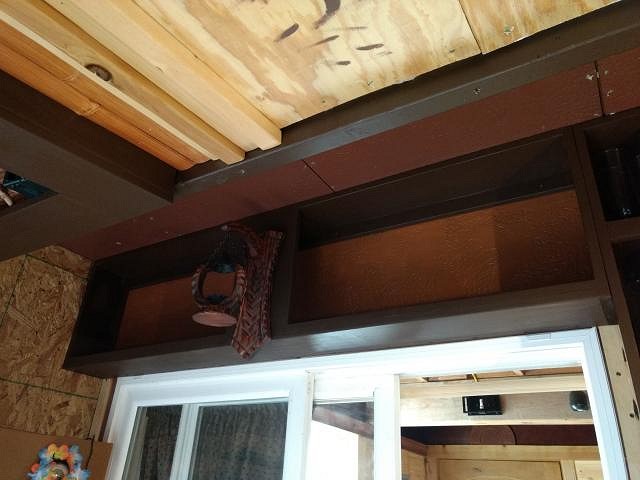
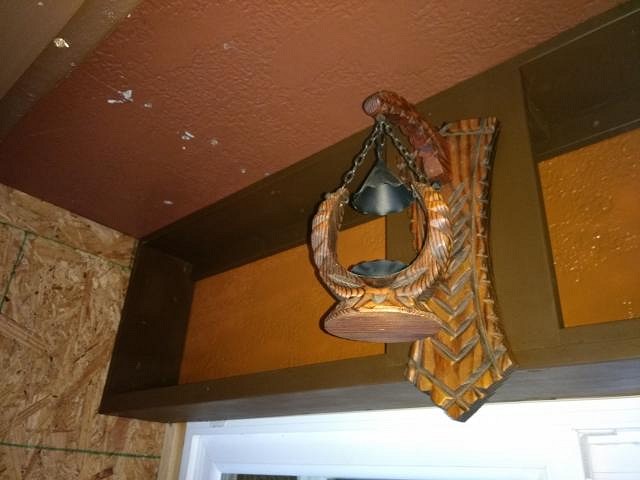
Our kitchen remodel is still kicking my ass, but I've managed to add a few new items to the Lanai. First, I had my eye on this area above the entry patio door. Our bar is so tiny that there really isn't room for both glassware and alcohol storage. So, I decided that this area above the door could use a shelf and I could store bottles up there. As a bonus, it's out of reach of the kids.
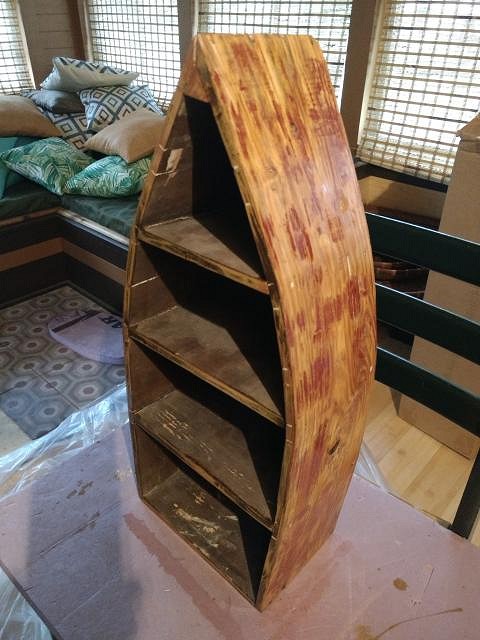
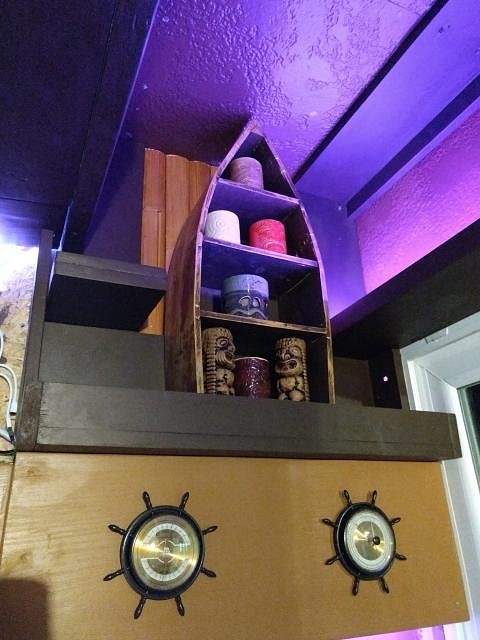
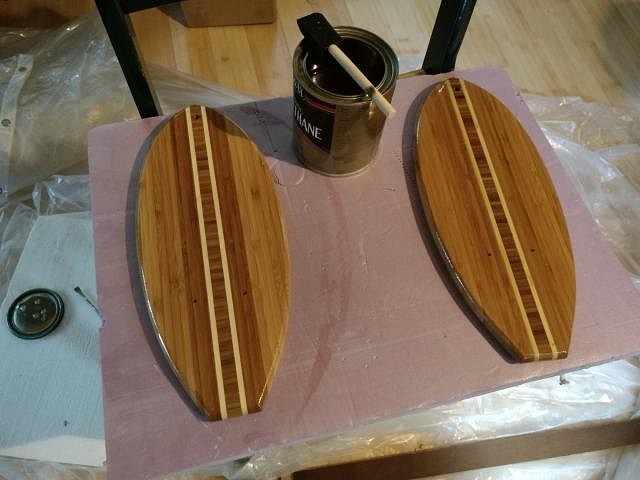
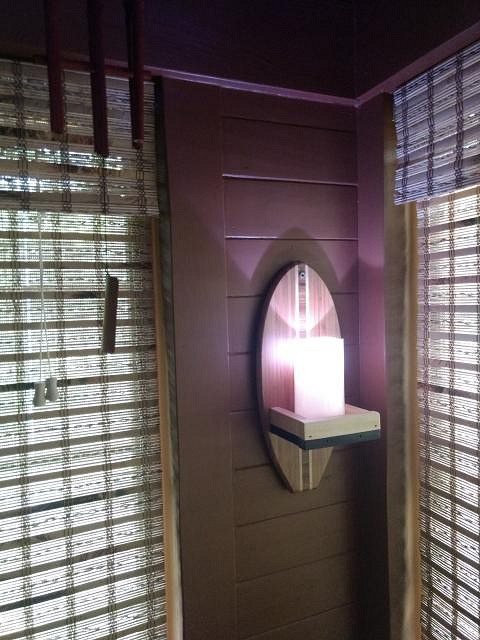
I painted the wall a caramel color and built a long, wide cabinet/shelf. It's supported from both the wall and ceiling above. I added an extra vertical support in the middle and decided that was a good place for this chunky candle holder sconce. I'm finally starting to get the wall decor up in certain areas of the room: We found this little red boat at a thrift store, and thought it would hold smaller mugs and salt/pepper shakers. It was pretty beat up in certain spots, so I went ahead and sanded the paint away more evenly. I then added a quick coat of polyurethane. I built a bit of shelving around it, added some bamboo behind it, and installed it near the aforementioned alcohol cabinet/shelf. I know some folks frown at the inclusion of surfboards in tiki rooms, but we spotted these neat little bamboo cutting boards for cheap, and knew we'd find a use for them. I poly coated them, built a little shelf and attached it, turning them into wall sconces for flickering led candles. More pix coming soon! Jeff |
|
M
MaukaHale
Posted
posted
on
Thu, May 17, 2018 1:34 PM
Surfboards are a nice touch. |
|
PP
Prikli Pear
Posted
posted
on
Thu, May 17, 2018 1:59 PM
Surfing was invented by, and practiced throughout Polynesia. Mark Twain watched Hawaiians surfing when he visited the islands. Apologize for nothing, Jeff! :lol: |
|
T
tikitube
Posted
posted
on
Thu, May 17, 2018 7:16 PM
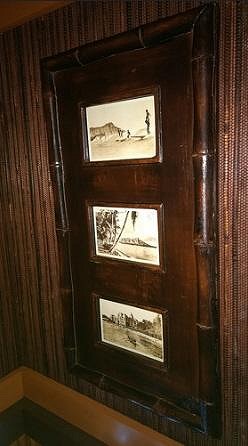
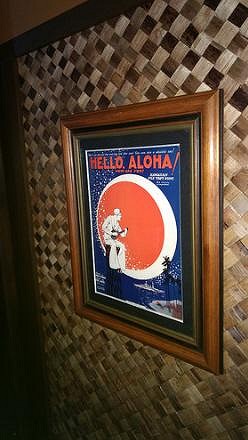
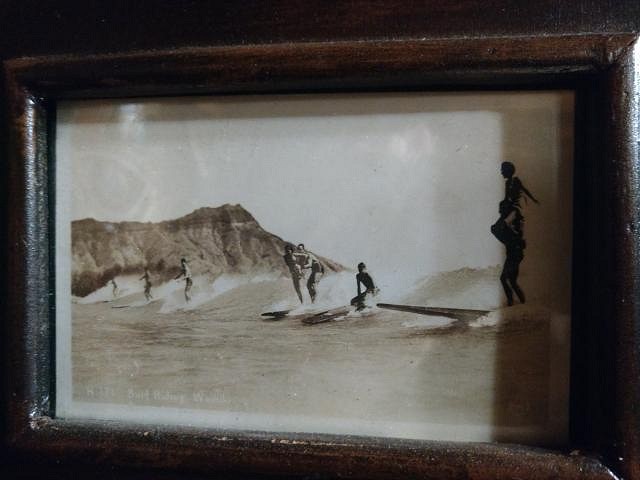
Thanks! That was my understanding, as well. It's also why I've got this picture framed in the tiki bathroom:
|
|
T
tikitube
Posted
posted
on
Wed, Jun 13, 2018 10:45 PM
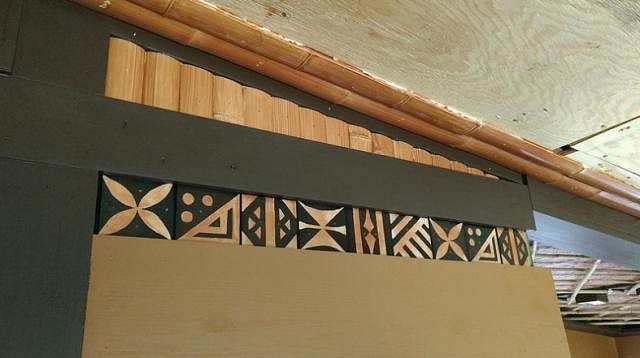
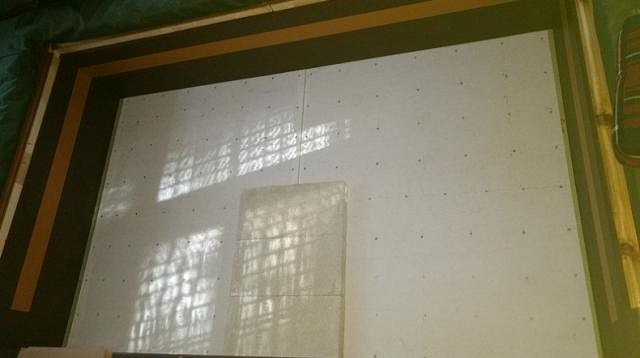
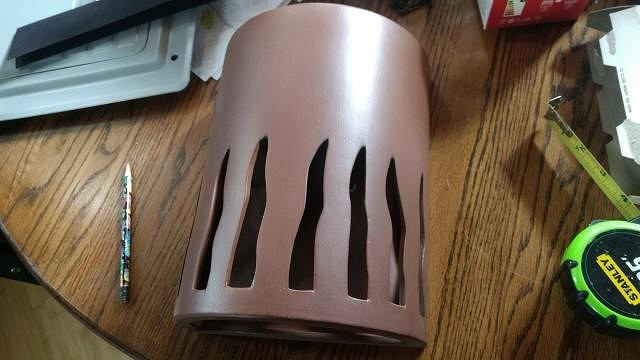
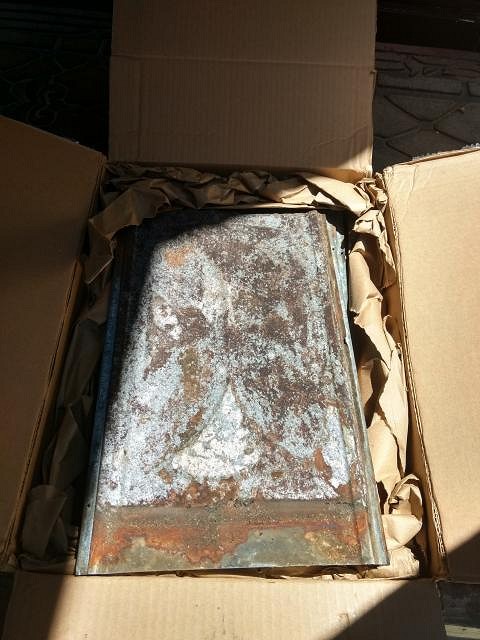
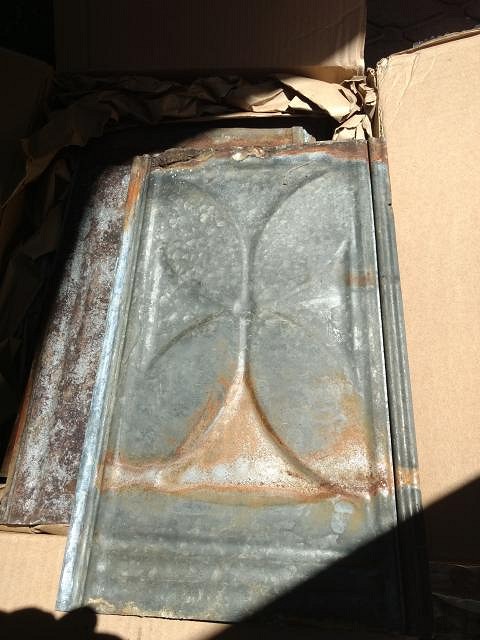
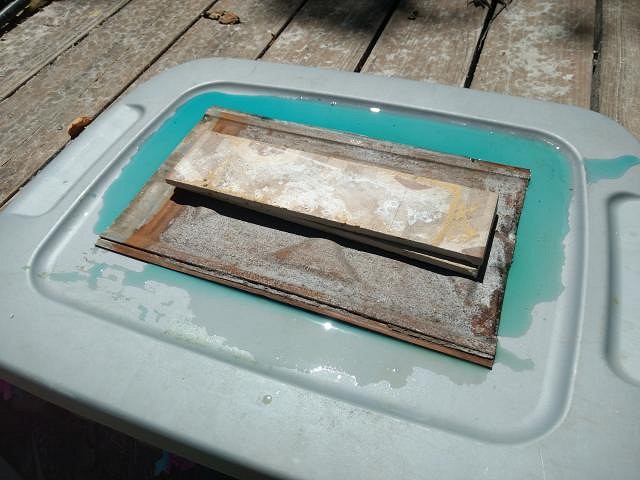
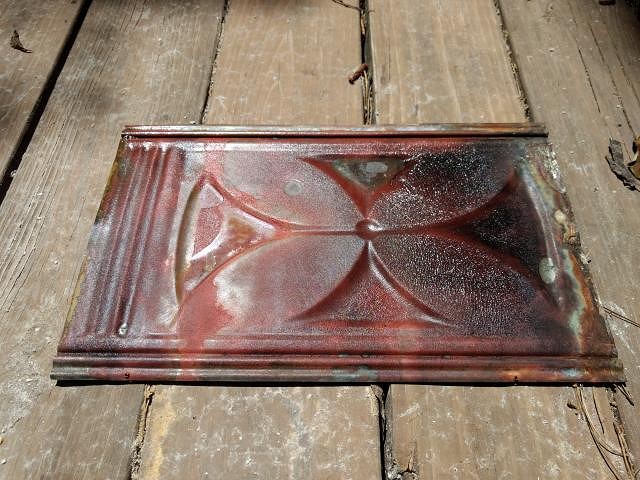
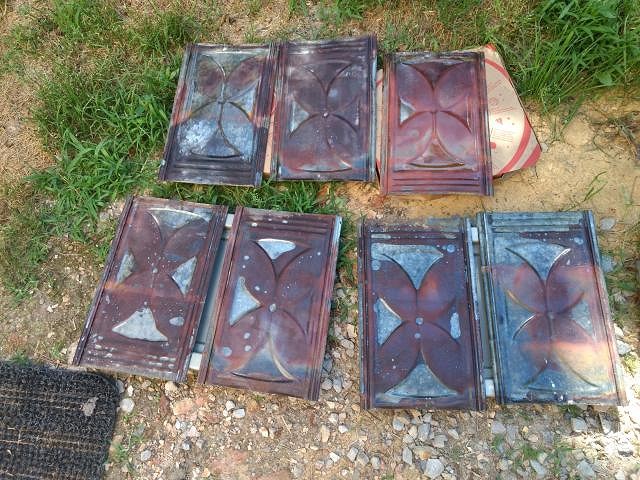
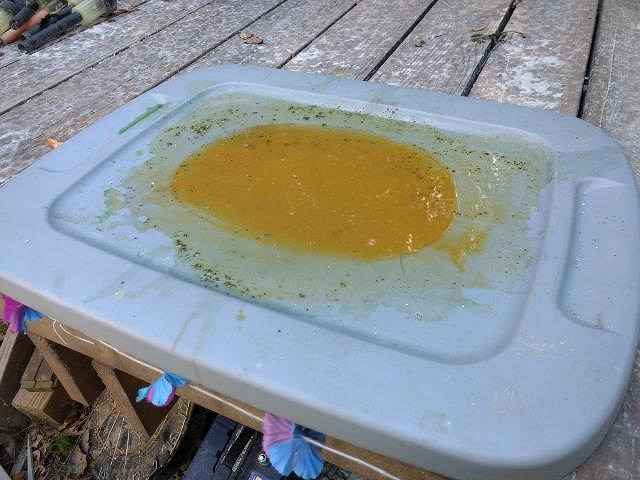
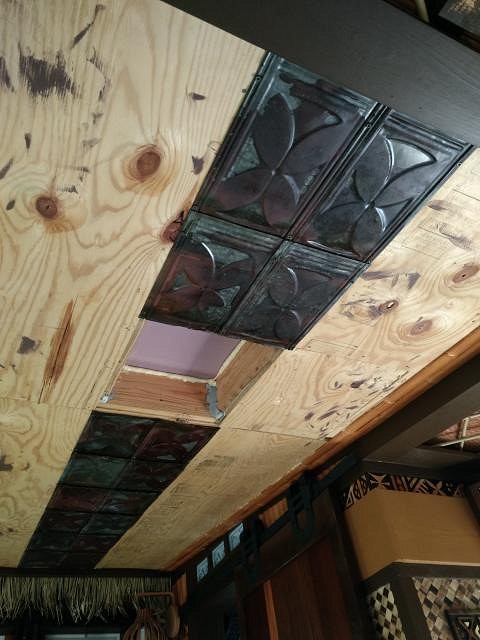
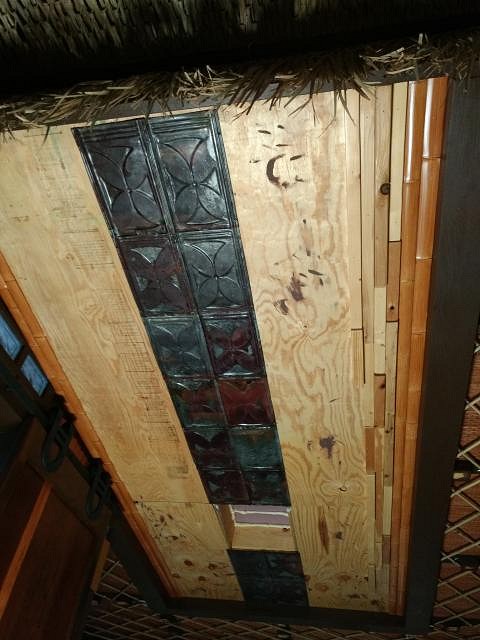
Part of the ceiling in our tiki room has been sitting unfinished while I've been tied up with other projects. I had started covering it in random pieces of scrap 2x, but I wanted a little more eye candy up there and I've been waiting for just the right materials. I really liked the idea of old tin ceiling tiles and was hoping to find some with maybe a pineapple pattern or some other appropriate design. I kept watching eBay but no luck... until I found these! They're from an old drug store ceiling in Tennessee, and they're full of corrosion: What you can't see too clearly is the pattern, which resembles a four leaf floral pattern that I've seen in tapa designs. The other side of the tile shows it better: I gave them the wire brush treatment and sprayed the bad side with rust inhibitor. And here's what it looked like afterwards...wow! The finish was unpredictable, and the liquid seemed to lose its strength as I treated all 18 tiles. But I had just enough liquid to treat them all, and it looked like some sort of funky mining discharge when I was done: When they were done drying, I gave them a few sprays of clear coat. All in all, I had enough tin tiles to run a double row down the center of the room. The opening you see in the middle is for a wood stove pipe installation that I've been procrastinating for longer than I'd like to admit. (Before next winter, I swear!) I may fill in the rest of the ceiling with the aforementioned 2x wood scrap pattern and some more bamboo strips, or maybe something else. Not sure just yet...! Cheers, Jeff |
|
C

Cutcarefullyplayloud
Posted
posted
on
Thu, Jun 14, 2018 6:50 AM
Those tiles are a killer touch! My girlfriend and I almost bought a similar size home recently with the thought of doing a tiki lanai or shed out back. This is inspiring. |