Pages: 1 19 replies
|
R

Rheanna
Posted
posted
on
Tue, May 8, 2018 7:46 PM
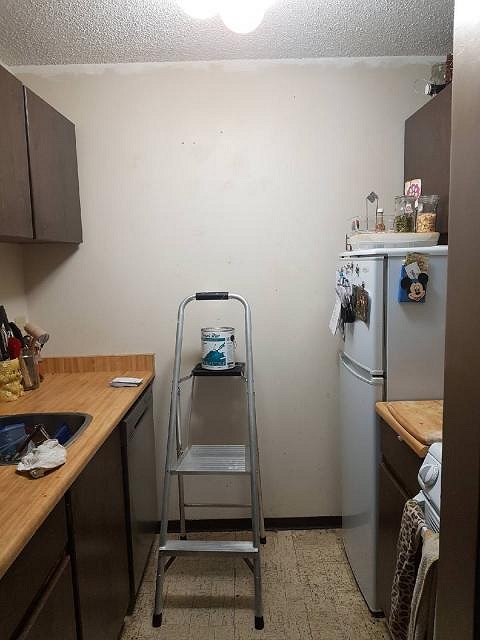
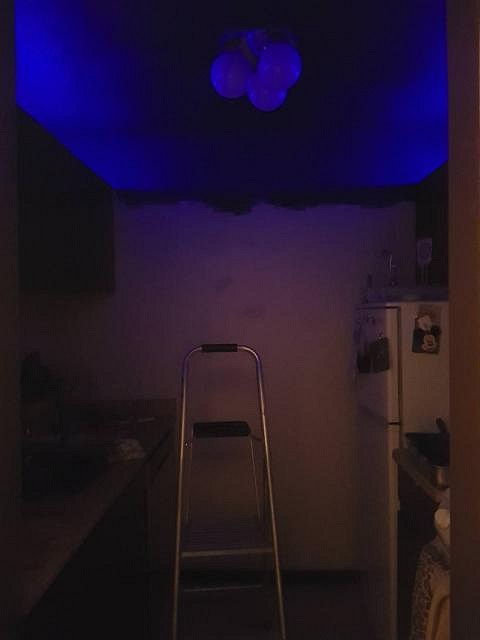
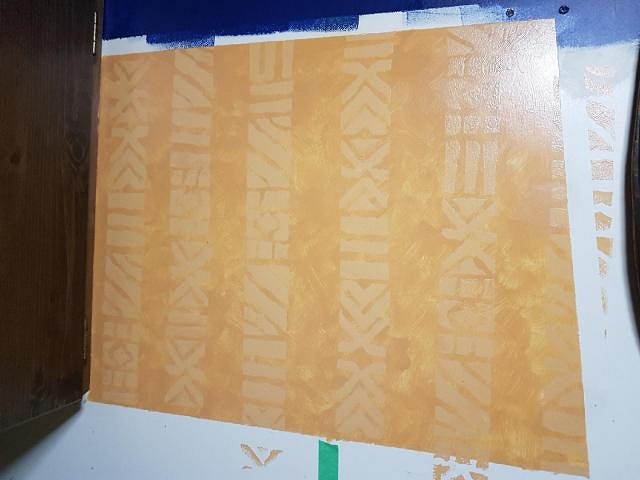
Last year, after 14 years of renting, I was lucky enough to be able to buy a one bedroom condo! (I'm in Vancouver, so getting out of the renter's market is a huge feat, haha) After a year of saving up and planning, it's finally happening and I'm fixing up the kitchen to be tiki themed! When it's done, we'll get folding bar chairs (possibly a folding bar table too) so we can hang out in it. It can't accommodate more than four people, but it's still a dream come true! Part of why we chose is the kitchen is that this was it before! My realtor did not understand why I was so excited about wood paneled cabinets and counter tops, or the patterned brown and cream linoleum floor. So much potential! Started out painting the ceiling and installing some cheap-o LED lights we picked up on sale after xmas. Inspired by a local tiki bar in The Waldorf Hotel in Vancouver, and of course, the beginning of Pirates of the Caribbean. Some painting came next. I'd love to be able to do tapa cloth, but I'm not too sure about how well it will last in our tiny kitchen (steam from cooking and needing to be wiped down a fair bit). I'm a graphic designer by trade and do work for Shameful Tiki Room. I've made a lot of patterned borders like this for them, and decided to incorporate that motif into the design by cutting up dollar store sponges into stamps. The exciting part! This first bamboo and lauhala matting going up. (Pardon the mess around it!) The matting was way easier to put up than expected, but the bamboo was a bit tricky. I discovered that you can measure it as much as you want, but the natural curves in it will throw it off a bit! I'll be filling in the gaps in the corners and adding some rope to hide my messy cuts! The nail heads will be filled over with wood putty once it's all up. We're currently in the process of putting up matting on the main wall of the kitchen! Fingers crossed it will be done this weekend. I've also got a divider curtain to sew, some wood to dremel designs into, and some wooden frames to stain and fix up! |
|
G

gitiki
Posted
posted
on
Tue, May 8, 2018 9:39 PM
Way to go. Very creative use of your space. I really like the stamped designs. I’m looking forward to seeing the finished room. Looks like it’s going to be a fun spot to hang out! |
|
H

Hamo
Posted
posted
on
Tue, May 8, 2018 10:32 PM
Welcome! You’re cooking up great stuff in kitchen.... |
|
L

littlegiles
Posted
posted
on
Wed, May 9, 2018 5:34 AM
Great job! The stamping is top notch. Looking forward to seeing more of the space. |
|
PP

Prikli Pear
Posted
posted
on
Wed, May 9, 2018 8:03 AM
That's looking killer! Very impressed with your sponge stamp pattern. Top notch! Your kitchen is going to be intensely tiki. |
|
H

hiltiki
Posted
posted
on
Wed, May 9, 2018 8:47 AM
Interesting project, I don't think we ever had a tiki kitchen makeover, looking forward to seeing what you come up with. |
|
E

EnchantedTikiGoth
Posted
posted
on
Wed, May 9, 2018 4:23 PM
As renters, my wife and I have always had to resort to an Enchanted Tiki Kitchen too. It's great to see someone who can actually do something with it though! P.S.: we're also going to be taking a road trip through BC in June and staying at The Waldorf. I'm looking forward to seeing their ceiling in real life too :) |
|
R

RichC
Posted
posted
on
Sat, May 12, 2018 6:12 AM
I know what you mean! I found bamboo very hard to work with, even though I only used a little bit of it in the way you did. I wound the joints in rope to cover the gaps, just as you intend. It works and looks great, besides. One question: how did you nail through the bamboo without it cracking? Did you use thin finishing nails and pre-drill? Looking great! |
|
R
Rheanna
Posted
posted
on
Sat, May 12, 2018 1:41 PM
Mine prior to this has always been an enchanted tiki patio, haha! I sent you a PM about your upcoming trip (but forgot to mention: If you're going to Shameful Tiki, make a reso at least a week in advance!), plus asked you some questions about Calgary since we're heading there in July, haha! |
|
R
Rheanna
Posted
posted
on
Sat, May 12, 2018 1:50 PM
We have to use screws to attached the bamboo to the wall (we have concrete walls in most of the kitchen, so we've had to go a bit of an unconventional route with oversized metal drywall anchors!) so we used a countersink drill bit to create pilot holes! We taped over the area we were drilling into with painter's tape just to be safe, but honestly, there were a few times i was on autopilot and drilled without putting tape over the area first, and they still turned out fine! :P We have a few more to do, so I'll take some pics of it today while we're working! |
|
R
Rheanna
Posted
posted
on
Tue, May 15, 2018 7:12 PM
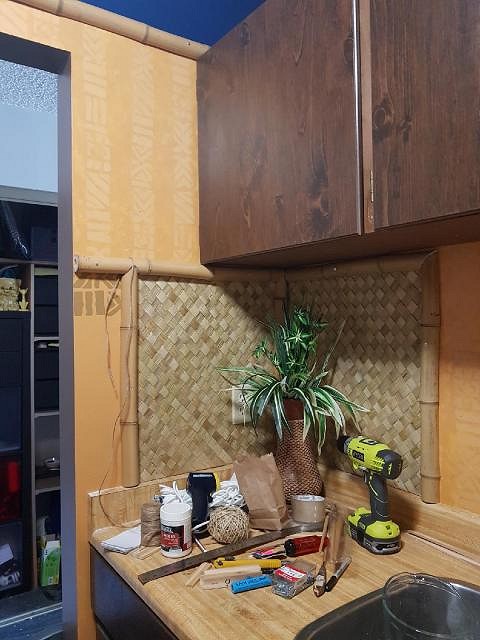
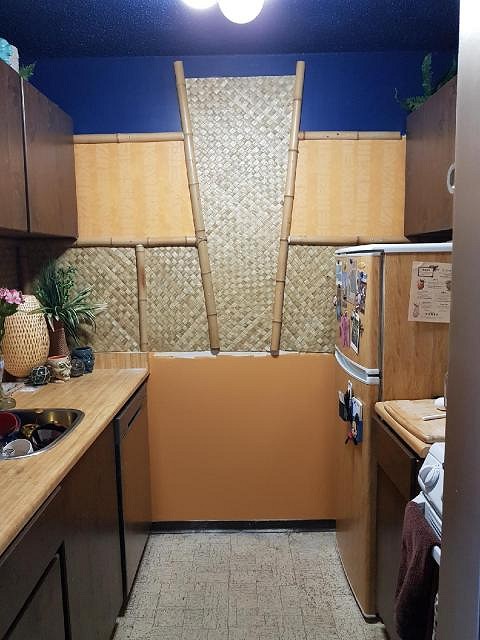
Some progress after the weekend! We still have one piece of bamboo to put up along the top of the lauhala in the feature wall though! We used thick acrylic gel to fill in the gaps between the bamboo, so rope to hide that will be next! The space at the bottom of the lauhala and the paint will be covered with some wood that i need to dremel and stain. Many thanks to RichC too! He posted about using sticky drawer liner to cover his mini fridge in his home bar, The Grasscutters Club, which is where we got the idea to cover our fridge! We also will need something to hide the gap on the right. The left cupboard is set far enough out that the door can open without bumping into the bamboo, but the right cupboard is much closer, so we needed a gap there. We're thinking of filling it in, then painting in the same colour and width as the bamboo, and getting some sort of fake hanging plant/vine to cover it.
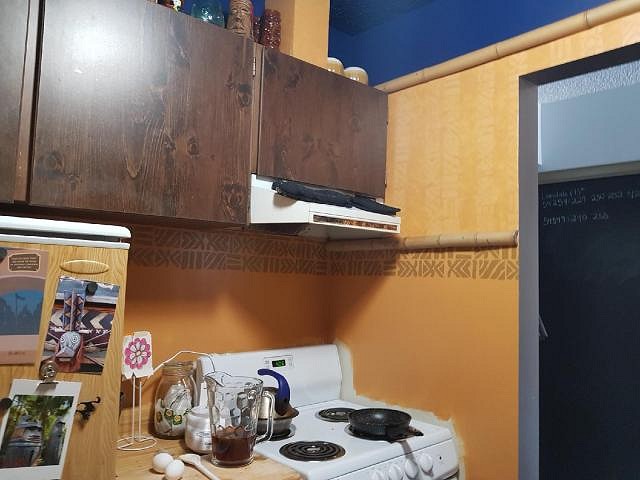
And below is a view to the stove. We still need to finish painting behind there, but all the stamping is done!
Many thanks for the words of encouragement too!! I felt a little nervous posting because everyone's tiki bars are so huge and amazing (not to mention that I have no building experience outside of assembling/swearing at ikea furniture!) but the replies have been so kind! :) |
|
M

MaukaHale
Posted
posted
on
Tue, May 15, 2018 8:07 PM
Very Cool! |
|
L
littlegiles
Posted
posted
on
Wed, May 16, 2018 6:43 AM
Looks great. Love the details. |
|
E
EnchantedTikiGoth
Posted
posted
on
Wed, May 16, 2018 7:58 AM
Oh my gosh, using the drawer liners on the fridge is brilliant! |
|
BB

Bam Bam
Posted
posted
on
Wed, May 16, 2018 9:08 AM
Very cool. I like the vertical piece of matting. It kinda evokes the profile of an A-frame. |
|
L

LoriLovesTiki
Posted
posted
on
Tue, May 22, 2018 4:42 PM
Looks good! Congrats on buying your own place!! I think the frig looks great. I may copy this idea for the white mini frig under our bar outside. No one sees it but me but the white drives me nuts. |
|
H

hang10tiki
Posted
posted
on
Tue, May 22, 2018 8:29 PM
Awesome... |
|
R
RichC
Posted
posted
on
Sat, May 26, 2018 6:59 AM
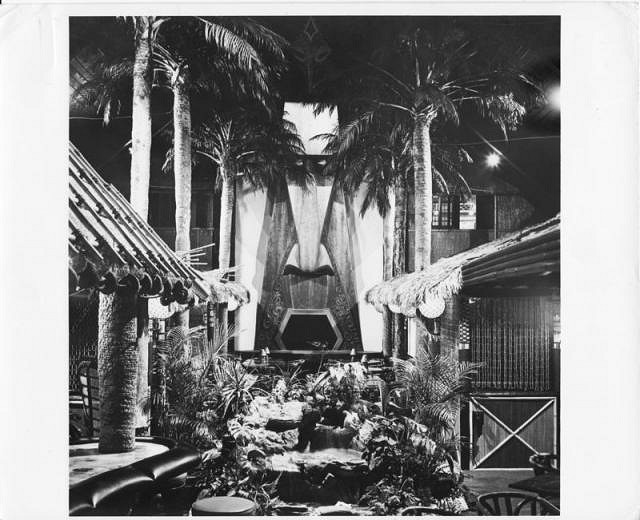
I love that trapezoidal focal point on the feature wall. It looks great and certainly draws the eye. It reminds me of the big tiki at the Kahiki Supper Club, but inverted. Awesome job so far!
|
|
W

W8N2Surf
Posted
posted
on
Sat, Nov 3, 2018 7:23 AM
My favorite is the shot of the painted ceiling with the led lights on. Love that atmosphere!!! |
|
S

Sandbartender
Posted
posted
on
Tue, Dec 11, 2018 5:20 PM
Great work so far! I really love the sponge-stamped border designs, that's a fantastic idea. |
Pages: 1 19 replies