|
R

Robin
Posted
posted
on
Wed, Aug 1, 2007 7:47 PM
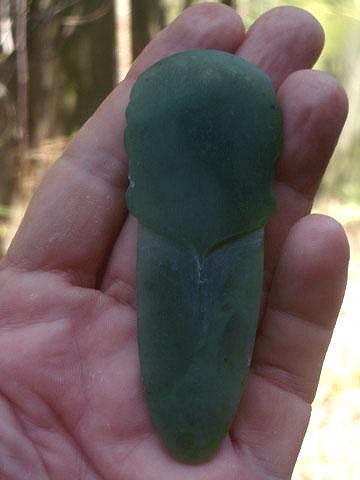
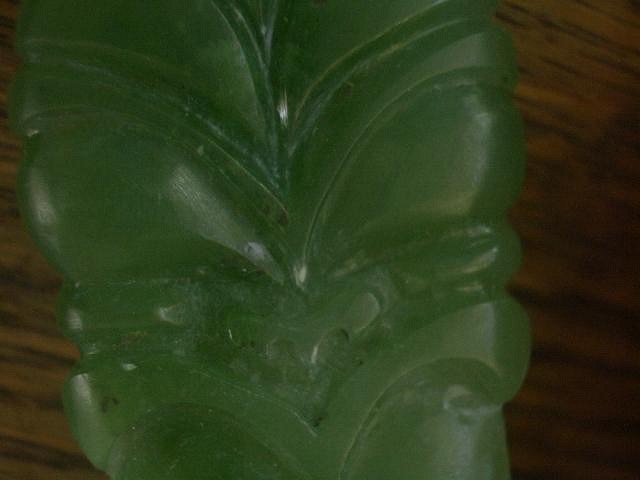
Hi All, It's taken awhile to actually get going. Lots of ordering and waiting for stuff, and trying to get a working set up together. Whew! Then with a lot of trepidation....and hemming and hawing about what to actually carve, I decided on a Taiaha, at least part of one. The Taiaha is a Maori weapon. Usually about 60" long it is used in close combat, pointed on one end with a flat broad blade on the other. The pointed end was used to poke at the opponent, and then the staff was swung around to crack the skull with the blade end. The pointed end was usually a head with a long tongue stuck out in defiance. The head was usually carved the same on both sides...I'm not gonna do that...I'm way over my head as it is! This weapon was also used to challenge anyone approaching a 'pa', homestead, to see whether they were friend or foe. Pardon to all who know this stuff already! I've been playing around with all my new toys to see what they'll do. It is a real challenge....here's what's happening so far. Can't show the back yet...it's kind of a mess.
Thanks to all for this forum...it is a great place to hang out, learn stuff, make friends and see great work. [ Edited by: Robin 2008-04-03 19:34 ] |
|
K

kingstiedye
Posted
posted
on
Wed, Aug 1, 2007 7:53 PM
that looks great, robin! i'd like to see some bigger pics though. please keep us up to date on your progress. (with bigger pics, of course.) :D |
|
B

Benzart
Posted
posted
on
Wed, Aug 1, 2007 8:14 PM
Robin, Excellent Beginning! Excellent form and shape. Post away and ask as many questions as you can think of and we will always find answers. Will this be a pendant? I'm Really liking it already |
|
T

Tamapoutini
Posted
posted
on
Thu, Aug 2, 2007 4:12 AM
Fan-Tiki-tastic! Thats a great design Robin; I reckon you've set the complexity-bar just right for where you're at. Totally Tiki too (ok, you're in the gang.) :D Keep it up; you're doing great. Cant wait to see more... Great lines too by the way! Tama :) |
|
T

timidtiki
Posted
posted
on
Thu, Aug 2, 2007 5:15 AM
GREAT JOB! I can't wait to se the finished tiki. You will be the one giving lessons and advice soon. |
|
B
Benzart
Posted
posted
on
Thu, Aug 2, 2007 11:24 AM
I agree with timid and what a Gorgeous piece of Jade! |
|
R
Robin
Posted
posted
on
Thu, Aug 2, 2007 2:14 PM
Hi you guys...wow thanks so much for the encouragement and praise. Been working away a bit today....trying make decisions based on what I want instead of what I have to fix! Making an image look the same on both sides is damn hard! Whoops, now I gotta do that over there....oh no, I liked it better before...whoa, almost lost that eyebrow! It's coming along though, and really fun. Kingstiedye...thank you! Sorry about the pictures. It does make it harder to see though(haha). Bigger ones next time for sure. Hey Ben...thanks and thanks...not faint praise to me coming from a master carver. Yes, a pendant it is for those really defiant days. :) I'm glad you like the jade...it's some that I got from British Columbia...let's hope I can do it justice. Tama my Teacher...Yippee! I'm in the gang...whooohooo! The back isn't so bad I guess...it's that reductive process thing...I wanted to wrap the mouth around the back, and by the time I figured that out, it was already gone. Don't quite know how to resolve it yet. Oh well. Your confidence is really inspiring...thanks. TIMID!!!! Where ya been! How's the thumb? What are you working on? Very nice words Timid...not ready for teaching...I'm pretty much staring at the burs and thinking...ummmmm wonder what this will do. Thanks again you guys...this is what I love about this forum...will update soon I hope. :D :D :D |
|
B

benella
Posted
posted
on
Thu, Aug 2, 2007 11:59 PM
I'm very impressed. Benjamin. |
|
T

tikifreak1
Posted
posted
on
Fri, Aug 3, 2007 9:58 AM
Hey Robin, Thanks a lot for the kind words! I really dig your jade carving. It's looking really cool! Maybe you could give some info on it sometime. I'd like to try that someday. And also, since you live in the U.S. how do get a hold of it (jade)?? |
|
R
Robin
Posted
posted
on
Fri, Aug 3, 2007 5:57 PM
Merci beaucoup Benjamin. And there you have the extent of my memories of French...except Je suis perdue. Which I used once in Paris...but I couldn't understand the reply. :lol: I'm not at all sorry I started this, and it is a challenge, but I am determined. I've learned a heck of a lot in a few short days. That's what it's all about. Hope to post progress pics tomorrow....as soon as I figure out how to make the nose look better! Hope your work is going well. What did you decide about your base? TF1...my pleasure...my thanks to you as well. I've admired your candor as well as your efforts...how's it going? Will pm you later or tomorrow with what little I know. Most of what I've learned about carving has come from reading Tamapoutini, Paipo and Benzart... Talk to ya later....keep on chippin' away at 'em. R. |
|
P

Paipo
Posted
posted
on
Fri, Aug 3, 2007 6:40 PM
We need bigger pics! It's looking very good from what I can see.... |
|
R
Robin
Posted
posted
on
Sat, Aug 4, 2007 12:53 PM
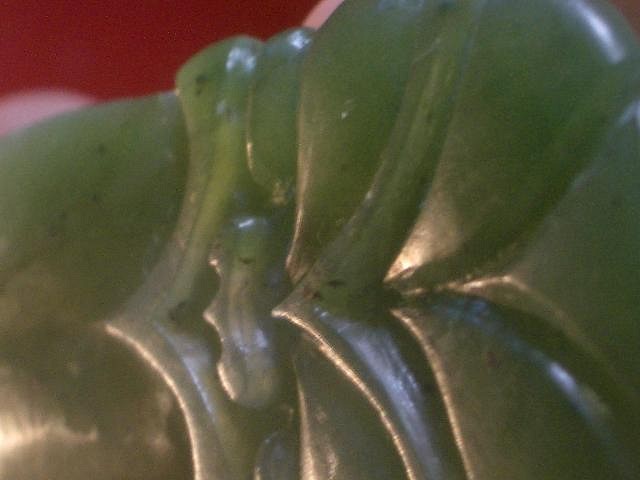
Hey Tiki peeps, Progress pics....bigger. Not exactly thrilled with it, but making my way. Some things I have learned...
Thanks Paipo...I know you're busy....looking forward to the pics of the sticks.
Some of this carving is pretty deep...I'm not finished noodling with some of the areas yet, but when I get there....what is the best way of getting in these areas to smooth it out some? Tama warned me about this. He said make designs that don't have areas that are difficult to get to...sigh. I don't want to touch some of these areas with burs now as the design is starting to deteriorate....eyebrows...nose...plus, my burs are to big for somethings. New ones on the way though. Suggestions? Your humble student. R. |
|
T
tikifreak1
Posted
posted
on
Sat, Aug 4, 2007 1:21 PM
Robin, I can't help with your questions. But I can say, I think your carving is looking pretty sweet! Craig |
|
B
Benzart
Posted
posted
on
Sat, Aug 4, 2007 3:01 PM
So far it is looking great Robin, you're learning well and Fast. Try not to do any of the fine detail (like nostrils,eyes and stuff like that ) until you get down to the near final finish. as you begin to shape a feature you'll find it may change considerably and if you have already cut in finer details you back yourself into a corner, Your nose, you have to be very careful with since you already have the nose holes, but it will be OK. The angle of the mouth/beak where the tongue comes out is undercut a bit so you may see if you can make it more of a 90 degree angle and lower it a bit closer to the tongue. Try to even out your V-cuts on the forehead without going deeper yet. It should probably be done with a bit finer grit bur if you have one yet, if you don't, then wait to get one. Try rounding out the nose with a slower rpm and go slowly. OH Yes, the Macro trick? Just take Macro shots of your work and enlarge them on your computer screen and get a close up look and Everything you are needing to do. In My case they are not so kind sometimes. [ Edited by: Benzart 2007-08-04 15:06 ] |
|
G

GMAN
Posted
posted
on
Sat, Aug 4, 2007 5:09 PM
Hi Robin! Sorry I haven't left you a note yet, but I have been watching your thread and your other posts in the carving forum. I'm glad to see you jumping and ripping into a difficult piece. It looks beautiful and I am sure you will work it all out nicely. Listen to Ben, he has the answers. We likely live close to each other - we should get together one evening for some carving and chat. Nice to have you here. :) -Gman |
|
R
Robin
Posted
posted
on
Sun, Aug 5, 2007 2:48 PM
Hey there. Well Ben...that puts you six or seven ahead of me. Plus lots of experience carving. The nose is problematic, and I am not totally in the corner, but dancing around trying to avoid it...dangerously close. Really good advice on the detailing...thanks...and sloooooooower is good...very very good. I saw that change you mentioned...it's kind of fascinating, but definitely complicates things. Whew! Thanks for that as well. Let it alone for awhile, and came back with a fresh perspective. Learning how to look at it. I have to go back and lower the top right of the head (learning experience #1)...couldn't figure out how come I couldn't get both sides to look the same. It all came down to the head not being an even thickness on both sides. Gonna work on the V cuts as well, need to get some finer burs. I am going to lower it some at the beak...I lost some of the shape/definition on the mouth while I was futzing around, I think it will come back if I take some off the top, and also help the nose. :) Macro shots...o.k. next time....I made those first pics small because they were kinder! Know what you mean. I am heading out tomorrow...have to put my piece up for awhile...unless I decide to take it and stare at it for two weeks...or rub away with wet/dry just for fun....uummmmmmmmm. I'm hoping the 'rubbing sticks' will offer some salvation! Thanks Ben...thanks for helping me...you're the best. Hey GMan. Been meaning to get in touch with you as well! Thanks for opening that door. Have also spent some time with your work...really fine craftsmanship. Thanks for following my posts, and for your support. It's nice to be in such good company. Ben has a lot of experience with carving these images, and his input is really valuable. I am pretty close to you I think, and would LOVE to get together...if you wanna carve with someone whose never carved wood before I am sure game. I'm an experienced coffee drinker though. Will PM you. Gotta go pack...thank you both. No carving for two weeks. R. Learning experience # 8. Get new glasses so you can see. [ Edited by: Robin 2007-08-07 08:24 ] |
|
B
Benzart
Posted
posted
on
Sun, Aug 5, 2007 5:54 PM
Take your piece so you can study it and play with it but take no tools. Have relaxed FUN. |
|
QK

Queen Kamehameha
Posted
posted
on
Mon, Aug 6, 2007 12:53 PM
Hi Robin, just saw your post, really nice first piece. You have talent! enjoy your trip Amy |
|
R
Robin
Posted
posted
on
Tue, Aug 7, 2007 7:57 AM
Thanks so much Amy...nice of you to have a look. I appreciate your comments very much. :) |
|
T
Tamapoutini
Posted
posted
on
Wed, Aug 8, 2007 2:56 AM
Kia ora Robin. You look to be progressing just fine to me. You seem to have the main elements delineated and shaped nicely and its really just a matter of closing in on the finer detail (where, as Ben says, features will take on their final definition/quirks), establishing those final depths and cleaning up any rough surfaces (usually on the 'edges' of various elements: beak, tongue, etc) If your burrs are a getting a bit clumsy it sounds like you'd better wait for those finer ones, although one piece of carving wisdom its good to learn early on is "always use the biggest/best-fitting tool for the task" - as time has gone on I have found myself doing certain jobs on the grinding wheel that I wouldnt have dreamed possible when I first started, ditto with handpiece/detail. I think this is where Ben really excels; his understanding and experience of 'form' allows him to dive in with large burrs and pull out the image he sees. Mere mortals such as ourselves tend to sink a little depth into a 2-D design and do our best in breaching the difference :wink: You may soon learn the benefit of putting a carving away for a while too - the next time you look at it, it will be much more apparent what the next steps must be... Keep us posted! Tama :) |
|
P
Paipo
Posted
posted
on
Wed, Aug 8, 2007 3:47 AM
I don't know about salvation, but they will help you get a great finish in those difficult areas. They are only useful for removing toolmarks and scratches though - not for correcting errant lines or refining the detail. The carving part is usually complete before they come into play. I will post some pics in the Q+A thread tomorrow - I've been out of my workshop for almost a week or I would have done it sooner... Noses are definitely one of the trickier areas. I always draw mine up bigger than I want them to be, so I have some room for error (especially on softer stone). Because the plane around the nose is usually the lowest part of the face, inevitably it gets worn away from the sides, even with the utmost care...and always drill the nostrils last when all the other shaping is done! (actually rereading all this and the thread, I see Ben has pretty much covered all the bases as always...oh well, a concurring opinion never hurts :lol: ) |
|
R
Robin
Posted
posted
on
Thu, Aug 9, 2007 10:27 AM
Thanks Tama and Paipo. Your advice is very helpful. It's been interesting trying to figure out what to do when...I've been going backwards and forwards and getting in my own way. Your posts and Ben's have helped make that more clear. Great advice about the nose Paipo....it was kind of tiny to begin with. I hear you too Tama. Doing the right things with conviction at the beginning will certainly make the rest of it easier...as well as putting it aside for awhile. Ben sure does understand the process and how to get there.... you do an excellent job of drawing out your images as well...and Paipo. I hope I live long enough to get there too! :lol: Looking forward to getting back to work on it. |
|
T
tikifreak1
Posted
posted
on
Sun, Aug 19, 2007 6:23 PM
Hey Robin, |
|
R
Robin
Posted
posted
on
Mon, Aug 20, 2007 9:16 AM
Yes....still out of town...and missing working on it. Oh well....back to it late Aug. Thanks for checking in! |
|
B
benella
Posted
posted
on
Thu, Aug 30, 2007 12:22 AM
Still out of town ? Answer yes or post an update. No other choice :wink: Benjam |
|
R
Robin
Posted
posted
on
Thu, Aug 30, 2007 3:30 PM
Yah Ben...thanks for checking in. Just got back. Updates soon. |
|
R
Robin
Posted
posted
on
Wed, Sep 5, 2007 4:22 PM
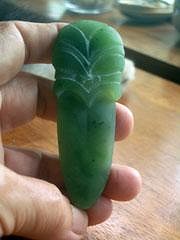
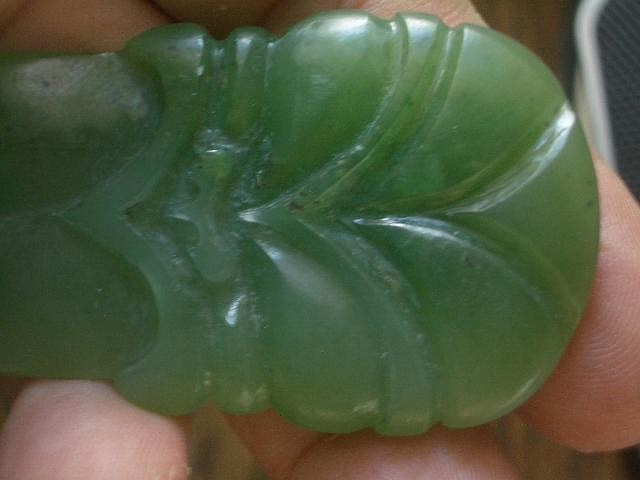
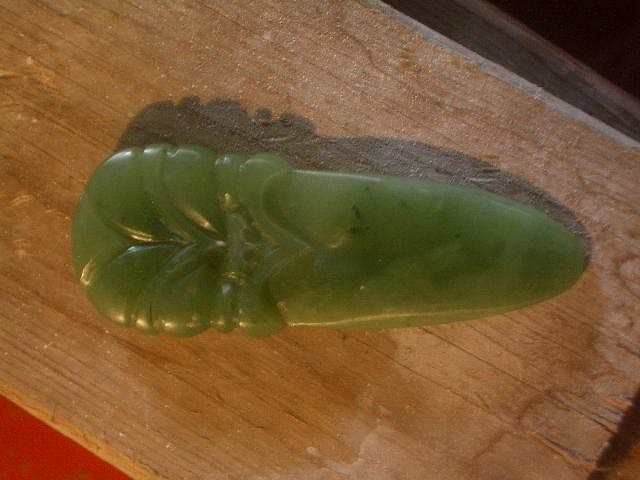
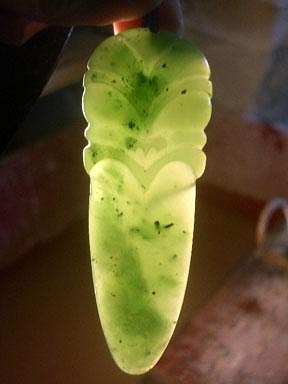
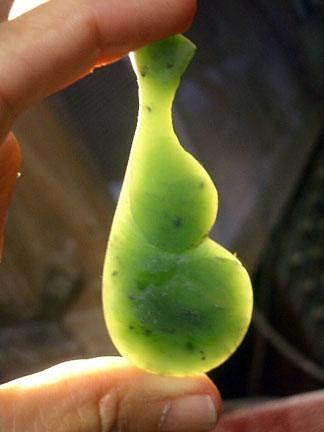
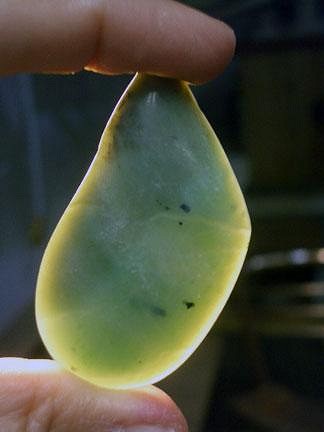
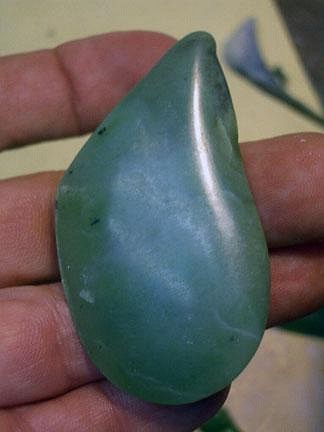
Hi guys (generic guys of course)...well here are some progress shots. I couldn't decide which ones to post, so I posted them all. I couldn't resist a bit polishing just to see. I don't know if you can see by the pictures, but there are some uneven areas I was kind of surprised about that showed up on the tongue near the mouth. Is this just a matter of more sanding/finer sanding, or do I need to go back and do something else? And the eyes...any suggestions? It kind of looks like the alien to me. Thanks for stopping by and having a look...any suggestions or comments greatly appreciated. Thanks for all your encouragement and help.
Robin |
|
T
tikifreak1
Posted
posted
on
Wed, Sep 5, 2007 4:47 PM
Alright, Robin's back!!!! That is looking GREAT! |
|
B
Benzart
Posted
posted
on
Wed, Sep 5, 2007 7:58 PM
Robin, you are coming along Very well with your first piece. He looks Much cleaner than a few weeks ago and the nose seems to have grown? Can't wait to see it in person one day. That jade looks great to me, hope you get Lots of chunks out of it. |
|
R
Robin
Posted
posted
on
Thu, Sep 6, 2007 10:36 AM
Thanks TF and Benz. It's great to be back...in Florida, and working on my carving. That was great advice you gave me on the nose Ben...lip goes down, nose comes up...it worked! Thanks! |
|
J

JohnnyP
Posted
posted
on
Thu, Sep 6, 2007 10:54 AM
Looks good! Nicely done. |
|
G
GMAN
Posted
posted
on
Thu, Sep 6, 2007 5:31 PM
Robin, I dunno, I think you are going to need to send that piece to me so I can go over it thoroughly and then provide proper comment. Please finish the cords to 14" so that I can accurately assess its pendantial qualities. -G |
|
V

VampiressRN
Posted
posted
on
Thu, Sep 6, 2007 8:17 PM
That is beautiful...nice work. Really now...as a girly-girl, I feel I would be best to evaluate it (from a jewelry perspective) so slip that baby on a 20 inch lanyard and send it my way. :D |
|
B
benella
Posted
posted
on
Fri, Sep 7, 2007 12:29 AM
Hi Robin, Happy you're back in Florida (you lucky man !) and back to work. Bravo, Ben |
|
T
Tamapoutini
Posted
posted
on
Fri, Sep 7, 2007 3:18 AM
-- Hi Robin. It is a little hard to tell from the pics but if its a problem with 'shaping' then you pretty much have to go back to your tools (most likely handpiece) to rectify. If the problem is better described as a 'ripple' or small undulation then you could probably get away with the slow/dry method; small circular scrubbing on the highest points, trying to blend/bluff them away. Keep in mind that diamond cloth and/or sandpaper are only smoothing or polishing tools, not carving tools. An early temptation is to avoid going back a step & thinking 'if I just go a little longer with this tool..' Hope this helps. Nothing wrong with Alien eyes either. The Maori Hei-tiki IS the proverbial little green Man!; big eyes, three fingers, came from the stars bringing knowledge, etc... (cue the Twilight theme - doo doo doo doooooohh) :o :o :o G: "I dunno, I think you are going to need to send that piece to me so I can go over it thoroughly and then provide proper comment. Please finish the cords to 14" so that I can accurately assess its pendantial qualities." Vamp: "Really now...as a girly-girl, I feel I would be best to evaluate it (from a jewelry perspective) so slip that baby on a 20 inch lanyard and send it my way." And as for you guys: its a jade piece! You know where it has to be sent Robin... :wink: TTT :) |
|
R
Robin
Posted
posted
on
Fri, Sep 7, 2007 9:51 AM
Hey thanks all for stopping by and for your comments, and best of all from such great artists/carvers. Nice to hear from you JP. I have looked at and admired your work as well...more than admired. Enjoyed your post on the old guys thread too. GMan...I would love to let you scrutinize this piece in person. I'm thinking that if I make all the cords in the specific lengths, you and Tama and Miss VampiressRn, ( thanks for stopping by VRN), could have joint custody. Thanks you guys....warmed my little heart. :) Benella! thanks for the Bravo!...loving Florida and carving. Tama, Thanks so much...I like that info on the eyes of the HeiTiki gives it a nice mojo. I understand what you're saying about thinking that I don't have to go back. It's not really a ripple. I'm thinking the stone is a tiny bit softer in that area, and my proficiency with the pressure of the handpiece isn't quite up to smoothing it. It's like getting caught in between the grain of wood...it's such tiny work. Will try with slow dry on the higher areas so I can see better. I will definitely drive your point about which tools for what into my head. Thanks for your post of your ceramic work and insights on the 'old guys' thread too! You would have made a great ceramicist! Jadi Warrior heading to the shop! |
|
B
Benzart
Posted
posted
on
Fri, Sep 7, 2007 10:02 AM
"Jadi Warrior"? I Love that. It slipped right by me at first as a Typo, Slow person that I am. |
|
B
benella
Posted
posted
on
Tue, Sep 25, 2007 10:08 AM
Hi Robin, Anything new ? :wink: Ben :wink: |
|
R
Robin
Posted
posted
on
Sun, Nov 18, 2007 11:16 PM
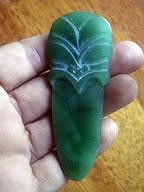
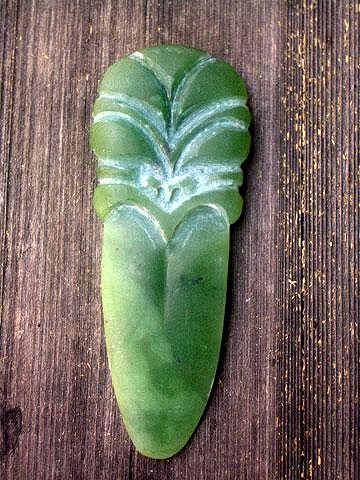
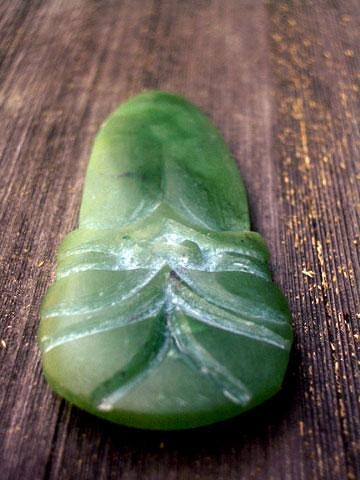
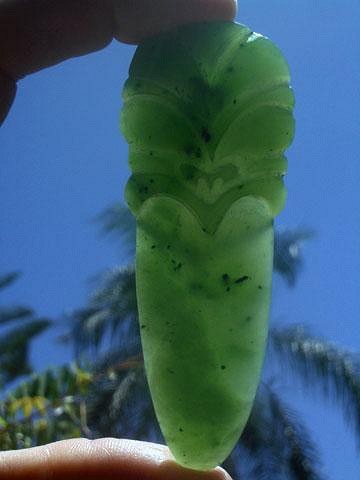
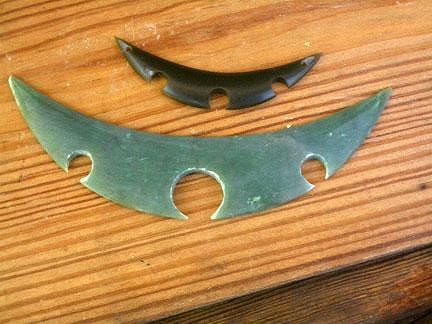
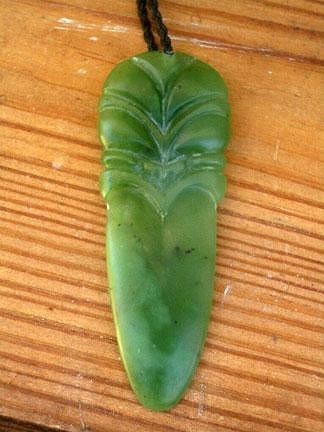
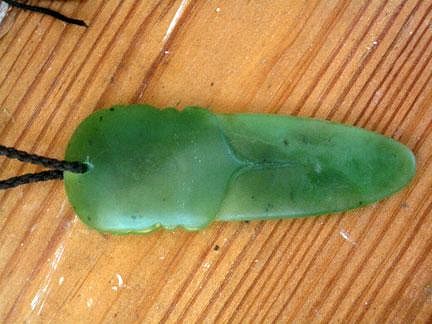
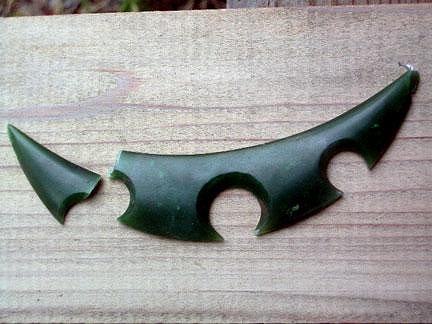
Well I found myself on page two....thought I'd have to go back a lot farther. I'm thinking of changing my name to slacker. It's been a looooong while....injured my back, and then a while more to get some enthusiasm going. When I finally looked at my carving again, I realized it was practically done. I had thought to try some inlay in the eyes, but decided against it. I kept trying to fix things and just created more things to fix...time to move on! When I looked at the pictures I noticed a little bit more sanding needs to be done in a few places. :( Learned how to do a 4 strand braid too. I had to start something different...I loved the shapes and the repetition of shapes in the design work I saw in NZ. Complex overlay and repetition of shapes. These forms are from Kowhaiwhai..here's a link to some information. They are amazingly done with strict mathematical formulas. http://www.aucklandmuseum.com/site_resources/library/Education/Teachers_Guide/Teacher_Resources_Library/Maori_Education_Kits/Maori_02Kowhaiwhai_1_.pdf Here are some pics.
Next I'm going to try some of those clubs and paddles. Thanks for looking. |
|
B
benella
Posted
posted
on
Mon, Nov 19, 2007 4:59 AM
Hey Robin, Are you really back ? Yippee ! Benjamin. |
|
B
Benzart
Posted
posted
on
Mon, Nov 19, 2007 5:30 AM
Ditto what that Other Ben said!!! |
|
T
Tamapoutini
Posted
posted
on
Mon, Nov 19, 2007 1:00 PM
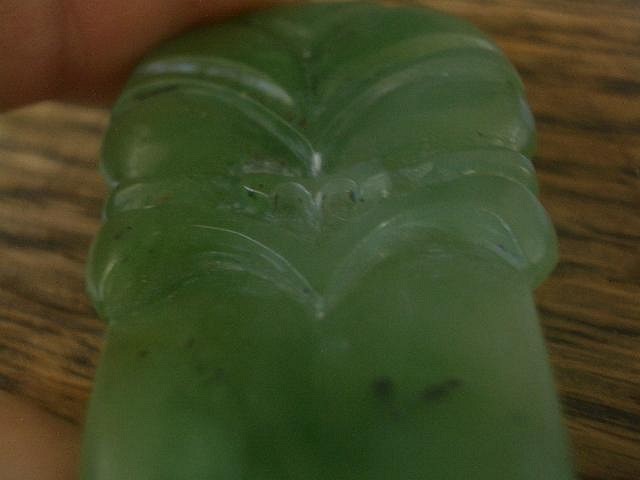
Kia ora Robin. Glad youre feeling a bit better and very cool to see you are back into some carving. I love these kowhaiwhai pendants; very precise and nicely stylised. What sort of stone is the smaller one made from? delicious! (I can see a small but sexy detail in the way you have contoured the hole to better accommodate cordage on this smaller piece). Getting technical: I like the crisp/contemporary look of the 'straight-sided' cutaway holes, but have you considered continuing with the edgeline/shaping right into the cutaway areas? It would eliminate the chipping at the edge of 'cutaway' on the larger piece. *Hope Im making sence here. Let me try again: if you started making a large 'bevel' on the interior of those cutaway/'almost circle' bits (sheesh - what sort of teacher am I supposed to be? haha) and continued that bevel until it reached half-depth/centre-of-thickness. With me? (I can illustate if neccessary) Keep us posted of your carving progress. Remember: keep pushing and trying new things. Tama :) |
|
R
Robin
Posted
posted
on
Tue, Nov 20, 2007 8:42 PM
Hi you guys. Thanks so much for your comments and support. Yep Ben...I'm really back...god willin' and the creek don't rise. I'm really interested in the shapes of those clubs and paddles...hoping to get into some surface design. I'm really looking forward to trying some. Thanks for hanging in there with me. Benz...hey there...yeah major slacker here. Thanks friend...your work and support have been a major inspiration. Kia ora Tama. Thanks for looking, and for your nice comments....I'm hoping that that little one is pounamu...that's what it's supposed to be! It looks kind of like a stone Kshaman used...at first I was disappointed in the color, but it is so soft and subtle with light, and really nice and dark without that I've learned to appreciate it more. I was going to ask you about that chipping. The stone didn't seem to be flawed, but when I was closing in on the edges, bits started to fly. I thought maybe I was spinning the foredom to fast...any way...I think I know what you mean. I sort of saw that when I was working on the bigger hole,forming a sort of beveled edge... but had already committed to a straight edge on a small hole. Hadn't thought about going back. The chipping is problematic...I was thinking I'd have to enlarge the smaller holes...which I think kind of spoils the design. I'll get a picture of that area and see what you think. There is a chip on the back near one of the points...small....but a problem...Wait...do you mean work toward a center line from both sides...or bevel from the front to the back edge???? I think the former rereading....a gradual/smooth transition from new center edge to the center of the pendant ....unnnnhhhh it's hard to describe huh? Maybe that pic is a good idea. Thanks so much Tama for your input...I really appreciate your help....I think you're a great teacher! |
|
T
tikifreak1
Posted
posted
on
Wed, Nov 21, 2007 3:48 AM
Looking sweet Robin! Glad you're back!! |
|
G
GMAN
Posted
posted
on
Wed, Nov 21, 2007 6:14 AM
Hey Robin, The pendant came out beautiful. Very nice job on a difficult piece. I hope you feel wel, enough to continue. The new pieces are wild. Could you tell us more about their significance? I know you picked up a craving for them while you were over there - is there some history you could ket us in on? I like the little one....need my address? -G |
|
R
Robin
Posted
posted
on
Mon, Nov 26, 2007 12:06 PM
Hi guys...thanks TF1...it is nice to be back instead of crippled...I've been jealously lurking and drooling over all the carving. [ Edited by: Robin 2008-01-18 19:27 ] |
|
R
Robin
Posted
posted
on
Fri, Jan 18, 2008 8:11 PM
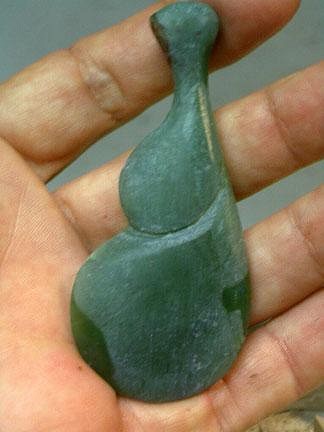
Hi all, This one was almost done when the buffing wheel grabbed it and slammed it against the back of the machine! SHIT!!! Benz had reminded me that at least the machine didn't eat my fingers.....which is great.
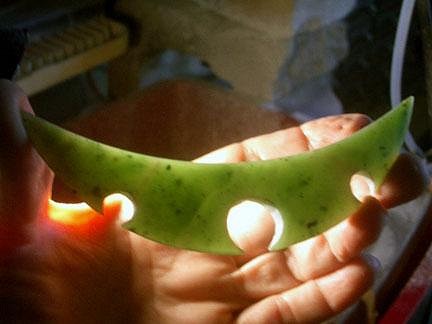
I was persevering with my skills development by making this Kotiate. I got this one done, and was walking across the shop to grab a cord for a pic when I dropped it!!!!! It bounced off the 100 sq. ft. of carpet, and landed on the 6 inches of cement around the edge! SHIT SHIT SHIT! Tama...just what are the stones trying to tell me?
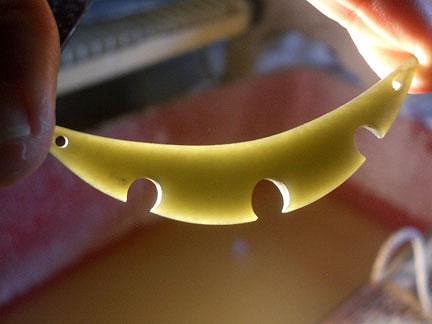
So onward...I have been looking at clubs and coming to terms with my interpretation of the shapes and uses. I wanted them to be an honest representation of the Maori clubs. It's very interesting to me that ultimately these clubs are based in the age old question of form and function. And the craftsmen/artists made them and designed them with these questions in mind as well as spirit. I don't know if the warriors made their own, or went to the club maker and selected one. Or if the club was made specifically for a particular person. Does anyone else? I also started a Wahaika another close combat lobed weapon. Originally clubs were made of stone and undecorated. The notches and lobes in both weapons served to catch an opponents weapon, and disarm them. I read somewhere that the Kotiate was sharp at the end, and that the notches were used for disembowling. They eventually became more and more elaborately carved...more mana, more spirit, more protectively charged and fierce.....and beautiful. Still in the planning stages...not quite sure where it's going yet...hopefully not in the scrap bucket!
And this....guess what it is...I wasn't going to post it, but I'm kinda desperate. It is very loosely related to the topic of Polynesia/New Zealand. Sorry no prize involved. And it didn't break...yet. Thanks for looking....wish me luck! [ Edited by: Robin 2008-01-19 05:57 ] |
|
T
tikifreak1
Posted
posted
on
Fri, Jan 18, 2008 8:19 PM
This is starting to look like my thread!!! Sorry about all the breaks, they were looking really good!!! I really like the new clubs you are working on too. |