Tiki Central / Home Tiki Bars
The Zombie Hideaway
|
UT

uncle trav
Posted
posted
on
Sun, Jun 27, 2010 4:37 AM
Amazing job Dan. Looks like the Hideaway already has a warm atmosphere even though the mood lighting isn't on. That pole is great and the backbar area is a piece of art by itself. Keep those pictures coming and keep up the good work. |
|
P

Potato.
Posted
posted
on
Sun, Jun 27, 2010 11:26 AM
This looks really cool. On a long list of great tiki rooms on here, this is up toward the top. |
|
G

GROG
Posted
posted
on
Sun, Jun 27, 2010 11:59 AM
Great job. This looking awesome so far. GROG like. |
|
W

Wayfarer
Posted
posted
on
Wed, Jun 30, 2010 4:25 AM
I love the detail on the cabinet, especially taking the extra time to do the interior. |
|
R

Reid-O
Posted
posted
on
Sat, Jul 10, 2010 1:11 PM
Lookin' awesome! Now seriously Dan, isn't it about time for a few Zombies in the Hideaway? |
|
K

ka'lenatiki
Posted
posted
on
Sat, Jul 10, 2010 9:04 PM
at least a shrunken head.. :) Love the bar. makes me wish I had the space!! |
|
R
Reid-O
Posted
posted
on
Wed, Jul 14, 2010 9:23 PM
Oh...and when I say it's time for Zombies, I mean... 3/4 oz. lime juice Dan...I know you know! Cheers! |
|
B

Brandomoai
Posted
posted
on
Thu, Jul 15, 2010 11:02 AM
Hey, Dan, I'm gonna' throw this out there... |
|
E

ErkNoLikeFire
Posted
posted
on
Wed, Aug 11, 2010 12:47 AM
Very cool sir, very cool! In regards to your fireplace insert, is there any issues with the exterior of the "box" it's encased in becoming to hot on the outside? I'm thinking of doing something similar but am worried about potential hazards. |
|
T

TabooDan
Posted
posted
on
Wed, Aug 11, 2010 3:26 PM
Man that Zombie sounds good right about now!! Nice one Reido!! Hey Brando, I PM'd yah. Aloha ErkNoLikeFire! I like your name! Glad you like it so far. That being said, to the left and right of the insert (inside, behind the rock), it is hollow right to the edge of the woodworking. Plenty of space for air to move. There is an eternal shelf about 4" or so above the top of the insert and I drilled holes through the top of that shelf to allow for any warm air to dissipate that way. That was just a little extra I did which was just to allow more air flow but I didn't need to. Now if this was a gas unit, I would have done things a little different but not too much. I would have done my woodworking back a little from the face of the fireplace. Like have the carvings on the outside edges of the fireplace as opposed to what I did right around the fire. Would have had rock there instead and then nothing to worry about. Hope this helps!! Mahalo, TabooDan |
|
E
ErkNoLikeFire
Posted
posted
on
Wed, Aug 11, 2010 6:00 PM
Thank you sir! Looking forward to seeing more of your work. |
|
SF

Slacks Ferret
Posted
posted
on
Fri, Sep 17, 2010 8:12 AM
Looking forward to seeing an update! |
|
T
TabooDan
Posted
posted
on
Mon, Sep 27, 2010 3:00 PM
Wow, I can't believe how quick the time goes by!! That seems to be my common thing I say on here! I am quite a bit ahead of my updates on here so I will have to try to catch up. Updates to follow! |
|
T
TabooDan
Posted
posted
on
Mon, Sep 27, 2010 4:45 PM
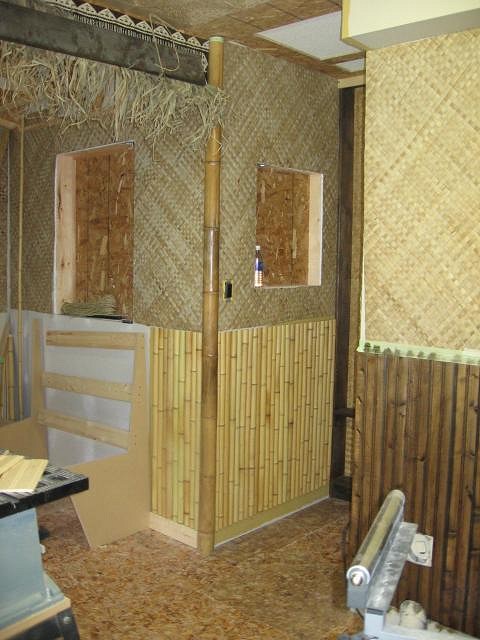
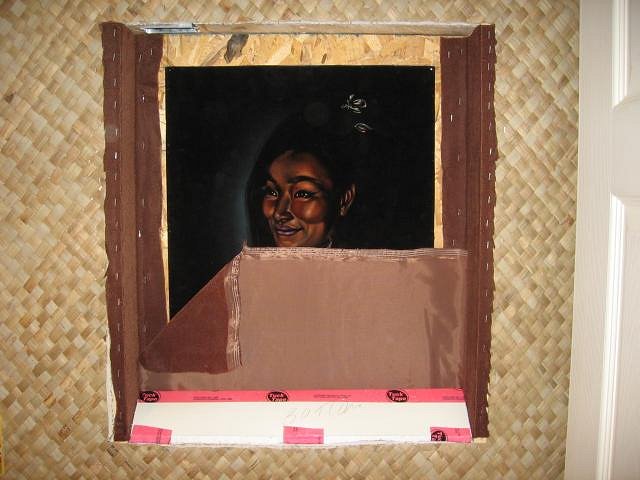
Okay, as you can see in this older picture, there is a space that is framed inside the wall on the left:
A little later you can see both spaces in the walls:
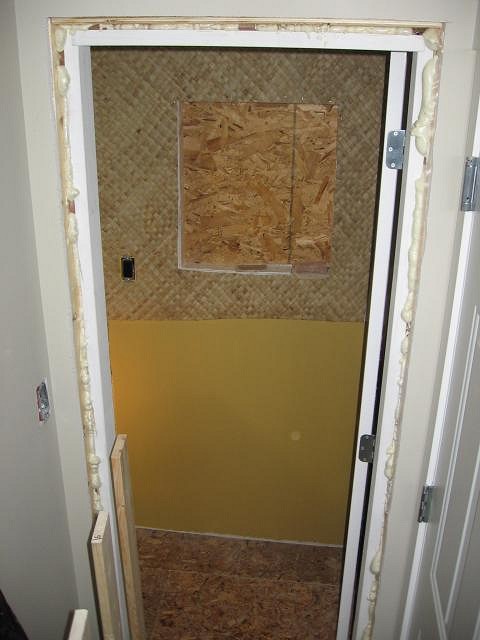
This is at the entrance to the room. These are going to house velvet paintings which I will frame, surround and add some lighting. I am kind of doing this by knowing what I would like it to look like and then seeing how it turns out as I go along. Since I am trying to do different things throughout the room and have the Lounge as unique as possible, each in-wall display will be different. The outside frame and whatever I do on the inside will be different. I figured since they are different sizes, different pictures and on different walls, I don't need to match anything. I also put the small one in this wall as I really wouldn't be able to do anything else on this small wall as the door opens into the room and restricts me from putting anything to thick on the wall. With the one on the small wall, I am having a small velvet go inside. This is opposite the doorway which comes into the room on the right. I am saying this as I have a future plan here which I will fill you in on as I get a little further ahead! Here's a view coming down stairs into the room:
You can see what I mean now about how tight it is there with the door swinging in. I have installed a electrical box right in the frame so I can add lighting later on. The velvet painting is a vintage 1960's one that I have. The detail in it is very very good. I first started cutting some pine wood and making an internal frame:
I started to think about what I was doing and how I wanted this to look and put the wood idea on the back burner for now. I wanted to have fabric (well, actually velvet) on the inside around the art piece.
But you can kind of see where I got the idea from. They used a lite-brown velvet which goes all around the inside around the velvet. Geez, look at the color of their walls!! That's what 50+ years of smokin will do to you!! What a great color though!! I went and found some brown velvet I liked and decided to attach the velvet either side of the art like this:
Just stapled on with no frills or gimmicks! Don't worry about the staples. They will be covered up. This is really just for the side sections.
I then decided I wanted to angle the top and bottom inside edges towards the velvet art. I could do it out of wood but I had some Styrofoam in these small blocks and figured if I cut that it should be quick and easy to use.
Once I cut the foam to size and with the angle/slope I wanted, I put red tuct tape around the edges to help keep the foams edge true and stiffen it up a bit. I then removed the foam and attached more brown velvet:
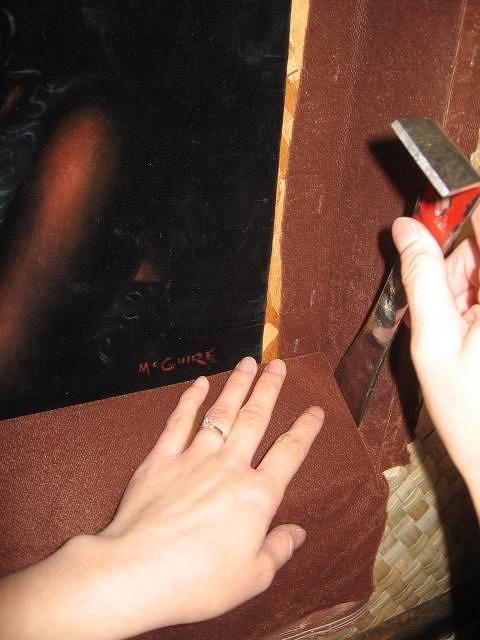
We then folded the velvet over the foam and attached velvet with staples to the outside edge. It is much easier to get an extra set of hands for this sort of thing.
We used a thin pry bar to tuck in the edges which worked great.
We had to make sure we wouldn't get any creases as we stapled. Just tight enough so it didn't go anywhere. Here it is tucked in on the sides and ready for staples:
The velvet has been pulled tight and stapled down:
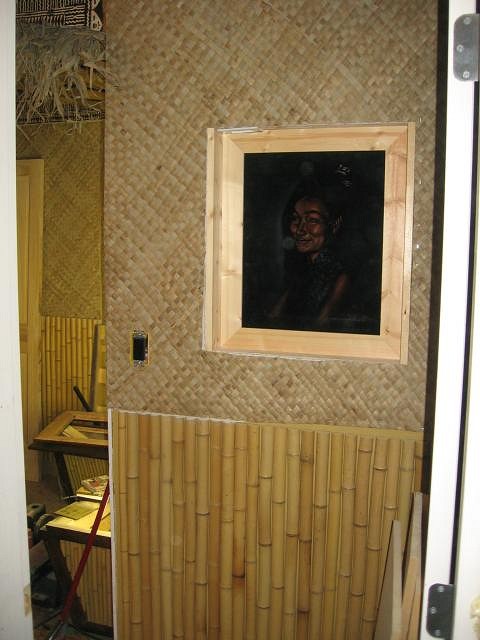
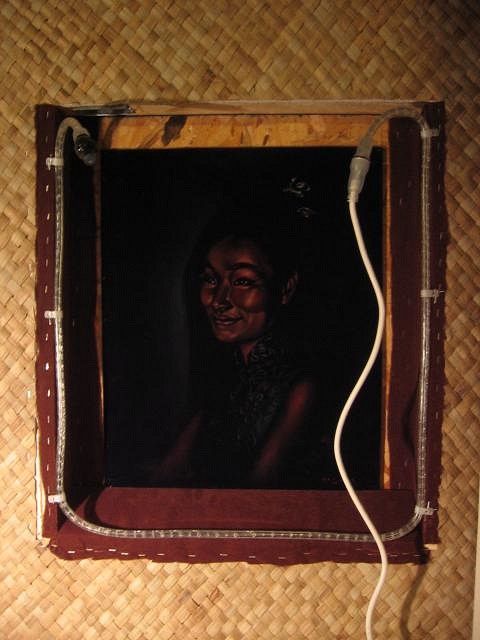
I wanted to use rope lite to go around the inside of the velvet because it let's off a nice warm glow (perfect for velvets) and also because of the low heat, ease and flexibility. I cut off the extra velvet and then attached the rope lite to the outside edge of the recess:
Once the external frame is done, the plan would be to not have the light visible at all when viewing the art or from inside the room. The cord itself will be hidden under the top piece of foam and go straight to the electrical box. No wires and no mess! To finish off this piece I will have two pieces of Bamboo running vertical down either side of the velvet and then have a dark wood frame mounted to the wall. I haven't decided on the frame style yet but it will be pine stained dark and may have bamboo or matting attached to it. Don't know yet. More to come. Mahalo!!! [ Edited by: TabooDan 2010-09-27 16:47 ] |
|
BK

Big Kahuna
Posted
posted
on
Mon, Sep 27, 2010 5:27 PM
Great idea, Dan. I like it! |
|
BS

bamboo stu
Posted
posted
on
Tue, Oct 12, 2010 4:19 PM
This is coming along nicely, top notch craftsmanship. But where is the BAR? |
|
T
TabooDan
Posted
posted
on
Fri, Dec 31, 2010 4:42 PM
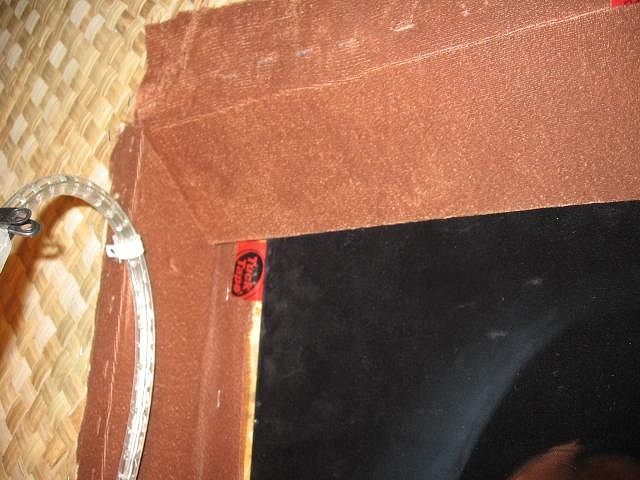
Thanks Big Kahuna! Hey Bamboo Stu, thanks! As for the bar you ask, well, I will be using an old vintage rattan one I have for now. It is a smaller one but the shape and size of it will fit my place pretty good. At first I was going to build a bar but as time went on I realized that I would actually like to use this room before we end up moving or something! And the way things look, that might have to come sooner than we had hoped. Next time I do a bar, I will for sure build my own. It is definitely a crucial part of any Lounge! Oh, and let me just say, I am no expert on these things. This is just the way that I have done it as I have gone along. I came up with a plan and tried to stick to it as I went along. There are many different ways to do the things I am showing you. These images and info. is just being shared so others can possibly get inspired or maybe see how some things can be done in there own place. Back to that recessed velvet I was doing. Here's what I did at the top:
I used Red Tuck Tape (used for Poly) to seal over the exposed drywall edge, matting and wood. This will keep dust and any loose bits of material falling in between the velvet and finished frame. Just kind of seals it up. Here's the wrapped piece of foam going in:
This was cut to fit tight and was set in place with double sided tape. Then the velvet wrapped over and stapled:
The only real difference with the top over the rest is that I have the power point being hidden here for the rope lite. I just cut a channel for the wire in the foam and once in place and the frame mounted, you won't see it. A little close up of the top corner area:
For the frames I'm making them with pine:
For this velvet I basically built three frames, one with in the other, to give me two borders. This way, if I decide to add bamboo, matting or another material to the front face, it will have dark wood bordering it. I also did the interior frame not as high as the exterior edge frame to build it up a little and give a slightly different profile. Here's what that looks like:
All sanded and ready for it's dark stain bath:
Once I split, cut and aged some bamboo:
I wanted bamboo running vertically on the sides only so here's one being checked for fit:
Without flash:
This is what it looks like with both bamboo pieces and rope lite on:
Of course, you won't be able to the lite once it's hidden behind the frame. I am adding a thin strip of wood on the inside edge of the back of the frame so you can't see any of the lite at all. Because this wall opening is right at the doorway and on a small wall, you could stand in the middle of the room and see the lite itself. UNACCEPTABLE!! This strip will prevent any visible lite. Just the glow on the Wahine!! More to come soon!! TabooDan Edited to replace missing photos. [ Edited by: TabooDan 2011-03-19 08:25 ] |
|
T
TabooDan
Posted
posted
on
Sun, Jan 2, 2011 11:15 AM
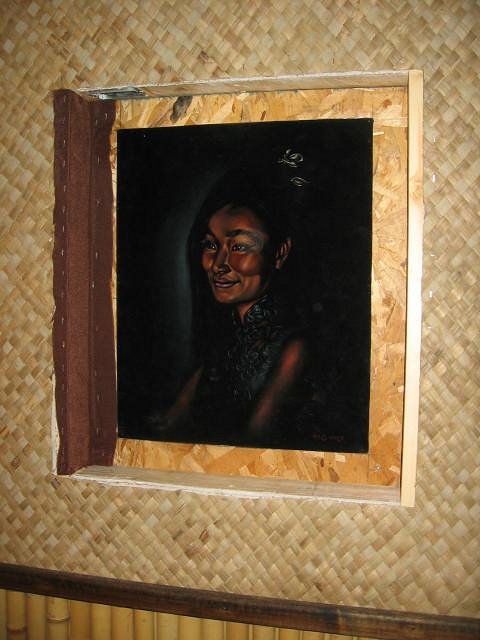
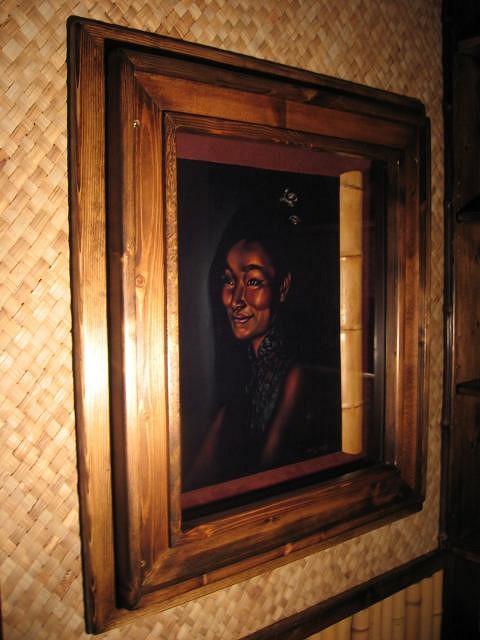
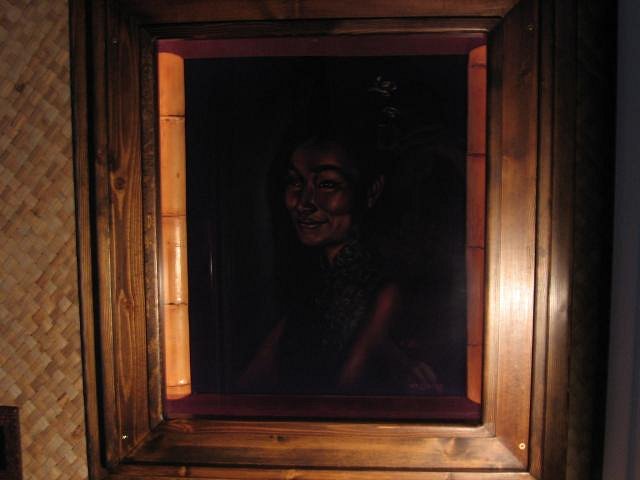
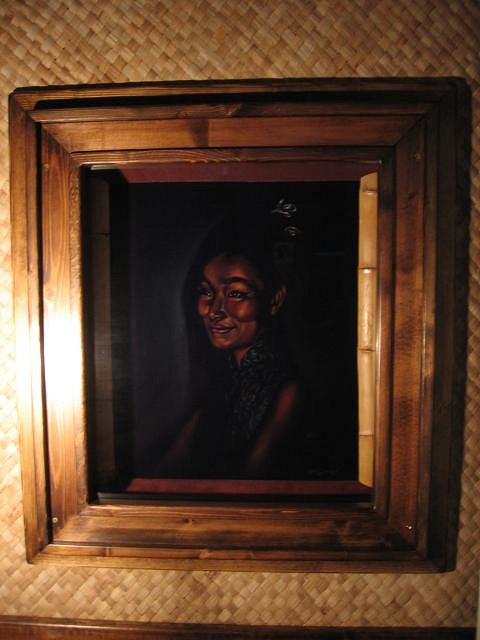
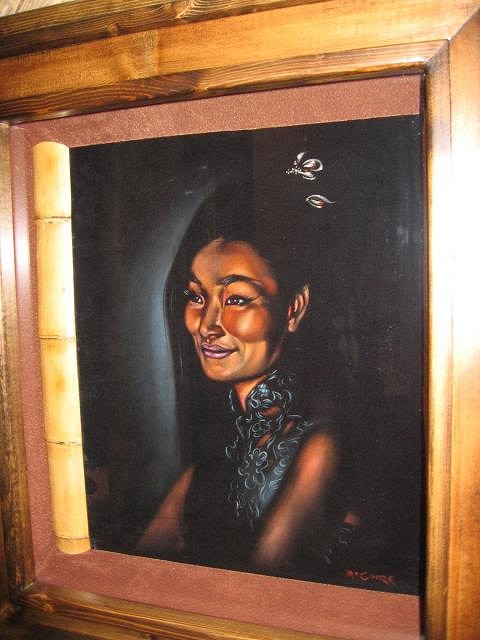
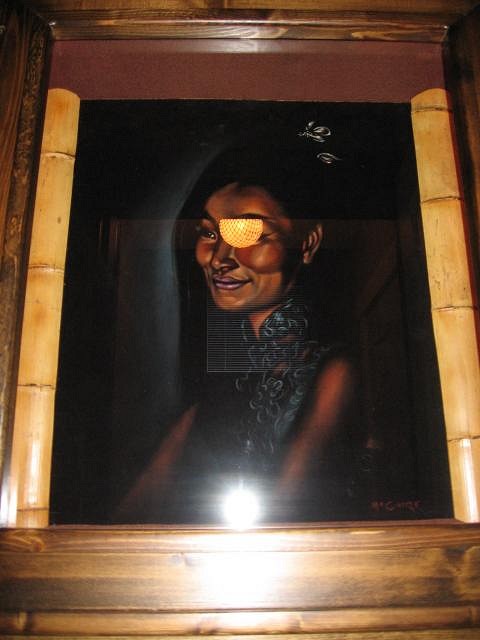
Here's some of the finished pictures of this project. Sorry if this dragged on a bit. I wanted to show the step shots in case anyone wanted some details. Once installed with glass:
You can now see another frame that was added around the frame I finsished and pictured inlast post. I had a problem. In this shot, you can just see the glow of the rope lite on the bamboo:
Sorry for the crappy pic's! We all know how the flash drowns out alot of the mood and atmosphere. It looks WAY different in person and I am no photographer so you aren't really seeing what it truly looks like. The whole image glows and the details and contrast with the materials like the brown and black velvet, bamboo, and dark wood looks pretty good.
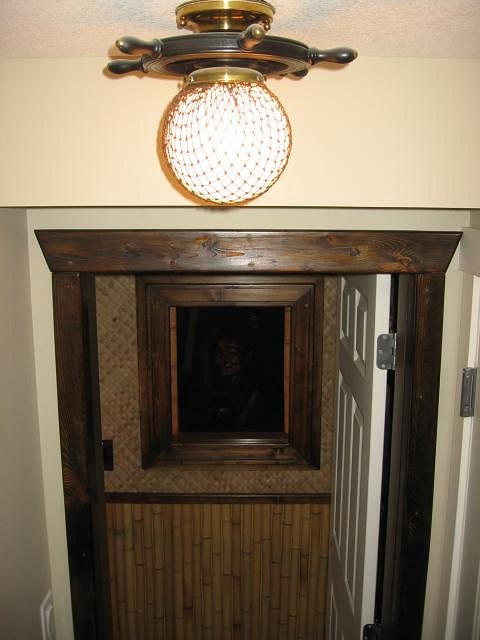
Okay, now the following isn't really a good picture but I kind of wanted to include it to show the reflection of the light that is just outside the doorway at the bottom of the stairs:
I was trying to be Artsy Fartsy but just don't have the camera (or the time) to set it up properly. The flash had to be used or you only see a blur. I will have a friend of mine shoot the room properly when it's done so we'll see how those turn out one day. This is the view coming down the stairs and into the Zombie Hideaway:
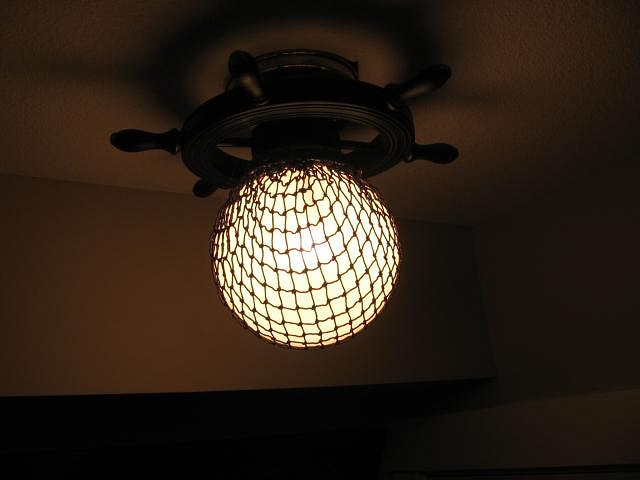
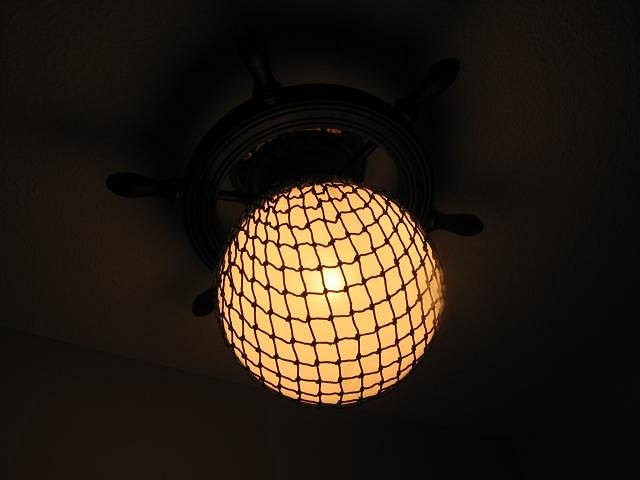
The fixture I made with a few other vintage lamp pieces. Brass canopy, small ship's wheel, misc. light hardware and a glass globe covered in old fishnet. I may add a colored bulb one day but for now it's just white.
More to come. EDITED TO REPLACE LOST IMAGES. [ Edited by: TabooDan 2011-03-19 08:46 ] |
|
V

VampiressRN
Posted
posted
on
Sun, Jan 2, 2011 3:21 PM
Wow...that is a lot of work...great job...it looks wonderful. |
|
T
TabooDan
Posted
posted
on
Thu, Feb 24, 2011 6:02 PM
It sure is disappointing that the last 20 pictures are missing! I thought these may get repaired but I guess not. TabooDan |
|
D

Dustycajun
Posted
posted
on
Sat, Mar 5, 2011 5:46 PM
Taboo Dan, Sorry you lost all of your pics in the great white out. Hope you can find the time to re-post them. Where you going to display that Islanders Clamshell bowl? DC |
|
V
VampiressRN
Posted
posted
on
Tue, Mar 8, 2011 10:40 AM
Sorry about the photo loss...hang in there though, we all get such enjoyment out of seeing your work...re-post them when ya can. :) |
|
SF
Slacks Ferret
Posted
posted
on
Tue, Mar 8, 2011 10:54 AM
Ditto that! |
|
E

ESP182
Posted
posted
on
Wed, Mar 9, 2011 12:09 PM
Nicely done. Keep the pics coming. Loving the detail you got going in there. I'll have to post pics of our bar space on here one day. |
|
T
TabooDan
Posted
posted
on
Sun, Mar 13, 2011 8:50 PM
Thanks everyone for the encouraging words!! Gives me a bit of fire to make some time and try to get an update on here. Hang in there! Hopefully I can get some posted this week. Aloha Dusty Cajun!! Right now I've got that clam shell bowl on one of the shelves where all the mugs are going. Will have to post over in Crypto-Mug thread when I get a few seconds. Thanks for asking! Mahalo, TabooDan |
|
C

corrinnao
Posted
posted
on
Fri, Mar 18, 2011 12:07 PM
wowzers!! Great bar so far! So inspiring and very well crafted! I love the sunken velvets in the wall - great idea. I love the idea of the twilight sky too. It reminds me of the Waldorf in Vancouver. And you really lucked out on the stone panelling too! Any ideas on what you're gonna do for the flooring? Can't wait till you sort out the photos and post some new ones! |
|
T
TabooDan
Posted
posted
on
Sat, Mar 19, 2011 8:55 AM
I just replaced all the missing pictures in the previous posts. Hopefully these stick around! I did document them as I added so it made it a little easier but am glad it's done :) Thanks alot Corrinnao!! I like your shot of the Waldorf. Reminding you of the Waldorf is a compliment but that is where I based a few of my ideas on. I've had to drop the Twilight Ceiling plan in this Lounge. It's taking too long to do some of the other projects so I am saving that one for another room. I will be posting pic's of what I'm doing for the floor and replacement for the Twilight plan soon. Keep coming back!! |
|
MPP

Mr. Pupu Pants
Posted
posted
on
Wed, Apr 6, 2011 11:51 PM
Hey Dan. I'm a huge fan of your place. Can't wait to see what you post next. |
|
RT

redwood tiki
Posted
posted
on
Thu, May 12, 2011 7:36 PM
Talk about classy! Really nice work, I love the attention to detail and old-school vibe. Which wall will you be tacking all the dollar bills to? |
|
T

ToddVegas
Posted
posted
on
Mon, May 16, 2011 12:57 AM
Greetings friend! Your bar is coming along great. Can't wait to see what's next! Thank you for your time. TODD |
|
S

shamefultiki
Posted
posted
on
Sat, May 21, 2011 4:24 PM
Hey TabooDan, It's me Shameful Tiki. I'm the guy who hosted the "Return of Tiki" night at the Waldorf last June. We had a chance to chat a few times leading up to it but haven't caught up with you since. I think your bar looks amazing so far, would love to see it when it's finished! Rod |
|
UT
uncle trav
Posted
posted
on
Tue, Jan 17, 2012 3:36 PM
Aloha Dan. Would love to see an update. I hope all is going well for you up in the great white north. |
|
FT

forgotten tikiman
Posted
posted
on
Tue, Jan 17, 2012 8:29 PM
From what I saw from all the progress shots so far, this room is too cool!! I love it. Great job bra!! You Got skill :) |
|
W

Walt_Tiki
Posted
posted
on
Fri, Jan 27, 2012 8:35 AM
It looks like this will be the spot to be when its done good job so far, and on a side note your Santa Cruz deck collection is awesome. The good cocktails never last long enough [ Edited by: Walt_Tiki 2012-01-27 08:36 ] |
|
T
ToddVegas
Posted
posted
on
Sun, Feb 10, 2013 12:41 AM
Awesome work so far!!! |
|
M

Murph
Posted
posted
on
Sun, Feb 10, 2013 2:22 AM
Should be almost done by now. Any updates? |
|
BK
Big Kahuna
Posted
posted
on
Sun, Feb 10, 2013 6:23 AM
Yeah, where'd ya go, Dan? Hope all is well. |
|
UT
uncle trav
Posted
posted
on
Mon, Nov 25, 2013 2:30 PM
I would love to see some updates. Hope things are going ok for you Dan. |
|
UT
uncle trav
Posted
posted
on
Wed, Aug 12, 2015 4:41 PM
Another great build from the past. TabooDan's last post on TC was in 2011. Hope he is doing well. |