Tiki Central / Tiki Carving
A couple more weapons
|
C

coconuttzo
Posted
posted
on
Mon, Feb 1, 2010 2:34 PM
Aloha or Malo e lelei as we say in my native Tongan tongue. I live on the Hilo side of the Big Island of Hawaii(tools & supplies are hard to come by and extra costs of S&H makes them not as affordable as I'd like). I found this forum first week of 2010 and was amazed at all the talent. So many gifted minds all in one place willing to share tips & ideas. That's what I call MANA! My wife bought me a dremel for B-day back in '02 and I've hardly even used the machine. After seeing this forum, I was inspired to do something about it. I always admired those bone hook pendants but was never happy with the affordable types available. In my opinion(no offense) they just looked too... CHEAP! The ones I really liked, I could never afford. So I figured why not make them myself which I was kinda intimidated at first. Having never carved anything in my life(I draw mostly)I searched the internet for any 'How To's on bone & found this forum, via TikiMango's thread which I must say is extraordinary. I can see the growth from his first bone to his most recent. Then I seen a couple of other's like, Rainhawk & Paipo. You guys are masters at this and yet I read that some of you are still taking lessons from other masters. That goes to show that we are never too old or too good to add on what we are already good at. There's also some youngster(can't remember his user name) from NZ who posts some really cool stuff at only 15yrs. of age. That was really impressive. Hat's off to you whomever you are. Everyone else I forgot to mention, outstanding work. Thank you all for the inspiration. [ Edited by: coconuttzo 2012-11-06 22:19 ] [ Edited by: coconuttzo 2012-11-08 13:28 ] [ Edited by: coconuttzo 2012-11-19 13:04 ] [ Edited by: coconuttzo 2012-11-19 15:53 ] [ Edited by: coconuttzo 2012-12-11 14:37 ] |
|
C
coconuttzo
Posted
posted
on
Mon, Feb 1, 2010 4:01 PM
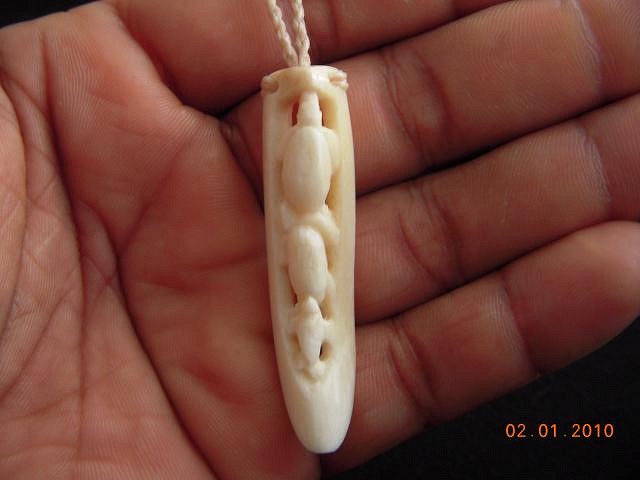
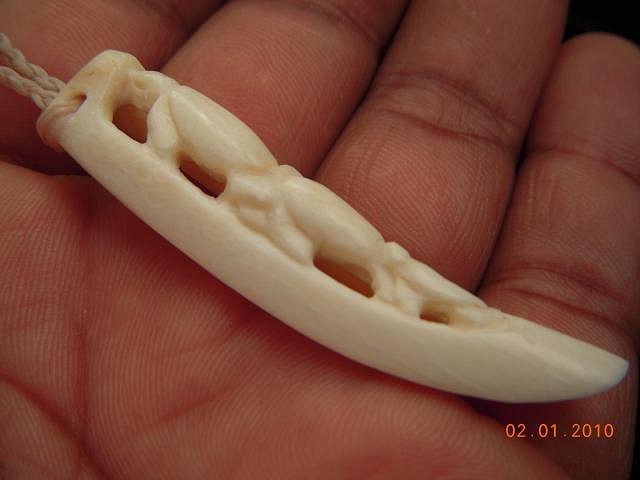
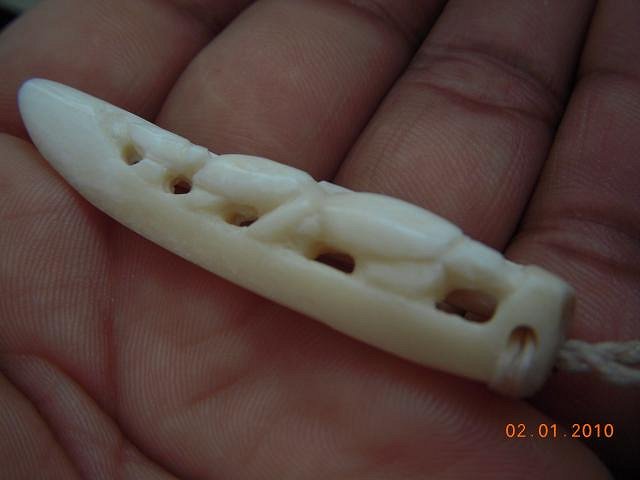
Aye, I forgot for post some pics of my first born boneheads. I am not happy with my first, I still have enough material to try to salvage it, but for now I am too ashamed of it to call 'my own' creation. Maybe I'll take a before & aft surgery pic(that's if I ever decide to pick it up again). So this is actually my second piece I ever carved out of bone on Jan 27th. It measures 2 1/4" x 1/2"(67mm x 14mm). I made this for my wife who loves green sea turtles. It depicts 3 turtles in a single file line, portraying me, my wife, & our son. It was inspired by different pieces done by Rainhawk and TikiMango. I'd first seen Rainhawk's piece, & it looked like it was carved out of a boar's tusk. I wasn't sure what it was but imagined what boar's tusks would feel like under the dremmel knife & then a recent post of TikiMango's showed up and I was massively impressed. Although I had no boar's tusk, I had improvise & had to use bone from the one & only Petco store on the island(2.5 hrs. drive away). Coincidentally I was looking for the new Target(only one on the island) & was lucky enough to find Petco across the street. All Brand New Shopping Centers opened last year July. I cut the piece off one of those corner edged ridges and started shaping and carved out about 3hrs. later(minus the thinking of what to do & other sidetracked activities)what you see here...
I found dental carbide burrs on ebay and my dentist gave me a few of his used ones that was still in decent shape. So I tried testing it out to see how fine of a detail I can get. I am still not happy with the 3rd turtle which turns out to be 5mm long. My son says it looks like a seal & you know what , I think he may be right. Man, I need to get me a flexshaft. The dremel tool was too cumbersome to hold, especially for that lil' guy. And yes, that is the 2nd turtle's head on the left rear of top turtle. I told my wife that it portayed her as always trying to take over my position as HOH. She just laughed. She adores this piece very much.
Sorry about the lighting, clouds came, rain gods blessed us after no rain since Dec. 20, 2009.
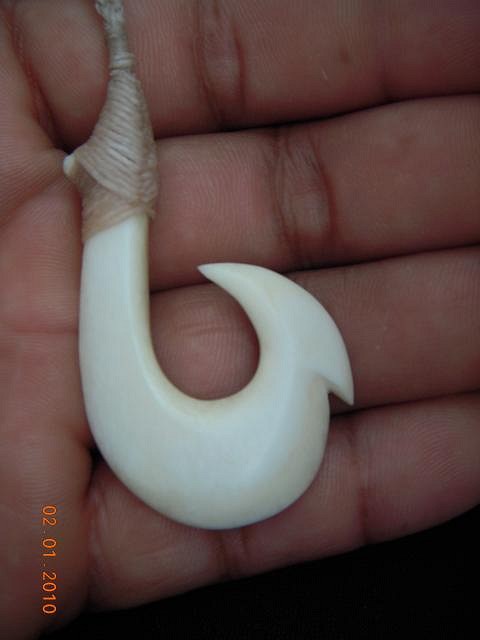
This is a simple makau design that I just was futtin' around just to see how fast I could make one. It measures 2 1/2" x 1 3/8"(60mm x 35mm). Took me about an hour total. I was confused when it came time to lash it though. There are no decent how to's on that subject with out drilling a hole in the middle for the cord, so I had to figure it out myself. I had to beckon the ancestral mana for assistance and I just started going at it. It holds pretty strong so I am confident that I have it done right.
|
|
4

4WDtiki
Posted
posted
on
Mon, Feb 1, 2010 4:13 PM
Welcome Mr. Nutzo! |
|
C
coconuttzo
Posted
posted
on
Mon, Feb 1, 2010 5:05 PM
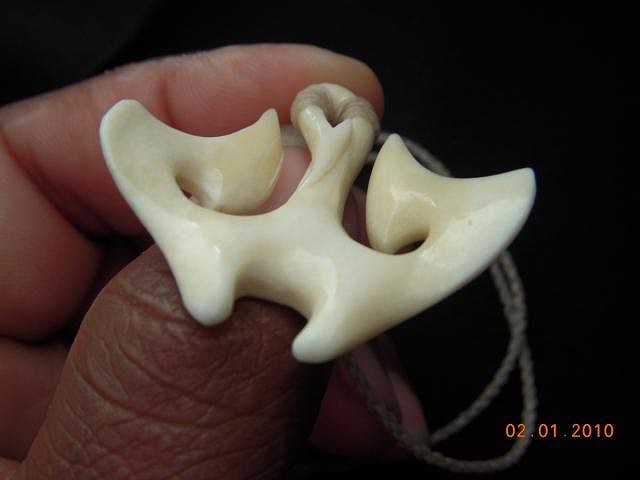
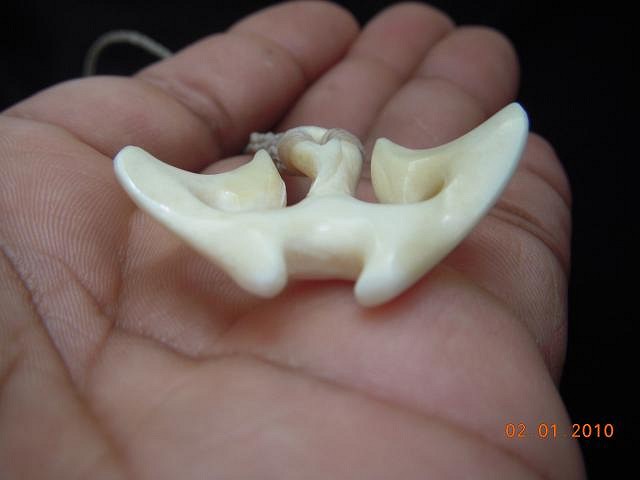
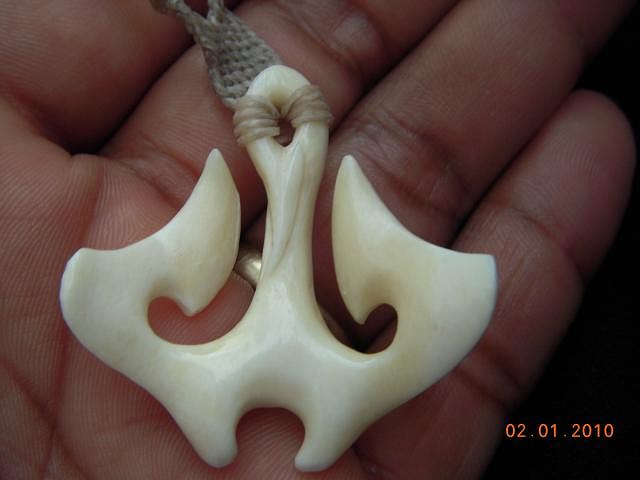
I was drawing sketches in my book of 'STUFF' this past Sat, Jan 30, of designs that I've never seen before for makau designs. I wanted something to POP! So I doodled & thought, 'what about double hooks?' I've seen some, but I wanted to seperate myself from the others, so the symetry elements went in then not so symetrical but more fluid, they then started to resemble anchors, so flowing anchors were drawn and then I put a semicircle gap on the bottom and was amazed that I had eventually ended with a design that resembled a manta ray. So my next drawing subject, a flowing manta ray, but I wanted mine's to fly, so I had to picture it underwater, in flight, thus the piece I call "Soaring Depths". It measures 1 3/4" x convexed curved 2"(44mm X 51mm).
This was pretty difficult to say the least because of the different planes that I had to make up as I was creating it which a paper drawing does not show. I wanted the planes to stick with the fluidity of the piece. At first started by trying to be more symmetrical but then thought, when is mother nature ever symmetrical? That's the reason our left finger prints never match our right. The bulky Dremel don't help either.
I let the bone speak to me on all my pieces so this was a no brainer on how I was going to achieve the curve for the fins, if that's what they're called.
I lashed it on with waxed nylon thread, 4 plaited, unbraided, with a simple single prussik loop but dressed the loop to show the threads wrapping around & dissappearing around the back. Then I wanted to do something different yet again and remebered my sisters braiding friendship bracelets back in da day. So 3 tried & failed attempts & a couple of youtube tutorials later I got it started to about 8 rows(to even out my thread). I then split them & made 4 rows each & then continued the 'under 2, over 1' 4 plait round braid. When I was finished, it was too tight for my neck. I only compensated for the usual round braid and did not take to account the friendship braid knots(note to self: Next time stick to the plan, dummy). |
|
C
coconuttzo
Posted
posted
on
Mon, Feb 1, 2010 5:29 PM
Malo 'aupito(Tongan for thank you), for the constructive criticism,4WD. I know it did lack detail. I don't have much fine detailed burrs to work with or a flexshaft would help too. I just wanted to log something down where I can record my progress. After all, the turtles were my second piece ever carved of any material in my entire life. I enjoyed it alot. I have so much respect for 3-D artists, sculptors. I can draw pictures with perfect shading & highlights, trying to capture a 3D likeness but to actually create the scupture, tiki, carving of any kind. That gives artistic talent a whole new meaning. I want to learn more. I need... to learn MORE! Constructive criticism is always welcome. That is how I know what other people feel or like when they see my stuff. If I ever want to sell my pieces, I need to hear from the artistic pros what works & what don't. Then I can concentrate on making what sells & stop wasting time & energy on what doesn't. |
|
4
4WDtiki
Posted
posted
on
Mon, Feb 1, 2010 6:03 PM
No criticism intended, though I now wish I worded that different! I'll bet the detail shows better in person compared to a pic online. Some bone carvers on here have stained the bone, I think with tea, and it gives the piece an aged look, but also gives some contrast to the carved lines and makes them show better. Maybe something to play around with? |
|
BTS

BIG tiki scott
Posted
posted
on
Mon, Feb 1, 2010 6:14 PM
coconuttzo!!! sum very nice bone carvin!! i havent tried this myself but am slowly gettin the itch!!! you definitly have genes for doin this as those are some awsome first bone carves!!!! cheerz!! |
|
C
coconuttzo
Posted
posted
on
Mon, Feb 1, 2010 7:01 PM
It's cool 4WD, I happened to agree with you when I was creating it myself. To me, it looks like you said, 'lacking in detail' but my wife seems to like it that way. I was thinking of doing the stain thing but she does not want me to touch it anymore. She considers it hers now. I just wished I had better burrs to work with. Big Scott, malo for the compliments, since I started thislast week, all I've been doing is cutting drilling, grinding, & sanding and when my hand gets tired from holding the dremel, I am drawing new designs & try to put them to actual carvings. I don't eat. Sometimes I can't sleep cause designs will be cramming my mind & unless I unload it on paper, I have a hard time sleeping. Sounds like I'm addicted somehow to the bone dust I guess. |
|
B

Benzart
Posted
posted
on
Mon, Feb 1, 2010 7:34 PM
Boy Oh Boy Nuttzo, You got bit Bad man, there's No hope for you at all now. Good thing too, for US anyway because your first pieces are incredible for the firsts. ANd on those sites are hundreds of pages of inspiration and help. You have nowhere to go but up so get started now! :o Have some fun.. Cheers |
|
L

laojia
Posted
posted
on
Tue, Feb 2, 2010 11:52 AM
Another bone master is born... Welcome on TC coconuttzo! J. |
|
M

MadDogMike
Posted
posted
on
Tue, Feb 2, 2010 5:46 PM
Welcome Coconuttzo. Great start, beautiful lashings too! I dabbled in bone carving, it's such a cool material. |
|
C
coconuttzo
Posted
posted
on
Wed, Feb 3, 2010 12:53 AM
Ugghh! I hate work! It drains me of all my time & energy to do more carvings. I wish I had enough carvings to sell so I didn't have to work for someone else. Benz, malo for the tips, I am deffinately woking on gettin more tools. Filter mask, needle files, & some sharp stainless steel wax carving set(12pc.) just arrived today from various ebay sellers. I've never used any of these tools in my life, so I'll see how things go. Laojia, malo 'aupito, but I dunno about master, not even close just yet. Maybe "Bonehead" will do for now, lol. MadDog, malo for the comps. The lashing part was confusing. That was actually after my second try & I was amazed that it still held together after I tugged really hard. I was almost tempted to take it to the ocean for a test drive, lol. I'd like to try antlers next but I always get outbid on ebay by those late bidders who just sit there before bidding ends & beat my max. Happened 5 seperate occasions. I might as well give up already, on antlers, that is. |
|
T

TikiMango
Posted
posted
on
Wed, Feb 3, 2010 4:08 AM
Really great work for your first ones, very impressive! It seems that you have already found your own style, and your cord work is very solid, nice. I'm glad you found TC from one of my posts. Looking forward to seeing your progression. Post and post often. |
|
T

Tikilizard
Posted
posted
on
Wed, Feb 3, 2010 12:02 PM
Exceptional Bone work! Keep'um coming. How about some progress shots? Would like to see the master at work....lol |
|
M
MadDogMike
Posted
posted
on
Wed, Feb 3, 2010 12:49 PM
Hey Coconuttzo, I tried some deer antler and wasn't impressed - it seemed more fibrous, less dense. Won't polish as well. |
|
C
coconuttzo
Posted
posted
on
Sun, Feb 7, 2010 2:31 PM
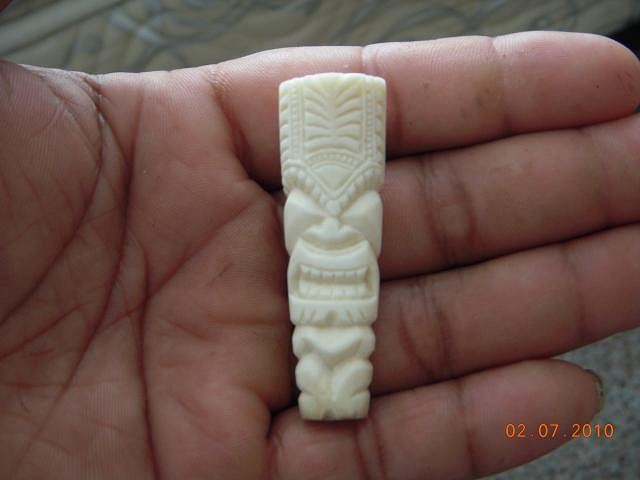
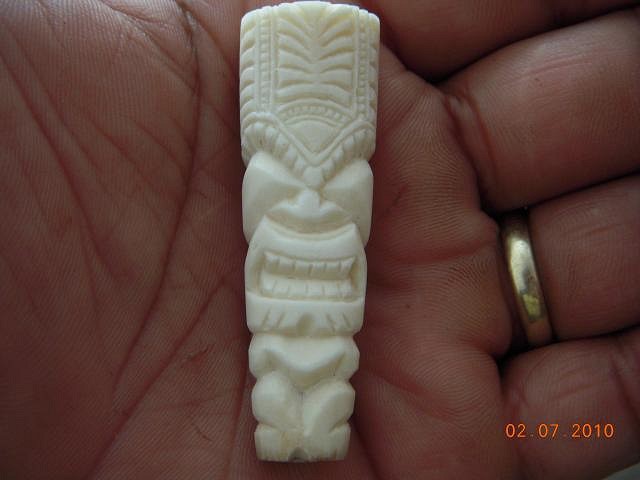
I figured I'd try my hand at an actual tiki this time. He's 2 3/4" x 3/4"(6cm x 2cm). He's carved of Tongan influence. "Tangaloa", in Tonga, who was the ancient god of the sea. He is also believed to be the father of all mankind. This was a challenge, especially the fine detail work in the head dress. The symmetry was off a li'. But I figured I still share. He took me about 3 hours(still no flexshaft). I tried to get some progress shots but after the first hour into carving, I didn't know my camera needed recharging.
Closer image:
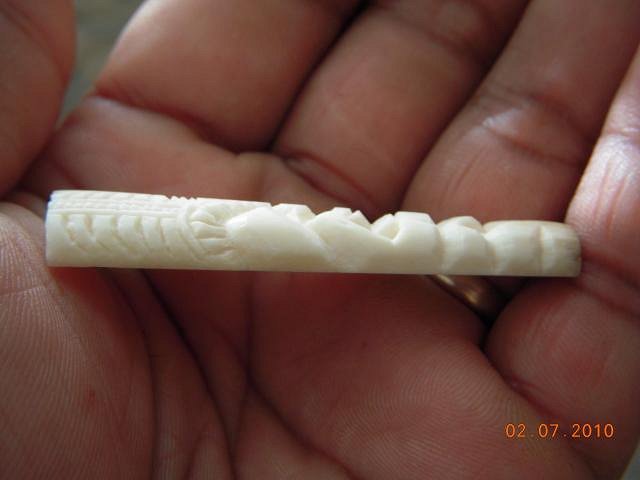
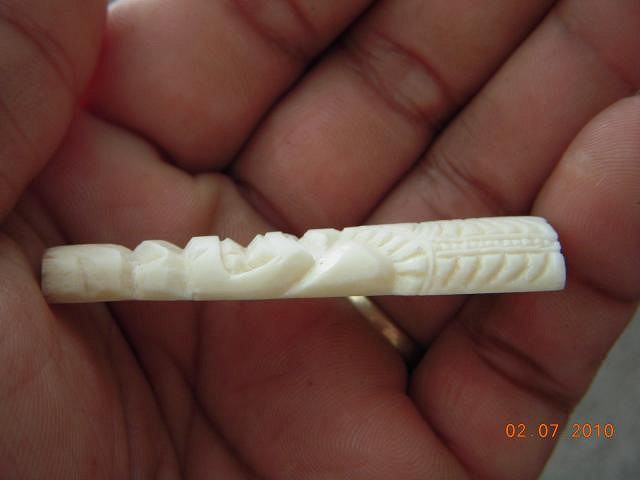
Side Profiles:
Don't know if I should stain the lil' guy or not. Also wondering if inlaid paua shells shaped like his eyes would match. Any suggestions? |
|
B
Benzart
Posted
posted
on
Sun, Feb 7, 2010 5:21 PM
Really Nice tiki there Nuttzo, excellent detail for only 3 hours with hand tools. I'd Really love to see your tools. |
|
C
coconuttzo
Posted
posted
on
Mon, Feb 15, 2010 11:45 PM
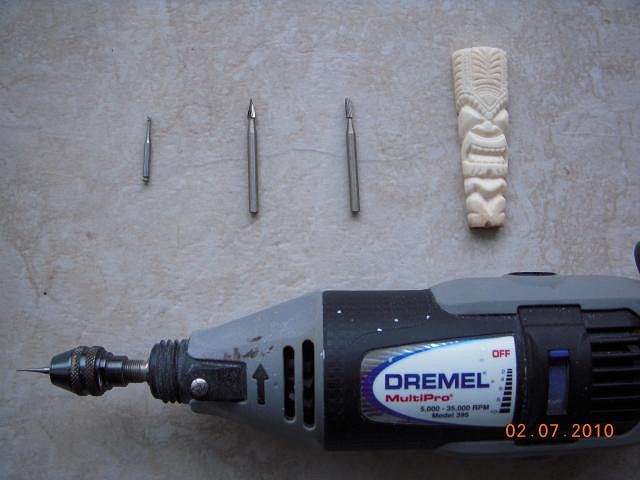
Malo 'e tau lava. Here are the tools I used for the 'Tangaloa' tiki.
The bur on the left & one in the dremel are the dental type burs, I like them for the detail work but the shafts are a bit too short to work with. |
|
C
coconuttzo
Posted
posted
on
Tue, Feb 16, 2010 12:31 AM
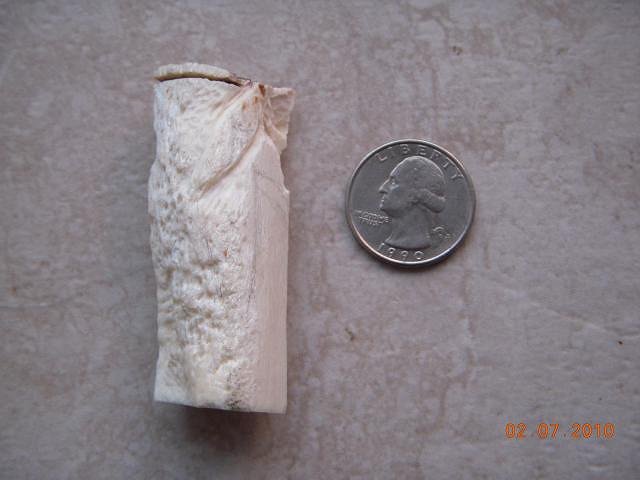
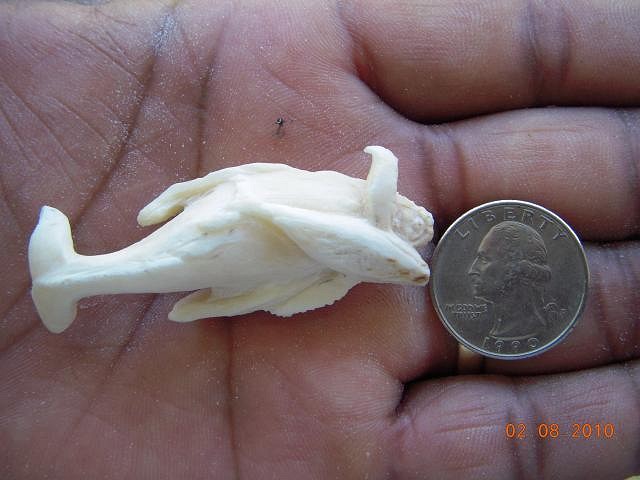
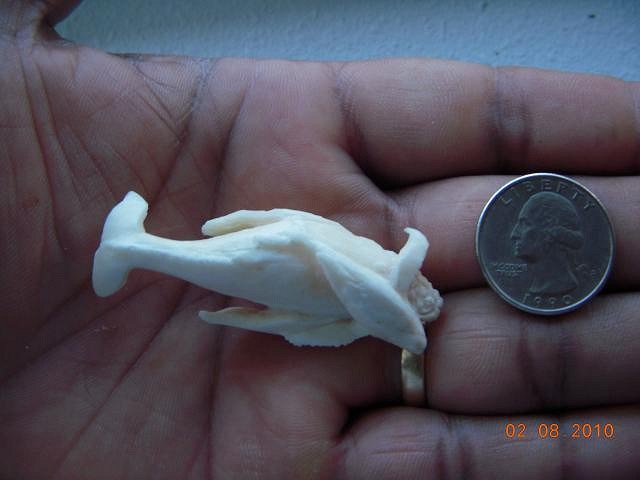
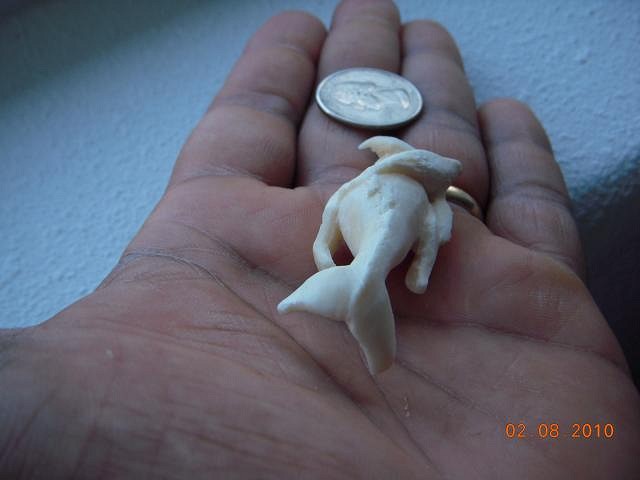
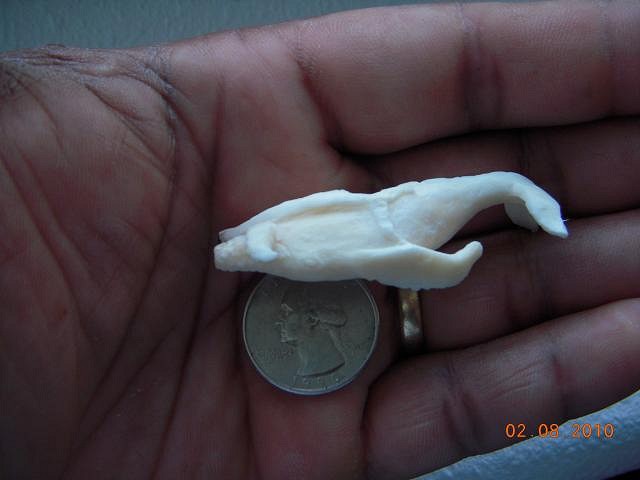
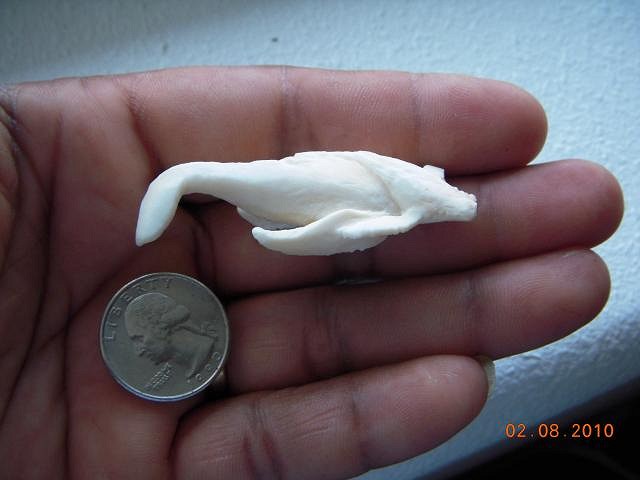
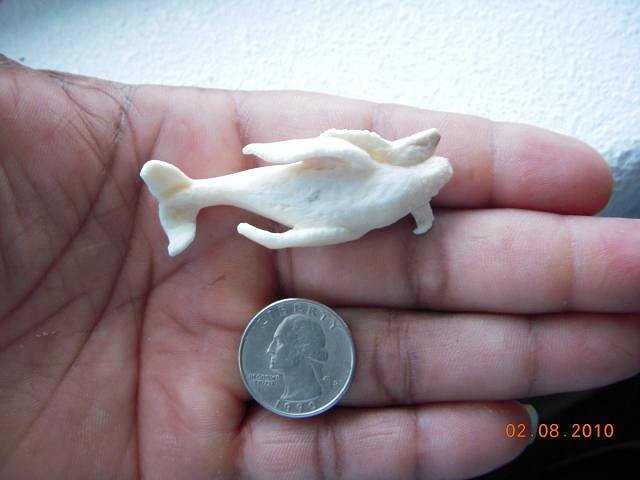
It's me again, I was not planning on showing this because of an accident that occured at the end which has halted the project. But I put so much time & effort, I figured I might as well share my experience/trial. Although it's non tiki themed, I've been wanting to do a project by carving whales out of bone for a while now & wanted to show some progress pics along the way. So here goes:
10 min. in... I forgot to take a before pic.
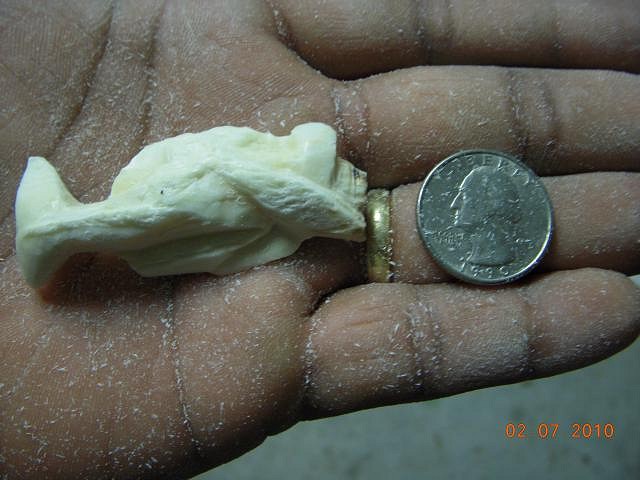
about 3 hrs. later. It was getting late so I had to continue the next mornin'.
1 hr. into the next day.
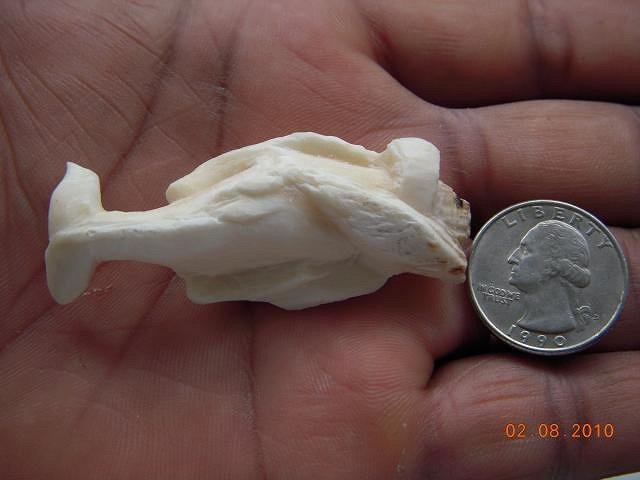
2 hrs. after
another 2 hrs later... man those bumps on the mother's mouth was a pain!!!
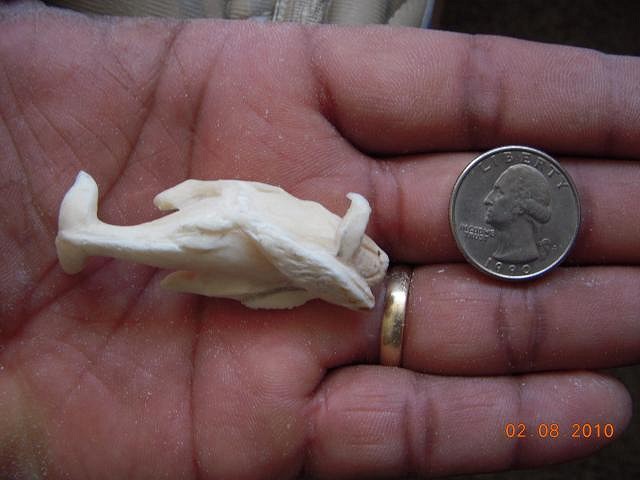
1 hr later... ready for sanding and final touch ups. Whew! I needed a break.
Okay, so after taking the last pic, I put the piece down to take a very long break. My lovely wife decides to pick it up to admire it & she accidentally drops it on our hard tiled floor. I was devastated. I wanted to cry & yell at her at the same time. But I knew she didn't intend to do it so I forgave her. The flukes(is that what they call it?) of the tail broke off. I haven't had the energy to pick up the piece and try to salvage it. I don't want to throw it away either. Too much painstaking hard work to do that. Maybe I'll post the broken piece. I haven't take a pic yet. It's too painful. |
|
T
TikiMango
Posted
posted
on
Tue, Feb 16, 2010 4:15 AM
The whales were... are looking great! Sorry to hear about the little drop, whales should know to stay off dry land. I'd use super glue to glue the tail back on. You'll only see a small seam at the end of the day, that probably only you will ever notice. Your burrs are very similar to the only ones I use as well. |
|
T

TheBigT
Posted
posted
on
Tue, Feb 16, 2010 1:34 PM
Wow, great carves. Luv the whale! |
|
S

surfintiki
Posted
posted
on
Tue, Feb 16, 2010 2:49 PM
coconttzo! That Tongaloan is quite nice! I'd love to see a close up of your burrs...it's about time I bought some new burrs myself. |
|
C

Clarita
Posted
posted
on
Wed, Feb 17, 2010 3:46 PM
oh very nice carvings, sorry about the little accident, the tangaloa and the wale are perfect. |
|
B
Benzart
Posted
posted
on
Wed, Feb 17, 2010 9:27 PM
Ya, Sorry to hear about the tail break up,, those things happen to all of us now and then, just more lessons learned. The piece was looking Great too. Oh Well now you'll have to do another, bigger better one!!? |
|
C
coconuttzo
Posted
posted
on
Tue, Mar 2, 2010 11:37 AM
Aloha,
Question... how can I sand without losing the details? Should I sand, or not? |
|
M
MadDogMike
Posted
posted
on
Tue, Mar 2, 2010 2:22 PM
Beautiful work Nuttzo. I had a friend drop one of my bone pieces and break it. I took some superglue to it and fixed it pretty well. Seems to be strong and only a little seam - better than throwing it way. |
|
T
TikiMango
Posted
posted
on
Tue, Mar 2, 2010 3:20 PM
Nice pendant! I say sand and polish... easier said than done though. You can use small strips of 200 grit sand paper to get the surfaces smooth, then some 1000 grit to get things really smooth. Follow that up with some polishing compound (I use white jeweler's rouge) and a buffing wheel for your Dremel and it'll shine like glass. |
|
S

seeksurf
Posted
posted
on
Tue, Mar 2, 2010 5:06 PM
Tight! Well done. |
|
C
coconuttzo
Posted
posted
on
Sat, Mar 6, 2010 6:00 PM
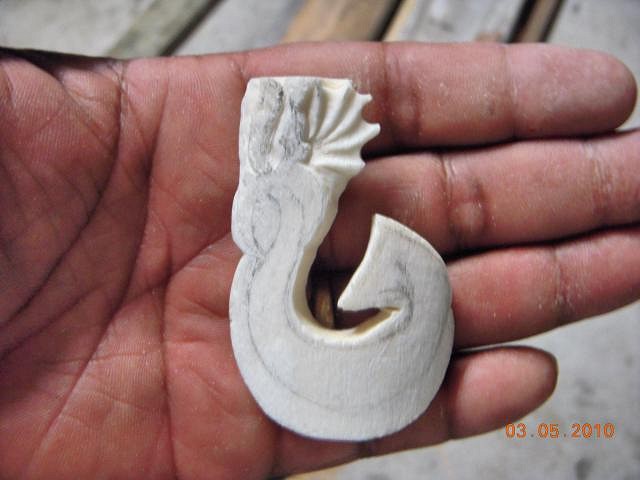
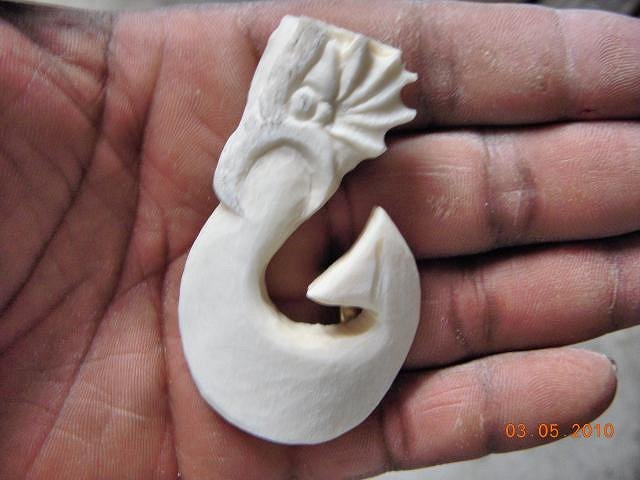
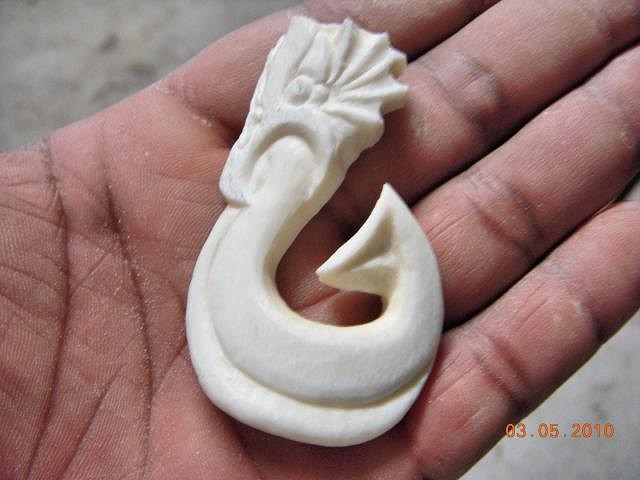
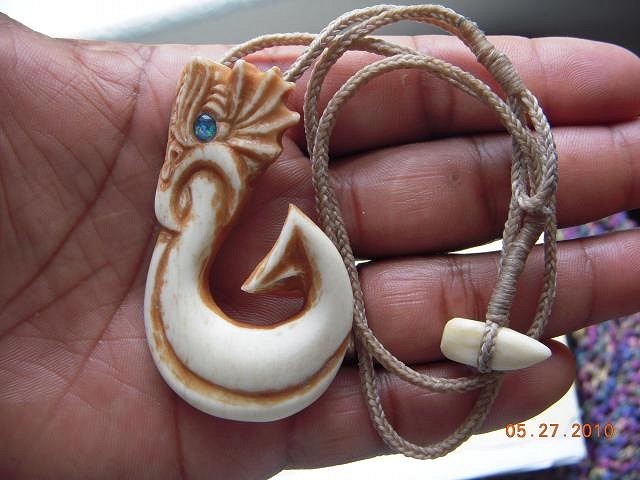
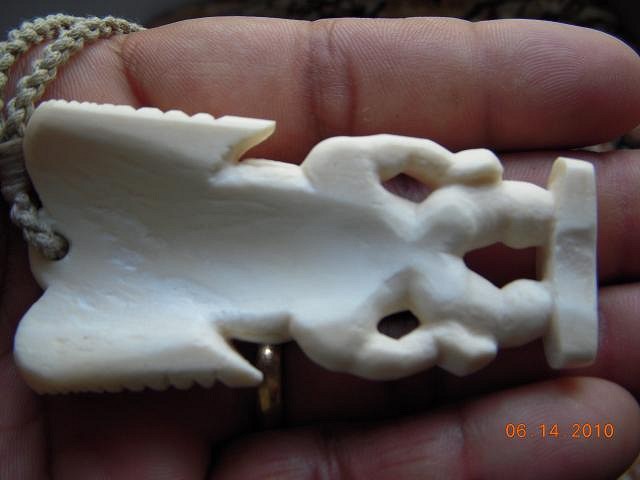
Here's one I started on last nite. I had a dream about it the nite before, so this is my version of a Taniwha head, the sea monster of Maori legend. It took me about 3 1/2 hrs. without staining. I was anxious to see the stain this morning when I woke this mornin so I stained it without sanding.
I figured I could sand the imperfections & hightlights later. The staining really brings out all the carving flaws, huh. |
|
C
coconuttzo
Posted
posted
on
Fri, May 28, 2010 3:00 PM
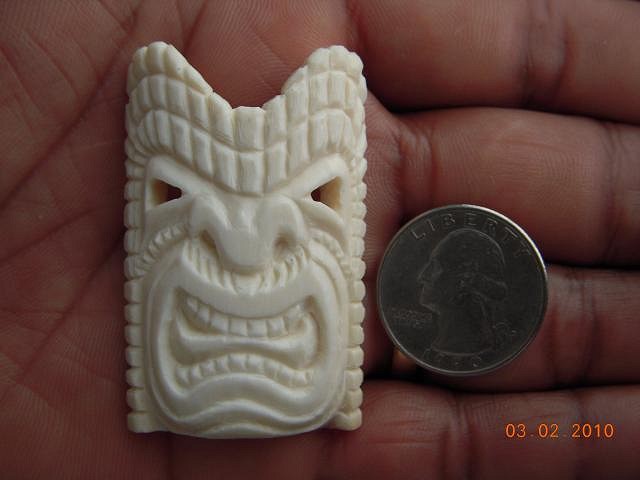
Malo 'e tau lava mai he pongipongi faka'ofo'ofa ko eni.(Good beautiful mornin' to you all) Everybody's been so busy doing what they love. I on the other hand have hardly done anything. It's been too long since I posted my last stuff I am actually embarassed to do so because so many of you have made more outstanding work. I've just been so busy with work & also added outrigger paddling to my regiment as a substitute for my lack of daily exercise. Doc says I need exercise but I can't afford exercise equipment, gym clubs are too expensive & runnin, walking around... boring. 'Nuff excuses though, here's what I've been doin' since last post...
I stained this Ku mask pendant in tea since the last pic, sanded it to bring out the high areas & restained it to give it that 'antiki' look. Buffed it up a bit & voila! 2"(51mm)L x 1 1/4"(32mm)W x 1/4"(6mm)thick.
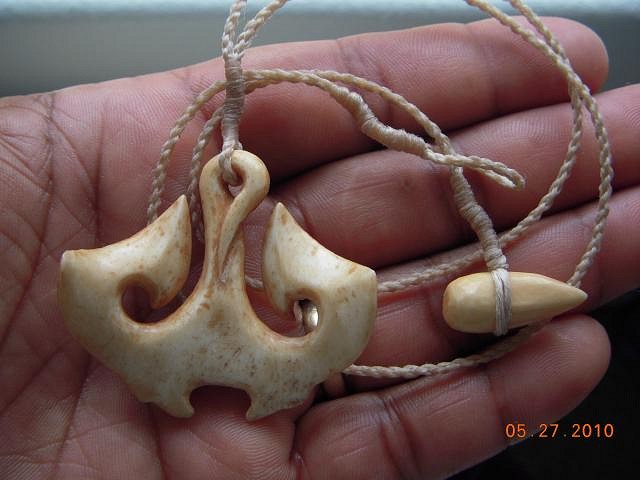
My attempt at another one of my stylized manta rays, with carved eyes & a different tail design & stained in tea. I wasn't too happy with the tail look & the piece of bone I was working was too porous. I kept trying to carve it out but it just kept getting deeper & I was afraid it'd be too thin a piece. Then I stained it, big mistake, it just higlighted all the porous pits, it looked like it was a dirty piece. Oh what the heck, I might as well keep this for my personal use only unless somebody out there wants to buy it. Any takers? 1 3/4"(45mm)L x 1 7/8"(48mm)W straight line between each tip. 3/16"(5mm)thick.
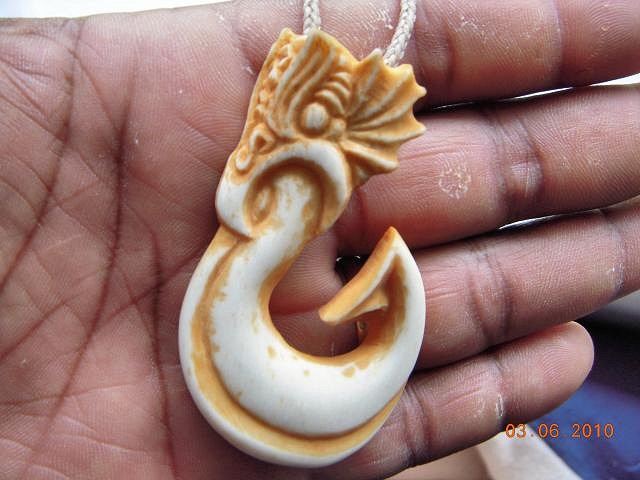
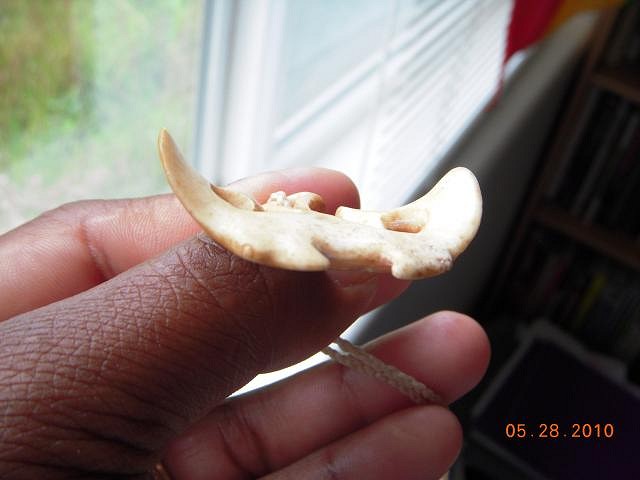
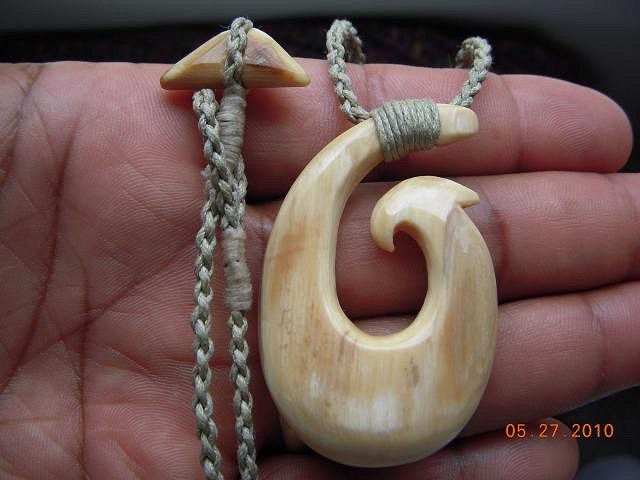
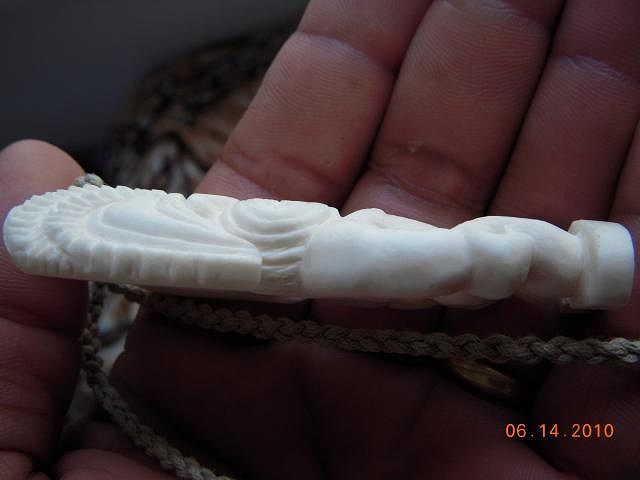
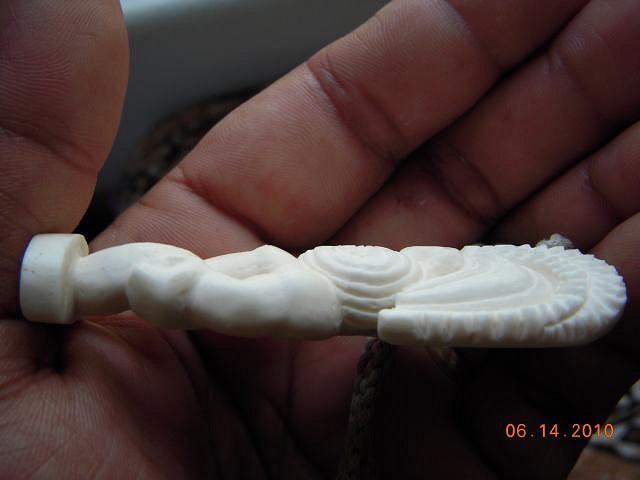
This one I really like. It's 1 5/8"(42mm)L x 1 5/8"(42mm)W x 5/16"(8mm)thick. If you haven't guessed it yet, the hook is supposed to be the Taniwha's tongue lashing out.
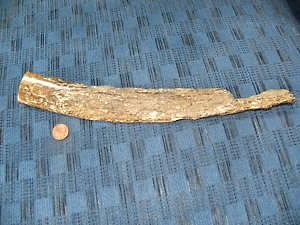
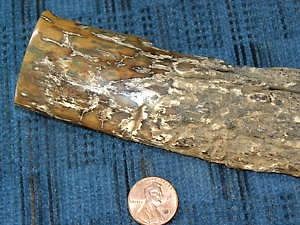
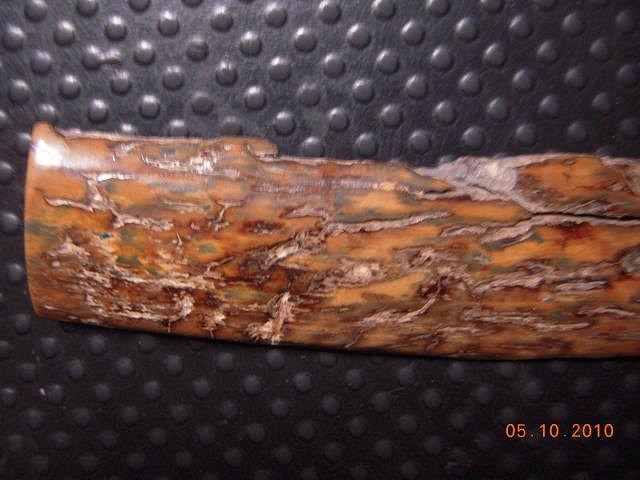
This here is a beautiful piece of Alaskan Woolly Mammoth bark ivory that I picked up from ebay. It was a pretty good bidding war, with $2 to spare, my highest bid was not beaten before the end. These pics are the pics from the ad itself(I forgot to take before pics when I received it). This is the hard outside bark layer of the extinct mammoth's tusk. It has mineralized ivory and brown colors mostly, with a layer of blue underneath and patches of blue closer to the surface. The patches of blue in the pics is what caught my eye. I just knew that this is a rare find in this type of material. This had a total length of 13 inches, with a thickness of 1/4th of an inch on most of the piece. This is at least 20,000 years old.
This is what it looked like after a whole days worth of sanding with an electric sander, 80 & 220 grit. Buffed it up a bit to see what other suprises I had. I liked the deeper valleys of the bark look so I didn't want to sand those out. I thought that that was a good call. What do you think?
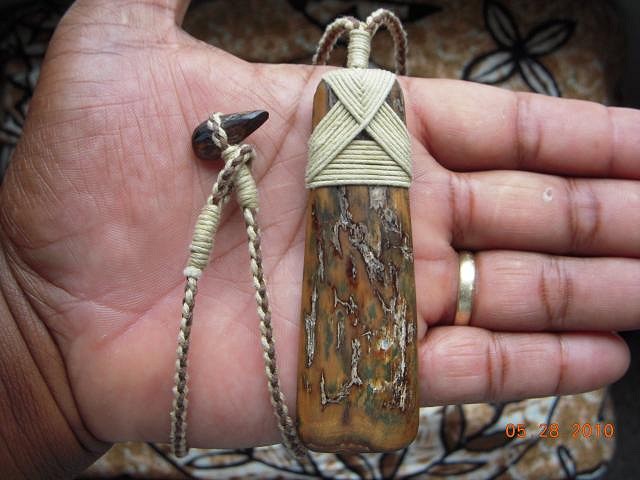
My first piece out of the bark ivory, a toki. the toggle is also made of the same material(all my toggles are made of the same material as the pendant created). 3 11/16"(94mm)L x 1 3/16"(30mm)W x 1/4"(6mm)thick. I was stoked to see how the blue patches turned out. The contrast with the natural aged brown & the crevices of the bark came out perfectly. I couldn't ask mother nature for a more beautiful piece. Money well worth spent.
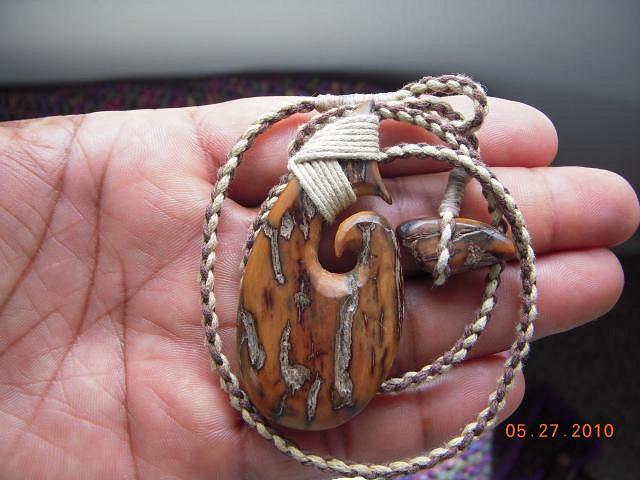
I wanted to make a makau(Hawaiian), matau(Maori), mata'u(Tongan), out of the same material but was torn at how much of the 'expensive' beautiful material would be wasted because of the negative space required for the traditional hook designs. My alternative was this simple koru design fit for a man yet elegant enough for a woman. 2 5/8"(68mm)L x 1 5/16"(33mm)W x 5/16"(8mm)thick.
Here's me sporting the hook the day I lashed it commemorating the day of our first outrigger paddling race in Kailua Kona. Received a few good comments from total strangers, now new friends with commissions.
another polished piece of fossil ivory.
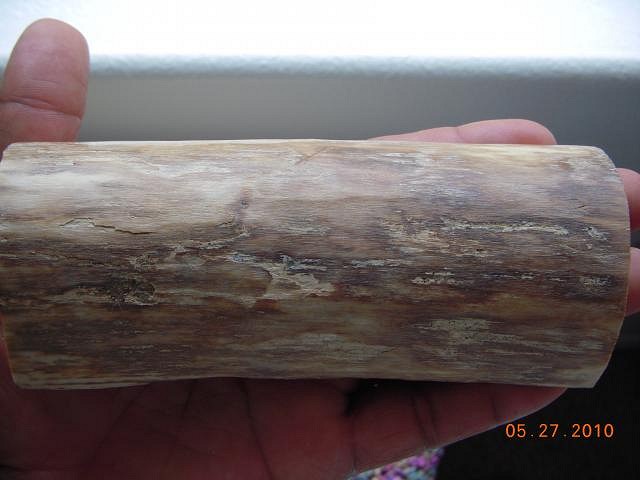
Here's one that's not polished. It's just the outer layer, like a huge bone with about a 1/2"(12mm) thickness. It measures 6"(152mm) long x 4"(102mm) wide(semi-circle) I see a future tiki mask in this whole piece. I wonder how much that would fetch? Or just a bunch of pendants would fetch more. I think the latter, although a tiki mask would look so cool.
And finally, this is another koru designed matau of fossil ivory that I designed cut, sanded & polished this past Tue.(was my day off) & finished with the braiding & lashing yesterday. 2 1/8"(54mm)L x 1 7/16"(36mm)W x 7/16"(11mm)thick in the center. |
|
C
coconuttzo
Posted
posted
on
Fri, May 28, 2010 3:28 PM
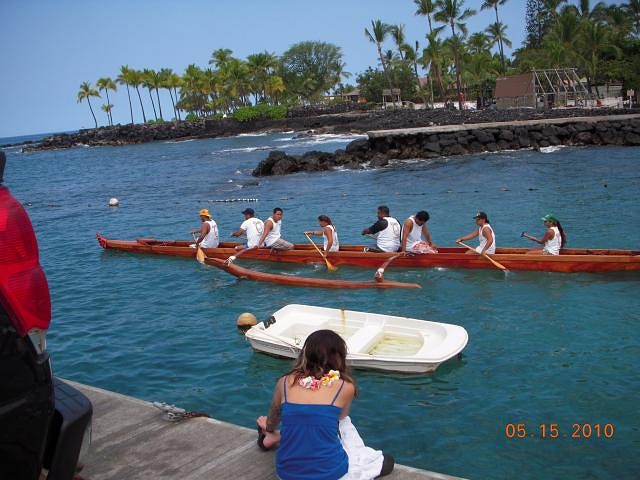
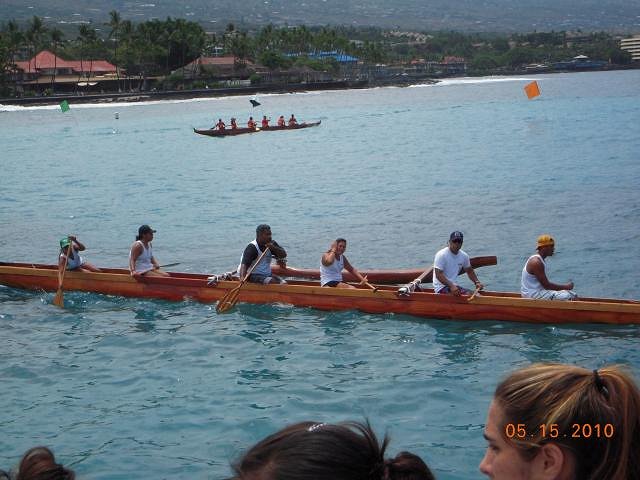
Just a couple pics of our 40' solid Koa canoe. That's right folks 40' of solid Koa. This is our fist race day of the regatta season & in this regatta association. Only solid Koa canoes are raced. You think seeing one is awesome, imagine 14 of them lined up on the starting line. It's a pretty amazing site to behold seing such beautiful works of art racing in the ocean.
That's me in the 4th seat(4th from right). 3rd & 4th seats are the powerhouse of the canoe. This is the Novice B Mixed(co-ed) team. Novice B are the first time/season paddlers. Individuals are only allowed to race twice in one race day so I was in this & the Novice B Men's team. Tommorrow I'll be in the Novice B Men & the Open Mixed(co-ed) team. Open, means any years/seasoned experience are allowed to paddle which means I'll have to step up my game on this one for sure. I was actually honored when the coach asked me to race with the Open Mixed crew. I guess I'm doing something right. I'll try to take more pics tommorrow, our next race & an actual ancient heiau replica being refurbished on the actual heiau site, It's actually a little to the right of the top pic. |
|
T

TikiG
Posted
posted
on
Fri, May 28, 2010 3:42 PM
coconuttzo - I LOVE the ancient ivory you scored on eBay! It is really scrumptious material...bordering on stone/lapidary for its beauty. Nice score and I hope to see a few more of your works created from that piece. Its just so unique, not to mention its age, that it must Oh - and the canoe and rowing as exercise thing? I'm jealous. Thanks for posting! Cheers! G |
|
S
surfintiki
Posted
posted
on
Fri, May 28, 2010 5:24 PM
That is awesome. Thanks for postin'. |
|
B
Benzart
Posted
posted
on
Sat, May 29, 2010 9:11 AM
Hey man, I'm Really Loving your bones and seeing you grow as a carver is Awesome. Thanks for the progress shots of the whales and Really sorry about the outcome,, but it happens to All of us and it hurts just as bad every time. Definitely save the pieces and even glue them back together for your own use. |
|
T

TikiDaye
Posted
posted
on
Mon, May 31, 2010 7:31 PM
coconuttzo - beautiful carves! loving the mammoth tusk work... incredible colors coming out of that ancient ivory! i also have to say that your presentation is some of the best i've seen.... you're plaiting and toggles make the piece so professional.... well done! quick question: where do you sell your pieces? do you have a website? peace, |
|
T
TheBigT
Posted
posted
on
Wed, Jun 2, 2010 3:53 PM
Great carves coconuttzo! You really know how to bring out the inner beauty of these fossils. |
|
S
seeksurf
Posted
posted
on
Wed, Jun 2, 2010 9:09 PM
Some very cool looking bone works. |
|
C
coconuttzo
Posted
posted
on
Tue, Jun 22, 2010 2:01 PM
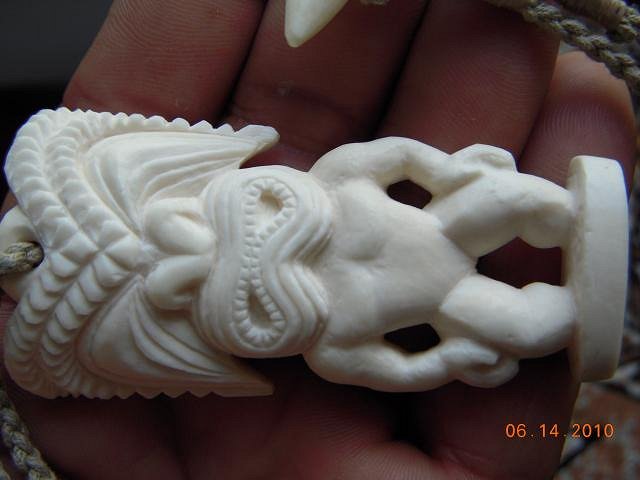
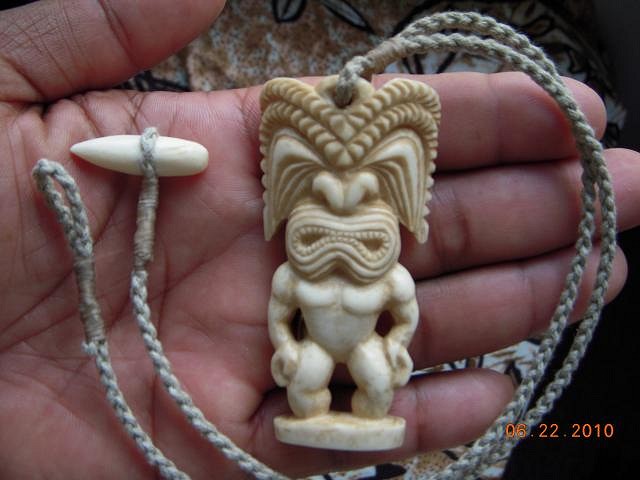
Malo 'aupito to you all for the compliments. I'm only inspired by all of you who contribute your trade secrets on this very informative site. Had it not been for me accidentally stumbling here I would have never progressed 1/2 of much as I have now. Here's a Kanaloa Pendant that I've been working on. Took about 9 hrs. of dremmel carving & 7 hrs. of filing/sanding. I used the small dental ball burr to carve out most of the body. For the face & head I used the cylindrical and wedge looking shaped burrs. It measures 3"(76mm)L x 1 1/2"(39mm)head width, 1 1/8"(28mm)base width x 3/8"(10mm)thick.
I wanted the toggle to match in proportion to the pedants size. Wanted a masculine feel to it I guess, so I made it 1/8"(28mm) long.
I actually started on carving out the body because I felt that's the hardest at least for me anyway.
Plus I still had the dilemma as to how I was going to attatch the cord. I didn't want to bore a hole into the finished head dress so I opted to carve a hole for the cord on top instead. I think that doesn't take the eye away from the piece. What do you guys think?
I also thought the plain white was not highlighting the details enough from a distance so I stained it in coffee & sanded the high areas to bring out the highlites. I think it looks like a very antique piece. Now I want to make a casting out of it so I can produce duplicates because I am not looking forward to carving another one like this anytime soon... unless the price is right of course. |
|
T
TikiG
Posted
posted
on
Tue, Jun 22, 2010 2:09 PM
Beautiful tiki pendant there, man! I love the staining, the proportions, the cord and toggle. I think the way you attached the cord to the pendant is great, no problem there with me. Keep up the great work and Thanks for posting. G |
|
CJ

Captain Jack
Posted
posted
on
Tue, Jun 22, 2010 4:28 PM
Very nice!!! Good idea on the eyelet ... how do you secure the toggle? Is there a hidden hole under there that the cord passes thru? Also, if you don't mind me asking - what kind of cord do you use? I'm assuming you braid it yourself ... Great Job! |
|
S
seeksurf
Posted
posted
on
Tue, Jun 22, 2010 10:06 PM
Yes, quit the gem there. Fine picking. |
|
C
coconuttzo
Posted
posted
on
Wed, Jun 23, 2010 1:53 PM
Malo TikiG, Captain Jack & seeksurf for your kind words. Captain Jack, after shaping the toggle, I use the wedge looking bur to first score the line where I want the cord to go all the way around. It's basically a guide for the next bur, the ball bur, so as the ball doesn't run away. I grind a fairly deep recess, between 1/3 - 1/2 diameter of cord. Then I wrap the cord firmly around the recess so that the cord has no chance of slippage, and then I lash the end with waxed thread. I did braid the cord out of 1mm waxed cotton cord. It's the usual 4 plait round braid. I just picked up some new cords at our local surplus store. They look similar to paracord but skinnier(2mm). Can't wait to braid these. |
|
C
coconuttzo
Posted
posted
on
Wed, Jun 23, 2010 2:29 PM
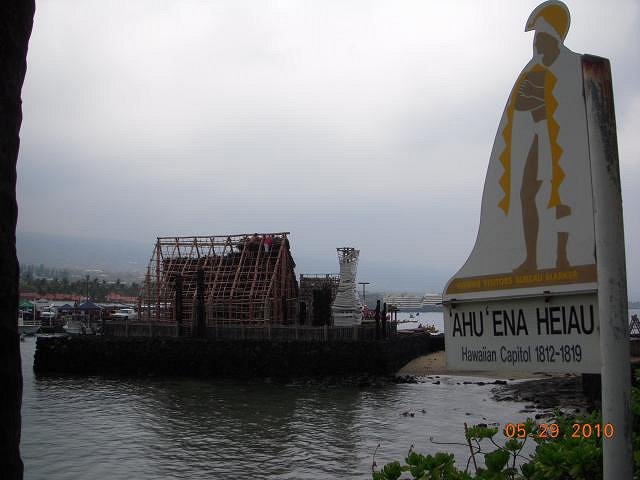
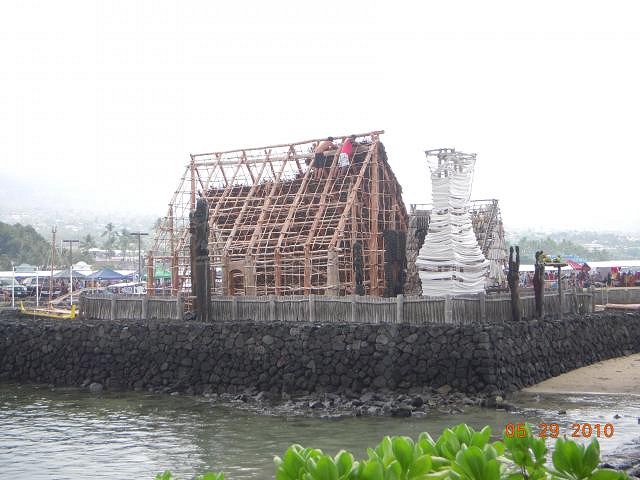
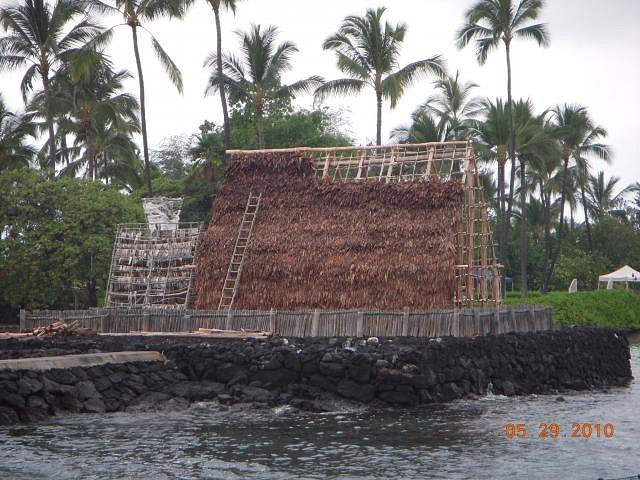
Almost forgot to post these pics of the heiau next to tthe beach where our canoe regatta was being held. It was a rainy weekend & on this side(leeward coast) it rarely rains so the lighting isn't all that great.
Upon this great stone paepae(platform) stood ‘Ahu’ena Heiau, rebuilt by Kamehameha the Great as his heiau(temple) of the Hale O Lono(House of Lono), type. Dedicated to the god of peace & prosperity. Help from the gods for the King & his people was invoked at this site through the appropriate rituals & food sacrifices. ‘Ahu’ena was not a place of human sacrifice. It was actually the center of the Hawaiian capitol between 1812 to 1819 when Kailua Kona was the capitol of Hawaii.
Hale Mana - House of Spiritual Power(large house) was a place of prayer, a meeting house for discussing the kingdom’s affairs, and the school where the king educated his heir, Liholiho in matters pertaining to wise government. Here the prince received lectures from the leading kahuna(masters) of the arts, crafts, sciences, history & religion. The structure was of strong poles thatched with ti leaves & trimmed with fern. The interior walls were covered with silky banana-stalk sheathing. Soft mats covered the floor, around a fireplace for roasting bananas.
Hale Pahu - house of the drum(little A-framed structure left side) sheltered the great ceremonial drum of the temple. The structure is thatched with hala(pandanus) leaves.
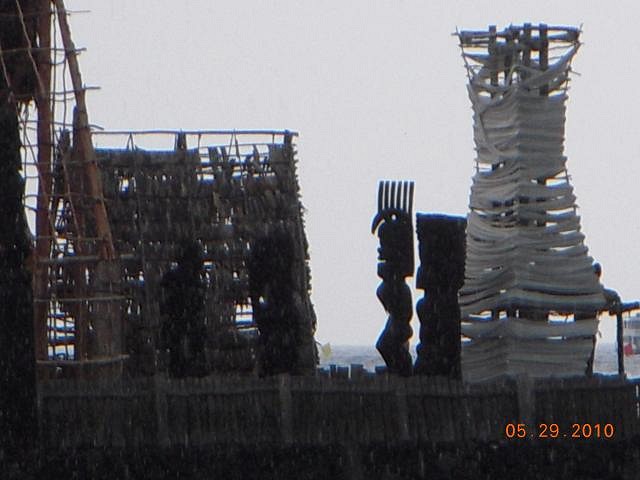
‘Anu’u(white tall structure) has been often referred to as the oracle tower, because here the high priest received & proclaimed the answer of the gods to his petitions. This tower was the most distinctive feature of the temples of ruling chiefs & somewhat comparable to the steeples of churches.
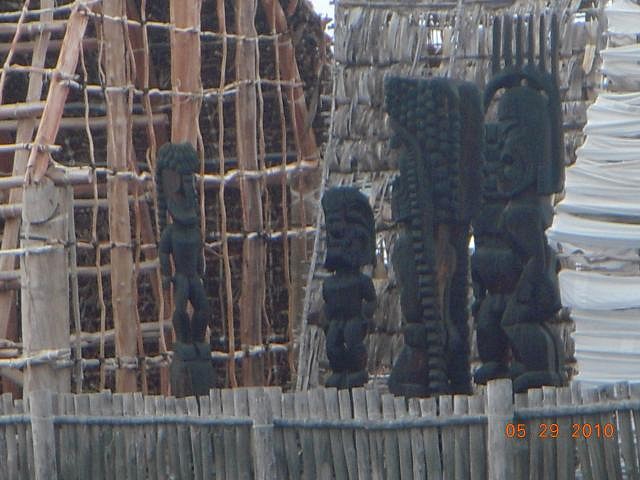
Ki’I Akua(temple images/tikis) symbolized the presence of helpful gods who were ancestral to the worshippers. To visiting Europeans, Kamehameha once said: “These are my gods. Whether I do right or wrong(by European definition)I do not know. But I follow my faith, which cannot be wicked, as it commands me never to do wrong.” Carved with great virtuosity, Ki’i Akua of the distinctive Kona style are regarded as among the finest of all Polynesian art forms. The tallest figure, crowned with an image of a golden plover, was Koleamoku, a god of healing.
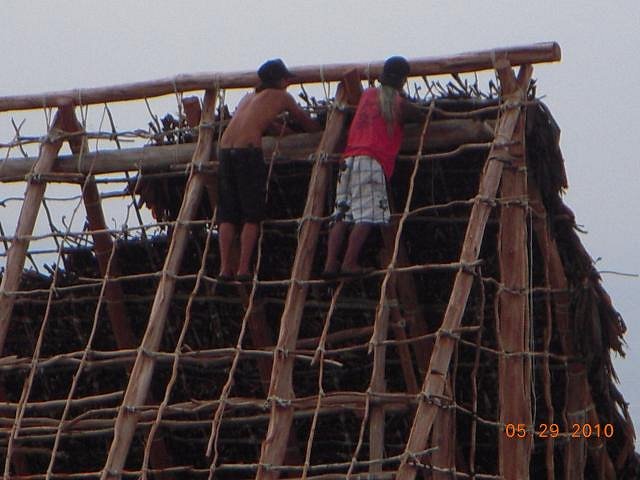
One guy would climb up this ladder with a stick about 6' long which was draped with ti leaves that had been boiled & then soaked in the ocean for a couple days.
Then these 2 fellas would lash the thatched panel(stick) to the the roof framework/scaffolding. |
|
CJ
Captain Jack
Posted
posted
on
Wed, Jun 23, 2010 4:02 PM
Cool! Thanks .... Now that I look at the toggle the cord does look to be indented a bit ... and thanks for the pics and info on the history of your island! Very Cool!! I'd love to see a closer picture of Koleamoku, the god of healing, that would be an interesting tiki to carve! Thanks again and Have a Great Day!! |
|
C
coconuttzo
Posted
posted
on
Thu, Jul 29, 2010 4:58 PM
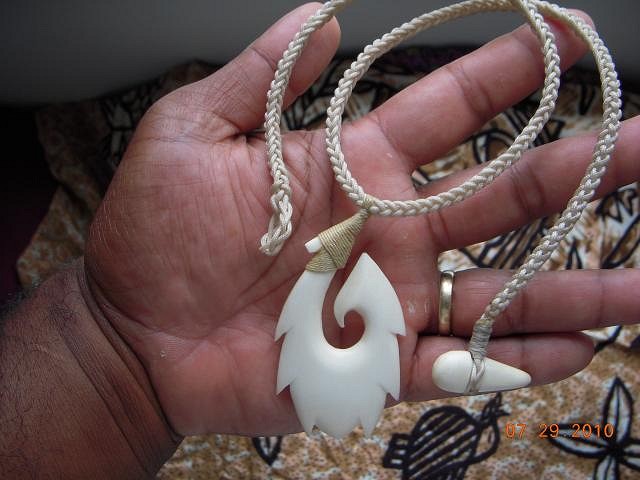
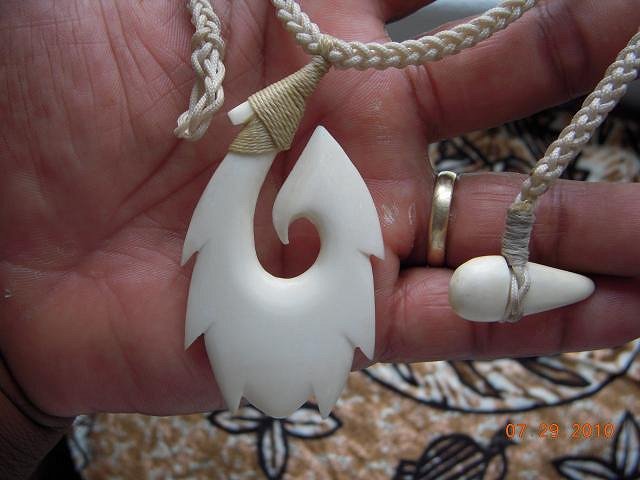
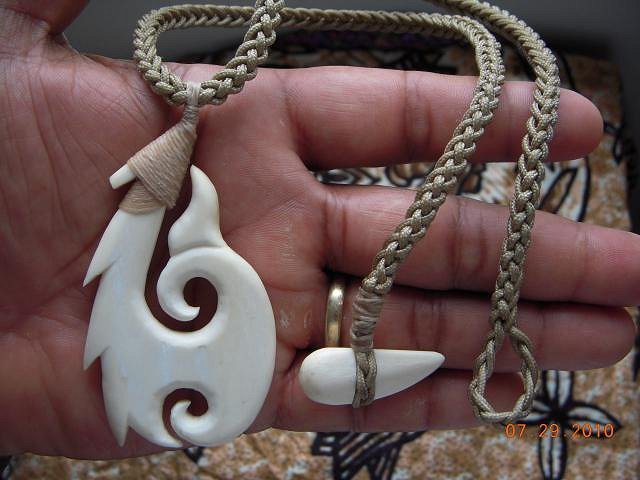
Aloha TC, A couple of bone pieces. Been too busy with day job to make more of these.
This one I am not done sanding yet. It's just a rough carve done. I just lashed it to see how it would look like on the necklace. I tried out the new micro paracords, about 2mm diameters that I got from the surplus store. They're my favorite, they look good & they don't take as long to braid because of the larger size. These necklace cords were braided from six plaits. I then lashed the fish hook pendants. I drew an instructional diagram for the lashing. https://acrobat.com/?i=1aGL7aih3WewHP01PyOgkg For more info on how I lashed them on, see the Bone Carving Q+A thread started by Tiki Duddy, page 6, post submitted by me. |
|
T
TikiG
Posted
posted
on
Thu, Jul 29, 2010 5:08 PM
Bad ass! Yeah, the braiding is quite nice as well. Great job!! G |
|
4
4WDtiki
Posted
posted
on
Thu, Jul 29, 2010 6:05 PM
Pendants look good! I happened to go back over you thread just now, and have a few comments on past posts.
|
|
T
TikiMango
Posted
posted
on
Fri, Jul 30, 2010 9:41 PM
Looking great! You've been busy, which is awesome. |