Tiki Central / Tiki Carving
Preparing Palm Logs?!?!?!
Pages: 1 34 replies
|
N

NIxxon
Posted
posted
on
Wed, Jan 19, 2011 3:26 PM
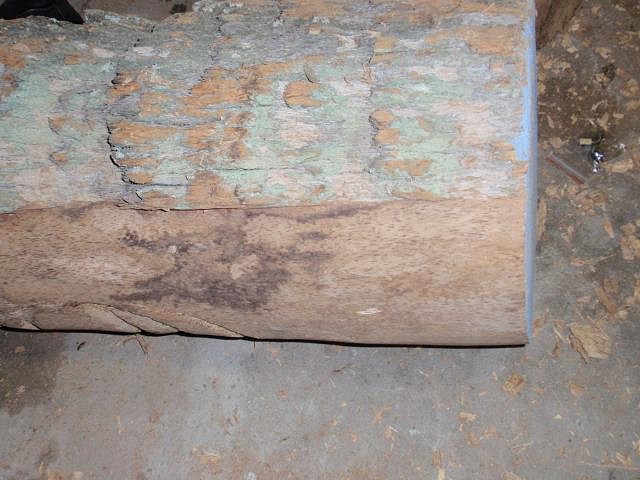
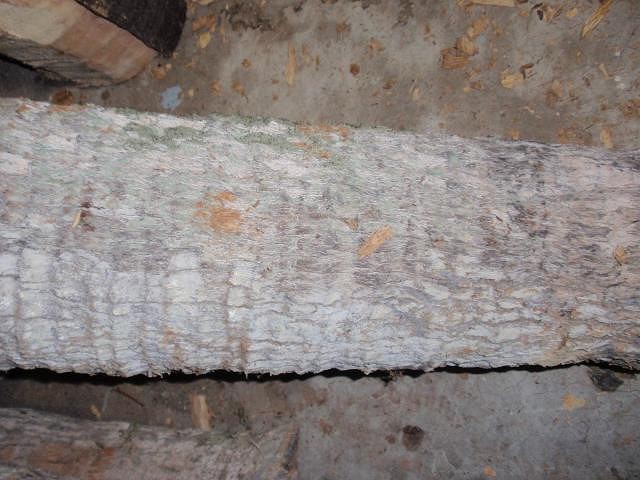
Hello All!! Fantastic website here!! Very glad I found it and I am blown away by some of the carvings posted. Im pretty new to this and am searching for a better way to strip the bark off of the logs pictured here. (pretty sure they are sable). I am currently using an angle grinder with a flap disc sanding wheel with a coarse grit but it takes FOREVER and is extremely messy. IS there an easier way?!?! Any and all replies are greatly appreciated and keep up all of the great work !!
|
|
4

4WDtiki
Posted
posted
on
Wed, Jan 19, 2011 5:33 PM
There's several different ways, none are "easy". Some people use a draw knife, some use an electric planer (Buzzy even has a how-to vid on youtube). I used to use a chainsaw by holding the bar almost flat against the log. I now use a Log Wizard attached to my chainsaw. Your best bet for the least investment would be a drawknife, and second would be a cheaper (Ryobi) planer. [ Edited by: 4WDtiki 2011-01-19 17:34 ] |
|
M

McTiki
Posted
posted
on
Thu, Jan 20, 2011 6:58 AM
Welcome to TC! Where are you located? I 2nd the Draw knife/Planer Skinning a log with a flapwheel = You gotz alot of patience! McTiki |
|
A

AlohaStation
Posted
posted
on
Thu, Jan 20, 2011 7:37 AM
You can always carve straight in and take the bark off later - or - use the bark in the design. |
|
P

pjc5150
Posted
posted
on
Thu, Jan 20, 2011 8:03 AM
I use the chainsaw method. With my gas saw I can shave the bark off a log in about 10 minutes. I'd like to get a log wizard like 4wd has, but they ain't cheap! |
|
N
NIxxon
Posted
posted
on
Thu, Jan 20, 2011 2:46 PM
Hey thank you all for the replies!! Yes sir the flap wheel takes a LOOOONG time :) I actually tried the chain saw today and it helped a great deal. Im located in Good ole Orlando FL...Winter park area if youre familiar... I made some good progress today with cleaning logs and started a little bit of carving...ill try to post some pics in a few days. Thanks again for all the help! |
|
N
NIxxon
Posted
posted
on
Thu, Jan 20, 2011 2:55 PM
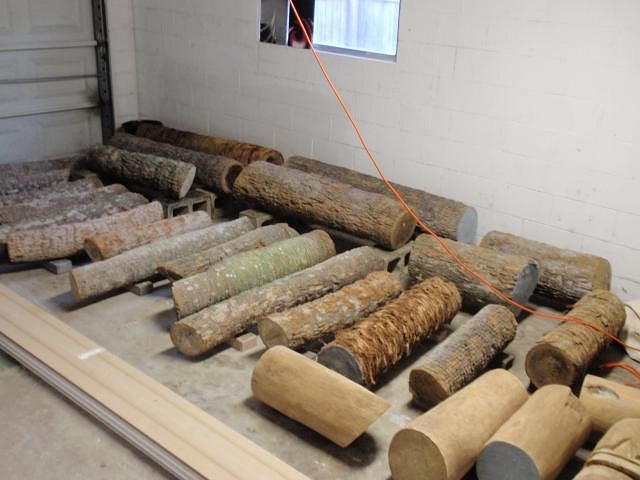
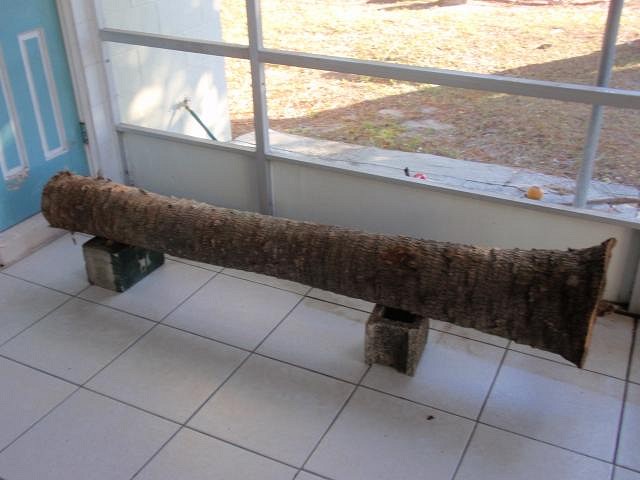
This is my current stash...I got lucky and happened to catch a tree company cutting down a couple of very tall palms and trust me they were VERY happy to let me take them off of their hands...one less trip to the dump for them! I have them all elevated on bricks and I keep the fan on in the garage to keep the air moving. Is this a good way to dry them out? I think I remember reading somewhere that they need to be off the ground with a little breathing room...anyway..thanks again and to all a great weekend!
|
|
M
McTiki
Posted
posted
on
Thu, Jan 20, 2011 3:21 PM
Porn! Merritt Island...... McTiki |
|
N
NIxxon
Posted
posted
on
Thu, Jan 20, 2011 7:42 PM
LOL...No Kidding!? Merritt Island!? I work out that way...for the county. But yea im pretty psyched with all of the logs...ran out of sunlight today but will def be back on it tomorrow :) |
|
A
AlohaStation
Posted
posted
on
Fri, Jan 21, 2011 6:47 AM
Nice stash. Try stacking the logs on end. Gravity will force the water out the ends. The fibers run vertically, when palm lies on its side the water has no where for water to run. The fan may help a bit?? - but not much. Most of the moisture in palm is at the center of the log. The trick is drying the center before the log starts to rot. You will be amazed at how light the logs will get when totally dry! |
|
M
McTiki
Posted
posted
on
Fri, Jan 21, 2011 7:53 AM
I sliced into a 2 footer that sat on it's side for a couple of months....I got hit with spray when the bur hit the centermost regions. Nix, irony? I commute from da Island de Merritt to O-Town daily for my professional gig. LOL! |
|
M
McTiki
Posted
posted
on
Fri, Jan 21, 2011 7:53 AM
I believe only fresh cut actually ooze water outta the bottoms for a day or two, then the capillary action begins depending on the log's position...I have had only a couple of logs get weakened on an end from the drying process. Buzz of an inch or two and poof! Nice wood again. [ Edited by: McTiki 2011-01-21 11:34 ] |
|
N
NIxxon
Posted
posted
on
Fri, Jan 21, 2011 9:49 AM
thanks for the insight Aloha...I will give that a try...will that cause the end closest to the ground to get soft from all of the water? Mctiki thats funny...wana trade jobs? would def save us both a bit in fuel expenses...lol...and leave more time for carving :) |
|
4
4WDtiki
Posted
posted
on
Fri, Jan 21, 2011 3:23 PM
Nix, can't tell from the pic, but if those logs are drying inside, get them outside and in the sun. |
|
N
NIxxon
Posted
posted
on
Fri, Jan 21, 2011 3:25 PM
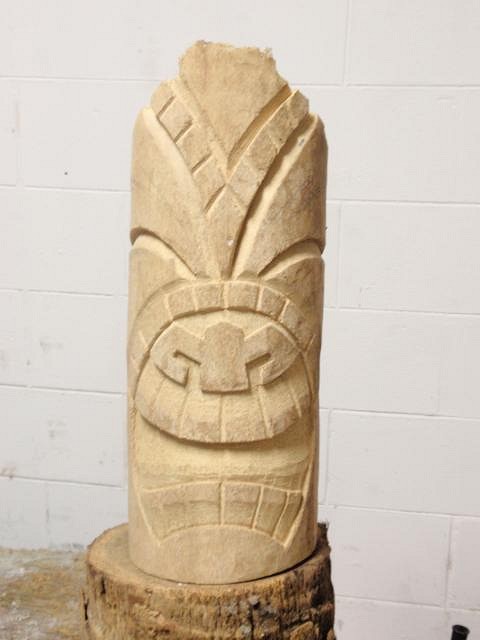
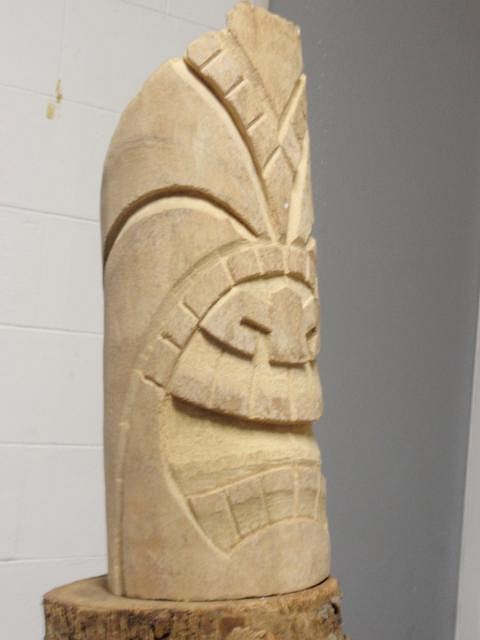
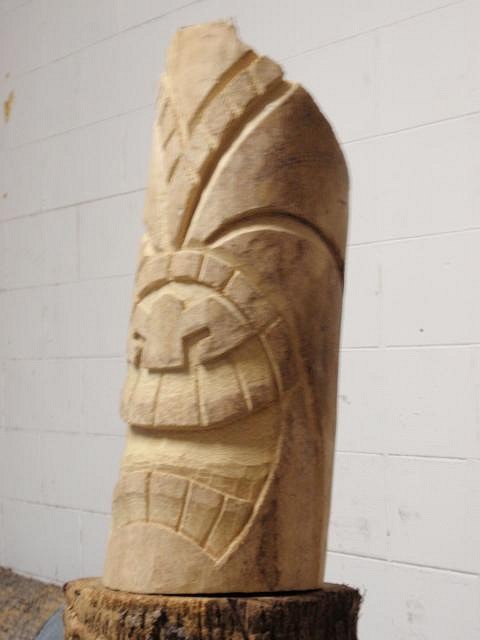
Some progress pics from today...spent a few hours on the back porch since the Florida Sun just didnt want to shine today :( |
|
M
McTiki
Posted
posted
on
Fri, Jan 21, 2011 3:45 PM
Ok Nix ...... spill! Is this number "one" carved with a Furniture Hammer and a sharpened screwdriver, or.....? Nice entry by what ever means...and in today's rains, I would have to assume small rotor or chisels. McTiki |
|
N
NIxxon
Posted
posted
on
Fri, Jan 21, 2011 5:37 PM
lol!! "one"? Not sure what you mean...and yea it was all chisels...still have lots of sanding and smoothing to do, nowhere near finished so we'll see how it comes out :) |
|
GP

Grand Poobah
Posted
posted
on
Fri, Jan 21, 2011 6:41 PM
Nice work Mr. President! I must admit I feel real sorry for you that the sun did not come out today. I too had some trouble as I had to shovel the damn ice for the third time in a week! All complaining aside; take it as jealousy as I hate the cold and wish I had your weather. Your work looks real nice. I have not had any experience with carving palm woods. I must admit I scanned quickly through the posts. I use a a draw knife (plane?) to take off the bark. I will then use a grinder to smoothe things out if necessary. For me, it is a dirty/ dusty job. It does not work well in a closed environment and I am usually forced outside to cut down on the dust. |
|
N
NIxxon
Posted
posted
on
Fri, Jan 21, 2011 7:32 PM
I can only imagine what its like having to shovel snow...that sucks man. Thank you for the kind words...im still getting my feet wet so any tips or advice would be great!! |
|
W

wplugger
Posted
posted
on
Sat, Jan 22, 2011 5:30 AM
Great for your first carve. ["#one"] |
|
N
NIxxon
Posted
posted
on
Sat, Jan 22, 2011 6:50 PM
Ok McTiki, this time I used the sledgemahher and an ice pick :wink: Hope that tanker fire didnt cause too much of a headache for ya!:) Hope everubody is having a great weekend! |
|
M
McTiki
Posted
posted
on
Sun, Jan 23, 2011 5:56 AM
That's an awesome first Mr. NIX! Depth is your friend. (unless of course, you are carving a twig) Bet you wore out your arm tapping that ice pick! Tanker fire has offered me a road less traveled for tomorrow. Mahalo |
|
N
NIxxon
Posted
posted
on
Sun, Jan 23, 2011 8:22 AM
lol...yea i def got a workout from the sledge...and I wish I could say that this is my first...but it isn't...more like 5 or 6...I didn't feel the others were worthy of posting so I started with this one. Anyway...Glad to hear you will be exploring more of the island and stay safe...ill post some pics of the finished product soon!! |
|
N
NIxxon
Posted
posted
on
Tue, Jan 25, 2011 3:05 PM
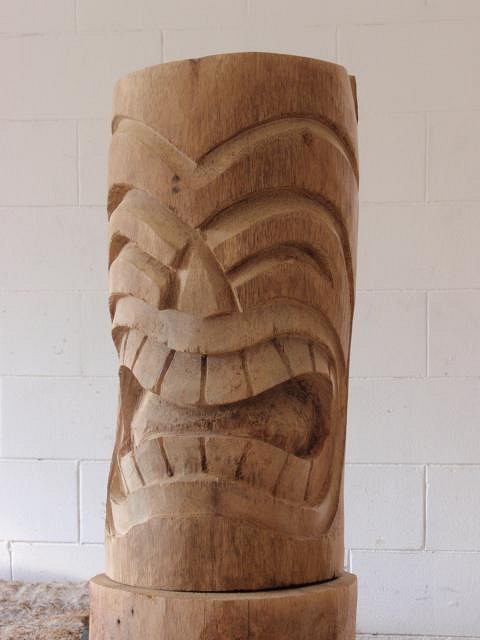
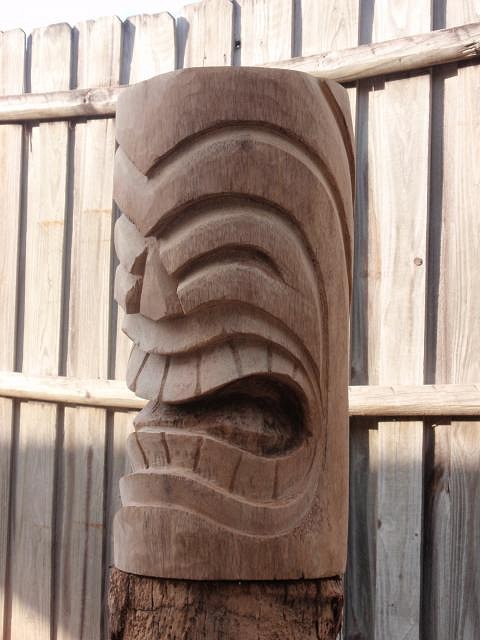
Ok well here it is...I believe im finished. Some sanding, couple ciats of stain, and a couple coats of polyurethane. Im pretty happy with the results. Now its time to start on the next :)
|
|
P
pjc5150
Posted
posted
on
Tue, Jan 25, 2011 3:11 PM
Very cool! I almost forgot...I also go over them with the angle grinder / flap wheel AFTER I chainsaw the bark off just to smooth 'em for the draw-out. Takes maybe 5 minutes. |
|
M
McTiki
Posted
posted
on
Wed, Jan 26, 2011 3:56 AM
Looking real nice Mr. NIX. Whats next? |
|
A
AlohaStation
Posted
posted
on
Wed, Jan 26, 2011 7:22 AM
Use one of the big logs!! |
|
N
NIxxon
Posted
posted
on
Thu, Jan 27, 2011 6:06 AM
Thank you McTiki...I am very pleased with the outcome. They should only get better from here on out...I hope, lol. Not sure whats next...but i'm very excited to get started :) Aloha, I think I want to knock out a few more smaller sized ones and get a bit more comfortable with carving before tackling one of the big boys...but soon enough! I just scored this beast the other day! 7.5 Feet! Awwwwe Yeeeea!!!
|
|
S

seeksurf
Posted
posted
on
Sat, Jan 29, 2011 9:23 PM
Well done. Some nice cuts going on there. |
|
N
NIxxon
Posted
posted
on
Mon, Jan 31, 2011 3:34 PM
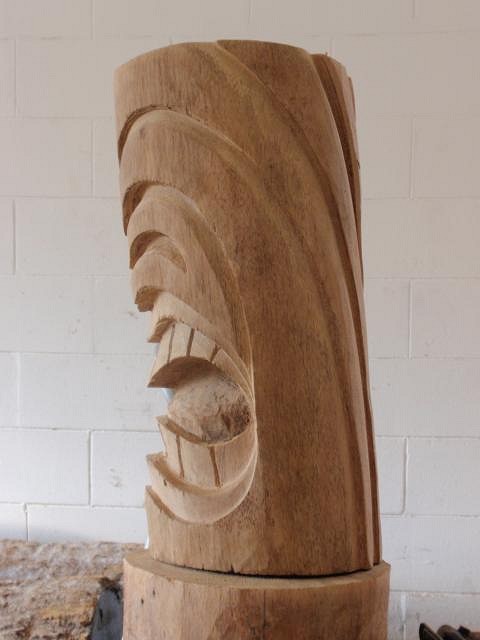
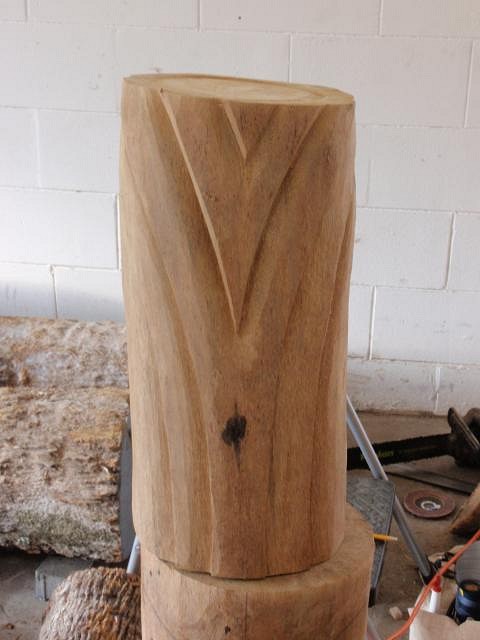
Here are a few pics from todays progress on the next one...I AM HOOKED!!!!!! Still have a little sanding and then staining to do so ill post the pics up when its finished...please critique!
|
|
N
NIxxon
Posted
posted
on
Mon, Jan 31, 2011 3:36 PM
Oh and I learned a VERY VALUABLE lesson today...always unplug your angle grinder when changing the blades...should be self explanatory...ill chock it up to a rookie mistake :)
|
|
GP
Grand Poobah
Posted
posted
on
Mon, Jan 31, 2011 4:31 PM
that is looking very nice |
|
N
NIxxon
Posted
posted
on
Mon, Jan 31, 2011 5:11 PM
well thank you kind sir...im hoping the stain and laquer will really give it that "finished" look...we shall see :) |
|
JJ

Jazzy Josh
Posted
posted
on
Mon, Mar 7, 2011 10:03 AM
Good stuff Nick. Those look great |
|
N
NIxxon
Posted
posted
on
Wed, Mar 9, 2011 9:52 AM
thanks brother! Ive been spending lots of my free time carving...im hooked :) |


Pages: 1 34 replies