Tiki Central / Home Tiki Bars
Aloha Theater and Tiki Bar!
|
M

MaukaHale
Posted
posted
on
Fri, Apr 24, 2015 9:36 PM
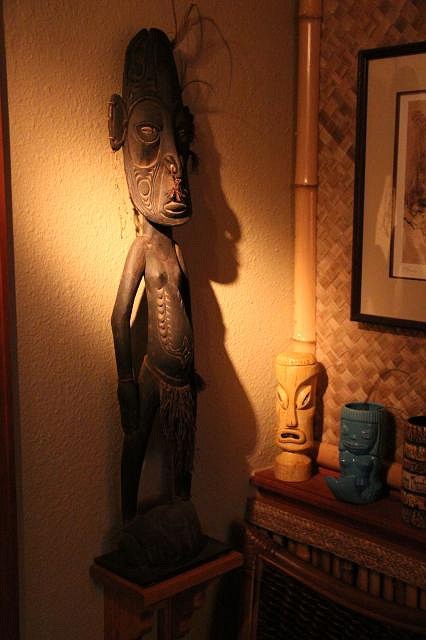
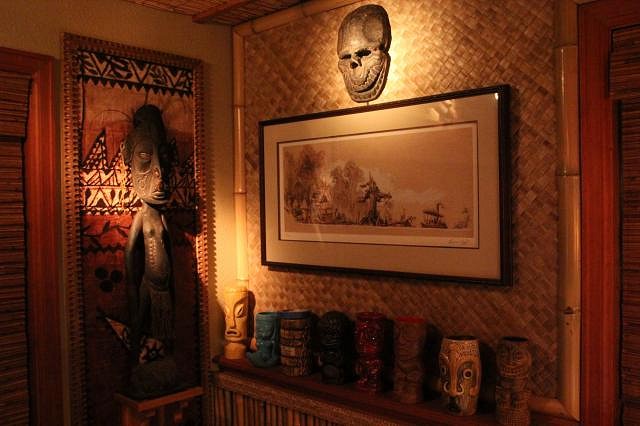
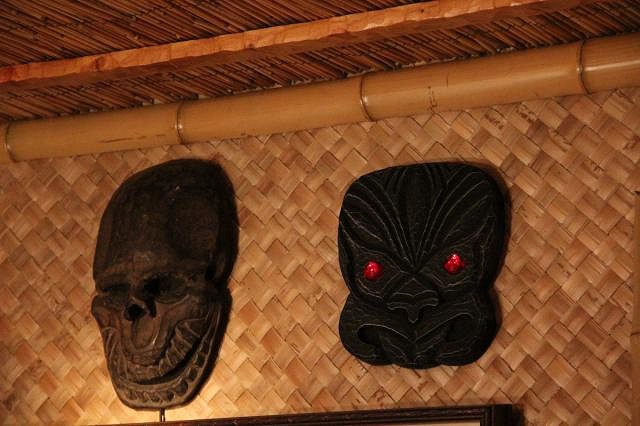
Here are a few new faces in the AT&TB:
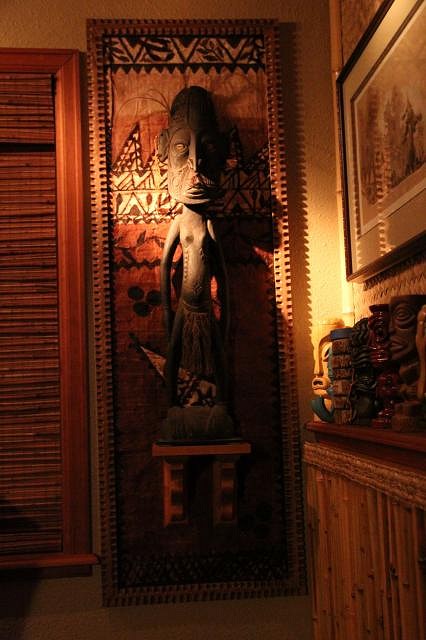
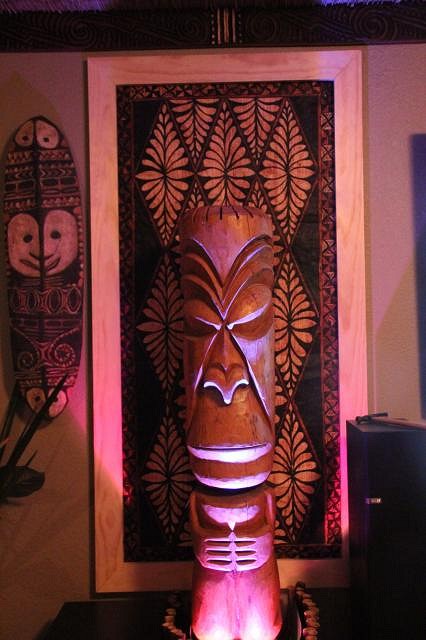
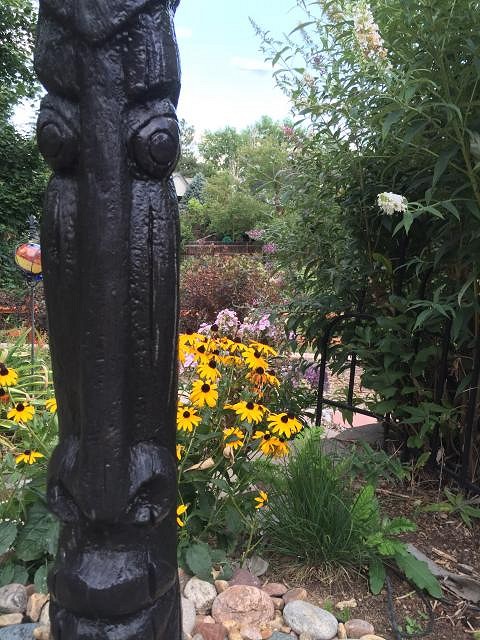
I decided that this guys needs some more attention.
I'm going to put this tapa cloth behind him but I need to build a frame to hold the tapa.
I have a few other projects in the works as well. |
|
AD

Aloha Daddy
Posted
posted
on
Wed, Apr 29, 2015 9:05 PM
More awesome additions Mauka, I especially like the masks and how you spotlighted them. I also like the Disneyland artwork, I am a big fan and I also tend to use Tiki Room and Disneyland/Adventureland artwork whenever possible. The tall statue is really cool, nice to see you gave him his dignity back :wink:. Always look forward to seeing what you are working on, keep up the good work! Inspires the rest of us. |
|
V

VampiressRN
Posted
posted
on
Thu, Apr 30, 2015 8:36 PM
Just get's better and better. I agree looks very classy!!! |
|
M
MaukaHale
Posted
posted
on
Sat, May 2, 2015 8:39 PM
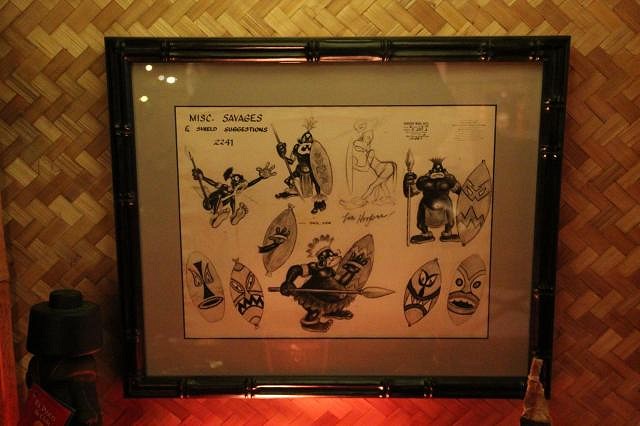
I didn't think I used many things from Disney in the home bar. But since you mentioned it I guess I do have a few items.
This next piece of Disney art is really unique. Most people wouldn't know what it is. I like to collect animation art and this is a model sheet from the Disney Studios. Its from the 1935 Mickey Mouse cartoon called "Mickey's Man Friday." Its a take off of the book, Robinson Crusoe. Since its supposed to take place on the island "Mas A Tierra" that's good enough for me. That's off the coast of Chile and its in the South Pacific.
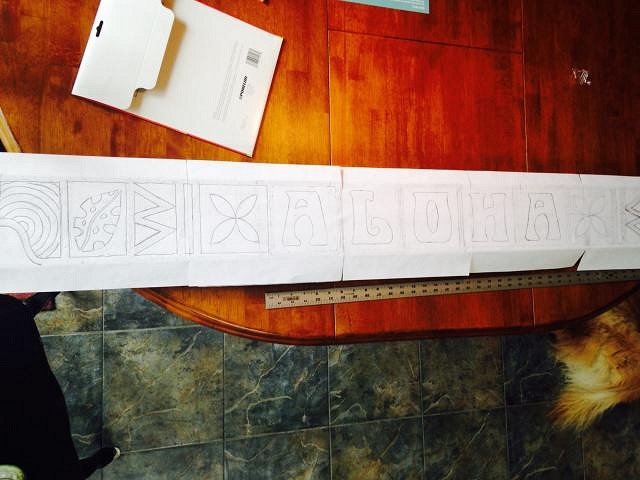
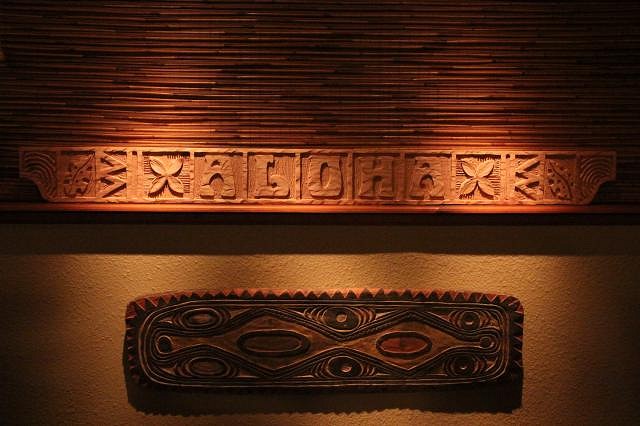
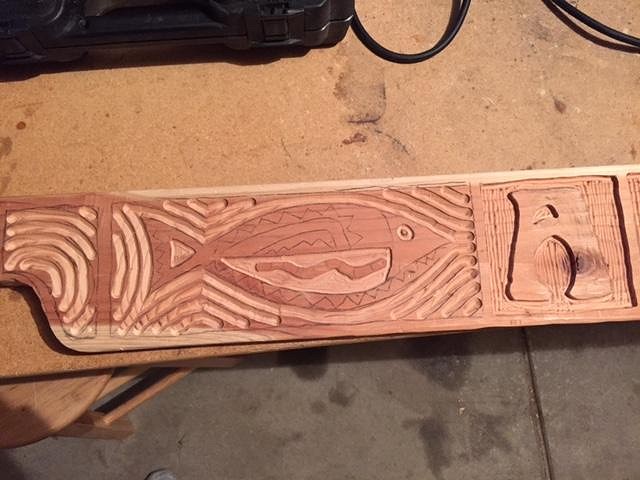
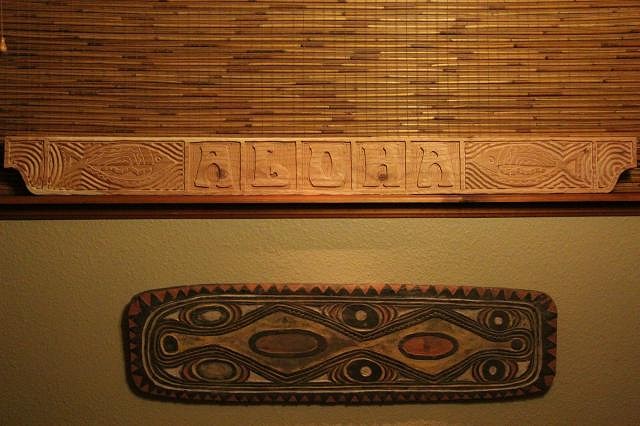
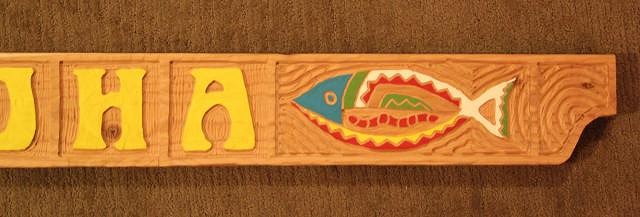
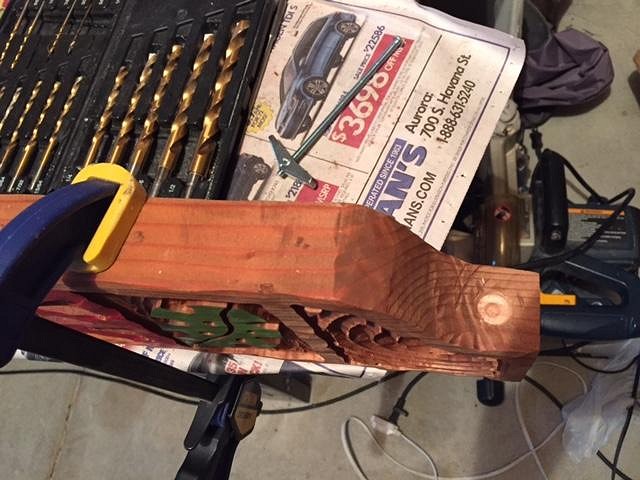
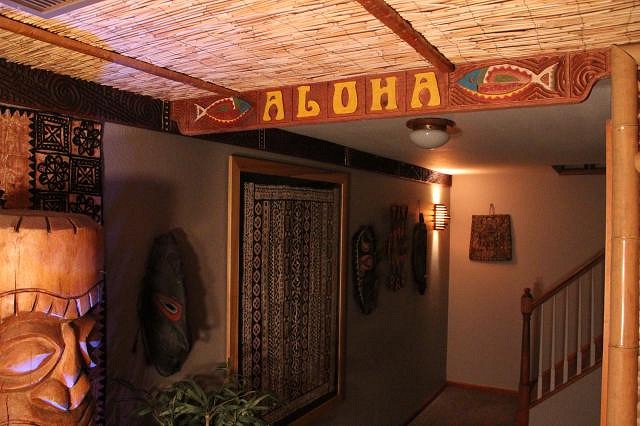
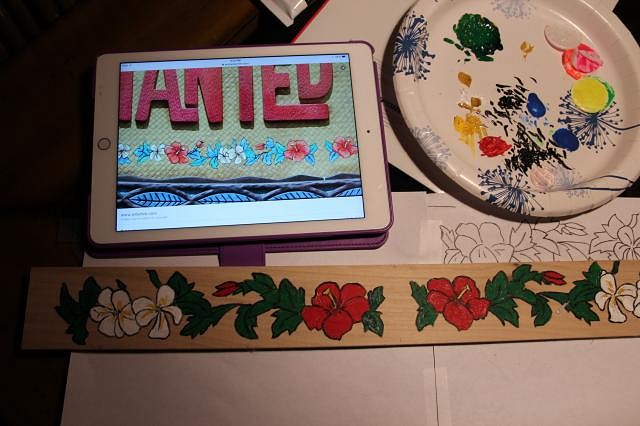
Here's probably what most of you want to see. This is what I worked on today:
Its a sign that will be on the ceiling. It will be at the entrance to finish off the bamboo on the ceiling.
The sign is long so its hard to get a good picture of the whole thing. Its a 2 X 6 - 59" long. The reason for the thickness is so I can run two toggle bolts through it.
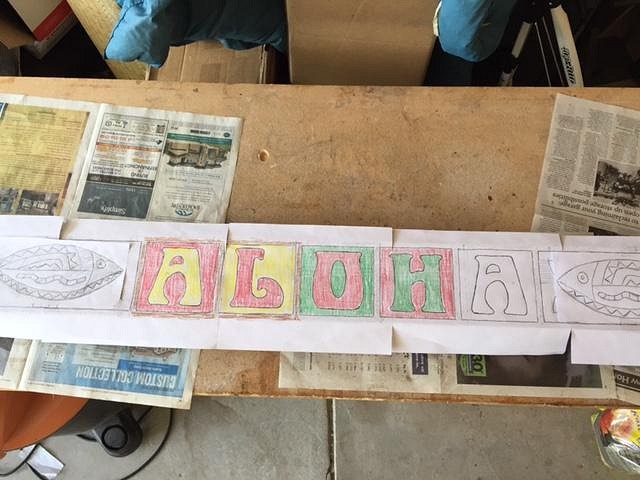
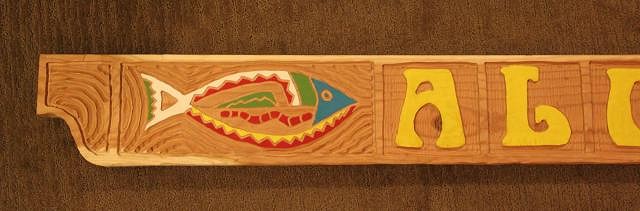
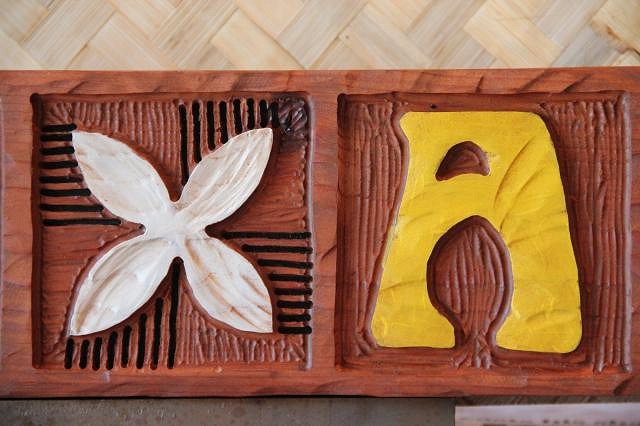
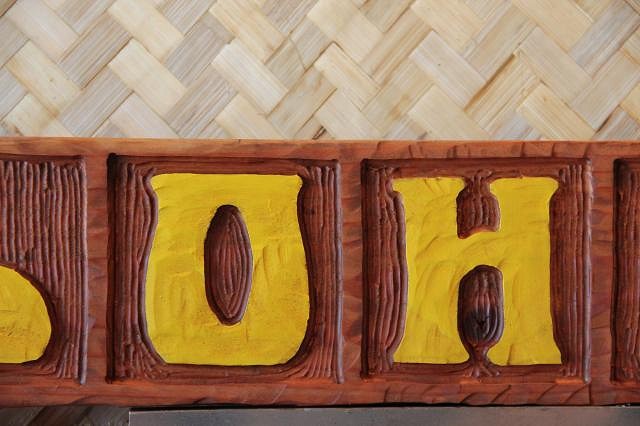
This is where it will go when its finished. I was going to carve the same thing on both sides, that way it will have Aloha for hello and good-bye. The wife said she would like to have a fish on the sign so that means a new template for the other side.
[ Edited by: MaukaHale 2015-05-02 20:41 ] |
|
T

Thortiki
Posted
posted
on
Sun, May 3, 2015 5:20 AM
ENJOY watching the continued layering updates for your Tiki room |
|
T

Tikifrog
Posted
posted
on
Sun, May 3, 2015 7:41 AM
Inviting space. I like the details on the Aloha sign. |
|
M
MaukaHale
Posted
posted
on
Mon, Jun 8, 2015 8:26 AM
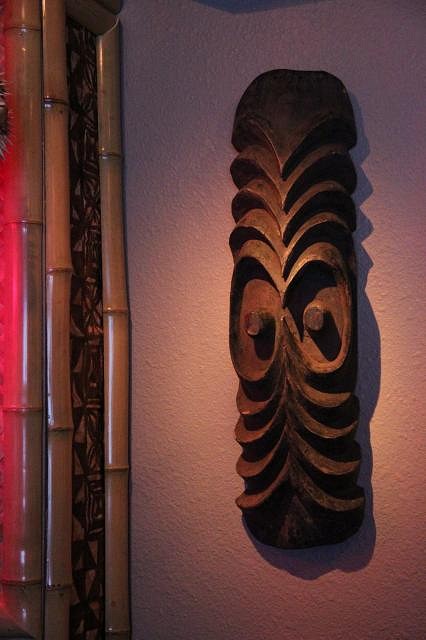
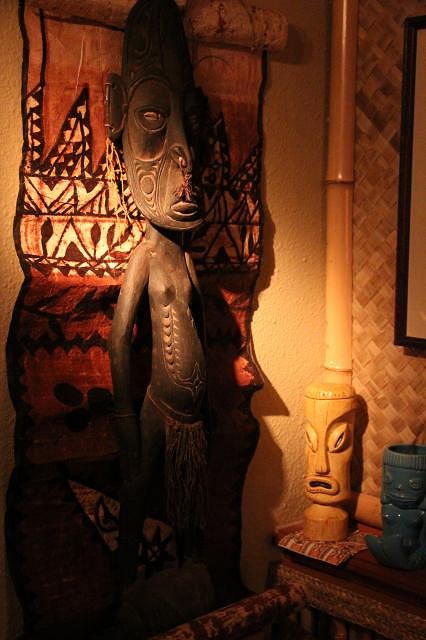
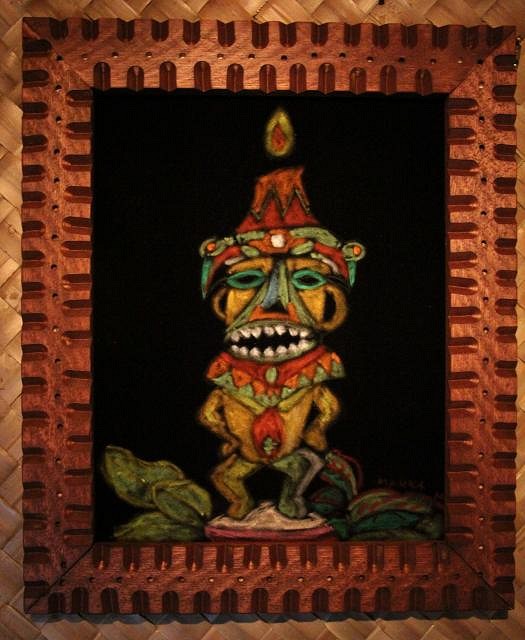
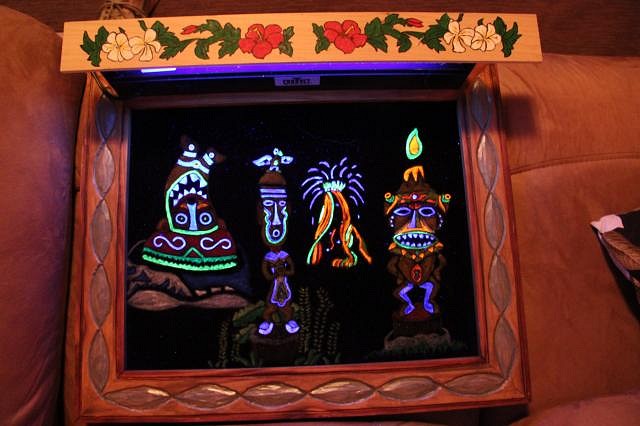
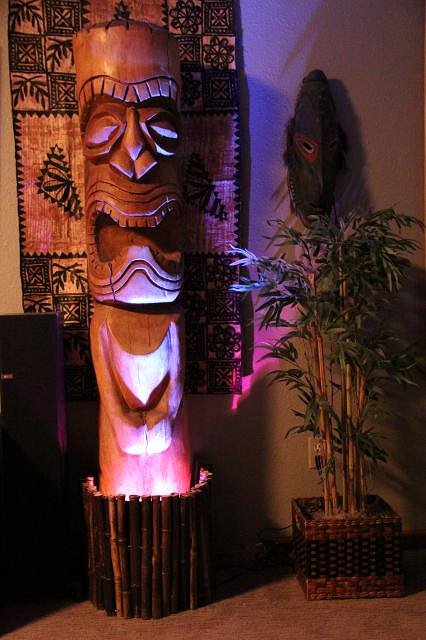
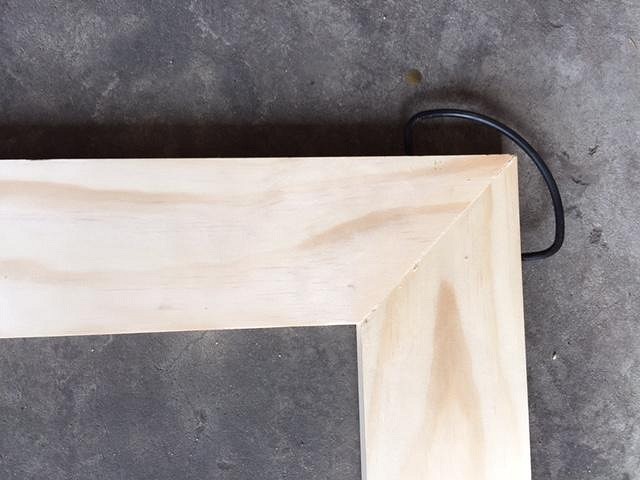
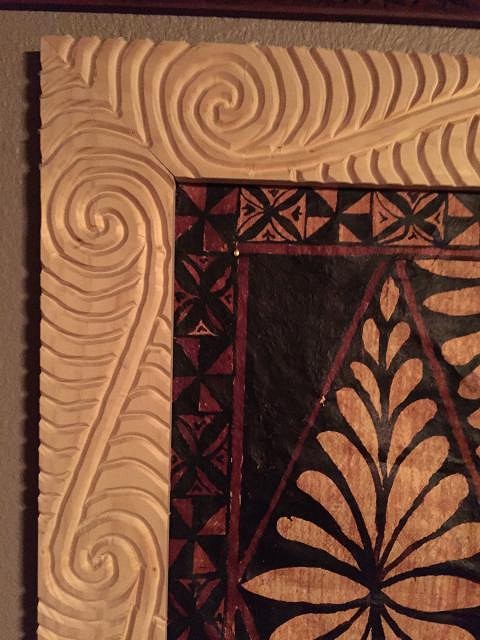
Completion of the PNG statue - tapa frame:
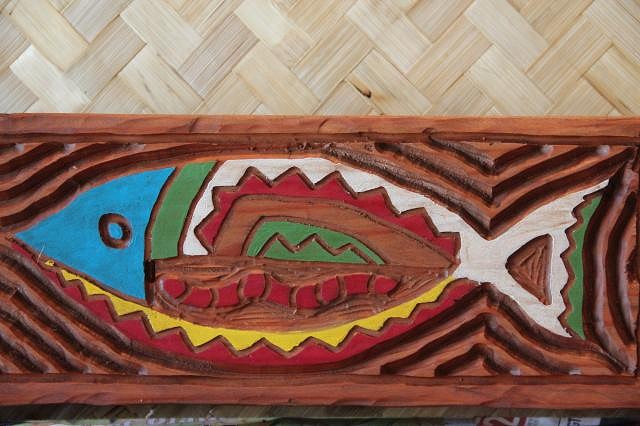
I'm still working on the Aloha sign and decided to use the fish design that Monkeyman used on the triangle tables.
This is old technology but it helps me decide what colors to use.
|
|
V
VampiressRN
Posted
posted
on
Tue, Jun 9, 2015 7:27 PM
Wow...that turned out great!!! |
|
AD
Aloha Daddy
Posted
posted
on
Sun, Jun 14, 2015 6:42 PM
WOW!!! You never cease to amaze me! Great work buddy, keep it up, looking good, especially the frame around the tiki statue, it looks incredible! Love your work! |
|
M
MaukaHale
Posted
posted
on
Sat, Jul 18, 2015 4:52 PM
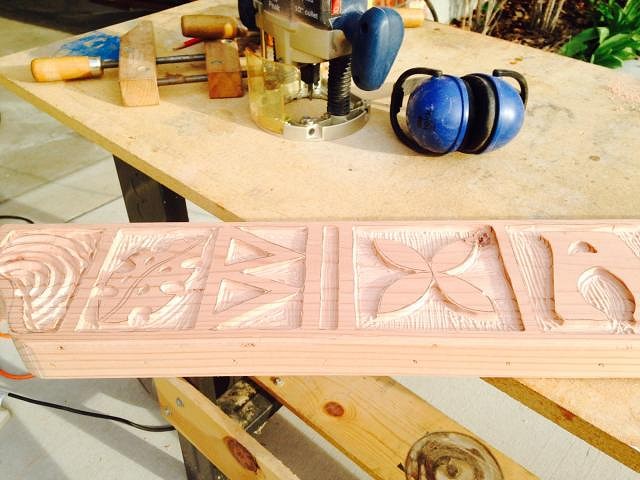
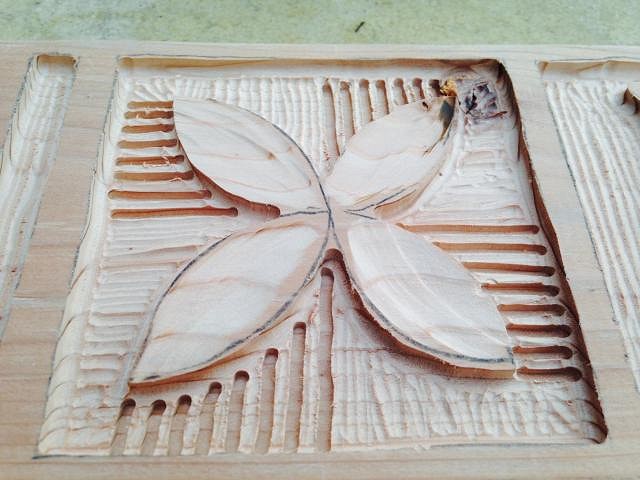
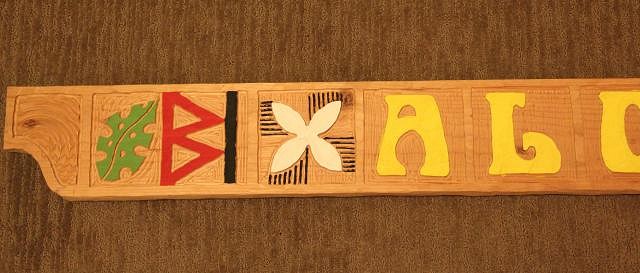
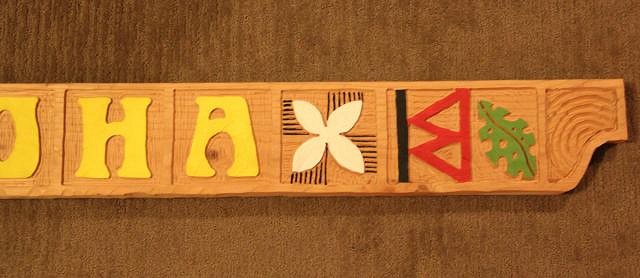
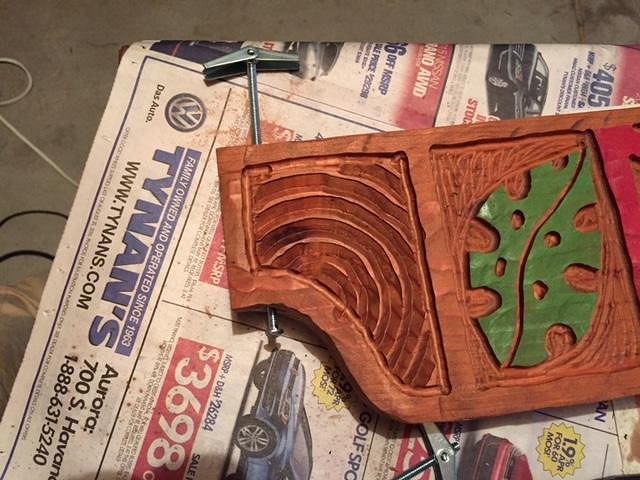
I finally carved the rest of the sign with the fish. Now I just need to paint and stain it.
|
|
TP

Tiki Phil
Posted
posted
on
Sat, Jul 18, 2015 5:21 PM
Amazing work! |
|
M
MaukaHale
Posted
posted
on
Fri, Sep 4, 2015 9:13 PM
I finally put some paint on the sign. After the stain I can install it.
|
|
M
MaukaHale
Posted
posted
on
Mon, Sep 7, 2015 10:17 AM
|
|
V
VampiressRN
Posted
posted
on
Mon, Sep 7, 2015 6:11 PM
Great job!!! I don't have a PNG...need a big one for my small collection of Tiki friends. |
|
M
MaukaHale
Posted
posted
on
Fri, Sep 25, 2015 8:12 PM
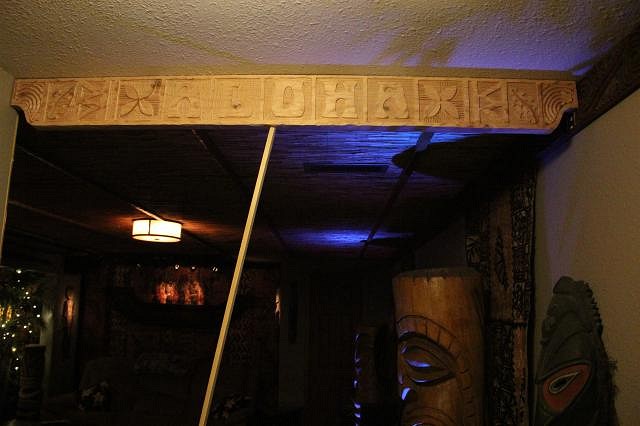
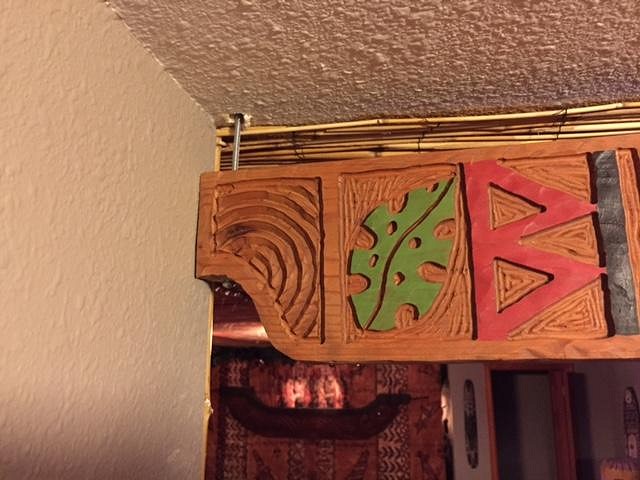
A set hole for the washer.
I'm using a 3/18" bolt with a toggle to hang the sign from the drywall.
A 1/2 inch hole is enough for the toggle to fit through and with a screwdriver it tightens to the ceiling.
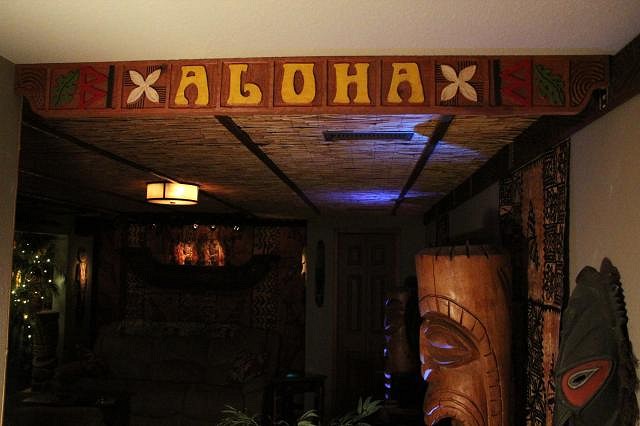
Entrance
This creates a finished end for the bamboo ceiling where it ends at the drywall. Exit
|
|
H

hiltiki
Posted
posted
on
Fri, Sep 25, 2015 9:46 PM
Just perfect. |
|
G

GROG
Posted
posted
on
Fri, Sep 25, 2015 10:41 PM
Muy awesome. GROG like. |
|
V
VampiressRN
Posted
posted
on
Sat, Sep 26, 2015 3:15 PM
Looks great...ya got good routing skills!!! |
|
M
MaukaHale
Posted
posted
on
Wed, Oct 14, 2015 8:15 AM
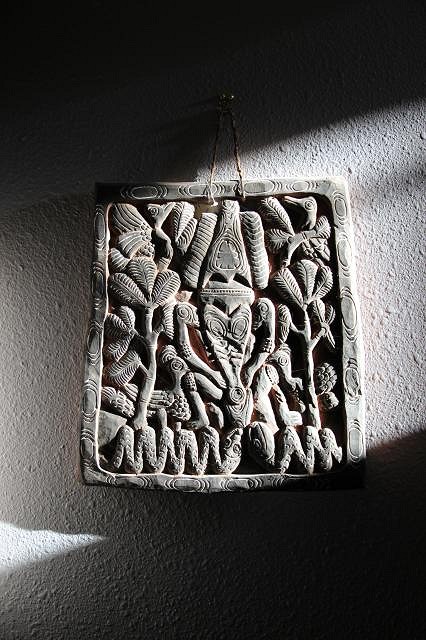
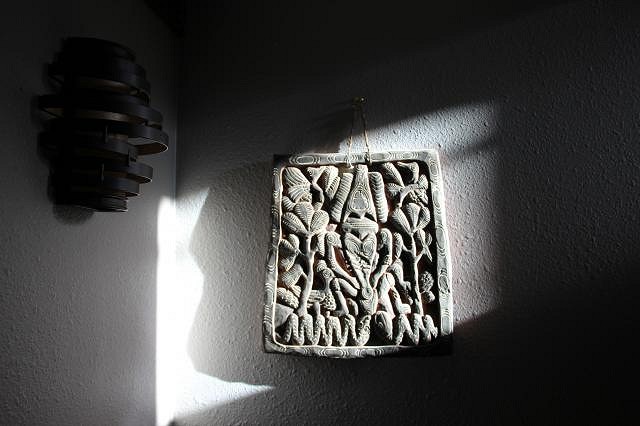
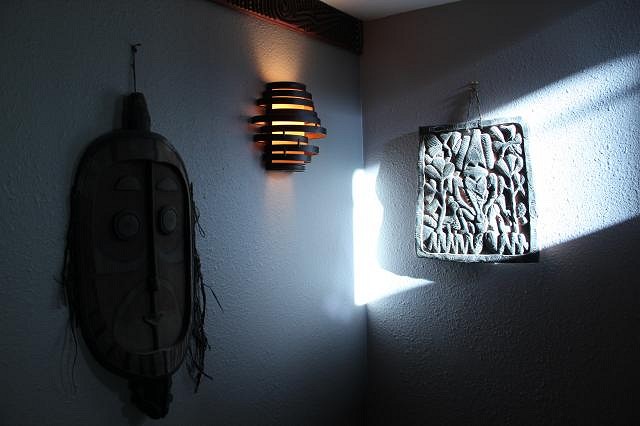
The other morning the light was hitting the walls in a unique way so I snapped a few pictures.
|
|
M
MaukaHale
Posted
posted
on
Mon, Oct 26, 2015 8:01 AM
A new carving by Lake Tiki
The jewel eyes sparkle depending on where you're standing.
|
|
W

W8N2Surf
Posted
posted
on
Wed, Nov 4, 2015 9:14 AM
Wow, this is a fantastic thread and a fantastic build. Your attention to sharing the details of your build, the "how to" parts are just great. Really makes a reader want to come and see this in person. You've approached museum quality on this, and as was just mentioned, your router skills are amazing. I'm sure you have steadily improved what you can do with your router. Nice to see these lighting shots as well. |
|
M
MaukaHale
Posted
posted
on
Fri, Nov 13, 2015 10:27 PM
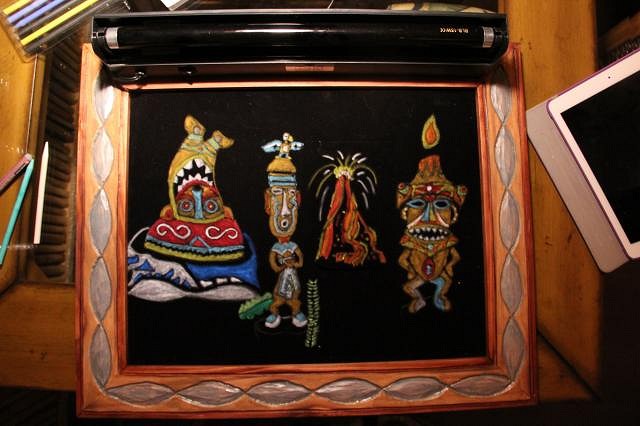
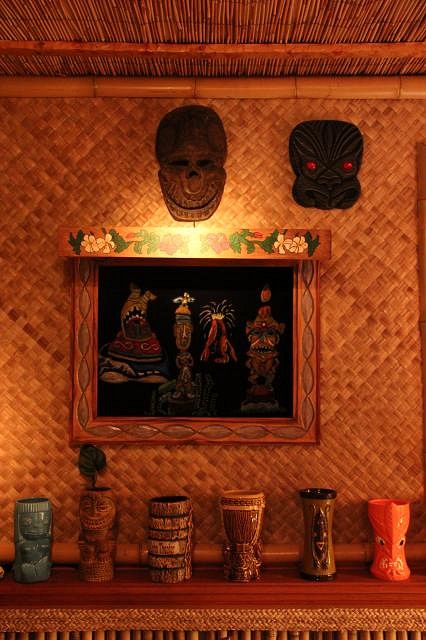
W8N2Surf - Thank you for the comment. I'm glad you like the thread.
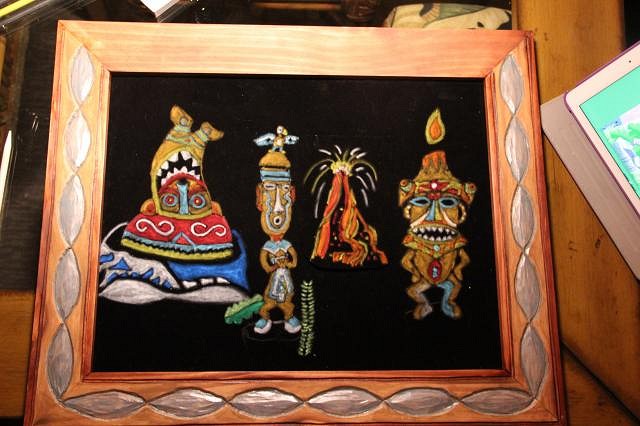
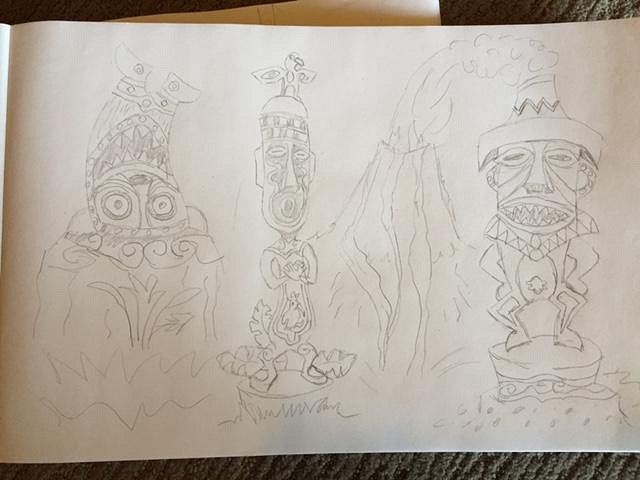
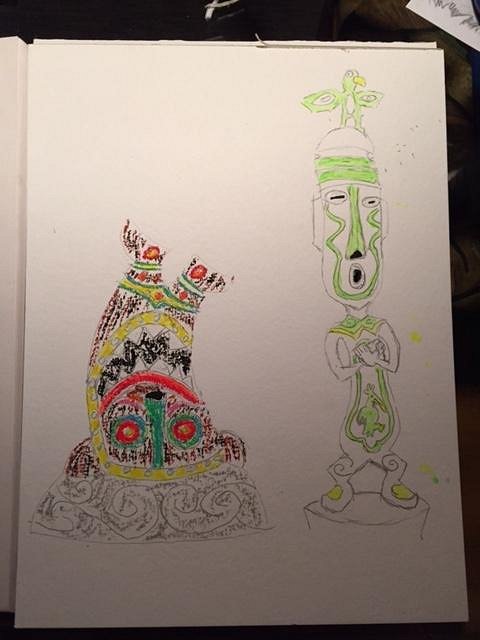
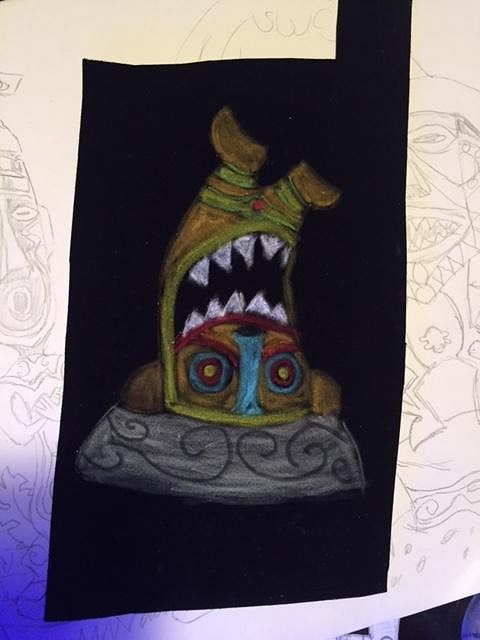
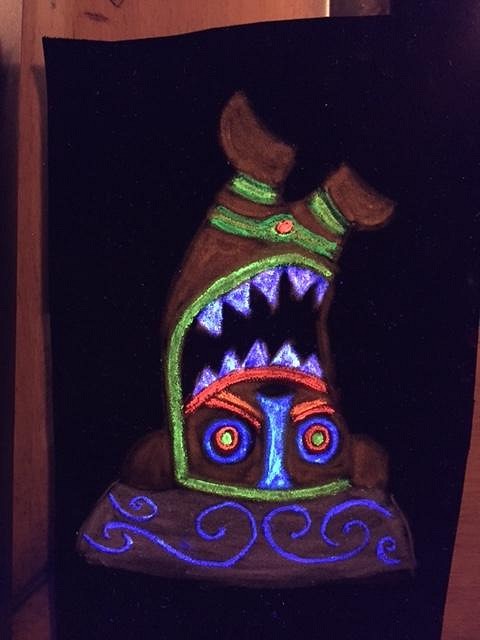
This is a project I started last summer for the TC Art Swap. Because of time constraints I knew I was not going to finish it on time so I submitted these two pictures for the swap. They were test drawings for the larger black velvet picture:
I'm now working towards finishing this project. Mounted on top of the picture will be a black light and there will be a timer that switches the black light off and on. There will be a cover over the light so it won't be visible. I always liked the windows in the Enchanted Tiki Room that simulated lightning and rain. When I saw the volcano window in Trader Sam's at Disneyland Resort I thought maybe I should have my own magical window.
Here is the previous progress from last summer and as I near completion I'll post more pictures Here's the sketch of the painting.
Like everything else I had no idea in the beginning how to do this so I needed to do some testing. The body of the painting will actual be oil pastels with UV paint over the pastels. The first attempt was on paper that's for acrylic paint but the pastels didn't adhear that well.
Here it is with the UV paint.
My next test was on a sample of the black velvet fabric.
And here it is with UV paint.
[ Edited by: MaukaHale 2015-11-13 22:30 ] |
|
H
hiltiki
Posted
posted
on
Wed, Nov 18, 2015 6:37 PM
I love your decorating skills, looking forward to the black velvet finished piece. |
|
M
MaukaHale
Posted
posted
on
Wed, Jan 20, 2016 8:46 PM
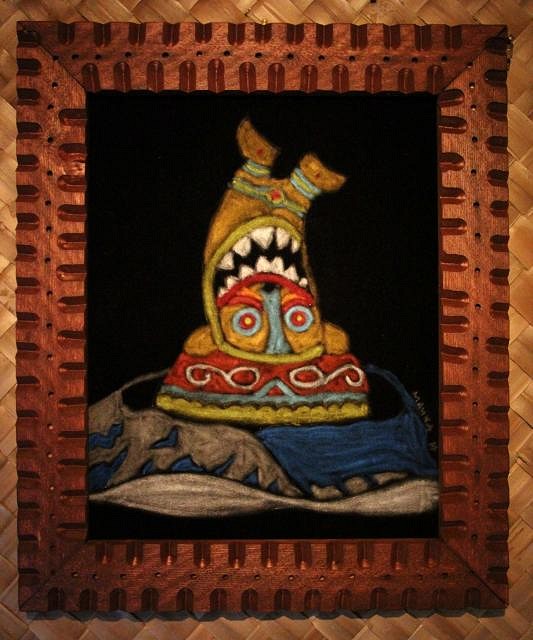
Its been awhile but I'm making progress on the black light black velvet picture. The next step is to finish the shield that goes in front of the black light. This was a project for the art swap with The Enchanted Tiki Room as the theme. I thought I would use an element from The Enchanted Tiki Room sign.
I just need a few more layers of the UV paint and the painting will be done.
Now I know what Robb Hammel meant when he said you need to make the paint stand up on the fibers. If you put it on too thick the paint goes below the top of the fibers.
I just need to stain the wood and mount everything. I'm working towards having this done by Saturday and hung on the wall. We are having a few guests over for a small party. |
|
M
MaukaHale
Posted
posted
on
Sat, Jan 23, 2016 5:53 PM
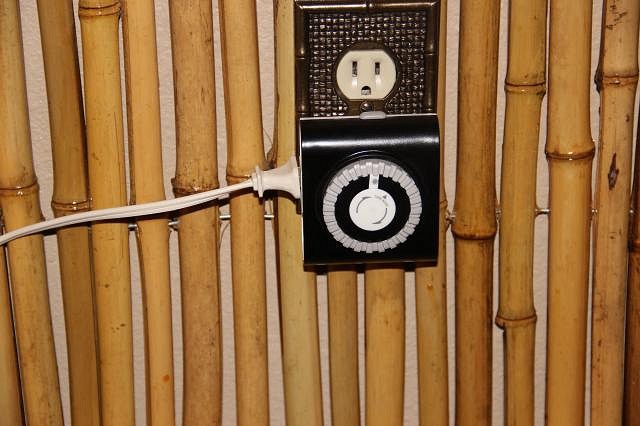
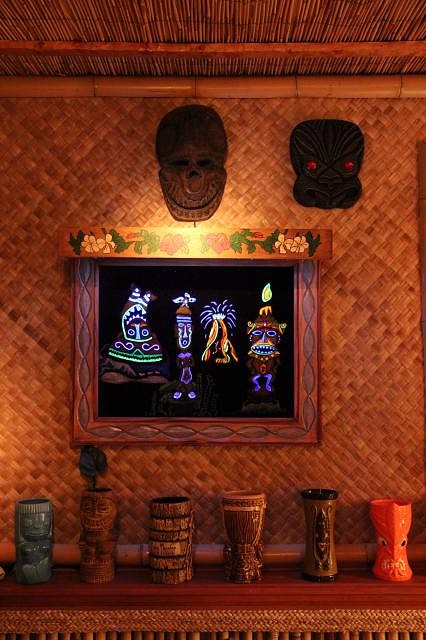
The picture frame was completed in time for the unveiling party on Saterday.
I uses a hydroponic timer so the UV Black Light would go on for 40 seconds and turn of for 40 seconds.
There was a good turnout for the unveiling.
|
|
SF

Slacks Ferret
Posted
posted
on
Sun, Jan 24, 2016 5:59 PM
Looks great. I love the idea of the light on a timer. The whole place looks fantastic. |
|
M
MaukaHale
Posted
posted
on
Mon, Jan 25, 2016 10:16 PM
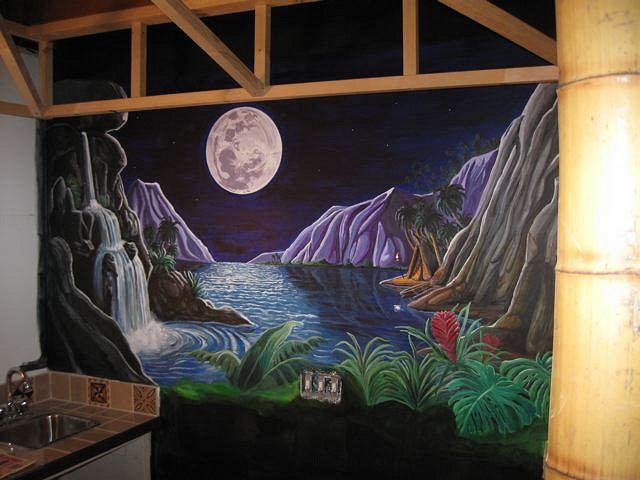
Thanks Slacks Ferret, the black light and the UV paint remind me of what the dark rides at Disneyland used to look like. Especially Mr Toad's Wild Ride and The Rainbow Caverns Mine Train. Its kind of like having my own magic window like they have at Trader Sam's. I'm going to keep working in UV paint and see if I can come up with a unique volcano and lagoon scene. It would be nice to have something as large as the mural you have behind your Kanaloa Lounge Bar
|
|
S

Shot-Tiki
Posted
posted
on
Tue, Jan 26, 2016 9:40 AM
LOVE the velvet picture. What model black light did you use? Can you provide a link? Thanks. |
|
M
MaukaHale
Posted
posted
on
Tue, Jan 26, 2016 10:08 AM
Shot-Tiki, I bought the black light based on the size I needed. Its an 18" Chauvet. I purchased it from Guitar Center. |
|
SF
Slacks Ferret
Posted
posted
on
Thu, Feb 18, 2016 8:41 PM
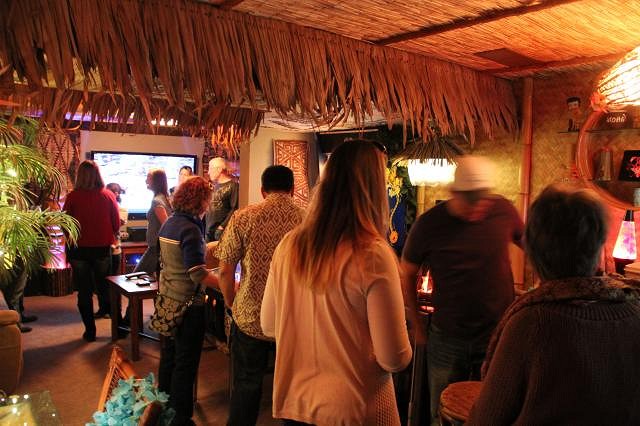
I had an opportunity to see John's space first hand, and boy-howdy, is it ever a nice one! Love the impressive tikis, the art, the pinball machine, the Monkeyman tables, the tapa cloth, and all the painstaking details (especially those details which were routered) that have gone into his Aloha Theater. He's also a fantastic host! Mahalo Mauka Hale! I hope I can see it again some day! |
|
M
MaukaHale
Posted
posted
on
Mon, Feb 22, 2016 7:31 AM
Slacks Ferret, I'm glad you took the time to stop by, It always has been enjoyable to meet other members of the Tiki Central community. Perhaps I'll make it to Calgary some day. |
|
AD
Aloha Daddy
Posted
posted
on
Wed, Feb 24, 2016 10:42 PM
Mauka, you are outdoing yourself, this is really great! I love how the picture glows, it's a great effect. You continue to inspire, thanks for sharing your how-to's, always keep me motivated! I am in the middle of a re-build of parts of my bar as well, getting it ready for the spring/summer season! Aloha and keep up the good work! |
|
B

bobtiki
Posted
posted
on
Fri, Mar 4, 2016 7:39 PM
MaukaHale, thank you for posting so much information about your build — I just got sucked into reading all of it over the last half hour. Really looks like a warm, inviting space! |
|
M
MaukaHale
Posted
posted
on
Sun, Mar 6, 2016 7:55 PM
Bob, Thanks. Its a great place for me. After my wife goes to bed I'll make a cocktail and watch old Adventures in Paradise episodes or Hawaiian Eye Episodes. |
|
M
MaukaHale
Posted
posted
on
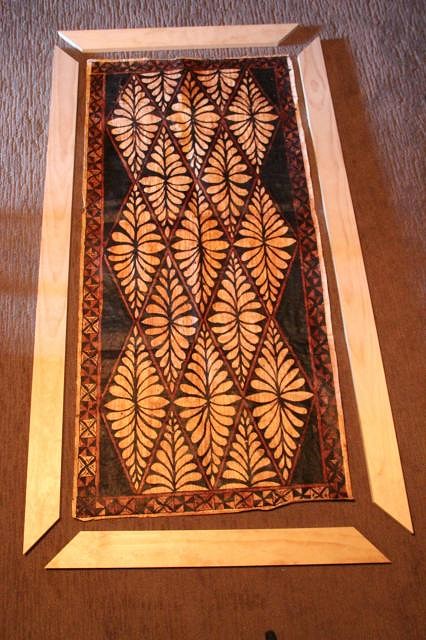
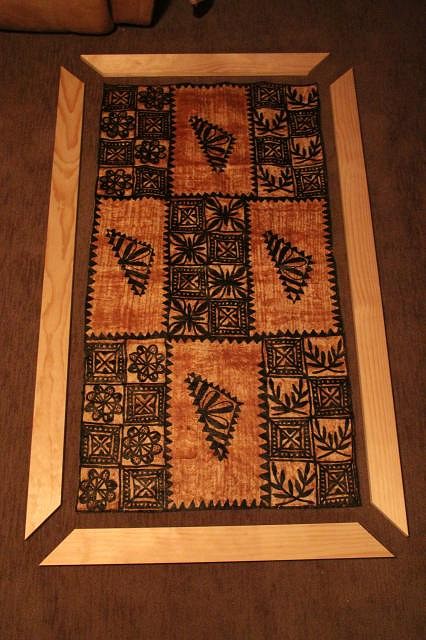
Sat, Apr 23, 2016 9:34 PM
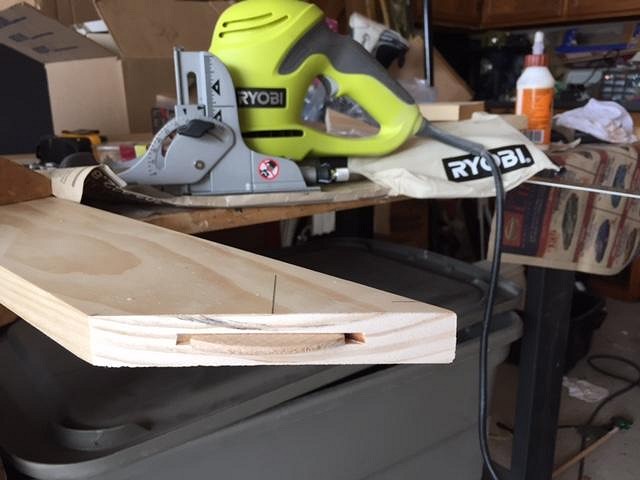
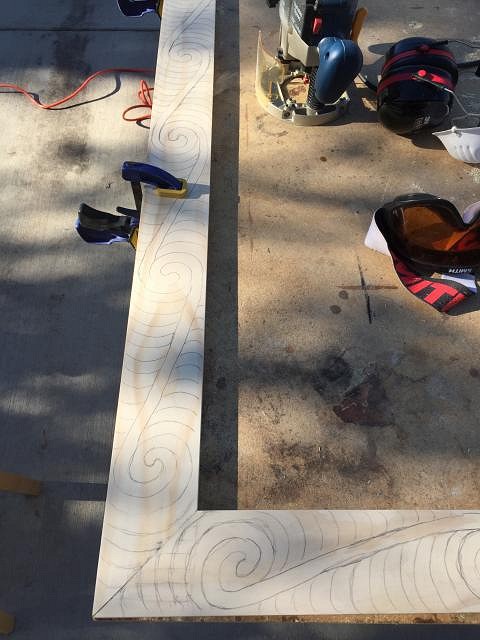
Now that the weather is warmer I can get outside and use the router. I want to build carved frames to go around these two pieces of tapa cloth.
Right now the tapa Cloth is attached to the wall with only two small needle point steel harden nails. They are very small and leave a small hole that can't be seen when poked through the tapa. The idea is to make frames that will hang over the tapa but won't be attached to the tapa. The nails and the pressure from the weight of the frame, against the tapa, will hold it in place (I'm a minimalist when it comes to attaching things to the wall and ceiling). Since the tapa doesn't have straight edges it takes a tight fit to cover the material but not the painted design.
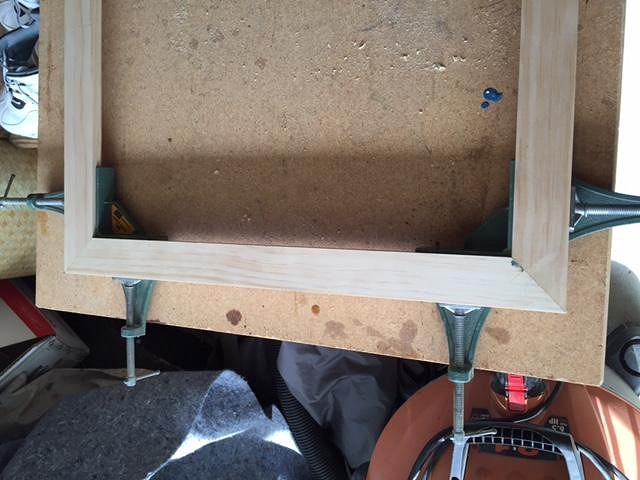
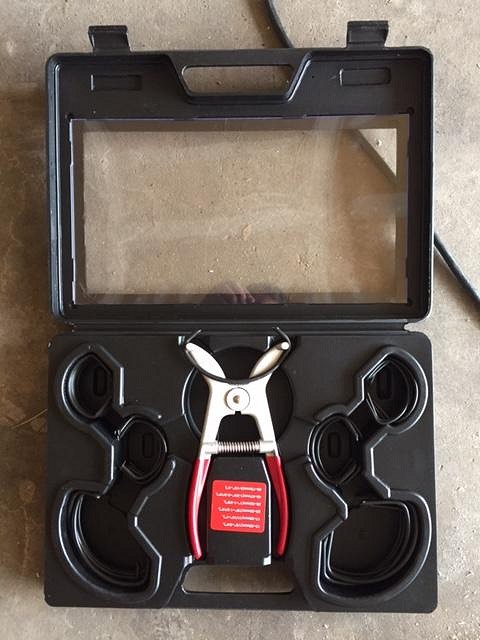
The boards are 1"X4"s and are too wide to fit into picture frame clamps. To join the ends I used spring miter clamps.
The corners are held together with wood glue and #10 Wood Biscuits. The biscuits are inserted by cutting a slot with a plate joiner.
One final check to make sure the frame does its job before I spend time with the router,
[ Edited by: MaukaHale 2016-04-23 21:41 ] |
|
D

danlovestikis
Posted
posted
on
Tue, May 24, 2016 8:23 PM
I sure hope we can stop by one day while on a Colorado road trip. That's one I really want to do and your tiki room would be a highlight. Wendy |
|
K

Kungaloosh
Posted
posted
on
Wed, May 25, 2016 2:44 PM
Fantastic job! All looks great. Getting some fantastic ideas for my room :) Love all the Disney stuff. |
|
P

Polly_Nesia
Posted
posted
on
Fri, Jun 24, 2016 5:17 PM
(long pause) Speechless here. What an amazing room. So vibrant with textures, colors, shapes and carvings. Very comfortable feel, kind of clean and contemporary while at the same time being native-inspired. You have quite an eye for design -- It all fits in so well together and with so many individual, detailed pieces incorporated. Your collection of tiki items is fun to look at. One of my favorites pieces would be the carved canoe, another the large tiki which you recently added the bamboo around the base. Even like both your bamboo bar stools and your chairs at the square table (find the upward ends on the seat back very appealing). Top notch carpentry work there. Have to say your how-to's make me feel like carving some trim now! Very inspiring thread. So is the backyard Phase 2? The moai and fountain makes for a nice start. |
|
M
MaukaHale
Posted
posted
on
Mon, Dec 5, 2016 9:38 PM
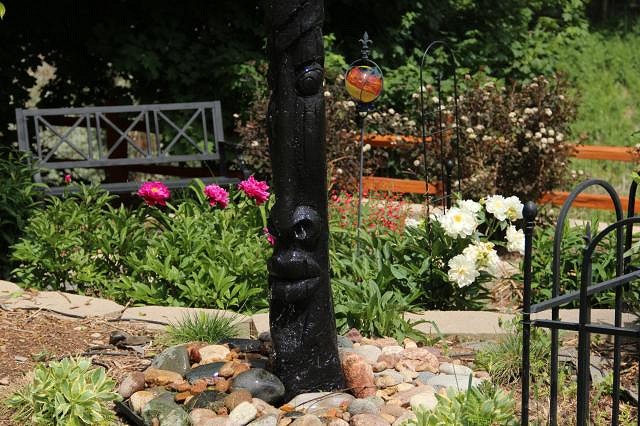
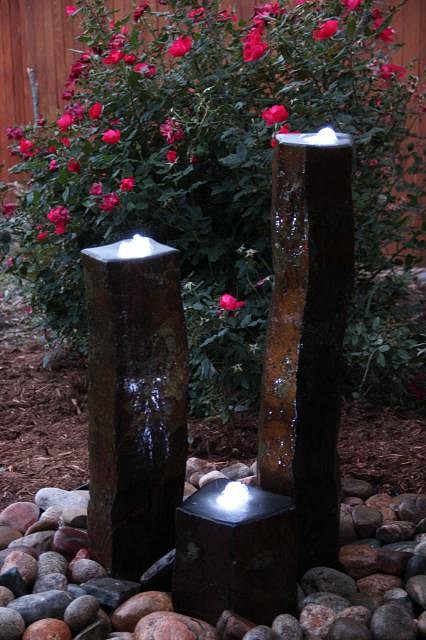
Its been awhile since I last posted. Polly-Nesia, you might say its a phase two. I have added two new water features to the back yard and I do have plans for another concrete tiki.
This one is really cool since it has lights inside the water.
I have finally gotten around to carving the frames for the large tikis.
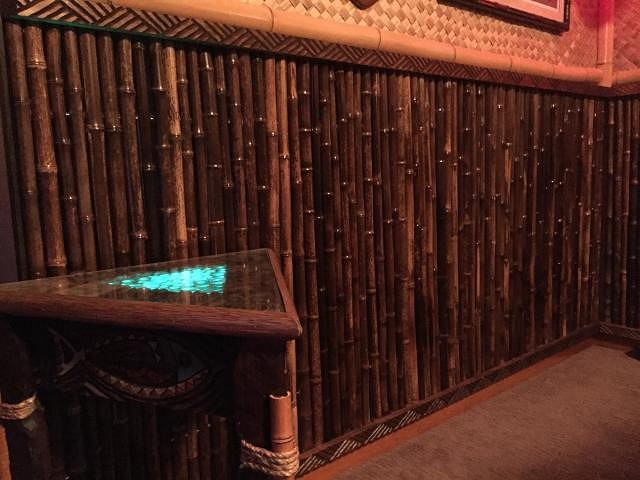
And this is new trim for the walls.
Some of the trim is being used to finish off this wall.
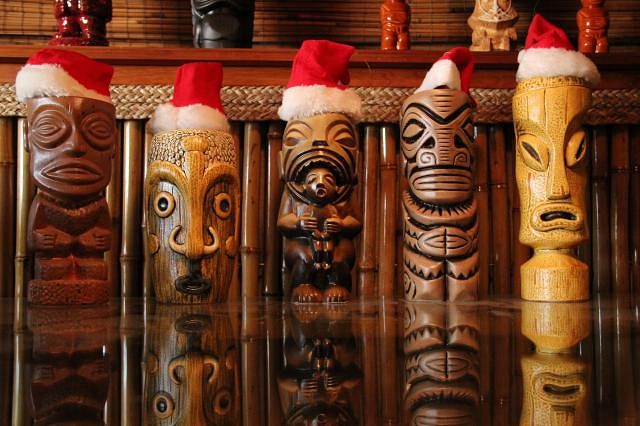
More to come. Here's one last one to wish everyone a Merry Christmas and Happy Holidays.
[ Edited by: MaukaHale 2016-12-05 21:49 ] |
|
N''

nui 'umi 'umi
Posted
posted
on
Mon, Dec 5, 2016 11:50 PM
Great pic Mauk! |
|
D
danlovestikis
Posted
posted
on
Tue, Dec 6, 2016 6:20 AM
If only I could get Dan to leave his stereos long enough to cruise through your thread I know he would be hooked. It's fun to look back at when you began until now. Great room and yard. Wendy |
|
M
MaukaHale
Posted
posted
on
Tue, Dec 6, 2016 9:59 AM
Hi Wendy, thank you for reading through. Dan does enjoy his music and tiki collection as well. I enjoyed looking at the pictures of your trip to Kaua'i. |
|
W
W8N2Surf
Posted
posted
on
Sat, Dec 17, 2016 5:09 AM
You are now flying through the stratosphere of awesomeness. Thanks for the pics, I look forward to more from the backyard as well. |
|
M
MaukaHale
Posted
posted
on
Fri, Dec 30, 2016 9:43 PM
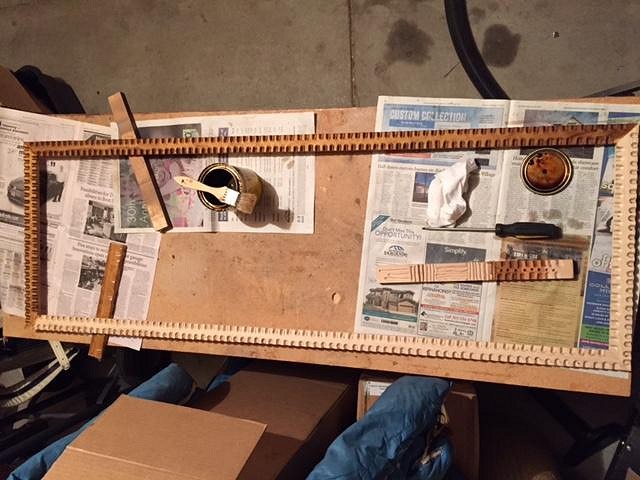
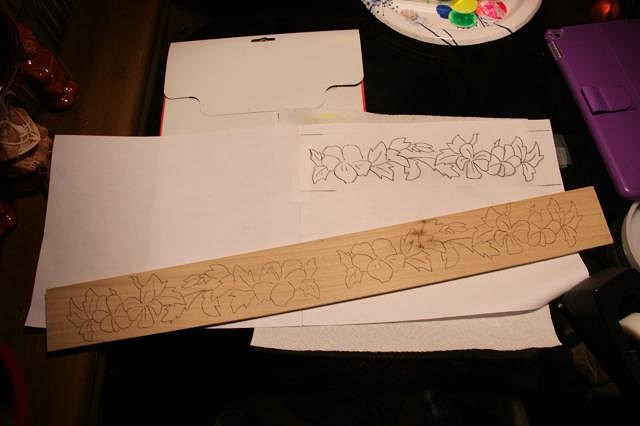
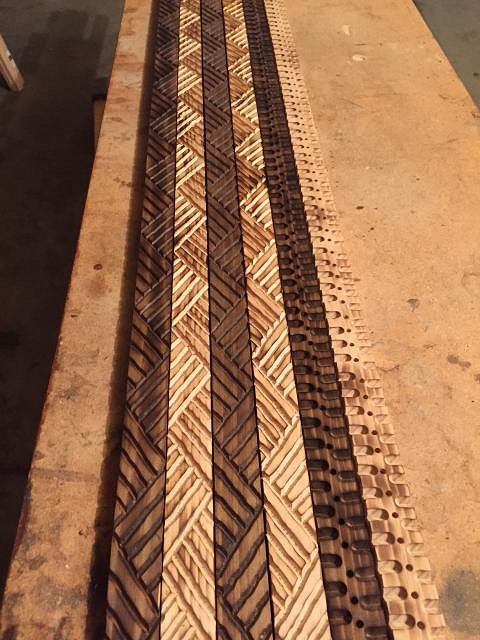
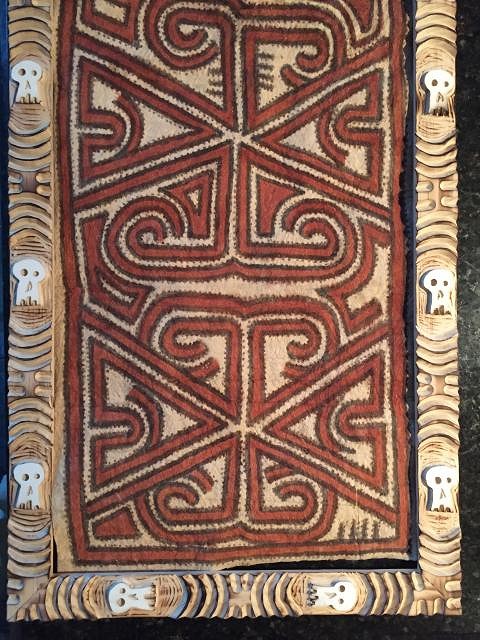
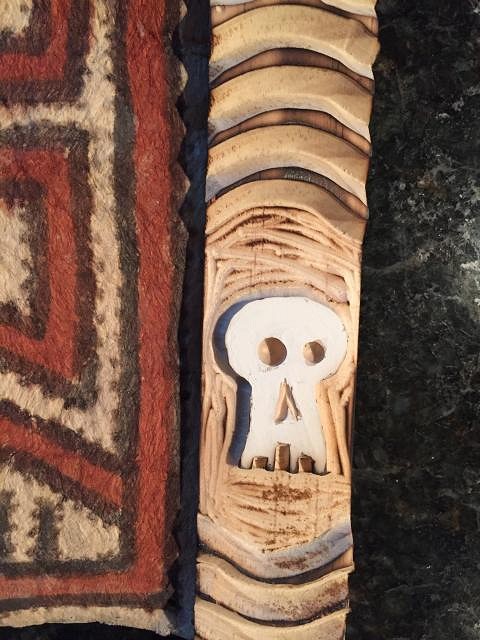
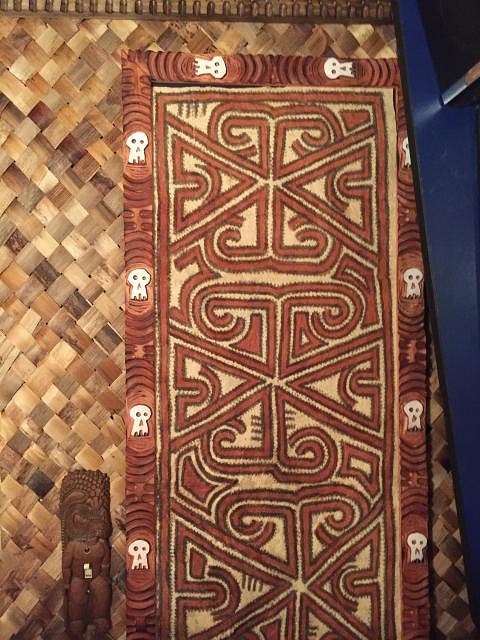
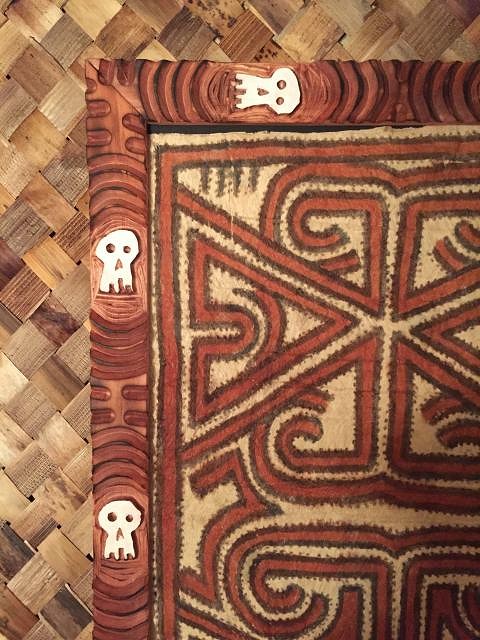
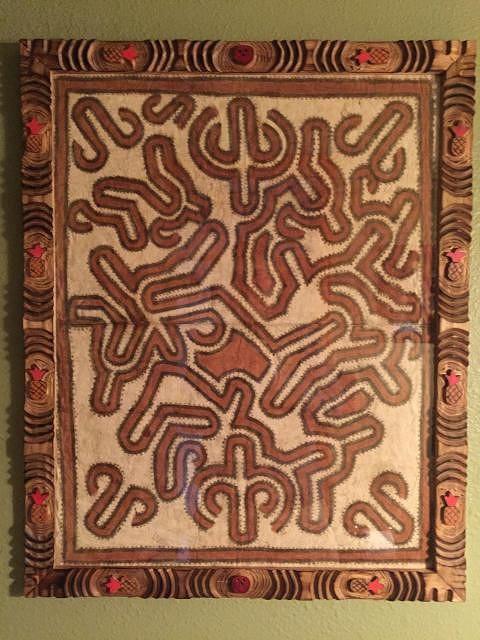
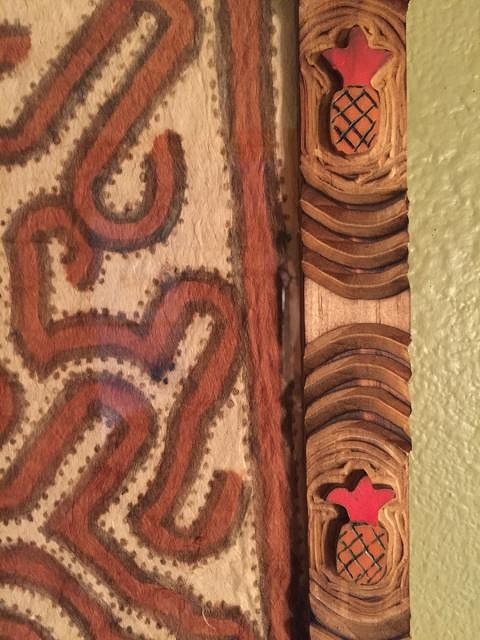
Here are some progress pictures. Right now I'm creating frames for several tapa pieces.
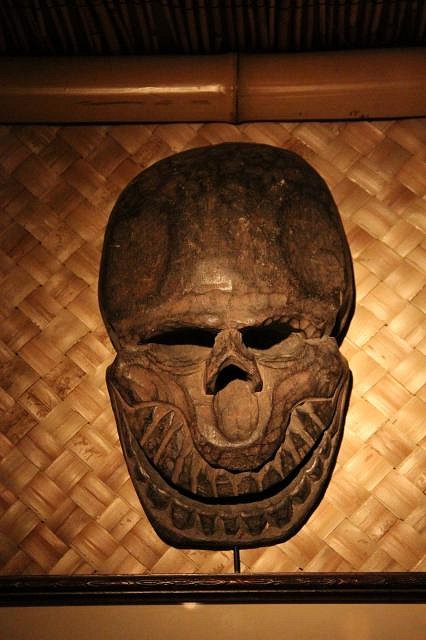
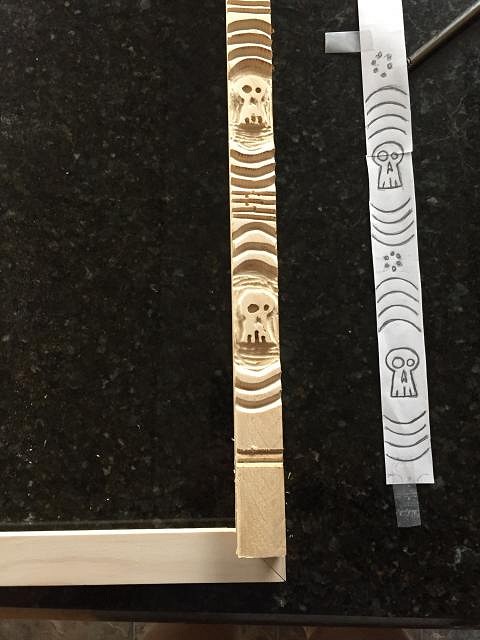
Since this tapa is from Papua New Guinea, I thought I would give it a head hunter look with the help of skulls by Shag.
I still need to put some stain on the wood.
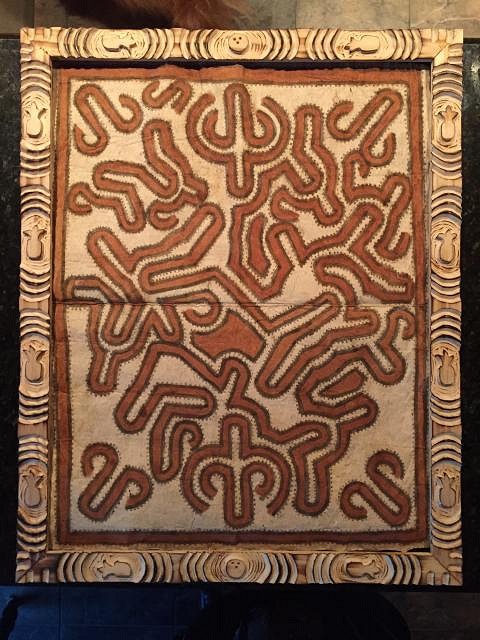
For this other piece of PNG tapa, I decide to use pineapples. It still needs paint, stain and some detail done with a wood burner.
|
|
N

nctrader
Posted
posted
on
Mon, Jan 2, 2017 2:51 PM
Totally inspiring thread, thank you for documenting your work so well! |
|
M
MaukaHale
Posted
posted
on
Fri, Jan 13, 2017 11:42 AM
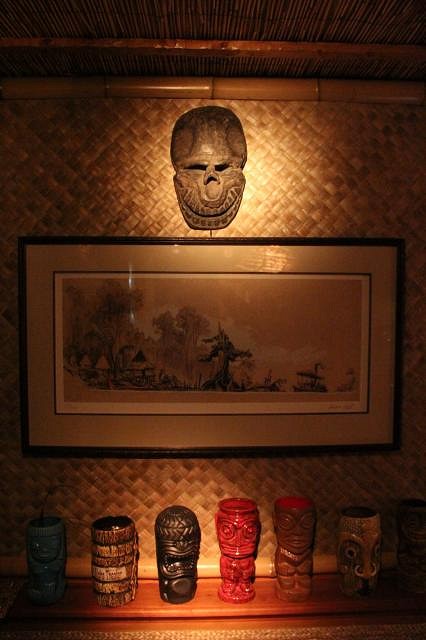
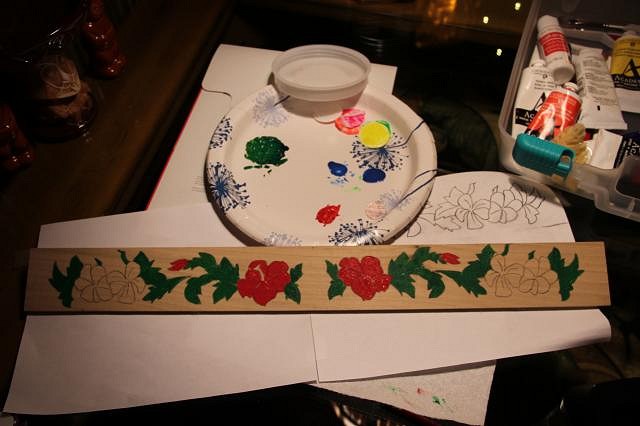
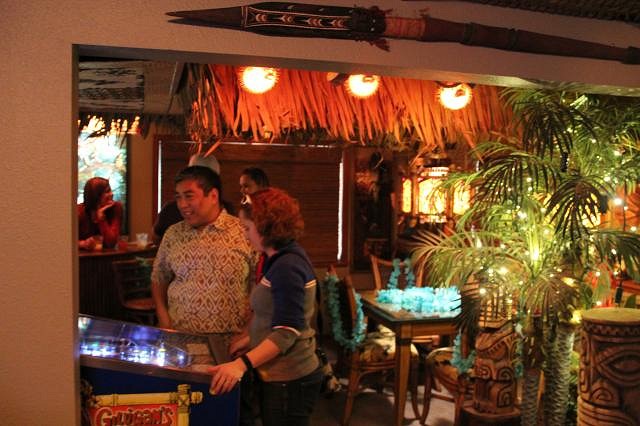
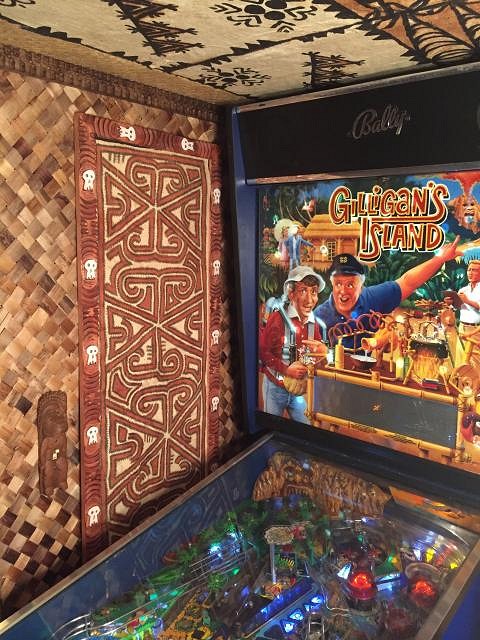
I finished both of the tapa cloth frames and put the one with the skulls next to the Gilligan's Island pinball machine.
The frame with the pinapples went into the restroom next to the Aloha Theater.
I used a wood burner to add some detail to the pneapples.
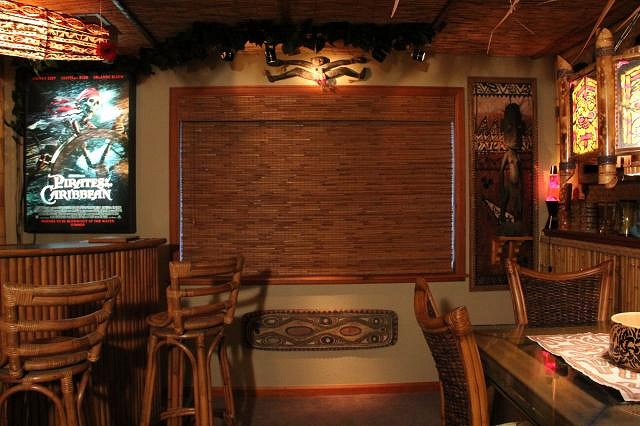
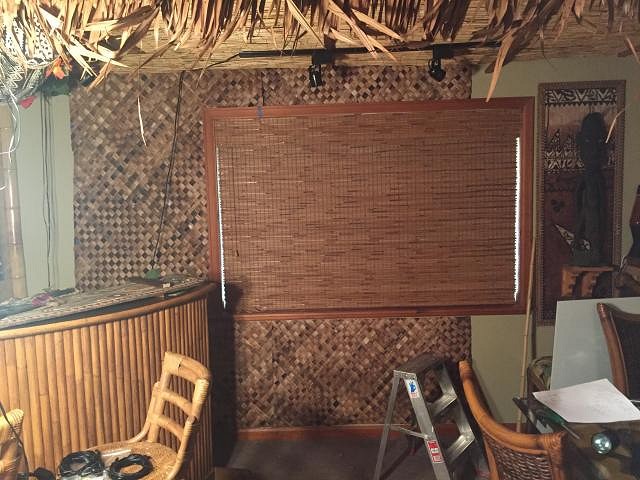
I'm currently working on adding Bac Bac mats to the back wall of the tiki bar Here is the before picture.
The in progress picture.
|
|
PP

Prikli Pear
Posted
posted
on
Fri, Jan 13, 2017 1:10 PM
Love this! The Gilligan's Island pinball game is a nice touch. :) |
|
C

creativenative
Posted
posted
on
Fri, Jan 13, 2017 8:27 PM
Agreed P-Pear. I'm so jealous! |