Tiki Central / Other Crafts
Lucky's Tiki Bonanza - Now in 3D!!!
|
HT

Hale Tiki
Posted
posted
on
Mon, Jan 14, 2013 1:00 PM
Touché, MDM. Touché. :) |
|
HT
Hale Tiki
Posted
posted
on
Wed, Jan 23, 2013 1:35 PM
I received the Mai Tai glasses, and they do not have a big thick bottom. I'm tracking down a new source for high quality, Made in the USA, at a decent price. A trip to the Grass Skirt Tiki Room lit another fire under me to get more tiki projects done.
So I came home and made some bright UV reactive chunks!
They're so bright that the camera in the phone couldn't stop down far enough to photograph them in regular overhead light. I liked the colors, and I found a form that I'm going to use, so I decided that my first light is going to be called Hot Lava, and will be a mix of approximately 12 different subtlety different tones of orange and red, including some blacklight reactive pieces. Call the Grass Skirt a bit of inspiration, and that I just got in a bunch of new pigments. So, here is a pile of some of the chunks that are going to go into this lamp.
And a moai or two. I've got something very special planned for the fill between the chunks. I'm waiting for it to arrive, and if it works out (which I hope it does), it's going to look wonderful! Now I'm deciding between color for the cord. It's going to be a cloth cord, newly manufactured for safety, and not grounded. Light bulbs don't need to be grounded, and as someone who has an older home with the occasional two prong outlet, I understand that some of you out there may also have some two prong outlets. My options are black and brown. Sorry about the photos, I really need to start documenting things with something other than my phone. |
|
M

MadDogMike
Posted
posted
on
Wed, Jan 23, 2013 2:03 PM
"UV reactive chunks" that sounds intriguing. Will you put a UV light source somewhere, either inside or outside of the lamp? |
|
HT
Hale Tiki
Posted
posted
on
Wed, Jan 23, 2013 4:42 PM
I'm looking into alternative lighting sources. I work with LED, neon, cold cathode, et cetera all the time, and am thinking of moving in that direction. Especially with all of the lighting I've done with RGB led's that allow you to change the light color. I was going to mention that later on, but since you asked, I'm more than happy to answer! I'd rather stray away from conventional lighting. As much as I love the warm glow of an old incandescent bulb with a nice filament, there's a lot of bulb banning going on in different parts of the world, even here in the US. And although LED's certainly aren't the way of the future, they're the way of tomorrow. My current thought on the light source is to do 1 of two things.
I'll have to try to get some photo/video. |
|
D

danlovestikis
Posted
posted
on
Thu, Jan 24, 2013 2:05 PM
Roge has used a black light to change the colors of his resin chunks. I'm looking forward to seeing how yours turns out. Wendy |
|
HT
Hale Tiki
Posted
posted
on
Wed, Jan 30, 2013 10:20 AM
I'm having trouble deciding on wire for my lamps. I can get either style in either color. I'm buying in bulk. Thoughts?
Also, I've started a dodecahedron lamp, as well as a bamboo ring lamp. I'm working late tonight to work on them, photos to follow. |
|
D
danlovestikis
Posted
posted
on
Wed, Jan 30, 2013 1:51 PM
Hale Tiki I would go with which color looks best with the lamp. Are you using a chain with the wire so you can hang it? Wendy |
|
HT
Hale Tiki
Posted
posted
on
Wed, Jan 30, 2013 2:10 PM
The problem is that I have several styles of lamp that I will be making, and was hoping that one color could handle them all, and I wasn't sure if that would be possible. I can also get both in black. I was thinking black, because in a darkened room, you wouldn't be able to see it, but a the same time, if you have a bamboo chain, or brass, black may not look as good as brown. Thus, my conundrum. But as far as application goes, it's chunk lamps, tapa lamps, and mixed bamboo/wicker/tapa. EDIT: I'm trying to avoid the gold translucent wire they traditionally come with (as well as most lamps). I hate that stuff. [ Edited by: Hale Tiki 2013-01-30 14:16 ] |
|
L

lunavideogames
Posted
posted
on
Wed, Jan 30, 2013 2:32 PM
I like the brown twisted one. |
|
L

LoriLovesTiki
Posted
posted
on
Wed, Jan 30, 2013 4:11 PM
I like the twisted brown one too and I think it would go with many lights. |
|
T

tikilongbeach
Posted
posted
on
Wed, Jan 30, 2013 5:00 PM
Have you tried electroluminescent wire for any projects? Positives/negatives? I've been planning a volcano picture, but it doesn't seem that flowing EL wire comes in the volcano colors of red, yellow, white and orange. |
|
HT
Hale Tiki
Posted
posted
on
Thu, Jan 31, 2013 6:04 AM
tikilongbeach: We use it all the time here. Rarely do we using the flowing EL wire, but we use EL a lot. As far as the lack of red, orange, and yellow, I've seen then from Chinese distributors, so alibaba might be the best chance for you. Conversely, you can find white EL chase wire, and coat it with a tinted transparent paint. You can buy them from a hobby store. That, or depending on the project, have the white behind acrylic. http://www.ravehaven.com/EL-Wire/Electro-Motion-Light-Chasing-EL-Wire-6-ft.-p-1212.html The companies above seems to have red, so that's a start. You could make orange from red... There might be alternatives to the EL, controllers, et cetera. Shoot me a message with what the project is, and perhaps I can help. (Side note, EL is terrible for light output. It looks great, but as far as the amount of lumens, even the best (which we've used here, everything from the wire, to the tape, to EL "neon") is very low in light output. |
|
HT
Hale Tiki
Posted
posted
on
Thu, Jan 31, 2013 6:14 AM
So, I didn't make a lot of progress last night after work. I got distracted doing actual work on personal time, and then got distracted on TC. I did, however, managed to gather a few things for the lamps. Here's a selection of a few hundred 3/16" cross sections of bamboo that will eventually be sanded to remove stray fibers and embedded in resin:
Next we have shells, also to be embedded in resin. These will probably decorate the bottom (and possibly sides) of the dodecahedron lamp.
And, lastly, these will definitely be a part of a few lamps. They're dyed bits of oyster shell. They're about $3/lb and have a great pearlescence to them.
I don't have a photo of it yet, but I also created a mold that will allow me to take the acrylic panels of the dodecahedron lamp and apply any volume of resin to color or embed things in them, while still allowing the panels to fit better. More explanation and photos of that to come. Not a very exciting day, but I did get some work done. I'm waiting on the LED's, still have to order cable, and then I can finish up the Hot Lava lamp. Thanks for reading! |
|
H

hang10tiki
Posted
posted
on
Thu, Jan 31, 2013 7:27 AM
Cool stuff!!! |
|
D
danlovestikis
Posted
posted
on
Tue, Feb 5, 2013 10:53 AM
Brown and twisted or black. I like your supplies which will surprise us! Wendy |
|
HT
Hale Tiki
Posted
posted
on
Thu, Feb 7, 2013 5:02 AM
Thanks Wendy! I'm having a lot of fun creating art in general lately. It's been a long time, and it's nice to be creating my own work again instead of that of others. Anyway, so here's what's new on the ever expanding list of stuff!
Also, later today, I'll be posting photos and details of my first two tests for the dodecahedron lamp. Failure, and success! |
|
L
LoriLovesTiki
Posted
posted
on
Thu, Feb 7, 2013 7:25 AM
Can't wait for the update Hale! |
|
K

KAHAKA
Posted
posted
on
Thu, Feb 7, 2013 12:26 PM
Cleaning all those bamboo trivets sure is "fun". Ha. Bamboo splinters galore! I've always wanted to make a dodecahedron lamp, and still plan to as well. Looks like a fun challenge. Looking forward to the pics! Cheers, |
|
HT
Hale Tiki
Posted
posted
on
Thu, Feb 7, 2013 2:03 PM
Hey Kahaka, And yeah, sanding is FUN! I just have to keep repeating that to myself over and over like a crazy person. |
|
HT
Hale Tiki
Posted
posted
on
Thu, Feb 7, 2013 5:20 PM
No luck with cutting out the gunstock war club yet. I instead spent the time finding lots of Maori and Marquesan patterns. I think there's some serious weapon making in my future. First things first, the first test pieces. I don't know why the photo came out blue, but it did. It's actually a dark green. There's a few problems with this panel. First, it's poured too thick. This means that some of the smaller shells are lost in the resin. Second, the resin wasn't mixed properly, and so there are some white streaks. This did, however, tell me how much resin I needed to pour onto each 5" panel. Approx 10 grams, for those of you wondering.
So, I cut the resin in half and poured the second panel. This also told me a few things. I have the resin amount right, but was too light on the dye. Not nearly enough tint. It's very, very light blue. This also means that I need to frost the back of the panels for both light dispersion, and to prevent you from being able to see the bulb. I really like the way the dyed oyster shells look.
While I was at lunch today, I decided to stop by a couple of my favorite shops to look for supplies. There's a lot of places that sell "froofy" things that can be easily turned into tiki items. Like the glass vases that I spent a year and a half collecting to make wonderful floats. Anyway, I found bags of shells for $3. Very few are broken, and there's a WIDE variety.
I'll be heading to more stores tomorrow to try to buy more. Here's some shells that are used very effectively in a lamp in our local Tiki Lounge. I tried to take a photo the other night during Tiki Tuesday, but couldn't get one that I liked. Oh hell, here it is anyway.
As you can see, there's the same type of shell hanging from the bottom. It looks great in person. And here's my budding collection of those shells. I took the photo for pittsburghpaulie, who loves that lamp.
Not much else to report. I'm working on a second piece for the art swap, that ought to be fun. OH, and I got in my bucket of fireproofing today, which means that the lamps will not only be fireproof, but safe in a commercial setting. Can't wait to make more things! |
|
ATP

Atomic Tiki Punk
Posted
posted
on
Thu, Feb 7, 2013 5:26 PM
Now that's really shellfish!, how could I resist :lol: |
|
T

tikiskip
Posted
posted
on
Thu, Feb 7, 2013 8:25 PM
On the cord those cloth cords are nice but a high dollar way to go. |
|
HT
Hale Tiki
Posted
posted
on
Mon, Feb 11, 2013 5:51 PM
ATP - I'm glad I could sucker someone else into a pun. Skip - I don't know why I didn't think of Roscoe, I have a background in photography and film. I'll keep that little nugget in the back of my brain. Thanks! For now, I'm waiting on parts for the other two lamps, so I decided I'd start a third lamp. It's a heaxagon lamp like the red one above here. I'll be changing it, but it'll be similar. I only got to cut it out today before heading out for my mom's birthday. Nothing exciting, really, but I took a photo anyway. That little spark on the right is the laser cutting the material.
|
|
T
tikiskip
Posted
posted
on
Tue, Feb 12, 2013 6:07 AM
How thick is the Acrylite? Does this laser cut Bamboo? •:''':•:''':•:''':•:''':•:''':•:''':•:''':•:''':•:''':•:''':•:''':•:''':• |
|
HT
Hale Tiki
Posted
posted
on
Tue, Feb 12, 2013 8:00 AM
Hahaha. They are quite battleship like. 1/4", though that's not really necessary. I need to cut it down to 1/8" on the next ones. It does cut bamboo, actually. Quite well. I don't have any 3 or 4" stuff, but I should really get some. It cuts wood as well, which is the next monstrosity I'm working on. It'll cut anything but metal, really. Tinfoil, and metal that thin, yes. Any other metals, no. I'm waiting on the new Mai Tai glasses to come in at the moment. Had to buy 3 cases to get the price down, because I prefer the ones with a big, heavy bottom. The thin bottomed tapered double old fashioned I can get super cheap. |
|
HT
Hale Tiki
Posted
posted
on
Thu, Mar 14, 2013 11:15 AM
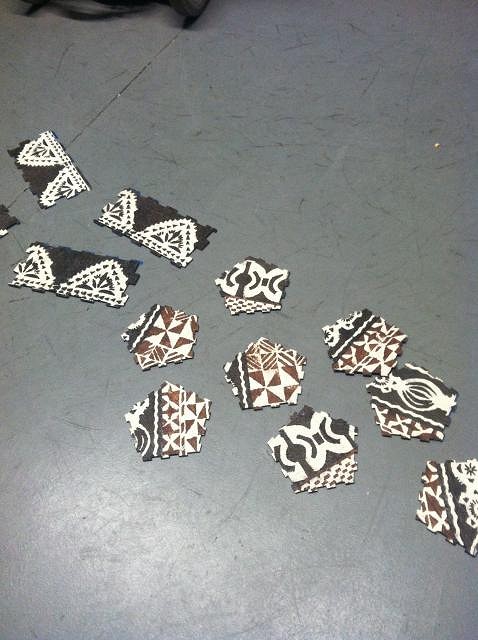
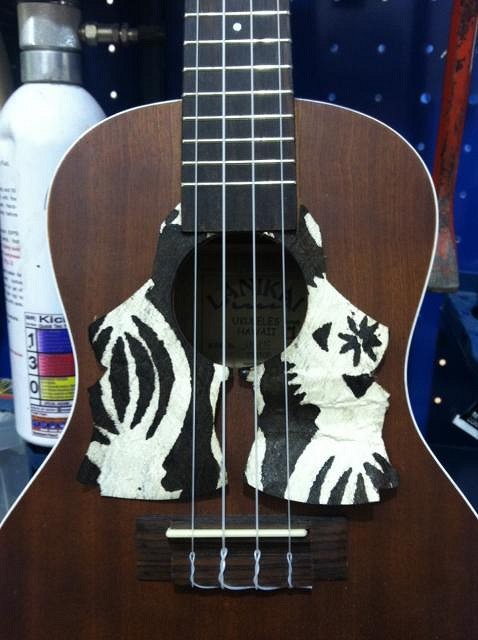
So. A few updates. I've got like, 10 different projects running and once and have been super busy. Recently, I did the first in a series of fictional Polynesian weapons for the Creatures of the South Pacific art swap. I call it the Maori Maul. Here's a closeup of the handle: Here's a bad photo of the whole thing, before the wrap at the joint. Head: Then, I decided to have a little fun, and so I asked Tiki Tony for permission to use his artwork to engrave my ukulele. I don't have a photo of the finished product yet, but it looks amazing. I'll post that on the next update. For now, here's the design: I mentioned before that I was waiting to get Mai Tai glasses in. Well, I got them in, finally, en masse: They're Libbey, 12oz, heat treated. I got them because I'm producing custom Mai Tai glasses for a few venues that you all would enjoy. More on that when the event announcement is made. But for now, here's a photo of the first ones engraving: The first run I did for a good friend, who is better know as Dr. Bamboo, Mr. Craig Mrusek. It's a mask he designed on one side, with the Dr. Bamboo logo on the other. Unfortunately, if you've had a Mai Tai at Frankie's, you know that once condensation hits an engraved glass, it's game over. It's very hard to see the logo. But when they're first poured, or empty, they look great. Here's a Mai Tai Craig made for me with Flora de Cana and Smith & Cross, two of my favorites. The next design is one I'm doing for another friend, whose work is better known as Atomic Cheescake Studios. It's for her home bar, in Baltimore, MD. The glasses aren't done yet, but here's the design: The lines signify the top and bottom of the glass. Go take a look at her work, and send her an email that she needs to come to Hukilau this year. Trying to get her to join the fray. Just be warned that there is an autoplay of music, so make sure your speakers aren't all the way up. Completely unrelated to making anything, I scored this at an antique store, which made me very happy. It also brings me to 10 Papua New Guinea pieces! A good start, but nothing like the big boy Swanky has in his home bar. Sooooooooooo, back to work on the lamps! I got myself a big sheet of Fijiian tapa cloth: And I began to cut it for panels for the lights. Fortunately, the cloth is divided off rather nicely, and so I'm able to use certain parts for certain panels for all the lights I have going on at the moment. That's about it. I've been working feverishly on a secret project, that I won't be able to divulge until after Hukilau, and I'm gathering things together to start construction on my home bar. Just a heads up, there will be a full post on The Marketplace about it when the time comes, but I will be offering custom Mai Tai glasses in small or large quantities for everyone's enjoyment. There will be pre-made designs to choose from, as well as the option to use your home bar's logo, a tapa pattern, recipes, the possibilities will be endless! But most importantly, they will be affordable. Custom glasses for the price of a Trader Vic's Mai Tai glass, or even less! I've already got some pre-orders from TC members, but more on that when I've finished the orders for the under wraps project I'm working on at the moment. MAHALO NUI LOA! |
|
EJ

El Jefe
Posted
posted
on
Thu, Mar 14, 2013 11:56 AM
Hale, Just for my own education and curiosity why only etch the glass instead of etch and frost or just frost the design? Would the design not show up better etched and frosted or just a frosted design? Look forward to running into you at the Huki. Jeff |
|
HT
Hale Tiki
Posted
posted
on
Thu, Mar 14, 2013 12:40 PM
Absolutely, Jeff. It's my first Hukilau, and I can't wait. So, as to why not etch and frost/front. I'm not entirely sure I understand the question, so I'll answer it as best I can. Both methods will fade when faced with condensation/water, it's the nature of glass. The short version is that the water helps to fill in the missing glass and refract the light...........zzzzzz Wah? What? I'm up, I'm up. To frost the logos on, I'd first need to apply some type of resist, usually a vinyl. Then carefully apply the acid/cream, or the cheap way is a spray can. Then allow things to dry, carefully remove the vinyl...it's a labor intensive process, and not meant for production work. Laser engraving/etching them consists of putting the glass in the laser, making sure it's level/aligned, hitting start, and letting it's do it's thing. Cleanup on both needs to be done. Frosting THEN etching would mean the logo wouldn't show up as well, as it's all kind of the same: just removing material from the surface to create an uneven/not clear surface. Does that answer the question? [ Edited by: Hale Tiki 2013-03-14 12:47 ] |
|
M
MadDogMike
Posted
posted
on
Thu, Mar 14, 2013 1:00 PM
Acid etching works OK for a few pieces when you don't just happen to have a laser engraver in your back pocket :lol: Very cool stuff Hale :) |
|
HT
Hale Tiki
Posted
posted
on
Thu, Mar 14, 2013 1:08 PM
'zactly, Mike. Gotta do something to make up for being underpaid and under-appreciated, and use of the facilities where I work is nice. I took a few years off from here, and after I left the first time I worked here, I didn't know what to do without a laser cutter, CNC plasma cutter, or mold making shop. It was a sad day. But now I have them all back, so woo! |
|
EJ
El Jefe
Posted
posted
on
Thu, Mar 14, 2013 8:44 PM
Got it. Thanks guys. Sorry for the kinda vague question. It will be my first Huki as well. PM me Hale and we will exchange info to make sure we meet up. |
|
HT
Hale Tiki
Posted
posted
on
Tue, Mar 19, 2013 3:50 PM
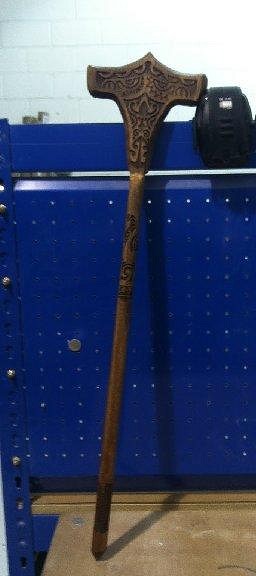
Aloha! I mentioned before that I was working on series of fictional Oceanic weapons. Well, the first one I made is for the Sea Creatures of the South Pacific swap, and should be arriving at it's new home soon. The Maori Maul. However, I will be making five more of them, for sale in the Marketplace. There will be a change, however, as they will have a carved hei with inlaid eyes in the pommel. I thought that from a weapons perspective, a spike would be good for close combat, but it just doesn't fit with the style. If you're interested before it heads to the Marketplace, feel free to send me a PM. They'll be quite reasonably priced. They're approx 28" long, made from poplar and pine, hand finished with stain and wax, and accented with raffia that's been handmade into rope. I took a few swipes at foam with one, and although I wouldn't recommend it, I have to say it really would be nice as a close range weapon. I'm working late tonight to finish a lamp or two. Hopefully I'll have photos of that soon. For now, more of the Maori Maul.
And to give you an idea of size...me doing my best Maori face. Or MDM, if you prefer.
Got some lamp components finished. Assembled and fireproofed. Nothing too exciting, just them drying. [ Edited by: Hale Tiki 2013-03-19 17:54 ] |
|
D
danlovestikis
Posted
posted
on
Wed, Mar 20, 2013 8:37 AM
Your weapons look terrific. Wendy |
|
M
MadDogMike
Posted
posted
on
Wed, Mar 20, 2013 11:08 AM
That Maul turned out great, nice details! |
|
C

Canvas
Posted
posted
on
Wed, Mar 20, 2013 9:44 PM
I love the idea of fictional weapons. Looks great! |
|
K
KAHAKA
Posted
posted
on
Thu, Mar 21, 2013 10:37 PM
Is the laser doing all the cutting/carving on these pieces? |
|
HT
Hale Tiki
Posted
posted
on
Fri, Mar 22, 2013 10:27 AM
Kahaka: It's doing the designs, yes. Not the shaping, or the pommel. I'm working on getting back into woodcarving slowly, and have worked on totally hand carved weapons, but I'm not happy with them yet. BK left quite the impression on me when he was active, and that's a lot of talent to try to come close to. I spent my childhood carving wood with my grandfather, who started one of the oldest wood carving clubs in the country, who still don't have a website, or email, seven years after his passing. They're very old fashioned. So I'm still getting back into the swing of things. Canvas: Thank you. Until I can do justice the original designs, I figured I'd come up with some of my own. Then, later, improve upon these. Building blocks, if you will. |
|
HT
Hale Tiki
Posted
posted
on
Mon, Mar 25, 2013 2:33 PM
So here's the first lamp to almost be finished to completion. The idea struck me when I was visiting Forbidden Island for the first time. There's a section of the wall that's cut away, revealing lauhala matting. I absolutely love the effect, and wanted to incorporate it into a wooden lamp. After going to Smuggler's Cove, the idea of a rum crate seemed to be the perfect idea. Fast forward to Tiki Oasis, and I see that at Tiki Diablo and Bosko's booth, there's a rum crate lamp. Not what I had in mind, but it's nice to know great minds think alike. So, over the past few days, I've built my first crate lamp. It's not 100% complete, I'm waiting for the sockets to come in, but I'm very happy with it. Again, this is another item that I'll be offering for sale in the Marketplace, for anyone that's interested. Generally they have no finish to them, but I can do wax, satin varnish, or fireproofed. Here's the process on it, for those interested. Step 1: Build a frame. Step 2: Put wood on that frame. Step 3: Cut holes in the wood, a la Forbidden Island. Step 4: Burn. Step 5: Remove char with stainless brush. Step 6: Burn again Step 7: Tapa!
So, there you have it. I'll post photos of it lit up when I receive the socket. It'll come with a 10ft chain, in black, for hanging. I'm close to being finished with my first lamp, and it's really nice to be woodworking again for my own purposes, instead of just work. Mahalo for looking! Oh yeah, and I got to share a delicious batch of Painkillers with a near and dear friend from Baltimore. And this is what a batch of 10 Painkillers looks like: [ Edited by: Hale Tiki 2013-03-25 14:35 ] |
|
ATP
Atomic Tiki Punk
Posted
posted
on
Mon, Mar 25, 2013 3:12 PM
|
|
HT
Hale Tiki
Posted
posted
on
Mon, Mar 25, 2013 3:23 PM
AHAHAHAHA, thanks ATP! |
|
H
hang10tiki
Posted
posted
on
Mon, Mar 25, 2013 9:20 PM
Lamp lookin Kool Jon |
|
HT
Hale Tiki
Posted
posted
on
Tue, Mar 26, 2013 4:11 AM
Hey Tikilongbeach, I think someone just invented what you're looking for: |
|
D
danlovestikis
Posted
posted
on
Tue, Mar 26, 2013 10:34 AM
The clubs and wooden box are very cool, good job, Wendy |
|
HT
Hale Tiki
Posted
posted
on
Mon, Apr 1, 2013 9:23 AM
Got all my electrical supplies in, finally. I'll be wiring up some lamps this week. Tiki Tuesday is tomorrow, so I hope to have at least one to bring to show the other Pittsburgh Ohana. |
|
M
MadDogMike
Posted
posted
on
Mon, Apr 1, 2013 6:36 PM
Hale, that lamp turned out way cool! Hopefully headed to someone's Tiki Bar soon. |
|
HT
Hale Tiki
Posted
posted
on
Tue, Apr 2, 2013 5:40 AM
Oh yeah, it's over in the Marketplace for those interested. Thanks MDM! |
|
HT
Hale Tiki
Posted
posted
on
Thu, Apr 18, 2013 5:04 AM
The lamp is still available for sale or trade, for anyone who is interested. I also have smaller/lighter/more economical versions. So, I'm pitting a pick guard on this uke that I'm working on. It's a Lanikai, but I'm making it more personal with the help/blessing of a wonderful tiki artist. Anyway, before I glue on the tapa cloth pick guard, I wanted to get other people's opinion. Can you tell what this is/do you think it looks good? It's just out of cardboard, but will be tapa.
EDIT: OR WITH TWO!!! I like how it looks more abstract, like an elaborate pick guard, but when you look close, you see the moai.
EDIT: Here's the tapa...not sure if I like it. I might just do white/ivory.
[ Edited by: Hale Tiki 2013-04-18 07:33 ] |
|
L

littlegiles
Posted
posted
on
Thu, Apr 18, 2013 6:59 AM
I have to agree with you. In the last picture with the Tapa, the details of the Moai profiles get lost. Just my opinion, but actually the single profile in the first picture I think shows it off the best. Dale |