|
JB

Joshua Bell
Posted
posted
on
Sat, Feb 22, 2014 9:57 PM
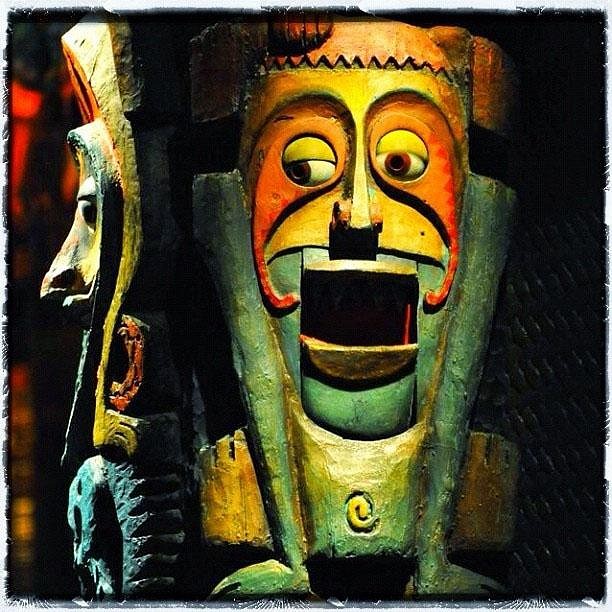
A few days after returning from "the DL" the Pele statue I'd had shipped arrived by mail. She needed a friend, so I was staring at the empty cardboard box and packing paper, and inspiration struck.
How I made it: I printed out reference photos of the Tiki Room Drummer God on 8.5x11" paper, cut out a side view, and traced it onto multiple sheets of cardboard. I cut the cardboard out, stacked the layers together, trimmed down the neck and waist (etc), then taped them together. I coated it with papier-mâché - flour and water mixed to the consistency of heavy cream, and used strips of the brown packing paper. Then set it in the sun to dry:
It looked a little rough, but the prototype was supposed to appear carved from wood, so I figured that was okay. I learned on Wikipedia that you can sand papier-mâché so I did a little smoothing.
Base coat of brown ("burnt umber") acrylic paint:
I painted the details on both sides then added cracks:
The colors looked too bright - my son made a quip about hot dogs. :( I went back in and weathered it: painted over the details with brown then immediately wiped it off.
I thought this looked acceptable. I used a plastic food storage tub as the drum, lined the inside with aluminum foil, used parchment paper as a diffuser for the drum skin, and stuck in a flickering LED tea light.
He's obviously (and intentionally) much smaller than the drummers in the ETR (or the copies that now go for terrifically high prices). He'll end up on a high shelf, and we can call it "forced perspective". Here he is with a common household object for scale:
[ Edited by: Joshua Bell 2014-02-22 22:03 ] [ Edited by: Joshua Bell 2014-03-01 13:44 ] [ Edited by: Joshua Bell 2014-03-08 14:01 ] [ Edited by: Joshua Bell 2014-07-06 23:45 ] [ Edited by: joshua bell 2014-09-04 21:08 ] [ Edited by Joshua Bell on 2025-05-01 20:38:42 ] [ Edited by Joshua Bell on 2025-05-01 20:38:55 ] [ Edited by Joshua Bell on 2025-05-25 10:59:56 ] [ Edited by Joshua Bell on 2025-05-25 11:01:23 ] |
|
S

SandraDee
Posted
posted
on
Sat, Feb 22, 2014 10:05 PM
That's a pretty good representation and a heck of a lot cheaper than buying one off Ebay. Good job! |
|
M

MadDogMike
Posted
posted
on
Sat, Feb 22, 2014 11:27 PM
Very nice JB. Nice step-by-step too. |
|
4

4WDtiki
Posted
posted
on
Sun, Feb 23, 2014 9:04 AM
Wow, looks great! |
|
H

hiltiki
Posted
posted
on
Sun, Feb 23, 2014 10:02 AM
looks great, thanks for all the info. |
|
N''

nui 'umi 'umi
Posted
posted
on
Sun, Feb 23, 2014 8:50 PM
JB. That is a very nice piece! I like working with paper mache. Are you adding plenty of salt to your flour mixture? |
|
V

VampiressRN
Posted
posted
on
Sun, Feb 23, 2014 9:25 PM
Wonderful project, you did a nice job. Certainly it would look good in any Tiki lounge. |
|
T

TikiAno
Posted
posted
on
Sun, Feb 23, 2014 11:59 PM
Awesome. Great build out. and perfect material choice for the design! Very cool. |
|
D

danlovestikis
Posted
posted
on
Mon, Feb 24, 2014 8:30 AM
Exactly what everyone else said. You really did a great job and paper mache isn't all that easy to work with. Wendy |
|
JB
Joshua Bell
Posted
posted
on
Mon, Feb 24, 2014 8:45 AM
Thanks for the encouraging feedback, everyone! nui 'umi 'umi: Big thanks for the tip about salt! This was the first time I'd made papier-mâché since... probably elementary school. I'll have to watch this guy over time and be prepared to remake him if critters start to nom. It turned out well enough that I'm thinking of doing a Ngendei next to really match Pele; if I do, I'll take more detailed pictures of the process. And add salt! |
|
T

tobunga
Posted
posted
on
Tue, Feb 25, 2014 2:19 PM
Cool! I especially like your solution for the drum! I like your choice of "common household object" too! Please post more photos if you continue with other Tiki Room figures! |
|
E

ErichTroudt
Posted
posted
on
Tue, Feb 25, 2014 5:31 PM
Very clever... congrats. |
|
JB
Joshua Bell
Posted
posted
on
Thu, Feb 27, 2014 10:10 PM
Another package arrived. Not Tiki. Well, an Olmec stone head decanter... so only by way of Thor Heyerdahl. But anyway, the empty box was sitting there. Calling to me. And the kids were asleep. So.... I found this nice WED reference photo online and printed it at the appropriate size:
Cut it out, traced it onto cardboard 3 times, cut those out, then started making smaller pieces to bulk out the body. Also made a base and framework for the Earth. Ngendei's profile is a simpler shape than the drummer and he's got much less volume overall but the curves will be less forgiving.
Started assembly:
And completed assembly:
I will probably need to trim under his hands to give that transition a nice edge. Or I may sneak in a cap for the top of the Earth, just under his head. Elapsed time: 2 hours from printout to posting this. [ Edited by: Joshua Bell 2014-03-01 13:41 ] [ Edited by Joshua Bell on 2025-05-25 11:01:57 ] |
|
AL

Abe Lugo
Posted
posted
on
Thu, Feb 27, 2014 10:27 PM
wow great job getting crafty, great job, I may take that lead and make some of these. |
|
JB
Joshua Bell
Posted
posted
on
Sat, Mar 1, 2014 1:37 PM
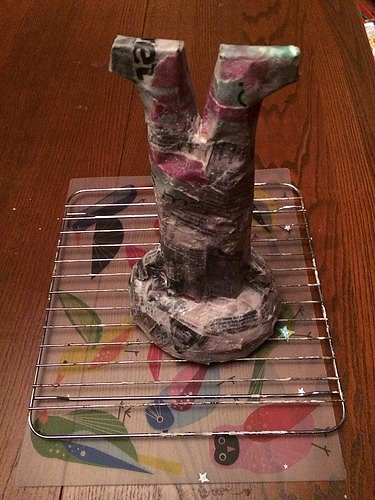
On with the papier-mâché - this time with newsprint (packing paper from the box!) with lotsa lotsa salt! Astute observers may note that I added one more bit of cardboard to change his shape - a bit of a tummy!
Is that the glee club on the placemat under the rack? Anyway, Ngendei hadn't dried out all the way overnight...
...and since I'm impatient and it's cloudy here today, into the convection toaster oven to dry:
[ Edited by: Joshua Bell 2014-03-01 13:39 ] [ Edited by: Joshua Bell 2014-03-01 13:40 ] [ Edited by Joshua Bell on 2025-05-25 11:02:13 ] |
|
JB
Joshua Bell
Posted
posted
on
Mon, Mar 3, 2014 9:39 PM
Once he was dry I worked him over with a sanding block. That turned up a few areas that were too thin, so I added another layer in places, and then back into the oven to dry overnight. Sanded him again, and called it good:
Base color is burnt umber again:
And then some wood grain. My wife said he looked like he was wearing pin-stripes. The real Ngendei has quite distinct (and regular) cracks, so I did those initially and will come back later and add lighter cracks, if necessary.
Then I started on the colors for his body, which went pretty quickly:
ETRphiles may note that I'm going for a classic color scheme - the real Ngendei is sporting a blueish paint job at the moment, but we thought he'd be a better match for Pele this way. Next up - the swirly Earth, and then a weathering pass. [ Edited by Joshua Bell on 2025-05-25 11:02:31 ] |
|
N''
nui 'umi 'umi
Posted
posted
on
Tue, Mar 4, 2014 12:33 AM
Hey JB, Really enjoying this thread. You’re proving to be quite the craftsperson. See if you can use this tip; If your piece is still wet when you call it a night, set it atop the water heater ( mine is in an enclosed space inside the house). Almost certainly dry in the A M. |
|
N''
nui 'umi 'umi
Posted
posted
on
Thu, Mar 6, 2014 3:10 PM
JB,Every piece that I have made is kept indoors.I still use a “finish” on them. Gives em the look of ceramic (glossy) and they are much easier to dust/clean. Also comes in a “matte” finish which I have not used. At most craft stores. |
|
JB
Joshua Bell
Posted
posted
on
Thu, Mar 6, 2014 6:02 PM
Thanks nui! I have something similar which I used on the Drummer to seal him. Here's the base painted and a little more wood grain added:
I have him weathered but need to touch it up a bit and put on the finish. [ Edited by Joshua Bell on 2025-05-25 11:02:49 ] |
|
K

KAHAKA
Posted
posted
on
Thu, Mar 6, 2014 7:43 PM
These are neat!! Nice jorb. |
|
N''
nui 'umi 'umi
Posted
posted
on
Thu, Mar 6, 2014 10:17 PM
Your choice of colors really sets off your art! |
|
JB
Joshua Bell
Posted
posted
on
Sat, Mar 8, 2014 2:01 PM
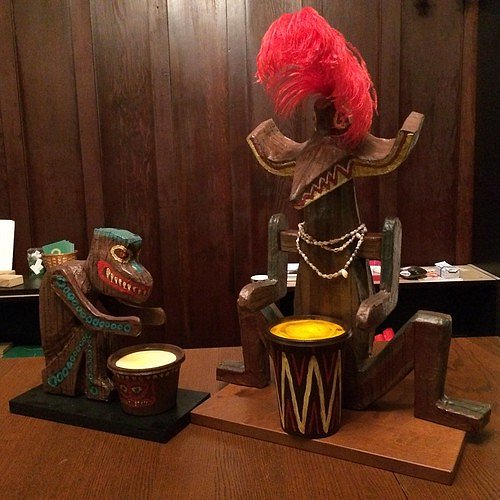
Done!
And here he is with a friend:
I am Pele, goddess of fire and volcanoes. Legends say I'm balancing the Earth. But sad to say I'm just hanging on! I'm the one who's really sad, for when I smile it comes out mad! [ Edited by Joshua Bell on 2025-05-25 11:03:04 ] |
|
T

tikiskip
Posted
posted
on
Sun, Mar 9, 2014 8:52 AM
GREAT job!! |
|
S
SandraDee
Posted
posted
on
Sun, Mar 9, 2014 9:05 AM
Really great! Looking forward to seeing what you come up with next! |
|
C

cy
Posted
posted
on
Mon, Mar 10, 2014 8:08 AM
Very nice JB. |
|
TG

Trader Gino
Posted
posted
on
Mon, Mar 10, 2014 2:48 PM
I agree! Very nice! Keep it up |
|
SG

Sam Gambino
Posted
posted
on
Tue, Mar 11, 2014 4:52 PM
|
|
JB
Joshua Bell
Posted
posted
on
Sat, Mar 22, 2014 5:12 PM
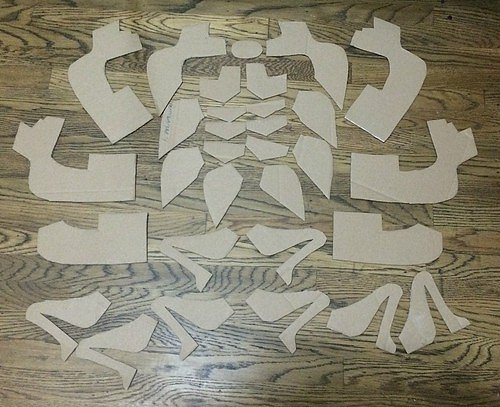
Another build... This one got started because I was stuck inside on a gorgeous day while the kids napped, and another box had arrived. I started with a skeleton rather than than stacked layers:
Which covered nicely:
And skipping over the painting/weathering steps...
Uh, yes, so far he's just a head on a convenient stand. His drum is in progress, but I want to scale the body to fit the space rather than be exactly the same dimensions as the ETR originals. BTW, do these guys have names? I casually refer to the ones like ErichTroudt built over in http://www.tikicentral.com/viewtopic.php?topic=34289&forum=5&vpost=710941 as "the witchdoctor" and these as "the bird". [ Edited by Joshua Bell on 2025-05-25 11:03:17 ] |
|
E
ErichTroudt
Posted
posted
on
Sat, Mar 22, 2014 9:02 PM
Good job man. I know you said you were going smaller, but if you need any help with the sizes on his body or drum let me know..the one I built is really close to true scale. If they have names, I've never seen it... I always just called them the middle drummer...(creative, I know)... I'm waiting for you to do the tangaroa tree next... complete with "new life forms"...lol |
|
T

TikiHula
Posted
posted
on
Mon, Mar 24, 2014 3:18 PM
So good! I'm gonna have to try making these someday. Thanks for sharing. |
|
M

MauiTiki
Posted
posted
on
Mon, Mar 24, 2014 8:47 PM
Wow, those are awesome! I mix a little garlic powder in my paiper mache to keep the bugs from eating them. |
|
JB
Joshua Bell
Posted
posted
on
Sat, Mar 29, 2014 9:26 PM
Time to give the poor guy a body:
ErichTroudt will no doubt notice that I've simplified the shape a fair bit: his legs are straight out, the arm pegs are square, and the neck is much shorter. Once assembled he'll still be taller than Pele, though! Right now, though, he looks a bit like a frog:
Also, this one's tilted head is provided by a slant on the top of the neck; on the real drummer in the ETR, the head has a wedge underneath to give his awesome visage the right view to ensure the audience is enjoying their Dole Whip. [ Edited by Joshua Bell on 2025-05-25 11:03:32 ] |
|
S
SandraDee
Posted
posted
on
Sat, Mar 29, 2014 9:27 PM
your awesome work continues! Really great stuff! |
|
E
ErichTroudt
Posted
posted
on
Sun, Mar 30, 2014 12:56 AM
very nice yeah mine is flat, so I straightened out his legs too....and because my drum was only 2 inches thick I had to tweak his arms at the elbows to go in over the drum instead of more forward. Look at it this way, if we made them exact like disneys we get a nasty letter..lol just like me, you've probably got .92 cents in material, and $36 in feathers :wink: |
|
JB
Joshua Bell
Posted
posted
on
Sun, Mar 30, 2014 8:24 PM
Okay, here he is, with a little mood lighting:
Or more clearly, towering over his supplicant:
I am very happy with how the body paint job turned out. It's again a base of burnt umber, then some subtle highlights of red and blue mixed with the brown, then texturing, weathering, and sealing. I'm also pleased with the paint job on the head. Straight-on shot:
Critique-ey: when I scaled down the body I didn't scale down the head enough. And then when I was comparing the body shape to the head I thought the neck was too skinny so I made the body wider which makes the neck look too thick. Ah well - I think he's recognizable, which is the main thing. I may still add the flashing eyes, if I can find the right sequins. And no, his hands don't reach the drums. The arms on the real drummers in the ETR angle in. For scale, another cameo:
ErichTroudt: Yeah, feathers were spendy! The paints weren't cheap either, since I went to a "real" art store. This particular feather was the best of the lot, but does make him look a bit "emo". [ Edited by Joshua Bell on 2025-05-25 11:03:44 ] |
|
D
danlovestikis
Posted
posted
on
Sun, Mar 30, 2014 8:31 PM
You are so good at this. Talented. This is a really fun thread to watch, Wendy |
|
JB
Joshua Bell
Posted
posted
on
Sun, Apr 13, 2014 7:17 PM
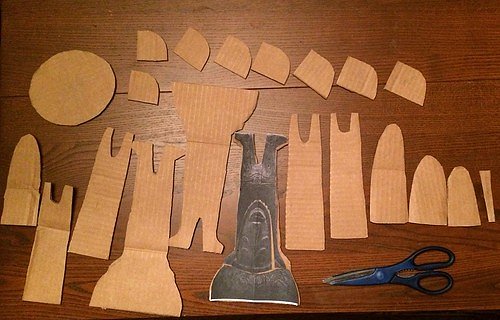
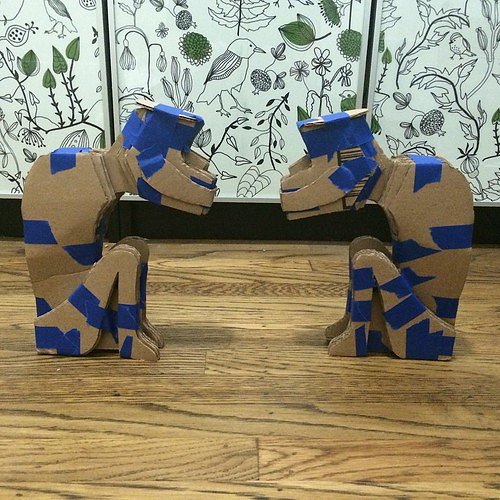
So the center drummer looks good, but he can't really be a center drummer without drummers on each side. So time to make another drummer god! Step 1: Print out a picture, trace onto cardboard, and cut out. Over and over and over again.
Step 2: Trim them:
It's easier than it looks. I basically assemble the layers, decide what to cut away, test fit, and repeat. Do one side first, and use it as a template for the other. Step 3: Assemble!
Yes, I'm doing two! They need to be symmetrical, and there's no way I can perfectly match the one I made before. It was just as easy to make 4 of each piece as it was to do 2. Plus, I can make improvements. [ Edited by Joshua Bell on 2025-05-25 11:03:58 ] |
|
T

tigertail777
Posted
posted
on
Mon, Apr 14, 2014 12:56 AM
Wow! I am impressed! I have been silently following this thread, but thought I would finally pipe up because your work is so very cool. I loves me some Enchanted Tiki Room and I am pretty much in awe with what you have managed with humble paper mache! Great stuff!!! |
|
W

Woodtiki
Posted
posted
on
Mon, Apr 14, 2014 7:06 AM
These are so fun! Fun to watch them come alive. |
|
JB
Joshua Bell
Posted
posted
on
Wed, Apr 16, 2014 9:48 PM
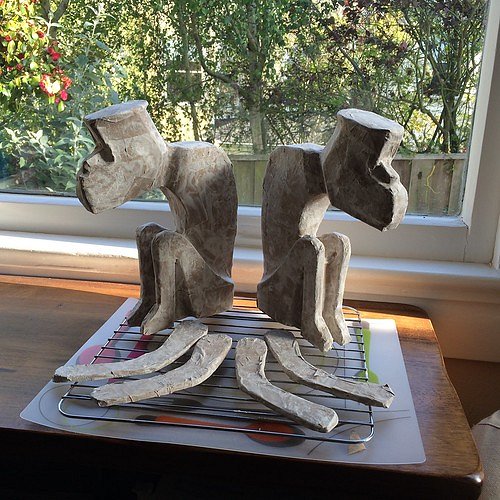
Thanks for the kind words and feedback, everyone! It means a lot coming from such talented artists. I'm tempted to enter the Art Swap this time if I can come up with something to make... Drummer Twins Progress! Wet: Dry: Followed by sanding, then another touch-up layer of papier-mâché. Then more drying. Then more sanding. Base coat: Wood texture: [ Edited by Joshua Bell on 2025-05-25 11:04:09 ] |
|
D
danlovestikis
Posted
posted
on
Thu, Apr 17, 2014 12:18 AM
This sure is fun to watch. You are so good at this, Wendy |
|
L

littlegiles
Posted
posted
on
Thu, Apr 17, 2014 7:46 AM
These are so cool! I love the pic of them sitting there in the window, wet. Looks like they were told they couldn't go outside and play until they dried off. Thanks for sharing the "how tos"
|
|
JB
Joshua Bell
Posted
posted
on
Tue, Apr 22, 2014 10:06 PM
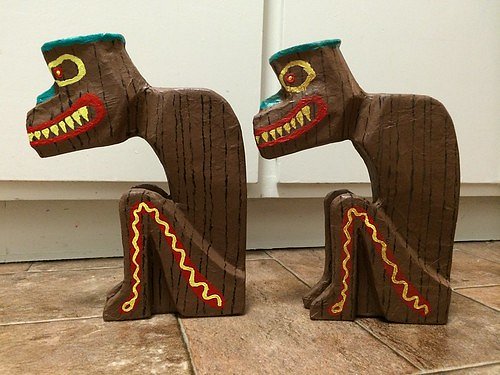
Almost done with the painting. Here is a comparison between pre-weathering (left) and post-weathering (right).
Yes, the eyes are different - slightly different personalities?
I stuck with the color scheme of the drummers that were sold, although each pair in the ETR has a different complementary scheme. I need to finish the drums and seal 'em. I'll compare "v2" against the first one I made, and can show the whole drummer family together in our enchanted dining room. [ Edited by Joshua Bell on 2025-05-25 11:04:19 ] |
|
S
SandraDee
Posted
posted
on
Wed, Apr 23, 2014 11:16 AM
So now that you are almost done with the drummers I think your next project should be making some of the face columns:
6'-8' columns? How hard could it be, right ? :wink: I like the matching pair--can't wait to see them altogether |
|
L
littlegiles
Posted
posted
on
Wed, Apr 23, 2014 12:45 PM
Drummers are really looking good! 8' paper mache column....I can't imagine that would be a challenge for you. I agree, we are expecting those to be your next project. :)
|
|
JB
Joshua Bell
Posted
posted
on
Sat, Apr 26, 2014 10:43 AM
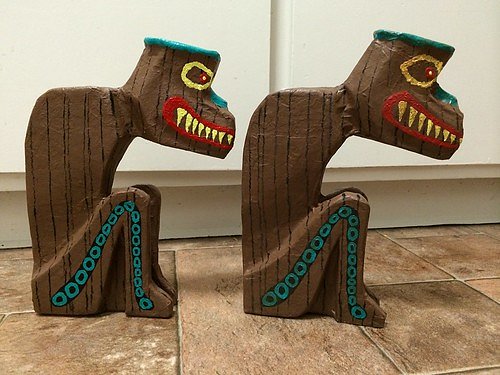
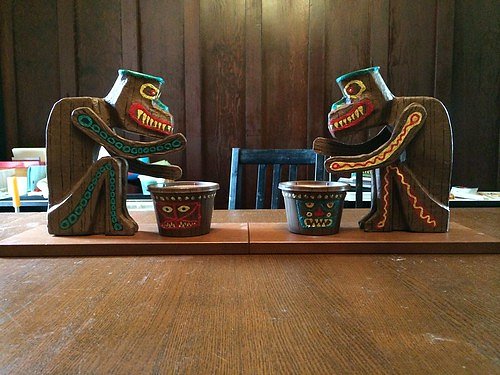
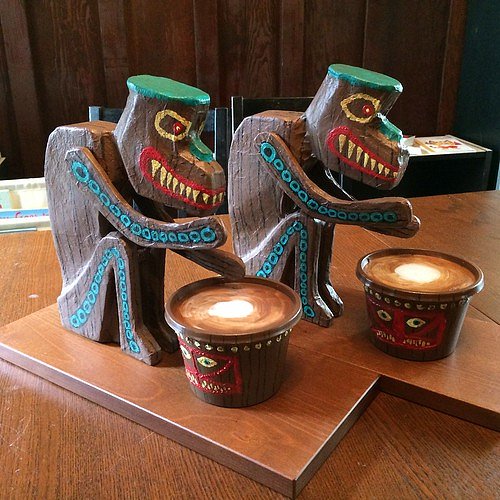
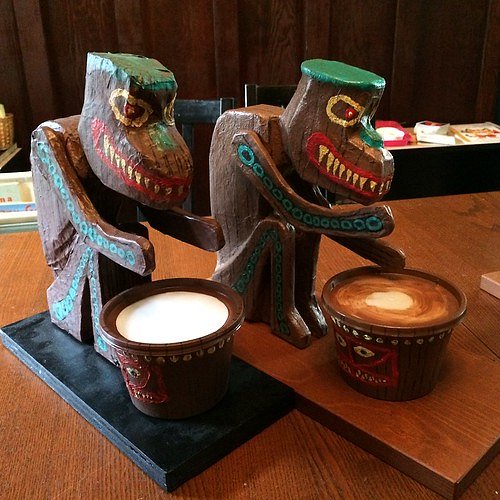
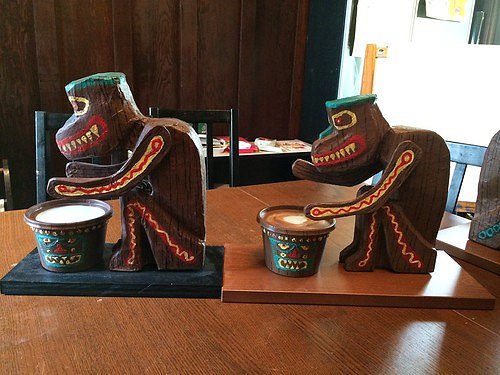
So... tempted... But on with the show! First off, the grand reveal. Tikis play the drums!
Here are the twins in detail:
The bases are old drawer fronts we had tucked away. And a comparison with "v1", which was much boxier. I still like his personality, though!
Here they are at home in our "Enchanted Tiki Dining Room", with Quiet Village Radio playing in the background:
Au we ta huala! [ Edited by Joshua Bell on 2025-05-25 11:04:32 ] |
|
S
SandraDee
Posted
posted
on
Sat, Apr 26, 2014 11:33 AM
You did a fantastic job! Are you going to add faux foliage/greenery/flowers to the space where they are displayed? I can't wait to see the column get made and displayed in that corner :wink: |
|
T
TikiHula
Posted
posted
on
Sat, Apr 26, 2014 11:46 AM
You did an amazing job - they're all great and I like the display! |