Tiki Central / Home Tiki Bars
Kilauea Cove - Featured on Critiki!
Pages: 1 36 replies
|
B

bobtiki
Posted
posted
on
Fri, Mar 4, 2016 10:31 PM
I've been a long time lurker here, but as I'm starting to work on something a little more ambitious than tossing some tiki mugs on a shelf, JenTiki prodded me to post here, so you can tell me everything I'm about to do wrong. :wink: We rented this house in Seattle about two-and-a-half-years ago, and there's a little nook just outside of the basement room that I turned into my screening room (a.k.a. home theater). I put a few wall-mounted shelves, a bar cart, and some faerie lights in there, and pretty much called it a day. The landlords kinda half-assed-finished the basement, which means a lot of drywall quickly thrown up in what used to be a garage space, willy-nilly-low ceilings, and exposed ducts making the already-low ceilings even lower. That weird curved surface that the faerie lights are zip-tied to? HVAC duct.
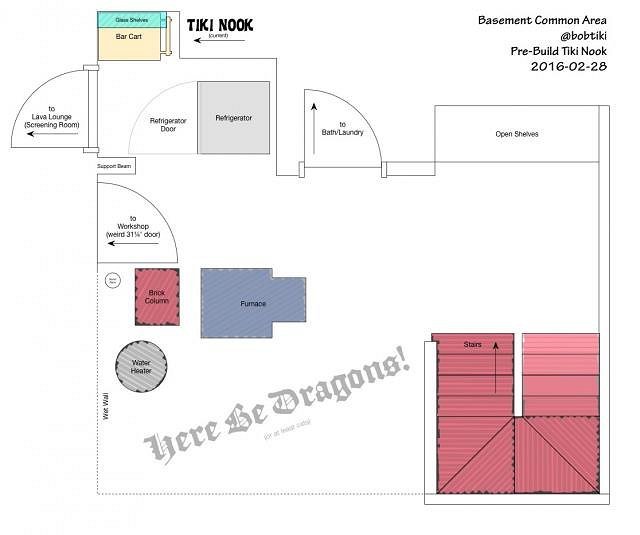
It's a cramped little space, as you can see from the floor plan I drew up, but I think I can move the refrigerator over by the stairs and open it up a bit.
Aside from opening it up and getting some more shelves in there for my glassware, I plan to paint and finish the space with some reed and bamboo wall covering (the landlords are really cool about us customizing the space), and the best part: I'm going to make a volcano. Just a little one, but somewhat inspired by Trader Sam's and the Mirage, a light-and-smoke show is in the works, all controlled by a Raspberry Pi. The lighting is mostly hooked up, and the relay to control the smoke machine works, so I hope to make good progress on the animation for the show this weekend, and report back with something to show. In the meantime, if you want some nitty-gritty about the LEDs and Python programming, there's some under the "tiki nook" tag on my blog. In the meantime, I'll keep reading about the amazing builds here, and try to plan what to do with my little tiny space. @bobtiki on TweetFace, et al.
[ Edited by: bobtiki 2017-04-25 18:26 ] |
|
H

hiltiki
Posted
posted
on
Sun, Mar 6, 2016 5:49 PM
Sounds like you have a lot of great ideas. Nice start, keep us posted. |
|
H

Hakalugi
Posted
posted
on
Sun, Mar 6, 2016 6:23 PM
Very cool! Here's something you'll want to check out if you haven't already. It's an Arduino Uno based Tiki project synching lights to music along with occasional thunder and lightening as well as a "volcano". http://www.tikicentral.com/viewtopic.php?topic=48850&forum=1 |
|
B
bobtiki
Posted
posted
on
Sun, Mar 6, 2016 8:53 PM
Well, the weekend got a little away from me (had a good time with friends at the North Shore Lagoon in Bothell, WA), but I still made some good progress — just not much visual enough to show here. I spent most of my time fighting with code for OpenCV and FFmpeg, which will help me read the video animation and translate it to LED control. I'm sure I'll get it sorted in the next couple of evenings. Wednesday, the reed and bamboo should be dumped in my driveway, and I'll get to start the wall coverings. At least I did move the refrigerator, so the space feels better already. :wink: Hiltiki, thanks for the encouragement! Hakalugi, Thanks so much for the link to Tiki Toli's shelf thread. That's very much in line with what I'm planning here, and the details on his blog may be very useful. |
|
B
bobtiki
Posted
posted
on
Thu, Mar 10, 2016 11:11 PM
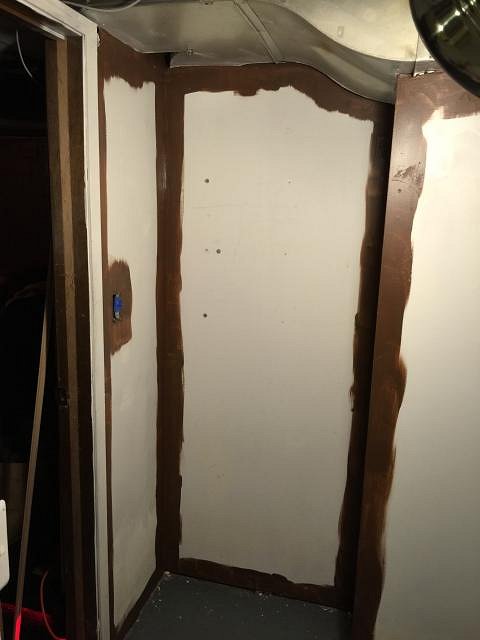
I finally came to my senses, and thought — since I'm spending all this time to get the lighting just right, shouldn't I really be getting the walls and the decor around the nook right first, so I can see how the light plays off of them? There's only so much I can do with these stupid ducts, or the lumpiest concrete floor that was ever poured (since we're renting), but this nice base coat of brown (Behr "Coffee Beans" in eggshell) is going to be the base layer for all of the other wall coverings and trim to go on top of. Good thing I did this now, too, because this brown really sucks up the light. I also started listening to The Quiet Village Podcast from the very beginning, to mark my work hours. Last night, episodes 1 though 6 got me through cleaning to the first coat of paint on the walls. Tonight, episodes 7–11 got me through the second coat, and painting the trim (Behr "Chocolate Therapy" in semi-gloss). It feels worlds better than with those ugly white walls in here already. Thanks for the work music, Digitiki! Before: During: After: |
|
B
bobtiki
Posted
posted
on
Thu, Mar 10, 2016 11:20 PM
I should mention: The reed fencing and bamboo did arrive, so it's going to be a busy weekend. :D |
|
J

JenTiki
Posted
posted
on
Fri, Mar 11, 2016 7:30 AM
I'm so happy you're posting your project here! I look forward to watching the progress. It already looks better without the white walls! |
|
J
JenTiki
Posted
posted
on
Fri, Mar 11, 2016 8:55 AM
Dammit!! Hakalugi's post above sent me down a rabbit hole and suddenly I'm researching how to project a rain effect onto my bar shelves! |
|
B
bobtiki
Posted
posted
on
Fri, Mar 11, 2016 9:09 AM
Hah! Me too, Jen. I'm wondering if there shouldn't be a second scene in a porthole added to this big paneled wooden door I have down here. |
|
B
bobtiki
Posted
posted
on
Fri, Mar 11, 2016 11:11 PM
REEEED!
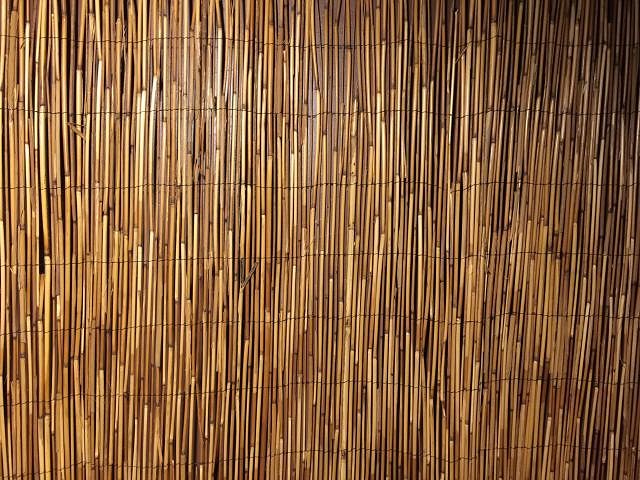
OMG, this reed fencing smells so good. Just smell it.
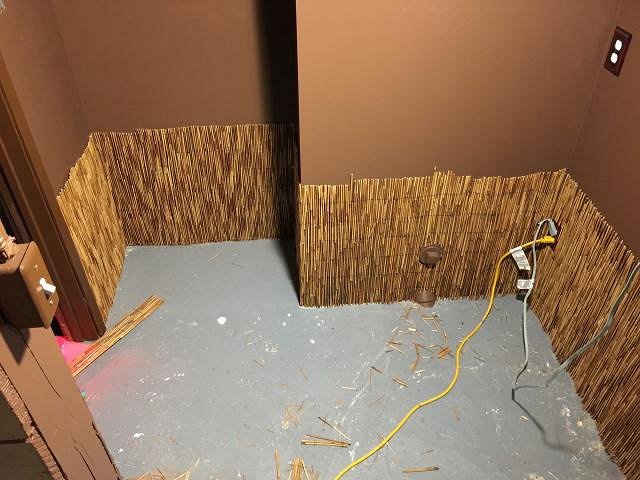
Holy cats, I want some cologne made of that scent. The fencing I got was 6ft tall, and thanks to the HVAC ducts, the ceilings in this area range from 6' 3" to 7' 3", so what I did is cut a 2' tall strip of fencing to go around the baseboards. The Quiet Village Podcast episode 12 to halfway through ep. 15 got me that far.
Next up is another layer of reed above, trimmed to fit the weird ceiling, and some half-bamboo trim, some of which will hide that seam. |
|
M

MaukaHale
Posted
posted
on
Sat, Mar 12, 2016 7:47 PM
I can't wait to see what you do next. |
|
B
bobtiki
Posted
posted
on
Sat, Mar 12, 2016 10:12 PM
Thanks, MaukaHale! I can't either — I’m makin’ this up as I go along! Okay, a good Saturday full of sawdust and The Quiet Village Podcast episodes 16–23½. I’d love to keep going, but I think my neighbor would complain if I run the chop saw after 10pm. Well, no, he probably wouldn't complain, but I would get a similar greeting at 6am. :wink:
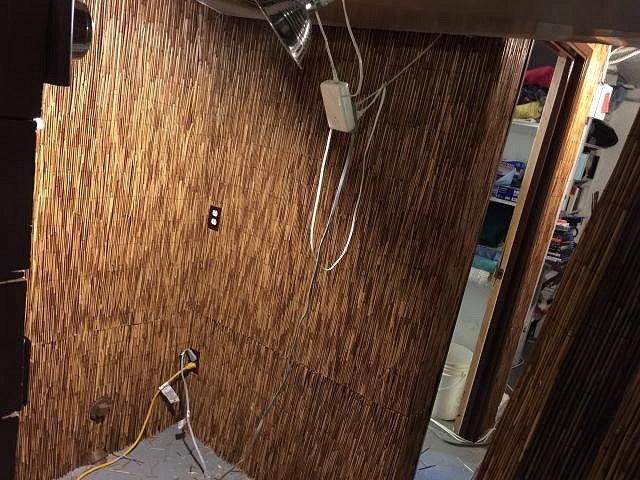
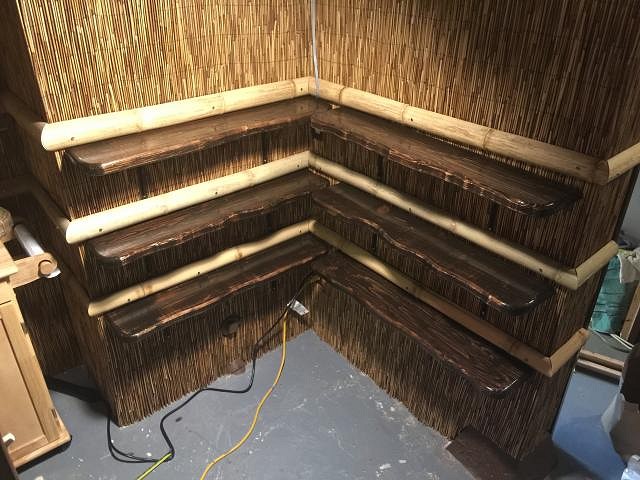
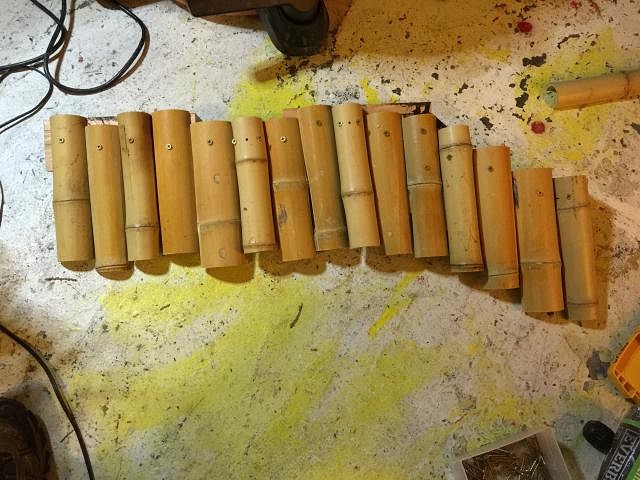
ANYWAY, Got the rest of the reed up, and started in on the bamboo trim. Here’s a close-up of the corner that wraps around the bathroom. Eventually there will be three rows of bamboo, like this, all the way around.
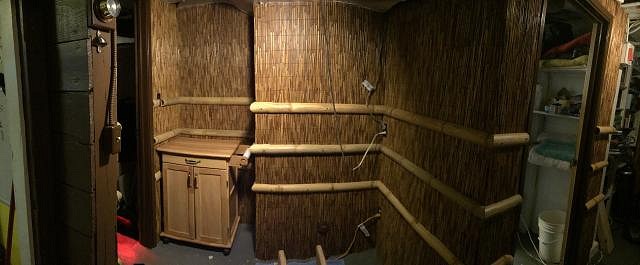
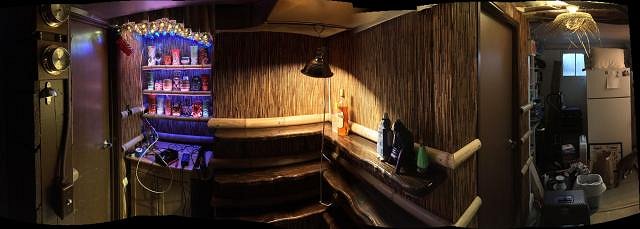
Here's a look at the Nook proper. Man, I gotta get a wider lens just to take pictures of this space!
More bamboo tomorrow, and hopefully starting on the router-carved trim. Now, to make a Mai-Tai to toast my friends down in San Francisco. :D @bobtiki on TweetBook, etc. [ Edited by: bobtiki 2016-03-12 22:15 ] |
|
H
hiltiki
Posted
posted
on
Sat, Mar 12, 2016 10:26 PM
This is coming along so nicely, its fun to see your progress pictures. |
|
W

whoseyrtiki
Posted
posted
on
Sun, Mar 13, 2016 11:31 AM
The bamboo trim looks great! Especially how you have it wrapping on your corners :D |
|
B
bobtiki
Posted
posted
on
Sun, Mar 13, 2016 9:25 PM
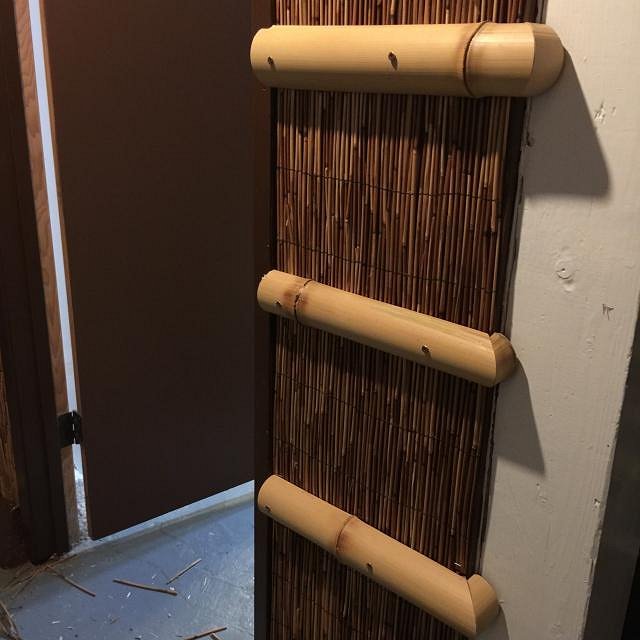
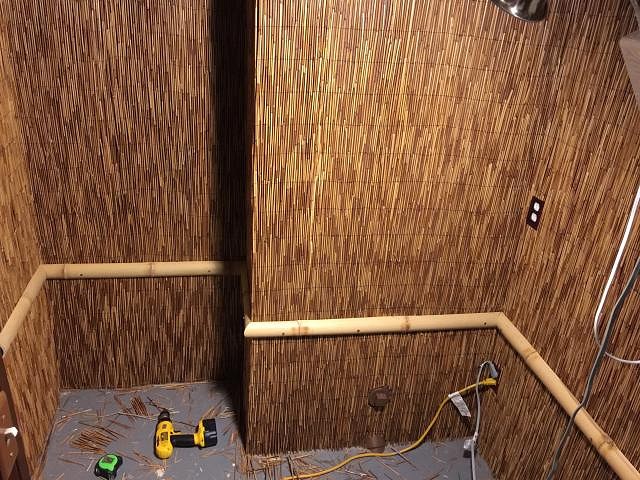
hiltiki and whoseyrtiki: Thanks! The corners are definitely not perfect, but they're working pretty well. I think I may do a bit of faux rope lashing around the corners to make them come together a little better. I'll have to experiment. SUNDAY SUNDAY SUNDAY! No monster trucks, but a lot of work got done, and The Quiet Village Podcast episodes 24–33 were played. All of the bamboo is now in:
And here's the cart back in the nook. It's probably not going to get replaced anytime soon, but I'm thinking maybe some reed cut to fill those inset panels might tie things together a little better.
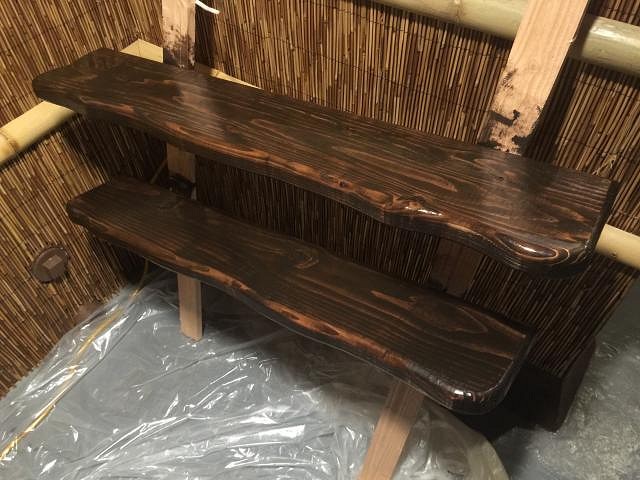
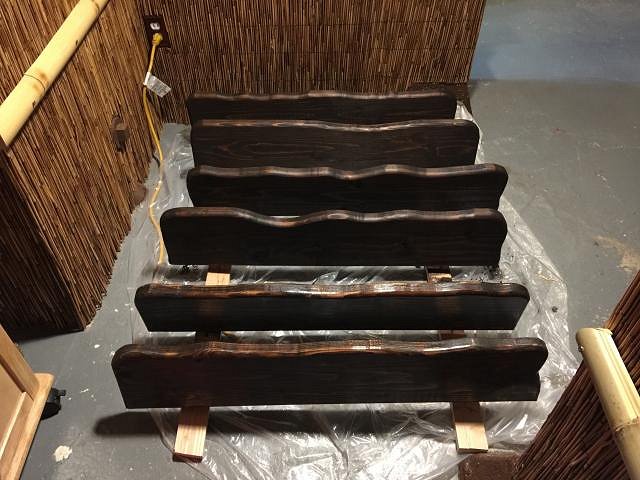
Since I didn't have much time left — nor the router bit that I needed for the “carved” trim — I decided to work on the shelves instead. These are just 3-foot-long cuts from a regular pine 2×8. I cut a wavy front face and rounded the edges with a ½" round-over bit with the router. In this photo they've just had the stain (Varathane Kona) wiped off, but after that dries, it'll be a couple of coats of spar urethane. I've never urethane'd anything before! I hope this works! The shelves will be mounted in the space to the right of the cart. There will be six shelves total, three on each side (at right angles), butting up against the bottom of each row of bamboo. I started with just two shelves, to see if I was doing it right, and see how they turned out, but if this initial color is any indication, I think the Kona stain color is going to work out great. In fact, I might use this for the trim instead of trying to burn it, since my propane torch has been feeling a bit anemic lately.
And the first artifact on the wall — it isn't very tiki, but I had to test out the mounting corks! Since it's right outside the screening room, there's a little movie bleed into the tiki space, and a lot of tiki bleed into the movie space — Shag's “Raft of the Medusa” is right inside the door. :)
@bobtiki on TweetFace, etc. [ Edited by: bobtiki 2016-03-13 21:28 ] |
|
W
whoseyrtiki
Posted
posted
on
Sun, Mar 13, 2016 10:56 PM
Had issues working with my propane torch as well this weekend. Think I'll be sticking with MAPS gas in the future. |
|
B
bobtiki
Posted
posted
on
Tue, Mar 15, 2016 11:54 PM
Took last night off because my allergies were killing me, and not much to report tonight except the first coat of Urethane on those shelves, and a basement that smells like solvents. I cracked a window, but maybe I should do the rest of these outside, this weekend, if the fabled Seattle sunshine ever comes out.
Also got some “antique brass” wall plate screws to replace these old ones that had been painted over by my landlord twenty times. I also received a couple of LPs that will go up on the walls leading into the space, as album art: Arthur Lyman's “Taboo” and Martin Denny's “Primitiva” (with covers in very good condition). They will be joining Martin Denny's “Exotic Percussion” and Arthur Lyman's “Pearly Shells”. I already own the music on CD, but I wanted the big LP covers to show off in frames. Now to find some LP wall frames that aren't completely out of place… |
|
J
JenTiki
Posted
posted
on
Wed, Mar 16, 2016 12:06 AM
Monkeyman does custom album frames, or you can use his threads as inspiration to route your own. |
|
B
bobtiki
Posted
posted
on
Wed, Mar 16, 2016 10:47 AM
Wow, those are beautiful. Thanks for the link, Jen. |
|
V

VampiressRN
Posted
posted
on
Sat, Mar 19, 2016 12:13 AM
Your space is looking intimate and cozy...nice job with the smelly installation. Looking forward to more of your project. CHEERS |
|
B
bobtiki
Posted
posted
on
Mon, Mar 21, 2016 3:10 PM
Thanks for the kind words, VampiressRN! Been busy, but mostly putting urethane on things. Hopefully in the next night or two I'll have the shelves and LEDs back up again, so the nook will be back to basic usefulness, and I'll do an update post. As I said on Instagram, I think I'm about two days away from “useable space,” and four months away from “done.” I mean, if nothing else, I assume I'll be bringing something stellar for the walls back from Hukilau. :wink: |
|
B
bobtiki
Posted
posted
on
Sat, Mar 26, 2016 8:26 PM
The nook area isn't done, by any means, but I think I'm going to call it useable again. Let's start with the good picture:
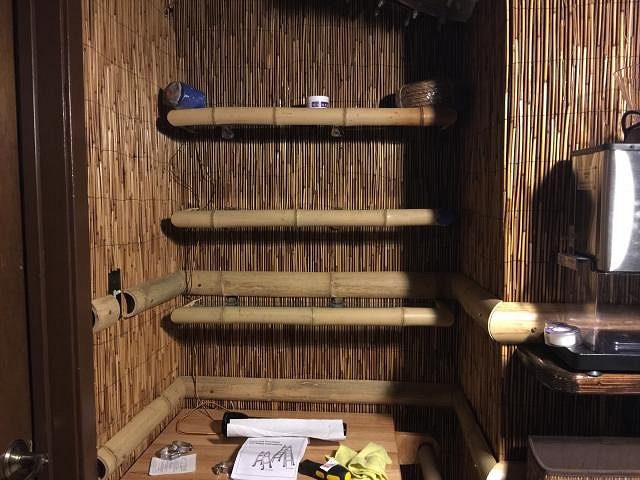
Some cables need to be hidden, but I think it's starting to look rather decent. :) Since last we met, I've been busy, so this will be a photo-heavy post. Got the rest of the new wood shelves cut and stained and urethane'd. I found it handy to screw loosely into the back of the shelves that were going to be against the wall, so I could stand them off a bit and get to all of the surfaces:
Set them outside for about three days under the porch awning, so the urethane could outgas for a while, and then brought them inside and mounted them:
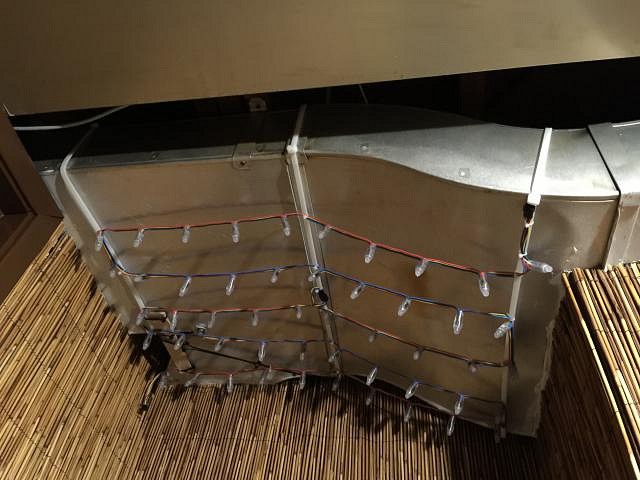
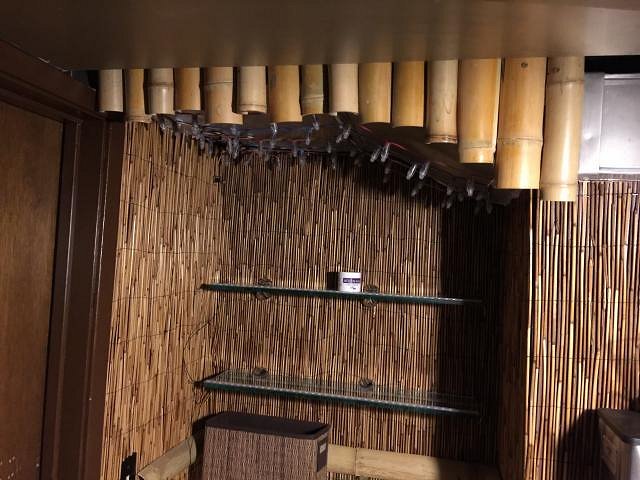
Next up was getting the faerie light-style LEDs re-mounted to the bottom of the duct. Some big strapping zip-ties (24" “Duct Fastener” model) provided the framework, and up they went:
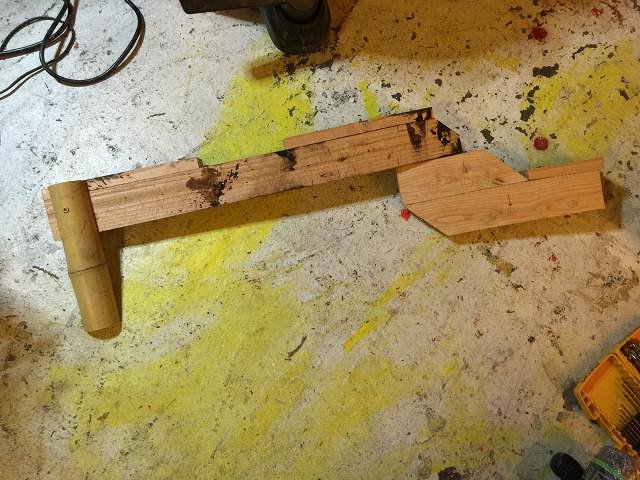
Only, I want to hide all of that, so I took the scrap wood that had been temporarily holding the shelves, and put together a little structure that would friction-fit over the face of the duct, and provide a little decor. Needs some finishing touches, but seems to fit ok:
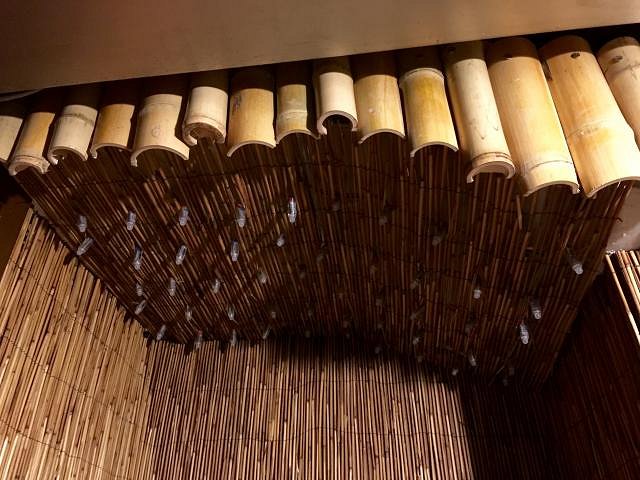
The glass shelves for the mugs had gone back up, but I want to hide those a bit as well. I built three shelf-edge facades out of thinner bamboo, which serves to: A) Hide the fact that the shelves are glass
Next I put some reed above the LEDs, basically a friction fit by pushing the fat little LEDs through the reed. The bamboo facade also holds up the front edge of the reed a bit.
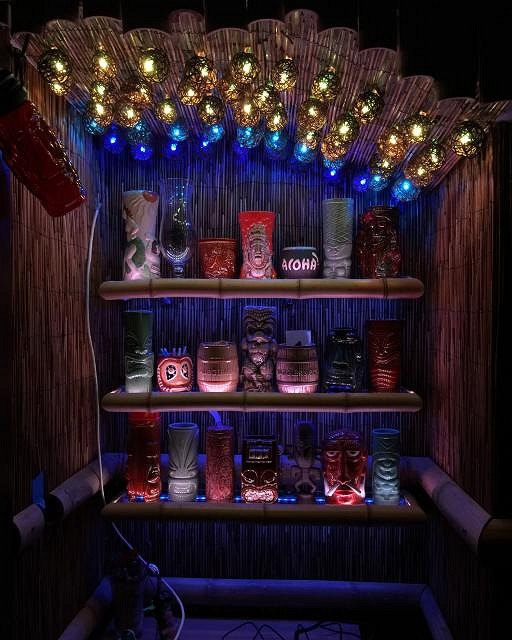
After that, I put the little rattan balls back on the LEDs, and sprayed all of this kindling with fire retardant spray — which kinda leaves a bit of crusty white residue on everything, so I'm not super thrilled about that, but it's not too noticeable, and better than burning down my house, I guess. After that, I got the Raspberry Pi back in place, and power going to the LEDs in a safer way then running it through the breadboard, and the result is as you see above! You can see the code I'm using on the RPi on my Github page for this project, if you want the technical nitty gritty. Here's a rough panoramic view so far, with a crappy work light standing in for where I'd like to place an amber fish float lamp. I also put a woven hat over the ugly bare bulb on the right, until I can get together a proper lamp shade for that spot:
Lots of little touches yet to come, not to mention hooking up a smoke machine and programming some lighting events with the volcano and such. ALSO, I am not sticking with the “Lava Lounge” name for the overall space (including the screening room) since it has some unpleasant connotations that I had forgotten about. That said, I would like to stick with something volcano-themed. Suggestions welcome! JenTiki came up with Kapu Kilauea, which is a strong contender so far, but I'd love to hear some more ideas. :D |
|
B
bobtiki
Posted
posted
on
Sat, Mar 26, 2016 10:08 PM
Oops, I almost forgot. That takes us up through The Quiet Village Podcast, episode 43. |
|
W
whoseyrtiki
Posted
posted
on
Mon, Mar 28, 2016 2:36 PM
You've done an amazing job with your space! Looking forward to more progress pics and reading up on your rasberry pi programming. |
|
B
bobtiki
Posted
posted
on
Sun, May 8, 2016 10:02 PM
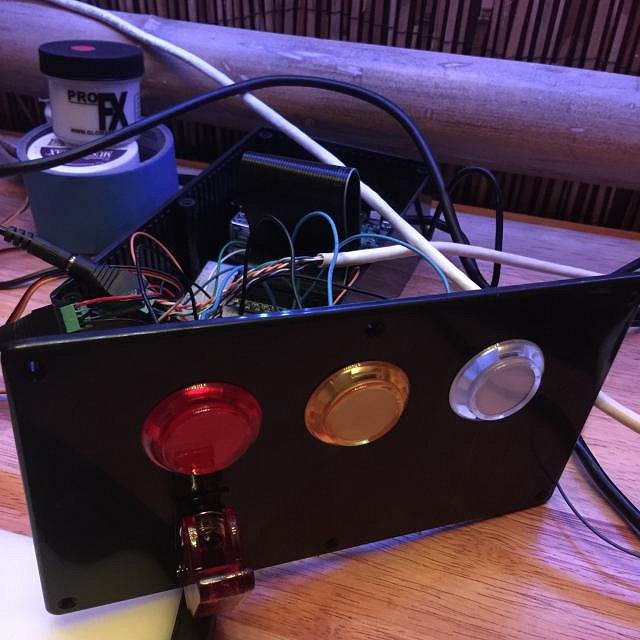
A few weeks away, but got back to it this weekend. I did try to work out the way to duct from the fog machine to the volcano location, a few weeks ago, and I determined that it wasn't going to work the way I wanted without bringing a reservoir box and fans into the mix. However, I'm going to try a smoke unit from a large-scale model train first, since that should fit in the volcano mug, and give me the output I want. Tests soon. Today, there is good news and bad news. I made a lot of progress on the Raspberry Pi programming, and I can play an animation on the critical LEDs pretty smoothly. However, It may all be for naught. Once I got the control buttons wired up, it seems that the code I need to use to detect on the button input pins is also screwing up the control signal pins for the overhead LEDs (the ones in the rattan balls). I don't yet know if this is solvable, or if I'm going to need to switch to a real-time control system like an Arduino, … which I was really hoping I could avoid. Anyway, not much to show, unless you want to have a look at the latest Python code. That August 20th deadline is looming closer and closer. :o
|
|
B
bobtiki
Posted
posted
on
Wed, May 11, 2016 9:58 PM
With a little help from some friends, I got that last LED control issue sorted out, and here's a video to prove that it works! This is not the final look, but proving that the buttons work, and that I can load an animation video file (that I created in After Effects) and play it back smoothly on the LEDs. https://www.youtube.com/watch?v=hb41LqBdPMw Also tested a little smoke generator that is made for model ships and trains, and… it's not going to be up to snuff for the volcano. So, big smoke reservoir and fans to pump it on cue, I guess? Testing continues. |
|
B
bobtiki
Posted
posted
on
Sun, May 15, 2016 1:34 PM
I've finally settled on a new name for the combined tiki nook & screening room space: Kilauea Cove. I've updated the Github repository and other names accordingly. Now to add designing a sign to my project list… |
|
J
JenTiki
Posted
posted
on
Mon, May 16, 2016 8:21 AM
I'm almost ashamed to admit that I really want to you to spell Cove with a K. :P |
|
B
bobtiki
Posted
posted
on
Mon, May 16, 2016 8:59 PM
You should be very ashamed. :wink: I … just can't. It makes me think of “Kiddie Korner” or something. :P |
|
H

harro
Posted
posted
on
Thu, Jun 9, 2016 6:21 AM
Cool project! I have no idea about programming but I do have a Raspberry Pi. Didn't know it could be used for this type of cool stuff though. I'll be following this thread keenly for updates or how-to's, love a cool volcano effect. |
|
B
bobtiki
Posted
posted
on
Thu, Jun 9, 2016 8:47 AM
Thanks, harro! I think I did get the fog reservoir worked out last weekend with a temporary setup (no pictures, alas), but installing it and final testing more will have to wait until I'm back from The Hukilau. |
|
B
bobtiki
Posted
posted
on
Tue, Apr 25, 2017 6:19 PM
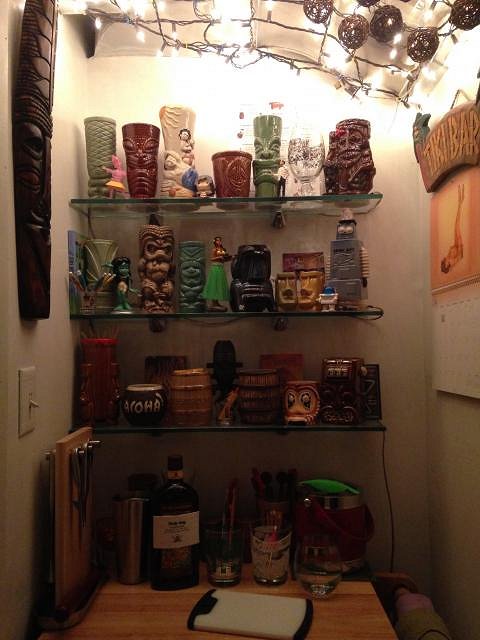
Sooo… since the volcano just got featured on Critiki today (squeeeee!), I figured I ought to wrap up this making-of thread! Here's a video of the volcano in action, with sound, smoke, and lights: I did a full write-up of the making-of on my Vixen Labs blog: All of the parts are linked from that one master blog post. In addition, all of the wiring diagrams, animations, and Raspberry Pi code are here on my Github: Sorry I let this languish for so long! But now on to improvements for Kilauea Cove v.2.0! :wink: |
|
J

jimsflies
Posted
posted
on
Tue, May 9, 2017 7:34 AM
Your area looks great. I don't suppose you have come across a program that would make LED strip lights change colors very slowly? I have LEDs on my fence around my area and would like them to shift colors slowly to the point of imperceptibility. All stock controllers change the lights fairly rapidly. I want people come over sit down and after about 15 minutes realize the lights look different. I'm thinking the answer lies in an arduino based solution. But I'm a complete noob. Any advice would be appreciated. [ Edited by: jimsflies 2017-05-09 07:34 ] |
|
B
bobtiki
Posted
posted
on
Tue, May 9, 2017 8:18 AM
Thanks! The code you use would depend on which LEDs you have, but at least Adafruit (and other companies, I'm sure) have sample code to show how to simply control their LED strips with a smooth color rotation. Usually there is a very small delay number between the change to the next gradual color, but in your case, you would make the delay number much larger. If you know which kind of LEDs you're using, I could probably point you to some sample code. |
|
J
jimsflies
Posted
posted
on
Tue, May 9, 2017 8:26 AM
The ones I have on the fence are SMD 5050 RGB LED 5m Strips (20m total). |
|
B
bobtiki
Posted
posted
on
Tue, May 9, 2017 8:52 AM
As luck would have it, Adafruit has a nice tutorial on controlling those 5050 LEDs. They even have sample code for fading colors, like you want. FADESPEED is the variable that you'll want to jack up. |
|
J
jimsflies
Posted
posted
on
Thu, May 11, 2017 6:27 PM
Thanks! I appreciate the lead. |


Pages: 1 36 replies