Tiki Central / Other Crafts
Trader Sam's Enchanted Tiki Bar In-A-Box
|
T

TheLuckyParrot
Posted
posted
on
Thu, Feb 20, 2020 12:02 PM
For over the past year I have been working on what I believe to be a unique project, and it's time to get it off my FB page and here into this more focused community so that it can shared with fellow enthusiasts. This could inspire me, inspire others, and/or create a dialog for collaboration and idea sharing that might benefit one and all. So here we go! Trader Sam's Enchanted Tiki Bar in Downtown Disney is well-known to Tiki Central and needs no background or history from me. And I am going to assume the same level of familiarity with their indoors event entertainment triggered by various drink orders from their menu. It's part and parcel as to why ETB is so much fun. Here is my project goal: take a set of those event entertainment experiences, re-imagine them, re-engineer them, miniaturize them, and repackage them all into a vintage television cabinet and make those experiences portable - starting in my own home Tiki bar. I will have an animated volcano that riffs off the ETB Krakatoa! event, and Trader Sam himself as a riff off the ETB beer pull jungle drum event, and (!!!) my own shipwreck sink-the-ship-in-a-bottle effect. I will have companion audio and lighting effects, including bell ringing and skipper shouting (no, I will not be having any water squirting thank-you-very-much!). I will have ambient audio including my own playlist of vintage tropical music and rain forest sounds when no event has been triggered. And the control for this will be WiFi-enabled allowing the system to be controlled from behind the bar no matter where it ends up being located in the overall space. This involves quite a bit of small-scale carpentry fabrication and sculpting, and it also involves a huge amount of mechanical engineering and micro-controller integration. For the latter, I have chosen to use Arduino. I do not need the CPU power of Raspberry Pi but I do need to take advantage of smaller form factors and greater GPIO ports. And, to be totally transparent, I am already a tiny bit familiar with the C language. All of this fits well with my background. I have an aptitude for engineering (you might pick up on that when you realize that I am doing this off the top of my head as I go). I have remodeled multiple homes that we have lived in (not a flipper) and have a large amount of experience with woodworking tools and have all those tools readily available. And I have been in the IT industry for 3 decades so computer technology comes easy to me. My main weakness is as an artist and I know many of you can do much much better, but I get by. There. That's my intro and preamble. In real time, I am actually pretty far along and am assembling the completed feature sub-systems into the finished cabinet (which is a major task in its own right). But I will start from the beginning stages with my photos and videos and work towards the current work in progress, which is on my workbench even now. I hope that you enjoy the project and engage freely even with a critical eye. The whole reason I am here is for the sharing, and that goes both ways both good and bad. Thank you in advance for your participation. |
|
T
TheLuckyParrot
Posted
posted
on
Thu, Feb 20, 2020 12:14 PM
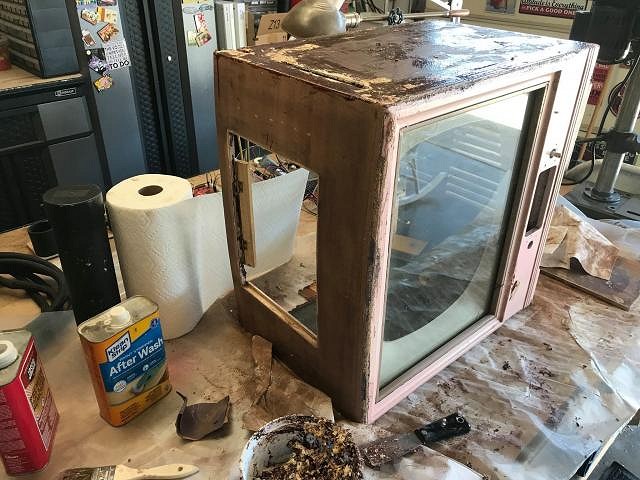
Ok, folks, here is the first step! This was last year, starting with re-purposing what used to be our camping music player. It is a vintage TV cabinet that we painted flamingo pink and inserted a motorized tiki diorama. It would play our tiki music via bluetooth at our campsite. Step 1 is to strip it all down and clean it up to start fresh with a nice looking vintage TV cabinet. There were about 9 different coats of finish on this poor thing and it took a couple of days to get it all back to original raw wood and cleaned up. (Looking back now on this photo, I notice bits of two other projects on the same worktable. The electronic in the background are for a commercial application being created by a well-known SoCal Tiki artist. And at the far left is a thick black cable that is part of my animated Tiki birds project. This latter project is much further along, but I am waiting to complete Trader-Sam's-In-A-Box because this project will teach me WiFi and I can rid the Tiki bird project of that very cable. which is a mess.)
|
|
E

eroc
Posted
posted
on
Thu, Feb 20, 2020 1:41 PM
This should be cool! Not sure how 'water proof' this will be, but some kind of fogger along with lightning on a schedule with the Adruino would be cool. Have that afternoon jungle thunderstorm every once in a while. Any room for say..... poison dart frogs? Or is the scale too much? |
|
T
TheLuckyParrot
Posted
posted
on
Thu, Feb 20, 2020 2:02 PM
Oh wow. Adding a fogger to the volcano would be epic. But I come full stop at the idea of monitoring and maintain proper water level and then keeping that clean without requiring a tear down every month or so. If you have an easy solution, please share. Having "smoke" rise out of the volcano when it erupts would be brilliant. (And, yes, at least for a sonic fogger I could probably trigger that via Arduino and a power relay pretty easy.) As for poison dart frogs, if you know of any about 1/4" in size they would absolutely be welcome. I do have fast approaching the need to stage everything and the more the merrier, not unlike the walls and shelves of ETB and the shores of the Jungle Cruise. |
|
T
TheLuckyParrot
Posted
posted
on
Thu, Feb 20, 2020 2:07 PM
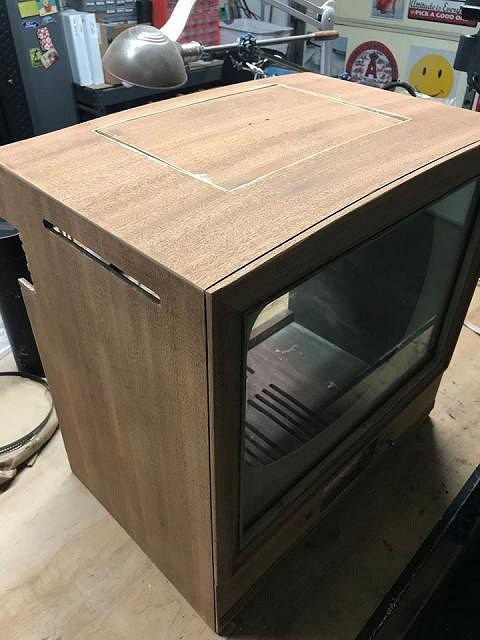
Here is the TV cabinet cleaned up and rough sanded. It actually looks rather nice with that wood color. Kinda pinkish. I still needed to pick out a couple of tiny spots of paint in the cracks, then give it a couple more standings of finer grade, and then come up with the final finish and color. But I am very glad that all those layers of funk and paint are gone and I have something clean with which to work!
|
|
E
eroc
Posted
posted
on
Thu, Feb 20, 2020 2:32 PM
Ha! Maintaining water quality of anything is nothing short of a full-time job..... As this looks to be 'portable', using any kind of float device to maintain water levels may be out of the question as well. The sonic fogger will work, it's about the size of a 50 cent piece. It's just a matter of positioning it at the right depth (which requires maintenance due to evaporation). So you request for an 'easy solution' is still elusive, I apologize. But at this point, you have to ask yourself, "What would a volcano look like without smoke?" And poison dart frogs are about 8 times the order of magnitude you would need for your project. To say the least, "Attack Of The Giant Frogs" would be your poster. |
|
T
TheLuckyParrot
Posted
posted
on
Thu, Feb 20, 2020 4:13 PM
But hold those thoughts for when I upload the "Trader Sam feature" pics and vids and the "Volcano feature" pics and vids. You might get struck with an updated inspiration concerning both! |
|
T
TheLuckyParrot
Posted
posted
on
Thu, Feb 20, 2020 4:27 PM
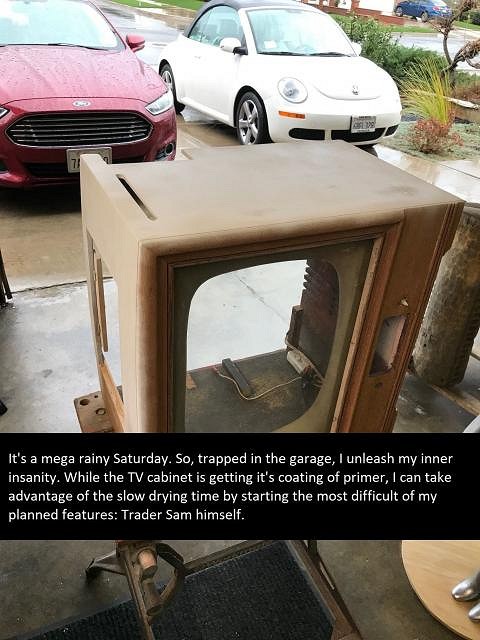
This cabinet progress update had the explanation embedded right into the photo, so no need to expand. (Other than another observation that we no longer own either of those cars in the background...man how time flies.) If at all possible, I will delay moving on to the "Trader Sam feature" that I call out in the text and see if I can upload the remaining cabinet updates first.
|
|
T
TheLuckyParrot
Posted
posted
on
Thu, Feb 20, 2020 8:07 PM
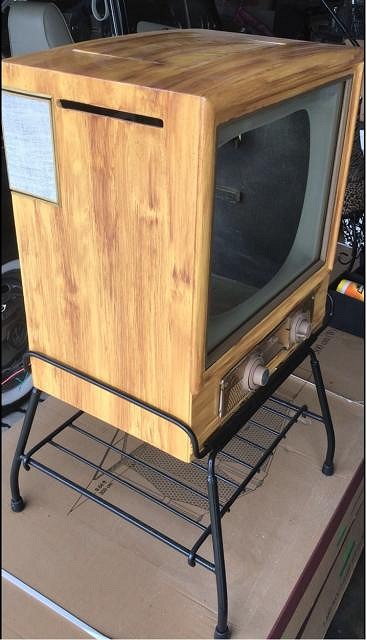
Here is a still photo of the finished cabinet. (I will link to the video walk-through in a bit.) I went with a faux bamboo finish. This is comprised of three color coats on top of the primer, and then about 10 poly urethane gloss coats to shine it up and protect the finish from scratches (which would be a bear to correct by replicating the faux paint job). For the first time, I hope that I am able to convey to this community the caliber of final quality in this project that I am shooting for. The speaker grills on each side are getting an update to something a tad more primitive. The TV stand was a lucky find. My wife claimed it at thrift store for $5 without realizing that it would fit this cabinet perfectly. The project might not end up on this stand, but having it certainly gives us options! And if I stick with this stand, I will have to come up with a more appropriate finish than flat black. That's a later worry.
|
|
M

MadDogMike
Posted
posted
on
Thu, Feb 20, 2020 10:06 PM
Welcome to Tiki Central TLP! Great looking project you have going there |
|
T
TheLuckyParrot
Posted
posted
on
Thu, Feb 20, 2020 10:08 PM
Here is the video walk-through of the finished cabinet. It was uploaded over on our Tiki camping FB site. https://www.youtube.com/watch?v=xGM8rgnG2wY [ Edited by: TheLuckyParrot 2020-02-24 20:51 ] |
|
D

danlovestikis
Posted
posted
on
Fri, Feb 21, 2020 8:37 AM
I watched your video. What a great project with so many parts to be inventive with. I thought the way those speakers slide in was so well done as was the bamboo finish. Thank you for posting. I'm looking forward to the next steps. Wendy |
|
T
TheLuckyParrot
Posted
posted
on
Fri, Feb 21, 2020 8:47 AM
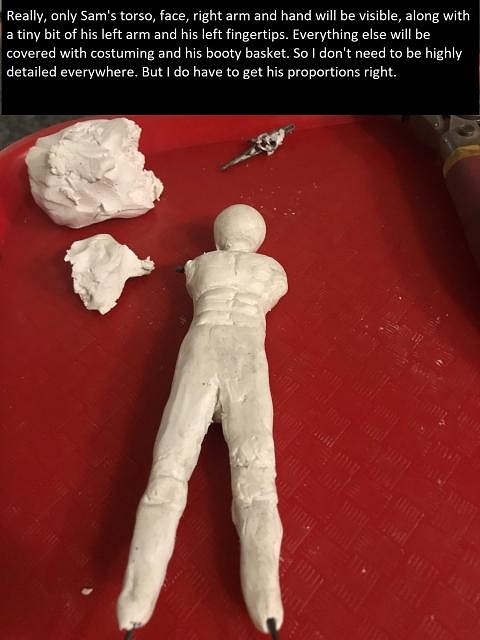
TRADER SAM FEATURE #1: Within Trader Sam's ETB, if a patron requests a beer the skipper will grab a glass and grab the draw handle of the requested beverage and pull to fill the glass. When that happens the bar is filled with the sounds of jungle drums. People order beer at a Tiki bar? This is rare enough, but I have heard that if the even MORE rare thing happens - more than one beer is being drawn at a time (!?) - the drums will speed up. Ok. Let's do that. But just doing the audio track is not enough. Nowhere near enough, ha ha! It occurred to me that I could truly embrace the whole Trader Sam alliance by bringing Trader Sam himself into the picture. So, for my bar, should a guest order a beer (which does happen more frequently as not all my neighbors are tiki-philes) I want to not only play the drum audio, but introduce our namesake in physical form. Maybe not all of my neighbors visit ETB, but they all certainly have ridden The Jungle Cruise enough in their lifetimes! At the time, I thought that this was going to be the hardest feature to construct. It was hard, but the shipwreck feature turned out to be much harder. So as complex as all this appears, know that something more complex is coming later. Also, I am aware that there are two versions of Trader Sam. The Disneyland version is a tall, stoic, warrior type whereas the Disney World version is more portly and comical. I am not an accomplished sculptor and I know that the intermediate sculpting stages can be cringe worthy, but I do think I pulled off a blending of these two different characters. Please bear with me... [ Edited by: TheLuckyParrot 2020-02-21 18:24 ] |
|
T
TheLuckyParrot
Posted
posted
on
Fri, Feb 21, 2020 8:47 AM
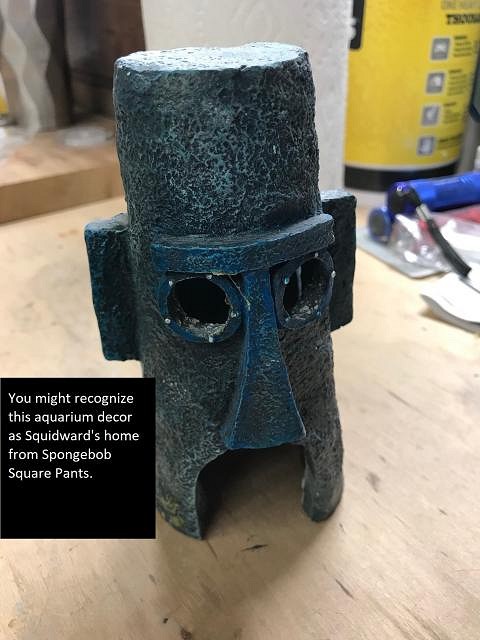
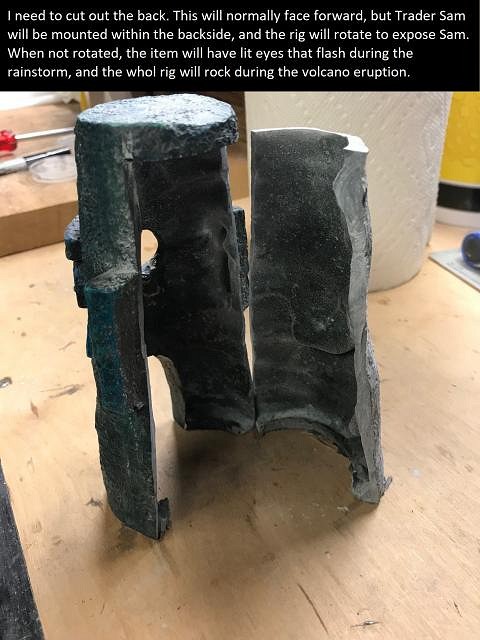
TRADER SAM FEATURE #2: I started out innocently enough, working to create something that would blend into the normal diorama an hide Sam until he was called upon to be revealed. The aquarium department of the local pet store came in quite handy for this.
[ Edited by: TheLuckyParrot 2020-02-21 18:25 ] |
|
T
TheLuckyParrot
Posted
posted
on
Fri, Feb 21, 2020 10:48 AM
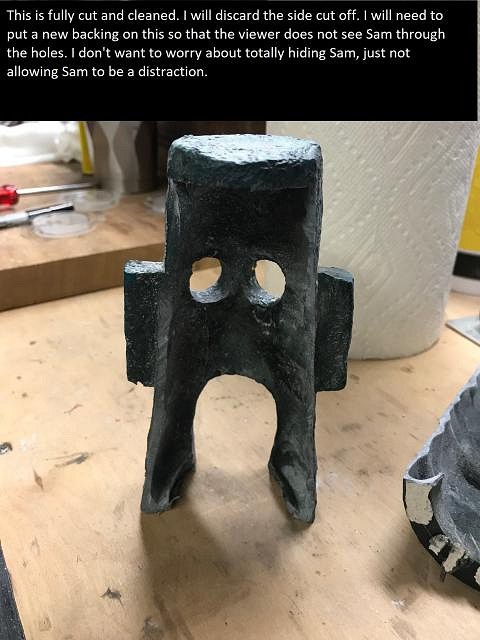
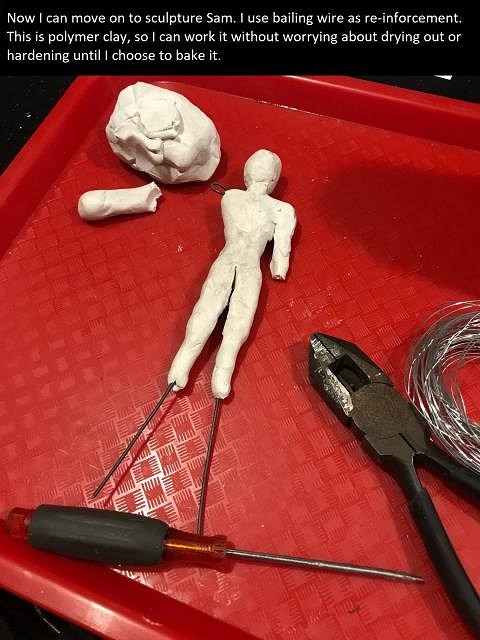
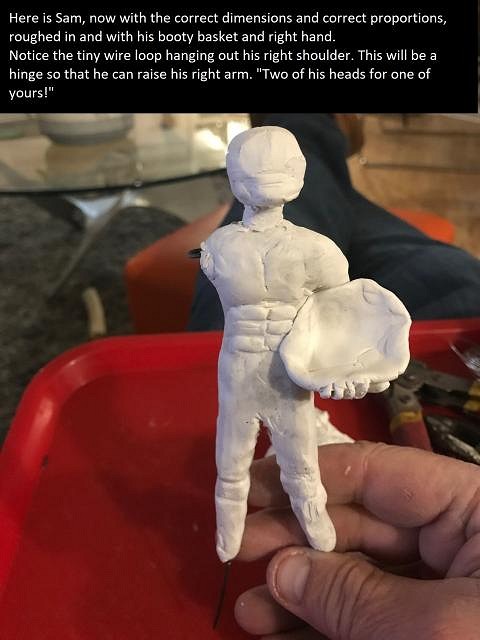
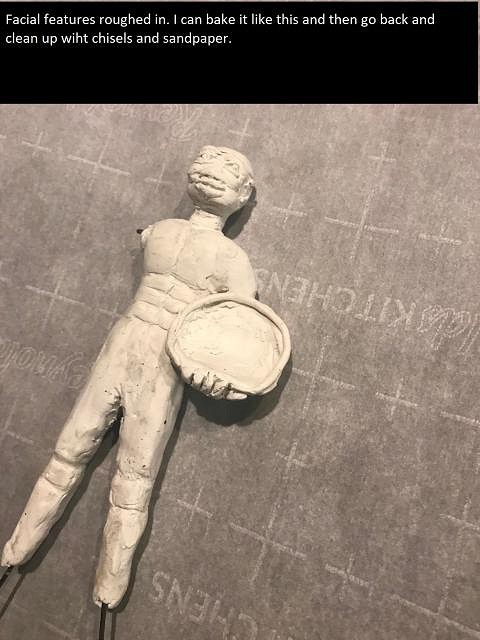
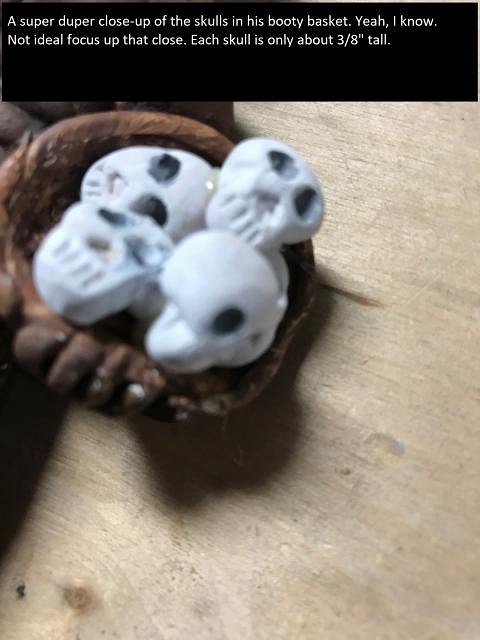
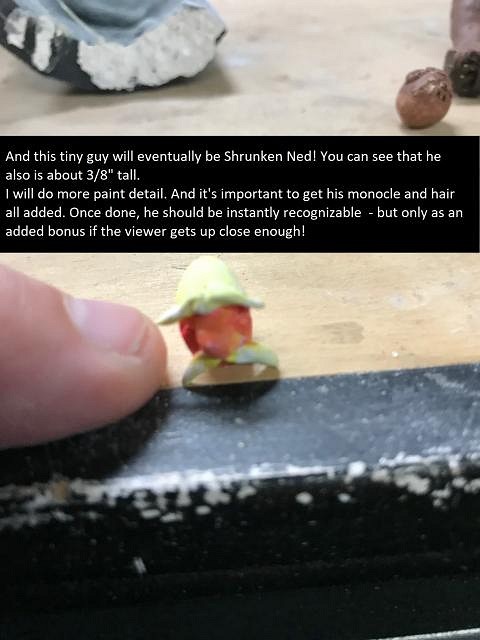
TRADER SAM FEATURE #3: With the shell for Sam created, I had my dimensions that would dictate the size of sculpture. So off I went.
[ Edited by: TheLuckyParrot 2020-02-21 10:50 ] [ Edited by: TheLuckyParrot 2020-02-21 18:25 ] |
|
T
TheLuckyParrot
Posted
posted
on
Fri, Feb 21, 2020 1:57 PM
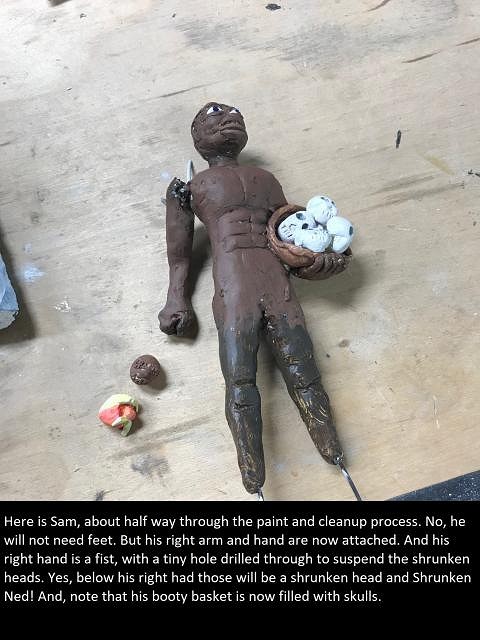
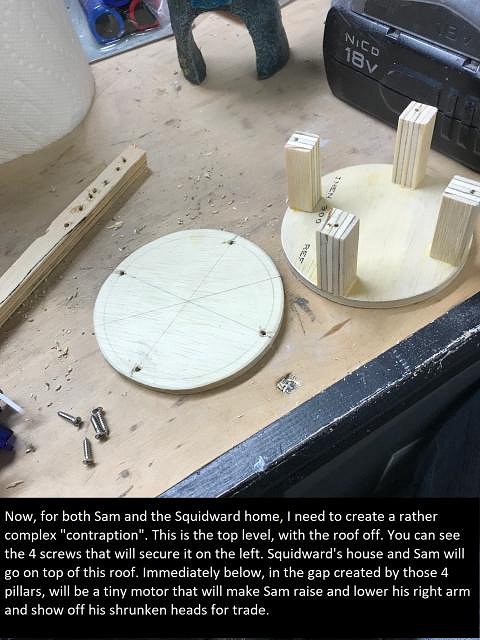
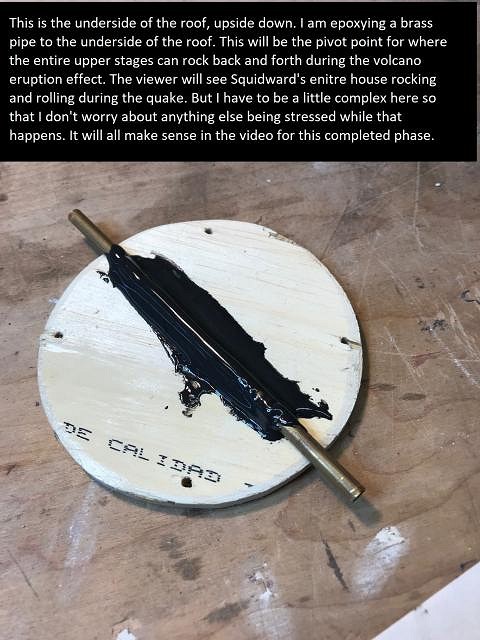
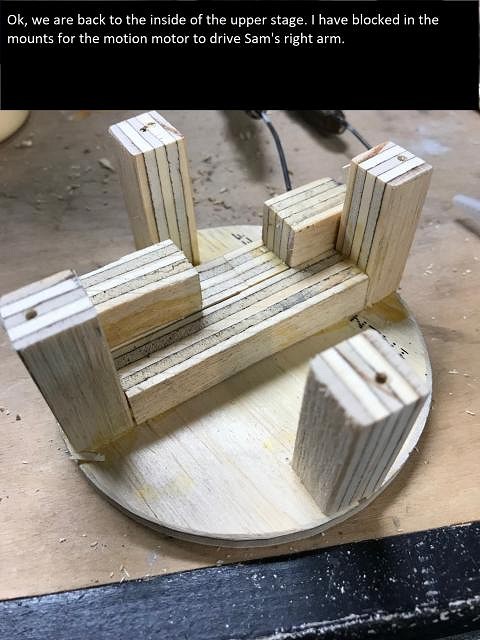
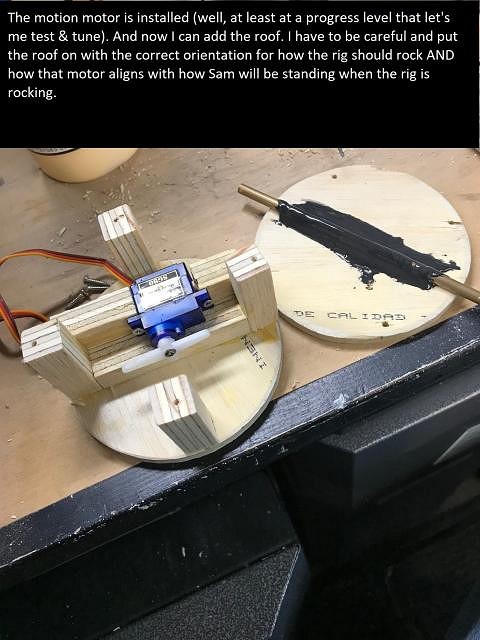
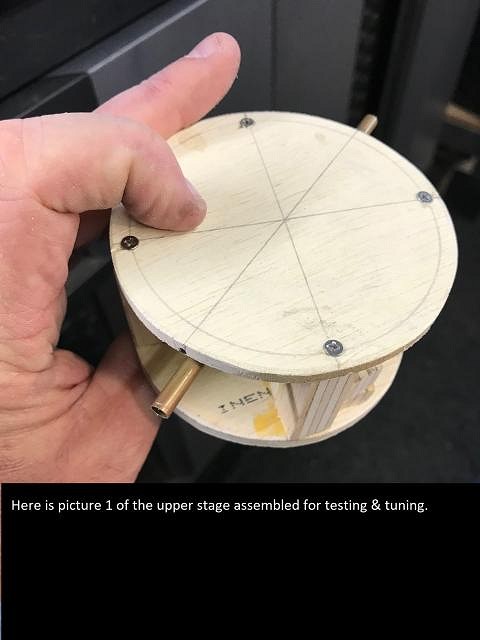
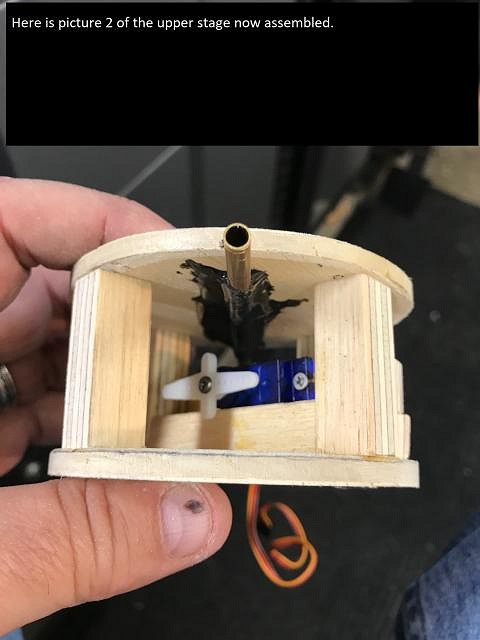
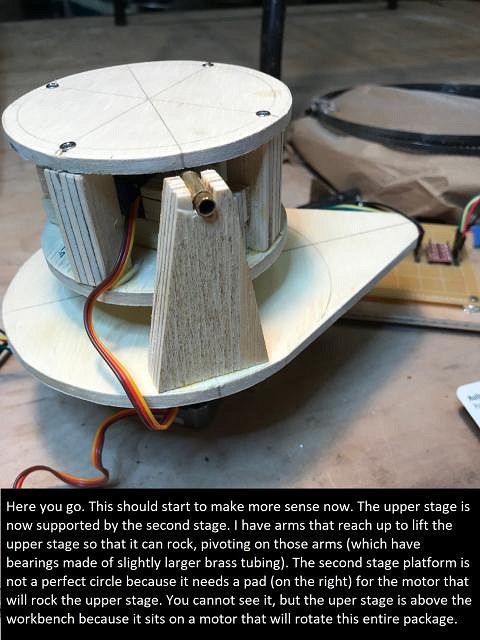
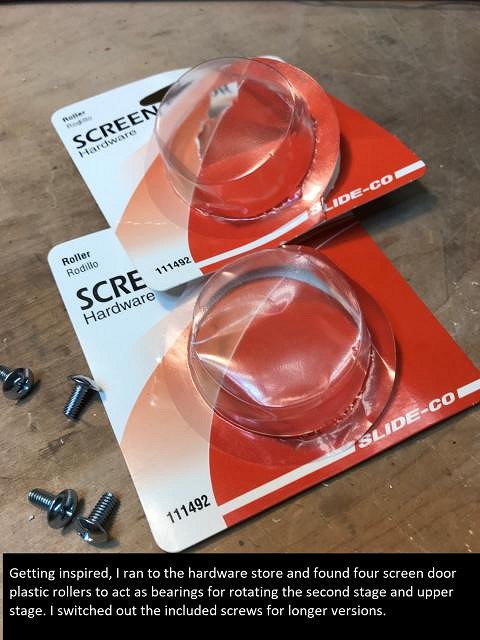
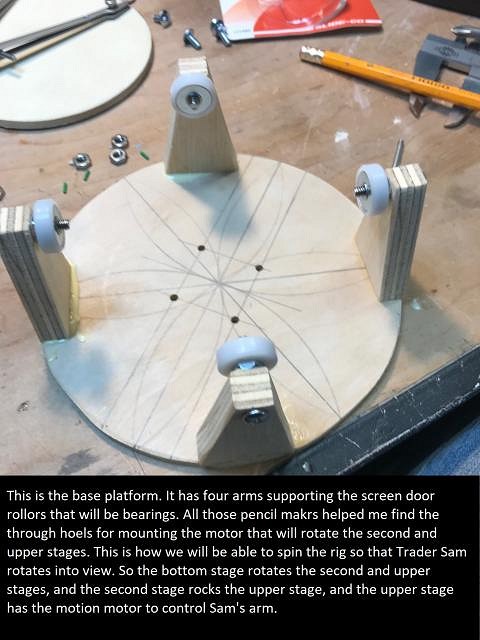
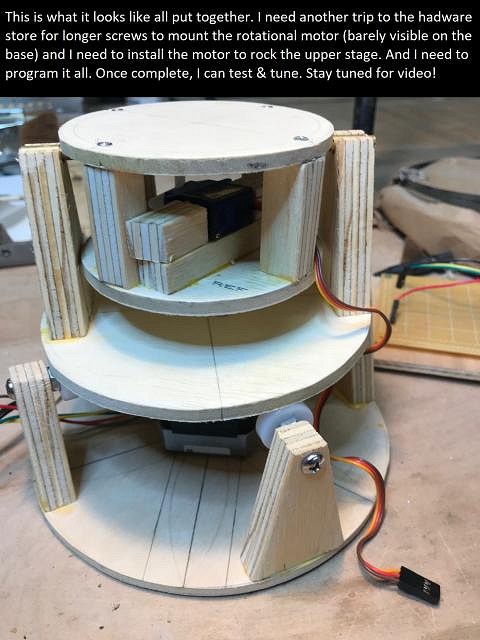
TRADER SAM FEATURE #4: While the Sam sculpting was ongoing, and I was gathering items for clothing and costuming the miniature, I was also working on the design, engineering and fabrication of the platform that would support this feature and enable the mechanical animation. I will post the pictures that I took of part of the process. Later, I will link to a platform test video that shows the actions with micro-controller control. Here was the design, engineering and fabrication process. Again, this is all happening off the top of my head. I work slow and steady so it all comes along organically to me.
[ Edited by: TheLuckyParrot 2020-02-21 18:25 ] |
|
D
danlovestikis
Posted
posted
on
Fri, Feb 21, 2020 2:05 PM
The little surprise must be Uncle Ned! So much work to pull this off. It's already a Wow! and you are not yet done. Wendy |
|
T
TheLuckyParrot
Posted
posted
on
Fri, Feb 21, 2020 2:06 PM
(I just freaked myself out there for a second. Being brand-new to Tiki Central posting, I was not expecting this last post to roll over to a page 2. It took me second to catch up with where the post went!) |
|
T
TheLuckyParrot
Posted
posted
on
Fri, Feb 21, 2020 2:09 PM
Thanks. But hang in there with me. It only gets much much better, I promise! Soon I will have Tiki Central all caught up with where I am in real time and the cadence of posts will slow down to once or twice a day. But because of where I am in the overall project, those posts will be epic!! (And just you wait to see the projects I have teed up right behind this one...) |
|
T
TheLuckyParrot
Posted
posted
on
Fri, Feb 21, 2020 6:23 PM
TRADER SAM FEATURE #5: Here was the first progress report video of the Trader Sam feature. You get to actually see it in action, with my laptop talking to the feature controller chip and offering instructions to control the motor and servos. This is where those photos start to make sense. https://www.youtube.com/watch?v=LNtJ1Uajz0I [ Edited by: TheLuckyParrot 2020-02-24 20:53 ] |
|
M

Mele_Ipo
Posted
posted
on
Fri, Feb 21, 2020 7:37 PM
Great work TLP! Keep the updates coming. :sheckymug: :music: |
|
T
TheLuckyParrot
Posted
posted
on
Sat, Feb 22, 2020 8:34 AM
TRADER SAM FEATURE #6: Let's look at another video update from when Trader Sam was finished and costumed, and then added to the painted mechanical platform. You will get to see the actions involved, too! In this version the wiring is not tightened up and the flora is not attached. You will see those in the final video of this feature, coming next. But this one is THE BIG REVEAL because you see the finished Sam AND you see the computer animated motion actions. https://www.youtube.com/watch?v=HNB-TCSaZKY [ Edited by: TheLuckyParrot 2020-02-23 09:43 ] [ Edited by: TheLuckyParrot 2020-02-24 20:54 ] |
|
T
TheLuckyParrot
Posted
posted
on
Sun, Feb 23, 2020 9:43 AM
TRADER SAM FEATURE #7: I am looking around and I think that this is the last entry I can make to the Trader Sam part of my overall project until I get back to the current work efforts. I think that after this last video is when I packed it up and set it aside for safe keeping and moved on to the volcano. There are two things of interest in this video. First there is the general appeal of seeing the full and final artistic result now with the flora attached. It helps integrate what will be the overall look of the diorama into this feature and hide the mechanicals. It also helps hide Sam when the Moai is forward facing. Second, there is a lot for the tech-minded as I summarize and wrap up the last of the technical challenges I overcame to make this feature not only functional, but rock solid so that it will enjoy many duty cycles and have a long life without constant maintenance. (Which is important, because I don't want to have a final result that is not 100% functional and I also don't want to keep opening things up to repair stuff AND I have to consider that this project will outlive me and I don't want to burden or disappoint whoever ("whomever"? I can never figure that one out) it is that inherits it. So here is the final progress report for the Trader Sam feature. Next I will start showing the work that went into Pele and her volcano. https://www.youtube.com/watch?v=xyRDPIuRPlk [ Edited by: TheLuckyParrot 2020-02-24 20:56 ] [ Edited by: TheLuckyParrot 2020-02-24 20:57 ] |
|
T
TheLuckyParrot
Posted
posted
on
Sun, Feb 23, 2020 7:41 PM
PELE AND THE VOLCANO, PART 1 Now we move t the volcano feature. These are videos. Obviously, I am riffing off of the Krakatoa! event within ETB. I knew that this one would be a lot easier than Sam because I was starting with a finished volcano and engineering/fabrication was limited to some cool light shows and an interior elevator lift. Here is the first one, where you already see one of the finished light shows. https://www.youtube.com/watch?v=M9xyJSEKTcg [ Edited by: TheLuckyParrot 2020-02-24 20:58 ] |
|
T
TheLuckyParrot
Posted
posted
on
Mon, Feb 24, 2020 7:53 AM
PELE AND THE VOLCANO, PART 2 So making the volcano shell and lava "flow" was easy. And in the earlier video I introduced the concept of some pieces for lifting pele out of her volcano. This video give us an update and focuses on the guts of the volcano, showing the lift. https://www.youtube.com/watch?v=Pik68Y9P3-I [ Edited by: TheLuckyParrot 2020-02-24 20:58 ] |
|
T
TheLuckyParrot
Posted
posted
on
Mon, Feb 24, 2020 12:23 PM
PELE AND THE VOLCANO, PART 3 Here is a quick 25 second video showing the elevator lift raising Pele out of the volcano, and you can see the assembly dry-fitted to the feature platform. https://www.youtube.com/watch?v=_yhtl_WNecg [ Edited by: TheLuckyParrot 2020-02-24 20:59 ] [ Edited by: TheLuckyParrot 2020-02-24 21:02 ] |
|
M
MadDogMike
Posted
posted
on
Mon, Feb 24, 2020 2:16 PM
Very cool progress! Complicated but looks like fun! Just a note, some people here do not have Facebook accounts so they can't see your video. If you upload them to YouTube first then link them here and to Facebook, they can be seen both places. |
|
T
TheLuckyParrot
Posted
posted
on
Mon, Feb 24, 2020 2:57 PM
Oh, man, really? Only those with FB accounts can watch videos linked directly? So I need to go back and re-upload and re-post? Dang. Did not know this. I'm not a lover of either service but this progress reporting doesn't make sense if people visiting cannot see the work in action. [ Edited by: TheLuckyParrot 2020-02-24 14:57 ] |
|
D
danlovestikis
Posted
posted
on
Mon, Feb 24, 2020 7:09 PM
The ship in the bottle attacked by an octopus and Sam lifting the head are so cool. Wonderful videos. Wendy |
|
T
TheLuckyParrot
Posted
posted
on
Mon, Feb 24, 2020 9:00 PM
Awwww...somebody is looking ahead!! :) |
|
T
TheLuckyParrot
Posted
posted
on
Mon, Feb 24, 2020 9:06 PM
PELE AND THE VOLCANO, PART 4 This is the final Pele/Volcano feature update (until we get to the part when things start to be packaged together). Here I review all the tech details and I show off one full cycle of the entire volcano performance. |
|
M

MauiRose
Posted
posted
on
Mon, Feb 24, 2020 11:58 PM
What an awesome project! Thanks for sharing this with TC. |
|
T
TheLuckyParrot
Posted
posted
on
Tue, Feb 25, 2020 7:58 AM
Thanks for the feedback, MR! But stick around, it only gets better!! |
|
T
TheLuckyParrot
Posted
posted
on
Tue, Feb 25, 2020 8:46 AM
SHIPWRECK, PART 1 As I type this it is 2/25/2020 but as we follow the project thread here, to this point it was actually March/April of 2019. I had just bagged up the Trader Sam and Volcano features for safekeeping and turned my attention to the shipwreck feature. Immediately after this first update, life got in the way and I was unable to return to this project until the month of December. (Now aren't you all delighted to have avoided THAT disappointment in progress reports!?) Lucky us, we can now pretend as if none of that happened. The Shipwreck feature is the motivation for the entire project. The first time I was sitting at ETB and somebody ordered the Shipwreck cocktail I was sitting in the most perfect vantage point to observe the sinking of a ship-in-a-bottle. I was thunderstruck. Oh, sure, their "bottle" was the size of a Sparkletts Water bottle but their ship was equally huge. That was all simply scaled up for the benefit of the audience. No, it was THE IDEA. As a natural engineer and crafty person I had been fascinated by ships in bottles since childhood and marveled at the skills and patience of seamen going back hundreds of years. That was brilliant enough, but to see Disney Imagineers take all that up a dozen notches by sinking one?!? Well, I had to be a part of THAT! I started thinking about how Disney had pulled that off, and then how I might pull that off, and then how likely it was that I could find an excuse to pull that off...and...well...one thing lead to another and here we are. Thus I began this whole thing. And this Shipwreck feature was always my ultimate goal. Along the way I had this silly thought: odds are that there is a similar feature in Grog's Grotto, so Disney has two of these things. And those are so novel they might be the only two in existence (they do exist in quite a few cartoons). That would make mine potentially only the third. I love the rarity and the elite company, and the challenge. But not too very long ago I learned a couple of surprising things. First, the ship model itself was created and constructed by Kevin Kidney (Disney artist)...AND...that Disney Imagineers use a Pepper's Ghost trick in their versions!!! Whaaaat??? Yeah. In their versions the only thing INSIDE their bottles is a sheet of glass, which never needs to move. Holy moly! (For those unfamiliar you can look up Pepper's Ghost, but the most obvious example would be the ballroom dancing scene you look down upon in Haunted Mansion.) So, uh, the entire ship and mechanical workings for that whole effect are NOT inside their bottle after all. It all sits on its side and hidden within the wall of the back bar. Why do I tell this tale? Because I learned it not until I had figured out how to do mine INSIDE the bottle, thinking that this was how Disney was doing it. I didn't know that it was supposed to be impossible, so I did it. And recall how rare I thought this would be, one of three in existence? Well, you can certainly erase two others from that list. You are about to bare witness to the realization of what might be the One And Only! Oh, and for those familiar with the history of cinema, you will appreciate that this feature is my homage to the great Georges Méliès. |
|
T
TheLuckyParrot
Posted
posted
on
Tue, Feb 25, 2020 8:54 AM
SHIPWRECK, PART 2 The first thing I convinced myself of was that I was not going to focus any time on building my own tiny ship. Luckily, ships in bottles are not uncommon in antique stores. But getting the right ship would dictate the overall size of the feature (bottle, mechanics, housing, etc.) and it would also dictate the forces to be applied since I didn't want to destroy something fragile. Here is my project intro. I do end up choosing to use the "Bellum", although I will re-christen this ship when complete. https://www.youtube.com/watch?v=gCB_e54_oTE&feature=youtu.be |
|
A

arriano
Posted
posted
on
Tue, Feb 25, 2020 3:04 PM
Wow. That's all I can say. Wow. |
|
T
TheLuckyParrot
Posted
posted
on
Tue, Feb 25, 2020 4:31 PM
SHIPWRECK, PART 3 Here we have the final video done back BEFORE I got distracted (NOT the final update or video to the Shipwreck progress reporting itself). It is a motion study that helped me determine things like arc motion and distance and speeds. As I mention in the video I ended up not using this exact mechanism. I DID use the named model ship and I did use the same vertical stand and hinge. But as I was in the final phases I learned that the cute little blue servo I am using in this study video is not durable. Maybe it's a good thing I had so much time to complete this because in the intervening months (from which you all are being spared) I handled that study item a lot and I toyed with the motion a lot and I accidentally got the chance to abuse the servo more than I would had I gone straight to build. Here was the problem that did not show up in this study. At rest we want the ship to be "level at sea". The way servos work is that you have to tell the servo to be at some rotational position. Most servos have 180 degrees of travel so you have to tell the servo to move to some value from "0" to "180". Servos are also very fast so I needed to include some extra software code to take tiny little pauses between each step so that it not turn the ship into a rocket. In my case I chose that "level at sea" position to be angle 0 because I wanted to have the maximum amount of motion with which to work, hence level equals "0" and full sink could be anything up to "180". The ship is supposed to be sitting level while not in action, meaning that the servo is supposed to hold at position "0". But the ship and the pad upon which it sits are not weightless. Over time this tiny bit of weight started to be too much for the servo to hold at "0", and the weight pushing down would move the servo to "1". The servo would realize that it is not at "0" and go back to "0". But it still could not hold the weight. Rinse, repeat. This would end up with the ship oscillating. And the oscillation was not controlled by my commands so there were no tiny little pauses to keep things in check. And that would all quickly get out of hand and at the speed of electricity the whole rig would start thrashing violently!! I was lucky enough to learn this before things got bolted together and it would be too late to re-engineer and rearrange everything to accommodate a stronger (and therefore LARGER) servo. AND I was lucky that I was far enough along that the ship stand itself was glue down else the entire rig would have launched itself off the workbench and destroyed my model ship! Losing the ship would have been disastrous, since everything is all sized to fit together tightly and it would be impossible to get another model ship that exact size and shape. The whole thing would have had to be scrapped and I would have had to start all over. But I did survive it all, as you will soon see. Here then is that final study video from back in April of 2019. After this post, I will create and show photos of the final mechanical monster that went into all of this. All that before showing you the video of the final solution in perfect working action. https://www.youtube.com/watch?v=VcTNwdwaKEE&feature=youtu.be [ Edited by: TheLuckyParrot 2020-02-25 16:32 ] |
|
T
TheLuckyParrot
Posted
posted
on
Wed, Feb 26, 2020 7:53 AM
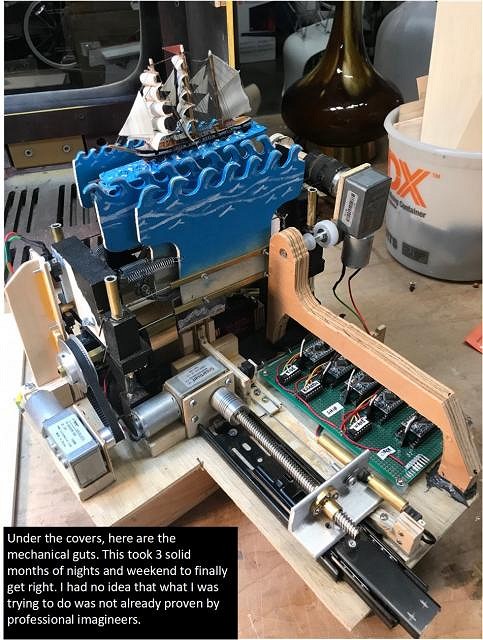
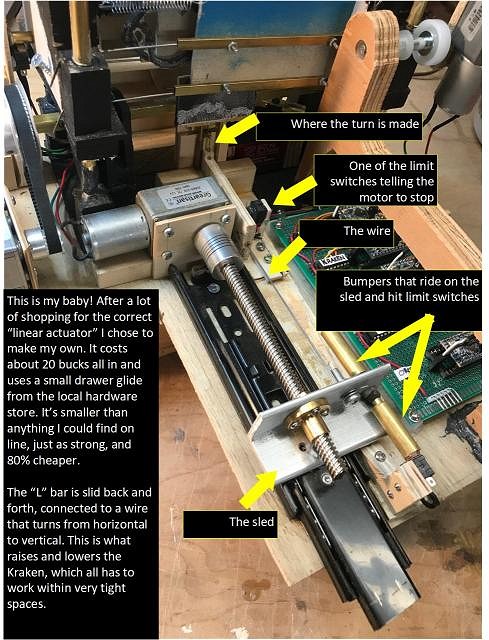
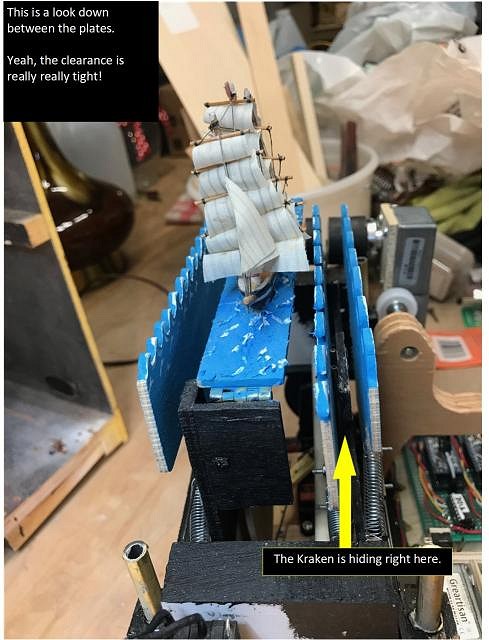
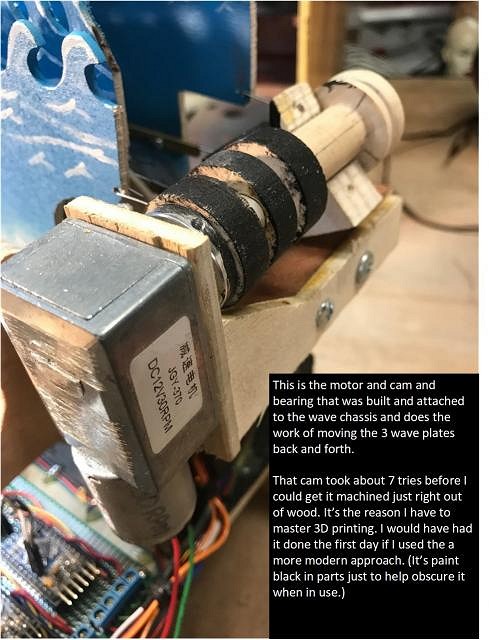
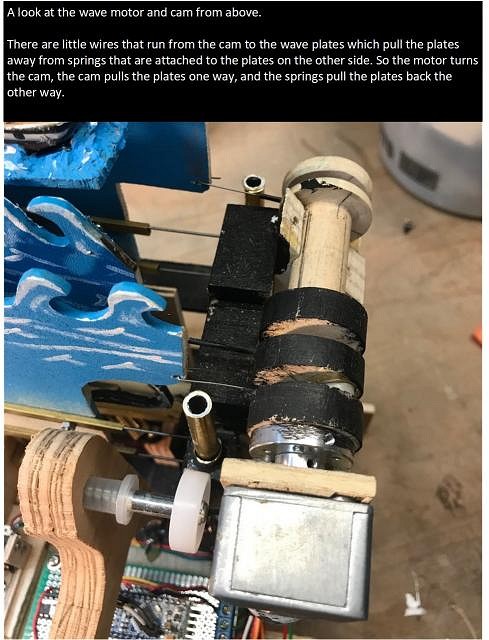
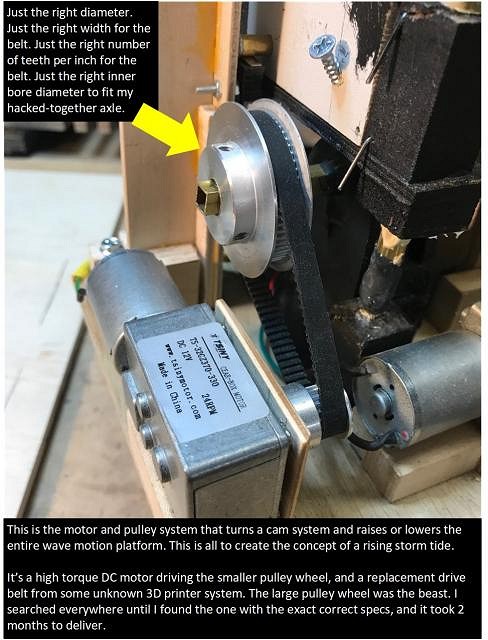
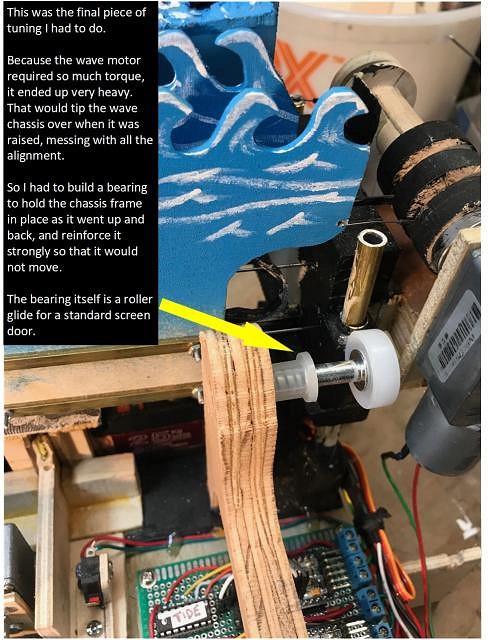
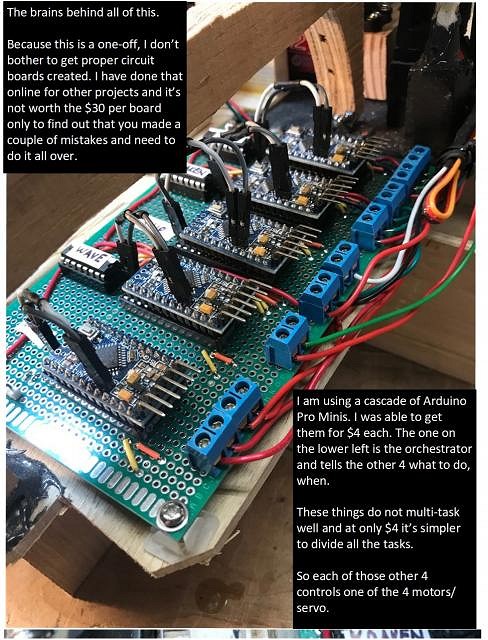
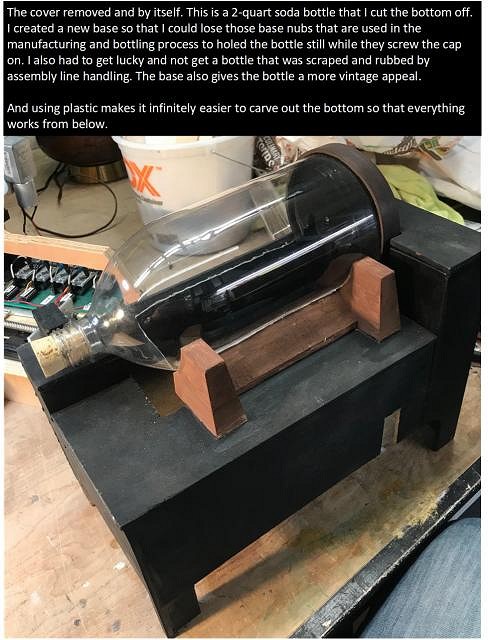
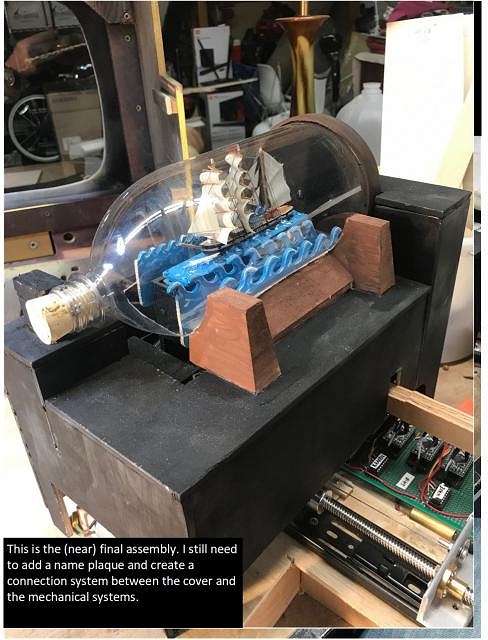
SHIPWRECK, PART 4 There. Now we are caught up to the month of February, 2020. By this point the Shipwreck system has been built. Everything but a new name plate. Before I show you a video of the working system, here are the pictures that detail the whole thing. I put the explanatory text in each photo.
[ Edited by: TheLuckyParrot 2020-02-26 16:16 ] |
|
E
eroc
Posted
posted
on
Wed, Feb 26, 2020 2:52 PM
Totally digging this build, but no idea how to incorporate fog into this one. Maybe using some kind of vinyl tubing with an exterior device like a mini fog machine? Still requires some type of upkeep.... |
|
T
TheLuckyParrot
Posted
posted
on
Wed, Feb 26, 2020 3:49 PM
Well, you DID inspire to look into this and, technically, a hack IS possible. But I don't know how far the vapor would travel and still come out as a volcano mist. I could make a variation on this: https://www.youtube.com/watch?v=Ihu05R_0fMk If the vapor traveled far enough it could be an external tank, maybe in the back. Unsure about what would happen over time with the increased humidity, however. |
|
T
TheLuckyParrot
Posted
posted
on
Wed, Feb 26, 2020 4:20 PM
SHIPWRECK, PART 5 Alrighty, then, here is the shipwreck feature in action! https://www.youtube.com/watch?v=cemiqhpcWtk&feature=youtu.be The performance script that I am going for is: [list=A] [] the seas get stormy [] the ship starts to rock in distress [] the rocking gets worse [] the Kraken rises out of the water to attack the ship [] the storm surge rises [] the Kraken takes the ship down to Davy Jones' Locker(!) [] the storm surge subsides [] the stormy seas calm [*] (wait 10 seconds before resetting) [list] None of the sounds audible in this video will be heard by viewers in the final project, and we are still a ways out from adding the proper audio track and lighting effects for this (which will be a part of the cabinetry). |
|
M
Mele_Ipo
Posted
posted
on
Wed, Feb 26, 2020 5:06 PM
Aloha TLP! Love watching this unfold. Keep the pics/videos coming! :sheckymug: :music: :) [ Edited by: Mele_Ipo 2020-02-26 17:06 ] |
|
T
TheLuckyParrot
Posted
posted
on
Thu, Feb 27, 2020 8:55 AM
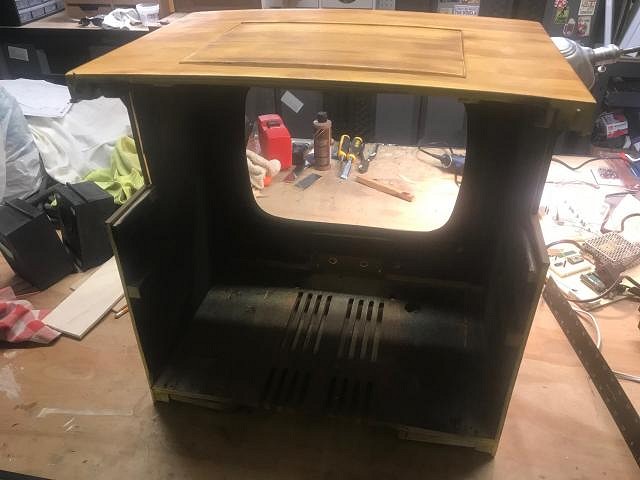
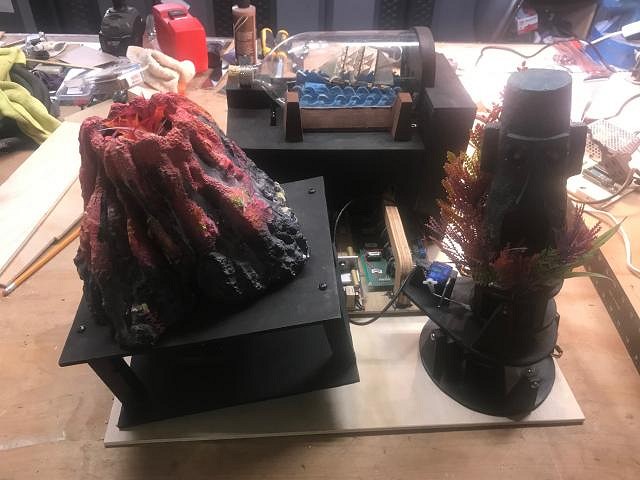
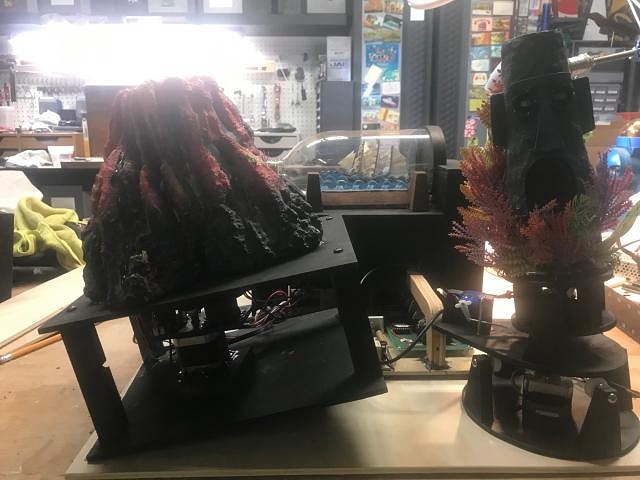
STAGE ASSEMBLY, PART 1 Ok, welcome to modern times. Now I can start showing the regular progress on my workbench that is ongoing right now. To summarize, the three main animated feature subsystems have all been built and tested but without the lighting and audio components. The goal now is to assemble them all onto one stage that will fit into the TV cabinet and get all the wiring for the sub-systems consolidated so that everything can be cross-checked again inside the cabinet. That way I can make sure that nothing bases into anything else, and that everything is readily visible for the viewing audience. Having the electronics consolidated will also give me the entry point for my main computer controller and the WiFi stuff. This will let me then extend those to the lighting/audio. So first we go to the cabinet. Here it is again without a backing and without the speakers. It has been cleaned up inside. Now I create a base and makes sure that it fits snugly into the cabinet. This the flooring for BELOW STAGE. About 3 inches above this will be another platform that will weave between the three feature sub-systems and create the primary stage level that will get decorated, which will end up hiding all the nuts and bolts and wires, etc. This fit perfectly. The deal now is to park the three feature sub-systems onto that base and fit them into place. Once fitted, I can secure them to that base and all three should then be able to slide into and out of the cabinet with zero further fitting issues. I can then safely and easily work on the entire stage platform outside of the TV cabinet as I do the final stuff. So let's see how those three sub-systems fit onto my stage base... "Ladies and Gentlemen, for the first time ever on the same stage, I bring you...!"
Ugh. Dang. They don't fit. Well, I kind of knew all along that I was going to have some fitting to be done to pack these things all up onto same platform and tuck them into the cabinet. So...yeah...I have my work cut out for me... |
|
M
MadDogMike
Posted
posted
on
Thu, Feb 27, 2020 1:52 PM
As far as I know that is correct. But I have a FB account so I can't really test it. If you do relad those videos to YouTube, you can edit your original post and add the YT link instead of the FB link. Let me know if you have trouble |
|
M
MadDogMike
Posted
posted
on
Thu, Feb 27, 2020 2:18 PM
Holy crap!!! That sinking ship is off the hook!!! Do you have some professional background in this type of work or is it all hobby? |
|
T
TheLuckyParrot
Posted
posted
on
Thu, Feb 27, 2020 10:39 PM
Mike, I did go back and edit all the earlier posts and replace the FB links with YT links for a new YT channel I built to support this. If I missed any, pleae let me know. |
|
T
TheLuckyParrot
Posted
posted
on
Thu, Feb 27, 2020 10:45 PM
Professional background? Well, yes and no. Yes inasmuch as I have been a career IT person so I have lots of experience and comfort with figuring out computer tech things. But no, I never did actual micro-controller work or programming in any production sense. And I have zero professional experience in arts or crafts. This is all hobby but, clearly, it's a hobby that I enjoy and have I am delighted to have some aptitude for it. |
|
BB

Bam Bam
Posted
posted
on
Fri, Feb 28, 2020 4:53 AM
This is stunning - legit imagineering on a miniature level. Hats off to you! |