Pages: 1 2 3 4 5 6 7 8 369 replies
|
T

TikiTomD
Posted
posted
on
Mon, Nov 7, 2011 7:50 AM
Trav, that looks like the beginning of a Mai-Kai A-frame, an exceptional challenge! -Tom |
|
M

MadDogMike
Posted
posted
on
Mon, Nov 7, 2011 9:59 AM
Trav, as attractive as "work slowdown" sounds I bet it's not all it's cracked up to be. Glad you're doing a new project, they always turn out so cool. |
|
T

tigertail777
Posted
posted
on
Mon, Nov 7, 2011 10:11 AM
Just strolled through your thread. What a talent for making magical miniatures! I will look forwards to seeing more of your work...it's like little menehunes got together to start on a village. :wink: |
|
UT

uncle trav
Posted
posted
on
Mon, Nov 7, 2011 1:43 PM
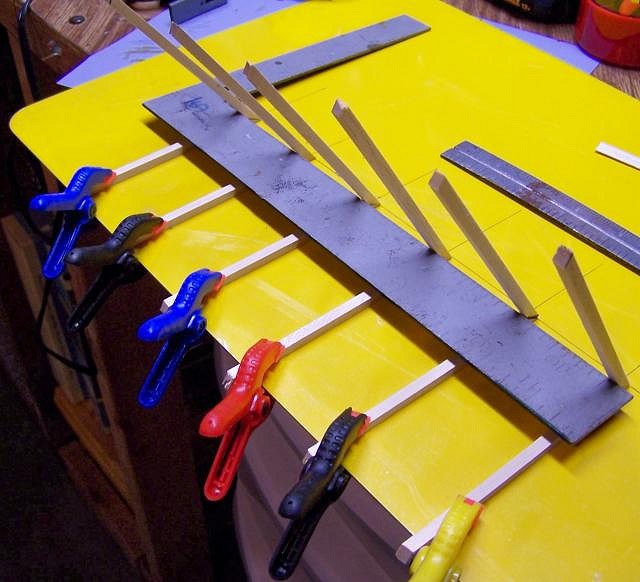
Thanks for the kind words everyone. Here is a pic of half of the ridge beam being glued up. It is being held down by a 12" framing square until it dries and then the same thing for the other side of the beam. |
|
UT
uncle trav
Posted
posted
on
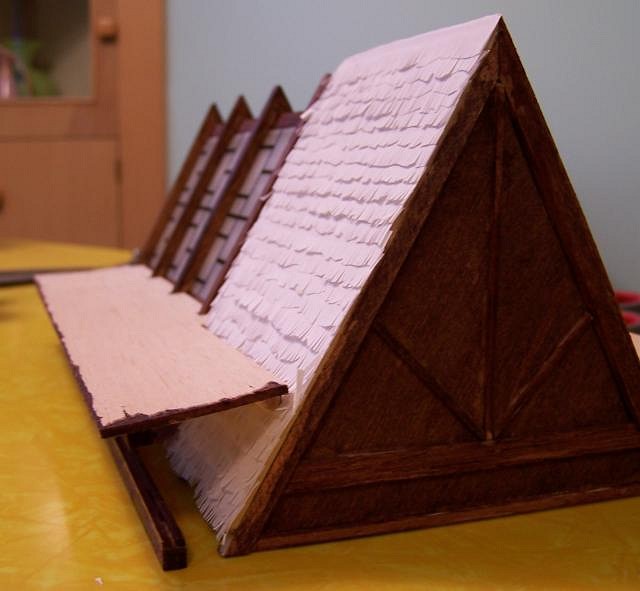
Tue, Nov 8, 2011 7:52 AM
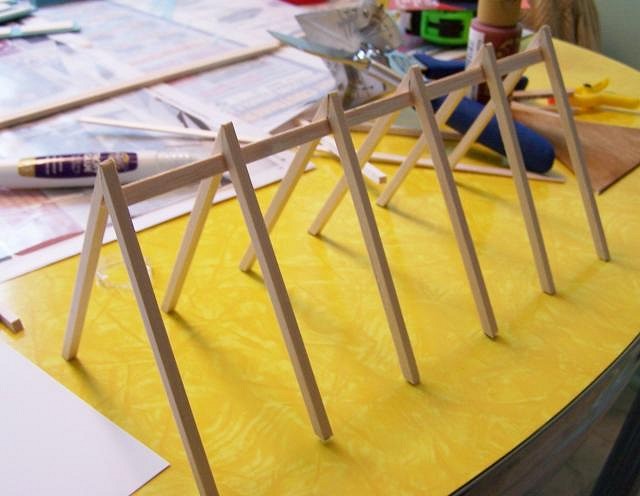
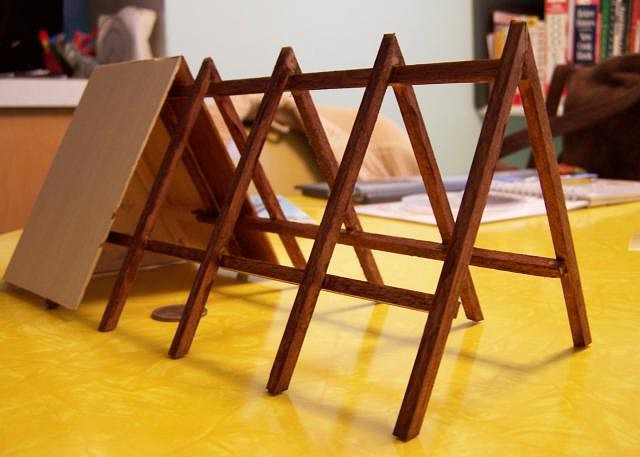
Here is my attempt at the bare bones structure of the A-frame. The A-frame is ten inches from end to end. Again this thing is small. The two pieces of wood I used for the ridge beam are only 1/16" thick and very fragile. Seems to be working out so far. Now I just have to decide what era to build the model as. As usual these are not meant to be exact detailed copies of original buildings just a fun project.
|
|
UT
uncle trav
Posted
posted
on
Thu, Nov 10, 2011 5:19 AM
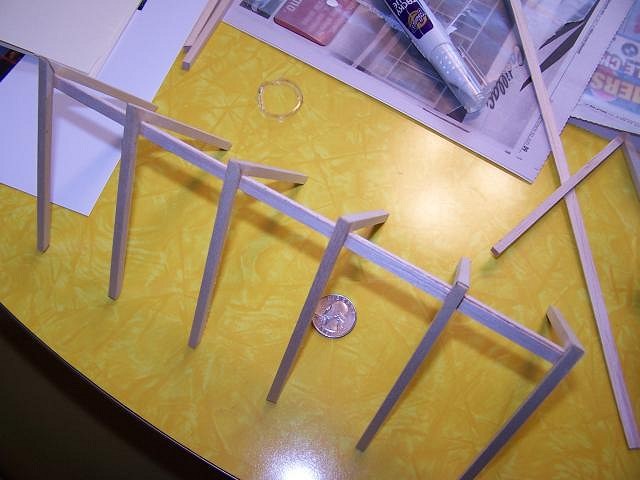
Have done a little more work on the back end of the A-frame for my attempt at a Mai Kai miniature. This is a shot of what will be the back of the building. I decided to go with a bit of a mix of the building's style over the years but I think it may turn out ok. The bare wood panels with be covered with the same type of thatch that I make for my huts.
|
|
M
MadDogMike
Posted
posted
on
Thu, Nov 10, 2011 5:48 AM
Looks like it's working out Trav, gonna be awesome! |
|
UT
uncle trav
Posted
posted
on
Sun, Nov 13, 2011 5:38 AM
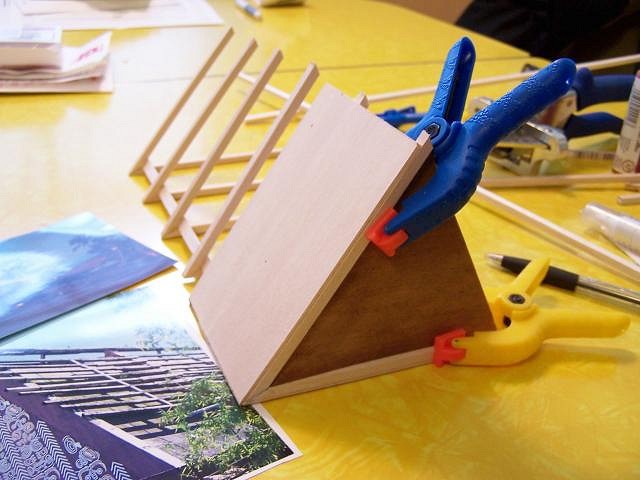
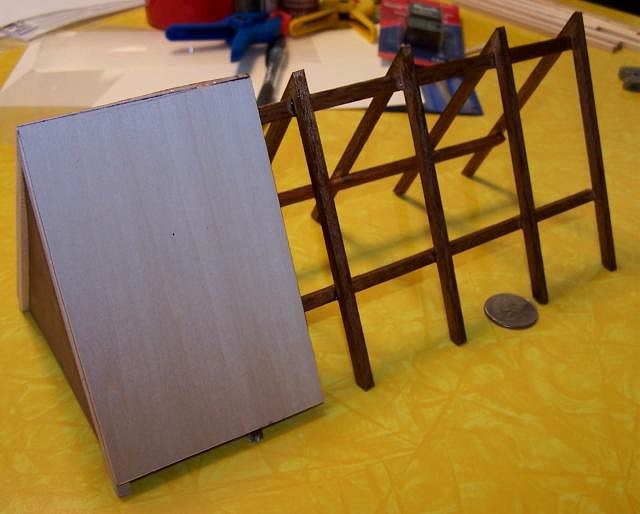
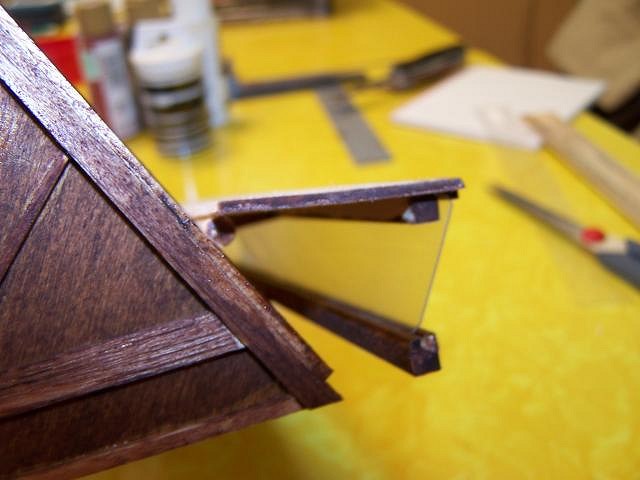
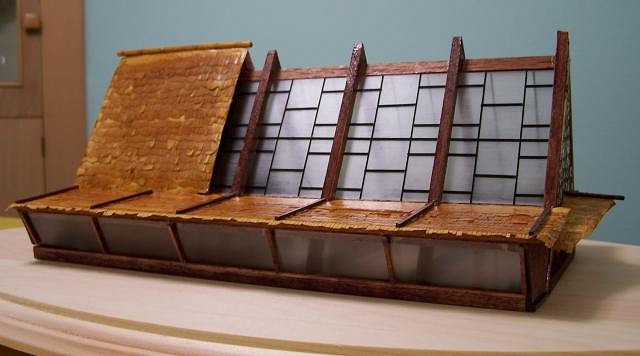
Thanks Mike. Construction is ongoing and like so many other projects here in Michigan we have ample time and a zero budget. The hardest part is waiting for the glue to dry. Next up is the skylights. I have ran through a couple of ways to do this and have settled on the one I think will work. Here is a progress shot. Now I have to figure out how to build out the wings on the sides. Thanks for taking a look.
_________"Anyone who has ever seen them is thereafter haunted as if by a feverish dream" Karl Woermann [ Edited by: uncle trav 2011-11-13 06:25 ] |
|
U

umeone
Posted
posted
on
Sun, Nov 13, 2011 6:08 AM
Aloha uncle trav, |
|
W

WaikikianMoeKele
Posted
posted
on
Sun, Nov 13, 2011 9:18 AM
Uncle Trav, |
|
UT
uncle trav
Posted
posted
on
Sun, Nov 13, 2011 5:36 PM
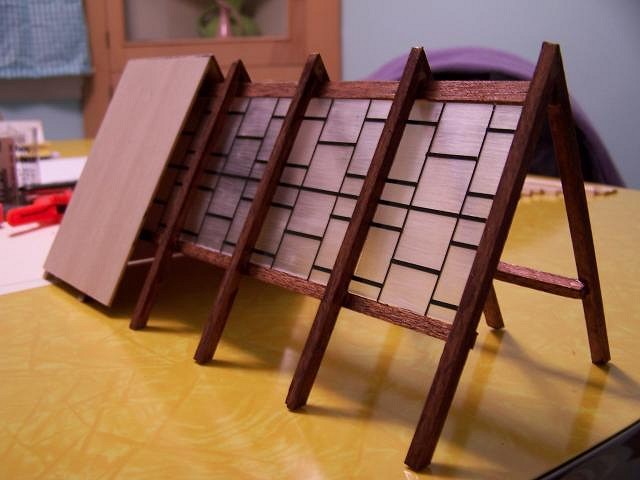
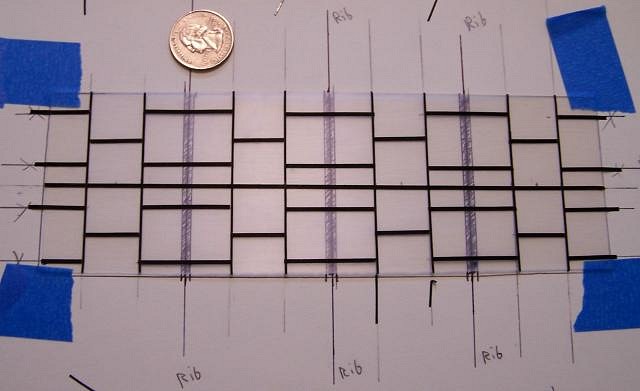
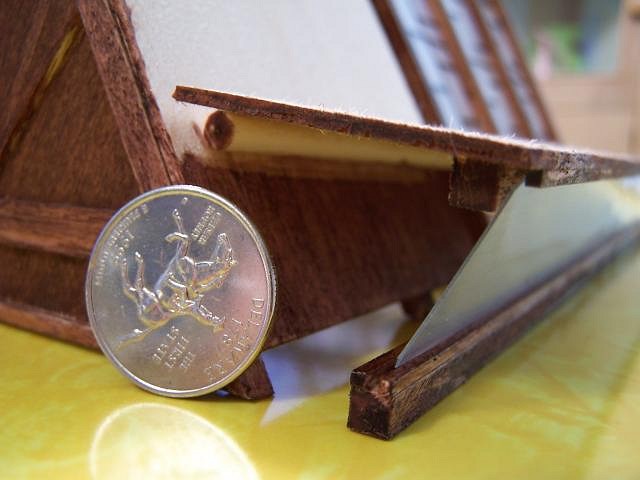
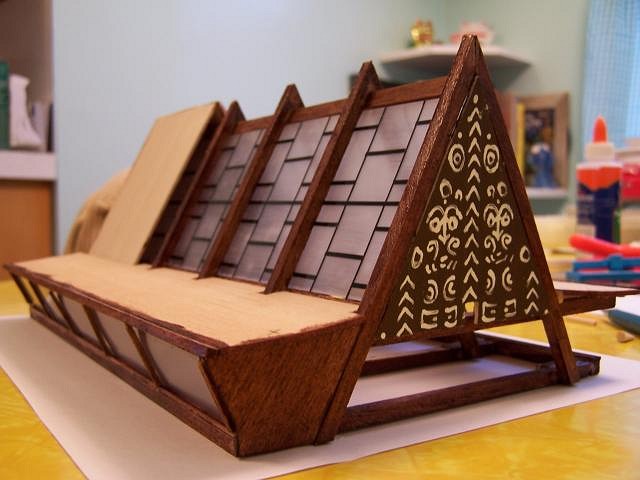
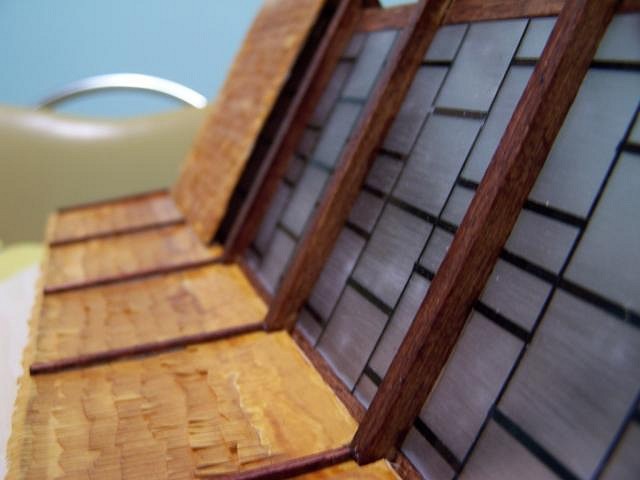
Thanks Kele. Here are some shots at my attempt at the skylights for the A-frame. I had to take a little artistic license with the framing for the glass. At this small of a scale I couldn't pull of an exact copy of the actual framing.
I used clear plastic sheets for the skylight. Roughed it up with some sandpaper on the front to give it a worn opaque look and the framing is very very thin pin stripping. Here is a shot of my layout for the framing. Thanks for taking a look.
|
|
T
TikiTomD
Posted
posted
on
Sun, Nov 13, 2011 5:58 PM
Wow, Trav! Those panels are awesome! You are a true artist in this craft. -Tom |
|
UT
uncle trav
Posted
posted
on
Mon, Nov 14, 2011 12:50 PM
Thanks Tom. I'm no artist just a construction worker on another small project. |
|
M
MadDogMike
Posted
posted
on
Mon, Nov 14, 2011 12:53 PM
I like it! Gonna be awesome! |
|
U
umeone
Posted
posted
on
Mon, Nov 14, 2011 2:12 PM
This is a remarkable build! I love it! :) |
|
UT
uncle trav
Posted
posted
on
Tue, Nov 15, 2011 6:38 AM
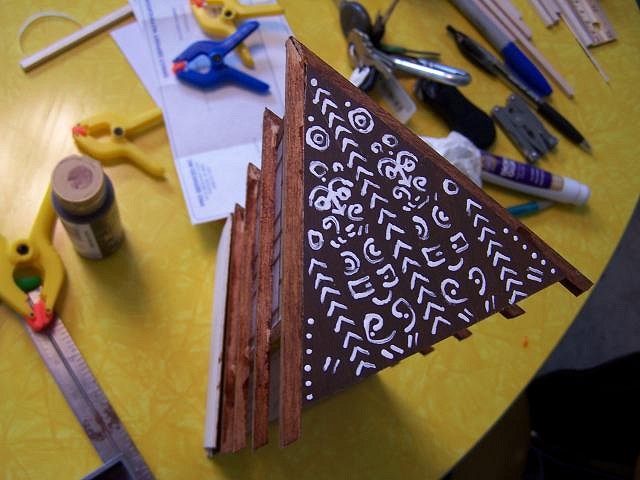
Thanks guys. Here is a shot of my first attempt at the street side end of the A-frame. This would have to be shortened up a bit before I glue it up. Not sure how it will look though. This is the first time I have painted anything other than a house in twenty five years. |
|
U
umeone
Posted
posted
on
Thu, Nov 17, 2011 5:20 AM
I think it is marvelous! :) |
|
R

RevBambooBen
Posted
posted
on
Thu, Nov 17, 2011 10:15 AM
where's the LIKE button?? |
|
B

Beachbumz
Posted
posted
on
Thu, Nov 17, 2011 9:25 PM
Eh uncle, dat's awesome brada!! |
|
W
WaikikianMoeKele
Posted
posted
on
Thu, Nov 17, 2011 9:37 PM
Awesome... wonderful... fantastic... (is there an internet equivalent to a standing ovation?) |
|
UT
uncle trav
Posted
posted
on
Fri, Nov 18, 2011 5:27 AM
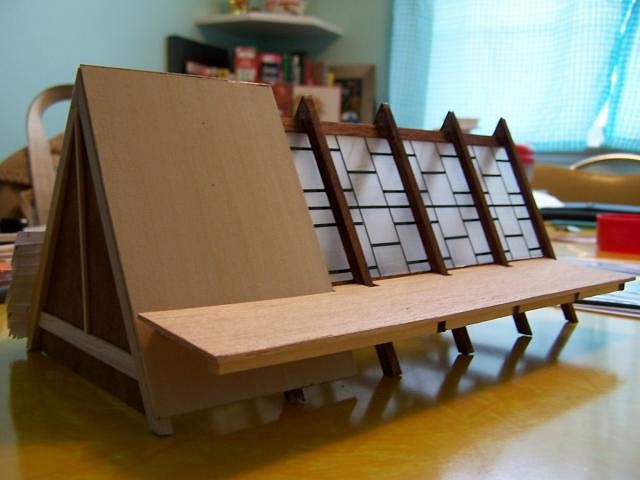
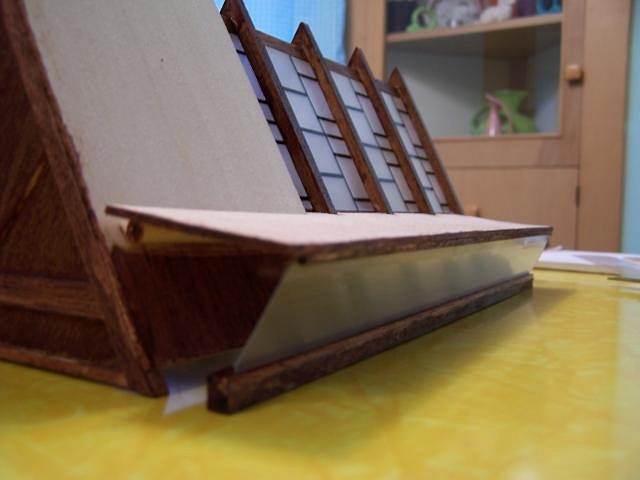
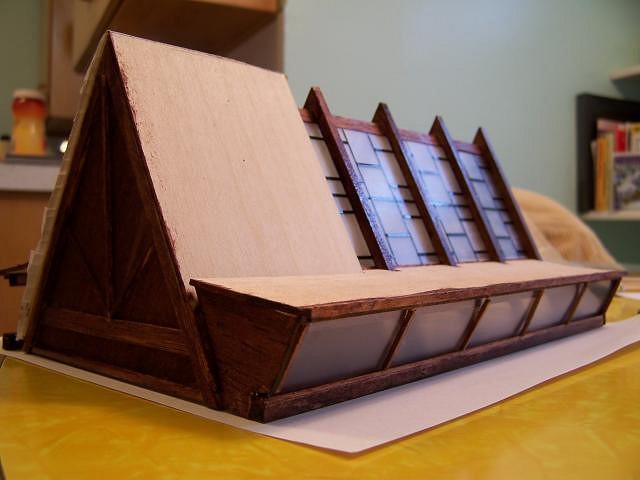
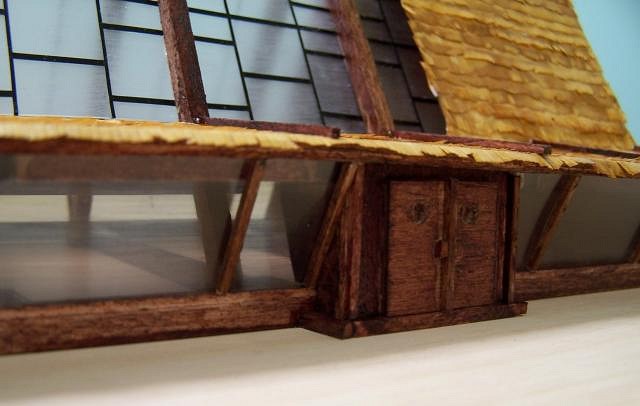
WOW !! Thank you very much everyone. I am glad you enjoy the build and progress pics. Here is another shot with the start of the wings off the sides of the A-frame. This part of the model is going to be tough to build because I have to hide all of the larger material that I use for strength in the interior. Thanks again for all of the kind words and comments.
|
|
P

Polynesiac
Posted
posted
on
Fri, Nov 18, 2011 2:45 PM
Wow - these are some seriously cool miniatures! and I'll be damned if your bbq skewers don't look JUST like bamboo! these are awesome! I'm very glad you're having success with selling these on ebay, I wouldn't be surprised if you could find a marked for your miniatures outside our "diorama behind the tiki bar" frame of reference and into the worlds of model railroaders and miniature wargamers. I bet they'd sell very well at those conventions. Great progress and I'm looking forward to seeing more! |
|
SF

Swamp Fire
Posted
posted
on
Fri, Nov 18, 2011 5:49 PM
Love this new one...heck they all look great! Love the skylights! Fun! |
|
BK

Big Kahuna
Posted
posted
on
Sat, Nov 19, 2011 2:04 PM
Trav, that's awesome! I love it. |
|
UT
uncle trav
Posted
posted
on
Sun, Nov 20, 2011 5:48 PM
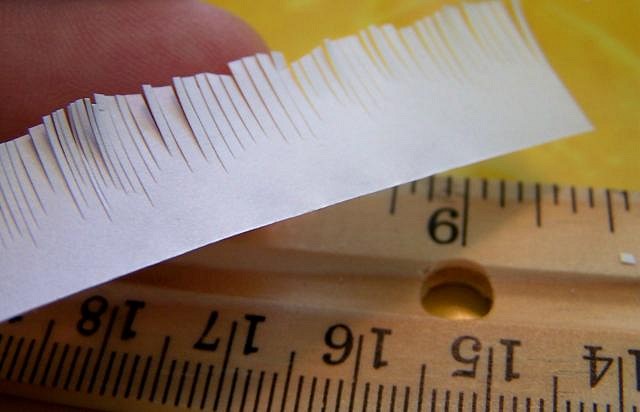
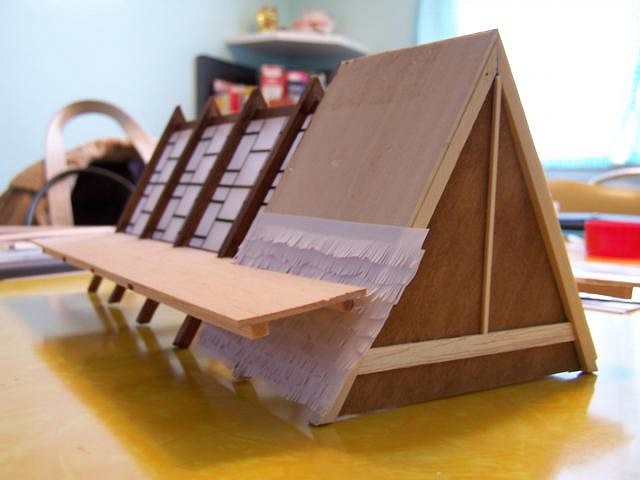
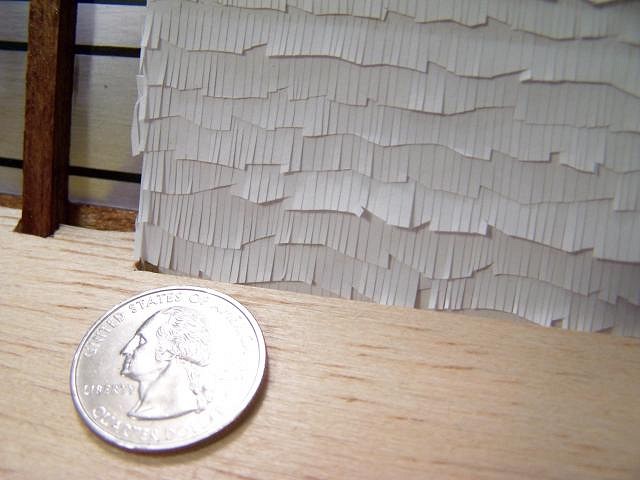
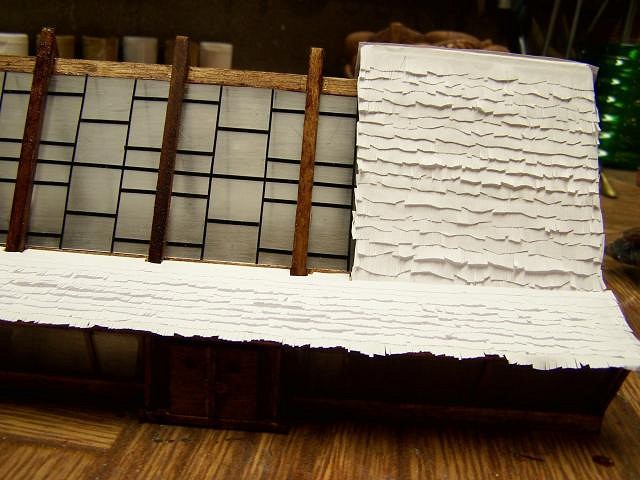
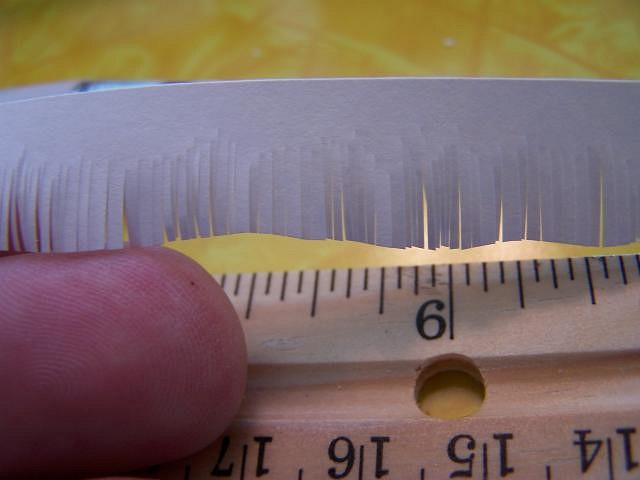
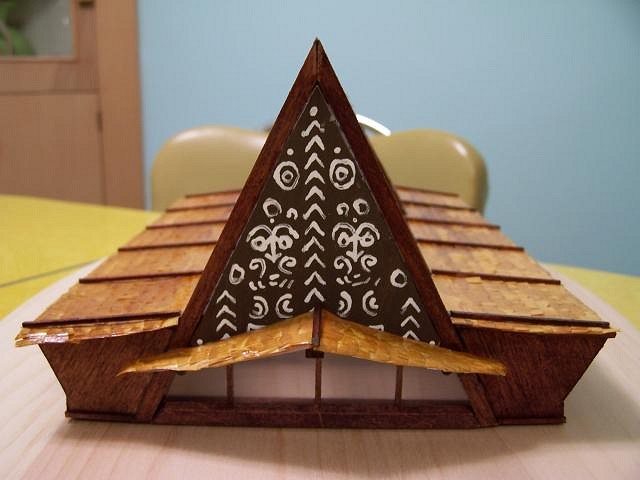
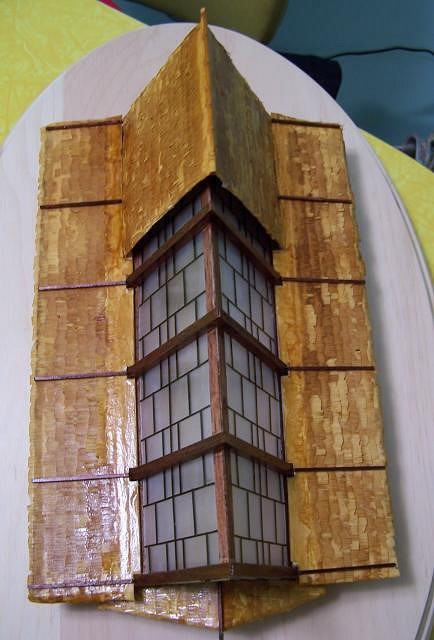
Thank you for taking a look and enjoying the build. I started on the thatch for the covered part of the A-frame. I am using the same process that I have used in the past and it takes forever to get done. All done free hand the ruler is just for scale. The thatch will be stained later.
|
|
UT
uncle trav
Posted
posted
on
Sat, Nov 26, 2011 7:24 AM
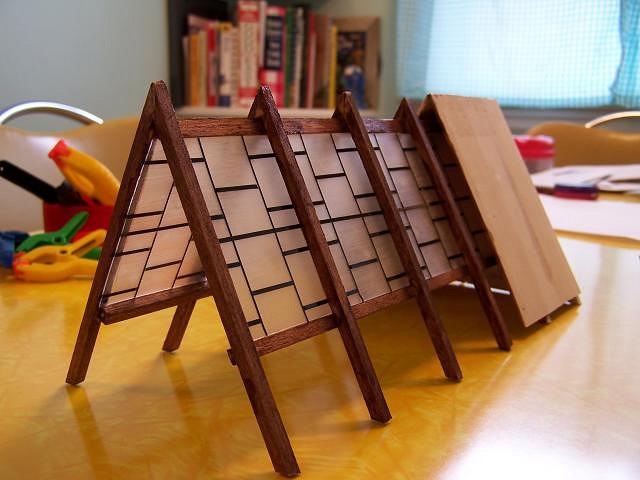
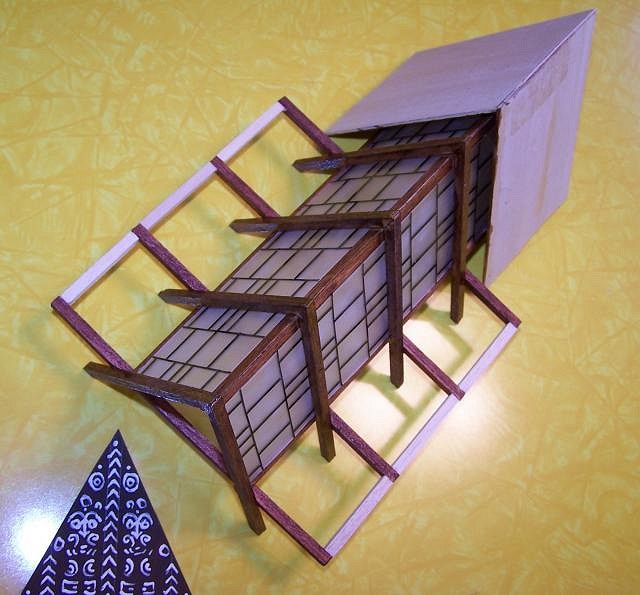
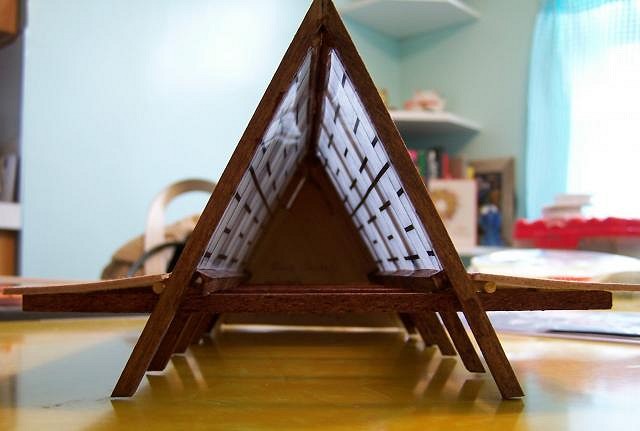
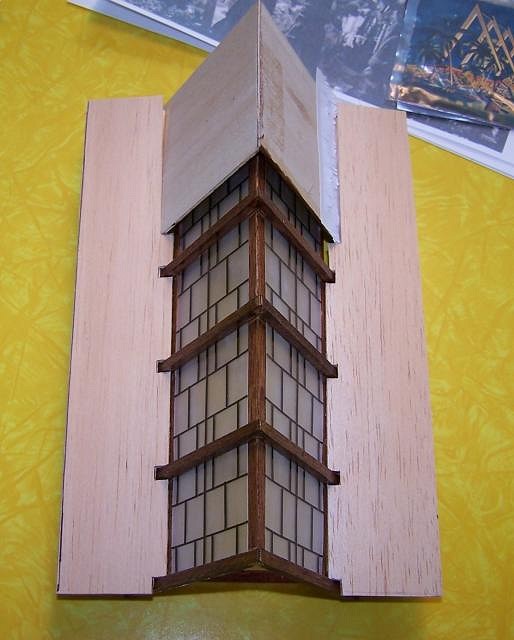
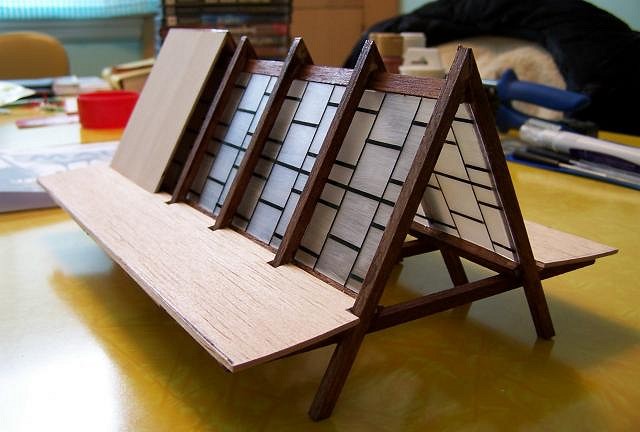
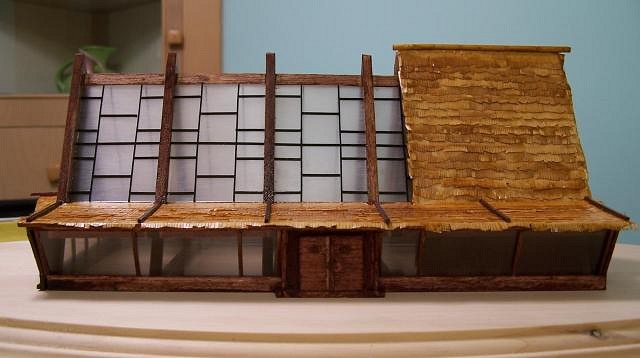
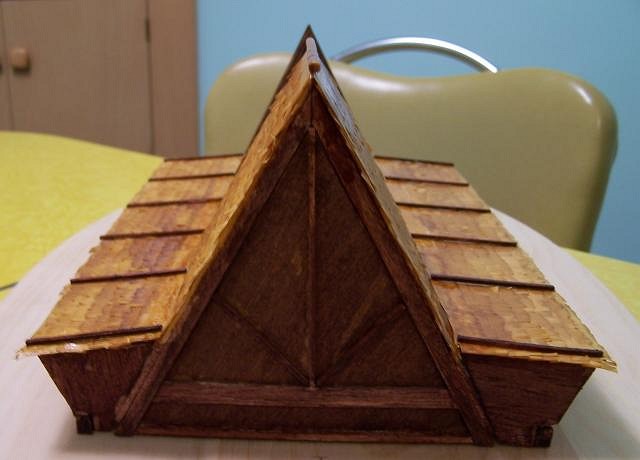
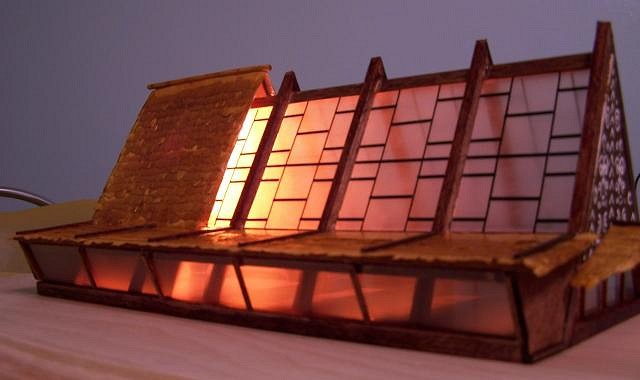
Here is a 360 degree progress roundup.
|
|
M
MadDogMike
Posted
posted
on
Sat, Nov 26, 2011 8:01 AM
I'm very impressed Trav, gonna look too cool! |
|
W
WaikikianMoeKele
Posted
posted
on
Sat, Nov 26, 2011 11:04 AM
Each new view is better than the last! |
|
Z

zerostreet
Posted
posted
on
Sat, Nov 26, 2011 11:25 AM
Beautiful work! |
|
TBBMT

tiki beat by marcus thorn
Posted
posted
on
Sat, Nov 26, 2011 1:48 PM
awesome work |
|
S

swizzle
Posted
posted
on
Sat, Nov 26, 2011 2:58 PM
Can't wait to see this one finished. All the others have been great but this is your best so far. |
|
UT
uncle trav
Posted
posted
on
Sun, Nov 27, 2011 5:25 AM
Thank you very much for the encouragement everyone. The mini Mai Kai has taken allot of hours. Working with the different materials has been a learning experience. Trying to make the model strong while keeping the scale small is a tough nut to crack. I am not even sure what the scale size is as I do all of it be eye. Thanks again for taking a look. |
|
D

danlovestikis
Posted
posted
on
Sun, Nov 27, 2011 8:02 AM
I love watching you work, this is such a different and fun thread, Wendy |
|
U
umeone
Posted
posted
on
Mon, Nov 28, 2011 5:36 AM
uncle trav, this build is one for the ages, absolutely fantastic! :) You know I am going to need a Kahiki, when my outrigger comes in! :lol: You've become a Master! |
|
UT
uncle trav
Posted
posted
on
Mon, Dec 5, 2011 6:23 AM
A bit of an update. I think I finally have the install for the windows on the side wings figured out. The next step is making the framework for the windows and that stuff is very very small. I also did some work on the thatch. And a special thanks to my wife for letting me turn our vintage 1958 Formica kitchen table into a major construction site.
|
|
S

Sophista-tiki
Posted
posted
on
Mon, Dec 5, 2011 7:17 AM
wow, thats all I can muster for a comment pre coffee, But WOW sooOOoo neato and perfect. |
|
UT
uncle trav
Posted
posted
on
Tue, Dec 6, 2011 6:00 AM
Thanks for all of the nice comments. Still have to tweak the vertical framing for the side windows. These pieces are the size of a wooden matchstick and a real pain to work with. Not an exact copy but I think folks will know it's the Mai Kai when they see it. Thanks for looking.
|
|
T
TikiTomD
Posted
posted
on
Tue, Dec 6, 2011 6:53 AM
Trav, exceptional and beautiful! I'm running out of superlatives to describe your work, so pardon the redundancies in praise of it. -Tom |
|
T
tigertail777
Posted
posted
on
Fri, Dec 9, 2011 4:54 PM
I can't believe how tiny these things are. Wonderful work I can't wait to see how it all looks completed. :wink: |
|
UT
uncle trav
Posted
posted
on
Wed, Dec 14, 2011 7:23 PM
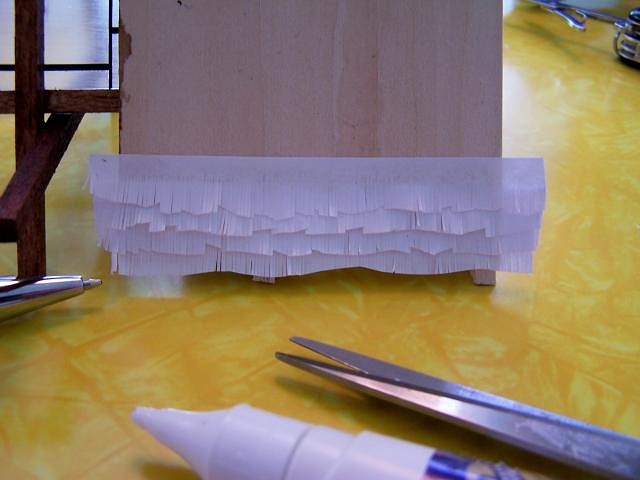
Thank you for all of the kind compliments. Here is a shot from the workbench. A whole lot of thatching going on. It's hard to make out in these photos but each row of thatch has hundreds of tiny cuts to make the detail of the thatch. Thanks again for taking a look.
|
|
B

BigToe
Posted
posted
on
Thu, Dec 15, 2011 3:58 PM
lookin good trav, you crazy sum-bitch!!!! |
|
UT
uncle trav
Posted
posted
on
Thu, Dec 15, 2011 8:11 PM
Crazy is right! This thing is sucking up a ton of time! Two Mai Kai restaurants in this world and one is on my kitchen table. I still have some work to do but I hope folks will recognize this model when they see it. Once again not an exact copy but a blend of my imagination and the real thing. I am going to do a sign for this one if I can figure out how. Thanks for taking a look.
|
|
B

bigbrotiki
Posted
posted
on
Thu, Dec 15, 2011 8:35 PM
Wow, sweet! And now, for the foliage... :wink: |
|
BK
Big Kahuna
Posted
posted
on
Thu, Dec 15, 2011 10:01 PM
Love it! Nice work, my friend. |
|
T
tigertail777
Posted
posted
on
Thu, Dec 15, 2011 11:10 PM
WOW. Incredible. What did you use to do the coloring on the thatching? I really like how it is uneven varying tones...just like the real thing! |
|
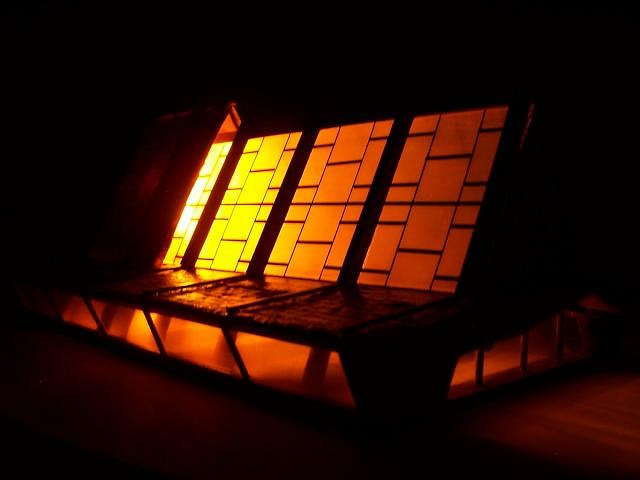
UT
uncle trav
Posted
posted
on
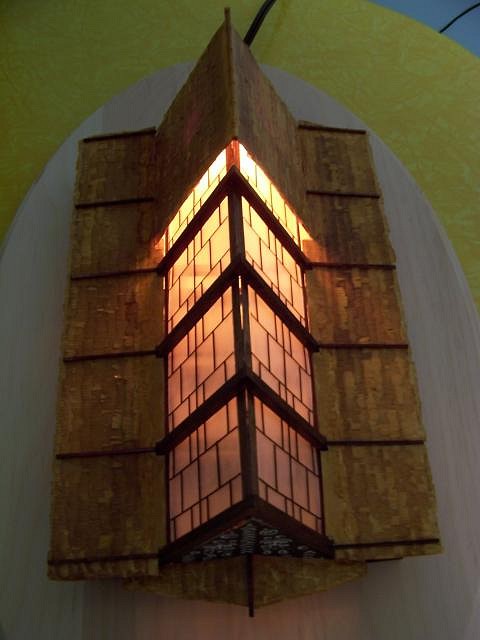
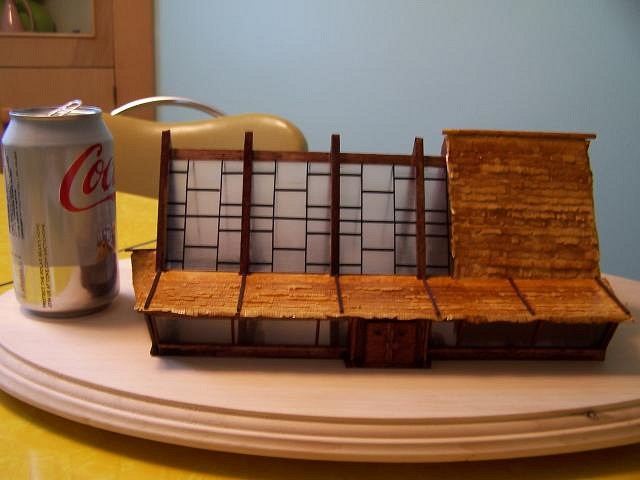
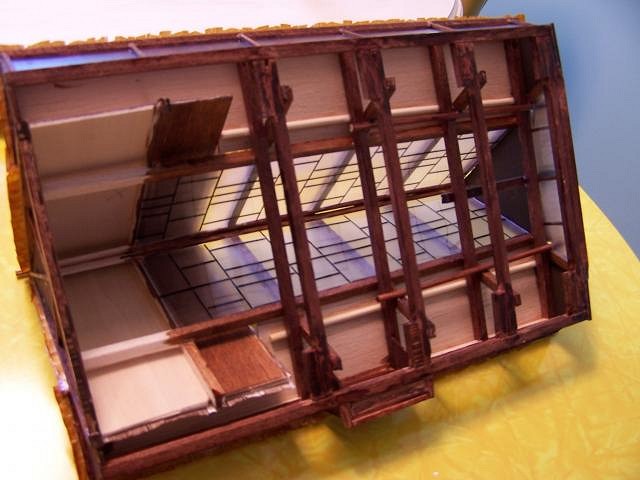
Fri, Dec 16, 2011 7:05 AM
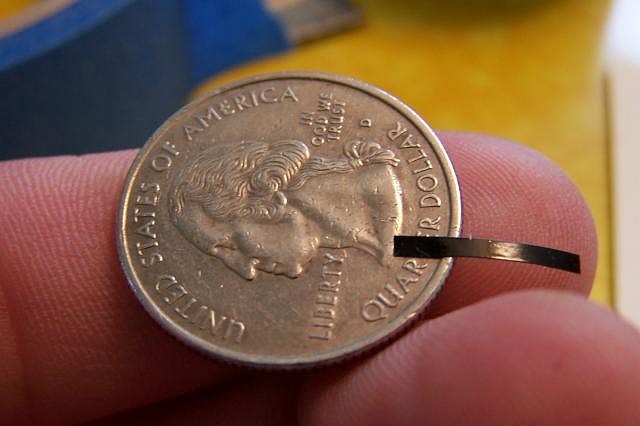
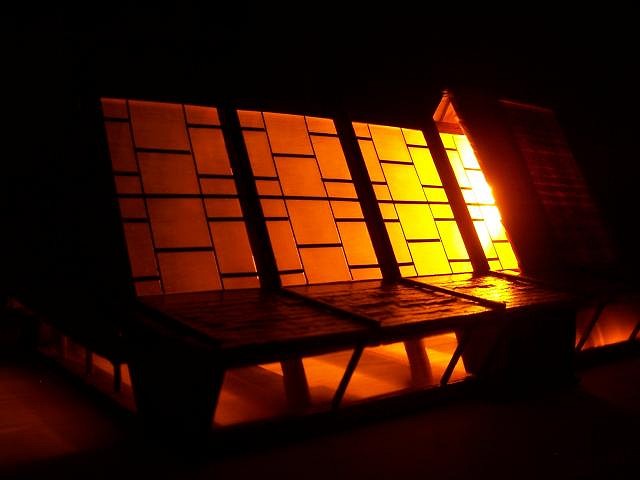
Thanks guys. Haven't even thought about foliage yet. I used amber shellac for the thatch. I think this works best on the paper I used. The amber light is from a small C7 bulb I installed in the base. All hand built and many many hours of work but it has been a fun project. Here is a pop can for scale and a look at the guts.
"Anyone who has ever seen them is thereafter haunted as if by a feverish dream" Karl Woermann [ Edited by: uncle trav 2011-12-16 07:11 ] |
|
B
Beachbumz
Posted
posted
on
Fri, Dec 16, 2011 7:47 PM
Unreal Trav! |
|
UT
uncle trav
Posted
posted
on
Thu, Dec 22, 2011 7:53 AM
No happy hour just yet. I still have to get the sign built but it is coming along. |