Tiki Central / Tiki Carving
Queen K Update Sept. 10th page 16 new bone &pig mug
Pages: 1 2 3 4 5 6 250 replies
|
QK

Queen Kamehameha
Posted
posted
on
Fri, Dec 1, 2006 9:23 PM
updated page 16 [ Edited by: Queen Kamehameha 2009-09-10 11:18 ] |
|
BPB

Bay Park Buzzy
Posted
posted
on
Fri, Dec 1, 2006 11:37 PM
Amy: Good job on those. I like the middle one. Nice detail. Congrats on taking on the challenge of carving rock early on. These are great for rocks you just scavenged. Cannot wait until you get better rocks to wok with. |
|
P

Paipo
Posted
posted
on
Sat, Dec 2, 2006 1:35 AM
These are looking really good for your first efforts Amy, now you just need to slow your speed down and work the same grooves a bit more to clean up your detail and get rid of some of the tool marks. Keep a bit of water flowing, just enough to make a slurry and cool the diamonds. My rule of thumb with stone carving is 10-20% of the time to remove 80-90% of what isn't a tiki, and 80-90% of the time to get rid of that last 10%-20%. |
|
B

benella
Posted
posted
on
Sat, Dec 2, 2006 1:36 AM
Real good & cool job. Ben |
|
QK
Queen Kamehameha
Posted
posted
on
Sat, Dec 2, 2006 12:07 PM
Thanks paipo, I will try that. I was using a little less water on the second one and it is much smoother and finshed looking. I will do what you said above. I had to stop as I needed to get a mask, I was inhaling all that dust and it got bad. I must have missed the part where you, Tama and Ben said "use a mask" :) The third one, was just started. I am still looking for my "style" Thanks again for all the help. Amy Amy |
|
T

Tamapoutini
Posted
posted
on
Sat, Dec 2, 2006 12:55 PM
Well done Amy! Nice to have another stoner in our midst. Judging by the first three originals, Im sure you have a definate syle of your own just waiting to be explored. It always takes a bit of time to find your way, but creativity doesnt seem to be a stumbling block. A couple of 'Rule #1's'... -Wear a dust mask!! Ill be back; just had a truck turn up with a load of firewood. Better go and help unload... Good luck QueenK - the 1st woman of stone! Tama :) |
|
BK

Basement Kahuna
Posted
posted
on
Sat, Dec 2, 2006 2:06 PM
Neat stuff, Amy. |
|
R

RevBambooBen
Posted
posted
on
Sat, Dec 2, 2006 7:36 PM
Amy Rocks! or... is it... Amy's Rock! What ever it is...Rock on! Maybe it's karma. Rock!!! Amy's Rocks Rock! p.s. :) Keep on Rockin!! |
|
S

saxotica
Posted
posted
on
Sat, Dec 2, 2006 9:13 PM
Damn, Amy !!!!!! Super nice work. I like the 3rd one the best. |
|
QK
Queen Kamehameha
Posted
posted
on
Mon, Dec 4, 2006 12:16 AM
Thank you, thank means alot! Thank you too Tama, saxotica, Benella and Buzzy for the nice comments and helpful hints. Bamboo, you make me smile....lol Thanks Dave! I will work on cleaning up the 3 above and see how it all works out. I got a mask...lol so I am ready!Thanks everyone, Amy 1st woman of stone......lol, I like that Tama..... [ Edited by: Queen Kamehameha 2006-12-05 13:48 ] |
|
J

JohnnyP
Posted
posted
on
Mon, Dec 4, 2006 6:42 PM
Sweet art. You are taking to this very well. Queen of the stone. JP |
|
QK
Queen Kamehameha
Posted
posted
on
Wed, Dec 6, 2006 6:09 PM
here is 2 more pictures of the 2 with more smoothing and more finishing. I will continue to work on these. Thanks Paipo and Tama for the finishing hints. They look a lot better in person. My photo skills are just lacking. Amy
|
|
T
Tamapoutini
Posted
posted
on
Wed, Dec 6, 2006 7:11 PM
Hi Amy. Good to see some better shots of those. You have some really nice forms/balance going on in there that I imagine would translate well on a larger scale. To me, this is one way of gauging the 'strength' of a design if ever in doubt... It seems you have a natural eye for these things. Keep 'em coming. I will enjoy seeing your progress & improvement. All encouragement. Tama :) |
|
B
benella
Posted
posted
on
Thu, Dec 7, 2006 12:23 AM
Happy to see some news of your carvings. Ben |
|
B

Benzart
Posted
posted
on
Thu, Dec 7, 2006 7:16 AM
Queenie, I LOVE the detail you are getting on your rocks. It's not fair that you are starting out looking like Aan Acomplished carver so soon! I Love it though. Nice stuff |
|
BK
Basement Kahuna
Posted
posted
on
Thu, Dec 7, 2006 4:55 PM
Very nice work, Amy. You're a natural. |
|
QK
Queen Kamehameha
Posted
posted
on
Fri, Dec 8, 2006 12:40 PM
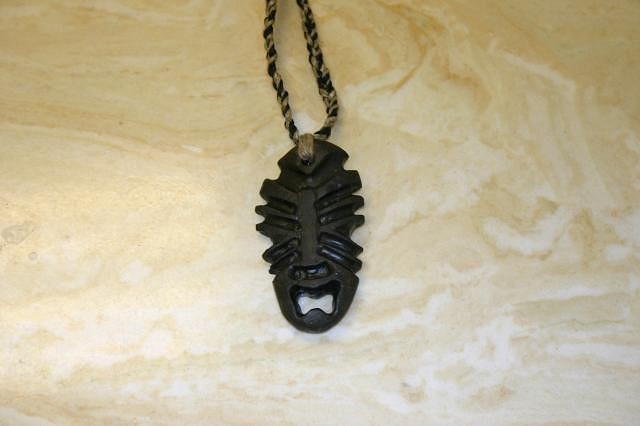
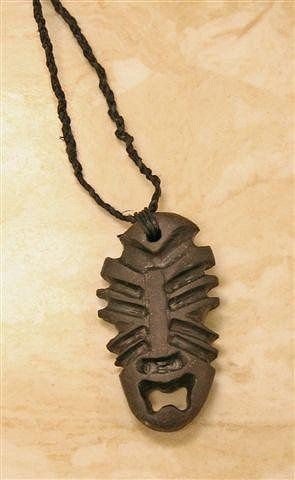
Thanks Benz, I appreciate the feedback. Your Moai is phenomenal! I really find the carving therapeutic and fun. I want to try a more 3D look. I can't seem to do it yet. But will try one this weekend. Thanks Dave, much appreciated :) Here is the end product. I made #3 a pendant. I braided the hemp thread and I think it looks ok for my first one... Thanks everyone for the support and helpful hints too too!
[ Edited by: Queen Kamehameha 2006-12-08 13:30 ] |
|
QK
Queen Kamehameha
Posted
posted
on
Sun, Dec 10, 2006 11:08 PM
hi All, worked on 2 more this weekend, a flat 2d one and a try at 3d. Its a simple moai, but it is a bear to do. I will start cleaning them up in the next day or two and I have more carving on the Moai to finish as well. The rocks are extremely hard. here are the pictures let me know your thoughts, thanks. Amy [ Edited by: Queen Kamehameha 2006-12-10 23:34 ] |
|
B
Benzart
Posted
posted
on
Mon, Dec 11, 2006 10:23 AM
Keep it up Queenie and you will be a Master before we know it!. |
|
G

GROG
Posted
posted
on
Mon, Dec 11, 2006 11:26 AM
Damn Amy!! You are going to town!!! Excellent. |
|
T
Tamapoutini
Posted
posted
on
Tue, Dec 12, 2006 11:19 AM
Good stuff QueenK. Bold cuts! You show strong confidence for a 'newbie'. I have been there for many first time stoners & your no-nonsence approach is very refreshing. None of this light scritchy-scratchy doodling for you; you're carving tikis!! Make way for the Queen! Tama :) |
|
QK
Queen Kamehameha
Posted
posted
on
Wed, Dec 13, 2006 10:09 AM
Thanks Ben, Ernie, Tama. I got a new Flex Cut this week, so it certainly is an improvement over the last dremel. I am practicing a lot with the different bits and such. Tama, Thanks, I really like the deep cutting although hard, it suits my ideas. I seem to also be doing a "cut out" in each piece.I will work on the Moai this week and post some more pictures. I hope I can get good enough to become a member of the "royal order of Tama" The membership is impressive :) thanks all Amy PS....is scritchy-scratchy a technical term??? LOL [ Edited by: Queen Kamehameha 2006-12-13 10:11 ] |
|
P
Paipo
Posted
posted
on
Wed, Dec 13, 2006 11:29 AM
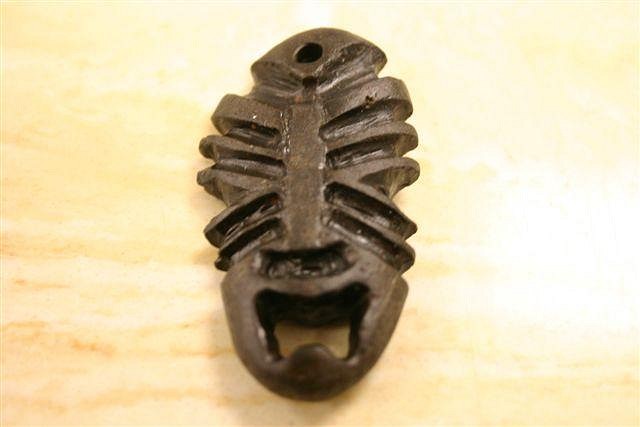
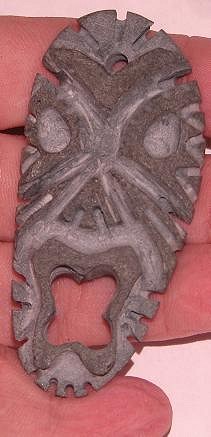
The first new guy is scary...very skeletal! Just be careful with your cutouts to leave plenty around the edges so you're not taking too much out of the stone. v TC Thread v [ Edited by: Paipo 2006-12-13 17:30 ] |
|
S

SCTikiShack
Posted
posted
on
Wed, Dec 13, 2006 12:02 PM
QueenK, Sweet stone carvings. Good work, |
|
S
SCTikiShack
Posted
posted
on
Wed, Dec 13, 2006 12:02 PM
QueenK, Sweet stone carvings. Good work, |
|
C

Clarita
Posted
posted
on
Thu, Dec 14, 2006 11:13 AM
Very nice! Keep posting! Congrats!! |
|
QK
Queen Kamehameha
Posted
posted
on
Fri, Dec 15, 2006 11:40 AM
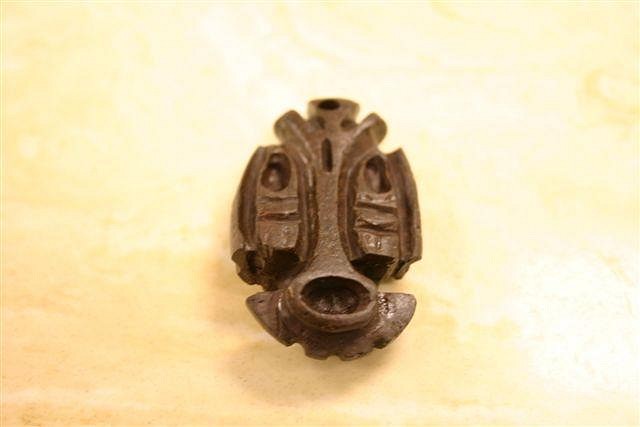
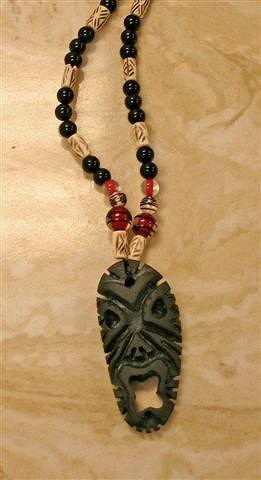
Thanks all, Paipo, your right The skeletal guy was really thin on the sides. He really was a practice piece that when I waxed him turned out better, so I finished it off. I am still learning the tools and now that I got the new Carver, I realize I have to re think preasure and touch as it carves fast and deeper. I do need better bits though and am waiting for some I ordered from Tama. I ruined plenty of cheap ones on the Moai. Still working on it though. Thanks Clarita, much appreciated Here is some finished pictures. I couldn't figure out the braiding , so I did do with a regular braid and I did 2 with beads to see how they would look... After all Im a girl...lol Let me know what you all think.... Amy
[ Edited by: Queen Kamehameha 2006-12-15 14:04 ] |
|
M

mieko
Posted
posted
on
Fri, Dec 15, 2006 3:45 PM
Hey Queen K, I really like how the one with the beads turned out, both the tiki and the beads. I think I like the variegated hemp braid more than the single color. I'm just starting to try to make some of my tiki's into pendants, so I'll probably be looking at stringing them up soon. One thing I was going to try is just lengths of leather cord, which should look nice. You're starting to have quite a collection, do all these guys have homes? :) |
|
B
Benzart
Posted
posted
on
Fri, Dec 15, 2006 3:59 PM
Queenie, I like the Deep detail on both these last ones, you are getting better at finishing them. Keep up the great progresss. |
|
R
RevBambooBen
Posted
posted
on
Fri, Dec 15, 2006 8:08 PM
Aloha Queen K, Rock on! (Just my 2 cents. To me, The Beads take away from your art.) And...if you ever break one, Dibs!! p.s. rock on! ps.s.s unless you made the beads too?
[ Edited by: RevBambooBen 2006-12-15 20:10 ] |
|
QK
Queen Kamehameha
Posted
posted
on
Fri, Dec 15, 2006 11:05 PM
Thanks Boo.... Thanks Mieko, I was having trouble doing the braiding, I need to practice more, but right now work is just consuming all my time. I also had the beads and thought I would give it a try to see how it looked. No, they all have homes with me :) I don't think they are good enough to even give away yet... let me know how yours go, maybe we can compare notes.. Amy |
|
T
Tamapoutini
Posted
posted
on
Sat, Dec 16, 2006 1:36 AM
Traditionally it IS a chick-thing! :lol: By necessity some of us guys do a bit too, heehee. We'll keep an eye on Kaha ki'i-s' thread - He's promised to show us a little binding (& Im sure with a little pressure we can hold him to his word :wink:) Tama |
|
QK
Queen Kamehameha
Posted
posted
on
Fri, Dec 22, 2006 11:47 PM
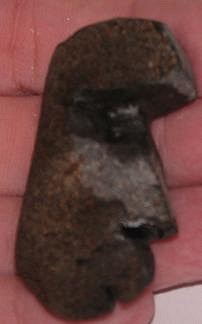
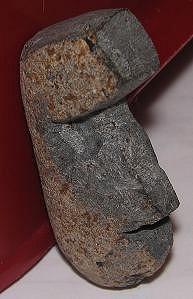
Ok, I have tried something new, and am stuck. The pictures are not that good, sorry. I afraid to continue with the detail. here are the pictures, please let me know what to do, thanks!Ben, Paipo, Tama.....Help!!! Amy
|
|
B
Benzart
Posted
posted
on
Sat, Dec 23, 2006 5:58 AM
Lookin good Queenie. It looks like you have this guy under control. Just keep removing stone to bring out the detail. How large is this piece, he doesn't look too small? Just keep defining the edges of the carving like you are going. I think Tama is on Holiday somewhere far removed from the Internet, so we're on our own unless Paipo is still plugged in? |
|
S
saxotica
Posted
posted
on
Sat, Dec 23, 2006 7:17 AM
The moai turned out awesome! Just keep nibbling away at this one, rounding edges over and making grooves deeper. Great design by the way. |
|
QK
Queen Kamehameha
Posted
posted
on
Sat, Dec 23, 2006 4:47 PM
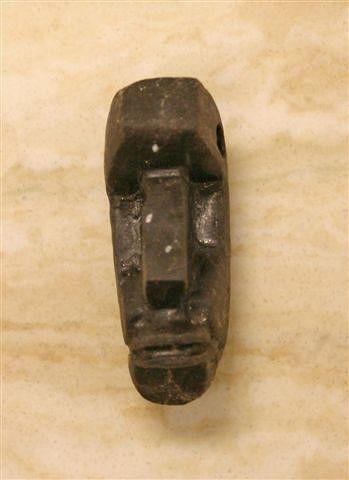
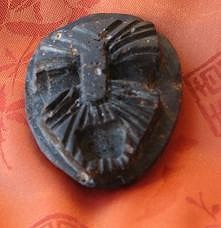
thanks Ben. I seem to be having difficulty with the detail, it seems jagged, not smooth, maybe I am using the wrong tool. The piece is about 3 inches tall. thought I would try something a little moari with the piece of jade I got. I think I am not ready yet. I will do more rocks this weekend to get back my nerve...lol have a great holiday! Amy |
|
QK
Queen Kamehameha
Posted
posted
on
Sat, Dec 23, 2006 4:48 PM
thanks SAx, bought some books and saw this design, and it seemed easier then it is turning out. I am afraid to ruin it. happy holidays! |
|
T
Tamapoutini
Posted
posted
on
Wed, Dec 27, 2006 11:49 PM
Hi QueenK Great start - Dont panic just yet; It looks to me that you could go a bit more depth & I would suggest that you just keep going... Your outer profile looks great/sharp (what tool/s did you use to achieve this?) but to get some real 'shape' going on you're going to have to dive into that 3rd dimension. Try to make your carving movements as smooth as you can rather than in a 'scrubbing' motion which will make those divots all the worse (it can all be remedied however - as you close in on the shaping you will naturally focus deeper and identify/remedy the lumps & bumps...) A stone will often have a speckling of 'inclusions'; often a softer material which pits away faster than the surrounding jade & hence makes it very hard to ever achieve a nice surface. There isnt really any way to avoind this; stone quality is everything in this game. That said, I know the stone you are using very well & it's nice stuff; wont give you that paticular problem. Once youve done your best with wet carving (quite hard to see with all the water & spray, eh?) try the slow/dry technique mentioned earlier(?) and in Paipos early pages. This will help iron out smaller bumps as will the final clean-up with sandpaper and/or diamond cloth (recommended). Be sure to post again before sanding & Ill guide you through that one as best I can. Nice design by the way; do I detect a bit of Gman influence? If it was made from bone Id swear it was from his workshop. Keep it up!! :) Tama [ Edited by: Tamapoutini 2006-12-28 01:30 ] |
|
QK
Queen Kamehameha
Posted
posted
on
Thu, Dec 28, 2006 11:34 AM
On 2006-12-27 23:49, Tamapoutini wrote: Hi QueenK Great start - Dont panic just yet; It looks to me that you could go a bit more depth & I would suggest that you just keep going... Your outer profile looks great/sharp (what tool/s did you use to achieve this?) but to get some real 'shape' going on you're going to have to dive into that 3rd dimension. >>> this is hard . I am using the needle type of burrs. I just can't seem to see it, and this perticular piece of Jade is very "chippy" I have been having issues. I cut the jade using large diamond wheel disks that fit my dremel. I don't have a band saw. so everything I have done is with the dremel hand tools. Even the rocks I will post later were all hand cut using these disks. Try to visualise where you want the deepest lines/cuts/areas to be (as you have started already) & reinstate them; Im not sure how you are achieving those; with a small round/ball burr? or a needle-type? I would suggest the latter; leaning it over & using in a smooth 'dragging' manner... Try to make your carving movements as smooth as you can rather than in a 'scrubbing' motion which will make those divots all the worse (it can all be remedied however - as you close in on the shaping you will naturally focus deeper and identify/remedy the lumps & bumps...) A stone will often have a speckling of 'inclusions'; often a softer material which pits away faster than the surrounding jade & hence makes it very hard to ever achieve a nice surface. There isnt really any way to avoind this; stone quality is everything in this game. That said, I know the stone you are using very well & it's nice stuff; wont give you that paticular problem. Once youve done your best with wet carving (quite hard to see with all the water & spray, eh?) try the slow/dry technique mentioned earlier(?) and in Paipos early pages. This will help iron out smaller bumps as will the final clean-up with sandpaper and/or diamond cloth (recommended). Be sure to post again before sanding & Ill guide you through that one as best I can. Nice design by the way; do I detect a bit of Gman influence? If it was made from bone Id swear it was from his workshop. amy [ Edited by: Queen Kamehameha 2006-12-28 11:38 ] [ Edited by: Queen Kamehameha 2006-12-28 11:40 ] |
|
T
Tamapoutini
Posted
posted
on
Thu, Dec 28, 2006 12:31 PM
**Silly me; I thought it was one of the pieces I sent you... In this case Im not familiar with the stone in question & it may very well be a difficult/chippy piece. If so you may be better to treat it as a learning piece &/or abandon if its really giving grief. You did an amazing job of the profile considering it was achieved with the handpiece cutting discs (I have heard of diamond bandsaws but most hardstone carvers use a diamond tipped 'trimsaw' blade set up similar to a regular wood/sawbench with 1/2 of the blade sticking up out of a 'bed') Try some of the stone I sent for comparison; I would be keen to hear your findings using the same techniques. If all goes well, you will know that it was indeed the eBay stone. Dont be discouraged just yet. Its all experience. Tama :) |
|
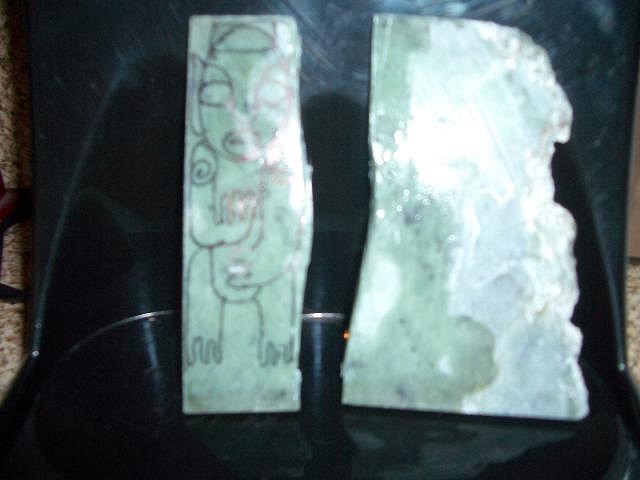
QK
Queen Kamehameha
Posted
posted
on
Thu, Dec 28, 2006 5:51 PM
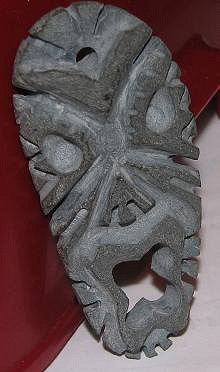
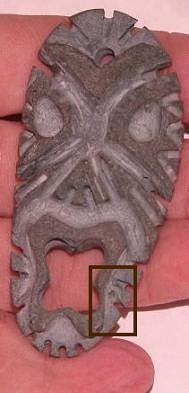
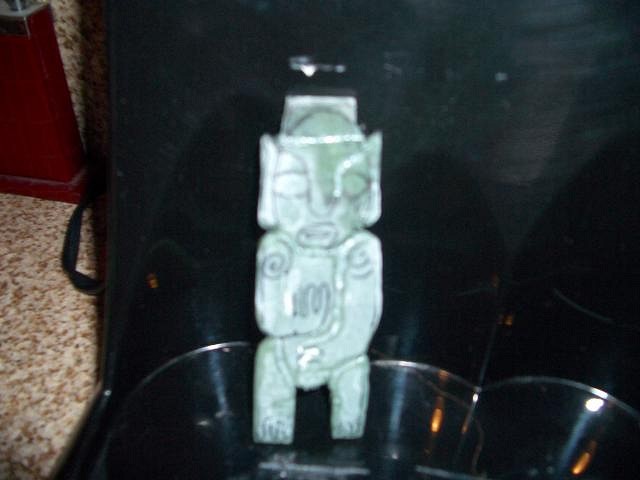
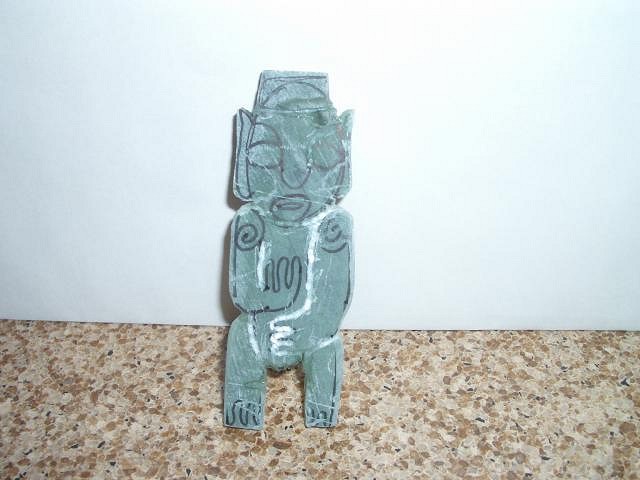
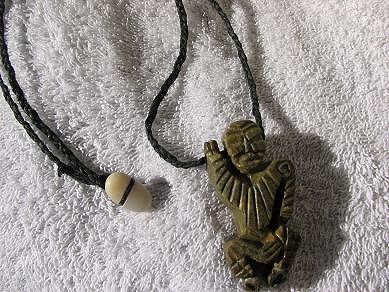
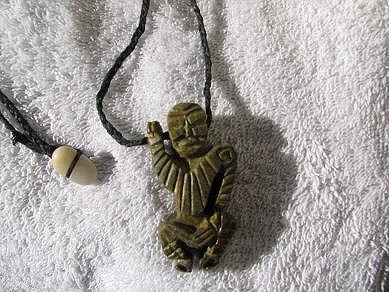
Hi Tama, ok I am totally bummed! That piece just exploded in my hands, I think I went to deep...bummer, well it was definately a learning piece. I am starting on one of yours tonight.I will do something simple first, I think that other piece was too hard for a first time too. I did some more rock, which I am still working on. The figure one I am most proud of, I carved it out of a 4 inch river rock, my hands are killing me, but I love it :) I haven't polished yet, but you can see most of the detail in it's white stage, let me know what you think Amy This was a 4inch river rock, green and yellow in color, The face looks weird, but that was due to the lighting. I still have to go over the lines and sand, but this could be my best piece yet. I also did the hole through the head and hand, like your "swinger" :) This one was a good face design when I realized the more I sanded the more these little holes appeared in the design. It's like the rock had air bubbles in it. I will smooth it out and when it's waxed it actually looks better. I will some new pics tomorrow of it. This was a design I saw on the web and wanted to see if I could do it with a rock. I carved it all the way through |
|
B
Benzart
Posted
posted
on
Thu, Dec 28, 2006 7:07 PM
Queenie, Lookin GOOD. I Love the fact that you don't get down and sulk, You just go to a different rock and make it happen. Excellent outlook. Proven face the More you carve, the more you learn and the Faster you learn. It is Nice to watch this process. Buzy is another artist who is learning so fast by carving so many pieces. You two t=should get some carving sessions going together,.. |
|
M
mieko
Posted
posted
on
Fri, Dec 29, 2006 8:06 AM
WOW Amy! Those are incredible! You seem to crank them out so fast! If your hands are hurting, make sure to take breaks every few minutes and stretch. I'm getting so excited seeing your work that I want to jump in and do it myself. Got too many wood projects lined up right now, but I'd love to setup a lesson someday so you can teach me. :) (I think we're both in So. Cal?) |
|
QK
Queen Kamehameha
Posted
posted
on
Fri, Dec 29, 2006 7:32 PM
Thanks Benz, I am really enjoying it, and I did cry and throw a hissy fit, but I waited to post till I was over it.....lol Mieko, thank you so much for the very nice comments. I would love to do some carving get togethers with other CA residents. I am in LA area. Let me know what your thinking... My hands hurt alot, I think it's the fact that I do the rocks with a dremel and I should probably use better tools. I actually have to go a few days between carving to get them back to normal. On teaching, lol, I am barely adequate, but I can show you what I use and how I started. I also reread through all the TAma, Paipo, Gman, Bk and Benz threads, I continually go back to them, their pendant pieces are all so amazing. Happy New year to all! Amy |
|
P
Paipo
Posted
posted
on
Sat, Dec 30, 2006 12:47 PM
I wanted to respond to this thread a bit sooner, but I've been pretty busy lately. I'm going to be a bit of a stick-in-the-mud here and advise you to be a bit more cautious - I'd hate to see someone have an accident just because they didn't have access to the right gear. Those cutting discs are one of the most dangerous tools in the stone carving arsenal, and aren't really designed for what you're doing (I think pdrake uses them for this too). Make sure when you use them that the shank is pushed as far as possible into the collet while still projecting enough to cut. I often cut a little off the shank (use a grinder for this) so I can push it in even further. Even amongst lapidaries, jade has a reputation for being difficult and without access to the right tools you will struggle to get satisafctory results. I would suggest you try and source some tumbled pebbles so you eliminate the need for sawing and grinding, or using the handpiece for jobs it's not really cut out (!) for. When I first started out that's all I did...carved pebbles, until I made enough to get my grinding wheel and rock saw set up. If you really need access to a saw and grinding gear, find a local lapidary/rockhound club in your area and talk to some of the members. These guys have decades of experience and often have access to some of the best material for carving. One afternoon in someone else's workshop could produce enough preformed pieces to keep you carving for a month or two. Design wise, I would also say be a little more conservative...start slow, make a few simple shapes and forms to get used to the tools and your medium.The adze and patu (club) designs are a good choice to start with. There are also some traditional hook designs that are very robust. A tekoteko is something I would struggle to pull off after 7 odd years of stone carving. Things like hands, surface spirals etc. are technically very challenging even for an experienced carver. I hope this doesn't come off as being too critical, because it's not intended in that spirit. Having seen a couple of breakages, I feel maybe things just need to be slowed down at a little and tackled from a different angle. I haven't posted much in the stone carving threads lately, but I will always answer my PMs. |
|
T
Tamapoutini
Posted
posted
on
Sat, Dec 30, 2006 1:19 PM
Looking good QueenK! *Some wise words from Paipo, though I am also inclined to support the Pioneering Spirit & simply urge care be taken. I see a robustness to your approach that gives me confidence in your vision/ability... The cut-through forms ring a bell for me, Ive made similar things myself. (if you dont know of them already, check out the work of influencial English sculptors Henry Moore &/or Barbara Hepworth, credited as 'inventing' the hole/open space in Modern Sculpture) All encouragement. Tama |
|
QK
Queen Kamehameha
Posted
posted
on
Sat, Dec 30, 2006 11:24 PM
Thanks Paipo, Tama, I really have to learn detail and finishing techniques too. I will practice on those next. I will be unable to do anything for about a week, as it seems I have developed an infection from a few of the dremel misses...LOL Nothing major more of an inconvenience. So I am a bit bandaged, but will be back in no time! The "swinger's Brother" is definitely my best piece, I will finish that up next weekend and post the pictures. I can at least work on the braided part, no chance getting hurt there...lol Thanks All for the constant incouragement.. Amy |
|
QK
Queen Kamehameha
Posted
posted
on
Sat, Jan 13, 2007 2:36 PM
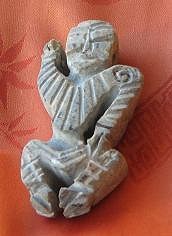
Hi All, I have finally finished one I am proud of. I have been practicing all the techniques you all have posted. My braid came out well on this one too, Keeping it really tight is the key! I will try to do a close up, but the detail is better then the photo.Please look over the pictures and let me know what you think, thanks Amy
|