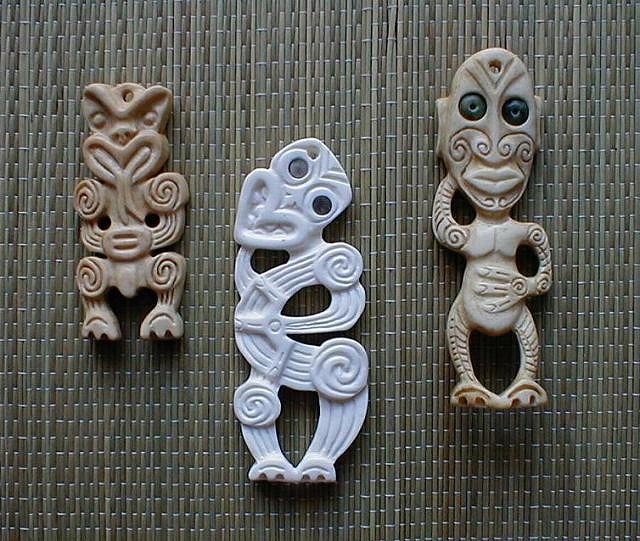
Tiki Central / Tiki Carving
Bone Carving Q+A
|
S

sar1
Posted
posted
on
Fri, Dec 21, 2007 12:58 AM
Thanks, that's just what I was looking for. |
|
G

GMAN
Posted
posted
on
Mon, Sep 22, 2008 5:11 AM
BUMP for the Surfin' man....... |
|
S

surfintiki
Posted
posted
on
Mon, Sep 22, 2008 11:05 AM
Thanks G, I prolly woulda never found it. |
|
H

hodadhank
Posted
posted
on
Mon, Sep 22, 2008 12:12 PM
Mahalos! I was just told by one of my Gurus that my training should imediately include bone and stone! Perfect timing! -Hodaddy |
|
B

Benzart
Posted
posted
on
Tue, Nov 4, 2008 4:17 PM
BUMP |
|
G
GMAN
Posted
posted
on
Sat, May 30, 2009 5:33 PM
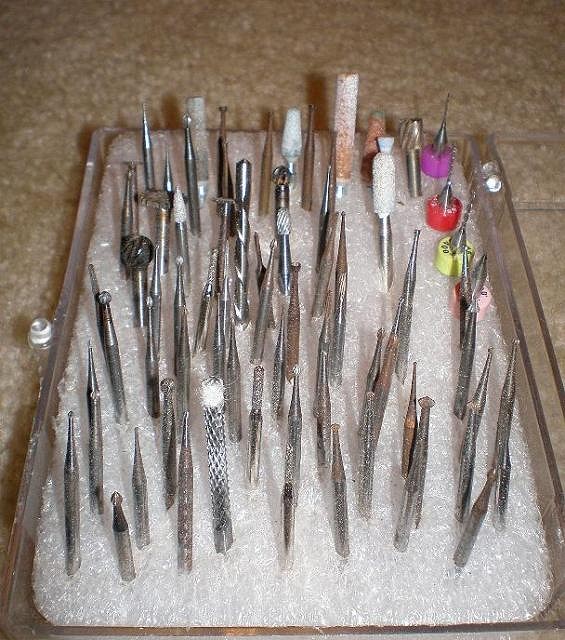
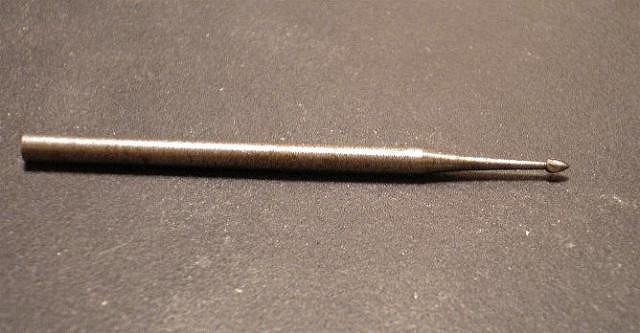
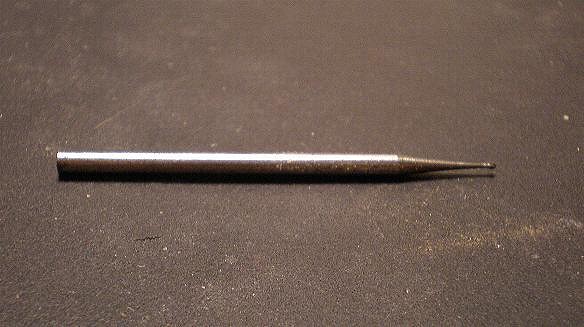
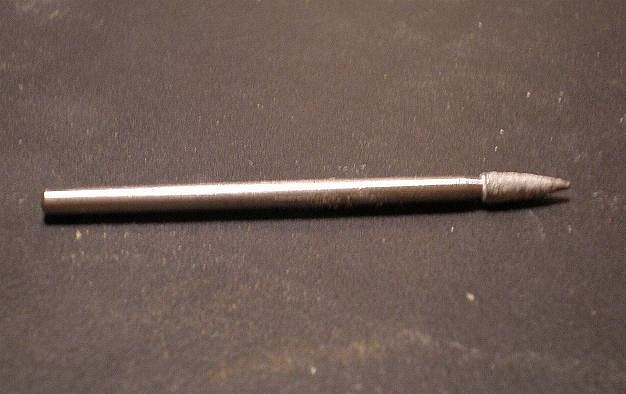
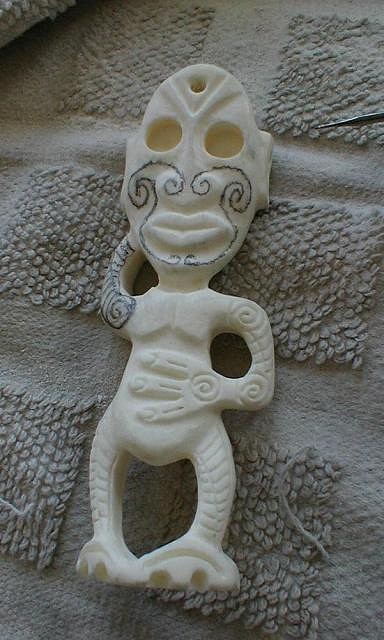
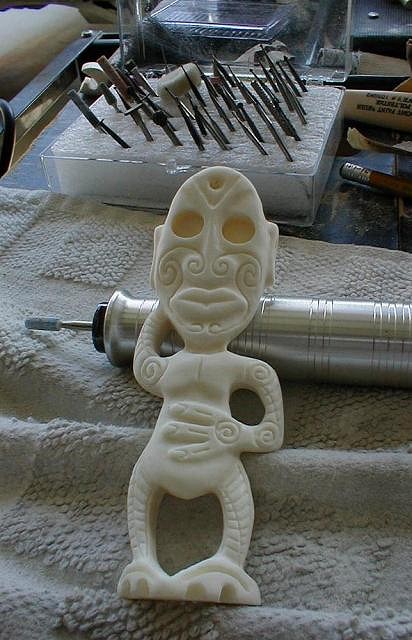
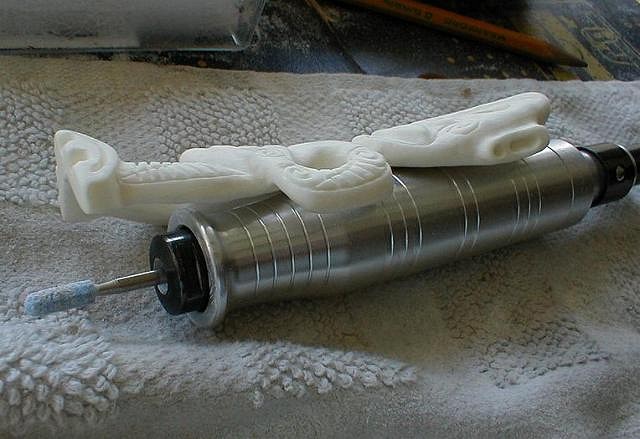
Bump for the new boners. Step by step discussion on page 1 -G [ Edited by: GMAN 2009-05-30 17:36 ] |
|
R

Rainhawk
Posted
posted
on
Sun, May 31, 2009 3:01 AM
Thats heaps different from how i do it :) but thats what i like about watching other do it. I saw one guy and he used nearly the exact same set up as me. Except I use extractors on all my machines so i dont wear a mask or pollute the enviro. I knew then he was unrelated :wink: :D I dont think much of the Myhre book On Techniques and Concepts. Even though i was trained, i still couldnt work out some of the things illistrated in the book. (That and his weaving is Asian) There are better resources, even free on the net. The best book i read though (imo)was by Ropata Davis (i think) but unlike Myhre instead of focusing on the tools, it talks about things related to Maori. The form and quality of the objects and also methods of sale. Its worth a read if you can find/ borrow one. The carved Pare is also good. From what i have seen there are alot of different styles of bone carving in NZ and even overseas. Many of the tools are the same but usually people develope their own ideas/ methods independly. There are specialised tools that have to run in perfect specs to even operate properly. Ie My friends machine runs at 1000 rpm he uses 80 grit paper, my machine runs at 3200 rpm so i have to use a softer paper 100 grit. Even then its twice as fast as his. It runs to fast. Getting all my tools to run at optimim is half the work. |
|
B
Benzart
Posted
posted
on
Mon, Jun 1, 2009 8:54 PM
Rainhawk, it's Amazing seeing all the different methods using different tools and ending up with basically the same end results. Usually people carve with what tools they have available which can be very different from person to person, country to country. |
|
P

pdrake
Posted
posted
on
Mon, Jun 1, 2009 9:17 PM
i learned, through trial and error (lots of errors), that a good staining technique is a teabag soaked in white vinegar. i won't bore you with the chemistry, but vinegar stains calcium. think easter eggs. you can apply it with a brush, q-tip or any small applicator. tape off areas you don't want stained. if it's an indented area paint the edge with elmer's glue to seal that off. it will wash off. |
|
R
Rainhawk
Posted
posted
on
Wed, Jun 3, 2009 8:22 PM
I was told never EVER use tea or coffee stain because it will wash out!?! Do you know how long it holds for? I dont really stain but i usually use a god pigment that will take. I read alot of books but i just liked Treasured Taonga on a personal level. Because it talks about being a struggling artist :) This is the only link i can find : http://bahai-library.com/bafa/d/davisr.htm |
|
T

TikiMango
Posted
posted
on
Thu, Jun 4, 2009 8:08 AM
Thanks for digging this up! Great reading for an addicted Boner like me. |
|
B
Benzart
Posted
posted
on
Thu, Jun 4, 2009 9:37 AM
Yes, Thanks Rainhawk. I found a couple Used copies for sale for $362 so I won't be getting that just yet. Anyone have a copy they would loan out? Looks like a "End All" book |
|
R
Rainhawk
Posted
posted
on
Fri, Jun 5, 2009 4:03 AM
$362 LOL: rolf its not THAT good :lol: |
|
G

Grapa-RuHa
Posted
posted
on
Mon, Jun 15, 2009 7:44 AM
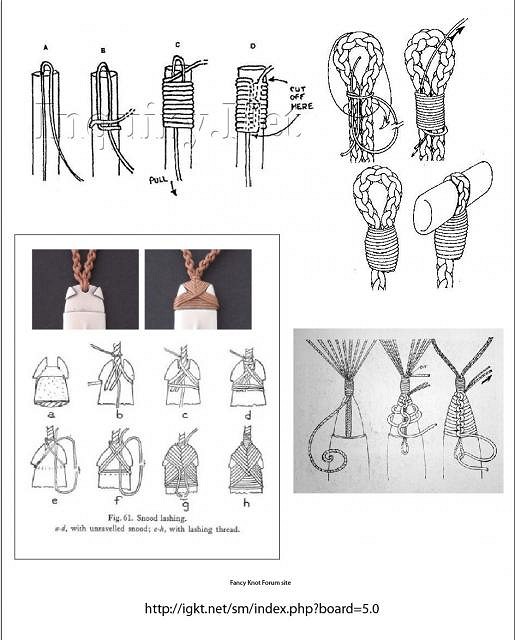
For all boneheads (like me)who don't have a clue on how to lash a cord on their hooks. This page explained a lot to me. |
|
M

MadDogMike
Posted
posted
on
Sat, Jul 18, 2009 2:51 PM
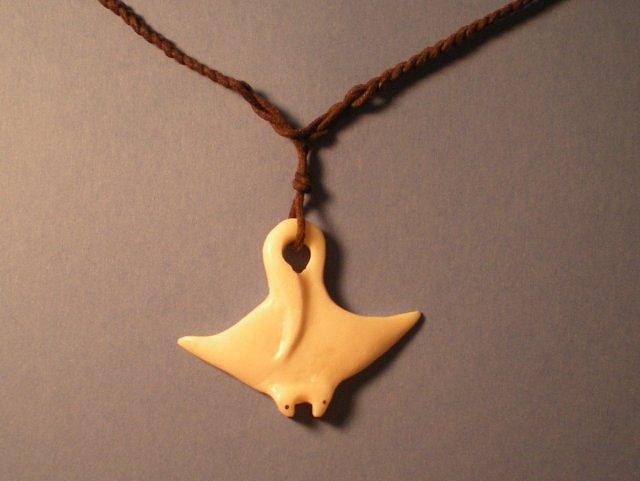
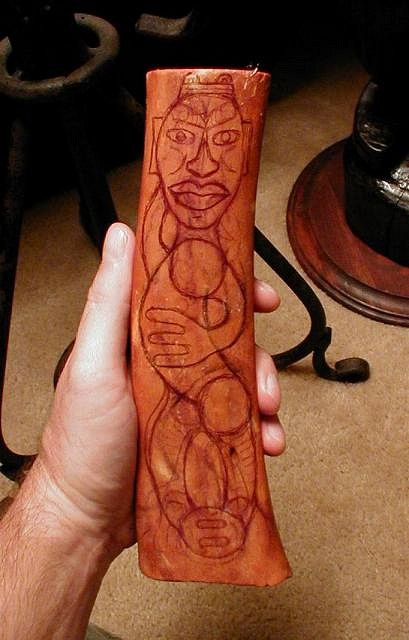
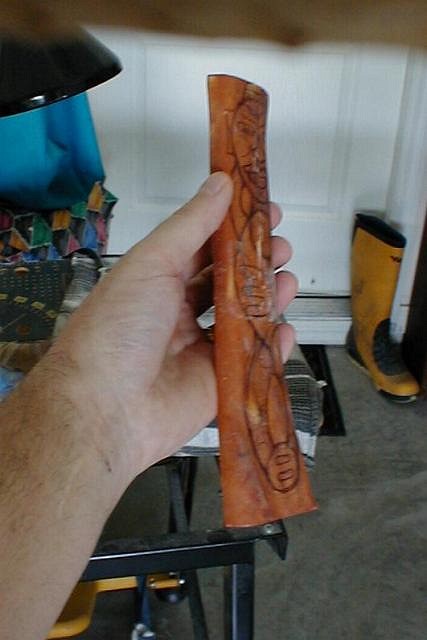
Thanks to all who have contributed to this thread. I started a manta pendant yesterday, did some rough shaping outside with a belt sander. When I took the piece inside, my wife said it was stinkin' up the whole house and she made me put it in a ziplock bag :lol: Bone seems like a cool material- strong, no grain issues, and polishes well. IF this turns out, I'll post a picture here. |
|
M
MadDogMike
Posted
posted
on
Tue, Jul 21, 2009 8:26 PM
So I made a bone manta ray pendant (yes, I know it's not very original) It turned out OK but the tail was off center, it was good practice - I love the way the bone polished up. Since I didn't plan on keeping it I thought I would experiment with a wood burner on it (is that allowed?) I tried to burn a tattoo style pattern on the ray and really jacked it up! :lol: I took some "before woodburner" pix but they didn't turn out, and the "after woodburner" pix are hideous, so no pix for you! :D EDIT - I sanded off all the hideous woodburner markings (except the eyes) and now it's back to OK (not good, just OK)
[ Edited by: MadDogMike 2009-07-22 09:41 ] |
|
M
MadDogMike
Posted
posted
on
Thu, Jul 23, 2009 8:50 PM
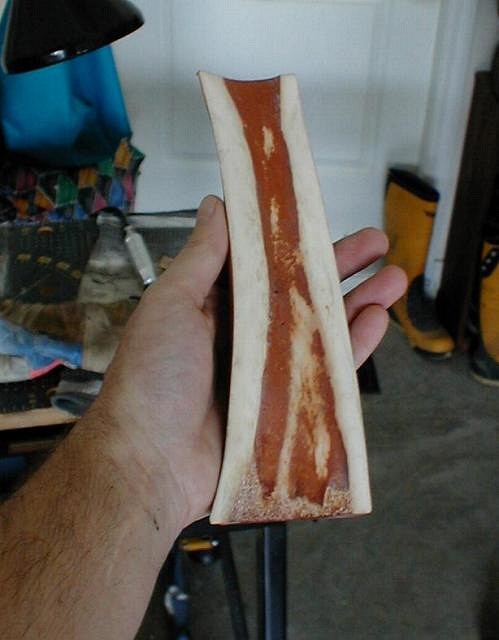
That was fun. My next project will require a bigger piece of bone than I can get from the pretty white Petco bone I bought. If I get one of the "Giant beef bones, how do I clean it and make it purty & white? Can I throw it on the ant pile? :)
|
|
BD

big daddy
Posted
posted
on
Thu, Jul 23, 2009 9:29 PM
get yourself a bone from a butcher and toss it into an ant pile. once it's been picked clean i think you could probly dunk it into a bucket o bleach so it can come out bright and white. at least that's what i would do. bd |
|
L

laojia
Posted
posted
on
Fri, Jul 24, 2009 3:31 AM
Hi MadDogMike! Happy to see you in this thread! Can't wait to see big bone carving! J. |
|
G
GMAN
Posted
posted
on
Fri, Jul 24, 2009 4:39 AM
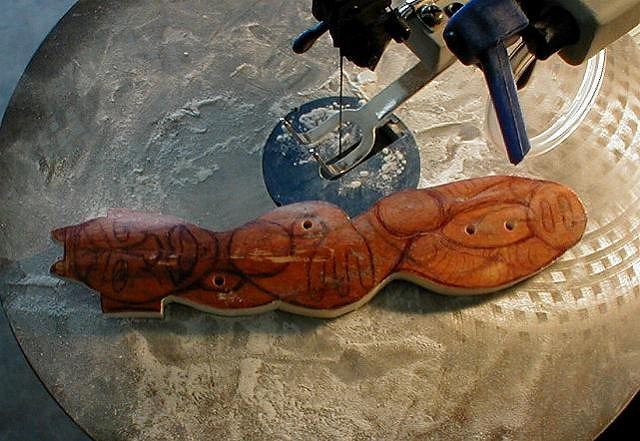
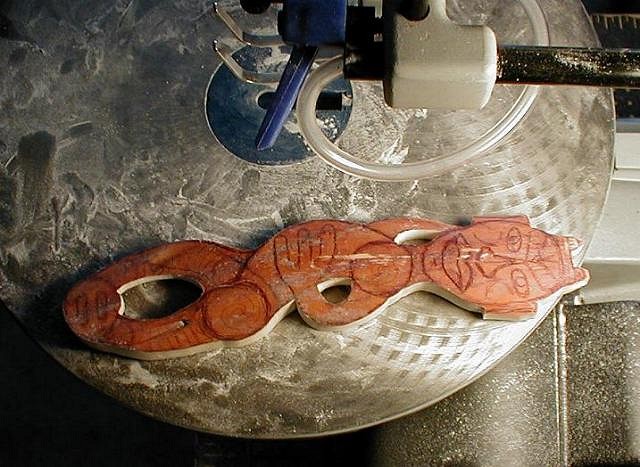
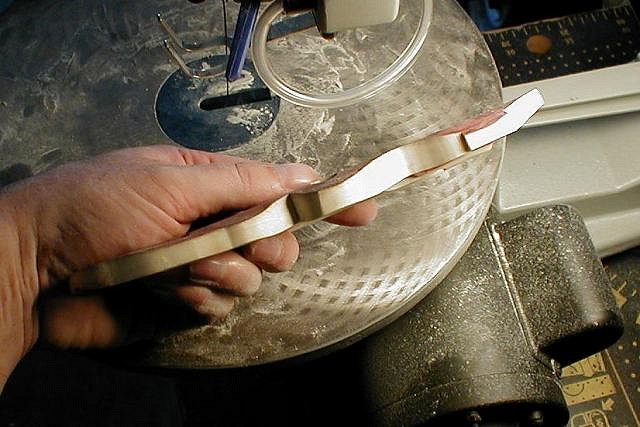
Don't use chlorine bleach! That is a major No-No. You need to clean as much of the meat off as you can with knives, metal brushes etc. Get as much or the marrow out too (push it out with a stick). You can boil it now. After boiling, remove any remaining meat and gack. You should then soak it in a wash of dish detergent (Dawn works well) and water to degrease it. This may take several days and some scrubbing. Once you have washed it completely and removed all of the soap, you should then soak it in 20 volume peroxide. This is not supermarket peroxide....you can get this stuff at a beauty supply store. It generally goes by the name of "developer" (hair bleach). Do not get cream developer! What you want is "clear developer" - it is like 7 bucks a gallon. Put this in a sturdy plastic container and let her soak for at least 48 hours if not longer. Keep the container somewhere cool and dark - heat and light deactivate the peroxide. Move the bone around and scrub it with a plastic vegetable brush to continue cleaning. Once it looks good, take it out and rinse it in water and set it somewhere clean to dry. Now youz ready to carva da bona... -G |
|
T
TikiMango
Posted
posted
on
Fri, Jul 24, 2009 5:14 AM
MadDogMike, nice manta. Most scrimshaw work was scratched/etched into the bone then the lines were filled with India ink or anything dark and permanent. |
|
M
MadDogMike
Posted
posted
on
Fri, Jul 24, 2009 6:02 AM
Thanks very much guys! I love the wealth of knowledge on this board and the willingness to share it :) |
|
B
Benzart
Posted
posted
on
Fri, Jul 24, 2009 8:02 AM
T-Mango, Do you Have the book Treasured Taonga? If so would you mind bringing it down to the jam? |
|
BD
big daddy
Posted
posted
on
Fri, Jul 24, 2009 10:20 AM
mdm, bd |
|
T
TikiMango
Posted
posted
on
Fri, Jul 24, 2009 12:39 PM
Benzart, I WISH I had that book... :( |
|
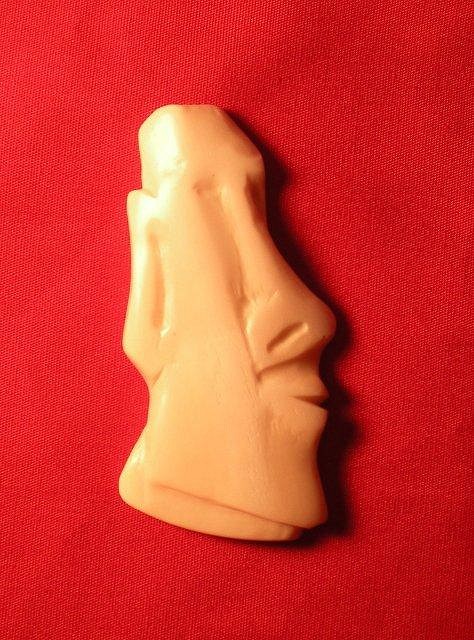
M
MadDogMike
Posted
posted
on
Wed, Jul 29, 2009 5:02 PM
This is fun, but challenging for me. For one thing you can't add material back if you take off too much like you can with clay :D Still needs more polishing but I have a couple more questions; If I don't want to drill a hole in his forehead to hang him as a pendant, what are my other options? Can I epoxy a ring to the back? I would have left a bone loop on the back but didn't have enough thickness. Can I use a cloth wheel & polishing compound/rubbing compound or will that stain the bone? EDIT - I just picked up a deer antler, does it carve just like bone?
[ Edited by: MadDogMike 2009-07-29 20:42 ] |
|
R
Rainhawk
Posted
posted
on
Sat, Aug 22, 2009 10:33 PM
Hey :) But then id concider it ready. If you did it properly, %50 of it would be pure white bone and some of it would be stained. I just dont believe in using any harsh chemicals. Not just for the enviro but because i have seen some chemicals weaken bone. I may be wrong GMAN may have more experence with chemicals. MadDog : Stephen Mhyr's book shows how to laminate steel to bone I only liked that book because it inspired me on a personal level and it is full colour, there are obviously better books for carving instruction. I was lucky to have a peek at a book recently. It was by brian flintoff i think it was Taonga Puoro. I am not sure because i just had a browse. But had insane detail of making traditional instruments by hand. I need to get it [ Edited by: Rainhawk 2009-08-22 22:38 ] |
|
T
TikiMango
Posted
posted
on
Sun, Aug 23, 2009 10:24 AM
When I polish my bones I use white jeweler's rouge. The polishing compound fills all the little pores and makes for a nicer finish. I've also used the red rouge and it provides a nice contrast to show off the pores if that is the look you are going for. To each his own when it comes to da bone. |
|
R
Rainhawk
Posted
posted
on
Wed, Aug 26, 2009 5:47 PM
Yea rouge not rogue :wink: :lol: |
|
P

Paipo
Posted
posted
on
Wed, Aug 26, 2009 6:00 PM
I have it and it's well worth the $35 or so. It's beautifully produced, well researched (although I would have liked more historical examples) and has a CD in the back with recordings of the various instruments. |
|
B
Benzart
Posted
posted
on
Wed, Aug 26, 2009 6:46 PM
Rainhawk, Paipo, the book sounds great and especially if it's only 35$ but you forgot to TELL US THE NAME??? You guys are as bad as me, forgetting major stuff like that. :o :) |
|
T
TikiMango
Posted
posted
on
Thu, Sep 3, 2009 4:26 PM
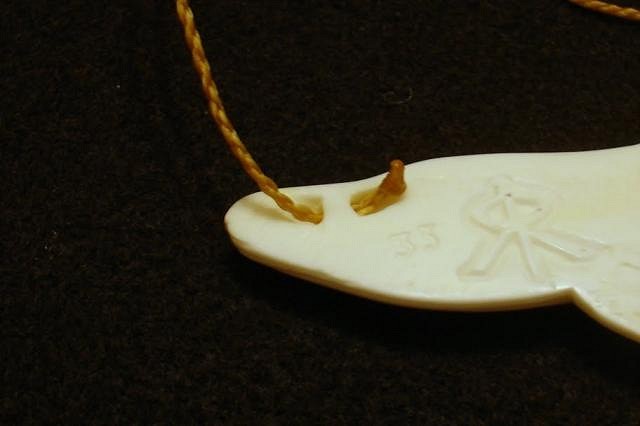
MadDogMike, sorry for the late reply on this, but did you solve your cord attachment problem on your moai carving? Depending on the thickness of your bone, you could do one of the following:
C) Bonded bone loop. I haven't done this yet, but I think it would work just fine. Create a bone loop with a flat base, this would insert into a channel on the back of your piece. Use a gel cyanoacrylate (super glue) to bond the loop to the piece. Just be careful as the bone will bond fairly quickly, so your working time is 1 or 2 seconds. Any excess glue can be tooled away. I hope those suggestions help. |
|
M
MadDogMike
Posted
posted
on
Thu, Sep 3, 2009 6:39 PM
Rainhawk and TikiMango thanks very much for the suggestions, I need to finish that piece. TikiMango, the 4 braid cord is awesome, I may have to try that. Mike |
|
C

coconuttzo
Posted
posted
on
Fri, Mar 5, 2010 10:56 AM
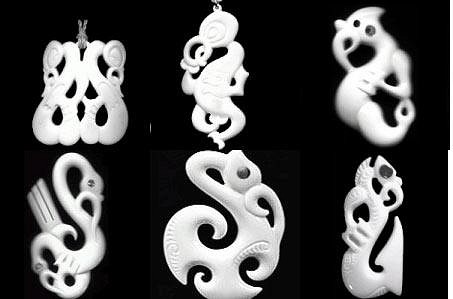
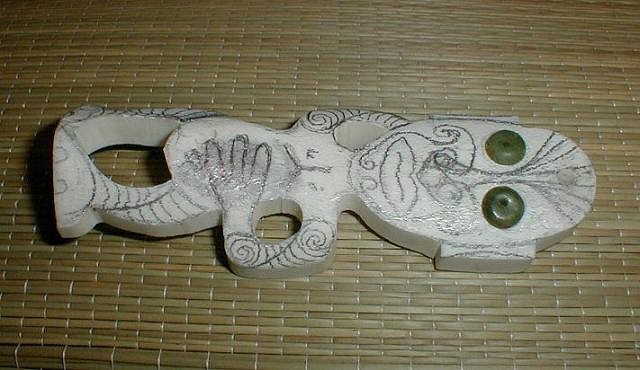
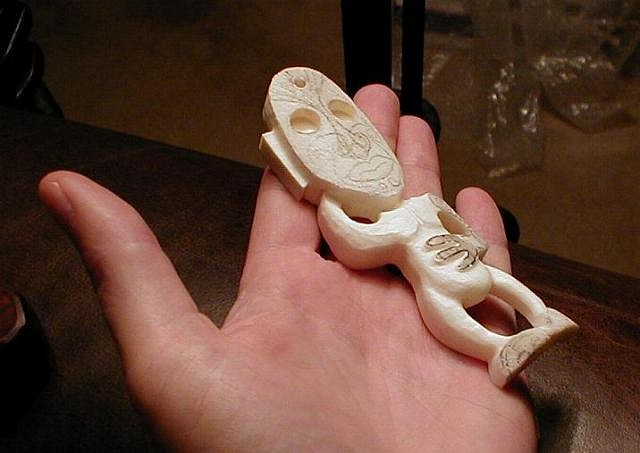
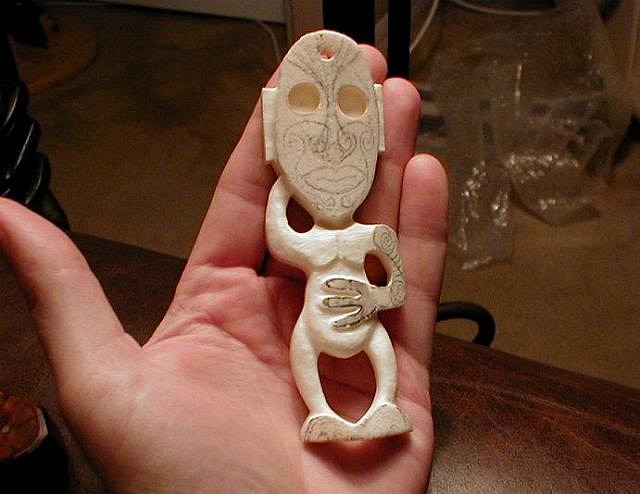
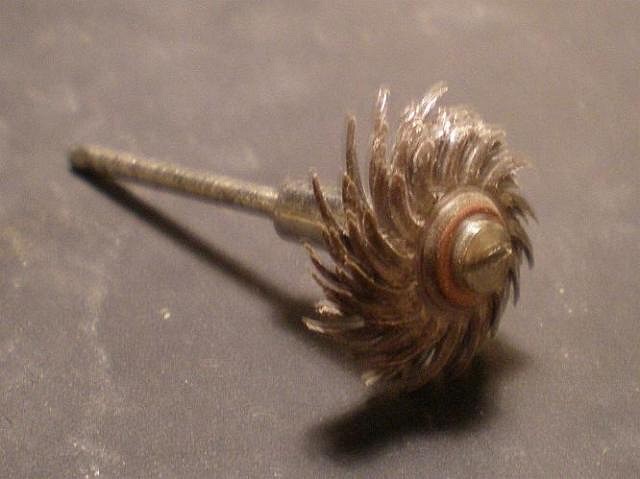
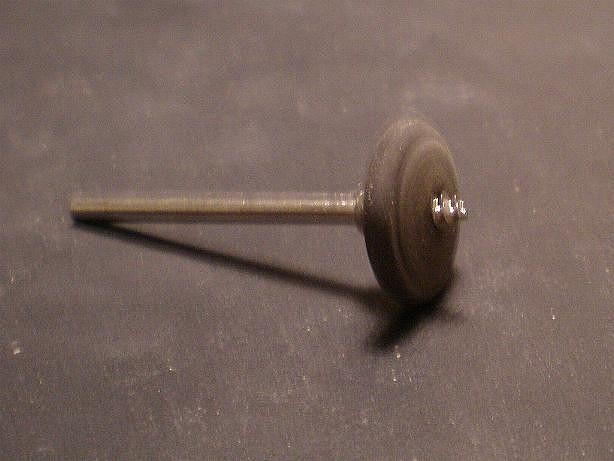
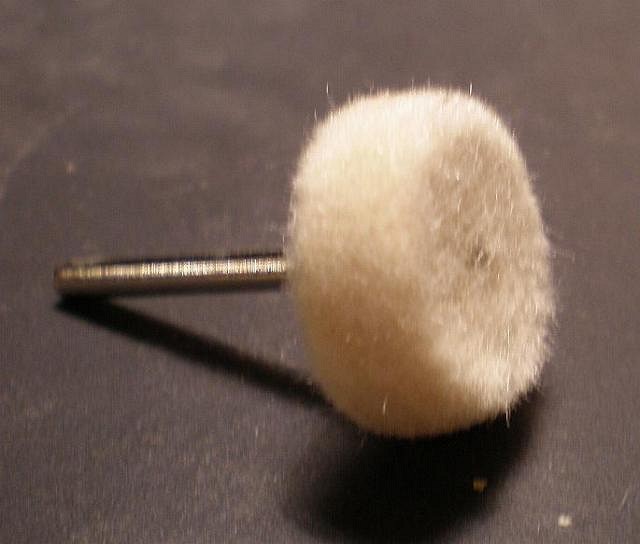
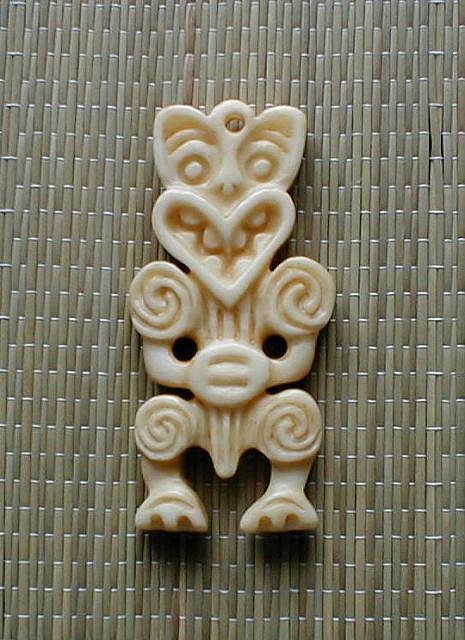
Malo 'e lelei, I was wondering if anybody can give tips to making crisp clean inside sharp angle cuts in bone. Especially in tight holed areas. Like these for example:
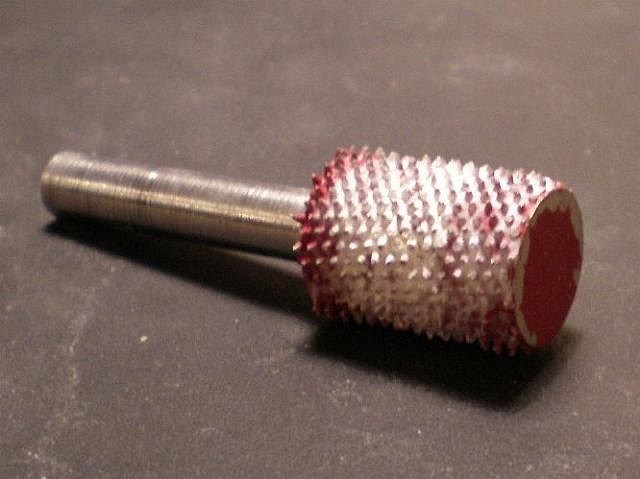
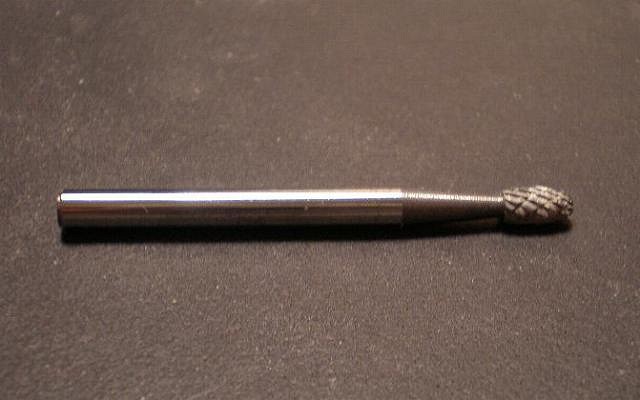
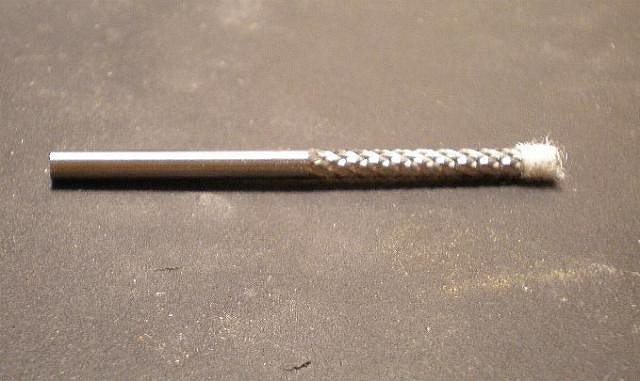
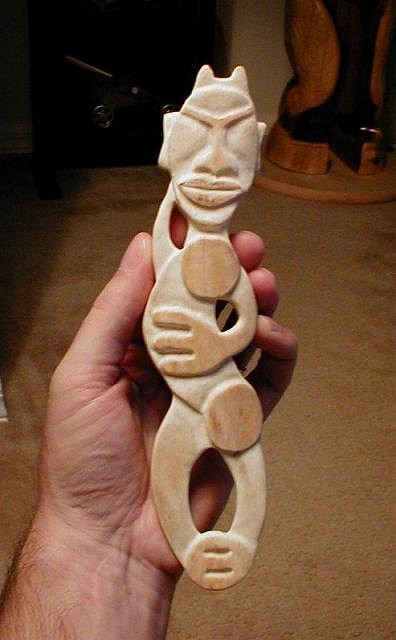
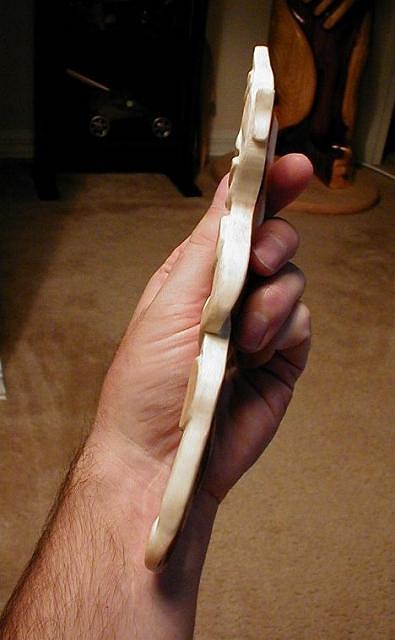
The smallest bur piece I have still does not give the clean angle I want. Somehow it comes out round. I've used a generic coping saw with the assistance of a mini swivel vice, but I have to make the hole large enough to pass one end of saw blade through. |
|
J

JohnnyP
Posted
posted
on
Fri, Mar 5, 2010 1:20 PM
Try a jeweler's saw--a much more precise tool than a coping saw although they look a lot a like. These saws are fairly inexpensive (student grade) and you can order blades you almost need a magnifying glass to see. You can get much crisper holes than a coping saw. Google jewelery supply companies for sources. |
|
C
coconuttzo
Posted
posted
on
Sat, Mar 6, 2010 5:44 PM
Malo 'aupito, JohnnyP for that tip, I'll have to get me one of those. pdrake for that tip on staining the bone in vinegar & tea on basement kahuna's thread. |
|
C
coconuttzo
Posted
posted
on
Mon, Mar 15, 2010 3:35 PM
Any tips on how to make shell inlays, especially the perfectly round shaped ones. What tools are used to create such small inlays? |
|
T
TikiMango
Posted
posted
on
Wed, Mar 17, 2010 4:37 AM
For sharp cut-outs, I use an inverted cone bur and/or a small set of jeweler's files (both regular and diamond). A good tip I got for inlays was to super glue a small piece to a stick so you can rotate it as you grind away the outer diameter. I guess you could also use a dowel rod of the diameter you wanted to use it as a guide as you shaped the inlay. You can also buy inlay in standard diameters already round... but where's the fun in that? |
|
C
coconuttzo
Posted
posted
on
Thu, Mar 18, 2010 11:22 AM
Thanks tikimango, Those tips help. I've been checkin the net & found a site for those already rounded but as I looked at the pics, you're really limited with what they cut for you which are not really quality selections. I did however find shell laminates & veneers that they were selling also. Has anyone ever tried using these and if so how'd it work out to your liking? Are they made from real shell or faux? Here's the site, http://www.mopsupplies.com/paua_shell.html |
|
T
TikiMango
Posted
posted
on
Thu, Mar 18, 2010 7:10 PM
I bought a sheet of veneers and tried to use them when I started playing with the idea, but didn't like them. Very thin, and inconsistent as far as color. Your best bet is to get your hands on some real shells or buy a bag of "chip" shells. Is feels wrong to cut-up a whole shell because they are so great to look at, but its the only way to get really usable pieces for inlay work. Just make sure you always use a cartridge-style respirator when working the real shell. |
|
C
coconuttzo
Posted
posted
on
Wed, Jul 28, 2010 1:41 PM
Aloha Bone Carving Enthusiasts, Someone here PM'd me about how I do my lashing for my fish hooks. I noticed on youtube a couple of guys that drill the hooks at the very tip which I think makes it vulnerable to breaking. Since I couldn't find any more decent sources on the matter, I took the liberty of drawing up a diagram yesterday which I hope is self explanatory. If there are any questions feel free to reply to this post & I can address them for all to read. Here's the link in PDF format. https://acrobat.com/?i=1aGL7aih3WewHP01PyOgkg Steps start from top L-R. A few things to point out, in the first step, I run my loops at least 3x around main cord for strength. It can get difficult but with patience & practice it will eventually work out. Before starting the 2nd, I make sure my loops from the 1st are pretty secure & that the pendant tip(make sure it's has a sharp point) is right under the main cord, practically touching it if you will. All your bindings from here on out should be fairly tight. I usually will wrap this around more than shown. I wrap till the tip is secured & I know that it will not come out through the sides. I usually will stop till about 1-2mm of the tip is wrapped. Step 3, just running figure 8s around in an orderly fashion being careful not to overlap each other. The only ones that I do overlap my figure 8 lashings on are the loops that attaches the pendant to the main cord from step 1. That is to hide it from sight. Step 4, when done, I hold working end in place thru loop while I use a needle nose plier to pull the starting/cut end above the main cord. I pinch the tip of string, wrap it around the needle nose by rolling the plier till it reaches the lashings & pull till the loop on the bottom pulls the running end under all the lashing. DO NOT pull too much, just enough to have the loop at least halfway under the bindings. After all is done I cut off the end I just pulled, as close as I can to the lashings. I then use an X-acto or razor blade to carefully cut the opposite end as close as I dare to, against the bone. Good luck. |
|
CC

Creative Chimp
Posted
posted
on
Wed, Sep 8, 2010 1:25 PM
here is my own little cheat sheet for lashing. just found it on google little bit here and there. had a hard time finding anything online to show different techniques.....thanks coconuttzo for your PDF. thought i would share what little i found. hope this helps somebody out there in tiki land also, a website for peopl that like doing knots.....its a good source http://igkt.net/sm/index.php?board=5.0 a good youtube video: http://www.youtube.com/watch?v=0qCi8yWA8IQ and a link to where i found some of what you see below: http://igkt.net/sm/index.php?topic=1794.0
if its too hard to see just PM me with your email and i can send a PDF to anybody interested..... [ Edited by: Creative Chimp 2010-09-08 13:39 ] |
|
T

tikigodz
Posted
posted
on
Wed, Sep 8, 2010 5:06 PM
Just saved that to my files Thank you sooo much !.Always good to learn a new trade. |
|
B
Benzart
Posted
posted
on
Sun, May 8, 2011 7:47 PM
WOW,,, Been a LONG time since I saw the GMAN do some carving like this. GMAN, I Miss you!
|
|
G
GMAN
Posted
posted
on
Tue, May 10, 2011 4:33 AM
I miss you too Ben. -G |
|
S

skoko
Posted
posted
on
Fri, May 27, 2011 7:14 AM
Hey guys i'm thinking of starting bone carving got my dremel and stuff :) And how do you prepare your bones for carving and make them so white :) |
|
T

Tamapoutini
Posted
posted
on
Sun, May 29, 2011 9:08 PM
Hi Skoko. Its been a while since I did any bone carving but can safely say that any dense bone material is suitable for carving, its really only the crumblier porous material that isnt any good. Beef 'shanks' are the preferred bone simply for the fact that you get a decent thickness slab to work with. Whitening is achieved by boiling with soap or bleach, although I have heard bleach can weaken the bone and is a shunned practice by the true boners. The whitening occurs due to the oils being washed out from the bone. If youre starting with meaty/marrowy bones it can be a smelly job, best done outdoors.. Maybe add a little aftershave to the brew? Best of luck!
|
|
S
skoko
Posted
posted
on
Sun, May 29, 2011 11:29 PM
Thank you very much for the answer.Because here (in Bulgaria) very few people eat beef it's next to impossible to find a bone unless you kill the cow yourself :P.On the other hand you can find tons of pig and sheep bone at the butchers.I'll try whit pig bone for now and tell you how it goes :). 10x |