Tiki Central / Tiki Carving
Bone Carving Q+A
|
TD

Tiki Duddy
Posted
posted
on
Sun, Feb 25, 2007 1:52 PM
Goodday all. i am pretty interested in alot of the bone or stone carvings that alot of you come up with. [ Edited by: Tiki Duddy 2007-03-06 08:21 ] |
|
T

Tamapoutini
Posted
posted
on
Sun, Feb 25, 2007 2:17 PM
Kia ora Duddy. Have you been through the Stone Carving Q&A thread. Not the definative volume on the subjuect but we're getting there. Check it out. Tama :) |
|
P

pdrake
Posted
posted
on
Sun, Feb 25, 2007 2:18 PM
pick up a good sized bone from a pet store. i got a nice beef bone, femer i think, from petsmart. it was bleached and sterilized and only about 6 bucks. it's amazing what can come out of it. get some drum bits from smokey mnt wood carvers and good sanding material. get some grits that go up to 2000 if you can. sanders: http://www.woodcarvers.com/drumsander.htm paper: http://www.woodcarvers.com/swisssand.htm use low speed. i have a foot pedal to control my speed on my flex shaft machine. get a cartridge type respirator. the dust may be bad, don't know for sure, but the smell is pretty rank and these help. get a magnifying headpiece. well, there's my advice. |
|
F

flynny
Posted
posted
on
Sun, Feb 25, 2007 11:12 PM
Excellent advice PD, also look out a book, Bone Carving by Stephen Myre, a great book with some solid advice especially lashing. |
|
P
pdrake
Posted
posted
on
Tue, Feb 27, 2007 6:03 PM
bump |
|
TD
Tiki Duddy
Posted
posted
on
Tue, Feb 27, 2007 6:48 PM
hey you guys thanks. ive seen some peoples work on bone and stone and it looked really cool and different when i first saw it. ever sinse then ive wanted to try it but i really didnt know how or what to do. i tryed it out a while ago i have a small stone piece that i made and posted in one of my other posts. i got a dremel a while ago so that would probably do. |
|
F
flynny
Posted
posted
on
Tue, Feb 27, 2007 11:08 PM
Hi TD |
|
P
pdrake
Posted
posted
on
Tue, Feb 27, 2007 11:30 PM
good, cheap stuff. |
|
TD
Tiki Duddy
Posted
posted
on
Wed, Feb 28, 2007 5:07 PM
hey guys thanks alot. im gonna go check at my local hardware store for some of these tools the next chance i get then ill fill you in. |
|
M

mcsommerreid
Posted
posted
on
Wed, Feb 28, 2007 5:33 PM
Definitely go with a cartridge type respirator, not just a mask type nuisance filter. Bone dust can do a number on the lungs. Abalone shell is also a bit like that (I'm working with abalone currently, myself). It's not so much toxicity, as it is the creation of calcium deposits in the lungs. A N95 cartridge filter with a good seal fixes that right up. |
|
G

GMAN
Posted
posted
on
Sat, Mar 3, 2007 1:35 PM
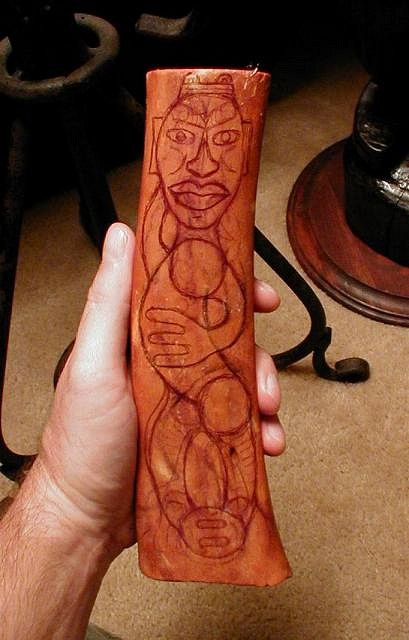
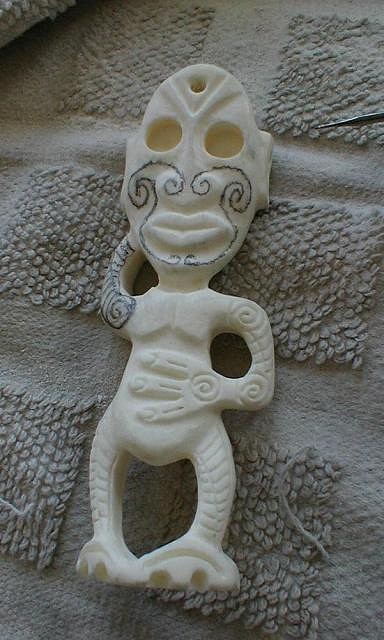
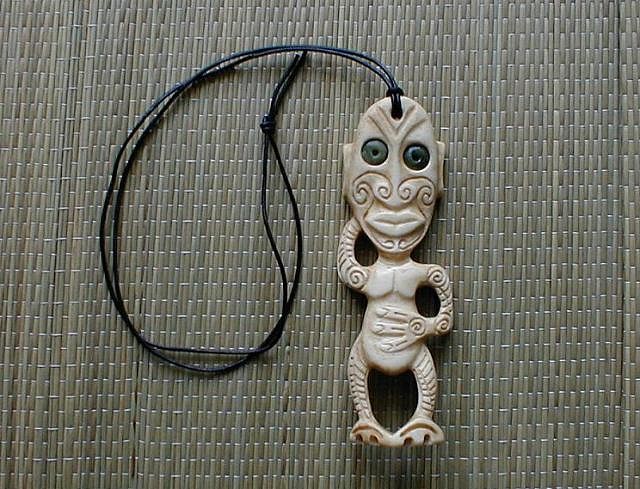
Duddy, Perry asked me to put together a few pics and ideas here to get you going. Here's a try at a medium sized bone "how to" lesson with pics of pieces I made previously. I hope this helps. Here you go... Get a piece of bone from a pet store or a butcher. Most of mine comes from a butcher and I clean it up myself using a wire brush, boiling water, 20 volume peroxide, and elbow grease. Peparing bone could be a whole thread in itself. So, let's start. Now that you have your bone, think about the shape, side angles, and any flaws on the bone. Now work a piece out on paper, or on the bone as I do. If you made your drawing on paper, transfer it to the bone now. It will look something like this...
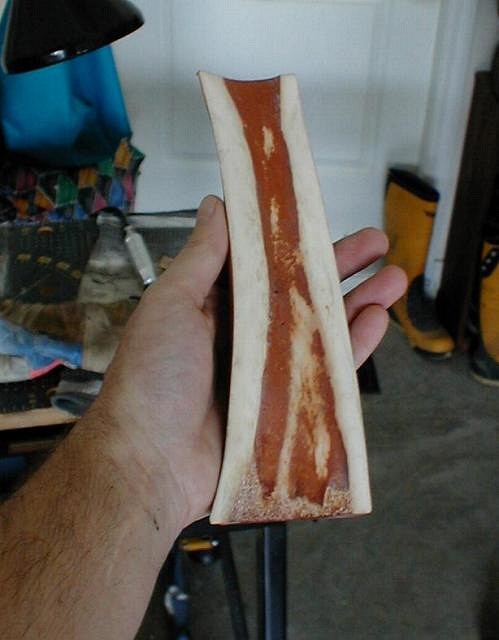
Ok, now you need to split the bone with a saw, leaving 1/2 to 1/3 of it left for your carving. I use a machining clamp and a jigsaw for this, but a band saw would be the tool of choice. Do it like this...
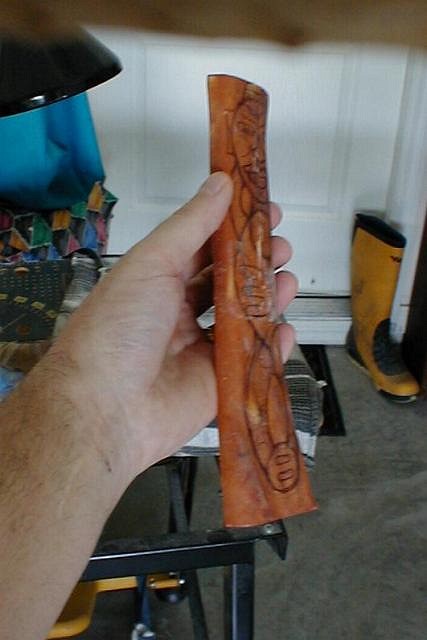
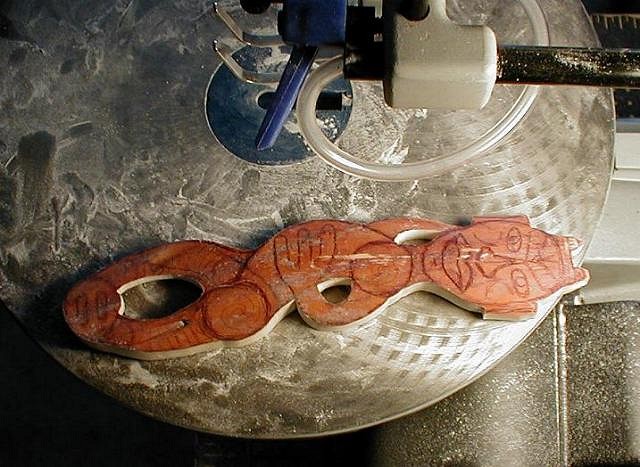
Ok, now we are on our way. Next, you need to rough out the shape according to your drawing. I use a scroll saw to do this....
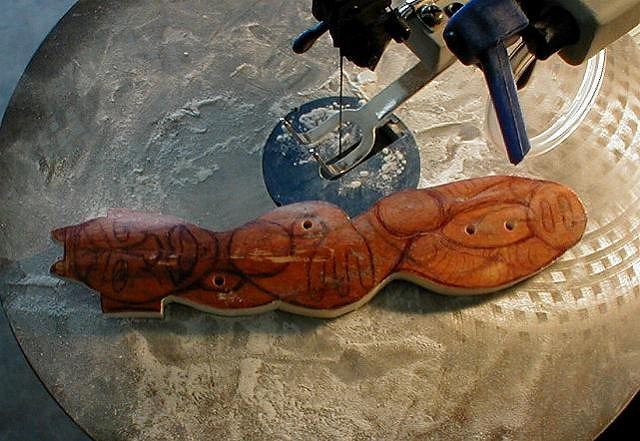
As you can see in the pic above, I have also used a drill press to make small holes in the areas where I need to do open work. Once I rough out the main shape, I use the scroll saw to remove the material inside the open work areas.....
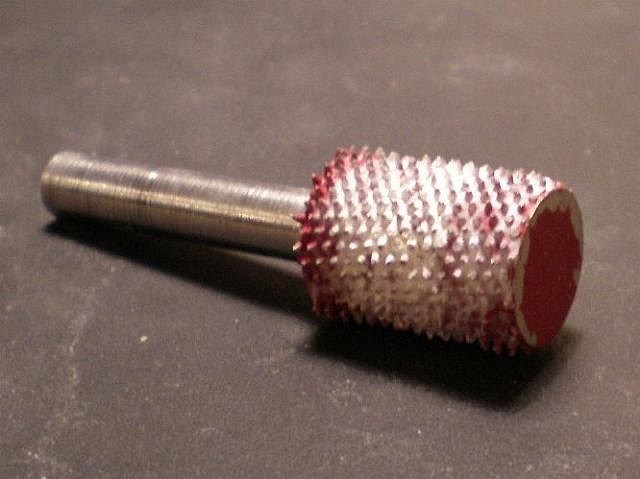
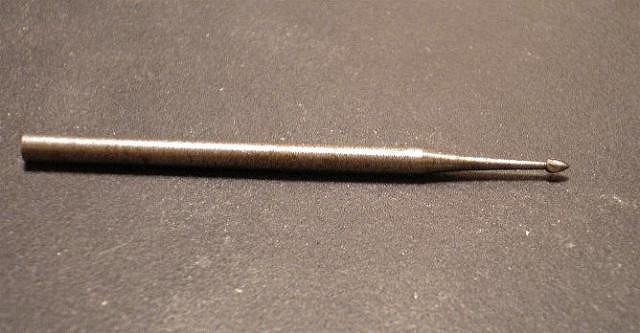
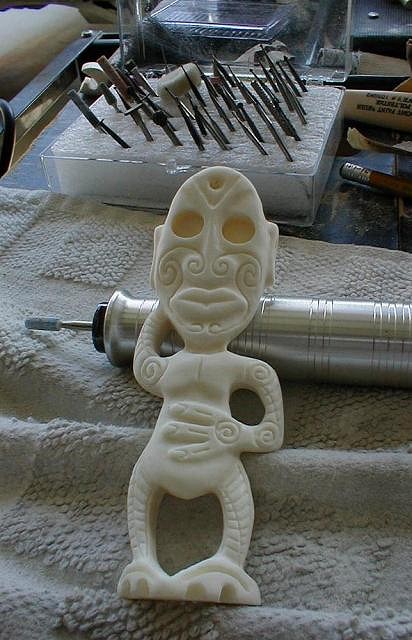
Once you have the bulk of the material removed we can start doing the relief carving. For this I use a Foredom flex shaft unit and a rotating handpiece. If you have a Dremel, this is where you would use it. First I use a Typhoon bit to work on the back edges where the bone is angled and may be very thick. Watch yourself here, these suckers will really bite ya. This removes lots of materal FAST. I do not recommend using this bur for anything on the front side of the piece!
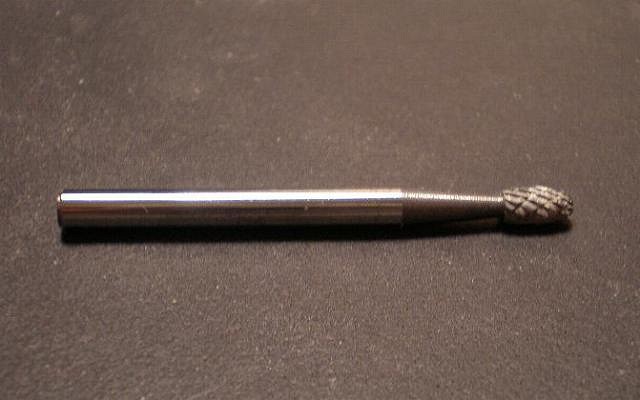
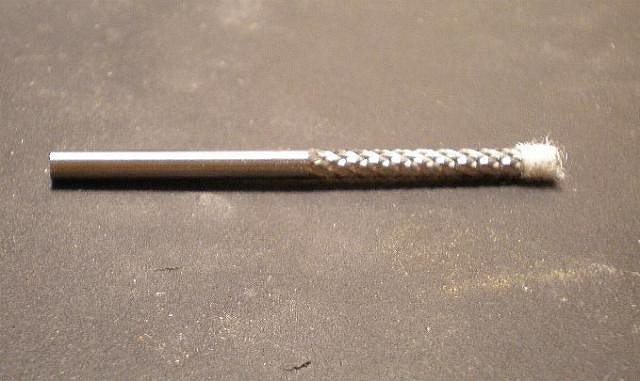
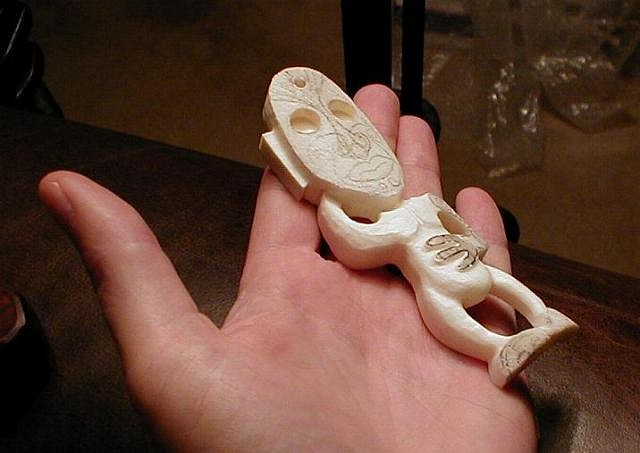
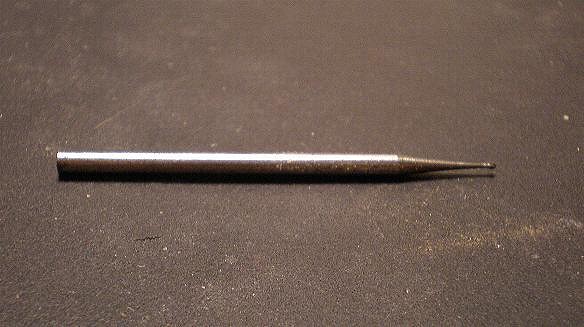
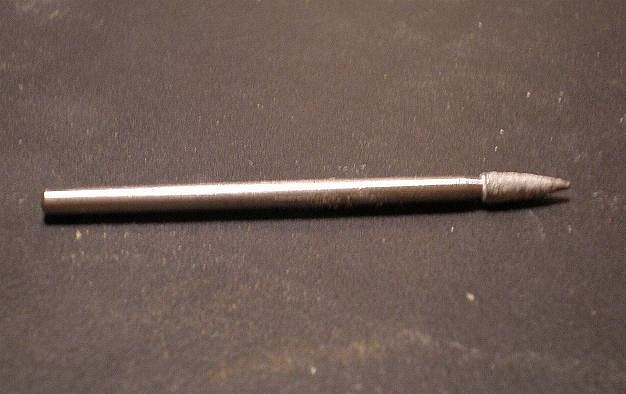
Now I start using different cutters and remove material giving the piece it's basic front relief/side profile. For areas such as legs and arms where large areas need to be reduced, I use the long cutter pictured below. While using this, I lay it flat and draw it toward me (kinda like using a pen knife). I have wrapped cloth around the tip so it doesn't bite me. I use a smaller "pineapple" cutter to work the edges around the faces, arms etc, where I need to use the tip and be precise.
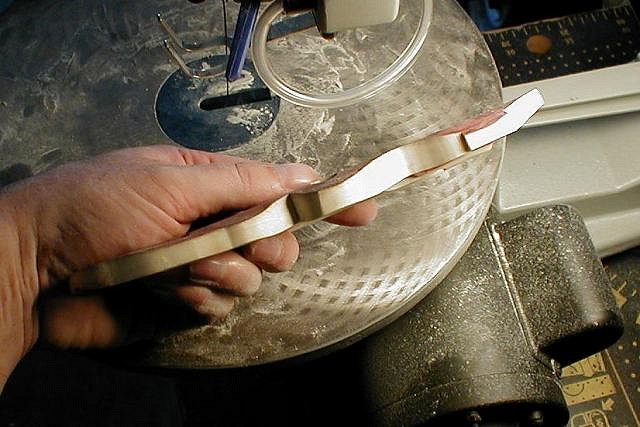
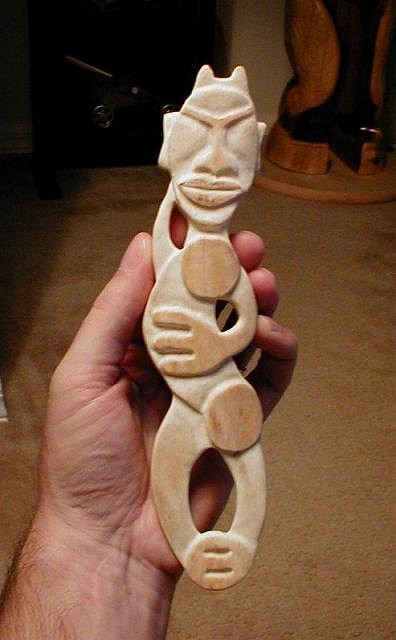
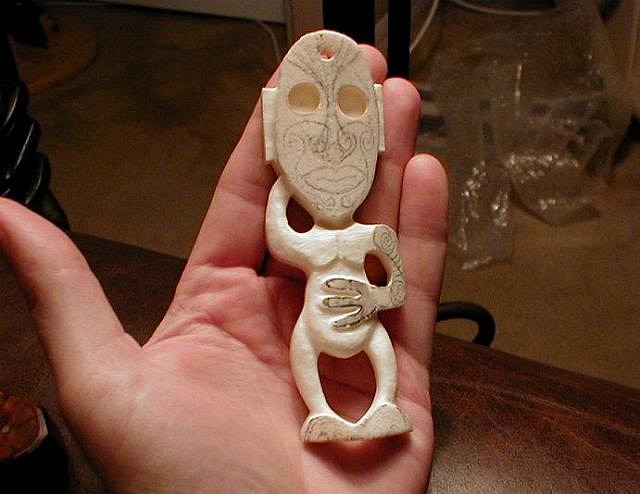
Now I need to switch projects, as my pics ran out :) So here we are at a similar stage in another piece....
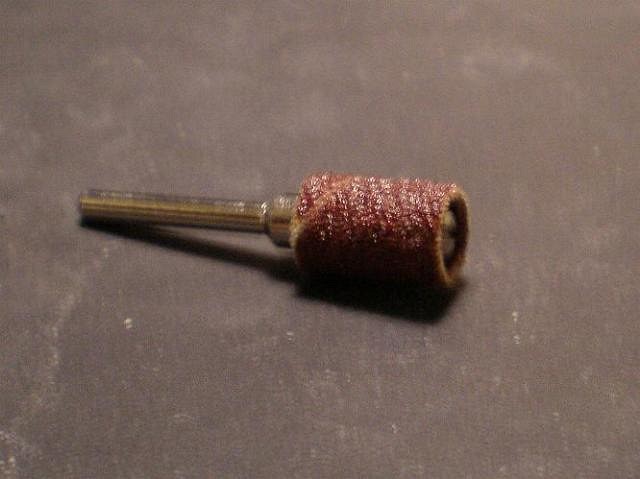
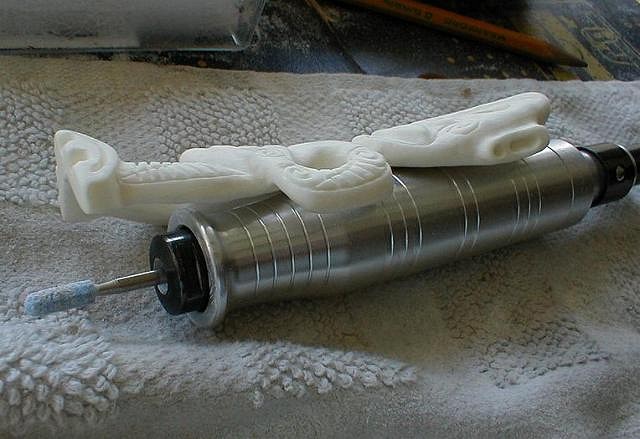
Once we get most of the relief carving done on him, I give him a quick hit with a rough sanding drum and a medium sanding stone.
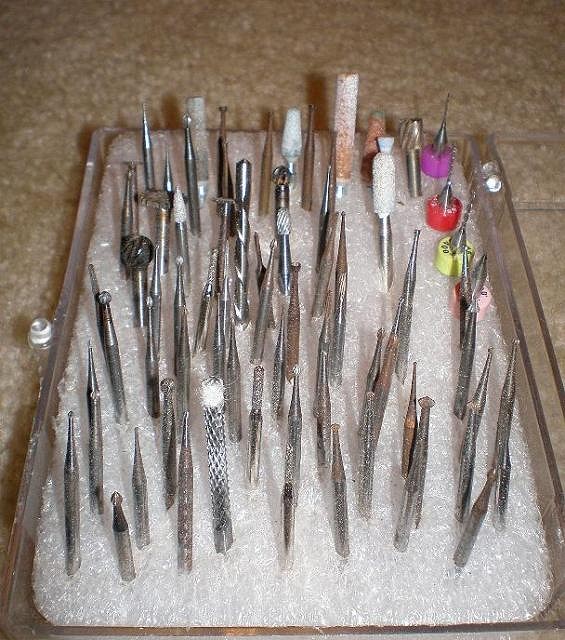
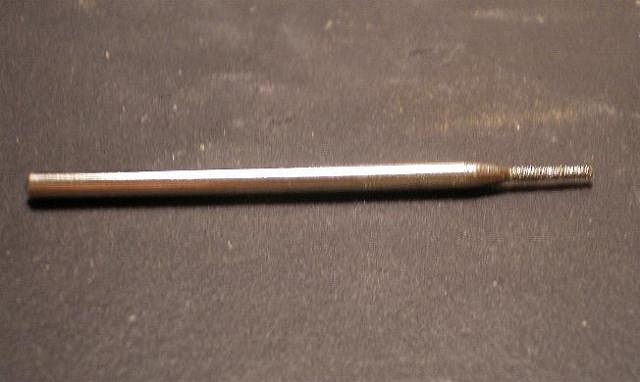
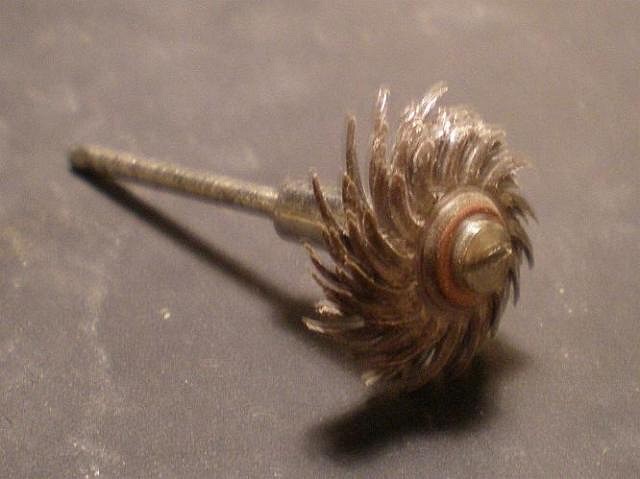
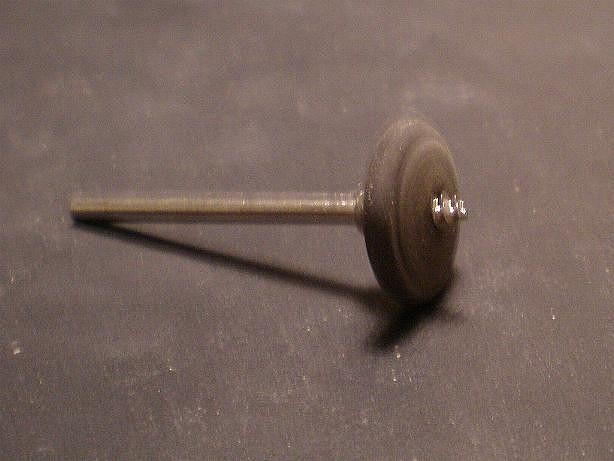
Now we are ready to use a bunch of smaller toolz. I generally use several sizes of bud burs, ball burs, diamond burs, and other cutters. Here you should have a mix of styles and sizes because it will be trial and error to find what works best for you. Here is some of what I use.....
a small bud.... a smaller bud.... Diamind burs in several shapes/sizes are good for cleaning up saw cuts and for working in tight areas....
For nice even detail lines, I like to use bud burs and lay them on their side. By doing this the tool with track straight and not leave a funcky, wiggly, uneven trail like a ball bur.
Once you get all the details in and all the cleanup diamond work completed, it's time to sand. I hand sand using 100, 150, and 220. Then I switch to my rotary handpiece and use impregnated plastic and rubber attachments. These are great for getting down into detailed areas and removing sharp edges.
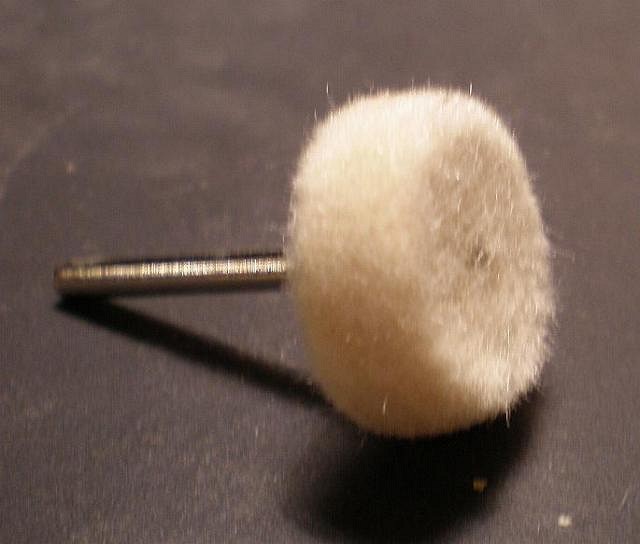
After these, I often sand with 300 on up to 1,000, but very quickly. Next, I use a polishing buff for a quick hit. You can use some super fine polishing compound/powder if you wanna get it any smoother.
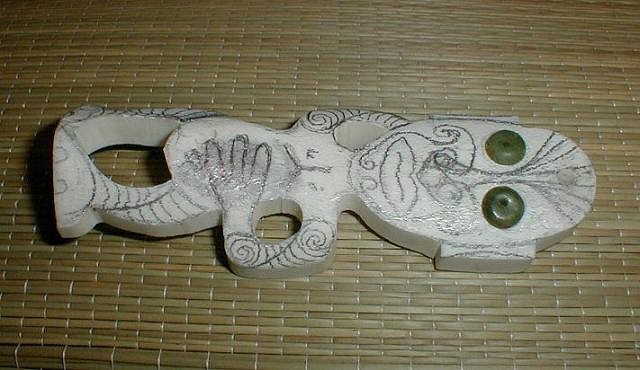
All that is left now is to add some age/color to it if you want to. I like to use a lipton tea bag and some cold water to make a pigmented bath for the bone. The amount of color picked up by the bone depends on the strength of the solution, the degree of polish you put on the bone, and how long you leave it to soak. 12 hours should be sufficient for a real rich color. More highly polished bones will not take color as well. If you have a high polished piece and the tea isn't giving you the color you want, add a little cold coffee. Be sure to check it often as the coffee adds color quick. After coloring, you can give it another hit with the polishing buff to lighten up the high areas which will age it a little more.
well, there you go. I hope this helps. -Gman |
|
TD
Tiki Duddy
Posted
posted
on
Sat, Mar 3, 2007 3:01 PM
GMAN! thanks so much! that is gonna come in handy. i just need to get my hands on a resparator some how. |
|
G
GMAN
Posted
posted
on
Sat, Mar 3, 2007 4:32 PM
You bet Duddy. Good luck, be careful, and PM me if you need any help. -Gman |
|
F
flynny
Posted
posted
on
Sat, Mar 3, 2007 11:22 PM
GMan |
|
P
pdrake
Posted
posted
on
Sat, Mar 3, 2007 11:27 PM
that was one of the most comprehisnive explinations i've ever seen. better than myhre's book. |
|
T
Tamapoutini
Posted
posted
on
Sun, Mar 4, 2007 12:00 AM
Great lesson Gman!! Bone should have a thread of it's own really..? That was some Big ol beast eh? Wow! No excuses now Duddy! :wink: Tama |
|
HOK

HOUSE OF KU
Posted
posted
on
Sun, Mar 4, 2007 2:21 AM
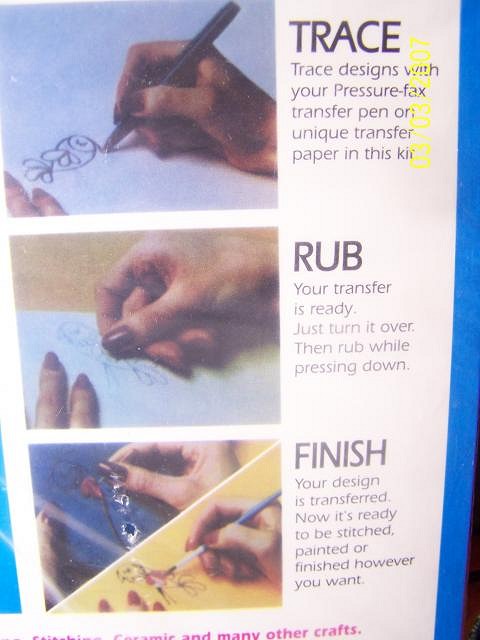
Aloha Duddy! If you want to trace a design to save time and to keep things symmetrical, you could use a product called a transfer pen, made EZ Crafts found at most craft stores [ Edited by: HOUSE OF KU 2007-03-04 02:26 ] |
|
B

Bowana
Posted
posted
on
Sun, Mar 4, 2007 11:17 AM
This is a great thread. I would like to thank everyone who is contributing to it, esp GMAN. |
|
G
GMAN
Posted
posted
on
Tue, Mar 6, 2007 4:46 AM
Hey Duddy, Let's change the title of this thread to match the one Tama made for stone - only for bone here. This way we can use this thread as a resource for bone carving toolz, technques, and work. -G |
|
F
flynny
Posted
posted
on
Tue, Mar 6, 2007 11:35 PM
Back to the top for a great idea Gman |
|
G

gMoney
Posted
posted
on
Wed, Mar 7, 2007 6:04 PM
Hey GmaN, I love your work dude. Thanks for the wonderful explanation as I am very interested in learning to carve done. Let me know if you're gonna be selling any of these beauties! Your an awesome craftsman dude! Keep up the wonderful work!!!!! |
|
M
mcsommerreid
Posted
posted
on
Wed, Mar 7, 2007 7:49 PM
Here's a good respirator to use if you plan on doing a lot of bone or stone grinding. It's a 3M P100 filter with a 6000 series face piece. Reason I recommend this one specifically if I've used it for 6 hours relatively straight welding, and besides the retarded amount of sweat filling it up it was still comfortable. Oddly Amazon doesn't have them in anything but small, but the local welding emporium will likely carry them in small, medium, and large. The charcoal filter isn't really necessary, but considering it acts as a P100 filter and an N95. There's also a organic vapor version which is good if you plan on working with nasty paints and what not. There's also the particulate filter, which will work for really crazy things like oil vapors and other nasties. |
|
QK

Queen Kamehameha
Posted
posted
on
Thu, Mar 8, 2007 4:43 PM
GMAn, That was unbelievable! really was a great help. I also printed it out so it will be easy to refer to. Thanks again so much Amy |
|
G
GMAN
Posted
posted
on
Fri, Mar 9, 2007 4:34 AM
Thanks All, I'll add more to the bone thread when I fishish this Tekoteko and get back to the bone bench. Help me with subjects that you would like discussed? Anything pressing? -Gman |
|
F
flynny
Posted
posted
on
Fri, Mar 9, 2007 10:37 AM
GMan |
|
G
GMAN
Posted
posted
on
Sat, Mar 10, 2007 5:59 AM
Flynny, Have you tried the plastic and rubber tipped sanding jobbies? The rubber fellas come in all sorts of shapes. The bullet shape might work for you? Also, try the plastic circular brushes. They are my favorite and should serve you well over areas of fine detail. On an aside, what tools are you using to do your fine detail? The fine detail should really not need sanding and if it is a groove or v-line, you should use a tool that gives you a clean cut all around. If that is the case then all you need is toi lightly hit the sharp edges. Always try to make your cuts clean so that sanding time is at a minimum. -Gman |
|
T
Tamapoutini
Posted
posted
on
Sat, Mar 10, 2007 10:43 PM
Hi Flynny Its been a long time since Ive done any, buy I did make my start with bone carving. My approach was to trim with an electric 'scroll-saw' & then remove any large areas of external waste with a very heavily diamond coated disc/grinding wheel (dry). I then did the internals & tricky bits with an electric handpiece using tungstan carbide burrs. I then smoothed all the shaping out with ordinary steel files ( I seem to remember experimenting with diamond riffler files but with limited success), & a final crisp-up with handheld gravers before sanding. Hope this is of some help (although I never made any sort of name for my bone carving & am certainly no expert) Tama :) |
|
G
GMAN
Posted
posted
on
Tue, Apr 24, 2007 7:48 PM
Bump for ST |
|
S

Sneakytiki
Posted
posted
on
Wed, Apr 25, 2007 12:31 AM
Thanks GMan, The tips you guys posted should be very useful once I go shopping. I'll apply this to hardwood and see if I can't make a better chair leg. Aloha S [ Edited by: Sneakytiki 2007-04-25 05:28 ] |
|
G
GMAN
Posted
posted
on
Wed, Apr 25, 2007 4:59 AM
:D |
|
T

tikisam
Posted
posted
on
Sat, Jun 2, 2007 10:10 AM
hey has anyone ever tried bone carving by hand? if thats even possible in the first place? :D |
|
T
Tamapoutini
Posted
posted
on
Sat, Jun 2, 2007 2:01 PM
Very possible; mankind whittled bonez for 10s of 1000s of years before Mr Dremel came along... There are many carvers in NZ who predominantly use course steel files for their main shaping tool & then clean & crisp the shape with hand-held 'gravers' (often homemade from old metal-lathe bits, pushed into a small wooden handle. quite small & used in the palm of your hand) The finish is incredibly smooth; I know one carver who does no sanding whatsoever as his finish is spot on after using the gravers (although I think sanding helps to stop the bone getting too dirty/grubby) Hope this helps. T3 :) |
|
T
tikisam
Posted
posted
on
Sun, Jun 3, 2007 4:07 AM
Hello Tamapoutini.. forgive my ignorance.. and thanks for the quick reply.. :) |
|
P
pdrake
Posted
posted
on
Thu, Jun 21, 2007 6:30 PM
anyone have some tips on dying the bone? not the whole piece, but just parts of it. i don't really know where to start. thanks |
|
M

Moondance
Posted
posted
on
Sun, Aug 12, 2007 8:22 PM
I thought about this for myself. I was going to dye the whole piece after all the sanding was done. Then resand the pieces I want lighter, then polish it all. That's just my take on it. ASK GMAN, he'll know!! |
|
M
Moondance
Posted
posted
on
Mon, Aug 13, 2007 9:31 PM
EXCUSE ME GMAN!! COULD YOU INTERVENE HERE, PLEASE! |
|
M
Moondance
Posted
posted
on
Mon, Aug 13, 2007 9:49 PM
|
|
KK

kaha kii
Posted
posted
on
Tue, Aug 14, 2007 1:04 PM
Wow. Ive been gone for too long! Shootz! Now everyone is a bone carver and damn good! As far as burrs and tools, there's only one place I go (and have for years) which is http://www.riogrande.com Im all for cheap tools, but in my experience, the cheaper the tool, the shorter the lifespan and it also affects how well you can carve, especially in miniature tight detail... man... Im so floored by all the pono bone work here on TC. I hope my being a member helped put some fire in the bellies of all you "new" bone carvers!!!! again, floored. Malama Pono! |
|
M
Moondance
Posted
posted
on
Tue, Aug 14, 2007 6:51 PM
kaha ki'i |
|
G
GMAN
Posted
posted
on
Sat, Sep 1, 2007 1:00 PM
bump for the Freak |
|
M
Moondance
Posted
posted
on
Sat, Sep 1, 2007 8:02 PM
GMAN |
|
G
GMAN
Posted
posted
on
Sun, Sep 2, 2007 6:46 AM
Jade beads :) |
|
S

sar1
Posted
posted
on
Sun, Oct 28, 2007 10:12 PM
Hi, my name is Scott Rudy and I just posted my introduction on the General Tiki forum but, I thought I would introduce myself here also as this was the thread that inspired me to join the group. I live in Dayton, Ohio USA and came across this site while looking for information on carving stone. I recently became interested in stone carving and was looking for information and came across Tiki Central and the Bone Carving Q&A thread. I have found a lot of sites on wood carving but nothing like I found on Tiki Central. I don't know anything about Tiki but, have been totally inspired by all of the carving artists I have found here, I now want to learn how to work with bone as well as stone. I would like to learn the wood carving side as well but I'm limited on material resources. I like being able to go out and find my own rocks and stones to carve and my preference of stone is Basalt as I like the high black luster of the stone after polishing. I have read all of the carving posts and threads and I think everybody's work is the greatest. But, then I think anything that has been transformed into a piece of art from something natural is wonderful. One site I found inspiring was http://boneart.co.nz/index.html. My tools so far complies of a Dremel 400 with flex shaft and the 50pc. 100 mesh large diamond point set from harbor freight, I paid $13.99 or http://lopacki.com/burrsets/50l.jpg plus the harbor freight 1/8" 20pc. diamond point set. http://www.harborfreight.com/cpi/ctaf/Displayitem.taf?itemnumber=40547. I'm a cheap when it comes to starting new things. I do have a few carbide bits for working with bone but not all of the ones that I want yet. Why do you always thing of things to make that you don't have the tools for? Jumping the gun! You all are the greatest, friendly, not afraid to share ideas and show your works, I love it. As soon as I can come up with something I will be here with you all. Thanks |
|
G
GMAN
Posted
posted
on
Mon, Oct 29, 2007 5:11 AM
Welcome Scott! Glad to have you here. Feel free to give me a shout if you wanna chat. -G |
|
S
sar1
Posted
posted
on
Sun, Nov 4, 2007 11:23 AM
I have been looking for the suggested book "Bone Carving" by Stephen Myhre. The book is not easy to find in the states and I have found prices ranging from just over $40USD to around a $100USD including shipping. Now my question to those of you that have seen the book, is it worth the price? I have read some reviews good and bad but, the bad reviews are the ones that make me wonder if the book is worth $40. Quote from Amazon review. Clearly not what I had in mind to learn about techniques. If you are interested in some pictures of finished carvings, you might like it - otherwise skip it. |
|
S
sar1
Posted
posted
on
Sat, Nov 10, 2007 3:37 PM
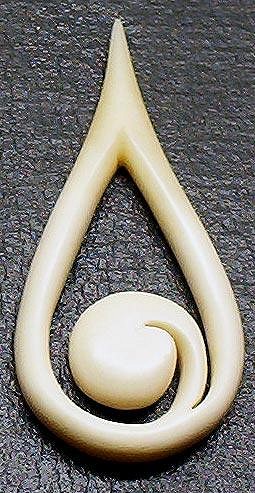
Ok, here's my first bone carving and what I thought was going to be a simple Koru pendent. I created the design on paper and since I'm not very good at drawing by hand I used Adobe Illustrator to make a cleaner drawing. I printed out the design and tack glued it to a small piece of bone. I used a scroll saw to rough out the inner and outer shape and found it has been a long time since I have used a scroll saw. For clean up and final shaping I used a Dremel flex tool and experimented with carbide and diamond points ball, cylinder, and fine tipped cones. I was having a hard time getting a good round shape and I was also having trouble with cutting the curves. The solution was I went out and purchased a jewelers saw and extra fine thin blades and a small swivel vise, very good investment as it made things a lot easier. It's not as good as I would like but, hey it's my first time carving anything.
[ Edited by: sar1 2007-11-11 14:23 ] |
|
S
sar1
Posted
posted
on
Sun, Dec 9, 2007 5:01 PM
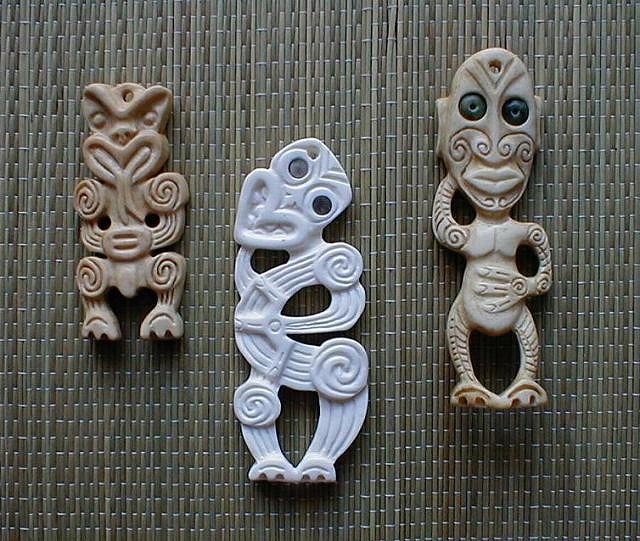
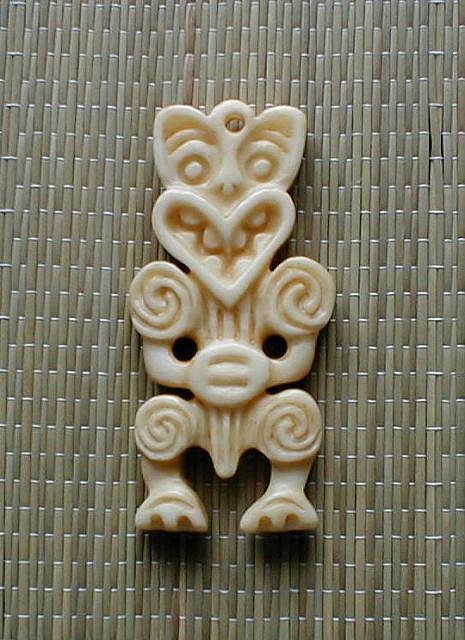
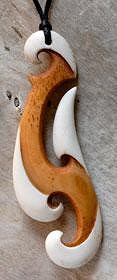
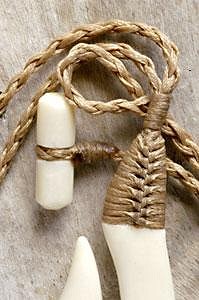
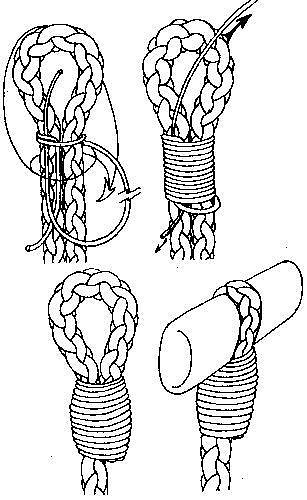
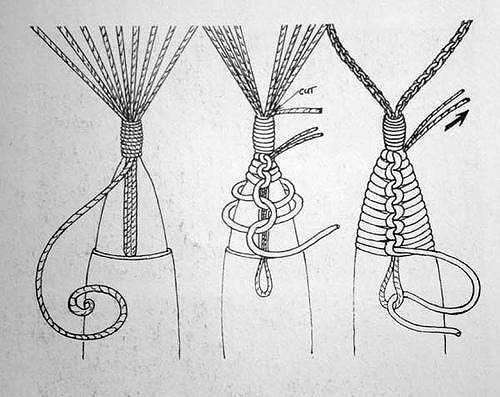
I was interested if anyone could shed some light on staining bone and/or tying a knotted ridge like found on the pieces pictured. [ Edited by: sar1 2007-12-09 17:04 ] |
|
B

BlueSage
Posted
posted
on
Thu, Dec 20, 2007 7:44 AM
I was recently looking for info on this, here's what I found: http://radio.weblogs.com/0128644/categories/boneCarving/
Hope that helps! |