Tiki Central / Tiki Drinks and Food
Backyard Imu
Pages: 1 46 replies
|
M

MadDogMike
Posted
posted
on
Sun, Jun 1, 2008 7:07 PM
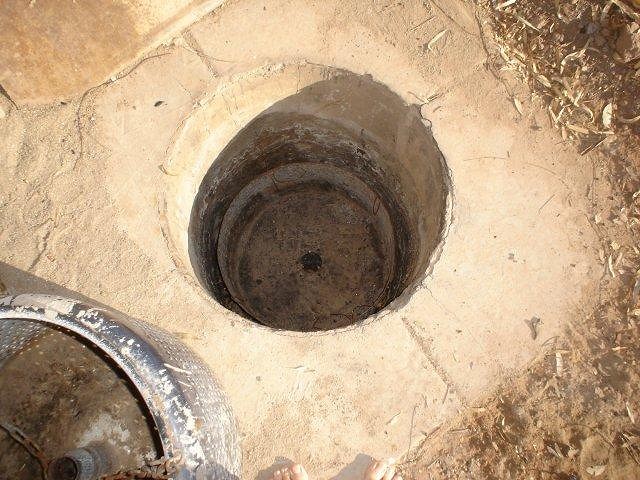
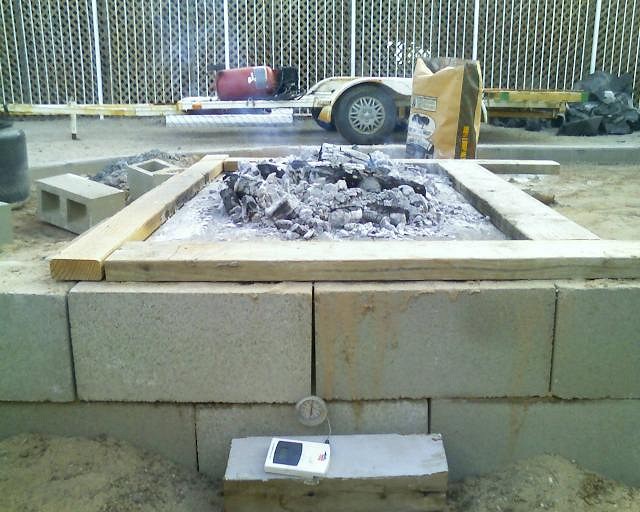
While not quite the traditional "hole in the beach", I built a cement deep pit BBQ/imu. Made from a 30 inch concrete pipe buried in the ground. You fill the pit with hardwood and burn it several hours until just the coals remain, this heats the concrete and the surrounding soil. You put the meat in and cover the hole with the metal lid, then shovel sand over the lid and wet it down well. The pit has to be sealed airtight or the coals will continue to burn and you'll have ash instead of kalua. After about 18 hours you pull the meat out, shred and serve.
Anything worth doing, is worth doing to the point of wretched excess. [ Edited by: MadDogMike 2011-12-03 18:27 ] |
|
T

Tiki-Kate
Posted
posted
on
Sun, Jun 1, 2008 7:18 PM
That's just...awesome. |
|
B

bananabobs
Posted
posted
on
Tue, Jun 17, 2008 8:07 PM
Why is there a ramp next to your pit? |
|
M

Murph
Posted
posted
on
Tue, Jun 17, 2008 8:20 PM
That is the coolest thing I've seen today! |
|
M
MadDogMike
Posted
posted
on
Tue, Jun 17, 2008 9:17 PM
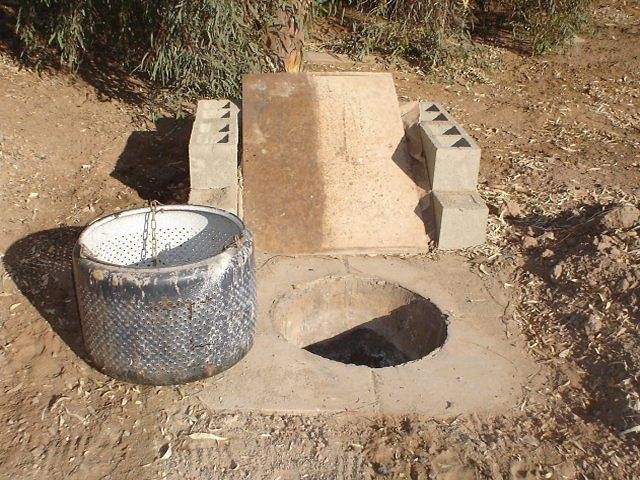
Why thank you Murph! The ramp is actually the metal lid that covers the pit. The concrete block "corral" helps keep the sand all in one place until next time. Placing the lid over the sand keep the DAMN CATS from using it as a litterbox! |
|
LL

Limbo Lizard
Posted
posted
on
Wed, Jun 18, 2008 6:11 AM
Looks like a washing machine drum. Do you use that for the coals, so the ashes are easier to remove? Or, to lower the meat into the pit, on top of the coals? |
|
JD

Johnny Dollar
Posted
posted
on
Wed, Jun 18, 2008 6:21 AM
this forth of july, my brother and i are cooking an 80 lb pig in an above-ground "imu" of sorts made by stacking concrete blocks. pictures soon :D |
|
LL
Limbo Lizard
Posted
posted
on
Wed, Jun 18, 2008 7:53 AM
Be sure and fill the cells of the blocks with sand (or dirt), so there is more solid mass to hold and re-radiate the heat. |
|
M
MadDogMike
Posted
posted
on
Wed, Jun 18, 2008 8:43 AM
Both- a metal washing machine drum fits in there perfectly. The bottom one is to remove the spent coals (they never actually burn to ash), the top one holds the meat and has some chains on it for handles to raise and lower it. Edit - Johnny Dollar, looking forward to seeing the pictures of that. Does it work like a big "caja china" that the Cubans make from plywood? http://www.lacajachina.com Sounds like a semi-temporary set-up (not mortared together) Anything worth doing, is worth doing to the point of wretched excess. [ Edited by: MadDogMike 2008-06-18 08:48 ] |
|
JD
Johnny Dollar
Posted
posted
on
Wed, Jun 18, 2008 10:01 AM
yes, it is the cuban style. loose concrete blocks. thanks for the sand/gravel info ~ i think my brother is engineering it, but better safe than sorry. |
|
H

Haole'akamai
Posted
posted
on
Wed, Jun 18, 2008 11:21 AM
We're considering building one of these at Lund Manor. Any thoughts on how much clearance one might need to be fire-safe? |
|
LL
Limbo Lizard
Posted
posted
on
Wed, Jun 18, 2008 5:10 PM
I wouldn't put it in a room with anything less than a 9 foot ceiling. [ Edited by: Limbo Lizard 2008-06-18 17:21 ] |
|
H
Haole'akamai
Posted
posted
on
Wed, Jun 18, 2008 6:02 PM
Oops, I should have clarified that I'm thinking of putting one in the backyard of Lund Manor... I've never seen one in action, so I guess I was figuring you'd have wood all the way up to the top, but that would be overkill and cause too much heat for too long, huh? Good thought about the mesh, still. Even in NorCal, it's dry around here. Good natural clay earth, though. |
|
LL
Limbo Lizard
Posted
posted
on
Wed, Jun 18, 2008 6:12 PM
MadDogMike described using two washing machine drums in the pipe/hole (that's the ingenious part!). The bottom one holds the wood/coals, so I assumed he only filled it to the top of the drum. You could add wood, as it burns down, if it hasn't heated the surrounding earth enough, yet. [ Edited by: Limbo Lizard 2008-06-18 18:35 ] |
|
M
MadDogMike
Posted
posted
on
Thu, Jun 19, 2008 9:22 AM
Yes, I fill it completely full of wood and it burns down to about 1/3 or 1/4 coals. L'Lizard, you may be right about the sand vs clay. I do have clay soil with poor drainage, it may shrink away from the concrete pipe. Unfortunately, I poured a small concrete slab around the pipe and now have no way of knowing. EDIT - If you were building a new one, that would be easy enough to fix. The hole you dig is bigger than the pipe anyway, just backfill it with sand instead of the dirt you took out of the hole. Here's a little more info http://mgilbert.net/deep%20pit.html I'm interested in knowing more about the above ground concrete block pit. What are they called, does anyone know of a website with more info? You can never have too many ways to BBQ (see my signature line :)) Anything worth doing, is worth doing to the point of wretched excess. [ Edited by: MadDogMike 2008-06-19 09:25 ] [ Edited by: MadDogMike 2008-06-19 09:29 ] |
|
LL
Limbo Lizard
Posted
posted
on
Thu, Jun 19, 2008 2:47 PM
Yeah, I pointed out your sig line to my wife, last night. For years, I've teased her that her official motto should be, "Anything worth doing is worth over-doing" (and everyone that knows her well, agrees). I told her, Look, this guy's even over-doing your motto! :) Since the embers are in the bottom basket, why don't you haul it out, before dropping the meat basket in? You'd still have all the radiant heat of the pipe and earth, and you wouldn't risk "cremated meat", if a little air gets in. I'm picturing a big swiveled lever-type thing, mounted on a stand, with a chain and hook. You hook it on the chains of the basket, lift it out, swivel to the side and set it down. I'm making it too complicated, aren't I? (I'm over-doing it!) [ Edited by: Limbo Lizard 2008-06-19 15:11 ] |
|
M
MadDogMike
Posted
posted
on
Thu, Jun 19, 2008 3:26 PM
These pits are fairly common in my area, seems every service organization or church has a huge one they use for an annual feeding of the 5,000. They have a swivel hoist mounted next to them to lift the meat basket in and out. I guess you could pull out the embers but they still hold a lot of heat (and lifting a big basket of 1500 degree embers would make me nervous :0) As long as you seal the pit well, you are ok. |
|
LL
Limbo Lizard
Posted
posted
on
Fri, Jun 20, 2008 12:40 PM
I don't know, seems kind of exciting to me - three Mai Tais down, sparks flying from the swinging basket, all that heat radiating, trying to see out of smoke-stinging eyes and not trip over the dogs running around your feet, because they smell the raw meat in the other basket. It'd look impressive on the YouTube video, anyway, especially at night. [ Edited by: Limbo Lizard 2008-06-20 12:44 ] |
|
H
Haole'akamai
Posted
posted
on
Fri, Jun 20, 2008 12:42 PM
now that is a party! |
|
LL
Limbo Lizard
Posted
posted
on
Fri, Jun 20, 2008 12:47 PM
5000! So, do they just have a couple of cowboys drive a small herd into the pit? |
|
R

royaltiki
Posted
posted
on
Fri, Jun 20, 2008 1:28 PM
man, i have soooo got to build me one of those. just building it sounds like a great excuse for a party this weekend. in this georgia clay I may just try digging a plain old hole and see how that goes. now i just need to find some meat recipes on here.. |
|
M
MadDogMike
Posted
posted
on
Fri, Jun 20, 2008 5:10 PM
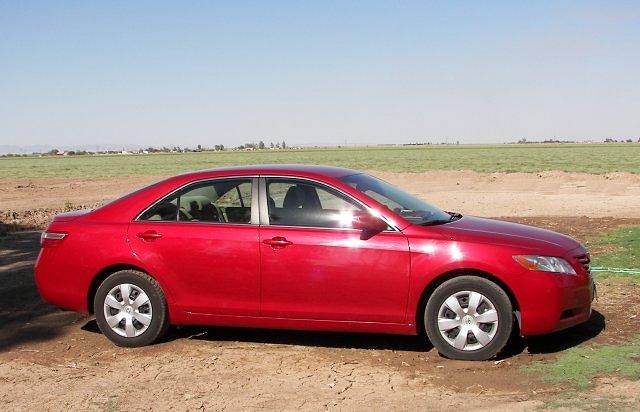
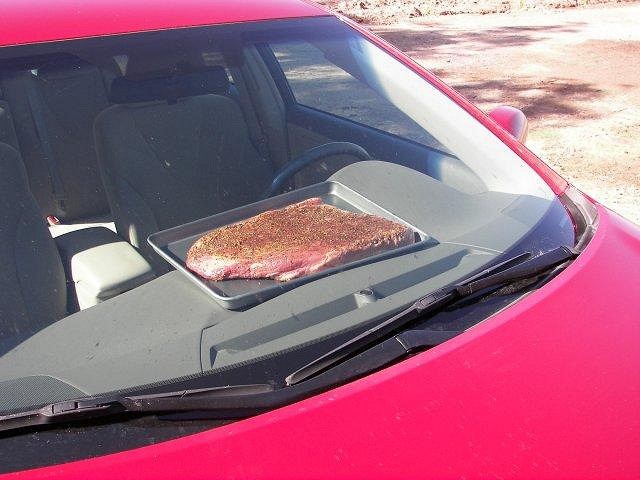
New Backyard Imu It was 115+ here today, I put a thermometer in the dash of the car and it read 175 degrees!!! So I decided to cook a brisket :wink:
Anything worth doing, is worth doing to the point of wretched excess. [ Edited by: MadDogMike 2008-06-20 17:11 ] |
|
M
MadDogMike
Posted
posted
on
Fri, Jun 20, 2008 5:21 PM
L'Lizard, OK, maybe 5,000 was an exaggeration. But the big pits are about 4x4x8 feet. Royal Tiki. I usually roll the meat in Liquid Smoke and vegetable oil then season it with salt and pepper. You can also poke some holes in the meat with a knife and shove cloves of garlic down in the holes. If banana leaves are available, wrap the meat in the leaves then in several layers of heavy foil and it's ready to cook. |
|
H
Haole'akamai
Posted
posted
on
Fri, Jun 20, 2008 8:25 PM
That's no Imu - That's a CAR-b-que! |
|
B

bigbrotiki
Posted
posted
on
Sat, Jun 21, 2008 12:30 AM
This might be helpful --some hints from the elders:
"Inside has a set of information on HOT ROCK CUISINE" |
|
LL
Limbo Lizard
Posted
posted
on
Sat, Jun 21, 2008 9:03 AM
Hot Rock Cuisine Seriously, though... The concrete pipe does the job of holding heat, but you can't (or, shouldn't) heat it too hot, or it will pop and chip and flake, or just crack. That's because water is part of the structure of concrete; it's trapped in an almost crystalline structure with the cement. High heat drives it out, causing some decomposition of the concrete - sometimes almost explosively. The concrete pipe, with those baskets, is so nifty a method, though, that it's worth it, even if it "burns out" after several years. But you wouldn't want concrete over the fire, where it would get the full intensity. Now, if you wanted to build one that could get extremely hot: [ Edited by: Limbo Lizard 2008-06-21 09:18 ] |
|
M
MadDogMike
Posted
posted
on
Sat, Jun 21, 2008 9:51 AM
My concrete pipe has cracked some but that alright. The earth surrounding the pipe still seals it airtight. It doesn't need to be water tight or anything, the pipe is mostly to line the hole and keep the walls from caving in. It probably helps that the pipe I used was not freshly cast, it had been sitting around for probably 40 years and was as dry as it was going to get. |
|
M
MadDogMike
Posted
posted
on
Mon, Jul 7, 2008 4:27 PM
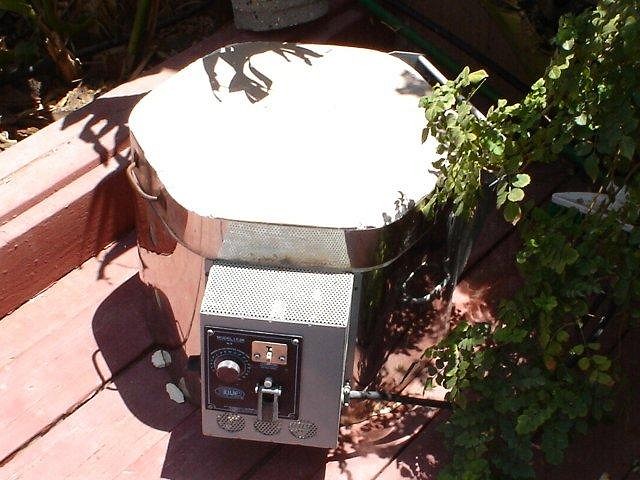
Does anyone know how to program this ceramic kiln to cook kalua pork? |
|
LL
Limbo Lizard
Posted
posted
on
Thu, Jul 2, 2009 4:50 PM
Bumping MDM's ingenious 'Backyard Imu' thread, in time for July 4th barbecue. Go back to the start, though. [ Edited by: Limbo Lizard 2009-07-02 16:51 ] |
|
M
MadDogMike
Posted
posted
on
Thu, Jul 2, 2009 5:02 PM
Thanks LL :D [ Edited by: MadDogMike 2009-07-02 17:02 ] |
|
SM

Sparkle Mark
Posted
posted
on
Thu, Jul 2, 2009 6:08 PM
Mmmmmmmm......... where's my shovel? I'm gonna have to make a pit, thanks MDMike! Best |
|
M
MadDogMike
Posted
posted
on
Sat, Dec 3, 2011 6:25 PM
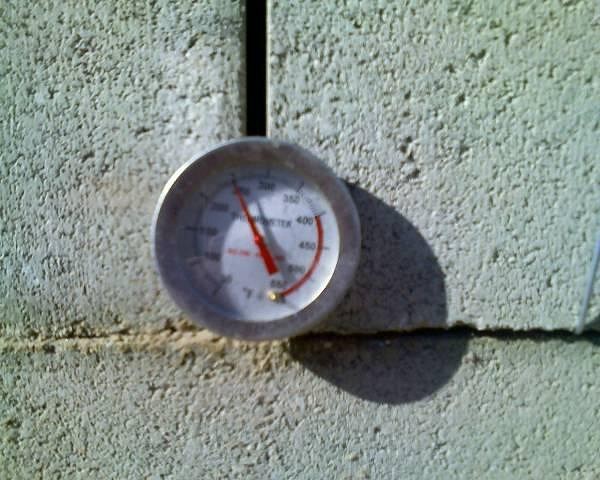
J$, do you remember how that worked out? Any tips for me? My brother and I are getting ready to cook an 80-100 lb Luau Pigs for a Christmas party. We had looked at a Caja China and decided to make one from concrete block. So today we picked up a couple of chickens, a 15 lb brisket and 100 lbs of mesquite charcoal to do a trial run. We started with 2x4 foot block box 3 rows high and a iron lid. We put the meat inside, built the fire on top and watched the thermometer. After a couple of hours we could just barely keep the telp at 200 and we wanted more like 250. So we shoveled off the coals and removed 1 layer of blocks (they were not cemented together). With less air to heat, temp was easy to maintain in the 250 range. After reaching proper temp, we cooked for about 3 hours. Cooked perfectly- the chickens were falling apart with a nice crispy skin. The brisket was still a little too pink on the inside. I could have put it back in the pit for another hour or so but I wrapped it in foil and popped it in the oven at 300 for a while. Overall, it was a good learning experience. Figured out how to maintain the temp, how to move the coals so we can turn the pig and glaze it at the end, learned that dragging the lid off drops grit in the meat. The plan to split the pig down the middle, cook half for a party next Friday and then cook the other half the following Saturday for another party. Brush it good about 30 minutes from the end with Teriyaki glaze and cover with pinapple slices. When we pull the pig from the pit, we'll dump the leftover hot coals into the pit, replace the iron top, and put the serving platter on top of the iron lid - should work like a warming table to keep the pork toasty during serving. (Serving platter is a 2x3 foot metal driveway oil drip pan :D ) I will be sure to post pictures of the finished piggie.
Be good to yourself and to the ones you love [ Edited by: MadDogMike 2011-12-03 18:30 ] |
|
D

danlovestikis
Posted
posted
on
Sun, Dec 4, 2011 11:35 PM
MDM what can't you do? That's so impressive. Wendy |
|
JD
Johnny Dollar
Posted
posted
on
Tue, Dec 6, 2011 7:48 AM
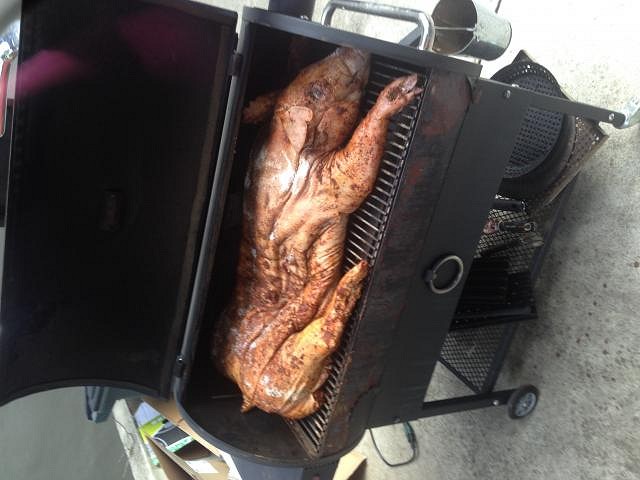
my brother (who is an engineer) ended up salvaging some switch gear equipment and building this pig-roasting box. here is a 65-lb pig on the rig. coals went inside with sheet metal/foil to reflect the heat back on the pig. it was rotated manually on the axel, although he has plans to rig up a motor to turn it continually.
|
|
Q

Q-tiki
Posted
posted
on
Tue, Dec 6, 2011 9:35 AM
Nice looking pits! I've never built my own (in either fashion), but I do know that you should try to keep the coals in the corners for the block pit since the hams and shoulders require the most heat. In theory, this will keep the ribs and loin from overcooking. I guess you could do something similar for the spit with coals primarily at either end. I'd love to see the finished result. :) CHEERS! |
|
TZ

Tiki Zen
Posted
posted
on
Tue, Dec 6, 2011 11:54 AM
Everything you could want to know about building a temporary concrete block pig cooker in the Cuban style. |
|
M
MadDogMike
Posted
posted
on
Tue, Dec 6, 2011 6:37 PM
That's a good looking pig Johnny D. Q-Tiki & Tiki-Zen, thanks for the advise. I had seen that 3 Cuban Guys website and got some good info from there. They are cooking their pig above the fire (but still indirect), we are building our fire over the pig similar to the Caja China Since we are cooking for 2 parties, 8 days apart we were originally going to split a 100 lb pig and cook half for each party. But we decided instead to get two 50 lb pigs instead. For one thing it solves that "where am I going to store half a dead pig for a week" problem. We were going to put a handful of chickens in the pit too and glaze them with spicy orange sauce. But it turns out that whole uncooked chickens cost $5.50, cooked chickens are $5. Instead of worrying about the chickens cooking at a different rate than the pig, we'll just use the precooked birds and glaze them at the last minute :D 1st pig is this Friday, I'll post pics. |
|
V

VanTiki
Posted
posted
on
Tue, Dec 6, 2011 6:56 PM
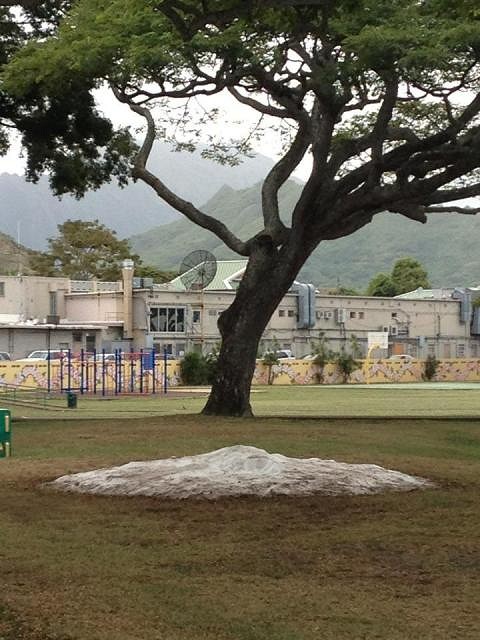
Great home-grown imu! Wanted to share that just up the street from me is Kailua Elementary School. Every year they do a MASSIVE community imu fundraising project. They dig out a BIG imu in the middle of the playground, and (for a fee) you can bring anything you want for them to bury in it and cook. They let it go all day long, and when they open it up you can smell it all the way over here at my house! A fantastic community fundraiser that brings folks together and raises cultural awareness. Today I rode by the school on the way to lunch and snapped a quick shot of the yearly snow delivery. This is the only way island kiddies get to experience snow!
Someday I wanna come to one of your luaus! Henrik "VanTiki" |
|
M
MadDogMike
Posted
posted
on
Sat, Dec 10, 2011 11:51 AM
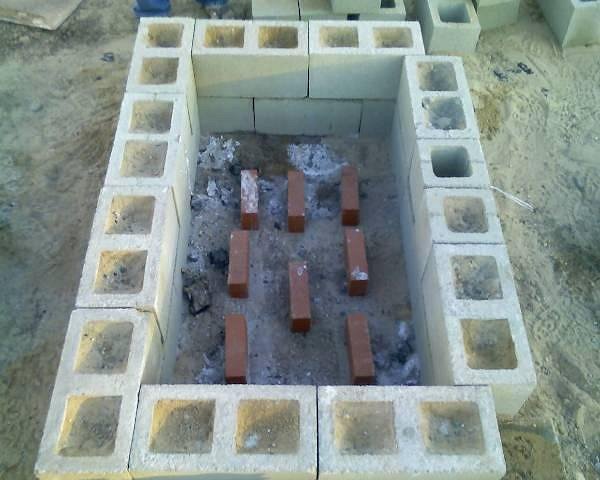
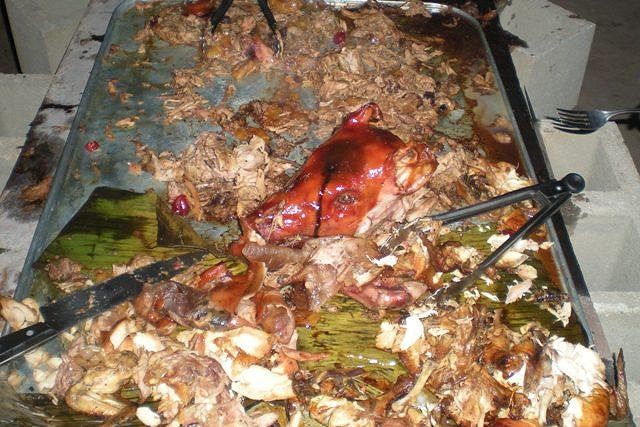
Van, you're welcome anytime! We're having one this Saturday - climb aboard the friendly skies and come on down! Well, we got the first of 2 pigs done last night. I'm recording this here for anyone who wants to try this method (also to have it written down for me next time, my brain isn't what it used to be :D ) The hardest part of re-creating this would be the 1/8 steel plate we used for the top. I just happened to have a piece laying around that was 30x48 inches, so we made the box to fit using 23 concrete blocks stacked 2 high. We poured the bricks full of sand and wet them down, seemed like it would help hold the heat in but I don't know if it was neccesary. There are 8 red clay bricks in the bottom of the oven to hold the roasting pan off the ground. Be sure built your oven over bare dirt or sand, not asphalt or grass. You could built it over concrete but it might stain the concrete.
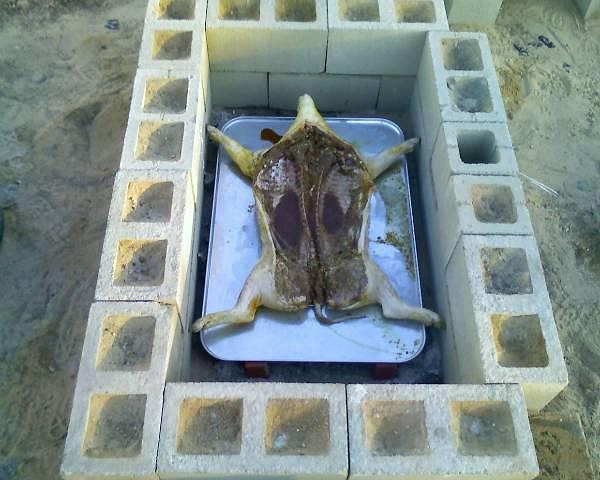
You can see on the right hand side there are 2 half bricks - one was not filled with sand and had a wire handle wrapped around it. The ideas was to use it as a peep hole but we didn't need it. We bought a 50 lb pig already dressed. We butterflied him using a cleaver and a hammer to split the spine, but not the skin underneath - he laid out nice and flat when we were done. We seasoned him with garlic cloves pushed into slits cut into the muscle, lots of dry rub, pineapple juice injection, and a little Liquid Smoke. The "roaster pan" was a new 2x3 foot galvanized driveway oil drip pan we picked up at an automotive store. (Note; TikiZen mentioned below that a galvanized tray may give off toxic fumes. The temp in the pit is 250 degrees max, that should be well below zinc's vapor point - but I am not expert, if you want to duplicate this you'll need to assess the risk for yourself) You cannot see it here, but we put an apple-sized ball of foil into the mouth to hold the mouth open and later be replaced with an apple.
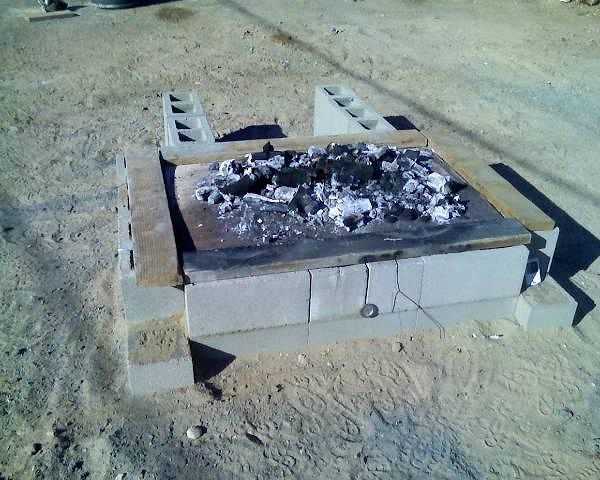
We started with the rib side up, the back (skin) side would be last so it would get browned and so we could glaze it. We put a digital thermometer on a cable in the thickest part of the shoulder and put the steel lid over the top, we put some wire handles on the ends of the lid so we could lift it off later. On our trial run last week, we got some sand in our brisket, mostly because we drug the lid off. Using the wire handles to lift the lid helped. This time we had put foil over the pig to help shield it from any debris, but the foil was reflecting too much heat and the pig was not cooking so we removed it. We poured a bunch of lump charcoal to top of the lid and lit it up. The steel lid warped some from the heat, the 2x6 boards around the lid helped fill the gaps between the warped lid and the bricks. We just had to be careful that the coals didn't get too close to the wood.
You can also see that we stacked another 4 bricks next to the oven so we would have a place to set the hot lid and coals when we moved the lid to open the oven. We kept adding more charcoal as needed to keep the oven temp at about 250 degrees. We stirred the fire occasionally and removed some of the ash (ash is a good insulator). We also ended up putting a fan blowing on the coals to bring the temp up a little.
After about 3 1/2 hours of cooking time the internal meat temp was 140 degrees, we moved the lid over, flipped the pig, and put the lid back. We continued to stoke the fire to keep it to a constant 250 degrees. After about 2 more hours, we opened the lid, injected under the skin with some Teriyaki glaze, brushed the pig liberally with the glaze, and layed down a bunch of pineapple slices and cherries. We put the lid back on for another 30 minutes to brown the glaze a little and the pulled it out, meat temp was about 170 degrees. It was cooked perfectly- the meat was falling apart and good flavored, the skin was brown and crisp, everyone really enjoyed it as you can see in this "after" pic :lol: When we were ready to serve, we removed the pig, dumped the hot coals from on top into the pit, replaced the steel plate top, and put the pig and the tray on top of the steel plate. It keep the meat steaming hot in 50 degree weather for more than 2 hours. Be good to yourself and to the ones you love [ Edited by: MadDogMike 2011-12-17 22:15 ] |
|
D
danlovestikis
Posted
posted
on
Sat, Dec 10, 2011 1:03 PM
Wow wow wow wow wow, that was a fun ride to see something requiring so much thought and work. Such manly work! Wendy |
|
JD
Johnny Dollar
Posted
posted
on
Mon, Dec 12, 2011 5:01 AM
impressive, thanks for sharing! :D |
|
T

TikiDaye
Posted
posted
on
Mon, Dec 12, 2011 11:51 AM
Awesome, Mike... Now I'm hungry! Can't wait to see pics from pig #2 Peace, |
|
TZ
Tiki Zen
Posted
posted
on
Mon, Dec 12, 2011 12:03 PM
Great looking cook. You might avoid using a galvanized tray next time. I'm certainly not an expert, and am just passing on what I've read elsewhere, but I've always heard that galvanized metal is not food safe and there is a risk of zinc poisoning. I've seen several sites devoted to whole-pig roasting that use chain-link fencing as a grilling grate, and they all warn against using the galvanized product. |
|
Q
Q-tiki
Posted
posted
on
Mon, Dec 12, 2011 12:13 PM
Looks great! Thanks for posting the pics. Cheers! |
|
M
MadDogMike
Posted
posted
on
Mon, Dec 12, 2011 1:14 PM
Thanks all, more pics this Saturday. Zen, I had seen those warnings against galvanized too but I think were OK (or at least I hope so :D ) Zinc fumes are pretty nasty but maximum temperature that it is exposed to in this pit is 250 degrees which should be well under zinc's vapor point. I definitely would not use galvanized metal as a grate above a fire where temps can reach 1500 degrees or more. |
|
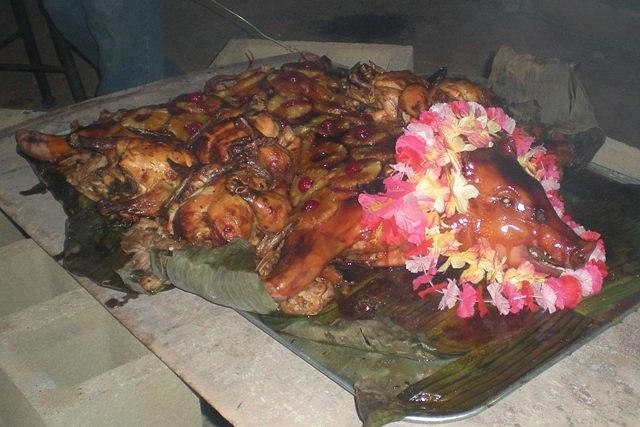
M
MadDogMike
Posted
posted
on
Sat, Dec 17, 2011 10:18 PM
Second pig came off perfectly, I had dressed it up a little better with some banana leaves underneath, some cherries, and a lei around the neck. I replaced the picture above of the finished pig with a new and improved one. |
|
M
MadDogMike
Posted
posted
on
Thu, Sep 15, 2016 9:55 AM
From another thread...
|


Pages: 1 46 replies