Tiki Central / Other Crafts
Whystler's WIP Thread (cannibals printed and based)
Pages: 1 42 replies
|
W

Whystler
Posted
posted
on
Sat, Jul 7, 2012 7:37 PM
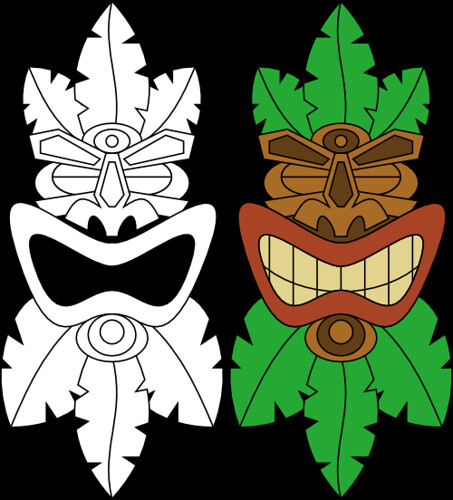
Hello! I started this thread to talk about a particular piece, but I'm noticing that a lot of artists here have a thread dedicated to their works in progress (WIP) and likewise in the gallery. So I've converted this into a WIP thread for me to show you what I'm working on. Enjoy! -Whystler The First Post: Hey hey, I'm making some designs that will be suitable for a plushie pillow and also used as the basis for a digital sculpture that I'll print with my 3d printer and then finish and paint by hand. Here's the first try - I would appreciate your crits :) I designed it in inkscape, which is a vector drawing program.
-Whystler [ Edited by: Whystler 2012-07-08 18:43 ] [ Edited by: Whystler 2012-07-09 18:53 ] [ Edited by: Whystler 2012-07-10 22:54 ] [ Edited by: Whystler 2012-07-12 18:42 ] |
|
W
Whystler
Posted
posted
on
Sat, Jul 7, 2012 10:22 PM
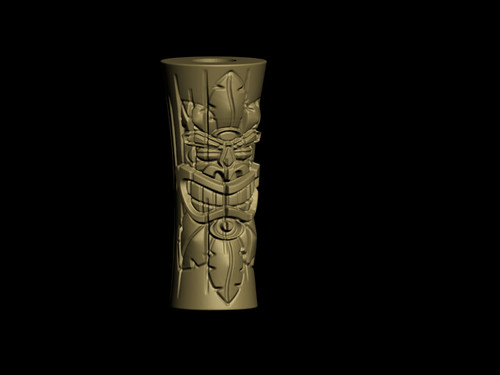
Using the above image as a guide, I have sculpted this pendant in a 3d program. I also gave it a few vertical cracks for age. Here is a render of the file:
-Whystler |
|
W
Whystler
Posted
posted
on
Sun, Jul 8, 2012 8:58 AM
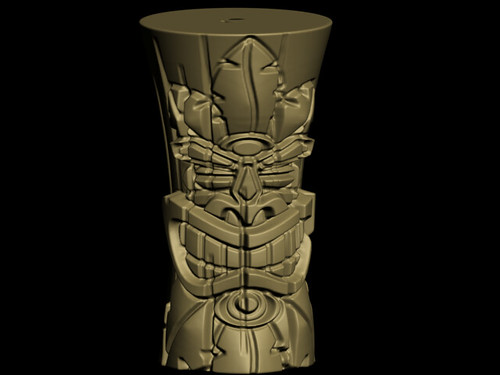
I did some printing tests, and found that the pendant is too small overall for good detail to come out with the 3d print. So, I resized the piece, which cut off some of the design from the pendant, but I think it's ok. I wanted to stop it from looking squished, and yet still have it be big enough for detail and not overly tall for a pendant. Here is the render. The piece is printing now...
-Whystler |
|
W
Whystler
Posted
posted
on
Sun, Jul 8, 2012 11:35 AM
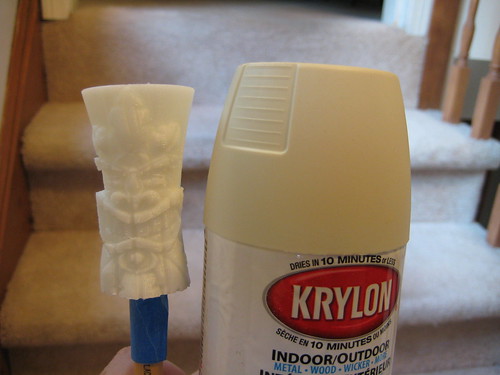
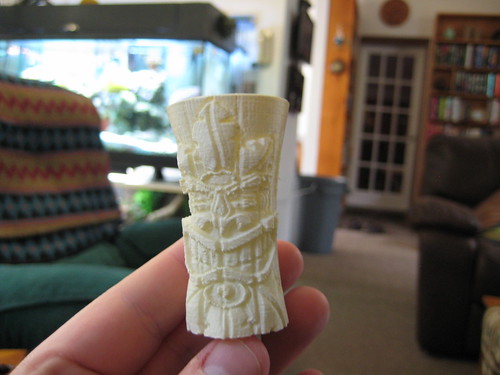
Here are a couple of pictures of the 3d print before painting. This it the piece, cleaned, but in a raw abs plastic state. I have it ready to be coated with ivory matt spray paint.
And here it is after the spray painting. You can see a lot more detail here.
I'll paint this and see what it looks like. If it looks too rough after I'm done, I can change the layer printing setting. I printed this at .3mm layers. I can try and print it at .2mm as this is the finest for my printer. Otherwise, I may have to polish it before painting. -Whystler |
|
D

danlovestikis
Posted
posted
on
Sun, Jul 8, 2012 12:09 PM
I am fascinated by your step by steps but I don't understand how you did all of this.
It all looks very good. I'd love to understand what's happening here. Wendy |
|
M

MadDogMike
Posted
posted
on
Sun, Jul 8, 2012 12:22 PM
Wendy, it's built up (opposite of carved) by the computer out of plastic but I'll let Whytler explain it. I had to look it up yesterday to see how it works :) Whyster, do you do some sort of business work with a 3D printer or is it strictly for hobby and recreation? |
|
W
Whystler
Posted
posted
on
Sun, Jul 8, 2012 1:52 PM
Hey hey :) Thanks for the questions! I am a 3d artist fulltime for a living. I create objects in a 3d program (the program I use is called 3D Studio Max, but there are many programs out there for sculpting digitally in 3D). When I design on the computer, there are a lot of different tools that can be used. Many of them are like traditional carving tools that deposit volume onto a form .. or carve it away. Other tools allow you to build up with different 3d shapes to work up an object. And there are still many more shapes. You can think about it like using photoshop or another image program, but in 3D. I most often create art for games and virtual worlds, but I also design in such a way that my work can be built by a special machine that creates a real life 3d object from a digital file: a 3D Printer. 3D printers generally work by slicing your digital file up into a number of horizantal crossections. Each crossection is printed as a layer by the printer. ... layer upon layer, until the object is finished. There are different kinds of printers that use powder or plastic in different ways to create layers. My printer is fed a plastic filament (sometimes ABS, and sometimes I can use PLA which us a plastic made from corn) and the filament is extruded into a very fine thread (like a glue gun, but in this case it's between .2 and .4 mm thick) that is drawn onto a plate. The plate is lowered after the crossection is drawn, and then the next layer is drawn on top of the previous. On it goes - so on and so on, until an object is built. And when it is finished, I remove it from the plate, carve off any support material and then go on to a number of other tasks like polishing or painting. Here is a link to a printer like mine, printing an object: http://www.youtube.com/watch?v=GoVUuJVgoYY Hope this helps you understand! :) -Whystler |
|
W
Whystler
Posted
posted
on
Sun, Jul 8, 2012 2:20 PM
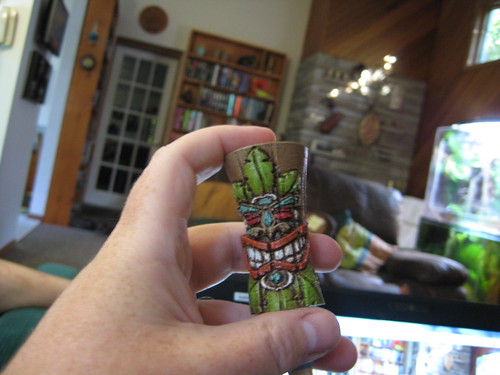
Here is the colour work. I don't know why I'm posting this part - It's not finished. But it's fun to show the process. This is the stage before I antique it. The painting looks a bit crappy at this point, but so far it's always looked fab after antiqueing. Hope it will be this time too!
-Whystler |
|
S

SandraDee
Posted
posted
on
Sun, Jul 8, 2012 2:26 PM
pretty cool love how technology enhances an artist's capabilities these days cool process |
|
V

VampiressRN
Posted
posted
on
Sun, Jul 8, 2012 2:29 PM
Wow, the process is interesting. I wasn't sure where you were going with this at first, but have been watching. Would like to see this in antique browns or creme colored (like bone). Great job...thanks for sharing. |
|
M
MadDogMike
Posted
posted
on
Sun, Jul 8, 2012 2:54 PM
Hey Whystler, where are you located? I noticed the "colour" spelling and was curious PS - I sent you a private message earlier, it's the little flashing red envelope in the upper right of the screen The natives grieve when the white men leave their huts, [ Edited by: MadDogMike 2012-07-08 14:57 ] |
|
W
Whystler
Posted
posted
on
Sun, Jul 8, 2012 3:39 PM
Hiya MadDogMike! Thanks for the message - that's really great advice :) I am from Canada in Guelph Ontario. -Whystler |
|
W
Whystler
Posted
posted
on
Sun, Jul 8, 2012 4:11 PM
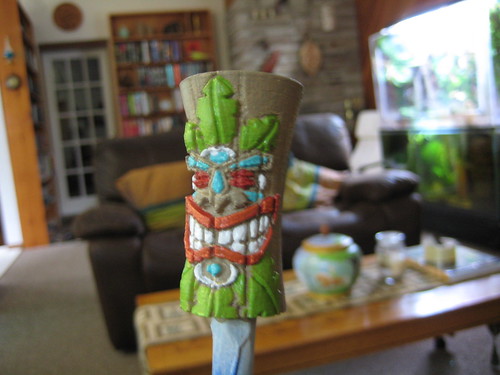
This is very close to final ... all antiqued for a warmer, aged tone.
-Whystler |
|
B

bavtech
Posted
posted
on
Sun, Jul 8, 2012 8:20 PM
I have been fascinated by 3d printing but just have not had the funds to make or buy one. What model of printer do you use? That is really nice item you put out and really show what can be done. |
|
W
Whystler
Posted
posted
on
Mon, Jul 9, 2012 7:50 AM
Hey Bavtech :) I use a printer, like the one in the video I posted above. It's called an UP! by PP3dP. Thanks for yor kind words! -Whystler |
|
L

LoriLovesTiki
Posted
posted
on
Mon, Jul 9, 2012 4:54 PM
Very interesting technique. I love learning about new things. Cool!!! |
|
W
Whystler
Posted
posted
on
Mon, Jul 9, 2012 6:55 PM
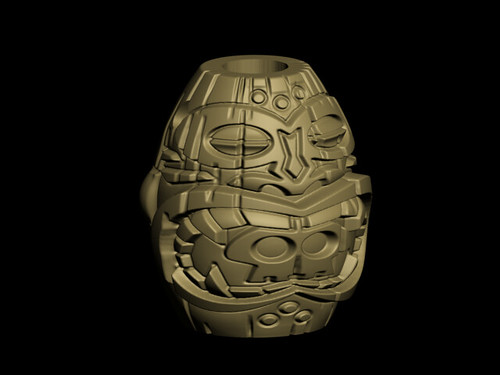
Thanks guys, Here's a new head pendant/ornament I'm working on. It's supposed to be a cannibal. I noticed that there is a cannibal style within this tiki genre, and that it often includes the use of skulls. I like skulls. You like skulls. They like skulls ... so here's a tiki cannibal design munching on a skull. This is a 3D render from the program I use...
As always, feedback is appreciated, -Whystler |
|
M
MadDogMike
Posted
posted
on
Mon, Jul 9, 2012 8:51 PM
I like him ~ he's got tusks! |
|
W
Whystler
Posted
posted
on
Mon, Jul 9, 2012 9:07 PM
Gotta crunch through dem skullz wif somethin! -Whystler |
|
A

AlohaStation
Posted
posted
on
Tue, Jul 10, 2012 6:17 AM
The 3D programs and printer should allow for more open space in you structure. Why are you making the recessed areas so shallow? ie: eyes of the skull, the inside of the mouth... What is the hole in the top for? Not trying to bust your chops just questions. |
|
D
danlovestikis
Posted
posted
on
Tue, Jul 10, 2012 6:46 AM
I think I saw this process in a science fiction movie years ago. They were making weapons! This is really special and you are really good at it. How large an item can it make? Wendy |
|
W
Whystler
Posted
posted
on
Tue, Jul 10, 2012 8:11 AM
No problem! Thanks for the questions! If you can imagine a table printed layer by layer, and the first crosssection is the feet. Moving up and up and up, until the next crosssection is the flat top of the table. Imagine what would happen when you try to print this next layer with nothing under it - quite a mess with filament spilled into empty space and no support :). With a powder technology, where each layer is a layer of powder and the crosssection is built by solidifying certain areas of powder, then the un-solidified powder always acts as a support. But this is not the case for extruded filament printers. So what we do with the table, is turn it upside down and print it from the top to the bottom. And also, in a pinch, we can gear the machine to actually print support. However, this can be a big waste of plastic, and also very hard to tear, pick, carve out of a model. If I'm gonna carve a model anyway, heck I might as well carve it out of wood :) So this is why we try to avoid extreme overhangs. I can handle a little bit, and also I can handle picking off a little bit of support material. But if I were to go quite deep, like empty the mouth cavity, then it would not only be a pain to remove the support, but also compromise the integrity of the model's surface with roughened surfaces and the liklihood of breakage. Hope this helps you understand! :) Oh the hole in the top - funny you should ask that. Originally, the hole in the top was to create a sort of "woggle" situation, where the pendant could be threaded through the middle with a bead at the bottom. To make the pendant lie flat, I decided to add a hole through each side instead. The hole down through the center is a remainder of its history. But also - the hollower I can make a model, the better opportunity I have later for "polishing", if I so choose. I use a solvent to smooth the piece, and if the model is quite thick, the solvent seeps inside of it, essentially melting it from within. However, if it is more hollow, there is less chance this will happen. -Whystler |
|
W
Whystler
Posted
posted
on
Tue, Jul 10, 2012 8:14 AM
Hi Wendy! Hmm, no weapons for me :wink: My printer can go about 13.5 cm high .. that's 5 1/3 inches. It's about 5 1/2 inches wide and long also. Of course, it's not the size that counts ... -Whystler |
|
B
bavtech
Posted
posted
on
Tue, Jul 10, 2012 12:18 PM
What model of 3d printer are you using? Makerbot? Reprap? This is something I have really been wanting to do for awhile. You can make so many things with a 3d printer. I have heard that the DIY 3d printers tend to need a lot of maintenance to keep operational. What is your experience in setup and use? THanks |
|
W
Whystler
Posted
posted
on
Tue, Jul 10, 2012 10:22 PM
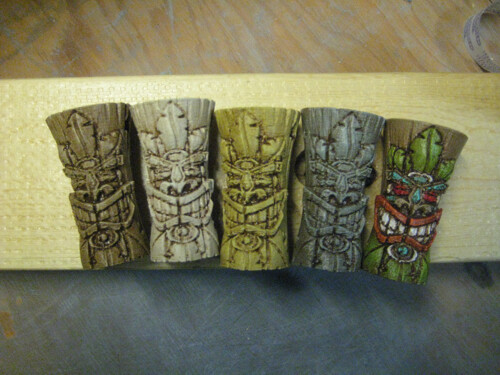
Here is a number of the pendants done in different earthy shades. I'm curious about a couple of things.
-Whystler |
|
W
Whystler
Posted
posted
on
Tue, Jul 10, 2012 10:29 PM
Hey Bavtech - I use a printer called the "UP!" printer by pp3dp. The DIY printers do tend to need maintenance and tinkering. It's all part of the pioneer's road, I suspect. There is a lot to learn through trial and error for certain. What I like about the state of home printers at the moment, is that you can tinker a bit. It's like the old days ... your toaster broke down, you could fix it in your workshop by taking it apart and figuring it out. You might have to order a part to replace, but you could do it by undoing a few screws. -Whystler |
|
M
MadDogMike
Posted
posted
on
Wed, Jul 11, 2012 11:35 AM
Whystler, I like numbers 1,2 & 4. #4 has a nice driftwood look to it. |
|
V
VampiressRN
Posted
posted
on
Wed, Jul 11, 2012 12:56 PM
Nice job...I like #1&2 best. Appreciate you sharing the process...very interesting. |
|
GSM

Gene S Morgan
Posted
posted
on
Wed, Jul 11, 2012 8:08 PM
Great work ... It is good to see something by a real 3D artist. I really appreciate your explanation of how a 3D printer works. I always thought it was magic. Thanks for starting this thread ... I think I might learn something. Your painting is excellant. I like 2 and 3 but I suspect 5 will be the most popular. Good detail. One question, is there a hole all the way through the center of the model? If that is true it could have a chord pass through it like an oversized bead. Just a thought. |
|
B

Beachbumz
Posted
posted
on
Wed, Jul 11, 2012 8:22 PM
Nice Work! #2, #4 for me.. I saw one of those 3d printers on Kickstarter.com, Too Cool! I can think of all kinds of things I'd print up in 3D! :wink: |
|
S

swizzle
Posted
posted
on
Wed, Jul 11, 2012 9:02 PM
Personally i like them all, except the painted one. :lol: |
|
W
Whystler
Posted
posted
on
Thu, Jul 12, 2012 3:07 PM
Oops! Sorry Gene, I didn't see your question until now. And thanks for your compliment! There is a hole through the centre of the model, and this was actually for the reason you mentioned. But then I found that the pendant didn't lie forward always against a person's chest since the piece is cylindical. One idea, that MadDogMike had, was to flatten the back, and I was going to take this suggestion at first. But then I realized if I put a horizantal hole through the sides, towards the top, and threaded the cord latterally, then the pendant would lay sitting forward always. So I did this instead. -Whystler [ Edited by: Whystler 2012-07-12 15:08 ] |
|
W
Whystler
Posted
posted
on
Thu, Jul 12, 2012 6:41 PM
Hey hey, Here's the cannibal tiki head, in a few different sizes, printed and base coated with ivory spray paint. From left to right .. I started with a very wide one and didn't like how stretched it looked, especially the skull. So the next one, I went the opposite direction. By the third one, I found a happy medium. The fourth one is just a copy of the 3rd, even though it looks bigger because its a little closer to the camera.
-Whystler [ Edited by: Whystler 2012-07-12 18:42 ] |
|
M
MadDogMike
Posted
posted
on
Thu, Jul 12, 2012 7:22 PM
I like 'em Whystler. It will be good to see them antiqued so you can see the detail |
|
W
Whystler
Posted
posted
on
Fri, Jul 13, 2012 9:53 AM
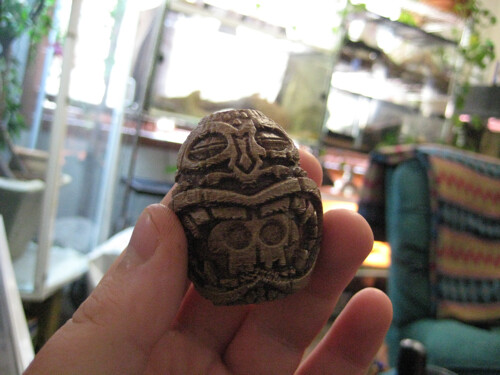
Here is one painted with a tan colour and antiqued.
I was thinking of painting the teeth white with a blood red skull sometimes, and other times making the teeth yellowed or blood red with a white skull... -Whystler [ Edited by: Whystler 2012-07-13 15:03 ] |
|
M
MadDogMike
Posted
posted
on
Fri, Jul 13, 2012 4:51 PM
That shows the detail nicely. I vote for the brown cannibal and a white or ivory skull & teeth. Maybe some liquid frisket on the skull after the base coat? |
|
GSM
Gene S Morgan
Posted
posted
on
Fri, Jul 13, 2012 7:31 PM
I went back a reread this whole thread. I'm starting to understand things a little better. I have a couple of questions ... (of course) The models I get back from ShapeWays are rougher than my digital scuplts. I kinda like that for now, but do you think it has to do with the material or the layer thickness? Your's look quite smooth and you mentioned that you went from .3mm to .2mm in your layering. Is is possible that they are using a coarser layer. You said you had used ShapeWays. How did theirs compare to what you can do on your own printer? I noticed you were using Krylon interior/exterior spray paint. Did you come up that by experiment? We hand paint ours with brushes and have been thinking that the brush strokes are showing too much and we should try spraying. Do you use a clear spray after antiquing? On the ShapeWays forum they often talk of hollowing out the model to reduce the cost. Do you do that. I must admit I don't quite understand hollowing. I have tried to sculpt on a plane and extrude the plane thickness, and those always get rejected by ShapeWays as unprintable. I would think that would be similar to hollowing .... Sorry for all the dumb questions ... It's not often I get to question someone who actually knows what he is doing .... Thanks Gene |
|
W
Whystler
Posted
posted
on
Sat, Jul 14, 2012 8:33 AM
Never a dumb question they say - and they are right! :) I'll see if I can answer a few things for you, but first - a question for you: What Shapeways material are you ordering your pieces made with? That will help me answer your questions about roughness/layering. re: smoother on my printer? Shapeways materials can, by far, be a lot smoother than what I can do on my printer. I would have to find out what material you're ordering and then I can probably recommend a better choice for you. Re: krylon spray paint - I have been painting models since I was quite young and learned that it's always good to put on a "primer" coat of spray paint before you do any brush painting onto plastic because paint applied by a brush is then more likely to adhere nicely to a primed piece. The spray paint option ensures that you get an even coverage on your primer coat. In my case, doing a primer coat also helps to reduce the ever so slight translucency of the ABS plastic I print with. If you hold a fresh piece pre-painted piece up to the light, you can see a glow through. This is disastrous when you brush paint on, because the light shows all the paint strokes from within. Priming it with spray paint totally seals out the light. I would recommend a prime coat on shapeways plastics too, just for the best adhesion of later paint. re: clear coat after ... I haven't done very much of a varnish coat like this because I use a brand of acrylic paints called "patio paints". They are meant for things that can go outside and be weathered a bit. They are more resistant to water, sunlight, and wear. Plus, these paints have a nice smooth finish that is great for painting on and brushing off the antiquing glaze. re: hollowing - yes, hollowing is definately a good skill to have for larger pieces. However, for your pendant pieces it wouldn't be so useful. Since you don't have a lot of volume as it is, you wouldn't be able to get rid of much internal volume anyway and still retain a 2mm - 3mm wall thickness. Many Shapeways materials required a 3mm wall thickness. Some can handle less .. as little as 1mm but then you are left with a very fragile model that feels cheap and is not particularly stable - easily cracked. I have not used the program that you use, so I can't suggest a good way to hollow in that program. But I can tell you two ways I can hollow in 3d studio max. (1) Imagine if you have a sphere... and then you make a slightly smaller sphere and embed this into the larger. There are boolean tools in Max that will allow you to subtract the smaller sphere from the larger. (2) There is also a shelling function in Max that you can use to create an inner or outer shell on your model. This works best on simpler models. Again, let me stress that for a small piece like a pendant, hollowing is not of use to you. It's great for larger pieces though! Hope this helps! Let me know what material you are ordering from Shapeways, and I can tell you why it is rough and advise you about better materials :) -Whystler [ Edited by: Whystler 2012-07-14 08:36 ] |
|
V
VampiressRN
Posted
posted
on
Sat, Jul 14, 2012 9:28 AM
Wow...your last post was awesome. I don't know anything about the 3D Graphic programs and not interested in doing this art, but loved reading all the specifics...very intriguing. I love how you answer everyone's questions and really get into every detail. That is why most of us like reading Wendy Cevola's posts as they are a delightful learning experience, even for those of us that don't make mugs. GREAT THREAD...keep it up. |
|
GSM
Gene S Morgan
Posted
posted
on
Sat, Jul 14, 2012 9:23 PM
Thanks so much for your info. It is really helpful. I have been having my models made in what ShapeWays calls White, strong, and flexible or PA2200. I have considered using their White Detail, but the cost is about twice as much and they say it has less strength. I was concerned about the top loop where the cord is attached, so I worried about strength. I find the poured resin I am using is quite strong and since I am making copies of my pendants, strength of the model is probably not a major factor. As I said, since the pendants I am doing now are meant to represent wood or stone a little roughness is not a big problem. But, I might get to a point where I require a smoother finish and wish I had started out right in the first place ....I sencond VampiressRN in her appreciation of you thread ... Pleas keep it up .... |
|
W
Whystler
Posted
posted
on
Sat, Jul 14, 2012 9:38 PM
Vampire & Gene - you're most welcome! Hey Gene, did you know that shapeways has a special augmentation to the strong white flexible material that smooths it? I have not tried it, so I cannot vouch for exactly what it feels like, but I suspect you might benefit from trying it. There is an extra charge for smoothing.. I believe that it is an extra .35 cents per cubed centimeter. I think they are coming out with their smoothest material very soon. If you take a look at their blog, you might see an announcement. It's a grey coloured material. You might also want to try their full colour sandstone. It prints fully coloured pieces. Paint up your piece digitally, and give it a try. It is a more delicate material - yes ... but only for small delicate design bits, like loop for stringing a pendant. But if you made the loop more of a hole (or a double hole, as I used to do for polymer clay pendants I made in my younger days), then it would not be so delicate. And it would be 1) cheaper, and 2) already coloured for you. Caution though, it is not at all smooth .. it really does feel like sandstone, which might be a bonus. Just some thoughts ... -Whystler |
|
GSM
Gene S Morgan
Posted
posted
on
Sun, Jul 15, 2012 7:29 PM
Thanks much for the heads-up on new materials in ShapeWays. I have not tried any of their other materials except for the aluminite, and it was very poor in detail. I will check out their blog ... I really appreciate your help ... Gene |
|
C

clintiki
Posted
posted
on
Sun, Jul 15, 2012 7:48 PM
Great pieces! After putting on your spray base paint, what other paints do you use? Are you using a glaze mixed with an acrylic paint to get the antiquing effect? Thanks in advance. Clintiki |

Pages: 1 42 replies