Tiki Central / Other Crafts
Making Pendants on your computer
Pages: 1 37 replies
|
GSM

Gene S Morgan
Posted
posted
on
Tue, Jul 10, 2012 9:23 PM
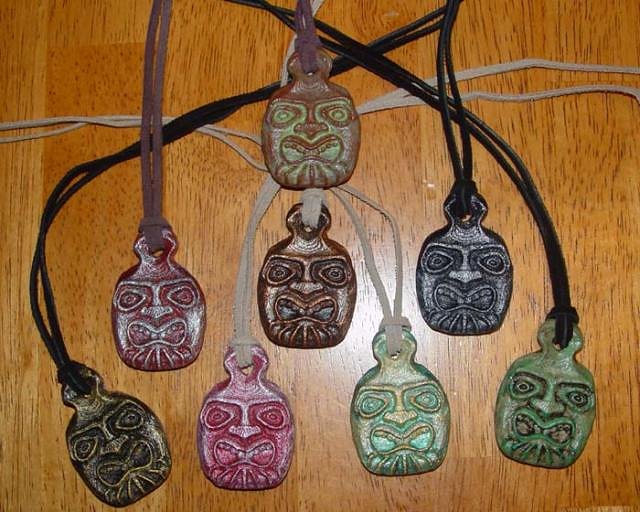
I have been following the recent thread by Whystler on creating tiki pendants with 3D computer programs. I thought I could add a little to the discussion. About a year ago I had a thread about trying to create tiki designs for t-shirts. At that time many of the artist here like Wendy, Zerotiki, MaddogMike, and others encouraged and helped me in my attempts. I really love the step by step threads here (Wendy drives me crazy with her cool ceramic work. I wish I could still do that) This image is of an assortment of tiki pendants I have made using one design. OK, they are not perfect tikis. It was my first try and I was experimenting with different designs to see how they would print up.
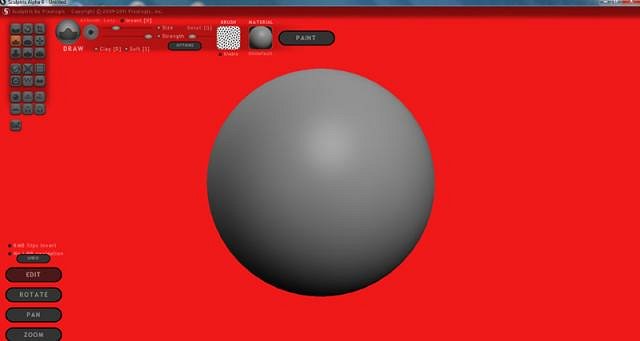
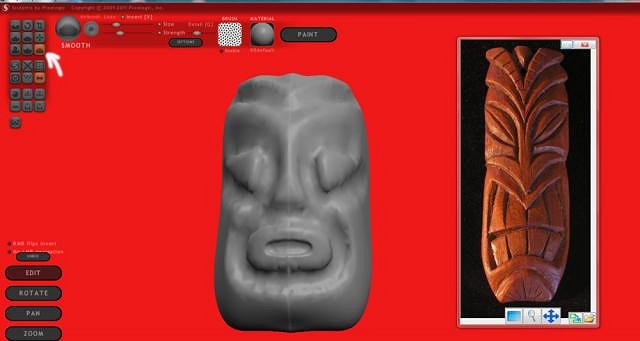
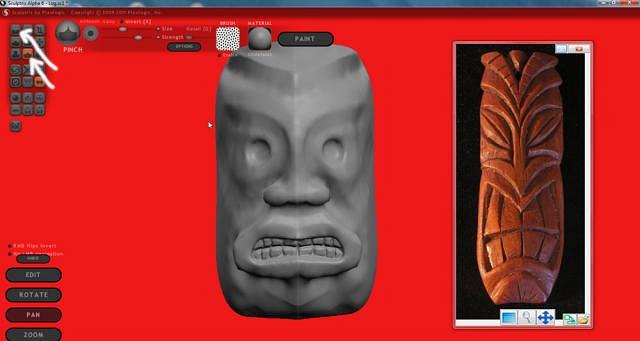
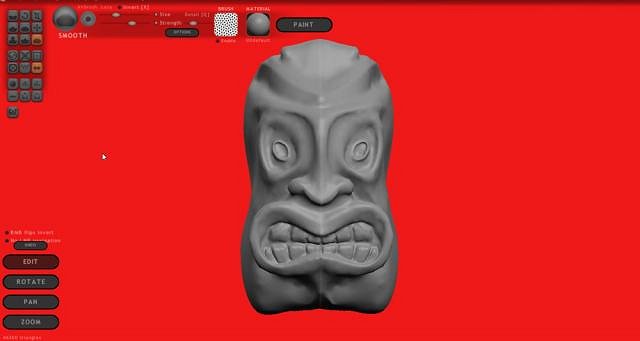
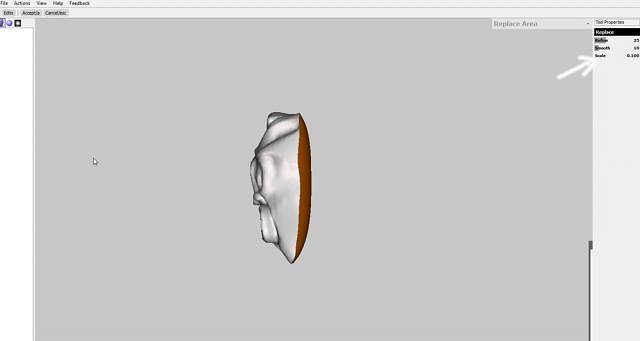
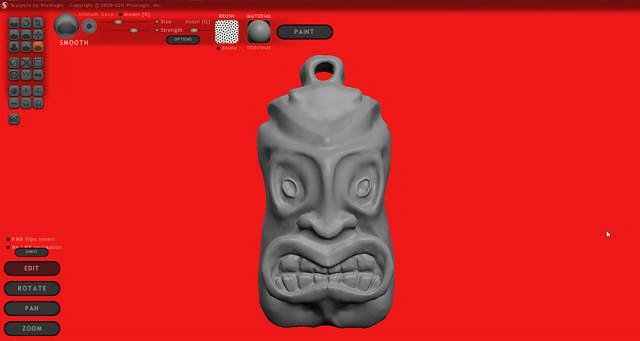
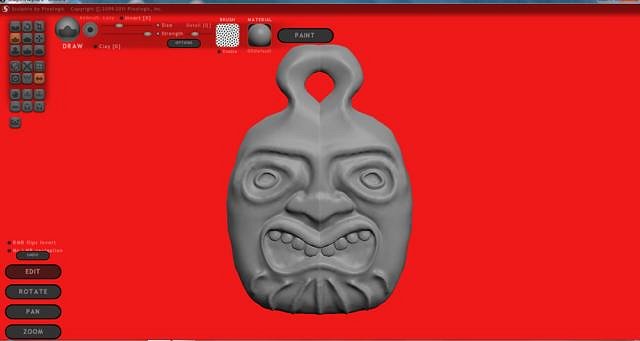
This is a free computer program called Sculptris. It is free and available online. It starts with a gray ball of digital clay. I'll show you some of the ways you can shape it.
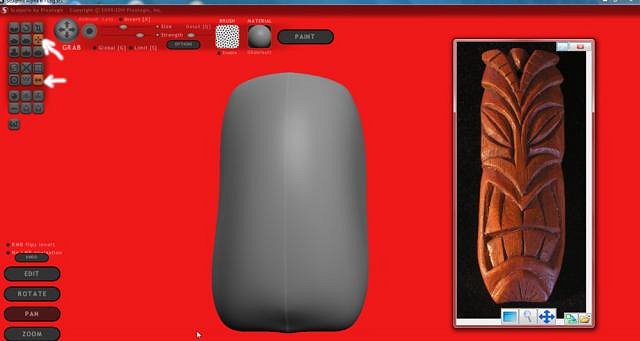
Couple of things you do to start. On the right you will see a carved tiki I have grabbed an image of online. (I do that a lot for inspiration. You will see I don't come close to copying) This is done using another free program called Image Overlay which allows you to keep a reference image visible on top of Sculptris. The bottom white arrow points to the symmetry button. If you push that button all your work will be mirrored. (makes things easier) The top arrow points to Grab. With Grab you use a big brush and pull the ball into any shape you want. I often start with a log. That is what you are suppose to carve tikis from.
|
|
GSM
Gene S Morgan
Posted
posted
on
Tue, Jul 10, 2012 9:36 PM
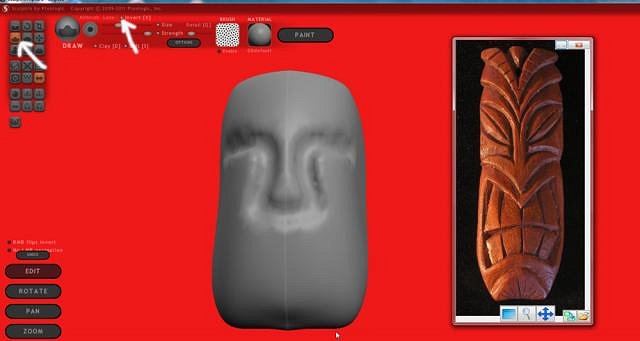
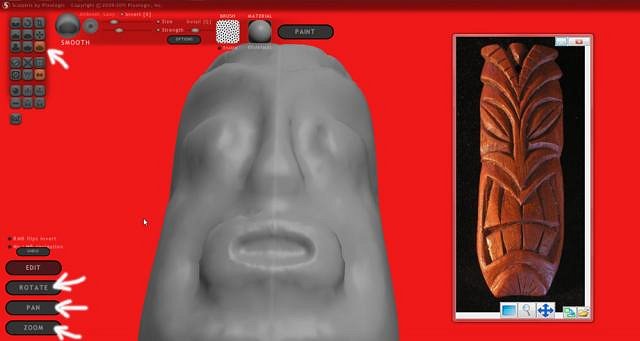
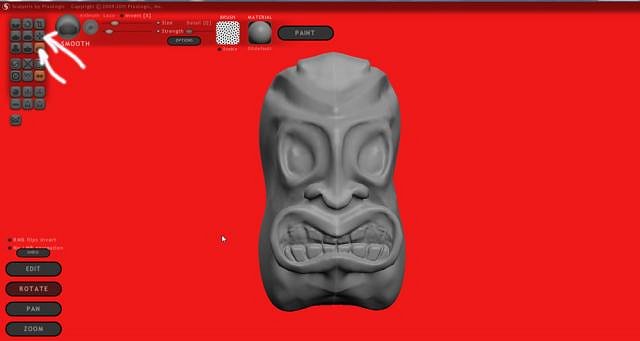
You can add clay to your model to create your design, but I prefer to mostly to carve because that is how it is supposed to be done. I push the draw button at the lower arrow. And, then I push the invert button at the upper arrow. This allows you to remove clay rather than add. Just start carving a general face look. Vary the size and strength sliders to vary the carving.You aren't going for detail at this point, just a general placing of features. Look at the example to get ideas. Notice, because of the symmetry button, all you have to do is work on one side and it is mirrored on the other.
Actually I find this to be much like carving wood. You dig in and then sand it. The sanding is done with the smooth button.
Check out the buttons in the lower left. You can move the model all around. Smoothing is easier if you zoom in. You can do these moves on the fly if you hold down the ALT key.
Used some more grab and smooth to try to define the face. Grab is a little bit of a cheat. As you can see the design is be altered greatly from where we started. It will be more defined as we go.
|
|
GSM
Gene S Morgan
Posted
posted
on
Tue, Jul 10, 2012 9:45 PM
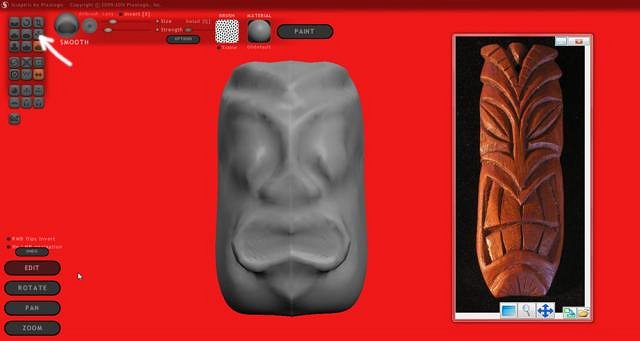
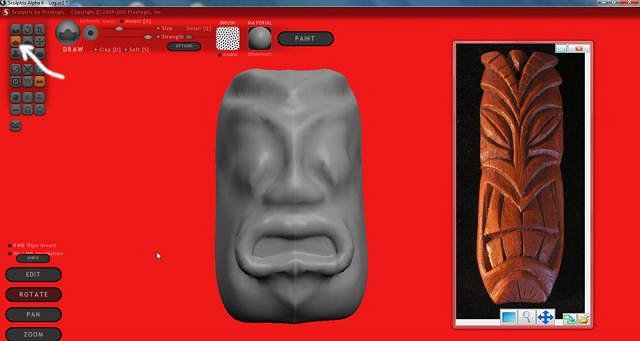
I messed up a little at the beginning. I will illustrate that down the line. I had to add some clay on the nose and mouth because I stretched them out too much. Do this with the invert shut off.
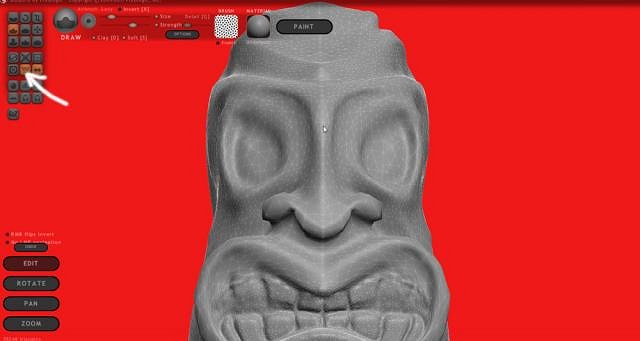
You can add and define detail with the Pinch and Crease controls. Crease is a more detail tool for carving than draw.
More grabbing and smoothing …... Looks more like something now. Got rid of my example. Did not need it any longer. It inspired me enough. Sorry I gotta quite for now. Will try to get back tomorrow. Hope this is helping some folks.
|
|
D

danlovestikis
Posted
posted
on
Tue, Jul 10, 2012 10:03 PM
Well I got a surprise when I brought this up to read. Thank you very much. |
|
C

clintiki
Posted
posted
on
Tue, Jul 10, 2012 10:30 PM
WOW Gene-- That's some "high tech" Tiki there! I'm really impressed. Where are you located in the Mid West? I'm here in Indiana. Clintiki |
|
W

Whystler
Posted
posted
on
Tue, Jul 10, 2012 10:34 PM
Thanks for showing this! I couldn't have explained 3d sculpting better myself. The truth is, the process of carving clay with a variety of tools, or your fingers, is very similar to 3d sculpting except you don't feel the cool wetness of the clay, the push and release of pressure, the gradual increase in stiffness. But it's a lot less messy. I hope this is a PG13 site, after re-reading what I wrote ... -Whystler [ Edited by: Whystler 2012-07-10 22:54 ] |
|
V

VampiressRN
Posted
posted
on
Tue, Jul 10, 2012 10:50 PM
Wow...that is really kewl. Thanks for sharing the screenshots and steps in the process and the reference to free programs...things like that encourage other artists to try too...WHAT FUN!!!! |
|
C
clintiki
Posted
posted
on
Tue, Jul 10, 2012 11:14 PM
Good one Whystler! Following yer thread too. Simply AWESOME... Clintiki |
|
A

AlohaStation
Posted
posted
on
Wed, Jul 11, 2012 6:30 AM
I'm glad that my carvings inspire other artists to expand their horizons. As a graphics guy I really like new software and I've tried this - with no good results. Perhaps it is just a matter of practice - or perhaps I'm too old school, and prefer having the media of choice in my hands. I'm still waiting for the 3D wood carving software! |
|
GSM
Gene S Morgan
Posted
posted
on
Wed, Jul 11, 2012 8:28 PM
Thanks much Wendy ... Your work has always inspired me ... I bet you would be great at Sculptris .... Clintiki ... thank you for your comments ... I live in Iowa ... far from the ocean but on the banks of the Mississippi. Whystler ... Thanks but I'm not really a 3D guy. It was your thread that got me started on this thread. Thanks for that too. I didn't get the PG13 thing ... I'm a little slow sometimes. But it did make want to get some clay out. VampiresRN ... Thanks ... I just wanted to give some folks some info and a little encouragement. I was surprised that folks checked it out. Computer stuff has never been very popular on Tiki Central. AlohaStation ... Your carvings do inspire me. I wish I still could work in clay and wood. |
|
GSM
Gene S Morgan
Posted
posted
on
Wed, Jul 11, 2012 8:38 PM
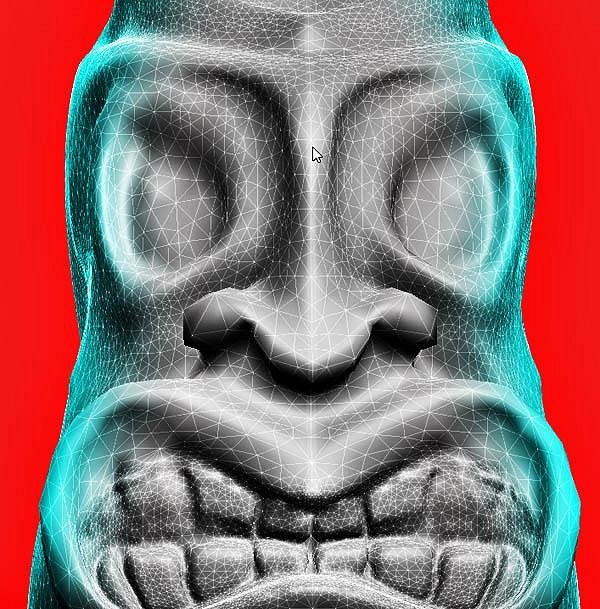
I mentioned I had messed up a little. I don't want to be too technical here because I want this to be fun. I don't really know much about real 3D modeling programs, but there are some things it helps to know. This image is a zoom in with the W button pushed. W stands for wireframe. That is really what your image is made up of. Like I said I don't understand it either, but those little triangles are part of the wireframe. The smaller they are the more detail. I started out with too big of triangles, so there is some rough looking areas on the nose and the teeth. I'll fix that in the mix.
Hope you can see the detail a little better in this image. See how larger triangles make the nose look wrong.
More smoothing and grabbing and adding a little more detail and I'm done. Not the greatest tiki, but it is our first try …... I lied, we are not done. Time to switch software because we have to get our model ready to send somewhere and have it printed in 3D.
|
|
GSM
Gene S Morgan
Posted
posted
on
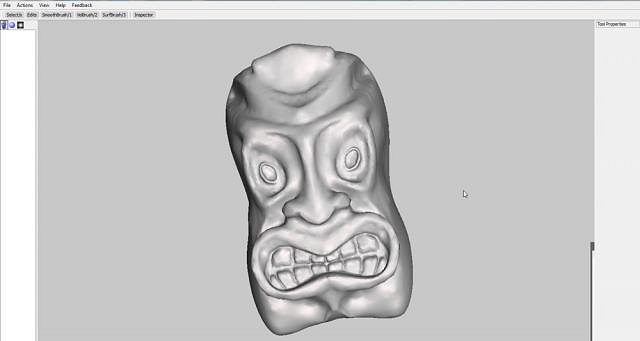
Wed, Jul 11, 2012 8:50 PM
The program is called Meshmixer and it is also free online. Looks different don't it? There is a reason for that but I won't tell you because it would take all the fun out of this. (Too technical again) This program is not as much fun as Sculptris. I'm not going to go into much detail on how this stuff is done because I think it would bore you all. There are other 3D programs that can do this, but I find this one to be the most learnable, even though it's learning curve is no bump in the road either. I will give you hints on easier ways to do this later, but this is how I do it most often now.
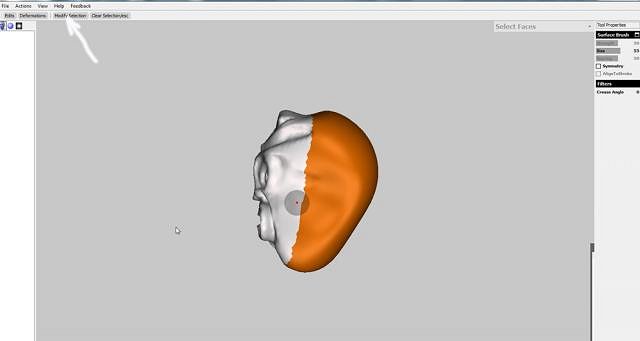
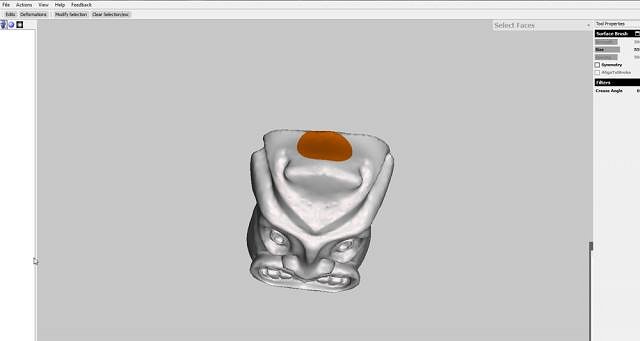
This is all about selection. Notice how I now have the pendant turned sideways. It sure don't look much like a pendant now. Let's fix that. Under the select menu at the top left use either the paintbrush or the lasso to select the back of the pendant. It is now orange. In the modify menu as indicated by the arrow select smooth.
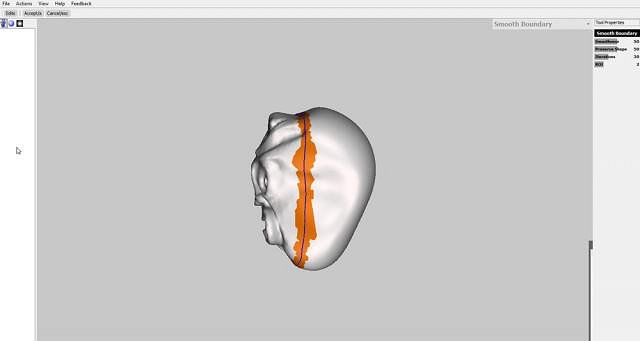
A blue line indicates a smoother boundary.
In the edit menu select Erase & Fill. Set the scale in the upper right as indicated by the arrow to zero. Hey, we got a pendant.
|
|
GSM
Gene S Morgan
Posted
posted
on
Wed, Jul 11, 2012 9:01 PM
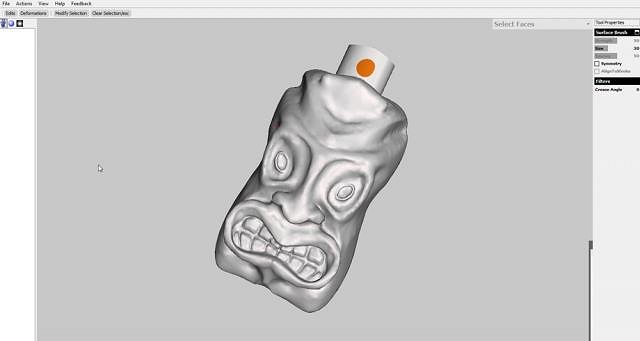
Do another select on the top of your pendant as we did before.
In the edit menu select extrude. In the upper right increase the offset. Wow, it's magic. Now he has a handle on top of his head. Or is it a hat? Select a round area on the handle. Turn the guy around and do the same on the back. In the edit menu select Bridge/Handle …..... Wait for it ….. more magic coming.
My handle's got a hole in it. (Wasn't that an old Hank Williams song?) We are going back to Sculptris now. When we go between these programs we have to export our stuff in an obj file. (You don't have to but it would be a good idea) Most 3D programs can read that format.
|
|
GSM
Gene S Morgan
Posted
posted
on
Wed, Jul 11, 2012 9:12 PM
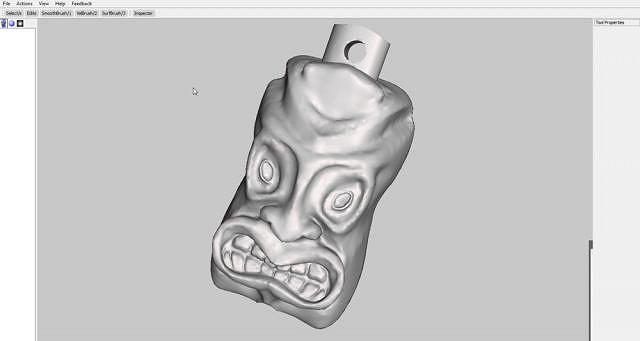
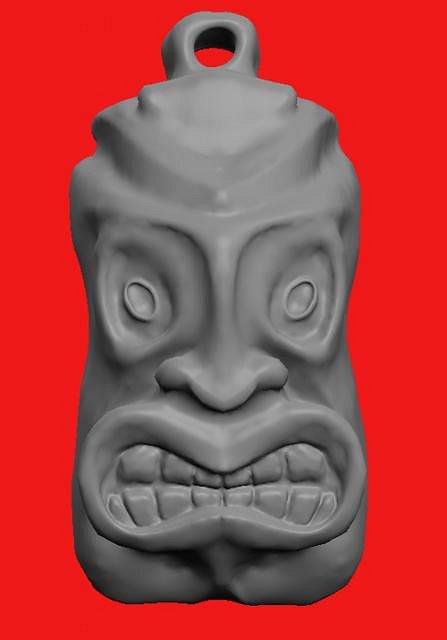
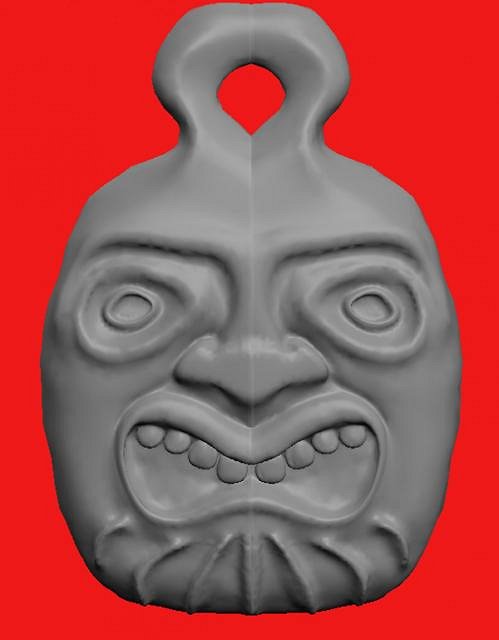
More smoothing and grabbing and adding a little detail and we have a tiki pendant. Not a great one, but this is only an example. Oh, it is a good idea to smooth the back real well to try to get it pretty flat. That will be important down the line.
A closer look at our guy.
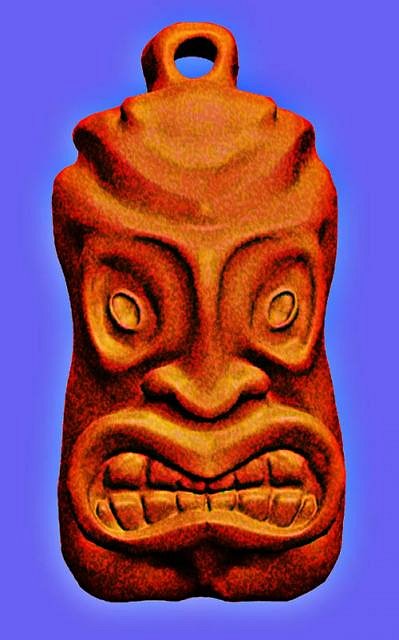
This is me experimenting with color possibilities in Photoshop after taking a grab of the image.
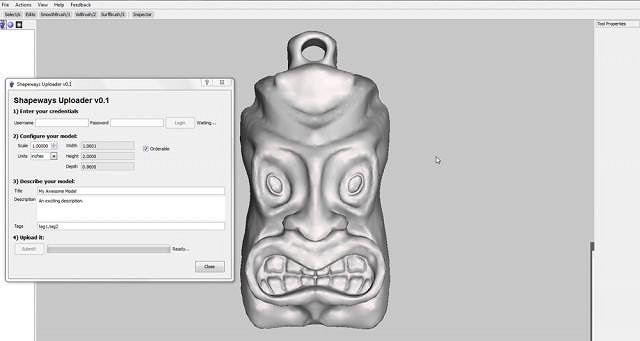
It's back to Meshmixer. Time to send off our file to a an online 3D printer. I use Shapeways. In the print menu you can send it right off to them. You have to log in and chose a size. Give the file a name and shoot it off. Then go to their site and log in. Check your model area and your new model should show up. (sometimes it take a little while) You can see the cost of having it printed in different materials. If it cost too much go back and try again at a smaller size. We will talk about that later. I have more to come. Hopefully tomorrow ….....
|
|
W
Whystler
Posted
posted
on
Wed, Jul 11, 2012 9:22 PM
I also use Shapeways! It's a great service! To be honest, I haven't used it much since I got my own 3D printer, but there are definate pluses to using Shapeways, not the least of which is not having to own your own printer. Shapeways can print objects in various plastics, some of which are quite detail oriented, but also in stainless steel, silver, gold, glass, and even ceramic. The downside to printing in ceramic, however, is the cost. Ceramic cost is based on the amount of surface area... I believe it is .18 per square cm. This doesn't seem like a lot, but a normal sized 7-8 inch tiki mug will cost you $250-$300.00 to print. The glaze colours are also limited to their selection, and they will not sell you greeware or bisqueware. Printing in metal is likewise expensive, however, metal pieces such as jewelry can be small enough to make it cost effective. Metal cost is based on volume of material. I have rings on Shapeways that cost under $15. -Whystler |
|
T

tigertail777
Posted
posted
on
Thu, Jul 12, 2012 4:04 AM
Very cool tutorials Gene, thanks for sharing! If you did a negative version, would it be strong enough to use as a mold for clay? If so, then using that service you mentioned could actually become cost effective by having molds printed and then making clay versions from the mold. It's a thought anyways. |
|
L

LoriLovesTiki
Posted
posted
on
Thu, Jul 12, 2012 11:24 AM
Gene, thanks for the tutorial and the pictures! If you're selling those pendants please let me know how much. I really like them. Lori |
|
GSM
Gene S Morgan
Posted
posted
on
Thu, Jul 12, 2012 8:24 PM
Whystler ... wish I could afford my own printer too. What kind of materials can you print with on yours? Is it all plastics? Tigertail .... If you were carful you could make plaster molds. You would have to make sure your sculpt did not have any undercuts. My demo here has too many undercuts to reproduce that way. I used to do ceramics and made some of my own molds. Wendy has had some good demos on how to do it. As you will see I did the same thing using rubber molds and resin ..... Lorilovestiki .... I'm really glad you like my pendant. This one was a demo and I have not tried to have it 3D printed yet. My wife has and Esty shop and has started adding some of my tikis to it. I hope to have more in time. She sells them for $12 each plus shipping. Her shop is at: esty.com/shop/morgancreativedesign. She is just starting out so there is not a lot in it yet but there is more to come .... Thanks for checking out my thread. |
|
GSM
Gene S Morgan
Posted
posted
on
Thu, Jul 12, 2012 8:38 PM
The first photo in this thread is of a number of pendants I have made in the manner I have demonstrated. But then again they are different. Those are made from the first sculpt that I had produced by ShapeWays. That sculpt was different in several ways. I was experimenting. There are several things to think of when sending to ShapeWays. As Whystler mentioned earlier in this thread, there is a cost consideration. ShapeWays charges by size and volume and what kind of material is used. Got to keep the price down, so keeping the thing as small as possible is what you gotta do. Also, ShapeWays has limits set on how thin they can be depending on the material used. I kept trying to make real thin ones to save money and kept getting them rejected by them. This image is of the first one they accepted.
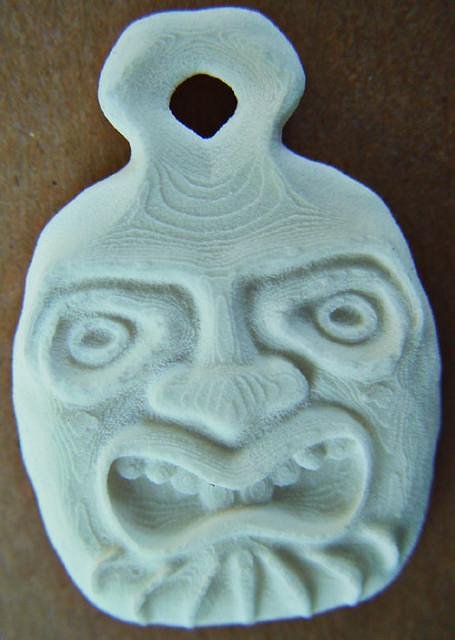
You can see that this not as tiki looking as most tiki lovers would like. I was trying to be kinda tiki and experimenting with what could and couldn't be done. Some details like the small teeth and those thin ridges on the chin were added to test how well the 3D copy could produce small detail. Whystler mentioned in his thread about the difficulty of trying to reproduce deep cuts and overhangs. I made the mouth somewhat deep and the nose with a slight overhang.
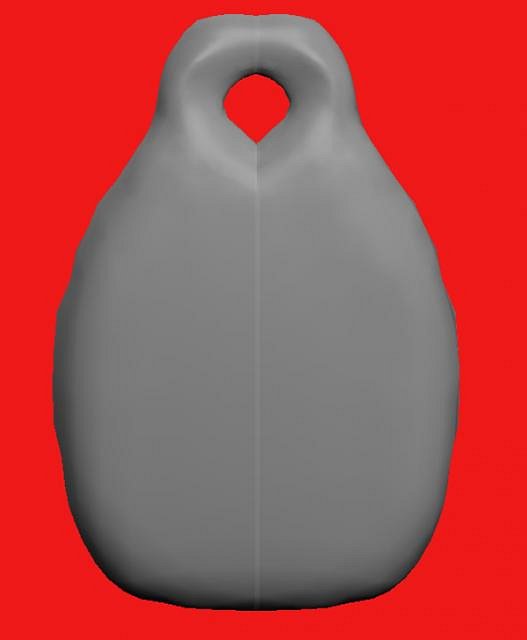
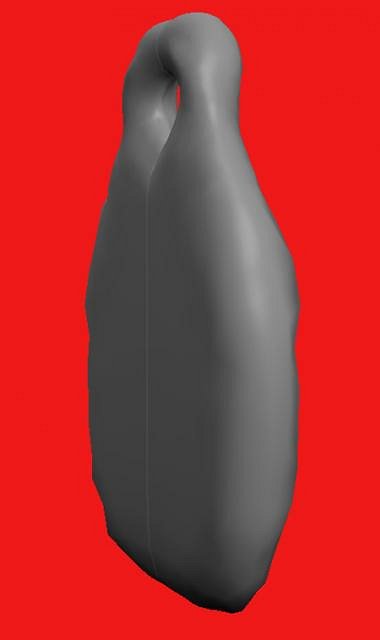
OK, I promised to talk about other easier ways to do this whole process. The way this pendant was done was by starting with something other that a sphere. It is easier if you start with a flat medallion like object. I have tried many ways and many other 3D programs to do this. Some worked, and some not so good. This one was produced on an Ipad app and transferred to my PC. It is a clunky app, but it does a nice job of producing a rough medallion.
As you can see, we already have a hole and a flat back. It makes all the sculpting easier and no cutting up in MeshMixer. The only trouble is the depth of your carving is kinda limited. You can see that my demo model has more form and shape than this one. It is a good way to start though.
So I sent off my obj file and it was accepted and 10 days later this is what came in the mail. Nice detail. I liked it. It is a nice fairly hard surface white plastic. The surface is nice and would be perfect to paint as Whystler has demonstrated in his thread. You may notice there is a wavy texture on the surface. I do not know why, but after awhile I got to liking it. I thought it looked like wood grain. This model is 2 inches high and 1 inch wide. It cost me $11.24 to have made including shipping. I wanted to have a whole bunch and did not want to spend that kind of money. The obviously answer to my problem was to make copies.
|
|
GSM
Gene S Morgan
Posted
posted
on
Thu, Jul 12, 2012 8:54 PM
You start with a box a little bigger than your model. Using hot glue you attach your model to the bottom of the box. (Remember when I said a flat bottom was what you wanted. Now we know why. I tried this with a non flat model and the glue gave out and before the mold set it floated up to the top) Spray some sealer and mold release.
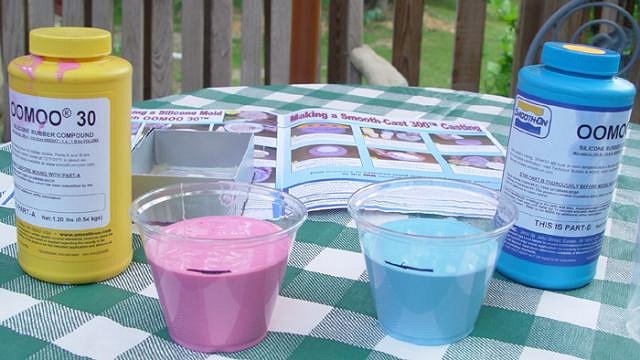
The mold stuff (I think that is the scientific name) comes in two different color which you mix together.
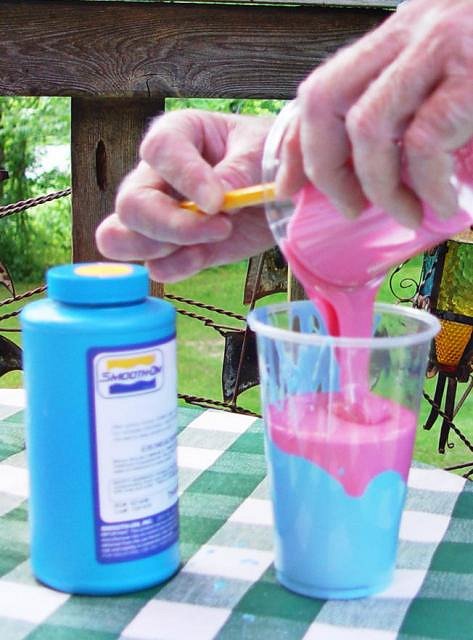
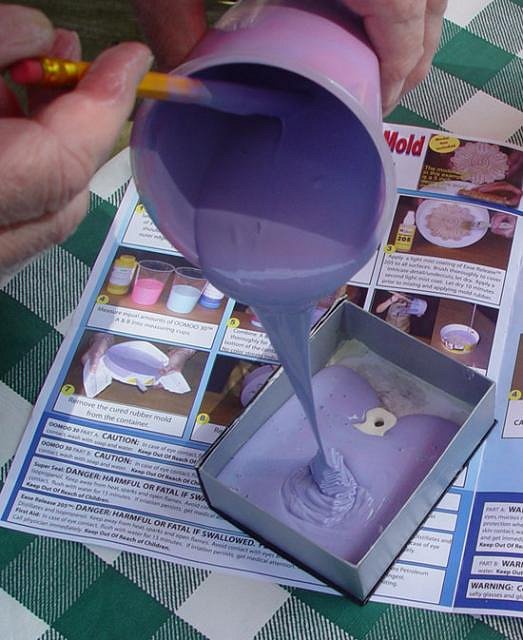
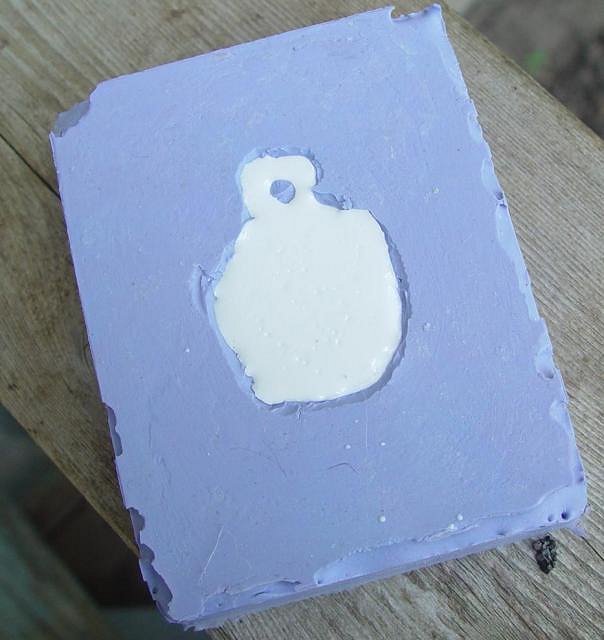
You mix them together and mix until it looks kinda purple.
Slowly pour it over your model ….. I used to do this kind of thing years ago and I must say they have really improved the mold making material over the years.
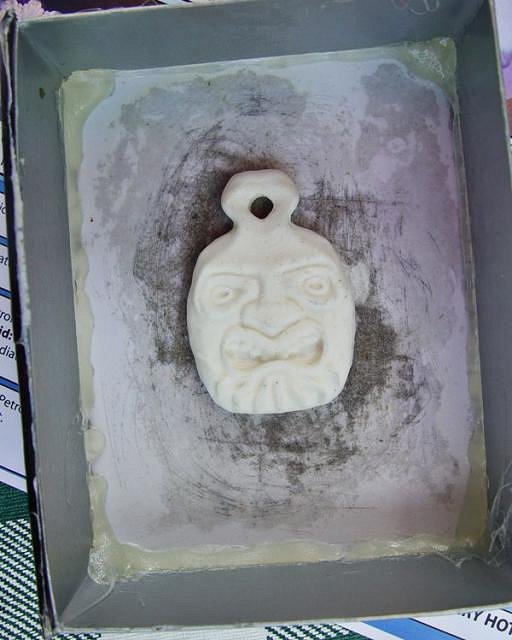
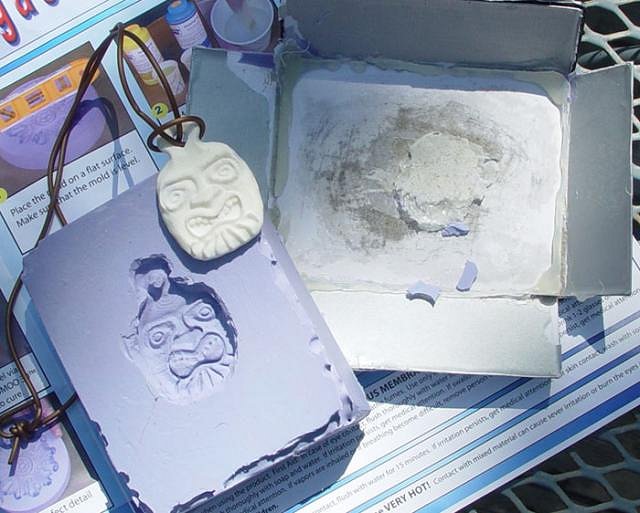
This is what the mold looks like with the original on top. Using the hot glue made it easy to get the model out of the box. You can see that the mold is a little rough around the back edge. That is because I am lousy with a glue gun and I got too much glue on and the pendant was raised up a bit and I had to cut it out. In the end that worked out because it allowed me to make slightly thicker pendants if I wanted to. That is all I have time for now .. the next time I will finish up with casting and finishing the pendant.
|
|
W
Whystler
Posted
posted
on
Thu, Jul 12, 2012 10:39 PM
Hi Gene - yes it's all plastics. But they are not always oil based. You can use PLA (poly lactic Acid) filament, which is made with corn. I have not used it extensively, but it comes in many cool colours, including a sparkly attempt at gold. The neat thing about using the PLA is that is smells a bit like cooking rather than burnt plastic when you print with it. -Whystler |
|
A
AlohaStation
Posted
posted
on
Fri, Jul 13, 2012 8:47 AM
How much time and expense was there just to get the pendant produced to this point (modeling, exporting and printing)?
|
|
GSM
Gene S Morgan
Posted
posted
on
Fri, Jul 13, 2012 6:21 PM
Whystler ... I like the idea of plant based plastic .... It must give you the munches when your printing and it smells like cooking. AlohaStation .... As far as the time goes, I had to experiment a lot before I got things right. But, I can sculpt a piece and get it ready to send in a couple of hours or so. The cost for this pendant was actually a little higher than I first reported. I did not include the shipping as stated, so it actually came to about $17. Trying slightly smaller sizes can knock that cost down a bit. The longest time was waiting for it to come in the mail. I think Shapeways' gets pretty busy sometimes and it took nearly a week before they printed it. They send you an E-mail when it goes into production. It was just about exactly 10 days from me sending it to them until I got it in the mail. |
|
GSM
Gene S Morgan
Posted
posted
on
Fri, Jul 13, 2012 6:32 PM
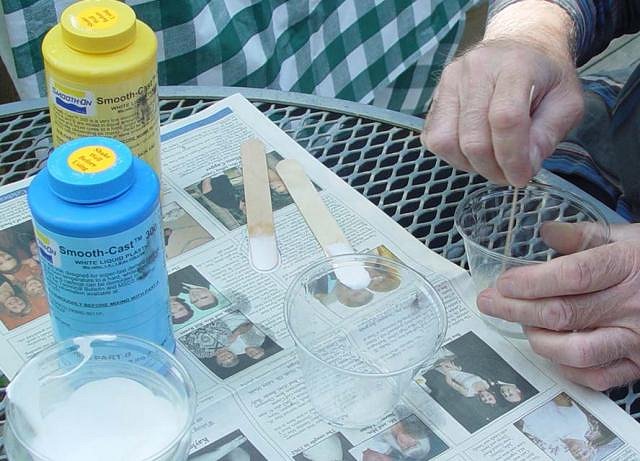
I want to make a whole bunch of these pendant thingies. Lets mix up some resin. You stir together two clear liquids.
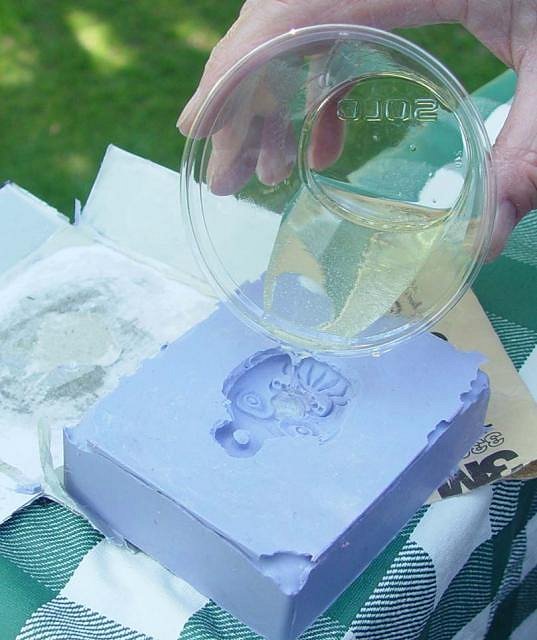
When it gets hot (you will know) pour it into you rubber mold. Do it slow.
The hardest part of casting resin is getting the bubbles out. You will see that I did not always get the job done. One thing that seems to help is to gently blowing on the resin. No, your are not cooling it. It is the carbon dioxide in your breath that helps disperse the bubbles. Once it starts to harden, it quickly turns white. You can pop it out of the mold after about 20 minutes.
This is what we end up with. It is pretty close to the model. Because of the overflow in the mold I have to clean the back edge a bit. I sand the back and roughen it some to get a better painting surface.
|
|
GSM
Gene S Morgan
Posted
posted
on
Fri, Jul 13, 2012 6:45 PM
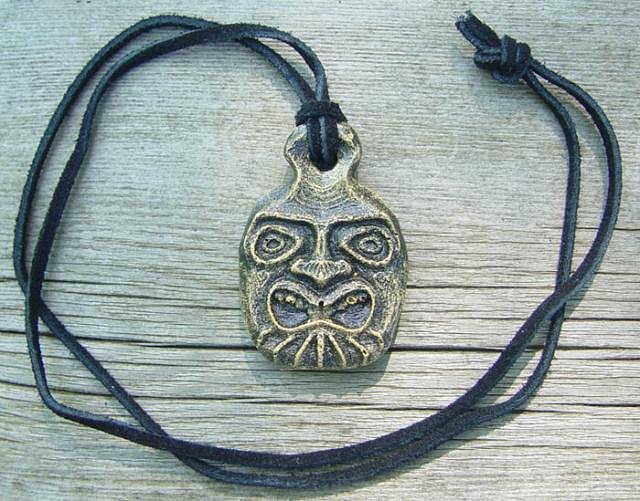
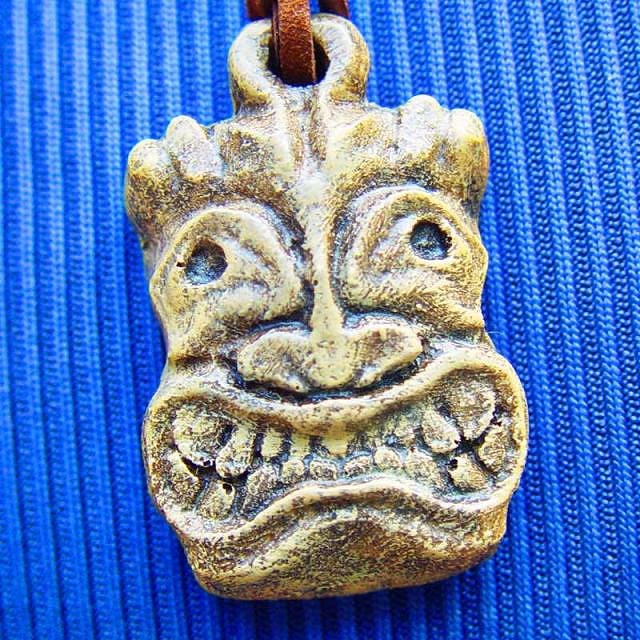
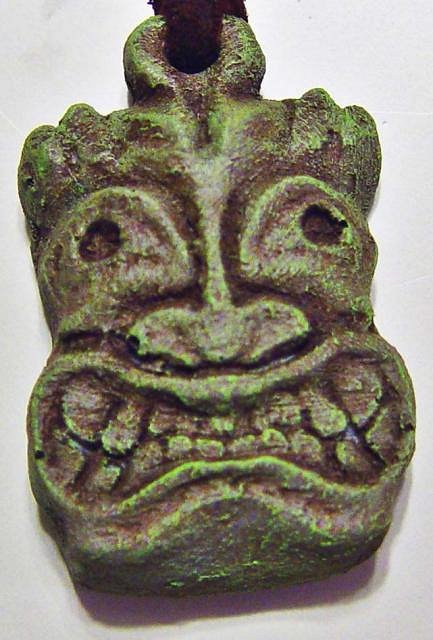
OK, here it is. A dark base paint is applied. Then we dry brush a lighter color on to bring out the detail and texture. A light clear satin coat is sprayed on. A leather chord and it is ready to wear. If you look close you can see what bubbles do. In a couple of places (like the teeth) there are tiny round holes in the surface. Not many, but they tend to be in areas where the detail is thin or recessed. I have convinced myself that this adds to the rustic funkiness of the pendant. Every one is a little different due to this.
That is pretty much the whole story. This is the second pendant I made. I think it looks more tiki. We experiment with different color combos.
I was going for an ivory or bone look for this one.
I kinda go the opposite direction from most folks in painting. Instead of antiquing I like to dry brush. Close up, it looks a little sloppy, but I think it brings the texture out more and I love the texture. Well that's all I got. I gotta say I have been thinking of doing this tutorial for awhile now but last year when I first posted here on Tiki Central it was in a thread about computer graphics and there seemed to be a bit of a backlash at the thought of using a computers in designing tiki. I check in here a lot but don't post. I want to thank Whystler for starting his thread. It pretty much inspired me to post this tutorial. Hope it was helpful and thanks to all who dropped in and commented and gave me encouragement.
|
|
GSM
Gene S Morgan
Posted
posted
on
Thu, Sep 6, 2012 7:02 PM
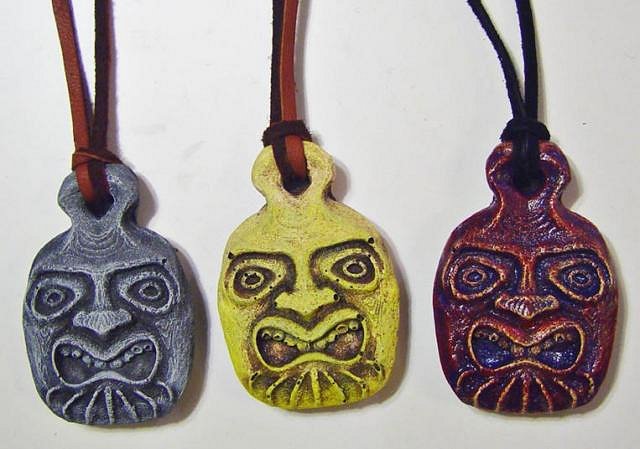
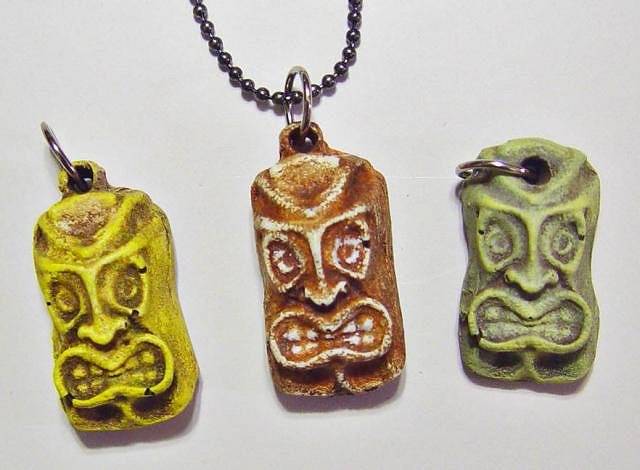
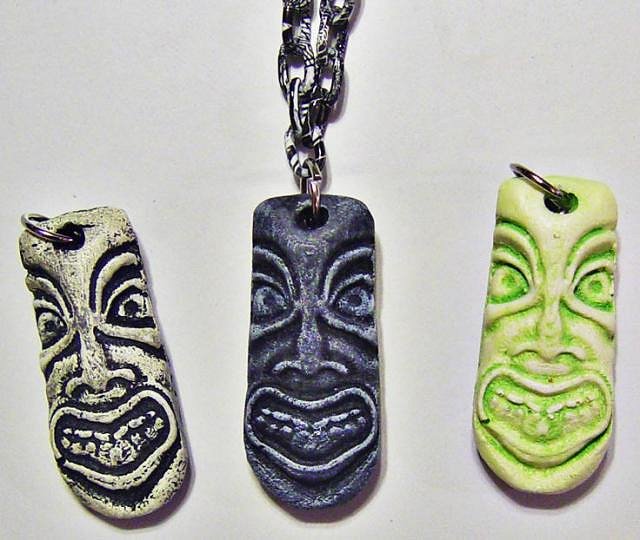
I thought I would post a little update to this thread. I wanted to show the final pendant made from my tutorial. Also Whystler has given me some new ideas on surface treatments for my tikis. On his sculpts he sprayed on a base coat and then antiqued them with a darker color. He convinced me that using outdoor paints (they sell under the name Patio Paint) made it possible to eliminate the step of a final protective clear coat. I must admit that I like the look of a clear coat, but sometimes it come out just too shinny. This image is of three pendants with the two on the left without a clear coat and the one on the right with one. I've got to say that the far right tiki is one of my favorites. It has a complex multi-color finish with a semigloss sheen over it. It is very unique looking. The first one had a base coat of an automotive primer which was antiqued with black. The middle one had a base of a matte ivory paint sprayed on with an antique of dark brown. On both of them I did a fine dry brush of a slightly lighter color to make the texture pop.
|
|
GSM
Gene S Morgan
Posted
posted
on
Thu, Sep 6, 2012 7:06 PM
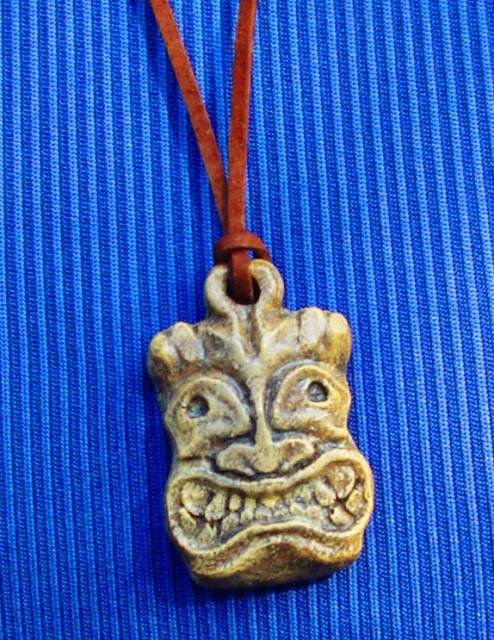
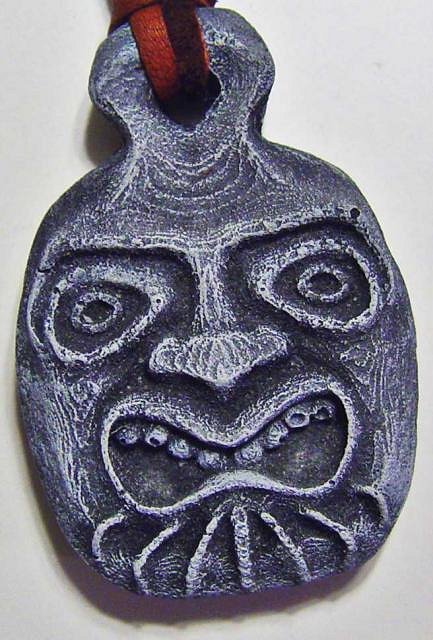
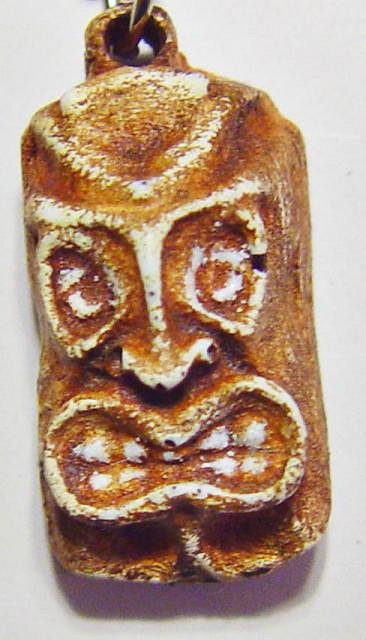
This closeup of this tiki shows how the matted surface makes the pendant look almost like carved lava stone.
|
|
GSM
Gene S Morgan
Posted
posted
on
Thu, Sep 6, 2012 7:10 PM
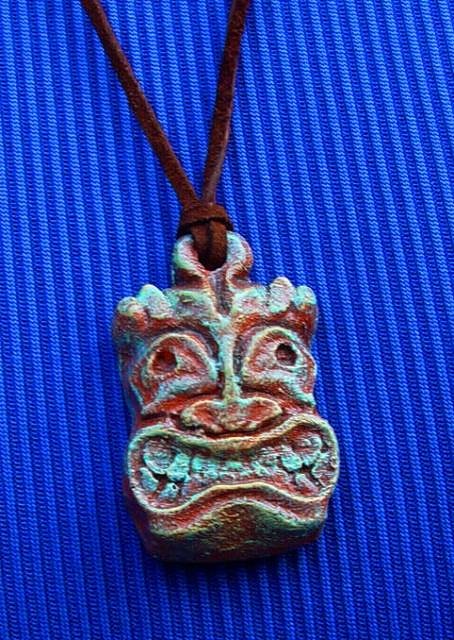
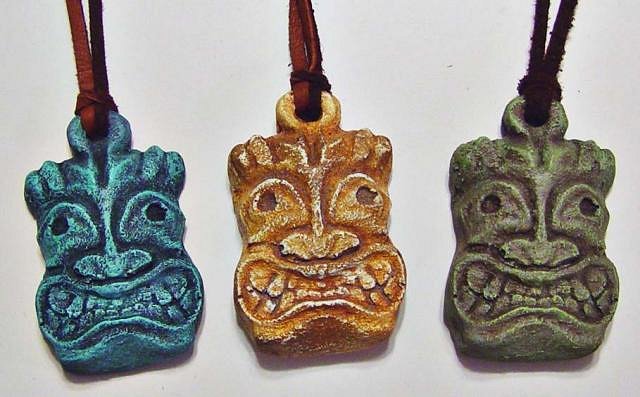
Antiquing and dry brushing can produce a variety of surfaces. The center one was rubbed extra hard to give it an old and worn look. I know many people want their tikis to have a simple finish, but I can't help liking more colorful and rustic looks.
|
|
GSM
Gene S Morgan
Posted
posted
on
Thu, Sep 6, 2012 7:14 PM
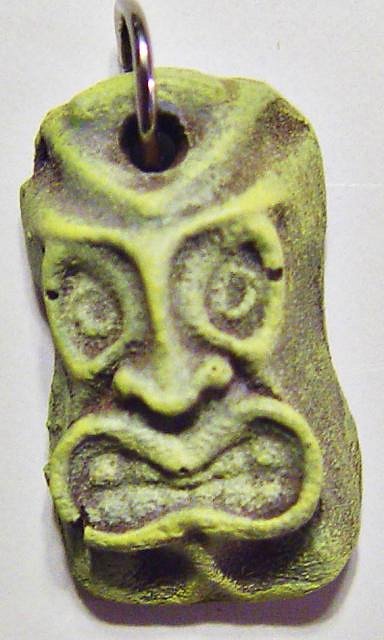
This tiki had a gray base coat with a black antique. I dry brushed several green tints over that. I put up this closeup so folks could see how dry brushing creates a very natural looking patina. Sorry the image is a little blurry.
|
|
GSM
Gene S Morgan
Posted
posted
on
Thu, Sep 6, 2012 7:17 PM
On the pendant made from the tutorial I decided to try something different. My original tikis were about 2 inches long. They looked good that size on a leather cord. I made these last two about half that size because I wanted to see how they would look on chains more as jewelry. I did similar color finishes as I did on the larger ones.
|
|
GSM
Gene S Morgan
Posted
posted
on
Thu, Sep 6, 2012 7:22 PM
A couple of problems were evident with the smaller size. I think there was less detail on these. It may be because the tutorial sculpt actually had a bit more detail and had more undercuts than the previous ones. I did that on purpose because this is all pretty experimental for me. It may be that this sculpt was just harder for Shapeways to reproduce. Also in the castings, I got more bubble holes on these smaller ones. I believe that is because there were smaller and thinner edges in the detail. Bubbles seem to form in the same places all the time. Any suggestions from folks with more casting experience would be greatly appreciated. All those faults sure made this one look old and worn.
|
|
GSM
Gene S Morgan
Posted
posted
on
Thu, Sep 6, 2012 7:26 PM
A little thicker paint coat on this one kinda covers up some of the defects. But those pesky bubbles are still there. You may notice that this one looks a little different because I cut the top hanger off and drilled a hole in it to see how that would work with a jump ring. I had become concerned that at this smaller size the top hanger might break off, so I tried this other approach.
|
|
GSM
Gene S Morgan
Posted
posted
on
Thu, Sep 6, 2012 7:29 PM
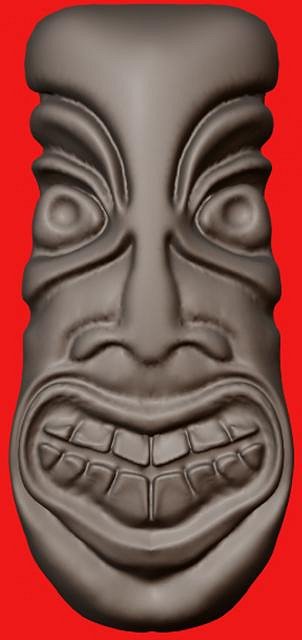
Whystler had suggested to me that I try to have my pendants produced in a smoother material. I tried one in what was called a polished version of the material I was using. This is the sculpt I tried that with.
|
|
GSM
Gene S Morgan
Posted
posted
on
Thu, Sep 6, 2012 7:32 PM
This is a design I produced awhile back as a t-shirt design. It was easy to convert it for a pendant design.
|
|
GSM
Gene S Morgan
Posted
posted
on
Thu, Sep 6, 2012 7:36 PM
These smoother finished tikis take the paint really well. And, they seem to have fewer bubbles. But, I think, again, the small size and polishing reduced the detail. The teeth which are nice in the original sculpt are kind of messed up on the pendant. I was disappointed with that ….... We have some of these pendants available (and there are more to come) on our website: etsy.com/shop/morgancreativedesign My t-shirt shop is at: cafepress.com/cidgraphics
|
|
UI

Unkl Ian
Posted
posted
on
Wed, Nov 7, 2012 7:50 PM
If you pour the resin sooner, it gives more time |
|
UI
Unkl Ian
Posted
posted
on
Thu, Nov 8, 2012 11:34 AM
You can also use a soft (disposable) brush, to coat This breaks up the bubbles on the surface. |
|
GSM
Gene S Morgan
Posted
posted
on
Wed, Dec 26, 2012 1:26 PM
Thanks very much Unkl Ian for your suggestions. They sure were helpful. I will give them a try. .... Gene |


Pages: 1 37 replies