Tiki Central / Other Crafts
News and Troubles of Jürka's Tiki Factory
|
M

MadDogMike
Posted
posted
on
Fri, Jun 28, 2013 12:39 PM
I just did a quick stop in here on my way out of town, as far as I know you can't just add water to clay to make slip. It needs a flocculant or deflocculant or something. I buy my slip ready made but remember something about that in school. I don't know what that chemical is or how much you need but do some research. If you have trouble finding that info get back to me :) |
|
V

VanTiki
Posted
posted
on
Fri, Jun 28, 2013 12:54 PM
MadDog is (as always) correct :) I have admit - I've never done any slip casting myself, but I have read a lot about it :) Best of luck! Henrik "VanTiki" |
|
J

Jürka
Posted
posted
on
Fri, Jun 28, 2013 1:10 PM
Lordy-Lord... So many difficult words... I have special slip-casting clay, not a modelling clay... I think, I guess it has everything inside whatever it needs? |
|
V
VanTiki
Posted
posted
on
Fri, Jun 28, 2013 1:33 PM
oh! Ok - If the powdered clay you have was made for slip casting, I think you are correct in that it has everything it needs mixed in. Can't hurt to try it :) |
|
J
Jürka
Posted
posted
on
Fri, Jun 28, 2013 2:06 PM
Yeap... Only thing they say about it... is that it is recommended to add some formsil and plastificator... I really don't know about them, but I've tried slip-casting once and I really didn't need anything more... Everything was just alright... except relation of water and clay-powder... This time I think I'll make 50/50 water/powder... |
|
M
MadDogMike
Posted
posted
on
Sat, Jun 29, 2013 4:13 PM
Thanks Henrik, I have a bunch of useless info floating around in my head :lol: Jürka, you say that everything comes out when you pour the slip out? That's what make me think there is a lack of deflocculant. Here in the US we have ready-made liquid slip available so I have never used dry slip mix. I looked up dry slip mix and the 2 I found DO NOT have the deflocculant added to the dry powder: From the Laguna site "To make liquid slip for casting into plaster molds, these bodies require mixing with water and deflocculants such as soda ash, sodium silicate or dispersal/Darvan". From the Byrne's site "just add the prescribed amount of water and deflocculants (we supply the soda ash and sodium silicate - No Charge)." You might check with your supplier and see if you can find out if it includes the deflocculant or not. Other than that, the wall thickness would depend on -
Some other factors could include
Hope that helps. |
|
J
Jürka
Posted
posted
on
Sun, Jun 30, 2013 3:20 AM
This is the instruction by seller of the clay: http://www.loovuspood.ee/files/Valumasside%20valmistamisjuhend.pdf I made a slip-cast yesterday. I put 1 kg powder to 1 litre of water. I think maybe I should make it just a little bit more liquid. But the biggest problem that happened was that I think the clay and water was not mixed propably. It looked alright, but after I slipped it out, I saw that walls were not solid, hard pieces or something... So, today I try another slip-cast and try to mix it longer with better instrument and maybe use little bit more water.
|
|
TSA

Tiki Shark Art
Posted
posted
on
Sun, Jun 30, 2013 5:41 AM
Jürka ~ Hope this works out... really a great story following this so far... amazing how much goes into production. I have so much respect for your drive. IT's a beautiful design. It'll be worth it! Can't wait to see the next step! Thanks for sharing all this... very inspirational. |
|
D

danlovestikis
Posted
posted
on
Sun, Jun 30, 2013 7:52 AM
I always learn from my mistakes. By sharing here and having MadDogMike and others write I'm learning a lot. Good design I hope today goes well, Wendy |
|
M
MadDogMike
Posted
posted
on
Sun, Jun 30, 2013 8:27 AM
I knew when I posted that yogurt comment it was going to get me into trouble, not very scientific :lol: Jurka, I'm having trouble understanding where your problem lies. "I saw that walls were not solid, hard pieces or something..." Were there places where no clay stuck to the mold and there was no ceramic wall there? Maybe a picture would help? The recommended Formsil 113 that you don't add is the deflocculant we were talking about, I'm not sure how it would work without that. I can't figure out what the Plastifikaator CJ is, some sort of plastifier or wetting agent usually used in plaster. I slip cast a piece yesterday afternoon and left it in the mold for not quite 2 hours, wall thickness is about 3/8 inch or 10 mm which is about what I like. As far as it turning hard in the mold, I have never had that problem. After pouring the excess slip, I let it set in the mold for about 14 hours then carefully removed the mold - it is still too soft to handle and will need to dry out of the mold for several hours.
|
|
J
Jürka
Posted
posted
on
Sun, Jun 30, 2013 4:01 PM
The problem was that in the clay there were many bulges. I really don't know if these were air bubbles or pieces of clay which didn't mix with water... Anyway... Yesterday's slip-cast had too thick walls, some bad holes (due to air bubbles) and those bulges... I tried to open it, no problem, but when I tried to take the clay-man out of the mold, well, the bottom part was too soft and everything was f*cked up... It wasn't good anyway... I could wait, but I wanted to make the new one... So, heck with it... So... Today I made a new slip-cast... This time I did 1,2 litres of water and 1 kg of clay-powder. It got a lot of mixing, very carefully and very long... So, no notmixed clay-pieces any more... I tried to kill all the air bubbles and everything was fine, but after pouring I saw some tiny holes (I guess air bubbles) in the walls... I killed some of them, but then some new ones came up... So... F*ck! I hope there's no bubbles inside the clay and I hope there's no bubbles in the front... Maybe the glaze will fill them and nothing will be seen. The walls are not perfectly straight, but... still looks good (except those tiny bubbles)... This clay-guy got much better every way, but I'm little bit afraid that I glued some little pieces back to the mold and I did it just few hours before slip-casting and I'm afraid those pieces will be stuck to clay-guy... But... That's not too big problem... I will glue them back and then I'm gonna use super-attack... Tomorrow I will not open the mold, I will wait at least 3 days... It's too wet and soft... I'm thinking about that difficult-word formsil thing... What exactly it gives? "...to keep the particles of clay evenly suspended and dispersed in the water." I understand that it helps to mix clay with water? Anyway... What else did I do today? I round-shaped Kanaloa's woodpiece and also woodpiece for skull's shotmug... I would start drawing Kanaloa right now, but I'm dead tired and I've lost the drawing of my idea (which dog tore off from my notebook, but it's still there... somewhere...), so... not today... But this will be very soon when I'm starting carving again... |
|
J
Jürka
Posted
posted
on
Thu, Jul 4, 2013 4:16 PM
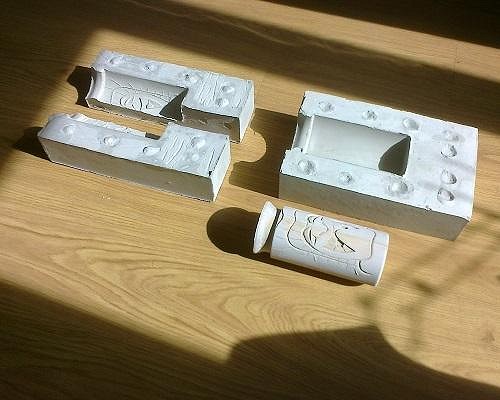
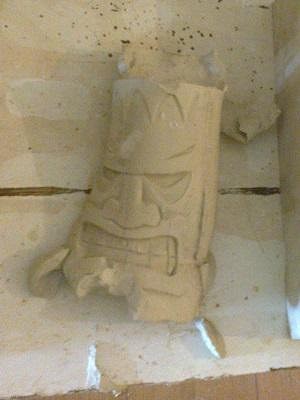
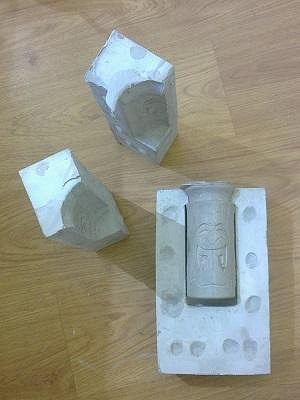
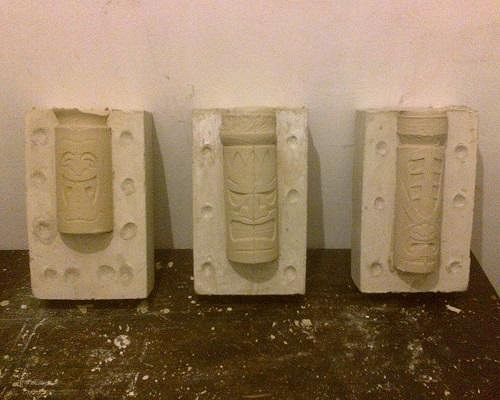
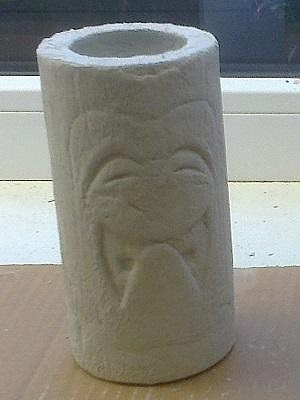
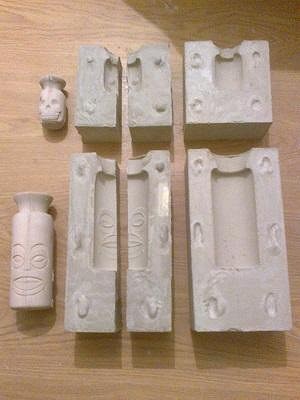
So... What has been done for now... Here is the picture of Ku and his mold. Got done pretty well... I'm satisfied with it. I poured one additional mold for Kumuhonua, just for to reduce time of making clay-guys. I started the next bag of plaster and this plaster ain't same as plaster as was the previous plaster... Again... Stoned in few seconds... and lot of bubbles... So... I'm afraid this mold is f*cked up... Plaster got stoned in the time while pouring... Oh, Lordy-Lord... So the connecting part of two front parts of mold is in one side now, because plaster was stoned before it reached the middle line. Lordy-Lordy-Lord... And I really think it is so bubbled that maybe it is not usable. But the biggest problem is those bubbles in clay. I opened the new clay-guy... Walls are pretty wide, maybe near 1 cm... and I'm pretty sure there may be many bubbles inside, so I'm afraid I cannot put it in fire... It would explode. I still exercised on it. I fcked up the bottom. I pushed that wooden ring to the bottom too hard, so the bottom was little bit ruined, so I tried to take it out again from inside and fcked up little bit more, so it's not so nice and clean anymore, but I put some water inside and tried to make it good. Well, not too bad, maybe almost ok. Anyway, that wooden-ring stuff is pretty not-so-easy. I don't have any other idea, so I guess I will use that ring in future too, but must be very careful. Also I tried to fill some bubble-holes with very wet clay... I guess they may be ok, but maybe not. Anyway, I guess I will not put it in fire. Kanaloa and skull... I also glued already woods for Kane, but I was too hardfisted with glue and now there's empty spaces between woods... Well, this is problem of future, I don't think about it right now. |
|
J
Jürka
Posted
posted
on
Mon, Jul 8, 2013 1:44 AM
Correction: formsil... formsil was that weirdo thing what I might need... |
|
D
danlovestikis
Posted
posted
on
Mon, Jul 8, 2013 7:43 AM
Spaces between wood pieces can be filled with wood putty and sanded before casting. Or you can use sculpters clay such as Romo number 3 or even ceramic clay still wet. Just cover it with mold soap before pouring the plaster. It all works. I like you two new designs, Wendy |
|
J
Jürka
Posted
posted
on
Mon, Jul 8, 2013 4:22 PM
No-no-no, problem is bubbles inside the clay! Mold is okay, but clay, it has air inside... Holes which can be seen outside, I can fix, but holes inside which cannot see nor reach, that's the big problem... It will explode in the oven... The same thing happened in Hiroshima and Nagasaki... |
|
J
Jürka
Posted
posted
on
Wed, Jul 10, 2013 1:03 PM
Today's News... I poured next clayman... After mixing clay I let it stay for a while that bubbles could come up... and mixed some more... I guess it didn't help much, because I didn't see any bubble come up... But the main difference I did was that I poured the clay into the mold the way the beer is poured into the glass to reduce foam... in angle of 45 degrees... And I think it was right thing to do... Anyway, it looks that this time there's no bubbles... So... I guess it will be the first mug that goes to oven... Kane is gonna come in this life... The wood is shaped and cut off and waits for drawing... I guess I'm gonna take a glass of brandy-cola tonight and will do something useful... |
|
J
Jürka
Posted
posted
on
Tue, Jul 16, 2013 3:56 PM
Report of today... I had poured three molds and now I opened them. Now the biggest problem... So... Today I poured next three claymen... and tomorrow I will put them horizontal and open the front part, so that the change of size would not hurt them. I don't know how it works, but we'll see... The next biggest problem... Anyway... I'm not happy with those guys I opened today... We'll see if my idea of opening the front part in very early stage works... There may happen that the clay-guy will slump flat when it's not vertical... or that when the front part will dry better (because it's open), then it bends because the other part will stay bigger longer time... or something like that may happen. Can't know before I haven't tried... |
|
M
MadDogMike
Posted
posted
on
Tue, Jul 16, 2013 5:10 PM
You are right Jurka. If you leave the casting in the mold too long it shrinks too much and breaks when you pull the mold off. The key is to pull it from the mold when it is just firm enough to stand on it's own. I let mine sit for about 8-12 hours before removing them from the mold, not a couple of days. As far as the "foot" or indented rim at the bottom. When you remove the casting from the mold and it's still somewhat soft, you can carefully indent the bottom by pressing on the bottom with your thumbs. Here is a simple 2 piece mold I made a few years back. It had a flat bottom when cast and I pressed it in. Jurka you are really struggling with this. I feel bad that I am 6,000 miles away and not able to be of much help. You might want to see if there is someone locally who is doing slip casting. Maybe a university nearby? I was able to see someone casting when I first started out and it really helped |
|
J
Jürka
Posted
posted
on
Wed, Jul 17, 2013 2:43 PM
Thanks for reply... The first time I took it out on the next day (around 12...24 hours) and when I put it on it's feet (no, my tikis have only heads), the bottom part was much more wet than the upper part, because there is not much air in the bottom... and it was too soft and... and... Well, that was yesterday's stuff... Now update! My idea is that I want to use fingers as less as possible... I want to keep them original shape as wood... With working on it later, it doesn't give the same true look... But here is my question: Does fingerprints and little variations will be seen under the glaze or maybe the glaze is the thing that makes miracles? Anyway... those new guys... which I opened after 2...2,5 hours... They really look clean... All the small details exactly as on wooden guy... There is still big question for me... that bottom thing... I don't like that finger-way too much... because I'm afraid it will look different on each mug... and I guess it would never look as clean as it should... I think I should find some cone-shape thing instead of round-shape... I don't know... That's one big question for me... All the ideas are welcome! Another question: Does every little airbubble inside mug means explosion in kiln? ...and if there is some 10 pcs of mugs in kiln and one will explode, does it mean the death for all of them who are chilling around in the same kiln? Oh! And one more thing! I'm not struggling! Let's say other way... I'm discovering the world of ceramics! :D I will do it again and again and again, learn the best ways by my practice and exercise my hands, fingers, tactics, eyes, and everything... Once I was lookin' for anybody I could know who would know anything about ceramics... Nope, there's nobody... Everybody is building cars, playing rock'n'roll, drinking beer, having babies... But no clay-stuff around here... Nope... But there's a Tiki-forum for that... :D Yeap... [ Edited by: Jürka 2013-07-17 15:51 ] [ Edited by: Jürka 2013-07-17 15:55 ] |
|
M
MadDogMike
Posted
posted
on
Wed, Jul 17, 2013 6:43 PM
Depending on your type of glaze it could cover all fingerprints, but that would also cover you small details too. As the clay start to dry and becomes like leather, you can smooth out any defects with tools or wet fingers. Once it is bone dry you can carefully sand it. Pressing in the bottom with your fingers will not change the shape of the mug, only the shape of the bottom which no one sees unless they turn it over. I think you are more likely to damage your clayguy if you try to push it in with some sort of wooden plug. As far as bubbles, there are 2 schools of thought there. Some people say that all bubbles will explode in the kiln. Others say that damp clay explodes. If you can't be sure that all the bubbles were eliminated, be sure your clay is COMPLETELY dry before you fire it. It helps to fire it slow if you can control that. You might even bake it in a regular oven for a few hours to help drive out any remaining moisture. Can a piece that explodes in the kiln damage other pieces near it? Yes, depends on the size of the explosion based on the size of the bubbles and/or amount of moisture in the clay Hope that helps, glad you are having a good time learning :) |
|
J
Jürka
Posted
posted
on
Fri, Jul 19, 2013 5:35 PM
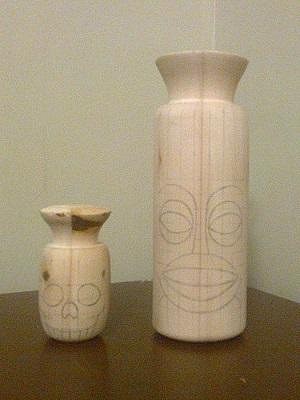
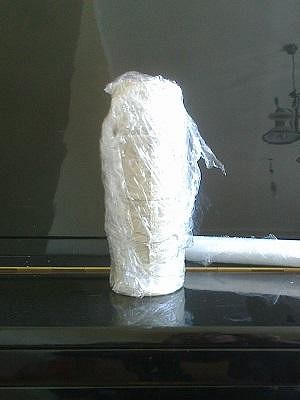
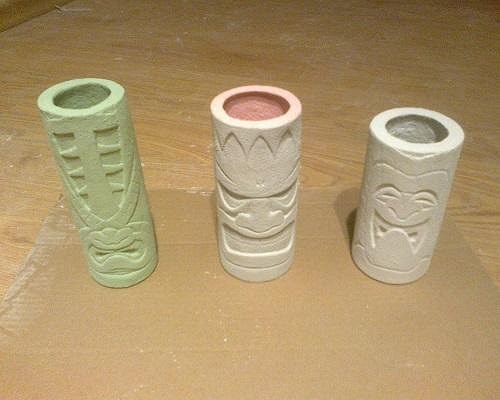
For me it would be okay if the glaze would cover small details. The main thing is that it must look natural. So... Today I discovered new way of fixing/cleaning them... I wait till they are dry and then I'll use scalpel and carve it as wood. Result is natural. Also the same thing I will do with that bottom. I'll wait till it's dry, then I'll take dividers and make a round and with scalpel I will scrape it out. And now some pictures... Here is a tip when you have to take the tiki out and you don't have time to clean it or anything... Put some plastic over it and you can go for rock and roll for few days, come back and it's still fresh... No sh*t, Sherlock... :D But yeah, I discovered that the dry one is just as good to fix than fresh... Here's the example how much it dries and shrinks in one night. Here they are... Coming three together... So... 1) Slip in. 2) Wait 30 min. 3) Slip out. 4) Wait around 2 hours. 5) Open front sides and let them dry as they are in picture... but better to take them out as soon as possible, because other side doesn't shrink as fast as front side and it will bend. I don't know yet if it bends back later when the back side will dry too after it's out. A-a-a-and here's carved Kanaloa and shot-skull and drawn Kane.
No! I'm not having good time, I'm f*cking pissed off every time I find out something is wrong again and again and again and things doesn't go as they should... but... must walk that road, cause holy mission doesn't finish itself. I will do it as long as it gets ready for rum and juice and umbrella. Amen! |
|
J
Jürka
Posted
posted
on
Sun, Jul 21, 2013 12:46 PM
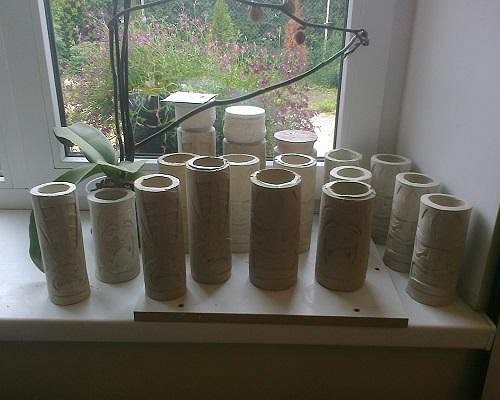
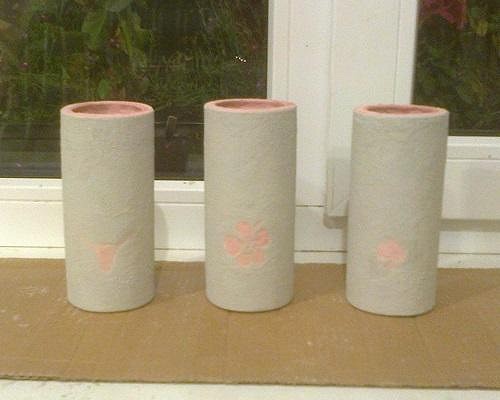
New problems, new questions! So, now I have started to clean the bottoms and tops... That's how I found out that yeap, there's many bubbles of each of them... I guess I have to try that good drying method, because I have no idea how to prevent air-bubbles even better as I do it. But now... With those bottoms and tops... Walls of the mug are not exactly same thick, there's always some places thinner than others... And now, when I'm doing that top... It will not be in round shape... More like pancake shape... What do y'all think? Is it ok? Or maybe it shows bad handcraft work? I could make them near round by scalpel, but I'm not sure if it would look better then... For me... in case of tiki mugs... it doesn't bother... Maybe it's even more interesting and old-school look... On your mugs, is it important that they would be all straight? For example some of mine has happened to be bended (very little)... How important is for you the bottom? If it's not seen, then it doesn't have to be 100% calendered? Or even if it's not seen, everything should be still perfect? What do you think about these things? Is it important that all the same mugs would be exactly same size (length) by every millimeter? And now... What has been done... There's three of them (one of each kind) in other room drying... Here most of them are garbage... At moment I have 5 Kumuhonuas, 3 Lonos and 3 Kus which could be almost ok for kiln (if they would not explode)... Ofcourse they need lot of cleaning, tops are not done yet on this picture, I cleaned pretty much after this photo was clicked. |
|
J
Jürka
Posted
posted
on
Sun, Jul 28, 2013 3:12 PM
I guess it's enough of them for now... I think I may have... some... emm... around 7...8 Kumuhonuas, 3 pcs of Kus and 4 pcs of Lonos... Few days ago I received my 90-euros glazes... So now I'm gonna wait till they get dry, meanwhile I clean them and make bottoms and tops and engraving... and then I'm gonna put it into my oven as Mad Dog recommended... to be sure it's 100% dry... and send to kiln and hope that they would not explode (they really have lot of bubbles)... and glaze and kiln again and party if everythings gonna come out fine... |
|
J
Jürka
Posted
posted
on
Tue, Aug 6, 2013 3:42 PM
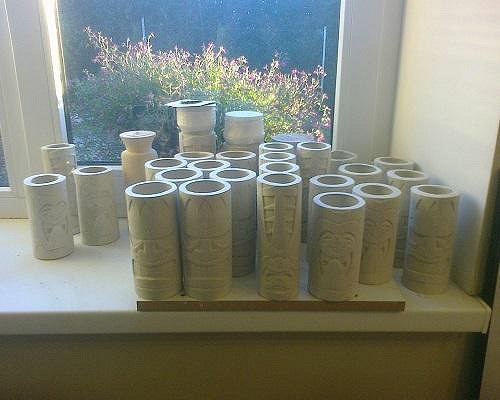
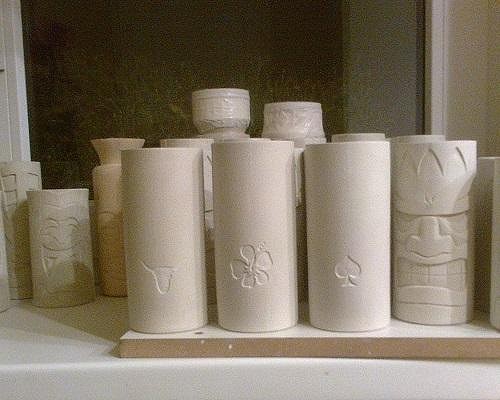
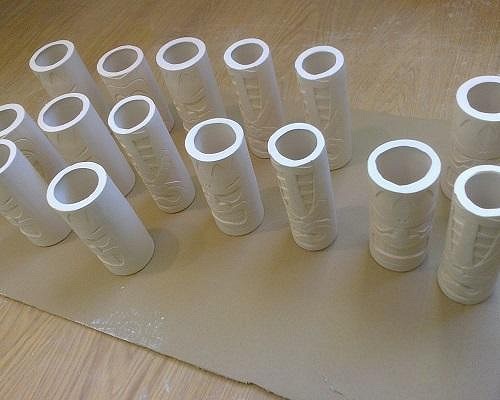
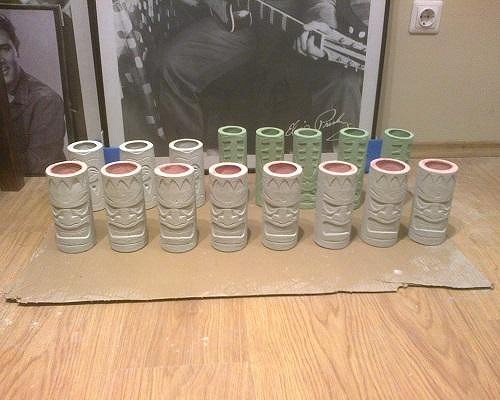
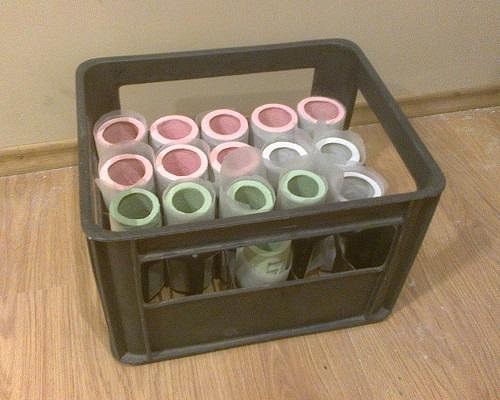
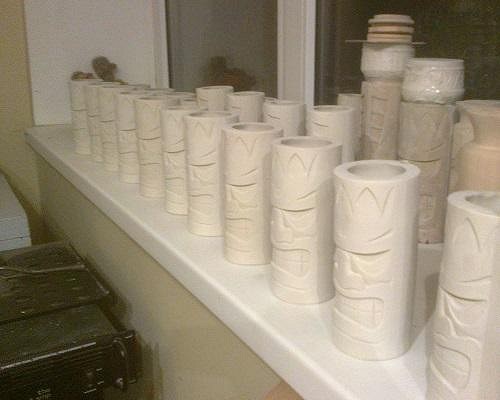
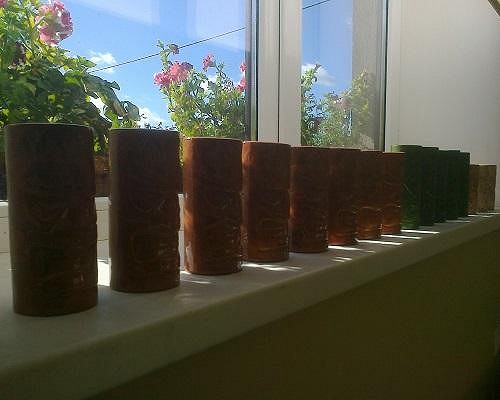
All are cleaned and still drying... Also started to pour next portion... This time I put more water into the clay and I guess it's the first time near perfect without holes or any bad stuff... Anyway... Here's the picture... of all the guys... On the platform are the ones which are going to kiln... 8+5+4=17 pcs... For three of Kumuhonuas I made some specials on the back... Engraved with scalpel... 1) Dixie. 2) Hibiscus. 3) Spade. |
|
M
MadDogMike
Posted
posted
on
Sat, Aug 10, 2013 8:29 AM
Jurka, that's an impressive army of mugs. Look nice and thick too. The engraving on the back of those three looks very clean - nice work. I'm anxious to see how they fire, waiting to see pics with you drinking rum drinks out of them with paper umbrellas! :D |
|
D
danlovestikis
Posted
posted
on
Sat, Aug 10, 2013 9:53 AM
I'm really enjoying watching you work. These will look great. Look for glazes that go into the grooves to show detail. Here those are Duncan IN glazes. Best wishes for a successful firing. Do a slow ramp to prevent cracking. Wendy |
|
J
Jürka
Posted
posted
on
Thu, Aug 15, 2013 4:31 AM
Thanks, y'all! It gives a bunch of motivation when I know that there's somebody else also waiting for results... :D My glazes are already bought... These are Botz glazes from Germany ( http://www.botz-glasuren.de/steinzeug-glasuren-farben/?L=1 )... I guess they will give the same efect, but can't know before I try... I could already send them to kiln, but I just don't have time for it at moment... They have been dried more than 3 weeks... So from next week I'll go on with it... |
|
J
Jürka
Posted
posted
on
Mon, Aug 19, 2013 4:04 PM
Holy sh*t! Firing of those 17 pcs costs around 60 euros... 4,5 euros per piece, Ku is 3 euros, because they are shorter... Crazy... It's getting more and more expensive every day... |
|
TY

Tipsy Yeti
Posted
posted
on
Sat, Aug 24, 2013 10:45 AM
I've used #1 pottery plaster for years to cast a wide range of things, I love the stuff. |
|
J
Jürka
Posted
posted
on
Mon, Aug 26, 2013 3:55 PM
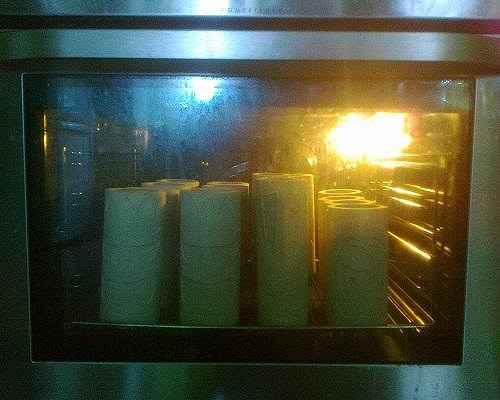
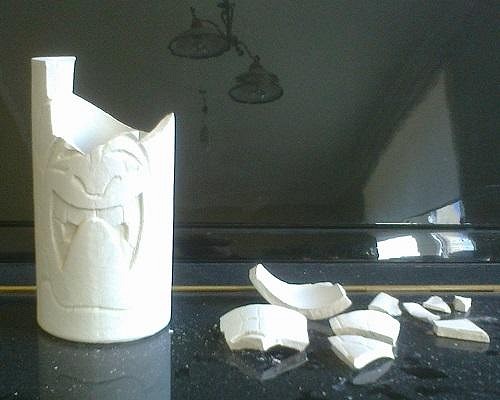
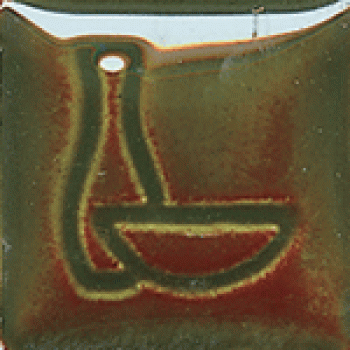
For today my first firings are over and guys are feeling healthy (except the fallen soldier)... To make sure that there would be no explosions I put them into oven for few hours (till 150 degrees of Celsius) as Mad Dog Mike advised. Although I guess this time it was not so necessary because guys had been grounded for 1 month. Then I tried to clean them from dust as much as I could... but I tried more than I could... So... Here I would like to bend the head for one of the guys who shattered when I tried to hit the dust out of his eyes... That was a sad moment, he was a good-looking mug and I miss him dearly... I put him gently into the water and melted up to afford the new life for it in the future... I brought them to kiln and today I received them, all healthy and strong. Got it all with only 40 euros (51 euros for 17 pcs, I lost 1 pc, so for 16 pcs = 40 euros... I love math! ...sometimes). I guess the ceramic guy who fired them just likes tikis... And now the glazing... for first time in my lifetime... I opened the bucket, stirred it as it was rum-coctail... and started to glaze one Ku... The glaze dries very fast and looks like sh*t... Very fat and dry... and all the brushmarks are visible... and the coat is so thick that the face of Ku is not to be seen... I don't know if it's normal... My theory says that in kiln the glaze will melt to be smooth and all the face will be drawn out then... But I am not sure of anything... So this is a point I would like to hear glazing experiences of others... Here's my so-called "glazed" Ku... |
|
M
MadDogMike
Posted
posted
on
Mon, Aug 26, 2013 4:58 PM
Hey Jürka! Looks like you are making progress! Most people like to do test tiles with their glazes ~ glaze a carved or textured tiles and see what the glaze looks like when fired. If you don't do a test tile, I would surely recommend that you do just one mug first and see how it comes out. Be sure there is no glaze on the bottom of the mug or it will fuse to the kiln shelf. The person firing your pieces should be a good resource too. He obviously knows about ceramics and can probably answer some of your questions. Good luck Jürka, here's to your success. |
|
D
danlovestikis
Posted
posted
on
Mon, Aug 26, 2013 9:57 PM
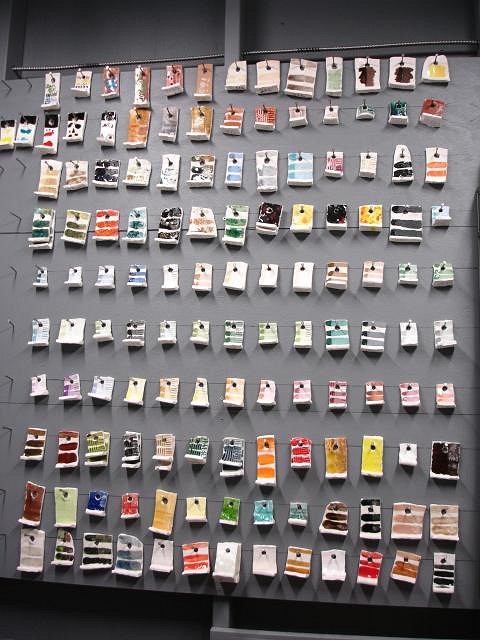
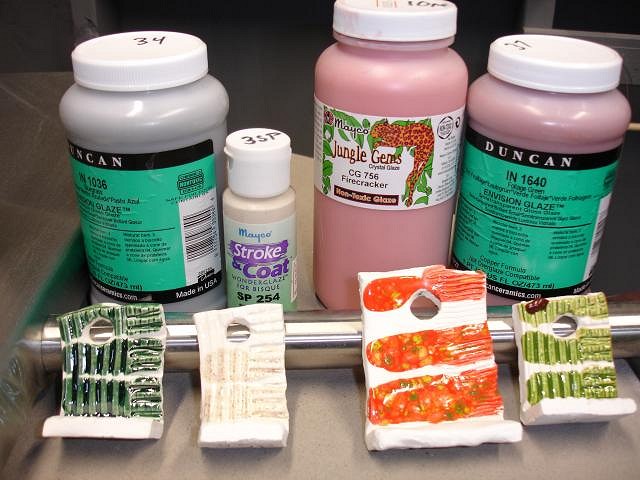
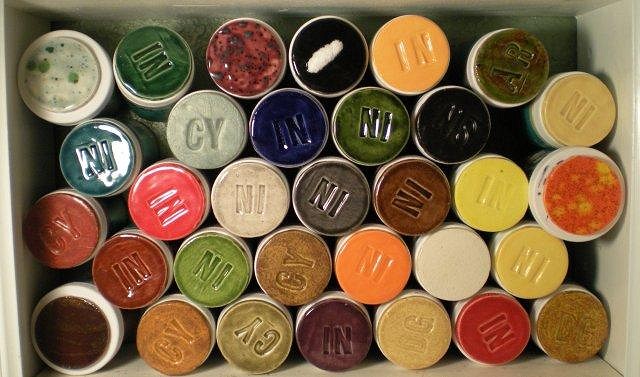
Thank you for the PM. Here's the help I promised. I have a glaze test for every jar of glaze I have bought. For the IN glazes by Duncan I wanted to see them go into the detail. So I made these L shaped pieces with a hole for hanging and pressed lines into the clay. They were bisque fired and I have a box of them ready to use when I buy glaze. I paint the glaze on 3 then 2 then 1 layers so I can see the difference the thickness of glaze will in how it looks. The ledge on the bottom give me a place to write the number of the glaze so I can see it when the tiles are hanging on the wall. When you look at these strips you can see how well the IN glaze shows up the detail where the clay is indented. Good luck, Wendy [ Edited by: danlovestikis 2013-08-26 21:58 ] |
|
M
MadDogMike
Posted
posted
on
Mon, Aug 26, 2013 10:20 PM
My test tile system isn't as sophisticated as Wendy's. I make round tiles and glaze them, then glue the finished tiles to the top of my glaze bottles. I don't have to worry about finding the bottle of glaze that goes with the tile I like since they are glued together :D But I don't have the single, double, and triple layers of glaze for comparison |
|
J
Jürka
Posted
posted
on
Tue, Aug 27, 2013 12:55 PM
Thanks for reply... I can't afford testing, cause every burning costs at least 20 euros, no matter how many things I burn... I don't have my own kiln... So... Must risk... I contacted the seller/burner and he advised to put the object into the water before glazing... I will see if he knows characteristics of this particular glaze... |
|
D
danlovestikis
Posted
posted
on
Tue, Aug 27, 2013 1:37 PM
After the bisque fire I scrub the inside and outside and then let it dry. Then, I rinse mine in the sink before I glaze, or I spray it inside and out with water. But I've also forgotten to do this and had things turn out fine. But one particle of dust will cause your glaze to crawl away from it leaving a glaze skip. This can be re-glazed but that's costly. Wendy |
|
J
Jürka
Posted
posted
on
Wed, Aug 28, 2013 3:41 AM
Mjah... The seller says, that yeah, when it's in fat coat, it will cover the face propably... He advised to keep very thin coat on face-side... to rub it off with water-sponge... |
|
J
Jürka
Posted
posted
on
Wed, Aug 28, 2013 3:03 PM
My Tiki Factory announces: the problem is solved! Brush is very wrong instrument for brushing, the sponge-Bob (dry!) is the right man in right place... Here's my silly-looking glazed tikis waiting for kiln to make some miracles with them... Kumuhonua should turn into brown and Ku should turn into beige. We'll see... What could happen if the coat is thinner than the maker of glazes recommends? They say that 2...3 coats should be brushed, I used sponge and I used it for one time... and just as much that there would be no clear spots... [ Edited by: Jürka 2013-08-28 15:06 ] [ Edited by: Jürka 2013-08-28 15:07 ] |
|
J
Jürka
Posted
posted
on
Thu, Aug 29, 2013 4:34 PM
Glazing of those special backside mugs was not easy mission... I used many kinds of little instruments to do it... The thinnest wire was very useful... At first I... yeah, ok, right, at first I filled the cavity with red... and then I washed it all down, because that's not the way to do it... So... Then at first... I dabbed very carefully the surroundings with tiny little spongey... and then tried to fill the cavity with red... using tiny little wire and other tiny little stuff... and then smoothed it carefully with fingers... Many times I had to clean it up again and do it again and clean it up and do it again... My nerves are happy to know it's over now... And yeap, the result looks silly (pink and grey is just awful together!), but miracle-kiln will do miracles and I hope it will look much better... But all the tiki corps is glazed now... ...and packed in soft stuff to prevent scratching off the glaze while transporting... Tomorrow I hope to send it to final kiln... and if everything goes fine, it would mean the birth of my first tikis... and propably the first tikis (at least tiki mugs) in the history of Estland and all the Baltic countries! 8) Yih-haa! |
|
TY
Tipsy Yeti
Posted
posted
on
Thu, Aug 29, 2013 4:59 PM
Anxious to see how these turn out, I'm glazing soon myself. |
|
J
Jürka
Posted
posted
on
Thu, Aug 29, 2013 5:55 PM
Oh yeah... I really have no idea if it really looks as fancy as the picture in my head... Well, they should... :D I only hope that the brown glaze will not start run... That's my main fear right now... |
|
M
MadDogMike
Posted
posted
on
Thu, Aug 29, 2013 8:59 PM
Go! Jürka go! |
|
J
Jürka
Posted
posted
on
Tue, Sep 3, 2013 3:15 PM
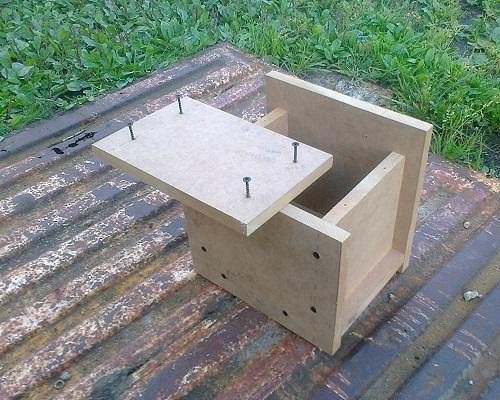
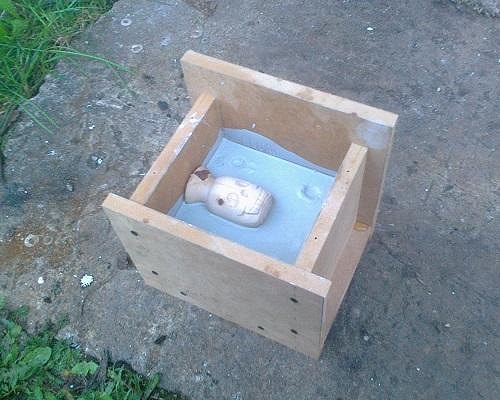
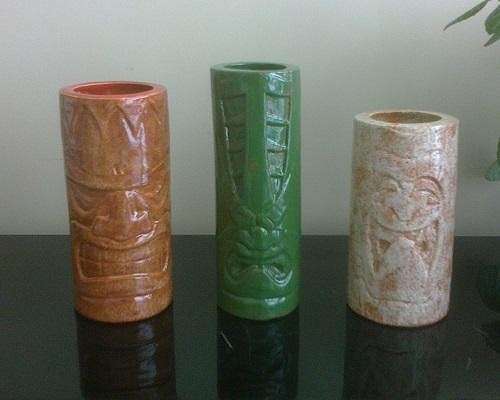
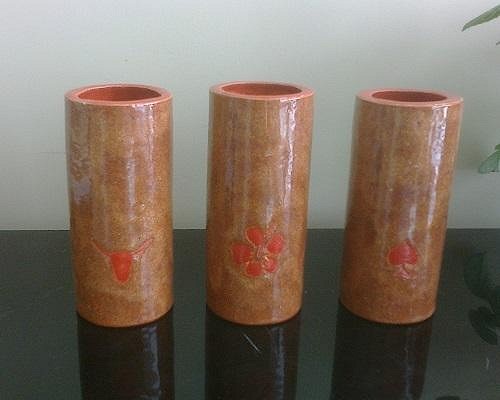
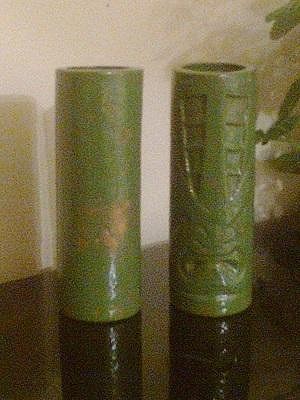
Hello, good morning, good evening, depends on which part of the world you are looking the sun... Today I've done... pretty enough... At first... Here's the next corps of my tikis waiting their birth... Maybe some minor cleaning and... oh yeah, the bottom carvings... yeap... and some, maybe one, special to make... and to the kiln... I was thinking 'bout flying time and thought that must think for the future and started to make new molds for new mugs... So... there's Kanaloa and skull shot-mug waiting for mold... But the shot-mug is li'l smaller and it needs the box its own size... So I made the new, smaller, box for skull... This time li'l easier way... with screws... Got pretty well and easy to handle... ...and I poured the first part of mold... ...and in same time poured for Kanaloa... ...and then I thought that maybe I could do some more today and I poured also the second parts... But that's not the peak of the day... I received my first corps from kiln... Here it is! Say "hello"... I'm pretty much satisfied... No running of brown glaze what I was afraid of... Kumuhonua and Ku are perfect, but Lono, which I didn't expect any problems, is not so good... Green glaze requires thicker coat, otherwise there's awful brown spots... I send e-mail to the kiln-and-glaze guy and asked if there's possibility to put some more glaze on it and send to the next firing and maybe the new coat of glaze would melt together with old glaze and give the smooth green coat... My specials of first corps... Good... I'm totally satisfied... Works very well... These are meant to be given away as presents... There's: 1) Dixie which I'm gonna give to the friend who lead me to inside of rock and roll lifestyle and must remember that through the rock and roll and hot rod culture I found out tiki culture... 2) Hibiscus which is made for someone very special, but I guess I may never have opportunity to hand it to her, so it propably will stay on my shelf... 3) Spade (hmm... red spade?!) is for my rock'n'roll-friend in Finland who was the first guy (the only guy so far... well, most of the people doesn't know anything about my project), who said he's gonna buy (not just get as some others would like) one of my mugs for sure... And here's the example of the problem of green Lono... It is hard to see in this sh*tty picture, but yeah, there's some brown stuff seen which is not meant to be there... And Wendy, yeah, I remember, I remember, will come, will come... :D Now... There's another big problem... What-the-heck I'm gonna put in this mug!?!? Me knows not a thang 'bout that coctailstuff... I have no any bottles of rum nor juice at home, no ice in freezer, even no straws nor umbrellas (which I'm gonna buy for sure when I happen to go big-town) and I've never mixed any other thangs than brandy and cola... F*ck, life is going to get tough... and fun I hope... [ Edited by: Jürka 2013-09-03 15:27 ] |
|
M
MadDogMike
Posted
posted
on
Tue, Sep 3, 2013 4:19 PM
CONGRATULATIONS!!!!!!! First mugs from the kiln! As far as your green glaze, some glazes intentionally do that. Here's an example, Duncan IN1603 Autumn As far as drinks, do whatever makes you happy - even brandy and cola if you have to. You can do without the paper umbrellas if you make a nice fruit garnish. But here is a list of simple drinks of few ingredients that are considered more "tiki". |
|
J
Jürka
Posted
posted
on
Tue, Sep 3, 2013 4:39 PM
Thanks for the link! But I've always liked "the real thang", so... :D When thangs go on, I will make a big expenditure and buy "everything" I need... So far... no cola-and-stuff... I don't want to give wrong aura to them... They belong to real tiki bar... So... there must come a real tiki bar... :D It will, I'm pretty sure... How and when... that's still question... About that green glaze... Yeap, this particular glaze intentionally does it, yeap... but it still looks not good... especially if it is located not much natural places... It like shows with a finger that "look, the guy didn't put glaze in this and this and exactly in this place!" Little brown spots and edges would be totally okay, but that kind of weird blobs suck... |
|
D
danlovestikis
Posted
posted
on
Thu, Sep 5, 2013 10:47 AM
Congratulations on your beautiful mugs. Good Job. It's really fun to watch you work. Wendy |
|
J
Jürka
Posted
posted
on
Thu, Sep 5, 2013 6:22 PM
From the factory... The second parts for Kanaloa and skull shot are poured and today I opened them... Almost satisfied, the nose of the... well... the nosehole for the skull got not so perfect, but it ain't problem... I guess I found out, as it is mentioned earlier, that all the parts of mold should be poured in one day and also opened the same day, few hours later... because the wood distends while getting water inside of it from mold... And here's the man and his tiki... |
|
M
MadDogMike
Posted
posted
on
Thu, Sep 5, 2013 6:51 PM
ROCK ON Jürka! Is that you? |
|
J
Jürka
Posted
posted
on
Thu, Sep 5, 2013 7:21 PM
Yeap, me and my polynesian guy... He's gonna hold drinks for me... :sheckymug: |