Tiki Central / Home Tiki Bars
The Forbidden Maya Tai, San Diego
|
T

TikiAno
Posted
posted
on
Fri, Nov 22, 2013 9:53 AM
I've been working on my home bar for a little bit. Maya, my wife, is not the biggest tiki fan (I know, I know), and she wasn't a fan of adding a bar to the tiki corner in the living room. I decided to clean out the garage to build a bar there. At first she was excited- that there'd be room to park her car in the garage, then grumbled when she heard the news. We discussed, then in discussing the bar name she was somehow placated (through her own idea): including her in the bar name. So, introducing "The Maya Tai Grotto." (or, possibly, "The Forbidden Maya Tai." (would love any thoughts on the name, I'm torn. Maya said no to "The Forbidden Maya Tai Grotto"). Some of the photos are not necessarily in order, but I tried to post them in an order so the build would make sense.
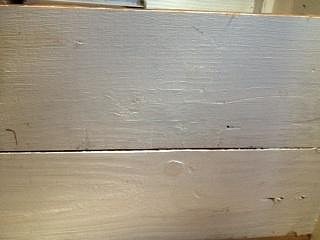
It's a 1.5 car garage that was filled with boxes, tools, surfboards, and more. I decided to divide it in half, so we can still use the garage for storage. I've yet to build the dividers (these will most likely be temporary hanging ones that will clamp to the wooden beams). It's been an interesting process, and I've been inspired by all of the bars I've seen on this thread. I've tried to work with some existing parts of the garage, modify some things, and build whatever I can myself. Before (bar side): Framed out the bar using 2x2s, didn't see the need for 2x4s, and the price was right. The bar is 5' wide, with a 4' (total) return, enough for seating for 5. Skinned it and put shelving inside. Originally I was going to install a sink on the left hand/ return side (w/o running water). I was planning on running a PVC tube to a 5 gallon bucket underneath. Grand plans, and an easy build, but wanted to keep more counterspace. The space for the "sink" (dump bucket) is still there. I'll eventually add some drawers to this side.
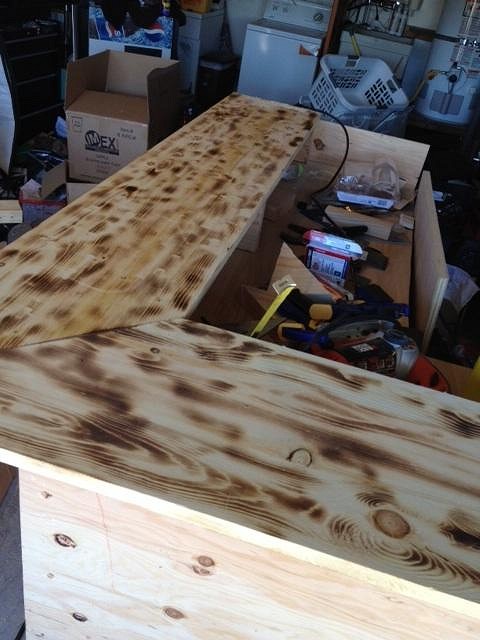
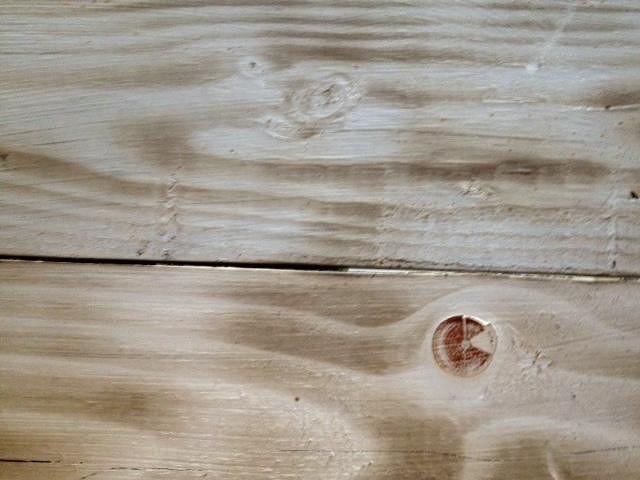
I then added risers and a bar counter (no photos of it before). I then started burning the top counter: Then brushed it, and stained it:
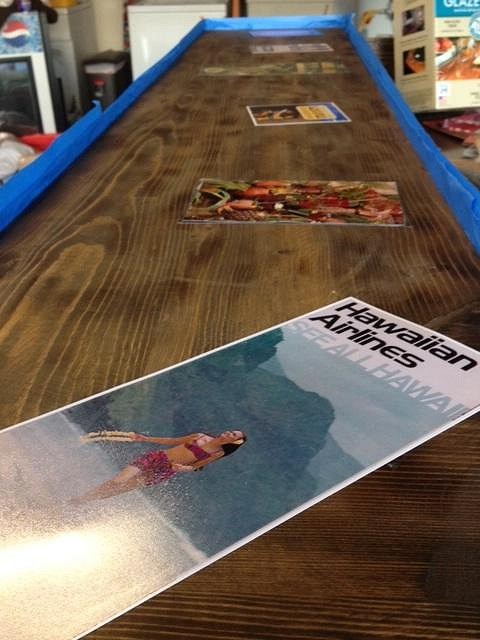
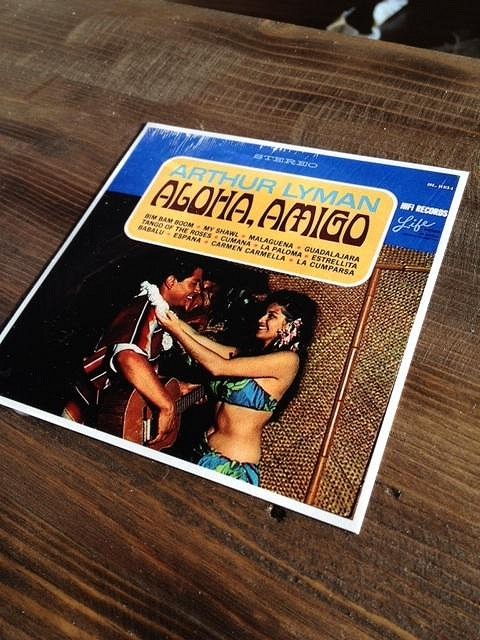
I did a polyurethane coat to the lower bar (semi-gloss), but wanted to embed photos in the bar top- as many have done here. I used a mix of old brochures, ads, and other images. I bought a whole lot of resin bar top mix, and tested it to see how it worked. This was essential- I ended up using a lot more catalyst/ starter to have it go off faster.
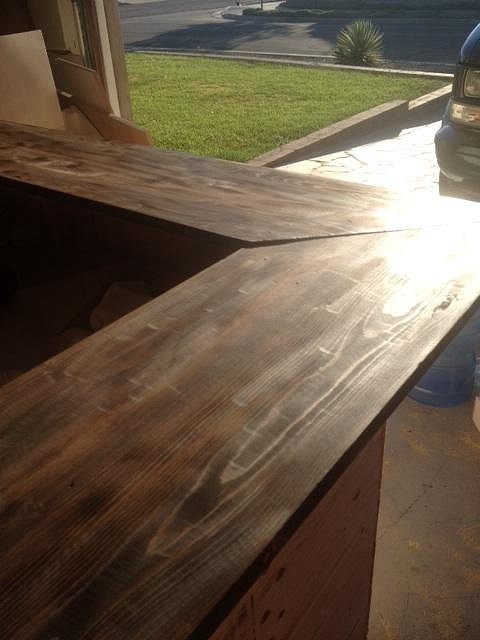
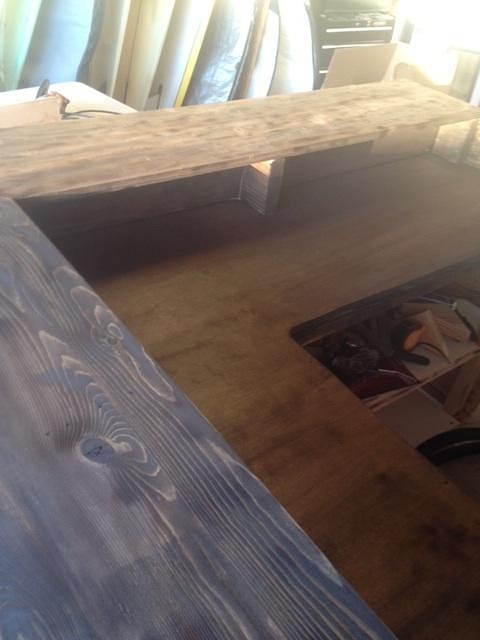
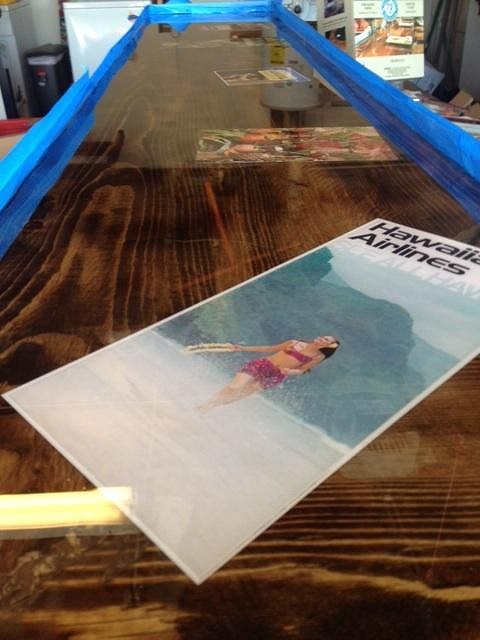
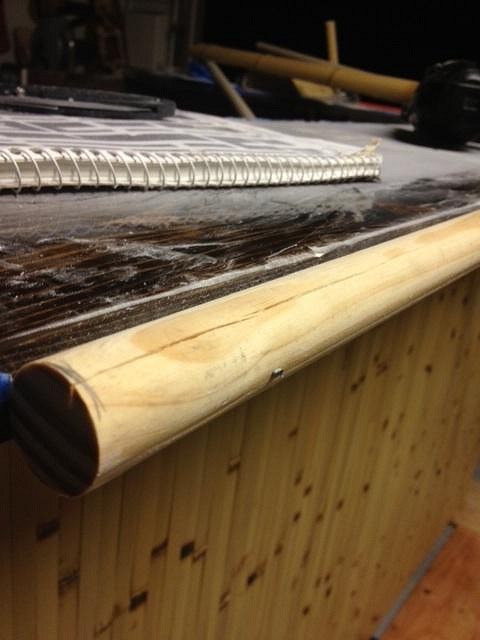
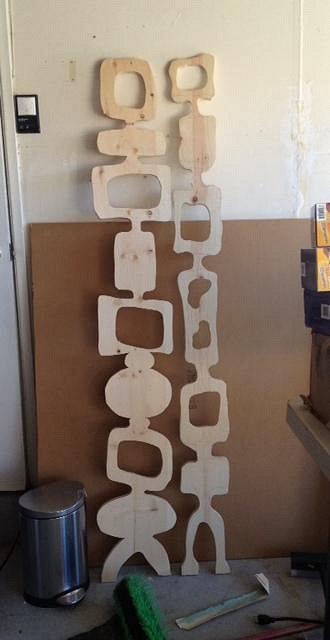
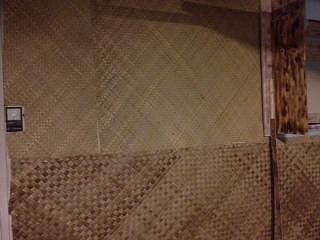
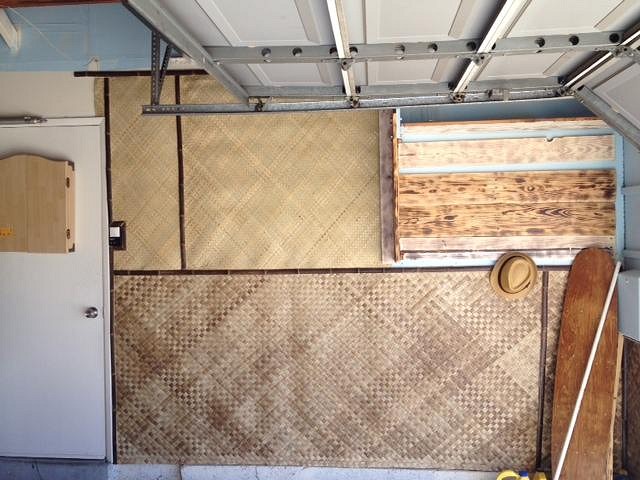
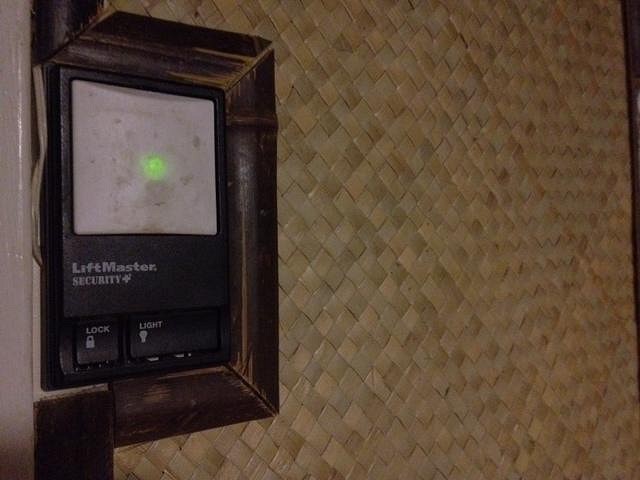
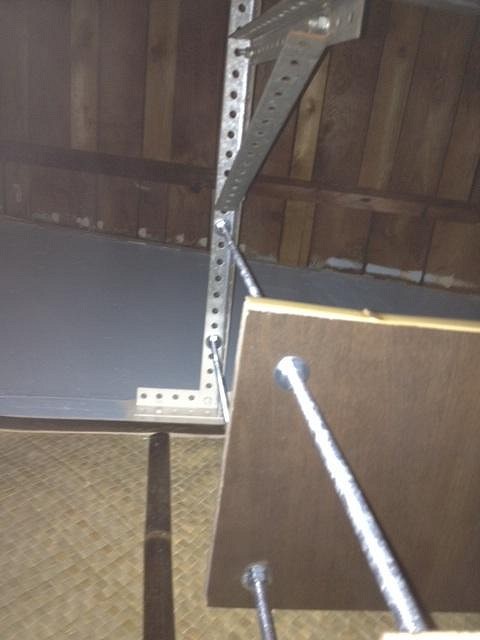
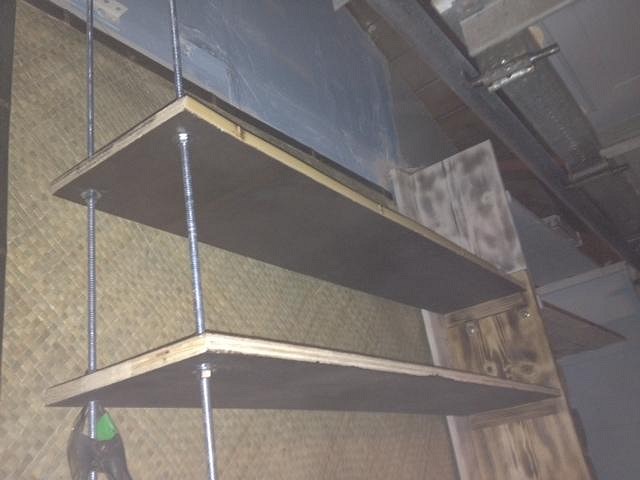
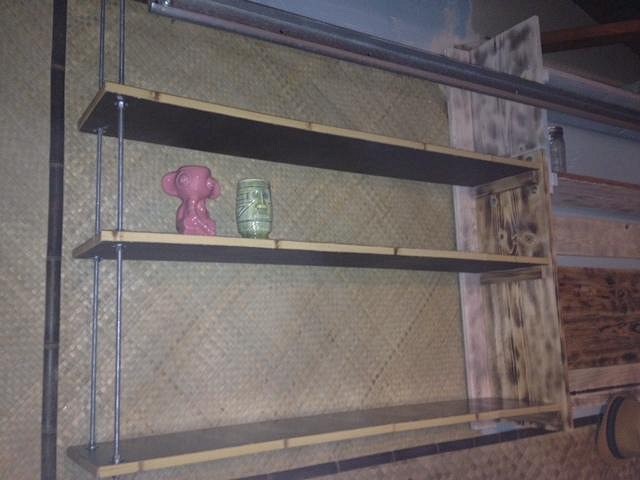
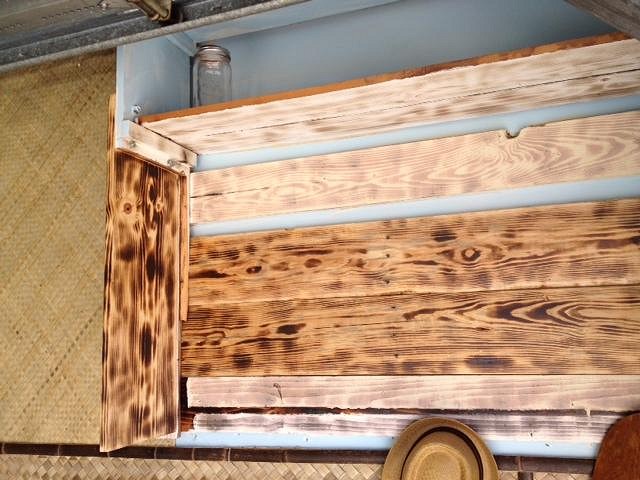
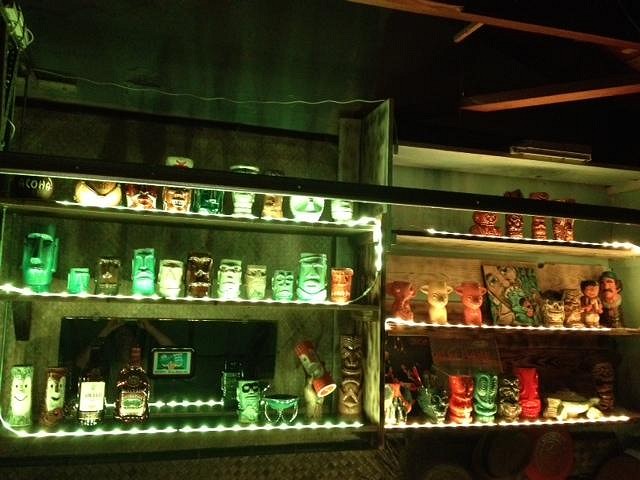
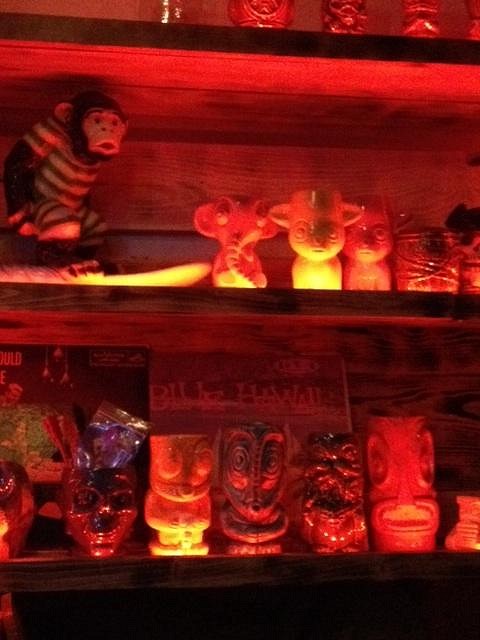
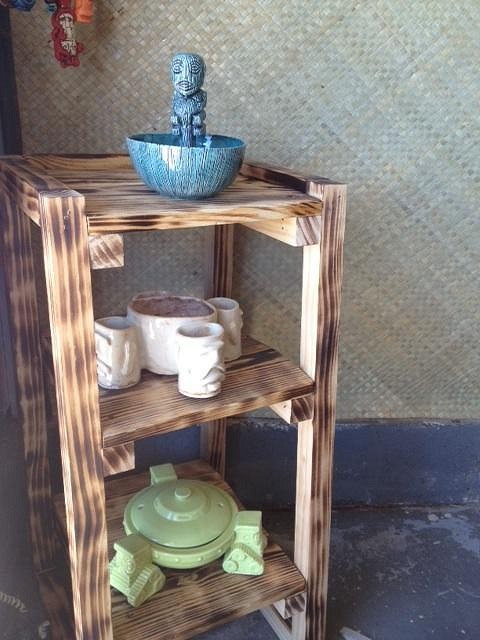
Poured the resin. In retrospect, I shouldn't have used any tape- which got embedded into the resin. Grrrr. Looked good, though. I wanted to cover up the "bad" edge, so wanted to add some half round bamboo to hide it. I shot a dowel into the bar top, then (later) shot the bamboo into that. I used bamboo panelling for the front facade. I liked using this since I could use the excess pieces to mask the wood on the front of shelves. Thinking about wall art, I started jig sawing some cut outs, inspired by a wall divider I saw in Palm Springs last year. I later saw than Dawn Frasier had cut out a similar piece that's hanging on her wall. Needed to work on the wall behind the bar, which was going to have shelving for mugs, booze, and more. While I didn't want to have a rattan heavy bar, I decided to use it for texture. I painted some exposed areas blue- I was following Bamboo Ben's advice: no white walls. Then: There was some pre-existing shelving in the garage- I had cut some of it away when we first moved into this house to put up larger metal shelving (more storage), but had pulled those out to put in the bar. I decided to keep what was there, and use that as a base for other shelves. I had gotten a bunch of pallet wood from my office park, and started burning it. I also found out that instead of sanding the white paint off of the original garage shelving (that had been there for 20+ years) I could burn it. Warning: using a torch on old (most likely lead) paint is a bad idea. I did this late one night w/o a respirator and felt like crap. Instead of brackets, I went for a "floating" shelf for some additional shelves. I used a long 3/8 threaded rod and bolted it to the steel holding up the garage door frame (slightly risky but figured it would be okay- I could hang on it and it wouldn't budge). Then added shelves. The other side is held up by some 1x2s I shot into the pre-existing shelf. I used some burned pallet wood as a background for the pre-existing shelf. I had to add shelves which I had cut out a few years ago.
That got me up until yesterday. I was building a test bar stool while keeping my eyes on craigslist. New lumber is expensive, and not the best for the environment. I found bar stools I liked on craigslist and picked them up last night. They're old wood, blue vinyl, and only needed a little bit of work. When I got home I added a few more shelves, some test lighting (one string light and one LED tape color changing set from Costco, not so cheap but oh so cool), and loaded up some of the mugs.
I then pushed the chairs in for the photo:
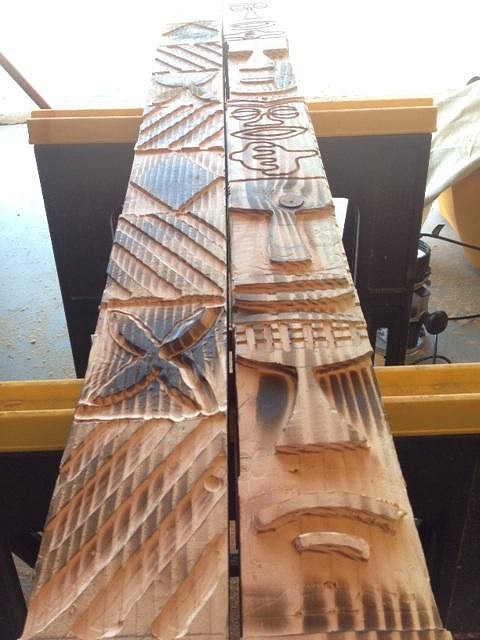
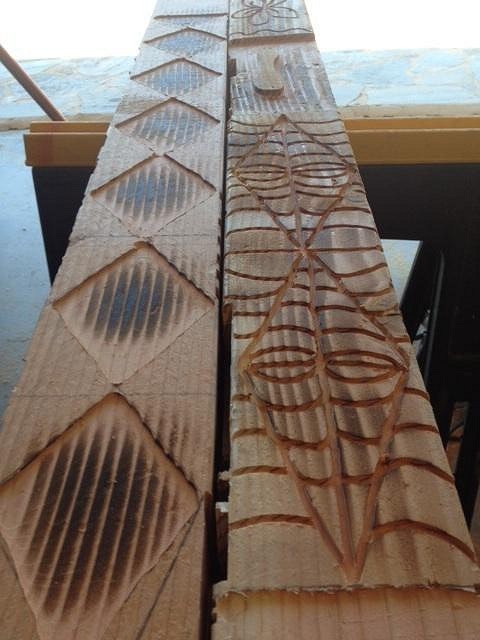
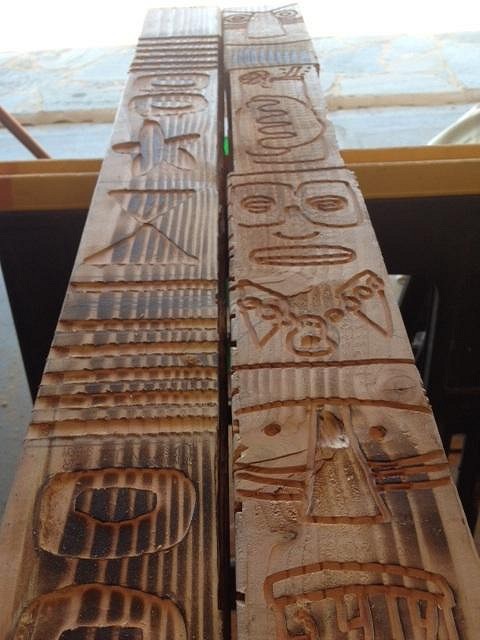
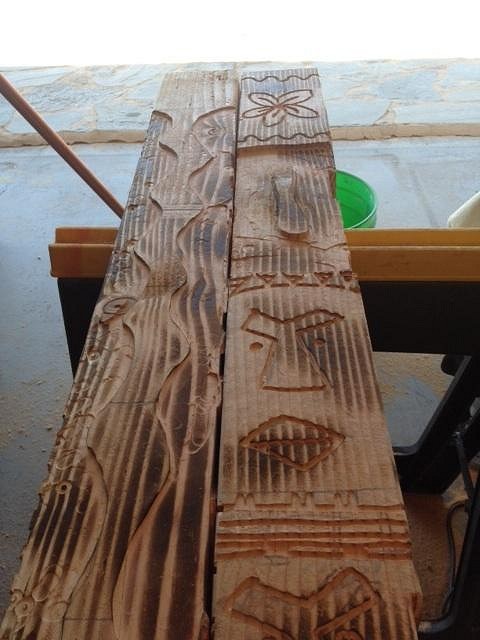
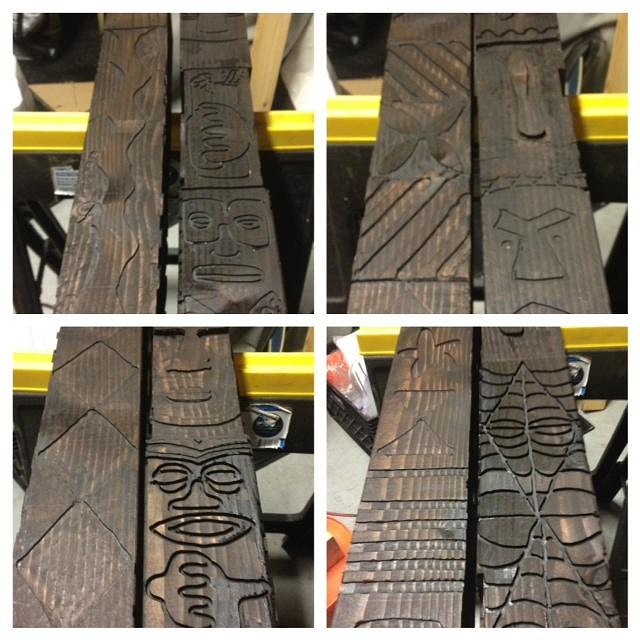
(The garage door was open). Now I have to keep going, finalize the lighting, hang some more art, and add rattan to the door going into the house (and over the dartboard). I have a glass door fridge that I bought a long time ago for my business and never used, that will get rattan-wrapped and will go behind the bar. The carved wood pieces are finished, and will find a home somewhere:
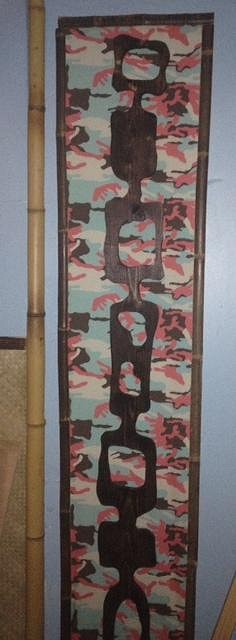
I also need to build some dividers so people can enjoy the bar w/o looking at tools and laundry. Surfboards will remain open, just for easier access to them. Thanks for looking.... and your feedback Will post some photos of the opposite wall as I can further along. Building in a garage has been interesting. I originally wanted to build a fake wall with a door so I could raise the garage door and enter directly (not through the house). Still might happen. [ Edited by: TikiAno 2013-11-29 22:59 ] [ Edited by: TikiAno 2014-01-08 09:01 ] |
|
D

Destro100
Posted
posted
on
Fri, Nov 22, 2013 12:31 PM
Inspiring work! Thanks for all the photos. Hmm.. thinking about my garage. |
|
T

TikiVato
Posted
posted
on
Fri, Nov 22, 2013 12:43 PM
Very nice job. I liked the way you added the dowel for the half round bamboo. I will try that technique on my next bar build. Both names you selected are very cool, I especially like the sound of the Forbidden Maya Tai. Keep the pictures coming. |
|
M

MadDogMike
Posted
posted
on
Fri, Nov 22, 2013 12:59 PM
Only in America do we park our valuable cars on the street and store our worthless crap in the garage :lol: Looks great David, very cool! Keep up the good work |
|
T
TikiAno
Posted
posted
on
Fri, Nov 22, 2013 3:52 PM
Destro, thanks! TikiVato, the dowel helps- adds some support. I was trying to figure out how to add half rounds to the edge, and the owner of Sunset Bamboo (supplier here in SD) suggested that. Mike, ha, that's exactly what Maya says! :wink: (And she said it again after I told her what you wrote). While there won't be much mainland Mexican influence, there will definitely be some Baja entering the bar. Surfing monkeys will definitely be there.. and I hope to make some Surfing Monkey mugs, too.... I'm going to have to have you over to build some mechanized magic.... |
|
B

bamalamalu
Posted
posted
on
Fri, Nov 22, 2013 7:37 PM
Lookin' good! |
|
V

VampiressRN
Posted
posted
on
Sat, Nov 23, 2013 7:46 PM
Looking good...Tikis Tikis Tikis!!! Nice job on the bar...keep the pictures coming. |
|
L

lunavideogames
Posted
posted
on
Mon, Nov 25, 2013 1:57 PM
Looks like you have been busy! Great job so far, keep up the good work buddy. I would recommend something to brace your mugs in case of an earthquake. On some of my simpler displays I use a rope half way up the mug to hold them back from falling and dying. It doesn't take away from the look of the display and it is an extra protection in case the ground shakes. Maybe I am just paranoid, or maybe they ARE after me :) |
|
T
TikiAno
Posted
posted
on
Fri, Nov 29, 2013 1:05 PM
Thanks bamalamalu & Vampiress. Yes, more tikis are coming. I have a number of wall pieces that will be moved in (in other parts of the house), plus two 4x4 columns that I need to attack with my router. Not in any order, next steps include:
Treg/ Luna, earthquake proofing is a good idea. Ii haven't done much to secure though even pushing the mugs back a bit (the shelves are fairly deep) will help. That or putting pillows in front of them. Either way, watch your back, man. More pics soon (I hope). Thanks for looking, and I hope everyone had a great Thanksgiving! |
|
L

LoriLovesTiki
Posted
posted
on
Fri, Nov 29, 2013 5:57 PM
TikiAno - Great work so far. I like you're burning technique. I haven't burnt anything yet, it makes me nervous. I like the Forbidden Maya-Tai too. Hopefully Tiki will grow on her. My husband doesn't love tiki like I love tiki but he loves me and wants to make me happy and he loves to build stuff so it works for us. Keep posting pictures. We love to follow bar building progress! |
|
T
TikiAno
Posted
posted
on
Fri, Nov 29, 2013 10:58 PM
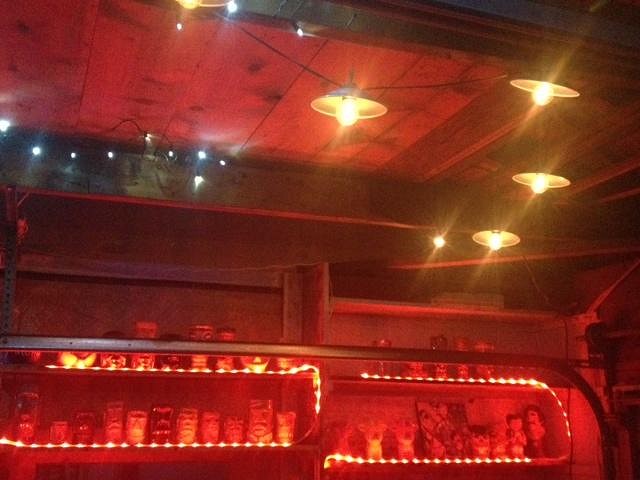
Installed more lighting today- now matching LED lighting on the bar shelves- these can change color, from solids...
These can also transition from color to color, which might work, depending on how the rest of the lighting installation goes. One remote can communicate w/ each system at the same time (even though they're not connected in line w/ each other). The LED strips are secured to the shelf, removing the rope light that was previously on one side of the shelves. It was going to work as an "under bar" light. I put triangles as supports for the upper bar (cut down 2x6s), but this prevented me from an easy run around the perimeter. I took a 7/8" spade bit and cut through a few of these triangles, then ran the rope light through the holes. Still need to secure it in a few areas.
Ended up having a cool effect as two bracketsat the corners hold the rope light perfectly in place. I'll have to add something on the front corner of the bar, methinks. I drilled a hole in the wall-side of the bar and ran the rope light to help brighten up the behind-the-bar area. Lighting is getting there, need a bit more ambience from above so people can see their way around the place- plus I wouldn't mind some spots to highlight a few pieces of art that will be go up soon (I worked in lighting for many years, so this is the most fun and equally most frustrating part (since I can't afford all of the lighting I want to add). :)
Built a riser for the glass door refrigerator and ran power across the ceiling and down the wall. There's unfortunately no pre-existing outlets around the bar area so have to run extension cords creatively. I hung one large bamboo curtain (for a patio) which is the beginning of a divider to split the garage into a drinking and working area. Thanks for all the name votes, I agree, I dig the "Forbidden Maya Tai" too. Lori, as much as she's not a fan of tiki in the house, she's pretty stoked on the bar- just so long as there's still room for "stuff" in the garage. Getting her to drink anything other than (large volumes of) wine is tough, but I'm working on a few drinks that are not rum-centric for her to enjoy. I'll post up an early drink menu soon.... Thanks for lookin'. |
|
H

hang10tiki
Posted
posted
on
Sat, Nov 30, 2013 2:12 PM
Ano- lookin sweet :) Jon |
|
T
TikiAno
Posted
posted
on
Sun, Dec 1, 2013 5:46 PM
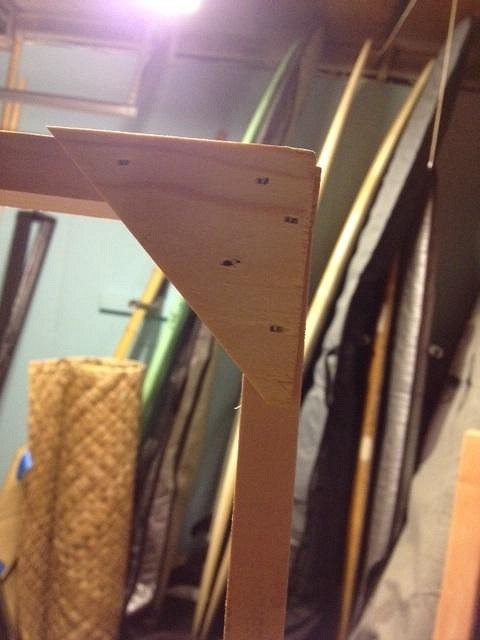
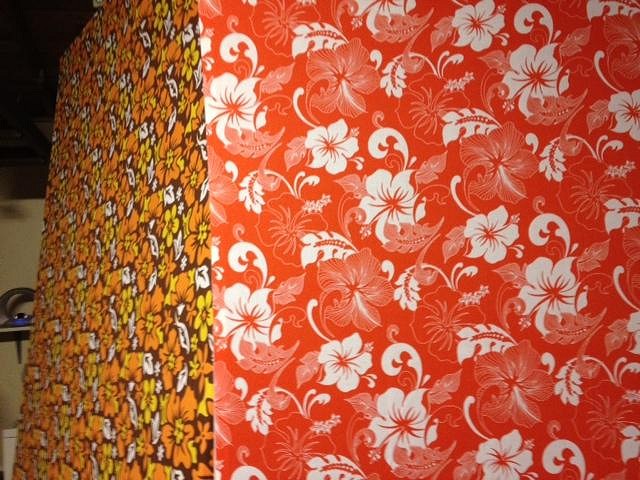
Jon, ha- let me know when you're in town again, maybe it'll be ready by then. It was time to make the room dividers. Part of the garage will remain a garage, but I don't want guests to be looking at my toolbox, storage shelves, or washer dryer when having a drink. I purchased an 8' wide bamboo shade from the Depot and hung it from the framework of the garage ceiling- but it wasn't long enough to span the garage. I wanted/ needed something that could be opened or closed to divide the space when necessary. I decided to make X-Large sized z screens (shoji-like) that were a little more tropical. First I built a simple frame out of 1x2s. Then I gusseted the corners for strength: Then I skinned the frames out with fabric. I used a staple gun and tape. I used to stretch materials off frames for years when I was in the film business, so used the same technique. I didn't want to cut the fabric down any more so measured out the frame to fit the fabric. If you secure the "middle" of each side you can then pull the fabric out to make it taut. Depending on the material, it's a good idea to put a tab of duct tape, which will prevent the staple from slowly tearing through the fabric- almost like a lock washer for the staple. I chose particularly bold aloha print fabrics- they can always be changed if I get tired of my choices. The frames are large- one is 5' x8', the other 42" x 8'. They are hinged together and they will stand upright if they are opened at a 45 degree angle (or so), just what I need to divide the space. Here's a close up of the two frames hinged together:
I had bought some additional fabric to highlight other areas, and used one small piece to put behind one of the wooden pieces I cut out (and stained). I shot pieces of dark bamboo around the edges to frame the fabric (this is on the opposite wall of the bar, which I haven't shown yet).:
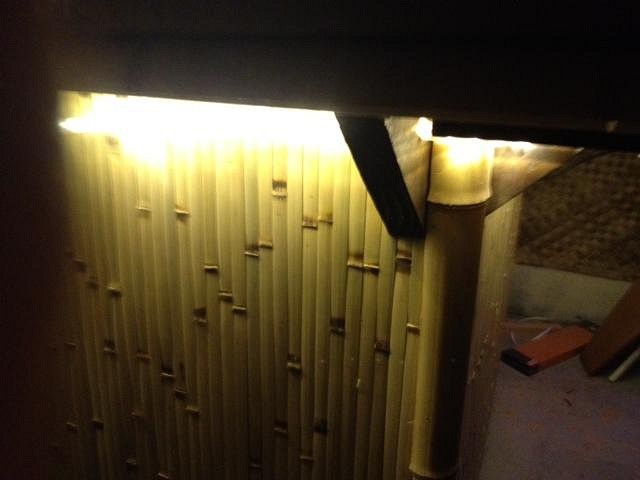
Worked a little more on the lighting in the ceiling. It was a tough decision to hang lighting for the garage door being up or down- obviously I lose a lot of options with the door open/ up (you can see the channel in other pictures). It's pretty cold in San Diego in the winter (okay, warmer than a lot of other places) but there's no reason to spend time at the bar with the garage door up. I decided to hang lights tight to the ceiling. I had bought some small metal shaded lamps that I always wanted to hang above the bar. I couldn't put them at the height I originally wanted, so attached them close to the ceiling. I put a dimmer in line with them so I can play with the light levels. I also took a strand of 100 LED white dome lights to act as stars in the ceiling. It doesn't cover a lot of area but gives off quite a bit of light. They're almost a little too blue, so might add a dimmer for these, too- though not sure if I can dim XMas lights...
Thanks for looking! |
|
T

TikiSpeer
Posted
posted
on
Mon, Dec 2, 2013 4:35 PM
Nice work. |
|
T
TikiAno
Posted
posted
on
Wed, Dec 4, 2013 8:59 AM
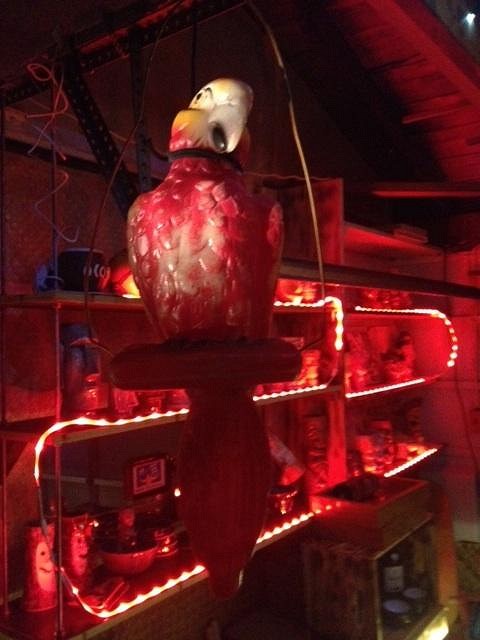
Thanks, TikiSpeer- means a lot, your bar is off the charts good. One day I'll be half as good with my router as you... Tiny bits of progress- secured all of the rope lighting under the bar and re-ran some electrical. Finally got an opportunity to hang the parrot I picked up at the Bahooka before it closed- it's slightly off balance, so had to add some black cord to get it to stand upright on its perch. Whenever I look at this parrot I'll think of the Bahooka- and Rufus... and want a carrot.
I also added bamboo paneling to a glass door fridge that's behind the bar. I burned a wooden crate (picked up from Michael's) and put it on top of the fridge. Originally I was going to use the lowest wall shelf for booze, but realize I need (a lot) more room for mugs. For now (some) liquor will be displayed in the crate- it's an easier reach, anyway.... We had our work holiday dinner last night, and my employees got me a bottle of Ballast Point Three Sheets Rum and a six pack of Ballast Point Sculpin- getting ready for a lot of San Diego local beer and spirits at the Forbidden Maya Tai, not to mention some homemade syrups and ginger beer. |
|
D

dtel
Posted
posted
on
Wed, Dec 4, 2013 12:38 PM
I tried some of those lights also, my son in law told me to try a piece of trim to hide the lights where you only see the reflected light, it looks completely different that way. Looking good, the wife will come around to like the idea after a party or two. |
|
H
hang10tiki
Posted
posted
on
Wed, Dec 4, 2013 3:54 PM
Lookin sweet bruddah |
|
T
TikiAno
Posted
posted
on
Thu, Dec 5, 2013 4:37 PM
Thanks dtel- I thought about putting some bamboo up to mask the LED strips, will see what I have left when I'm done playing with some of the walls. I admit, Maya is starting to like the idea of her bar- her friends are excited about it, which makes her Isomewhat) proud, and slightly less concerned. Ha! Still have to get around to cleaning up the rest of the garage, which will make her happier. Also, lots of stuff to add on the opposite wall.... Jon, thanks! |
|
T
TikiVato
Posted
posted
on
Thu, Dec 5, 2013 5:30 PM
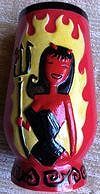
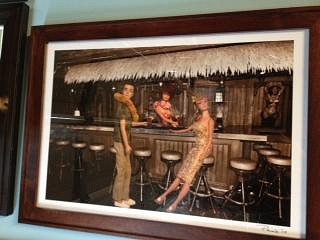
Keep up the great work and update with pictures. I see you went with your first choice of names for your bar. Has a nice ring to it. Your wife will catch Tiki Fever before you know it. It may influence her further if you buy her own drinking vessel. Maybe one of a wahine on it or something like this: |
|
L
LoriLovesTiki
Posted
posted
on
Thu, Dec 5, 2013 6:25 PM
I love that ^ one!!!! |
|
T
TikiAno
Posted
posted
on
Fri, Dec 6, 2013 10:35 AM
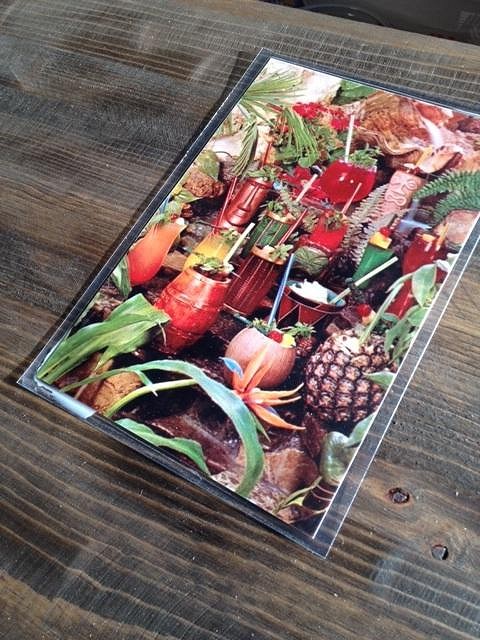
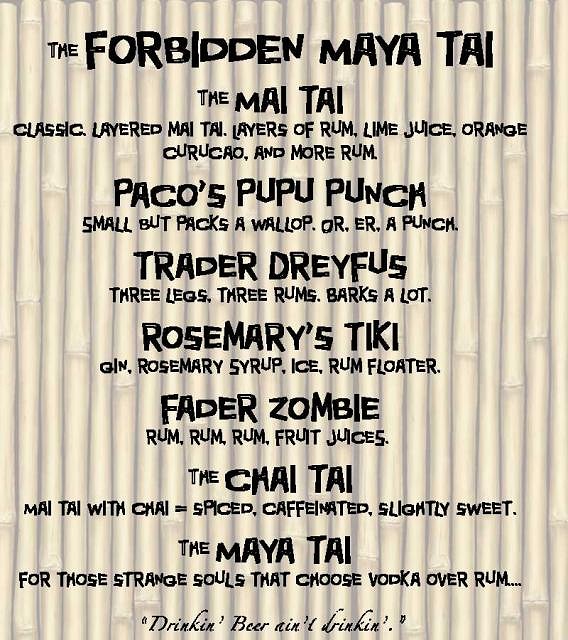
Ha, thanks- well, a few of the drink names are named for the dogs- and I'm currently carving out a mug dedicated to one of them (her 14 year old chihuahua. She's all about midcentury design, but tiki, not so much- she's come to Oasis to check it out (during the days of the free Sundays and didn't "get" it. Getting there, though.... Though it might be premature, here's a rough menu for the bar. I'm going to start brewing my own ginger beer so there'll be some additions to include it. FYI, Dreyfus is our 3 legged crazy dog, and Paco is the old man chihuahua.
|
|
D

danlovestikis
Posted
posted
on
Tue, Dec 17, 2013 10:35 PM
Cool bar, I think I spotted some of my work on those shelves, Wendy |
|
T
TikiAno
Posted
posted
on
Wed, Dec 18, 2013 9:36 AM
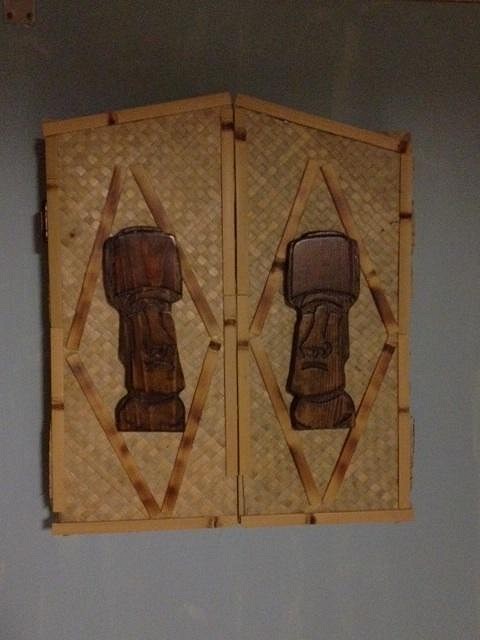
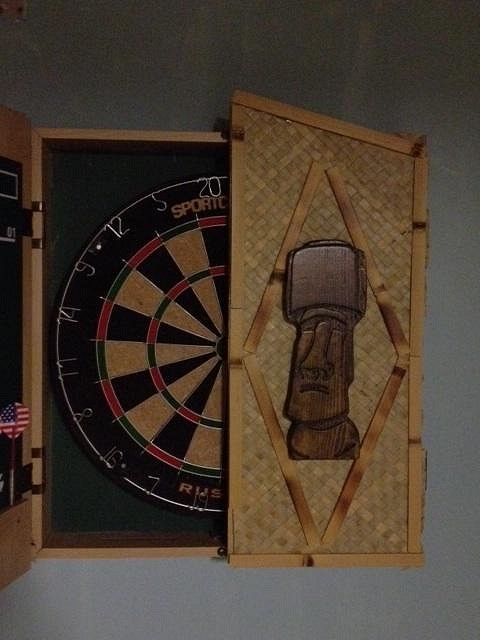
Wendy, yes- I'm (still) working on the lighting but they're there! I was actually working on hanging some art on the walls- and was figuring out where to hang the red Moai pendant I got from you (that's been hanging on a wall in another part of the house). I've been a bit swamped w/ work so haven't had much time to make progress- and the garage suddenly got filled up with holiday gifts. Starting to clear it back out- and adding some art to the walls. I'll post more photos later, but I worked on this yesterday: I've had a dartboard on the garage door for a while, and I wanted to keep it. I painted the door of the garage and pulled the cabinet off. I tried burning the wood finish on the cabinet first- not the best idea. I test burned the sides of the cabinet that to see what it would look like- while the wood darkened, the finish melted and created a surprisingly toxic cloud of stink as it ran off- but at least it helped the look of it and wouldn't need more treatment. (Sorry, I didn't take photos as I worked- it was late last night, and I kept seeing strange green and purple figures floating around- probably should have stopped burning that damn wood). I measured and cut matting for each door then stapled it on. I then took some of the bamboo paneling I had left over from wrapping the bar and used it around the perimeter of each door to hide the staples. It needed more, so made (very rough) diamonds on each door, inspired by Bamboo Ben's diamonds behind the bar at The Breezeway. I burned these pieces to darken them (and separate them from the bamboo along the perimeter) and liked the look of it. Felt it needed something more. I looked around at all of the work that needed to go up on the walls and realized I didn't have a lot of wall space- but I did want to use a matching set of Moais I had gotten from Buzzy a while back- and I wanted them to be seen. I put them in the center of each diamond and thought they were a good focal point. Closed:
Open:
|
|
D
danlovestikis
Posted
posted
on
Wed, Dec 18, 2013 10:41 AM
That's a fun game with an artwork cover, good job, Wendy |
|
M

Monkeyman
Posted
posted
on
Wed, Dec 18, 2013 5:56 PM
Slick :) |
|
D
dtel
Posted
posted
on
Wed, Dec 18, 2013 6:06 PM
Great news, before it's over she will take it over and have a party with her friends. |
|
T
TikiAno
Posted
posted
on
Wed, Dec 18, 2013 8:26 PM
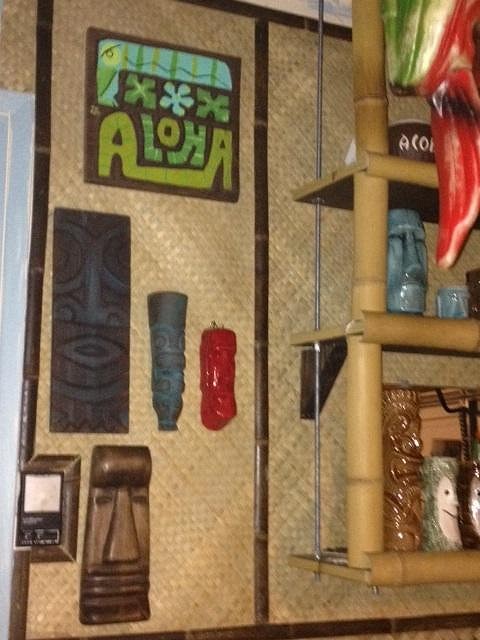
Thanks Wendy, Derek, and dtel. Wendy, there will definitely be an area in the bar dedicated to your work. :) dtel, I finally got around to it and added a second (vertical) layer of bamboo to hide the LEDs. I'm using leftover pieces instead of using a larger (er, more solid one)- but it does the job hiding the lights. In a few spots there's a little leak, but adds to the glowing effect. Earlier today I started adding more artwork to the walls. On the bar side I added a Tiki Tony carving, a Moai mask from Oceanic Arts- forgot to take a photo. To the left of the dartboard door I secured a found bamboo runner (staple gun)- which worked perfectly as a backing for a jigsawed piece I had made (then shot into the wall). The bamboo curtain acts as another divider between the bar and "garage" part of the garage.
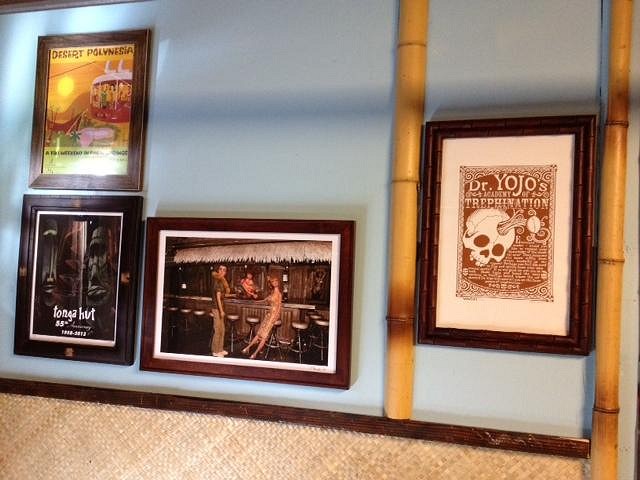
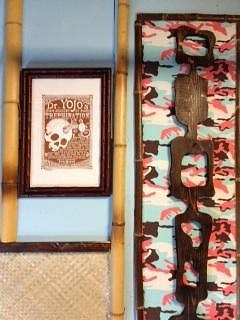
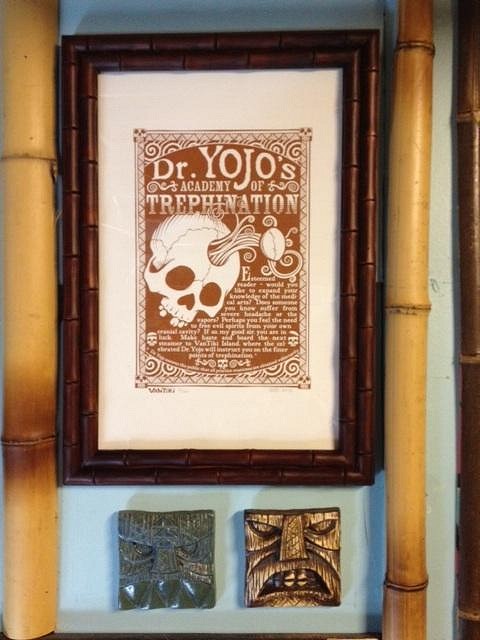
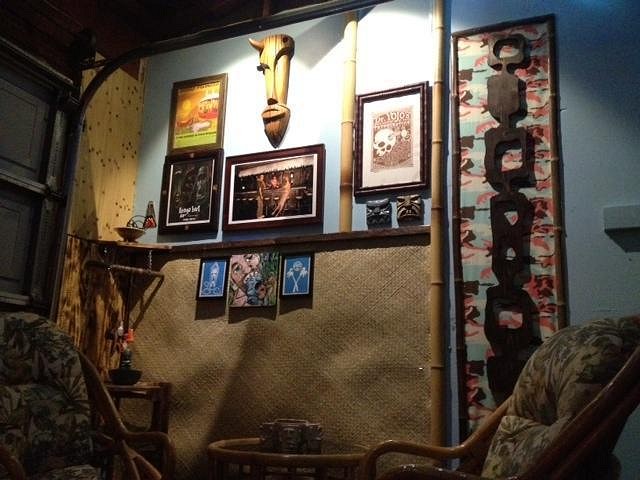
The opposite side of the garage will have a small seating area, and a few higher tables (once I get around to building them). I found some rattan furniture on craigslist, will post some photos when that corner of the garage is cleared out. I plan to use this side for framed artwork, almost like a gallery. There's more to come but so far I have one print from Eric October, Henrik Van Tiki, and more.
Henrik's silkscreened print went up in between two bamboo half rounds that were originally going to frame shelving for a bowl display (which will have to go somewhere else now): I then added some of his tiles below the print: These will look a lot different with the bar lighting, but will have to add some special lighting to highlight the gallery. dtel, it's true- Maya is looking forward to it- though I think she's possibly equally excited in having it look more like a bar and less like a construction zone. Patience is a virtue.... More to come, thanks for looking! |
|
D
dtel
Posted
posted
on
Thu, Dec 19, 2013 9:01 AM
Good deal,she will be fine, everything is looking good, very nice. |
|
T
TikiAno
Posted
posted
on
Tue, Jan 7, 2014 9:15 PM
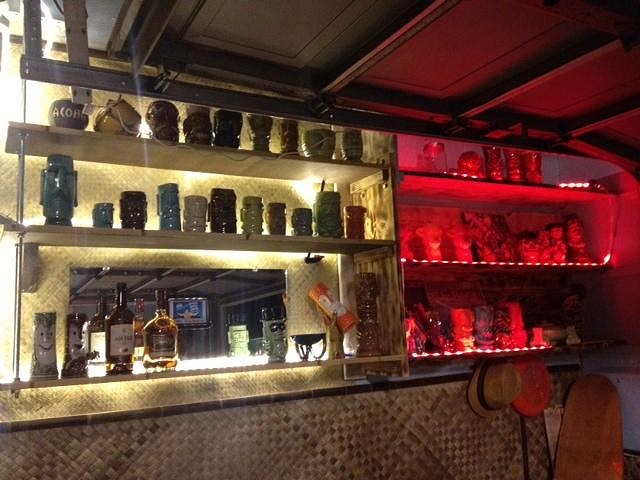
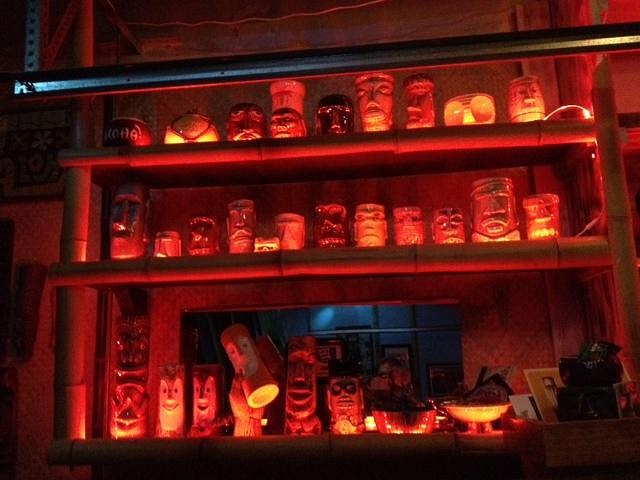
Got back to the bar to finally get some work done. After an initial stab at hiding the LEDs using bits of bamboo panelling, replaced it with larger half rounds of bamboo. Looks a lot better, I think. Thanks to all for the suggestions! I also organized some of the mugs- figuring out whether to organize by artist, style, color, etc.
I ran out of half rounds, so burned some 1x2s and cut them into the width of the extra shelves. It looks different, but does the job.
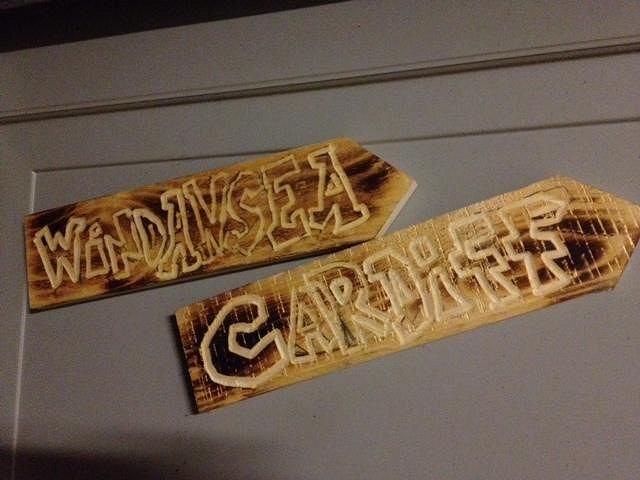
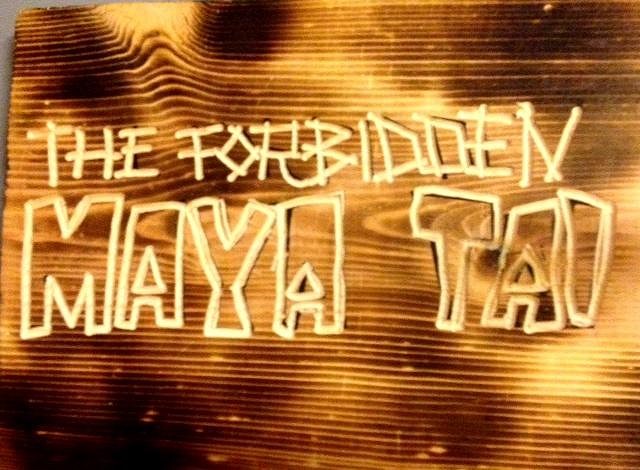
TikiPops, amongst all the other uber talented routers inspired me to work more on signs. I had cut out some arrows & burned them a while back but hadn't done anything more than write on them. I'll eventually add a whole lot of other beaches, but for now went for some of my favorite surfing beaches- both at home: and further away: I had planned on having them on a post, but wasn't sure where it would/ could live in the garage. I decided to stick them onto the garage door- it needs to be covered up somehow, and I doubt I'll get the pass to paint or replace the door from Maya.... It was good practice w/ the router. I switched bits, burned a new piece of wood: Then made a sign with the bar name with a 90 degree bit: Still clearing things out- and trying to use all of the lumber that I've been collecting for some time, or get rid of it. Getting there. Need to add more lighting to highlight some of the art on the opposite side of the room (in the seating area). While some of the art is visible, I'd like people's eyes to focus on it as they walk in. I also hung some more art (from Tiki Tony, Wendy, Buzzy, & Oceanic Arts) behind the bar- will try to post some more updates tomorrow.... |
|
T
TikiAno
Posted
posted
on
Wed, Jan 8, 2014 9:00 AM
Additions: Low light and iphone = crappy photos, my apologies. I need to add lighting is to improve photo quality, not to mention it will help my terrible eyeballs out.
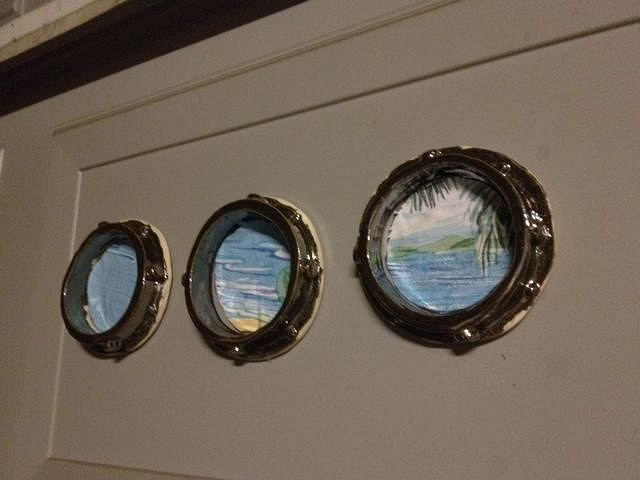
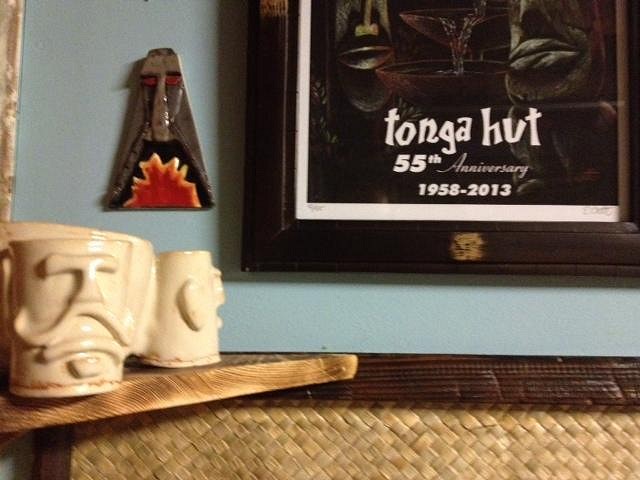
I had made these small (3") ceramic portholes but didn't know where they would live (photos on my other craft thread), then realized that the garage door was it. I crossed my fingers and used mounting tape (they're pretty lightweight), then cut circles out of an old Hawaiian print pillowcase and spray adhesived it inside the hole. I added a high shelf near the seating area, used it for one of my early bowls- I think I may add a whole shelf area here for bowls ("The Ala Moana," for another fun surf spot (Bowls). I also hung one of the small Kahiki fireplace tiles I made above it. Hoping my stuff looks better when it's next to tobunga's/ Eric's Tonga Hut painting?
Behind the bar some more art: from Tiki Tony, Munktiki (vase), and Wendy Cevola- Wendy, I still think this red glaze is my favorite (and I still can't find it!). A few of Wendy's mugs are visible to the lower right (including the latest Sac Crawl mug and 1.5 Bob mugs). The lower Moai is from Oceanic Arts. The empty spaces will eventually be filled- I plan a controlled clutter of art. From the angle you can see how I covered just the front threaded bolt w/ the half round bamboo- may have to add something to "hide" the side of this shelf....
Thanks for lookin'. |
|
SS

SoCal Savage
Posted
posted
on
Wed, Jan 8, 2014 12:22 PM
Loving the portholes! Great space. |
|
D
dtel
Posted
posted
on
Wed, Jan 8, 2014 1:10 PM
Everything's looking good, can't wait till I get to the decorating part. Your lights look much better, all the mugs are just glowing now. I need to order another string of those lights, I want to replace some florescent lights under our cabinets in the house. One string 16' will do the main center part and the top. They are very cheap to run for half the electricity of one of the two bulbs we use now I can do the whole thing, and it can be dimmed or change colors all on a little 12v transformer. Looking good ! [ Edited by: dtel 2014-01-08 13:10 ] |
|
T
TikiAno
Posted
posted
on
Thu, Jan 9, 2014 3:49 PM
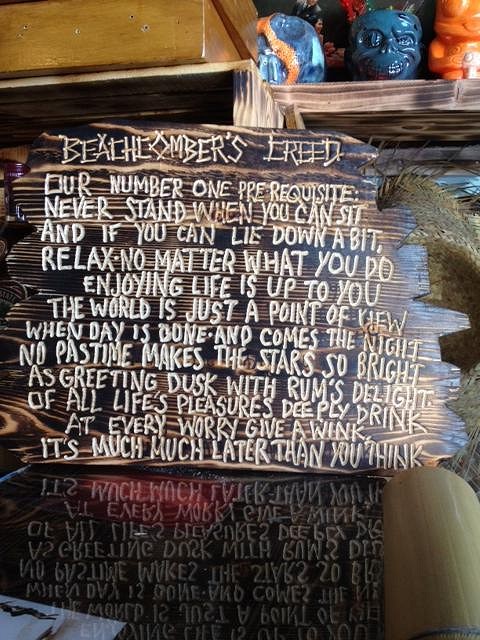
Thanks SoCal, they look good- I just now want to make larger ones! dtel, the lights are great- they're probably cheaper online but the Costco set was quick and easy- I would just like for it to have come with more "jumpers" so I didn't need a continuous run. Okay, I could have bought another set to get them, but that was a little too pricey. Sorry to post one photo at a time, but here's a new sign I routed. I copied down then routed the "Beachcomber's Creed" (from Don's). It's one of my favorite "life lessons":
Right now it's sitting on top of the bar but will hang in the air soon.... |
|
D
dtel
Posted
posted
on
Thu, Jan 9, 2014 4:45 PM
Looks good well done, I see why you like it. The relaxed style is perfect, if it were all perfectly lined up and neat it just wouldn't look right. |
|
B
bamalamalu
Posted
posted
on
Thu, Jan 9, 2014 8:28 PM
Looking good! I love the portholes and the inclusion of the creed. |
|
T
TikiAno
Posted
posted
on
Thu, Jan 16, 2014 9:59 PM
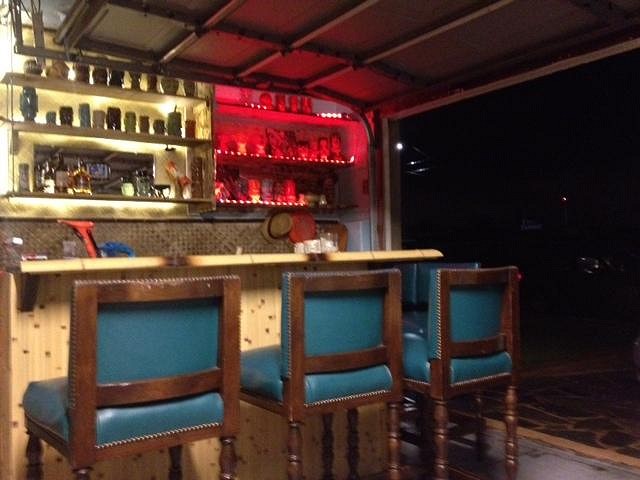
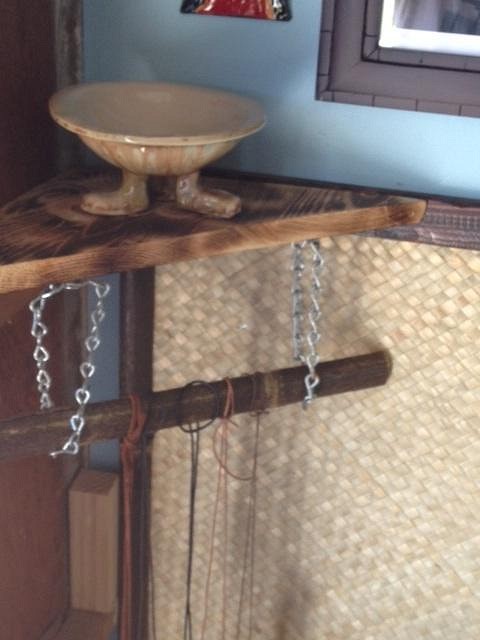
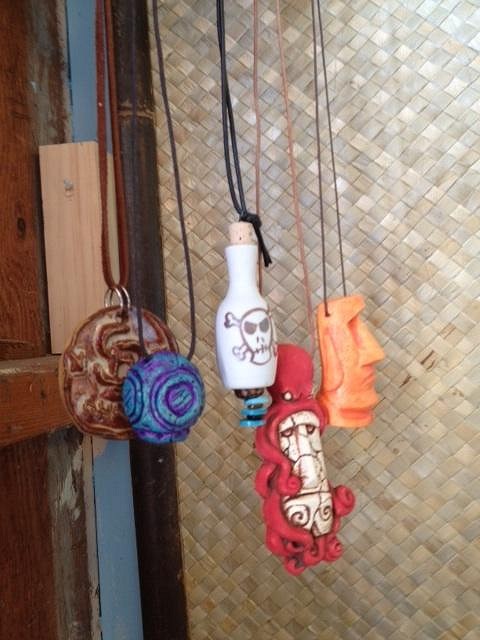
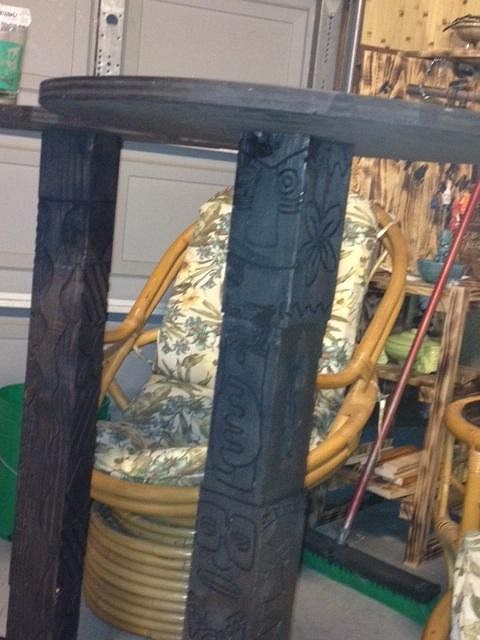
Trying to get all of the construction done so we can start having guests drink at the Maya Tai Lounge. Since we only have five seats at the bar, started working on some belly bars (bar height cocktail tables). I took two 4x4s and cut them to 40" tall, then drew, routed, & torched all four sides: Then stained it: Next up will be adding the table tops and outrigger feet (to keep it upright). Finished working on the small shelf to hold tiki bowls. I originally planned to build my own bar stools, then found a bunch of cool ones on craigslist. I held onto a frame of legs I built for a sample stool- I liked the simple design (w/ angled front of legs) then added cross supports. The shelves are made of recycled pallet wood rescued from my office park. I torched all the wood after shooting it all together. One of Grog's bowl lives on the top floor: I also added a small hanging piece of bamboo to hold pendants. These hang above the bowl shelf opposite the bar. I used chain to drop the bamboo down from an existing shelf, then looped the pendants onto it. Not an exciting photo, but here are a few pendants hanging. Next up hanging up a few small spotlights to highlight some art, a few more frames to hang.... Thanks for looking. |
|
D
dtel
Posted
posted
on
Thu, Jan 16, 2014 11:34 PM
looking good, I have got to learn how to use a router for things like that. |
|
T
TikiAno
Posted
posted
on
Sun, Jan 19, 2014 6:21 PM
dtel, I'm still learning. Practice, practice. Monkeyman has some good advice here: http://www.tikicentral.com/viewtopic.php?topic=43357&forum=17&start=15&29 The more times I use it, the better the work becomes. Watching everyone else's work develop helps, too. |
|
H
hang10tiki
Posted
posted
on
Mon, Jan 20, 2014 7:47 AM
Ano- looking good bruddah Jon |
|
L
lunavideogames
Posted
posted
on
Mon, Jan 20, 2014 2:00 PM
Yeah the router work is great! I like how you incorporated some of your mug designs into your router work. Very cool! |
|
T
TikiAno
Posted
posted
on
Tue, Jan 21, 2014 1:25 PM
Jon, sounds good. Should be (almost) finished by then... I hope. Treg, thanks for noticing! The "Rum DMC" is an unnamed mascot on the belly bar table leg- though, admittedly, the hat is missing. If I ever cast those will have to name a drink for him. So many options for ingredients.... [ Edited by: TikiAno 2014-01-21 13:26 ] |
|
T
TikiAno
Posted
posted
on
Fri, Jan 24, 2014 10:00 AM
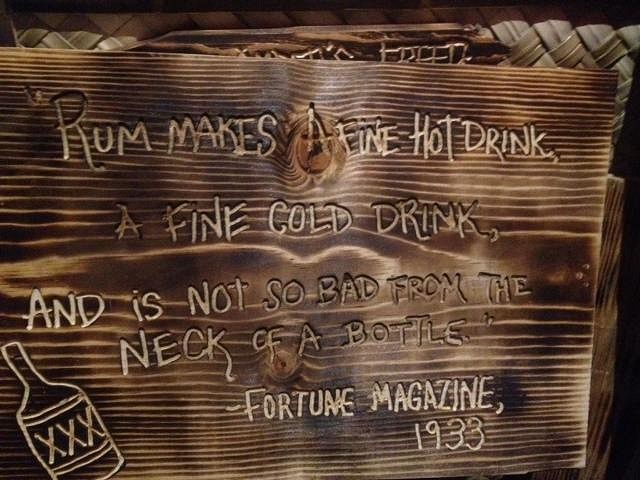
Slowly moving forward... one more sign routed: (It reads: "Rum makes a fine hot drink, a fine cold drink, and is not so bad from the neck of a bottle." - Fortune Magazine, 1933. I found this quote from a book I highly recommend- fun to read w/ lots of interesting history (& I'm under 50 pages in):
The rum may explain my lack of bar building progress..... |
|
T
TikiAno
Posted
posted
on
Mon, Jan 27, 2014 6:23 PM
Added some more lighting- used small (& cheap) LED spotlights from Ikea and rigged them up in the air. First one hits the hangings behind the bar... I added two separate ones to add a wash on the art on the opposite side of the room.
Next steps: rug for the floor for this area, netting for the garage door, more art- and finding where one of the horns from Doug Horne's/ Jason's Diablo Mask- it was hanging elsewhere in the house for a while, not sure if it was an earthquake but it seems to have run away.... I found the rattan set on craigslist a while ago for cheap, want to replace the cushions with a more interesting print... Thanks for lookin'. |
|
H
hang10tiki
Posted
posted
on
Mon, Jan 27, 2014 9:31 PM
Awesome........ |
|
T
TikiAno
Posted
posted
on
Thu, Jan 30, 2014 1:41 PM
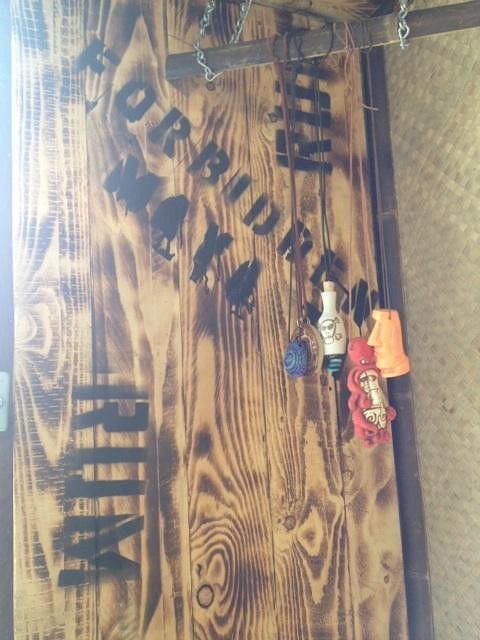
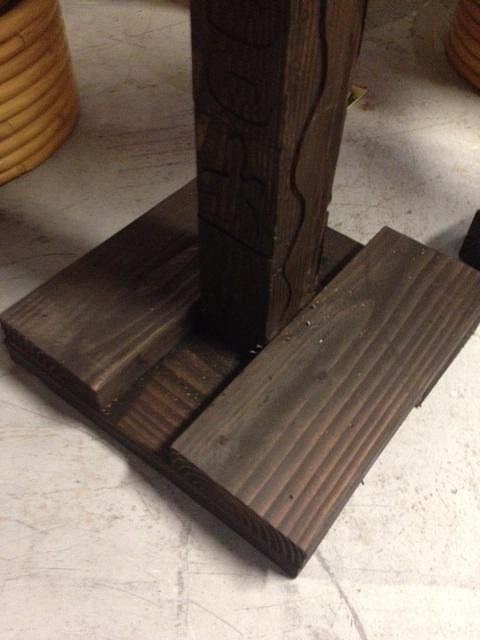
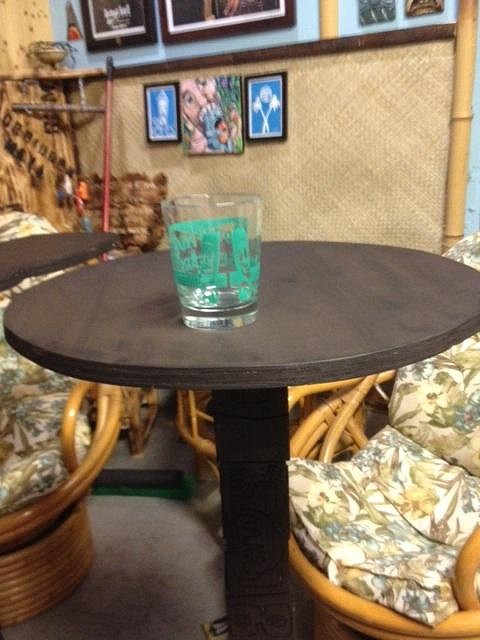
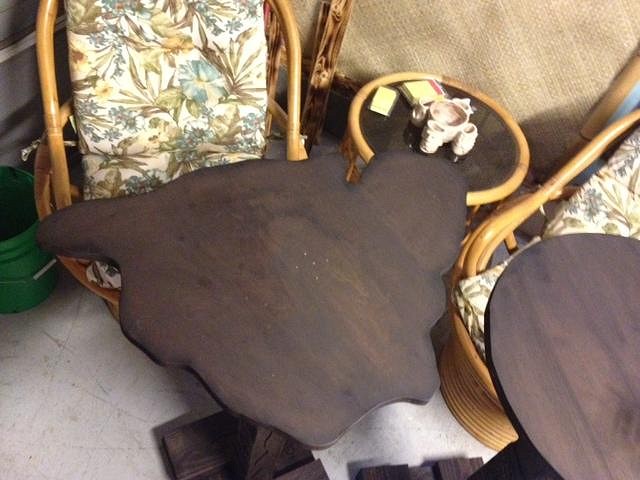
I needed some more shelving for drinking glasses and more display- I had already Ikea hacked this shelf (using two metal shelves to make one with more shelves) a while back (it was once a tiki mug shelf), but it was too shiny to use in the bar: Also took some stencils and added words to some wood slats I had pulled off of pallets, used as a wall covering. I wanted to make it look like part of a rum crate. I wrote the destination ("Forbidden Maya Tai") and "Rum" in a few places: Maya's been pressuring me to get going on this bar (she wants to show it to a few friends Friday night, a good sign (though I told her it wasn't ready for drinkin' yet), so had to finish the belly bars. First I made the bases: I cut 2x6s into 4 equal pieces, then made two layers so they'd wrap around the 4x4 posts, sandwiching them four times. Fairly simple. I burned, stained them, let them dry, then popped the posts in and shot them all together. Pretty sturdy. I had cut out the table tops a few days ago w/ a jigsaw. The first is a plain circle, the second I did my own rendition of the Big Island (of Hawaii). I'm not a cartographer, so it's not quite exact. I sanded the edges, burned & stained them. I then got them centered on the posts and shot them in. If only it was time for a drink, have to go to work... |
|
H
hang10tiki
Posted
posted
on
Thu, Jan 30, 2014 3:06 PM
Right on bruddah |
|
A

arriano
Posted
posted
on
Thu, Jan 30, 2014 3:45 PM
When's the TikiCentral member party? |
|
W

WestADad
Posted
posted
on
Fri, Jan 31, 2014 12:59 PM
Sure could spend a lot of time in this corner. Awesome!
Thanks for showing your space. Chris |