Tiki Central / Other Crafts
rvictor's tiki lab
Pages: 1 2 3 4 5 6 7 293 replies
|
R

RVICTOR
Posted
posted
on
Mon, Nov 17, 2014 9:35 PM
I guess this is as good a time as any to throw my work out onto the board and see what sticks. I will give Wendy Cevola the credit for encouraging me to post my play/work so that others can see. I also have to thank Jacques Pryor for his strategic placement of The Book of Tiki within his guest house, Hale Ulu Lulu, in Malanai (just outside of Hana). The tiki torch was lit.
|
|
D

danlovestikis
Posted
posted
on
Mon, Nov 17, 2014 9:56 PM
Hey you did a great job. Now you'll be hooked for life. I wish I'd started sooner but better later than never. Keep it up. I'll be watching, Wendy |
|
R
RVICTOR
Posted
posted
on
Tue, Nov 18, 2014 11:39 AM
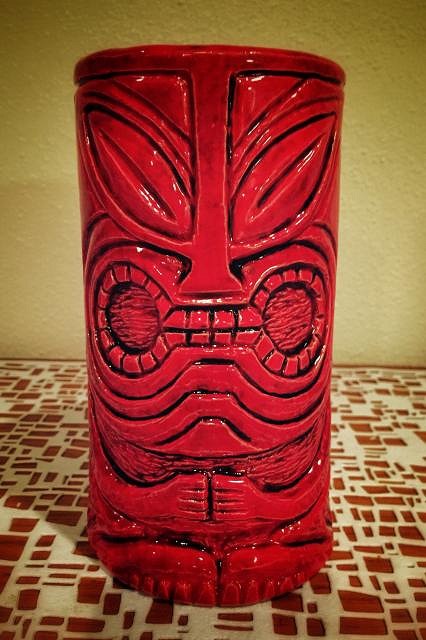
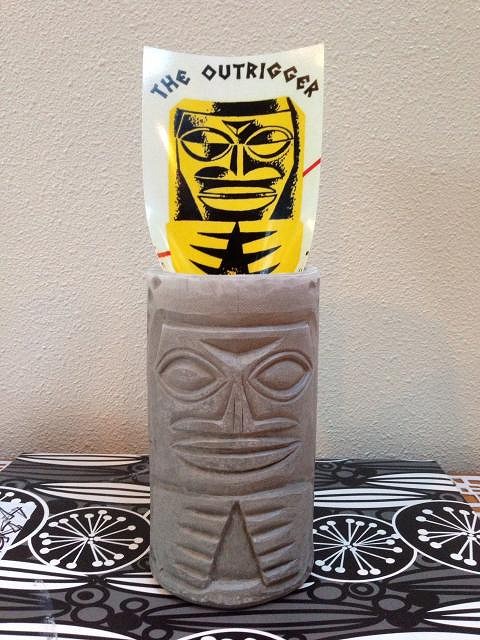
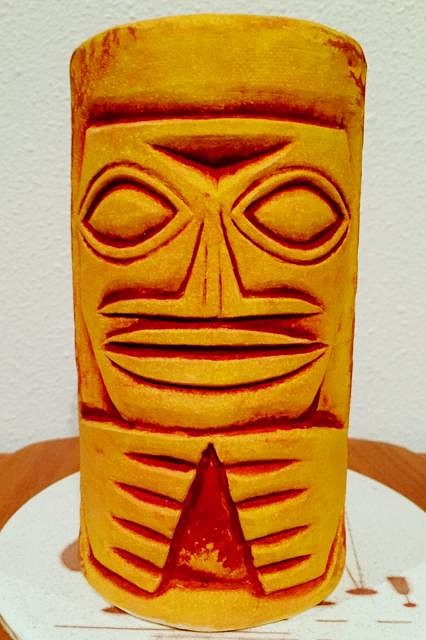
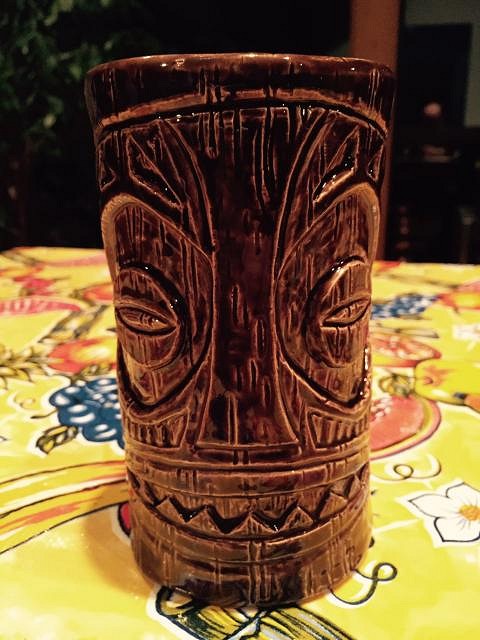
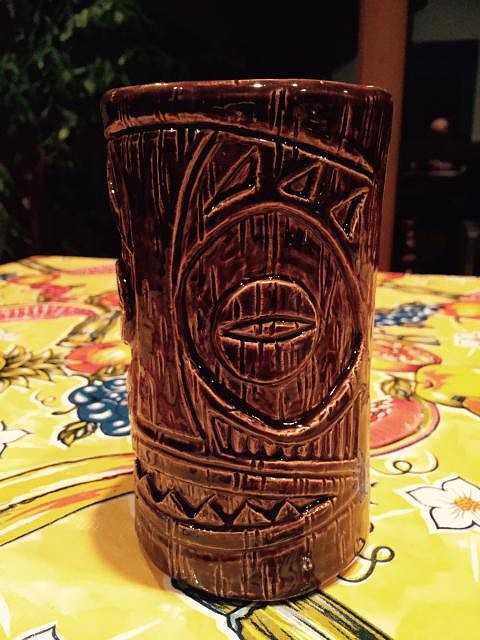
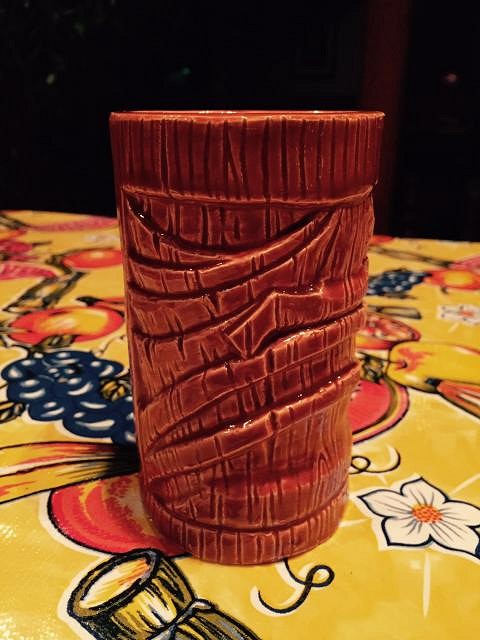
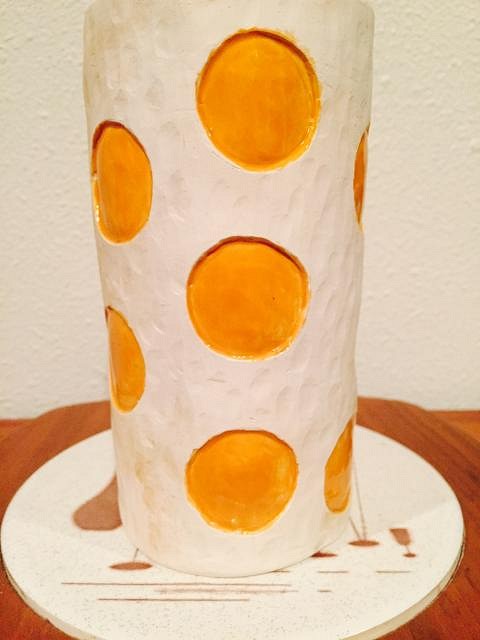
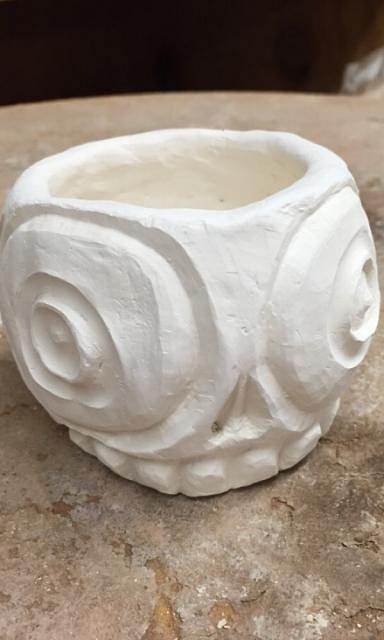
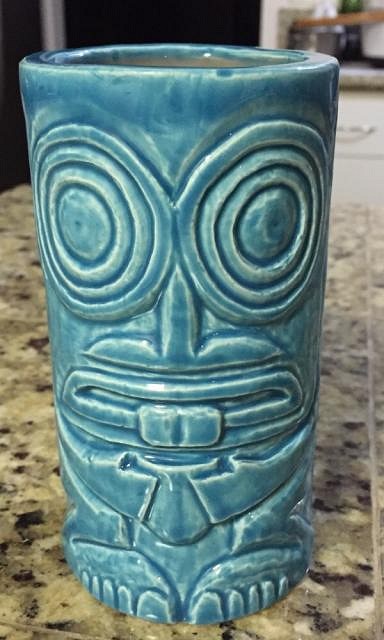
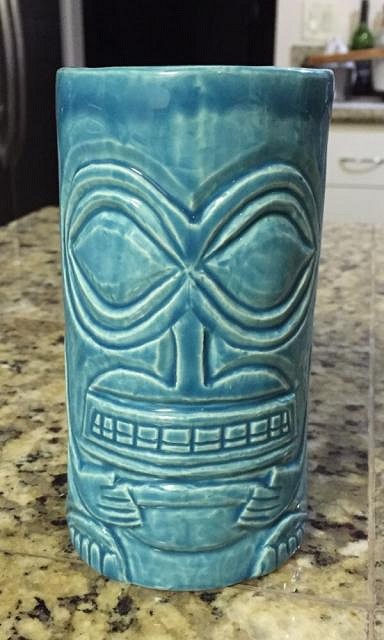
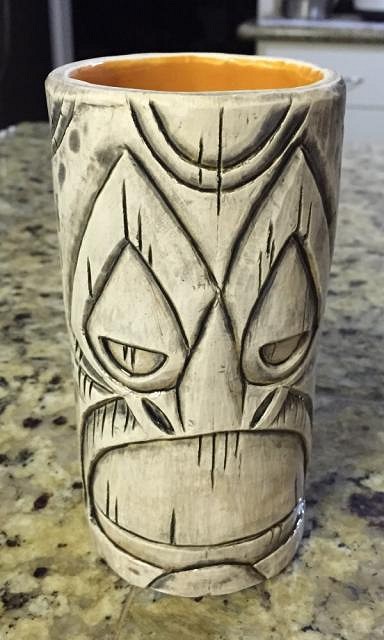
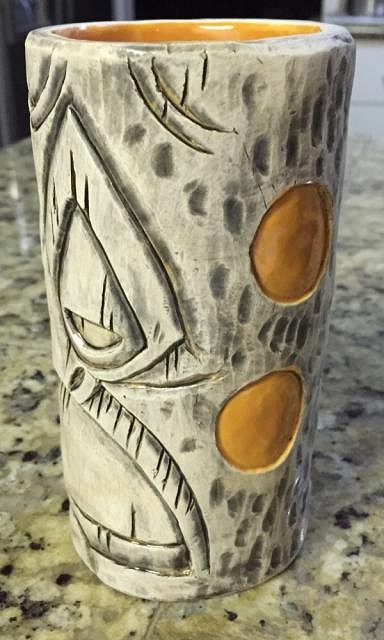
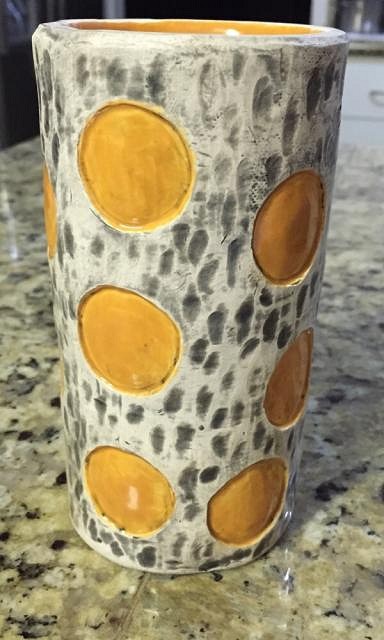
Posting more pictures of the first tiki mugs I worked on. The second one was based on the old Seattle Outrigger logo. There are very few remnants of past glory in Seattle, and I really wish I would have been able to visit the place. This first photo was after carving the mug. Here are a few after glazing. I was going for the original black and yellow look but was then told, after I had applied a yellow underglaze, that the black would ruin the mug. I was advised to try brown but even then it came out slightly red. If anyone has suggestions about how I could have pulled this off better I would love to hear your advice. |
|
R
RVICTOR
Posted
posted
on
Thu, Nov 20, 2014 9:04 AM
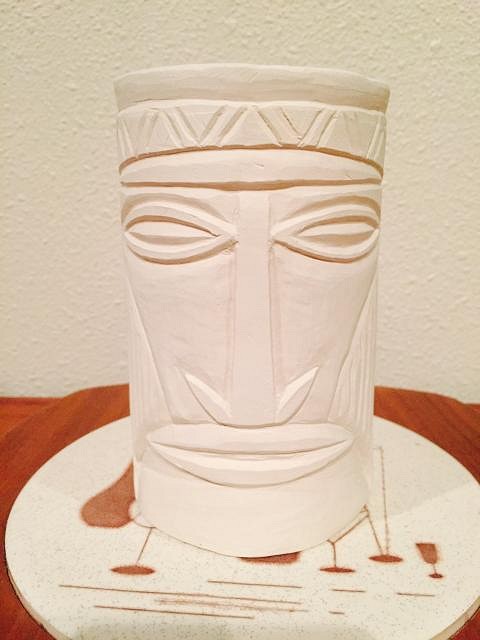
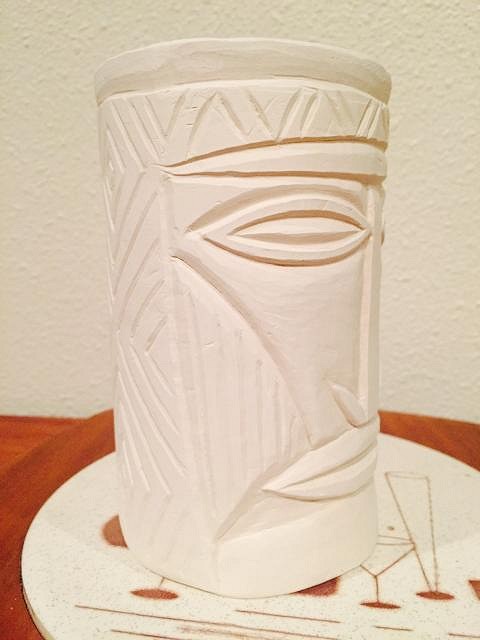
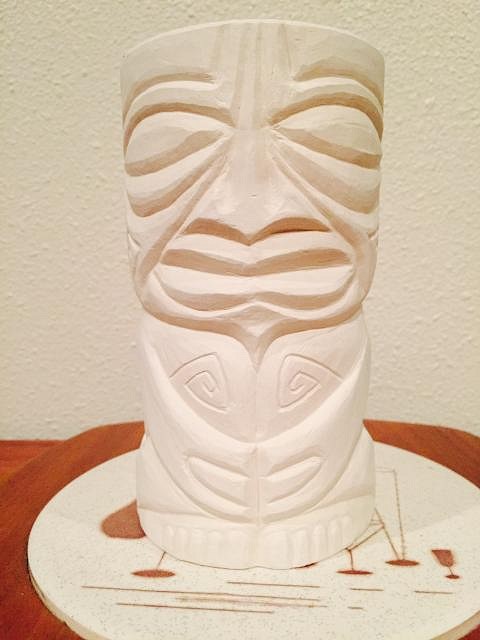
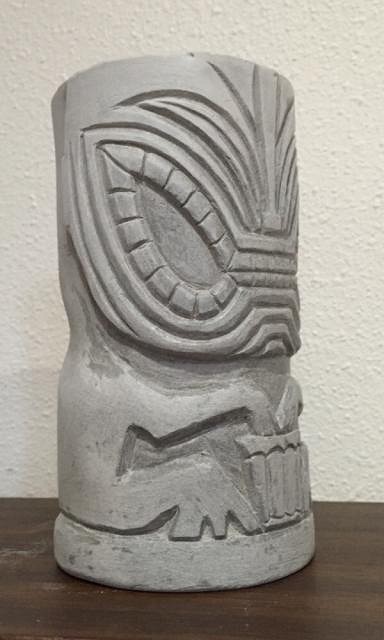
Ok...so my third mug was one that I did for my wife and was based on a sketch from one of my tiki sketchbooks, it's supposed to be a wooden witchdoctor's mask. I experimented with the wall thickness but found that it was too heavy. The findings from this experiment resulted in the following conclusion: "The mug is too heavy when the difference between the weight of the mug full and the weight of the mug empty is negligible". In other words, you need to be able to tell when it is time to start whipping up the next drink.
|
|
D
danlovestikis
Posted
posted
on
Thu, Nov 20, 2014 2:16 PM
I like the yellow brown mug as it is. All three mugs look great. I personally like thick and heavy mugs. I leave them in my molds for two hours just to get that effect. I guess no one knows when they need to mix the next drink when using my mugs! Keep it up, Wendy |
|
M

MadDogMike
Posted
posted
on
Thu, Nov 20, 2014 2:59 PM
I like them all, especially the Outrigger mug, very cool effect Besides the colors not moving, another benefit is that you can paint underglaze on greenware before it is bisque fired. The downside to that is you stand a greater chance of breaking fragile greenware the more you handle it. The disadvantage of underglaze is that they are opaque. They cover up textures and you don't get the cool color variations where the glaze breaks (thins) on the high spots and pools in the low spots Good luck and keep at it. |
|
R
RVICTOR
Posted
posted
on
Thu, Nov 20, 2014 4:32 PM
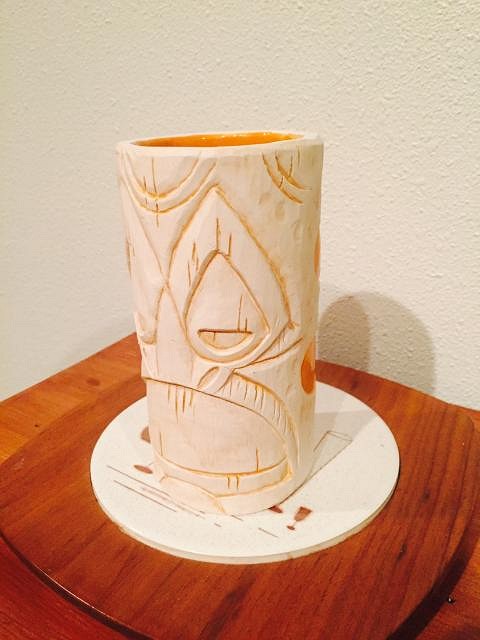
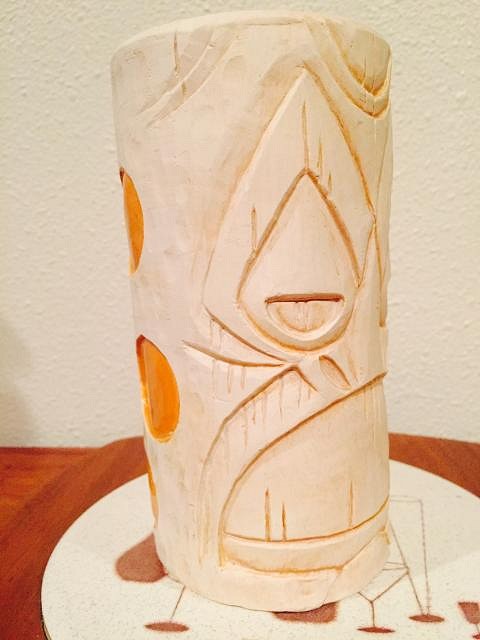
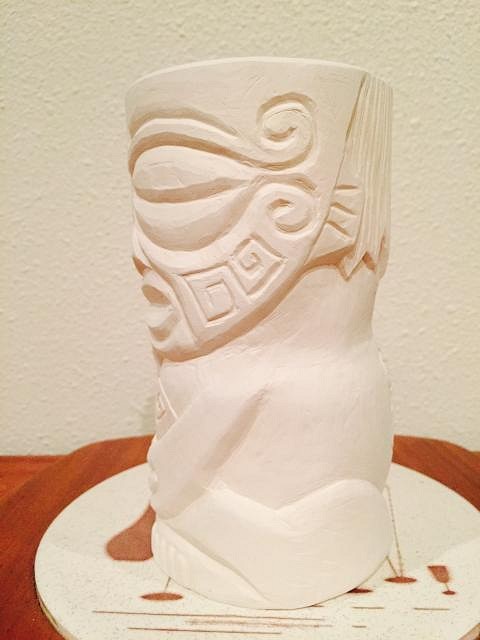
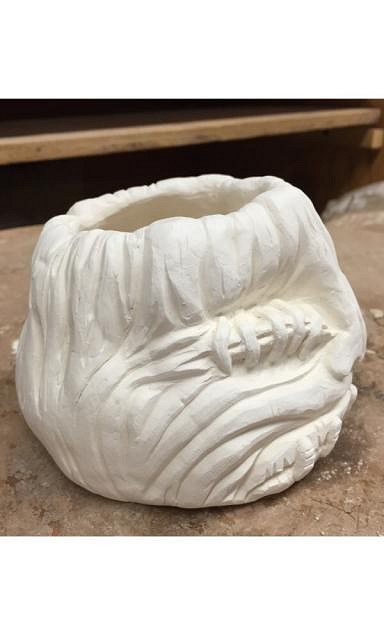
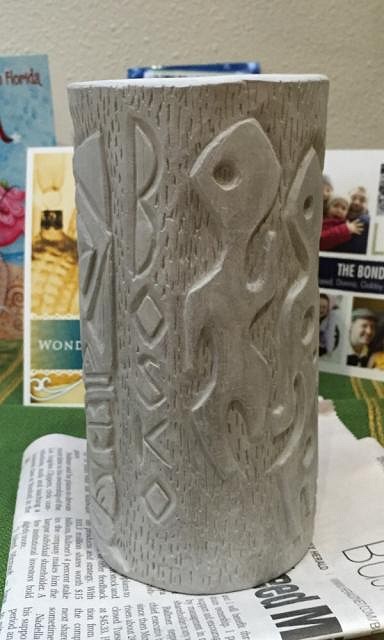
Wendy - Thanks for the encouragement. I promise to keep it up...at least until I am out of rum. MadDoy - Thanks for the advice. I will give it a shot as you suggested. Right now my glazing time is limited to the potters workshop I am part of...a couple hours a week. I'll pick up some underglazes and try out what you were talking about. I appreciate everyone taking the time to look. I will post what I have done to this point until I get caught up to date...Then I will post as I progress. That said...here is mug #4. It's a small slab build barrel mug with relief carving. I've taken this one back into the workshop to try applying a light coat of clear black glaze in hopes that it will make the details stand out more than they do. I hope it doesn't ruin the mug.
|
|
R
RVICTOR
Posted
posted
on
Thu, Nov 20, 2014 4:43 PM
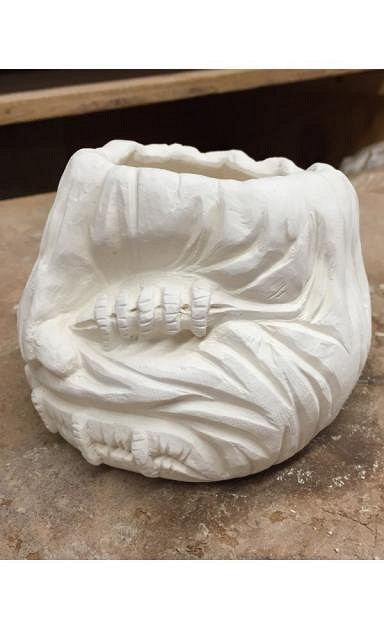
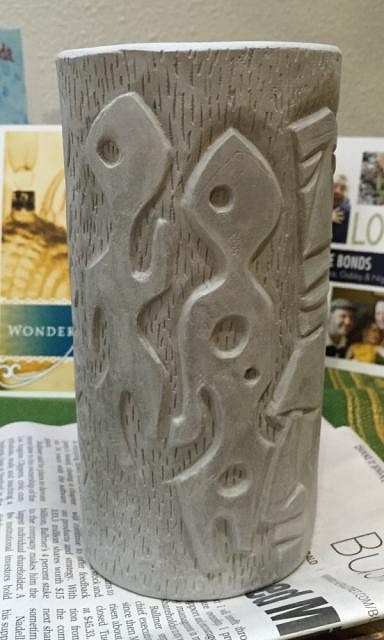
Mug #5 - a work in progress. There was a problem with the first glazing. It has since been reglazed and is currently in for firing. The mug has two sides and is supposed to represent a Hukilau. Boy the camera picks up all the imperfections. I will keep on reglazing until it either looks good or the carving disappears. About this time I started to realize that I have made a few...and I may be onto something if I slow down and try to make it look cleaner. Now that I have said that I am sure the next one I post will look all choppy too. |
|
L

LoriLovesTiki
Posted
posted
on
Thu, Nov 20, 2014 6:00 PM
I love your mugs! I'm particularly impressed with your first! I can't believe it's anyone's first mug! You have such great carving skills!! Seriously! I've made a couple of mugs myself so I know how hard they are to make. If you saw them you'd feel WAY better about yours. They're very nice! |
|
H

hang10tiki
Posted
posted
on
Thu, Nov 20, 2014 6:22 PM
Outrigger rocks it....Like that color They are all kool [ Edited by: hang10tiki 2014-11-20 18:23 ] |
|
R
RVICTOR
Posted
posted
on
Thu, Nov 20, 2014 7:31 PM
Thanks for all the compliments and encouragement. Its allot of fun and I am enjoying learning from those of you on this board. Really cool that this available. Have a few more to run through...most of them are not glazed. I am a little apprehensive about it given the amount of time I put into carving them...sure they aren't going to look good until they are...but I need to get my feet underneath me before I start ruining pieces...I just like the sculpting part more I guess. As an instructional sidebar, I was asked to make a sphere out of two pinch pots during the sculptors workshop I am in. I ended up making a Tiki Ball...no other word for it really...not sure what I would ever do with it...so I used it as a test piece for a cool glaze that I got at Seattle Pottery. |
|
R
RVICTOR
Posted
posted
on
Thu, Nov 20, 2014 7:45 PM
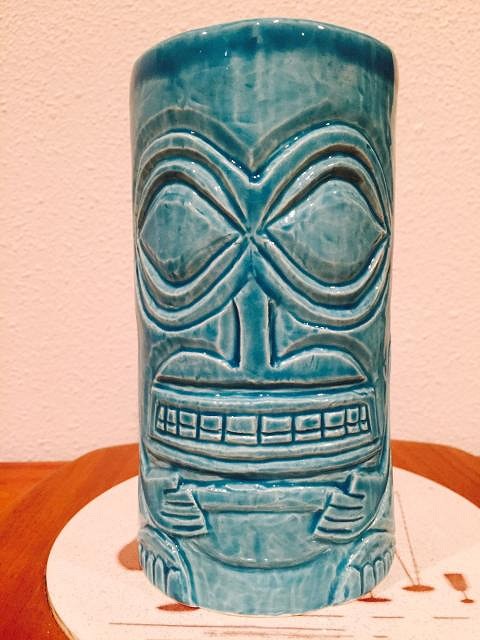
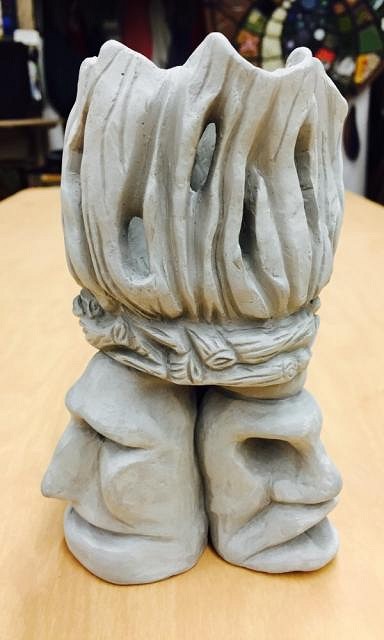
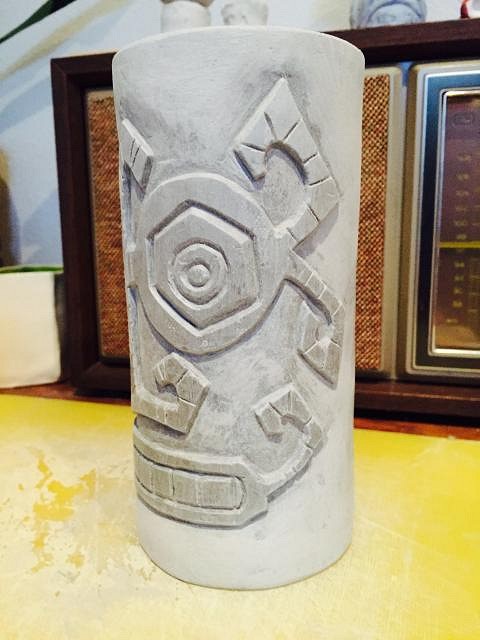
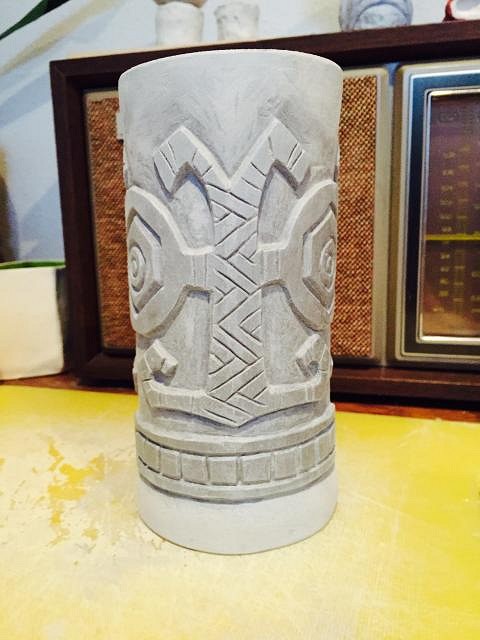
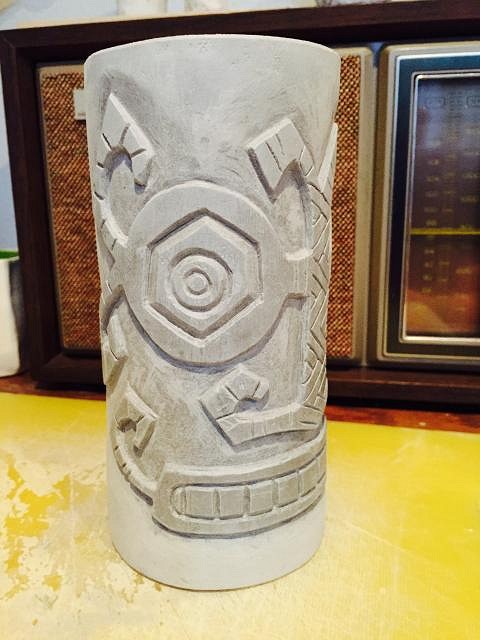
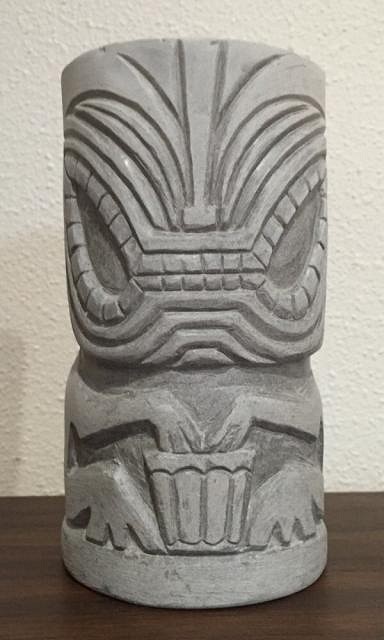
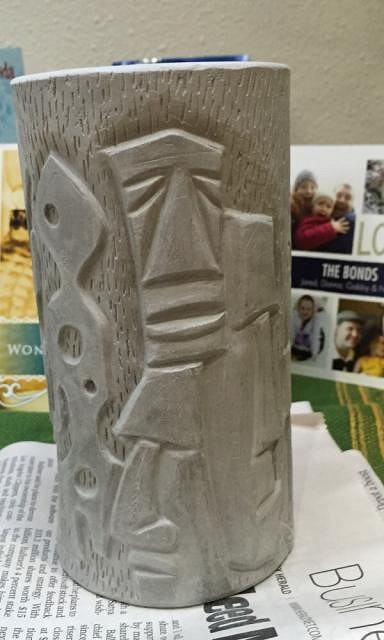
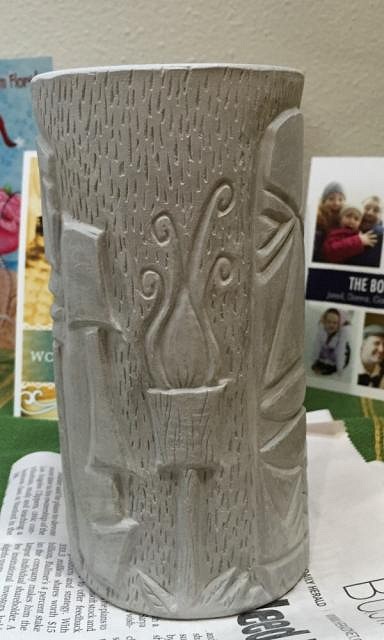
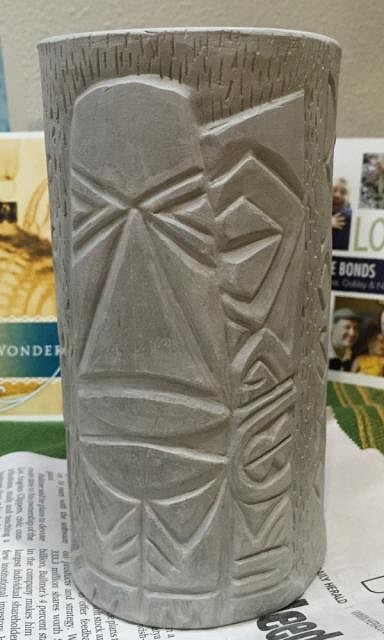
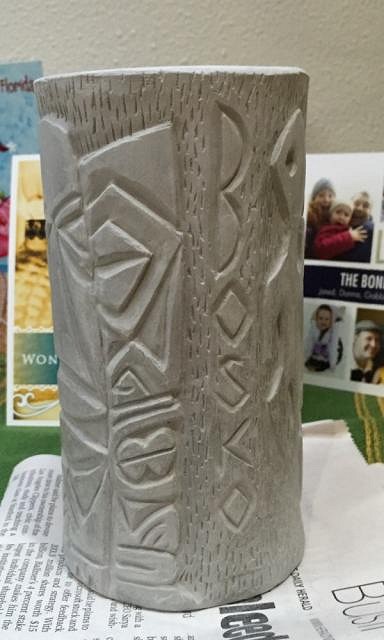
Ok...Onto mug #6... I don't know if I'm in any rush to glaze it.
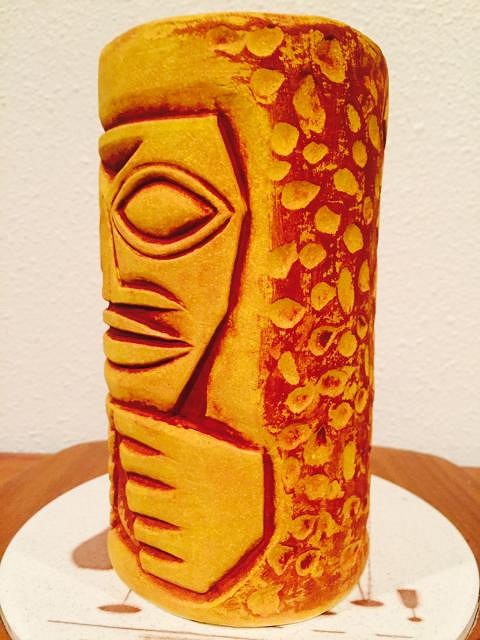
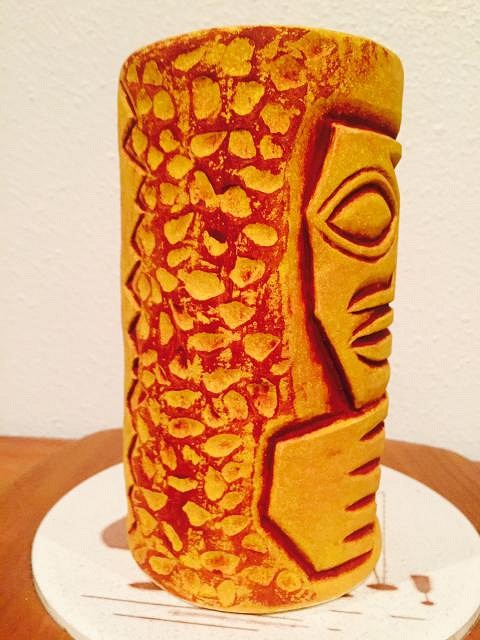
Moving on... Tiki Mug #7 is one of my favorites of the "barrel mug" style...I chose the sketch from my sketchbook...Which reminds me...I could post a picture of my sketches every once in a while too right?...Anyways I gave it spots cause i was thinking that the face looked long, old and dry and should probably be augmented by a copious amount of sunspots. I am in the process of glazing this one now.
|
|
H
hang10tiki
Posted
posted
on
Thu, Nov 20, 2014 7:57 PM
U on fire |
|
D
danlovestikis
Posted
posted
on
Fri, Nov 21, 2014 2:12 PM
Just what hang10tiki said...call the fire department! Wendy |
|
R
RVICTOR
Posted
posted
on
Fri, Nov 21, 2014 2:54 PM
Hopefully some of you aren't getting sick of my posting so much so quickly. Just trying to get what I have been working on over the past several months out there. I will slow down as I'm actually averaging 1-2 things a week...so I should be caught up to date in a few more posts. I'm really new to this so there's really not like a huge amount of work to show. Since I am in a sculptors workshop, and there is really no end date to it, I assume I will be producing work for a while into the foreseeable future. Mug #8 - I think this one is interesting. So I built another barrel mug...but I was getting a little bored of the same old idea of relief carving into a cylinder. I told myself that I would make 10 barrel mugs and then move onto something else. When I told my wife that I felt like I wanted to move on she suggested that I take it in a different direction. So I sat staring at this cylinder and it occurred to me that I should probably experiment with the shape...understanding that clay had plasticity. So I started pushing it with tools and then with my hands. I started shaping it to make it look more like a figure. Then once I had the general shapes outlined, I let it dry and started carving. This was the end result. |
|
M
MadDogMike
Posted
posted
on
Fri, Nov 21, 2014 6:17 PM
Robert I really like the circles on the back of #7, very interesting look. Sketches are good too, it's nice to see the evolution from the concept to finished mug. |
|
R
RVICTOR
Posted
posted
on
Mon, Nov 24, 2014 8:54 AM
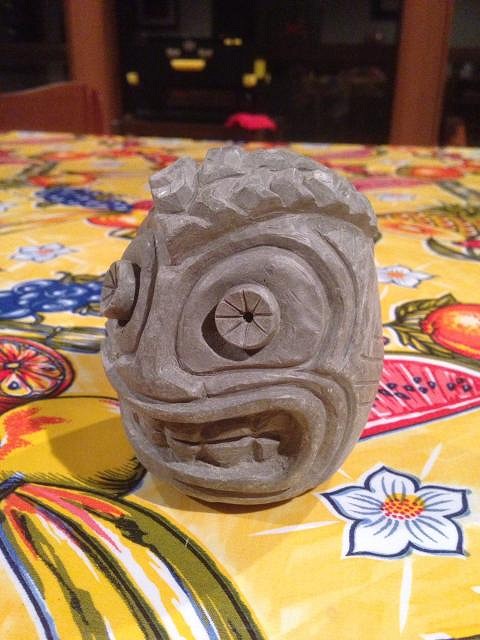
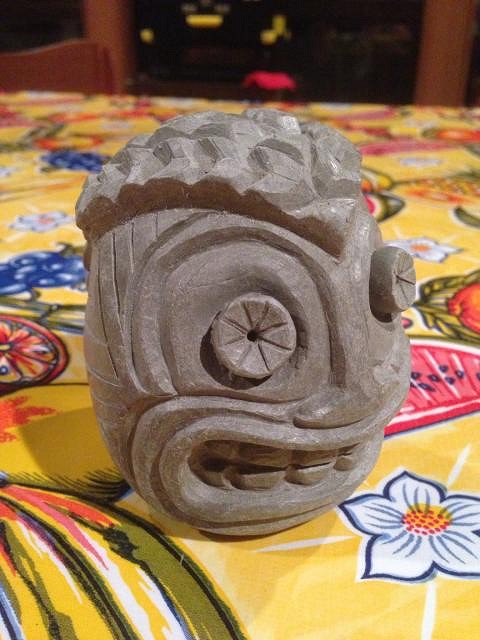
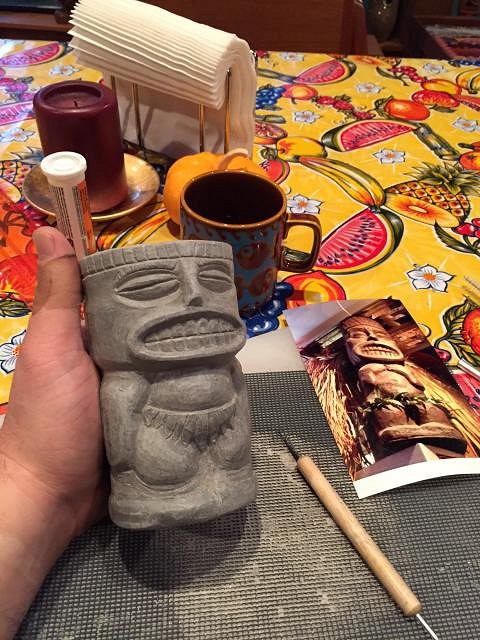
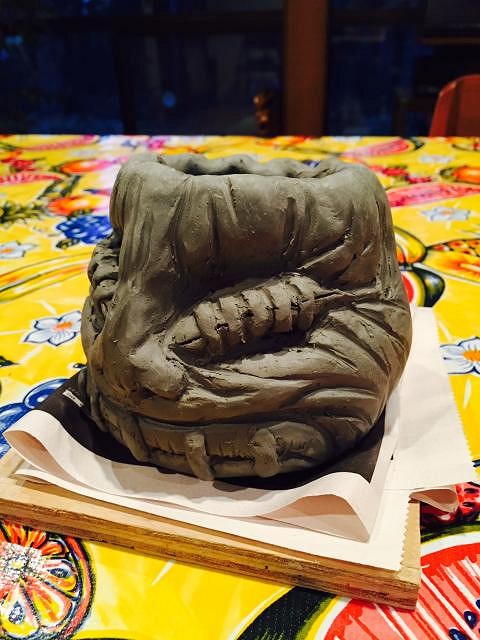
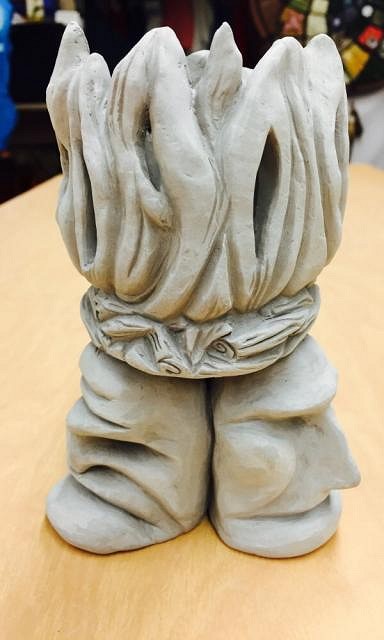
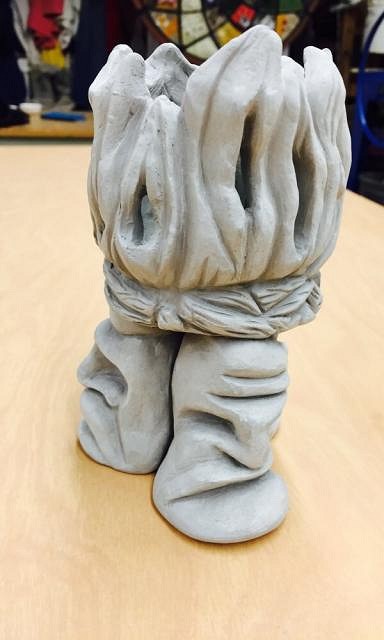
Just getting started in ceramics, and in making tiki mugs, I don't have allot of work...I appreciate your visits and kind words as I post the work to date. Having shared this with my family, friends and others in the sculptors workshop, I have received allot of great comments and feedback. Please feel free to leave your comments if you so choose. Any advice, guidance, tips, etc. that I can get will only help me progress faster. Today I am posting a mug that I am planning on making a mold of. It's one that I promised to make as a gift for the owner of a local tiki bar. I took pictures of the interior of the bar and used a photo of one of the tikis in the bar to do a one-off. The mugs name is Taki Tiki 1. My ceramics instructor saw the mug when I brought it in for firing and she said I should leave it green so that I could make a mold of it. So the plan is to make a mold in January and do 10 artists proofs in different colors. I am really looking forward to it. First a couple progress photos...the first one is while drying after I hand molded the barrel mug using the picture as a guide. I did a small build up for the frame of the mouth.
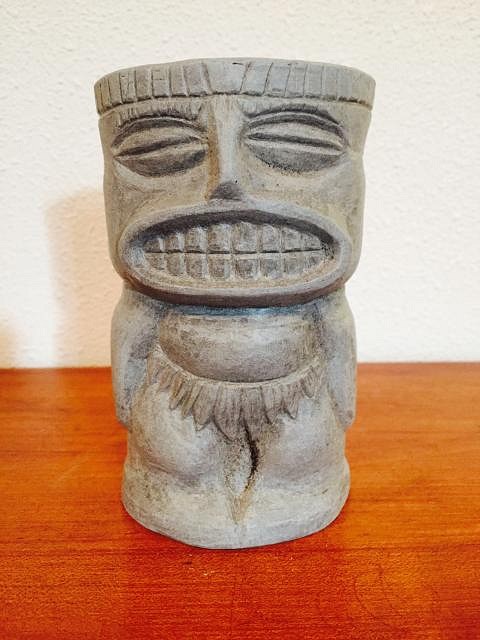
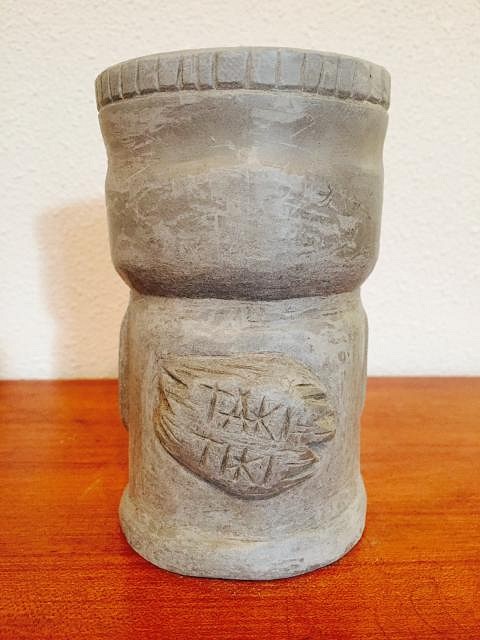
After drying I started carving...I have a long way to go to be able to carve with good symmetry. I struggled with this a bit on this one. Of course I didn't want to do an exact replica so I shortened the head and body, elongated the mouth and eyes, and changed the wanky, dinosaur arms. I also wanted the leaves to look more like a skirt. I like the way it came out after making the modifications.
And here are the front and back views after I was done with carving.
Once we get closer to the time we will make the mold, I plan on doing some more finish work. For the time being it is being stored in a plastic bag with a small basin of water in it. Hopefully it doesn't dry out too much. Otherwise I will have to moisten it up and work on it some more to restore the detail. |
|
H
hang10tiki
Posted
posted
on
Mon, Nov 24, 2014 12:12 PM
Wow |
|
R

rockydog101
Posted
posted
on
Tue, Nov 25, 2014 6:02 AM
Your mugs are awesome I would buy half of those in a heart beat. |
|
D
danlovestikis
Posted
posted
on
Tue, Nov 25, 2014 6:57 AM
Well done. Check to make sure you have no undercuts. That is where the mold plaster gets in behind clay and then either the mug or the mold breaks when you put them apart. On page one of my thread shows a simple two piece mold. Best wishes, Wendy |
|
R
RVICTOR
Posted
posted
on
Tue, Dec 2, 2014 12:02 PM
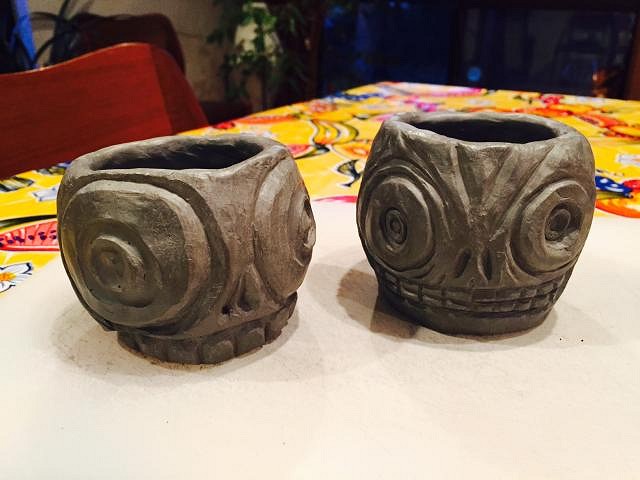
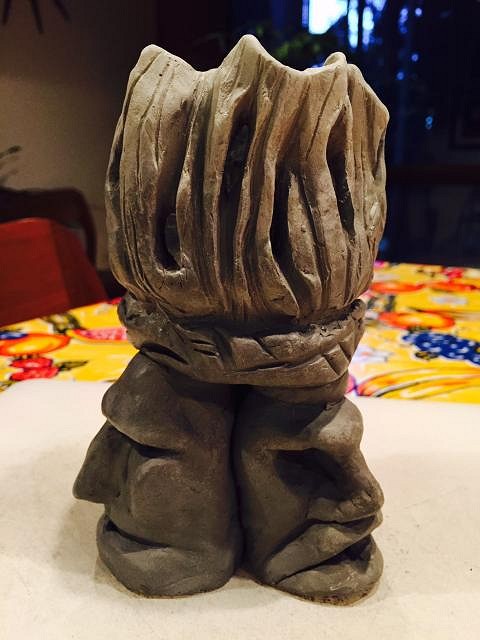
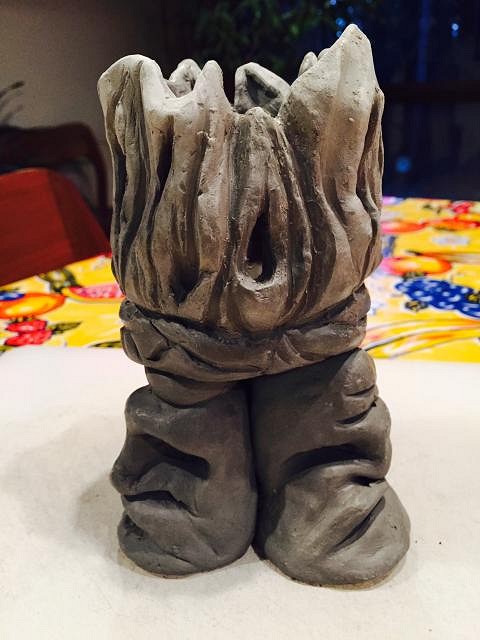
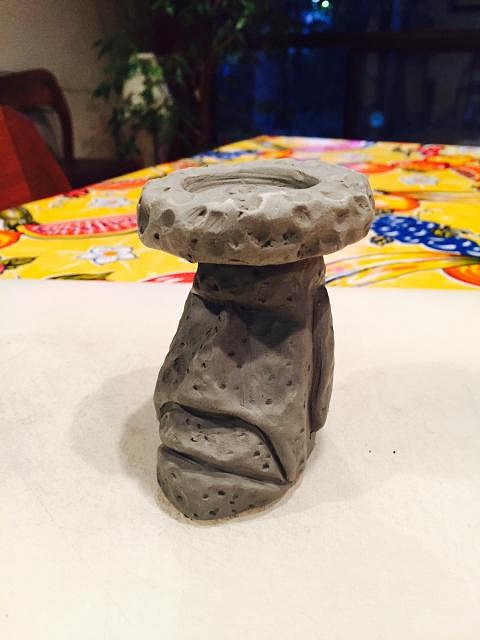
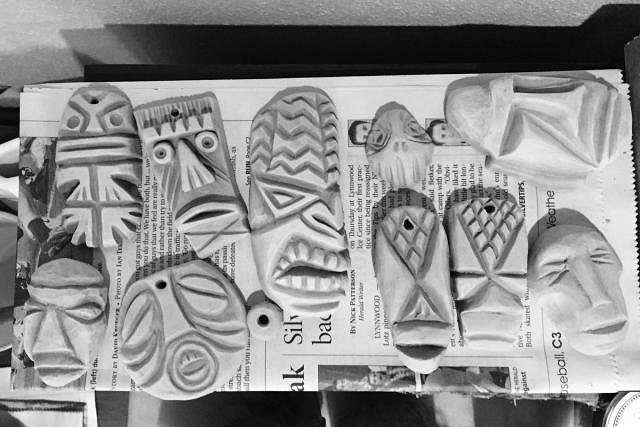
The second week of November I sculpted a few things outside of class. Short story is my daughter had a jazz concert the day of my weekly sculptors workshop so I took home some clay and worked on my hand sculpting. The following are the rough sculpts of a few things...I took some time to play around and I didn't have a plan to start with like most of the other mugs. First, a shrunken head mug... Next, a few skull cups... And finally, a moai tealight holder... And another maoi tealight holder, different design... I will try to post more follow up photos. |
|
D
danlovestikis
Posted
posted
on
Fri, Dec 5, 2014 11:20 AM
Keep those photos coming. You have now taken away my title of "The Machine". I really like that we can recognize classic tikis in your work. Wendy |
|
R
RVICTOR
Posted
posted
on
Sun, Dec 7, 2014 10:05 PM
Photos of the fired skull cups...
And some of the fired shrunken head mug....post carving
Got some glazes for home now...so I can glaze outside of the sculptors workshop class hours. |
|
H
hang10tiki
Posted
posted
on
Mon, Dec 8, 2014 8:41 AM
Very kool...... Love da Moai |
|
R
RVICTOR
Posted
posted
on
Mon, Dec 8, 2014 11:20 AM
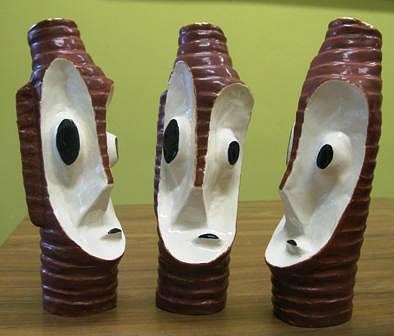
Hang10 - thanks, I wasn't sure if anyone would like the moai or not. I can't wait until I get some more techniques under my belt as I have allot of moai drawings that I would love to turn into mugs. Here are a few photos of one of the moai tealight holders after carving was done...
|
|
H
hang10tiki
Posted
posted
on
Mon, Dec 8, 2014 12:07 PM
Killer..... |
|
D
danlovestikis
Posted
posted
on
Tue, Dec 9, 2014 7:33 PM
Very cool, Wendy |
|
R
RVICTOR
Posted
posted
on
Wed, Dec 10, 2014 6:19 AM
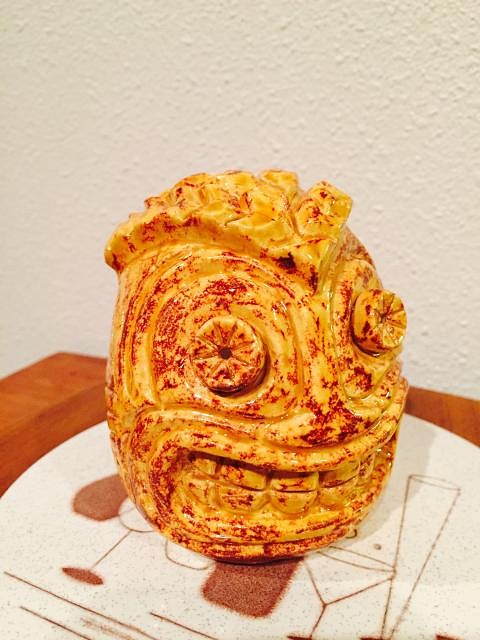
Mug #5 - I applied two more coats of the glaze and fired it again. The glaze was a Duncan Carribean Blue IN 1015 and I think it has a thin appearance. If I were doing this again, I would probably use 5 coats to start with. Mug #6 (I made a mistake and called it #7 earlier...If I just stuck to naming them I probably wouldn't get as confused)
Wendy and Hang10 - thanks for your encouragement. I do appreciate it. Wendy - You will always hold the title of "the Machine"...I can't keep up with you. You and Dan have the system...I've seen your posts. I am just another newbee learning the skills. I also finally put two and two together on "Dan's" mug collection (read tiki magazine article and didn't realize it was the collection featured-duh moment). At some point your collection will need a museum built in it's honor. Love it. |
|
D
danlovestikis
Posted
posted
on
Wed, Dec 10, 2014 7:18 AM
RVICTOR thank you for the comments. The house is a museum because everything has been displayed and perfectly arraigned by Dan. I don't touch his tikis! We have fun having an open house at the Sacramento Tiki Crawl aka Cap City Crawl. It's always fun getting together with all the tiki peeps. I would glaze the Caribbean Blue mug again but you don't have to glaze the entire mug. To do a flat surface without texture using a Duncan Concepts glaze works well. It is an underglaze (which means it will not run) but it is special in that it also fires to a gloss finish. Other underglazes have to have a couple of layers of gloss put over them. The best is Duncan's Brilliant. The other clear glaze they have which is pale blue green in the jar makes underglazes run. I ruined some Bob's when it made the black eyes run down the white face. The Brilliant clear has never done that. Cheers, Wendy |
|
R
RVICTOR
Posted
posted
on
Thu, Dec 11, 2014 8:26 AM
Wendy - Tell Dan that he's got an amazing collection and that he shouldn't be surprised if someone approaches him some day about doing an exhibit. Who knows, they may build a museum in it's honor. A very impressive collection that we can all appreciate. I appreciate the advice and will make another run down to Seattle Pottery Supply over the Christmas break for the Concepts glazes. I am hoping to have some down time then and be able to get to some more carving and glazing. My wife Tammy built two more barrels for me in class last night, so I will be able to complete the series of 10 barrel mugs (my goal) and move onto the volcano bowl that we have been designing/planning. While I am responding, I figure that I might as well post pictures of what I had in mind for the WISH LIST mug... So my wife and I are into midcentury modern and she commented about a tiki bob that she liked that was made by bosko. Something like this would be nice if you can do it... |
|
R
RVICTOR
Posted
posted
on
Sat, Dec 13, 2014 5:20 PM
Mug#9-Not easy to visualize how it looks by pictures alone. I really like how the face on this one spreads out across the mug. This one was quick and fun to carve. I like this one.
|
|
D
danlovestikis
Posted
posted
on
Wed, Dec 17, 2014 10:28 PM
RVICTOR you have covered so many tiki styles and ways of representing them that every time I come here I'm impressed. The mug I'm doing for you is based on the Tiki Modern book cover and not the Bosko mug. I hope you'll be as happy with that style. Dan thanks you. I can tell you that he'll never box anything up for an exhibit. He'd worry too much. I think you'll really like the Concepts glazes. Keep it up, Wendy |
|
T

TikiAno
Posted
posted
on
Thu, Dec 18, 2014 7:32 AM
Just got caught up on your thread- beautiful work, great style. As Wendy wrote, love your renditions of the classics, albeit with your touch. Killer, and great glaze choices. Look forward to seeing more! |
|
R
RVICTOR
Posted
posted
on
Thu, Dec 18, 2014 9:36 PM
Wendy - Thanks for the complements. You are very sweet and I appreciate the encouragement. It's really busy right now getting ready for the holidays. I have a bunch of different pieces in the process of getting glazed and finished and three mug builds waiting to be carved. I'm going to be off work for the next two weeks after tomorrow and am looking forward for some time to get the glazing finished and get back to carving. I wish I had more time than I do. I have allot of things going on in my life but Art is what keeps me feeling alive and happy. Tiki Ano - Thanks for the kind words. Love your Rum DMC mug. |
|
R
RVICTOR
Posted
posted
on
Fri, Dec 26, 2014 11:21 PM
Mahalo. Well, it's been a busy holiday season so far. Have a couple of days off but there flying by. Kind of had an issue with the lighting in my workspace (dining room) as one of the dimmer switches burnt out. Fortunately I got a $100 Lowes gift certificate in the mail and I was able to upgrade the switches and lighting to LED. Now the room is better than before. Nice to have a little Christmas Karma helping out. Anyways, I was just hopping on to post a few more carvings that I uploaded some pictures of...hope you like them. Mug #10 - Drummer Mug
Next was a Bosko Tribute Mug. It's an idea that I had about making "tribute" mugs...kind of like a tribute to tiki mug making Ali'i (or Royalty). The idea for this mug was to have a collage of the artists work (but in my freehand of course), have their name and a torch (symbolizing passing of the torch, so to speak). I had to take several photos to get the entirety of the mug. My family said that they really like this one...hope you all do to. |
|
H
hang10tiki
Posted
posted
on
Sat, Dec 27, 2014 6:54 AM
Page #3 Jon |
|
D
danlovestikis
Posted
posted
on
Sat, Dec 27, 2014 8:51 AM
Wow, I absolutely love your new designs. |
|
R
RVICTOR
Posted
posted
on
Sat, Dec 27, 2014 10:04 PM
Hang10-glad you like them. It keeps me going. Wendy - How do you feel about swapping? As you already know, I like your work as well. Makes sense to me. Plus the thought of one of my mugs in your collection just sounds cool. |
|
R
RVICTOR
Posted
posted
on
Sat, Dec 27, 2014 10:25 PM
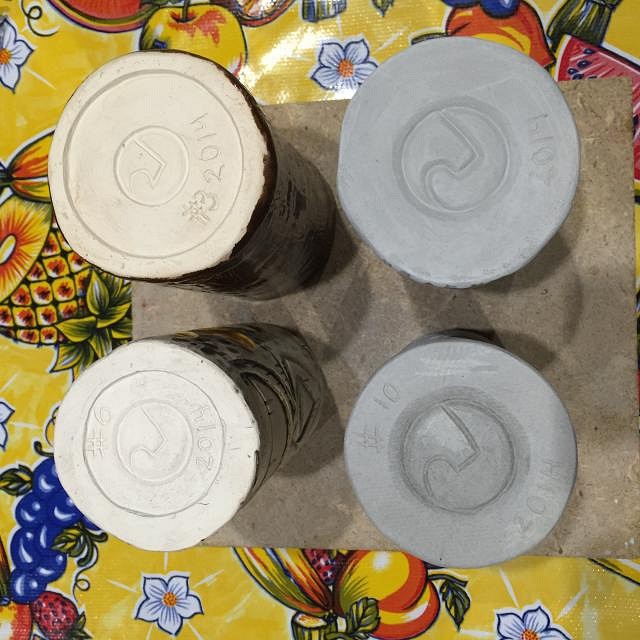
Wendy-To answer your question about how I am signing my work, I have attached a picture of the bottom of a few mugs. I don't know if there is something more I should be doing? I have been carving a logo on the bottom that stands for my initials RV and carving the year into it. Do I or should I also be doing the C?
|
|
D
danlovestikis
Posted
posted
on
Sun, Dec 28, 2014 8:45 AM
I've sent you a PM. Trading sounds like a fun proposition. Wendy |
|
R
RVICTOR
Posted
posted
on
Wed, Dec 31, 2014 5:11 PM
So I had some extra clay and some extra time (which seems to be allot more scarce most of the time) and started playing around...practicing my impromptu sculpting work. The result was this pile of heads... Also, I made another mug for my personal collection. Can anyone guess which mug this one is a one-off of???
|
|
D
danlovestikis
Posted
posted
on
Thu, Jan 1, 2015 10:22 AM
Wonderful tiki art. Do we ever get to see a photo of you? Wendy |
|
R
RVICTOR
Posted
posted
on
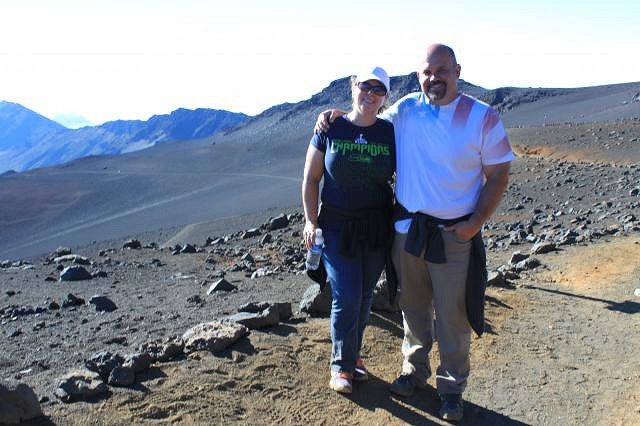
Fri, Jan 2, 2015 5:44 PM
Wendy - Here is a photo of my wife Tammy and I at Haleakala this past July. |
|
C

cy
Posted
posted
on
Fri, Jan 2, 2015 7:31 PM
Cool and creative works' goin' on there RVICTOR! |
|
V

VampiressRN
Posted
posted
on
Fri, Jan 2, 2015 8:20 PM
Looking good and with Wendy as a mentor, you will go far!!! |
|
D
danlovestikis
Posted
posted
on
Fri, Jan 2, 2015 8:52 PM
Super cool photo. Nice to be able to picture you as we correspond. How long did it take to drive from the base to the top of the volcano? Wendy |
|
R
RVICTOR
Posted
posted
on
Fri, Jan 2, 2015 11:54 PM
CY & VampiressRN-Thanks, glad you like it. I'm really liking this and feel like I'm continually improving which is good. Wendy-I think the drive was at least an hour...maybe more like 1-1/2 hours. It doesn't seem like it would be that long but there were so many switchbacks. I will never forget the mad dash up the mountain to see the sunrise. People say its great...and it's hard to imagine that it would live up to all the "you have to do this" hype. However, I was blown away. It was much better than I could have imagined it to be. It's just a surreal place. We stayed in Pa'ia when we made the trip up...I think that was a really good call in hindsight. Maui is golden. Can't wait to see the Big Island though. Much love....RObert |
|
H
hang10tiki
Posted
posted
on
Sat, Jan 3, 2015 8:22 AM
Great skull |