Pages: 1 46 replies
|
D

danlovestikis
Posted
posted
on
Fri, Feb 22, 2019 8:35 PM
Brenda's Tiki Hut Joined: May 02, 2006 Aloha Ohana! The annual Sacramento Home Tiki Bar Crawl is happening the first weekend in October 4-6. Watch this Facebook page for info: https://www.facebook.com/SacTikiCrawl/. Would love to see your happy faces and stuff luscious rum concoctions into them. [ Edited by: danlovestikis 2019-09-30 08:41 ] |
|
D
danlovestikis
Posted
posted
on
Fri, Feb 22, 2019 8:49 PM
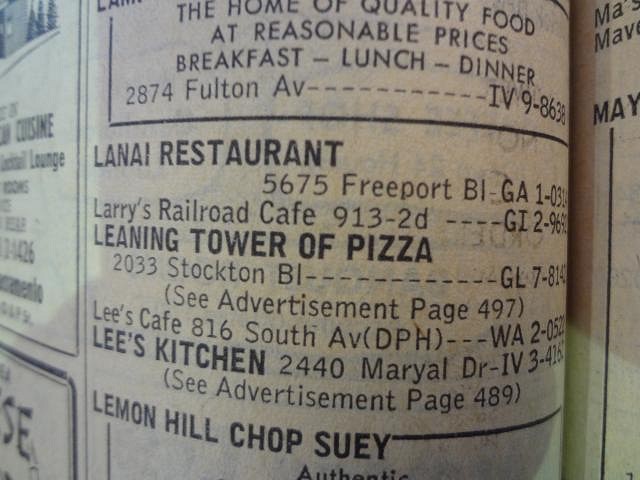
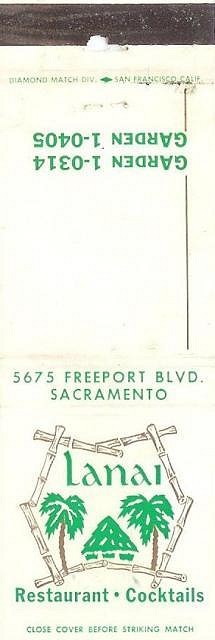
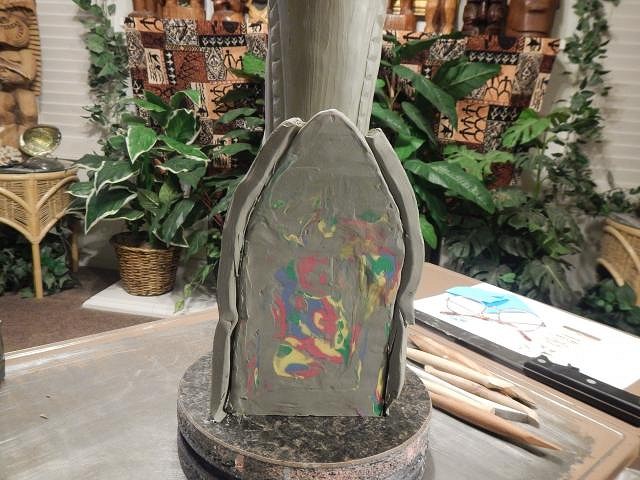
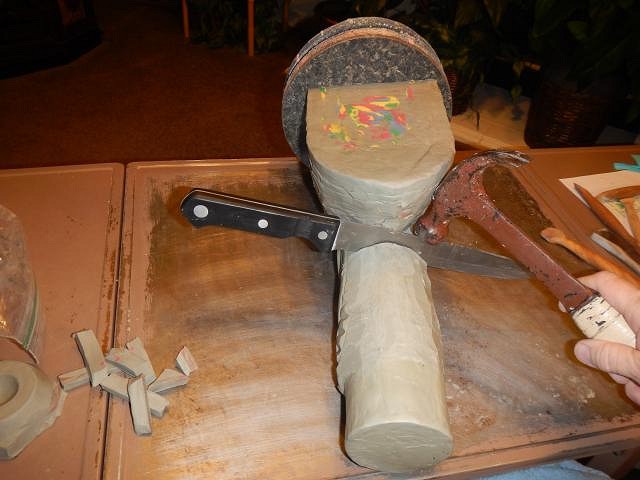
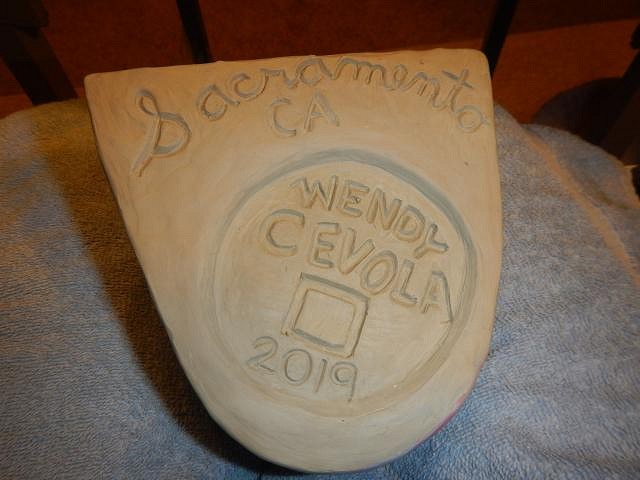
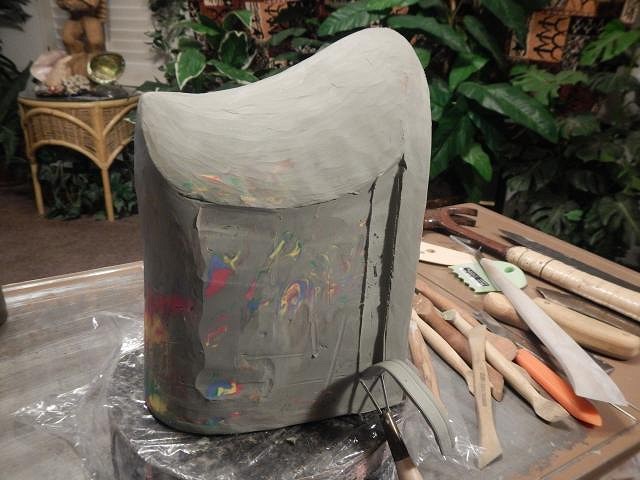
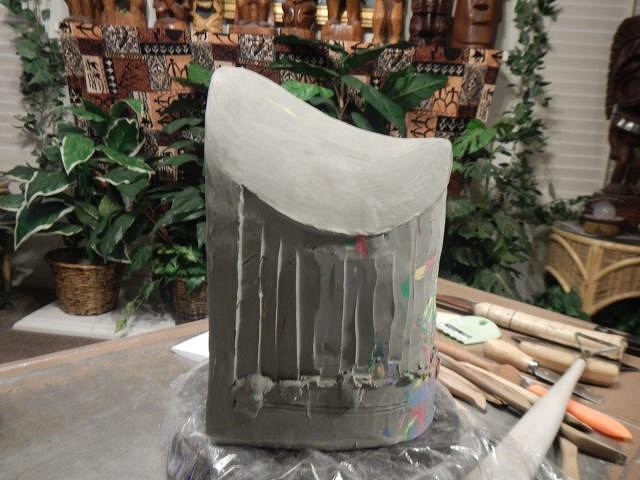
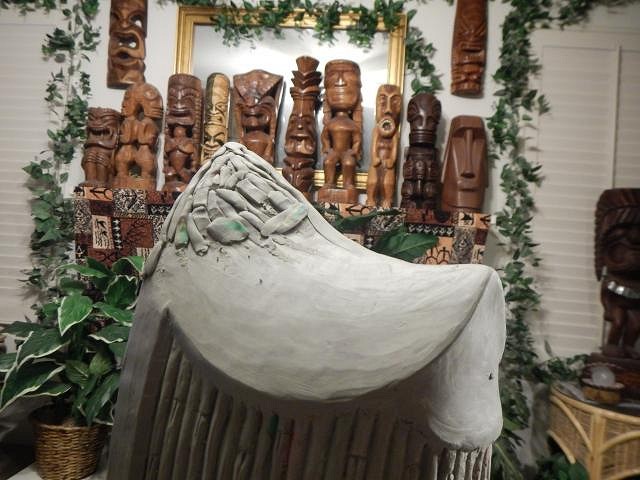
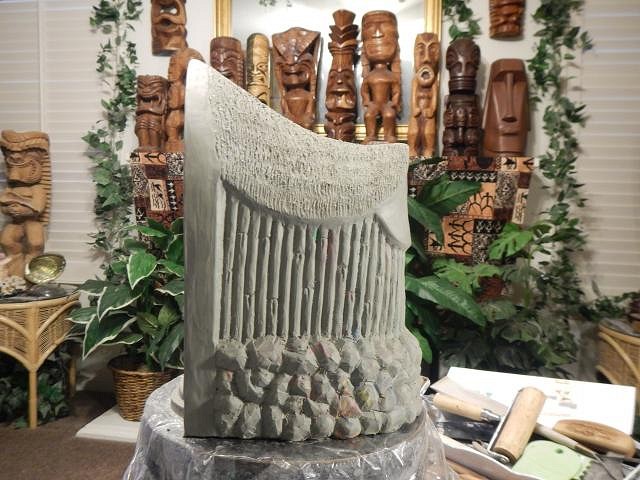
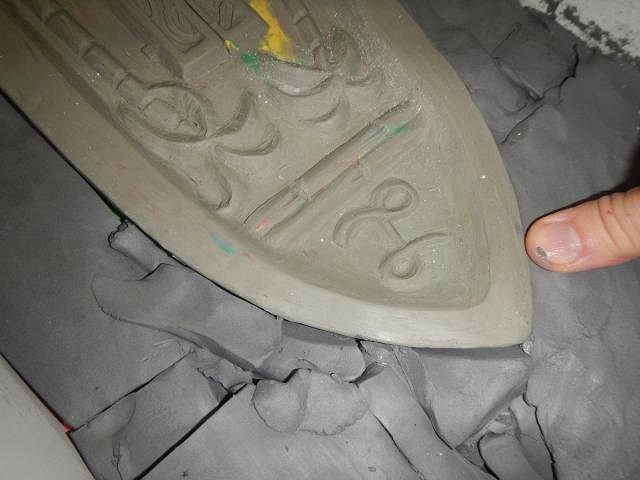
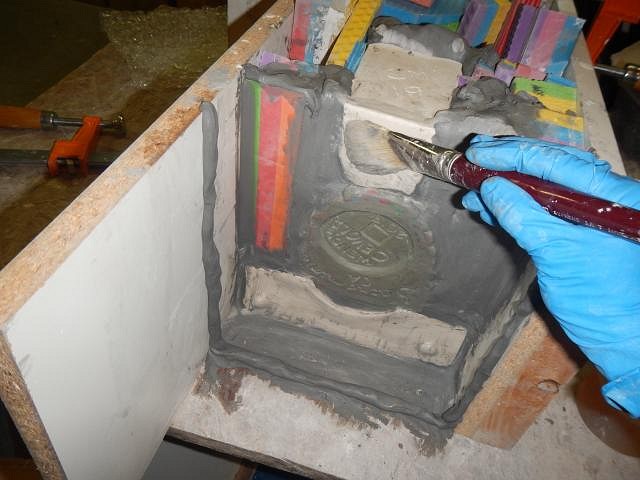
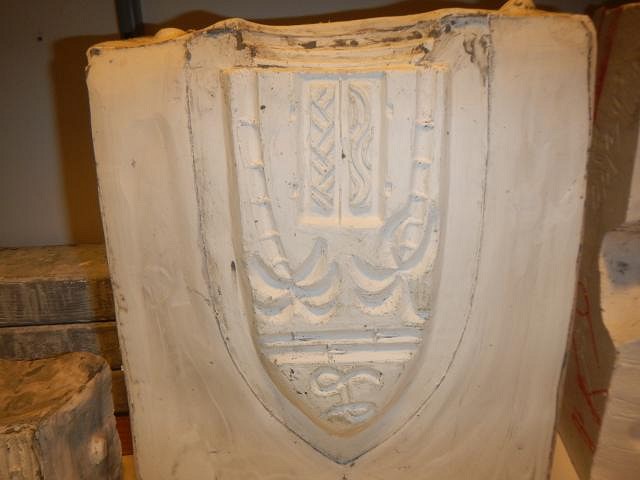
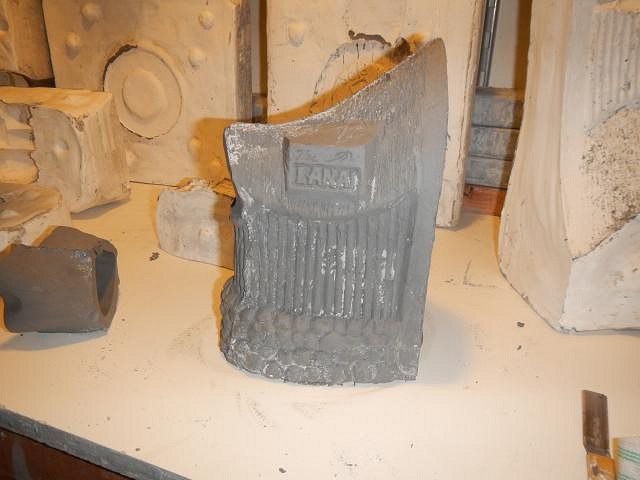
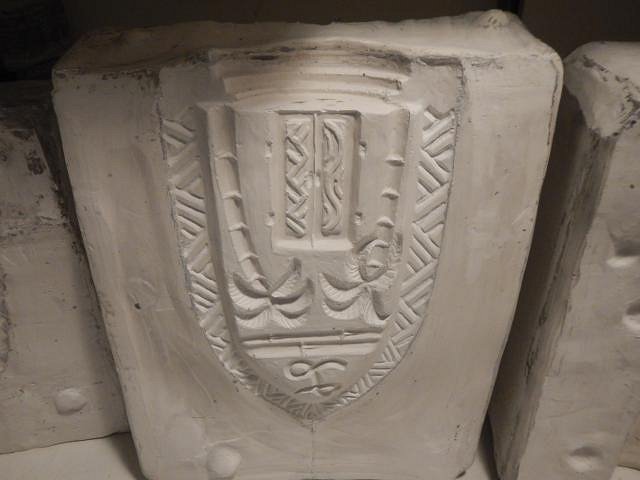
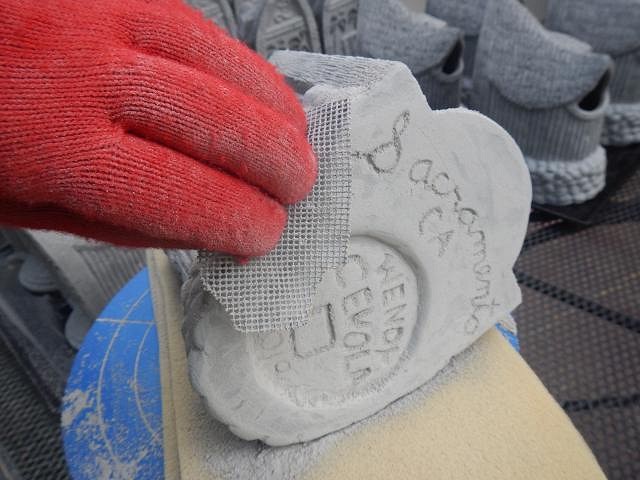
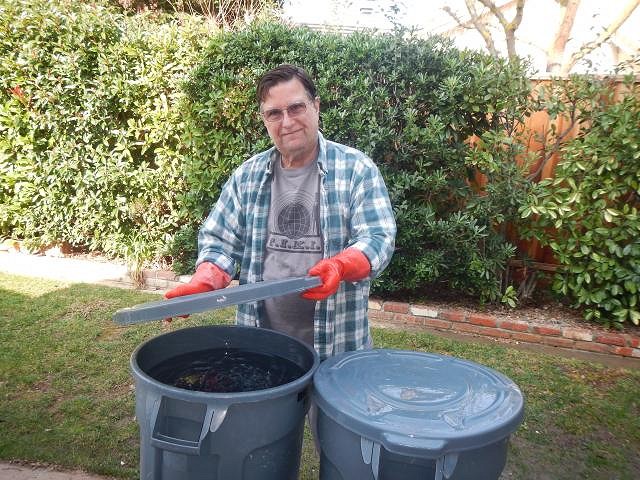
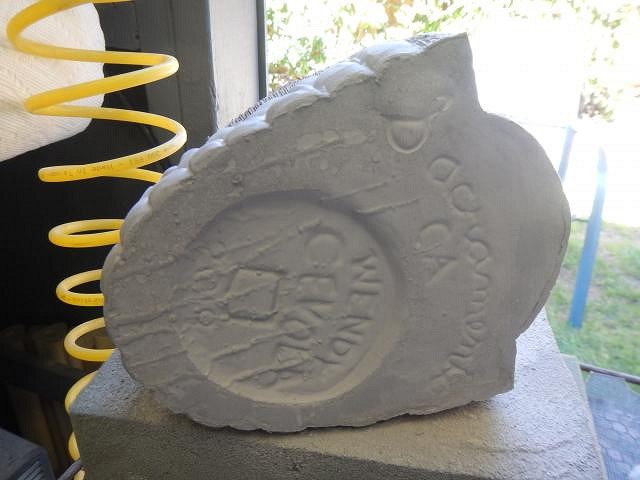
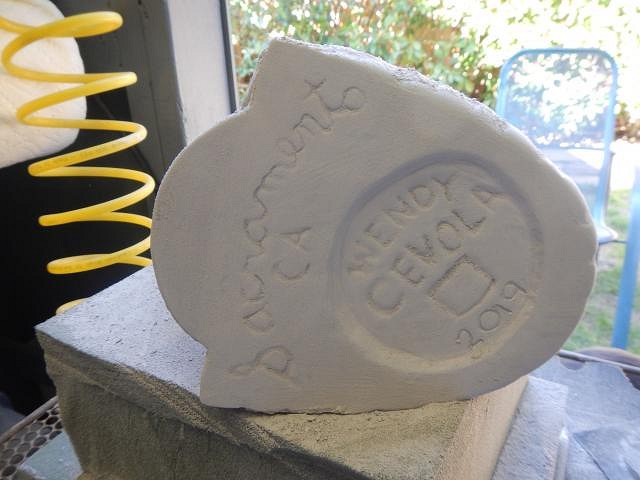
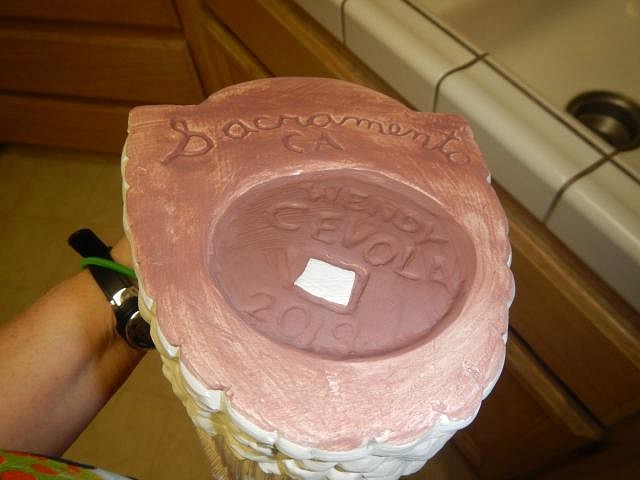
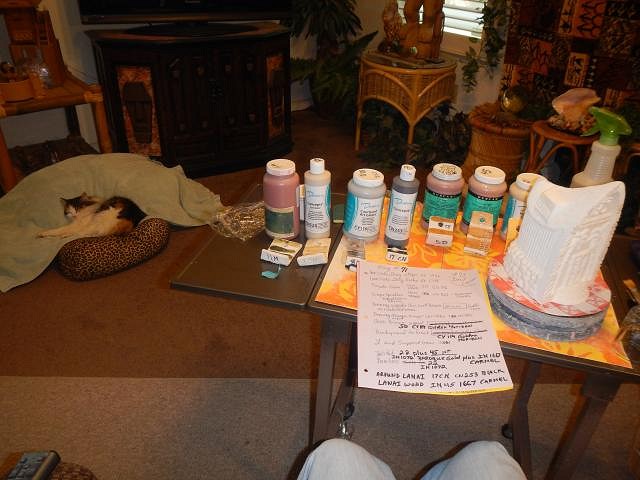
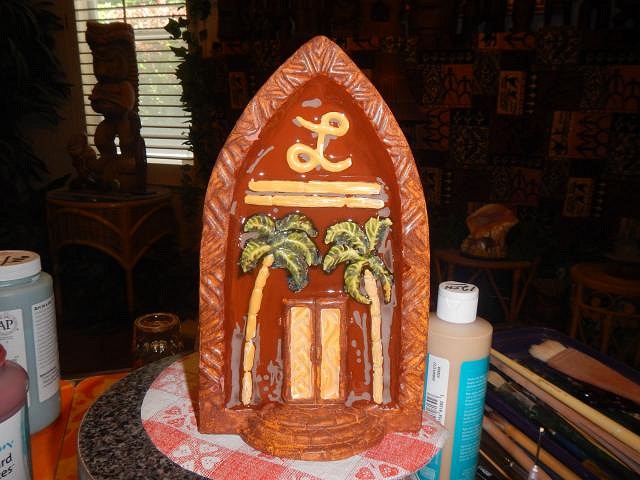
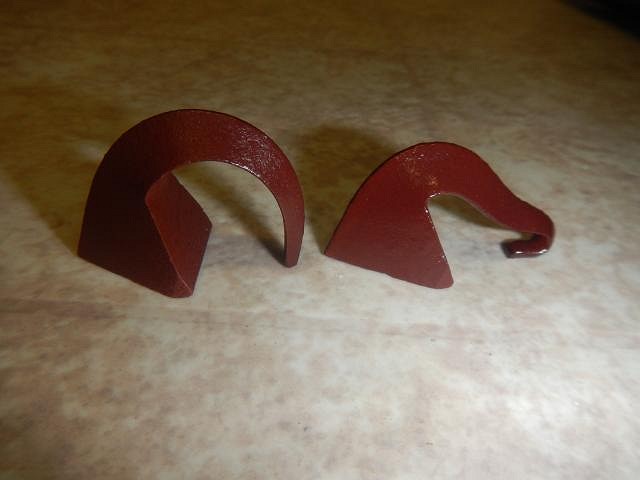
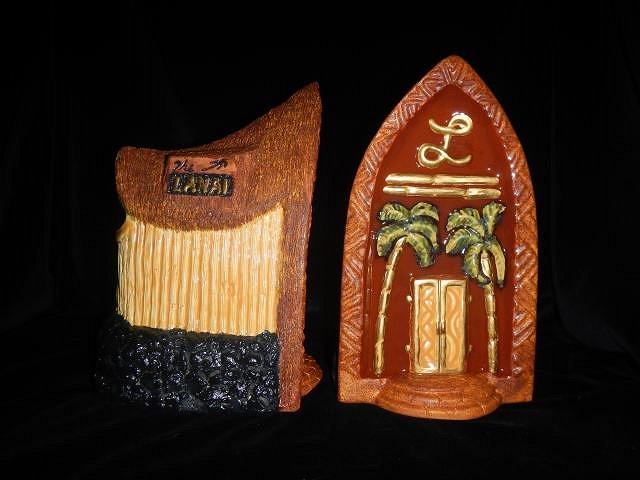
I'M A WOMAN AND I'VE CHANGED MY MIND! IMAGINE THAT. This is the 10th year I am making the Sacramento Crawl mug and it is my last year. It's easier on me if I start to show the photos now rather than wait for summer. This way I can show photos with the mug mixed in with Wish List projects. So here goes. These photos begin November 11th 2018 and end with November 19, 2018. The mug is for the Lanai on Freeport Blvd in Sacramento, California a sign still remains that says The Lanai Shops. The sculpting of my idea for a Lanai mug begins... We went to the Sacramento Room at the state library downtown and found this listing in an old phone book. Psycho Tiki D had this matchbook that I am using as the inspiration for the crawl mug. I re-use my Romo number two clay so that time had come to sacrifice my Coral Reef sculpt. I use whatever will save my hands when sculpting. I am sad to cover over Dan's cute butt. He was my model for this sculpt. I just keep adding clay to build it up. I do not have to worry about trapping air in a sculpt. I kept in mind that the actual mug will be 10 percent smaller so I added more clay. The best sculpting tool is a hammer. I added clay snakes to build it up further. The time had come to sacrifice my tiki. I turned him into a severed head. Hammer on the knife made it much faster. Less pain for both of us. It took 8 days but now I have the basic shape down. I cleaned up the bottom and carved these words and numbers. Another fun crawl is in the planning stages. Cheers, Wendy [ Edited by: danlovestikis 2019-02-23 19:44 ] |
|
D
danlovestikis
Posted
posted
on
Sat, Feb 23, 2019 7:43 PM
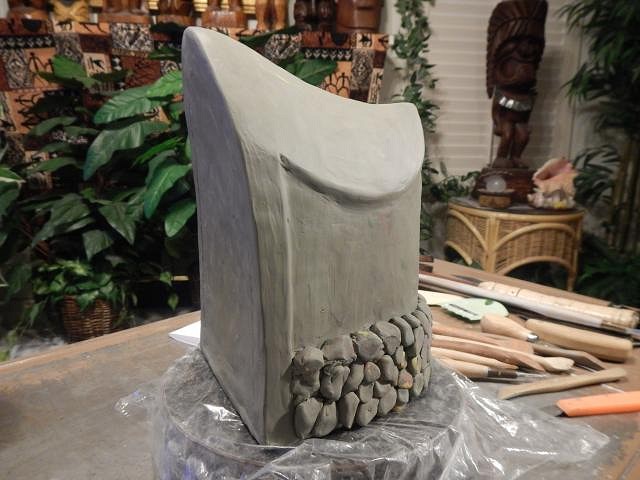
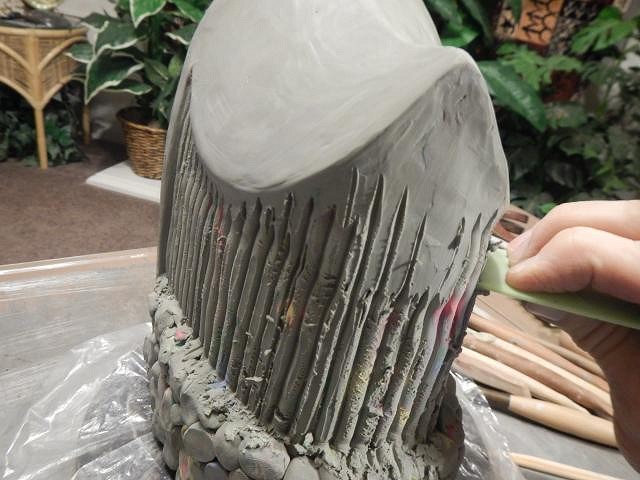
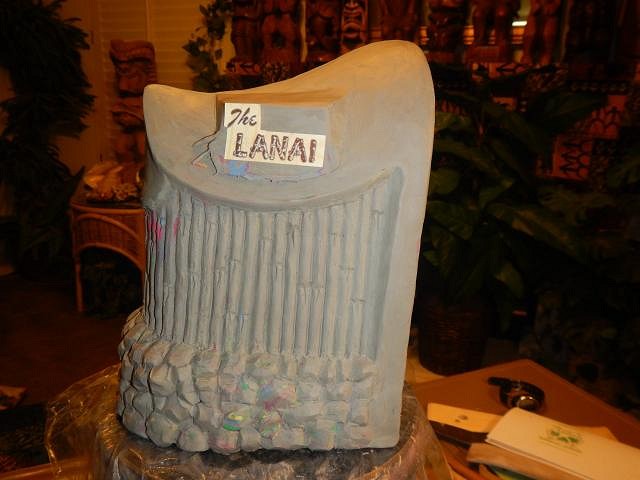
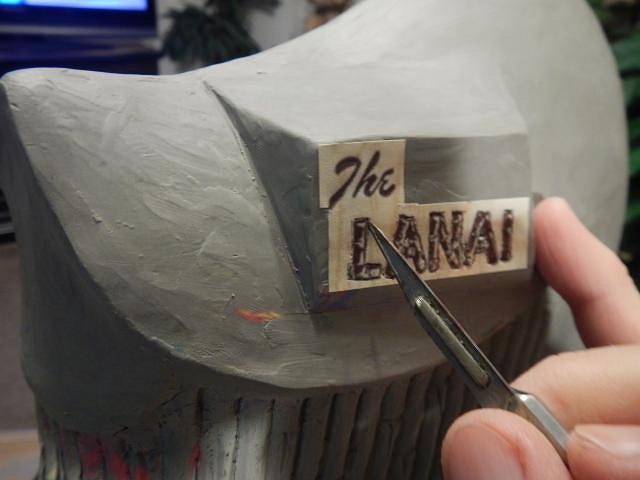
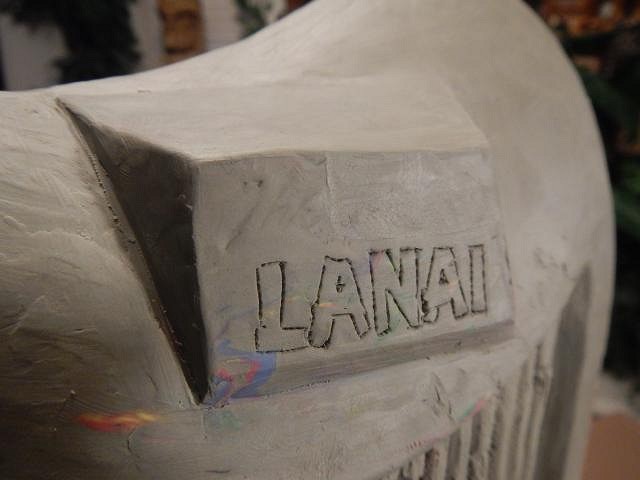
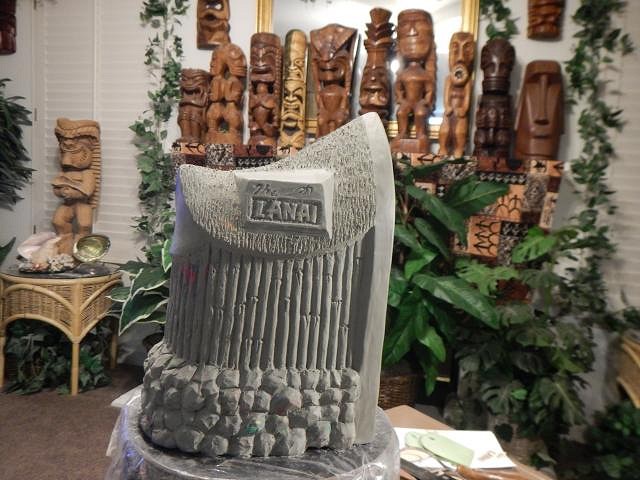
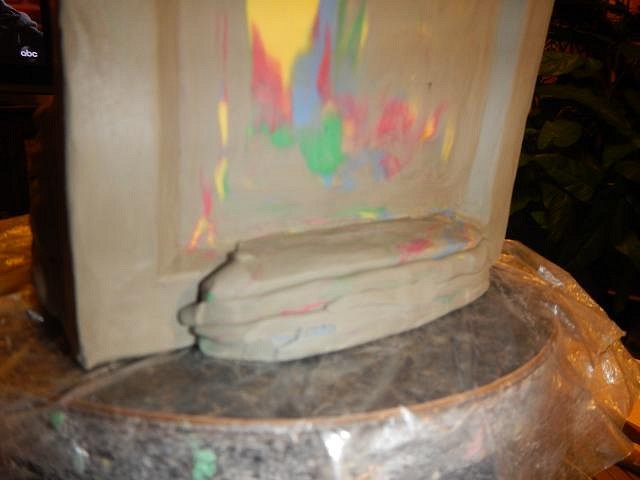
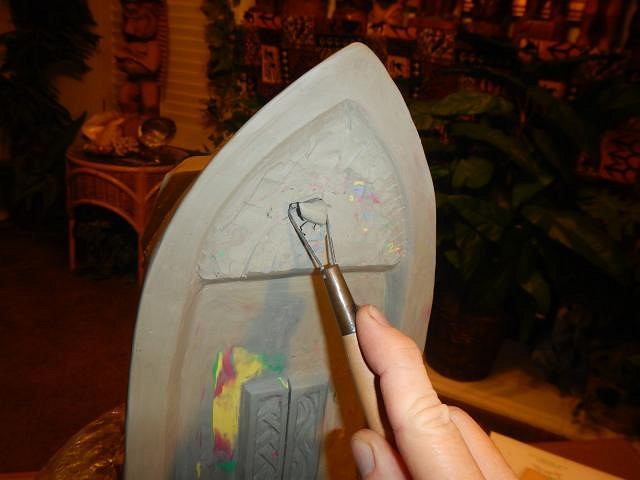
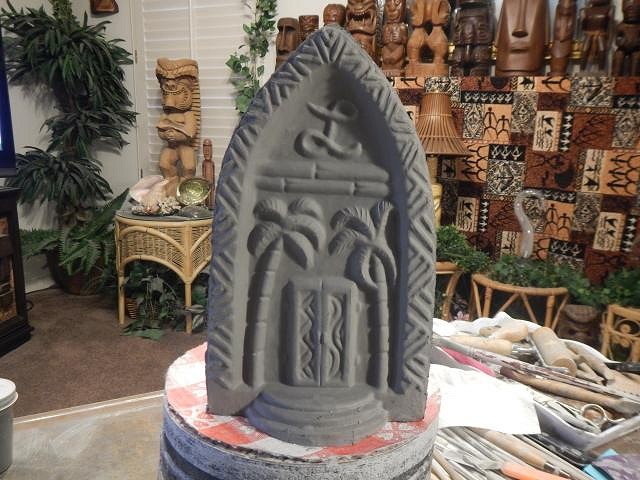
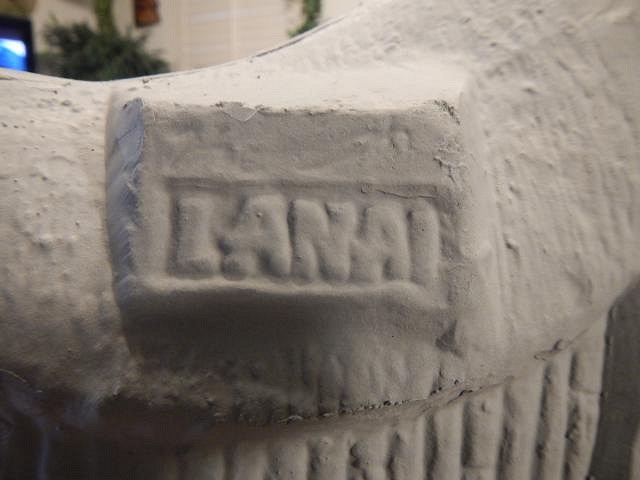
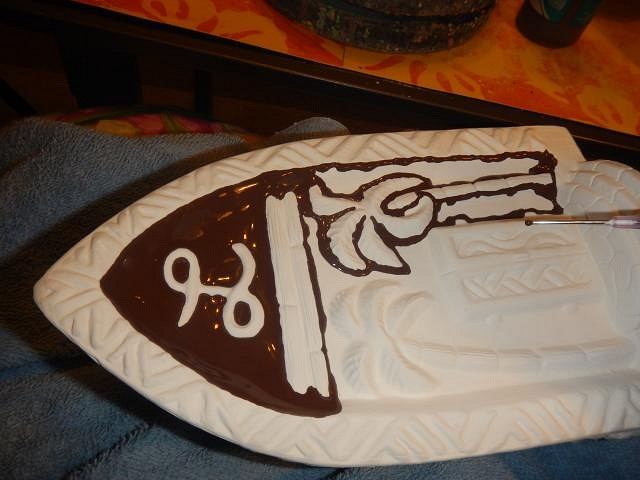
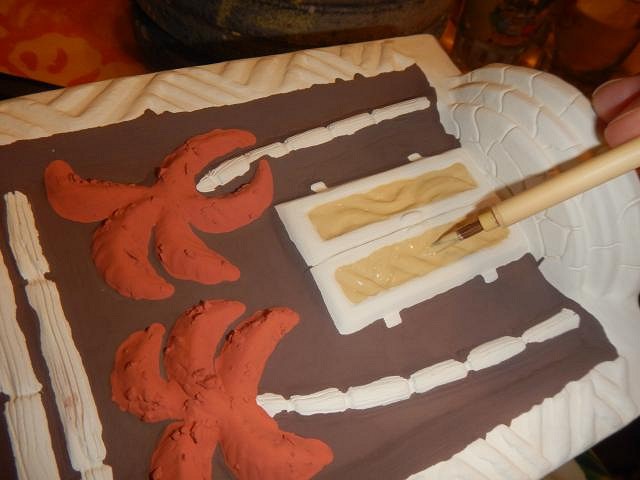
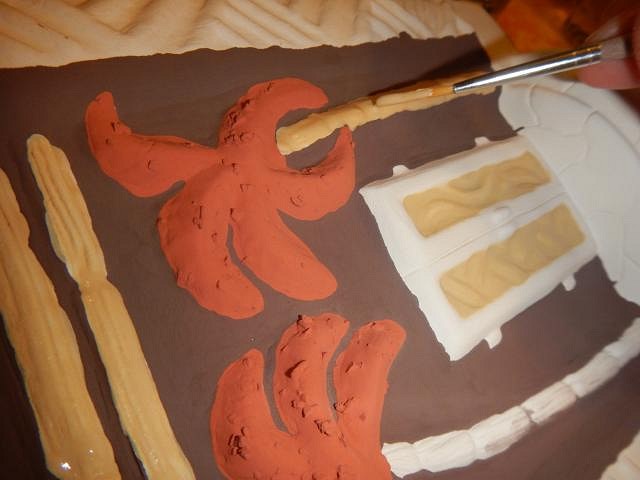
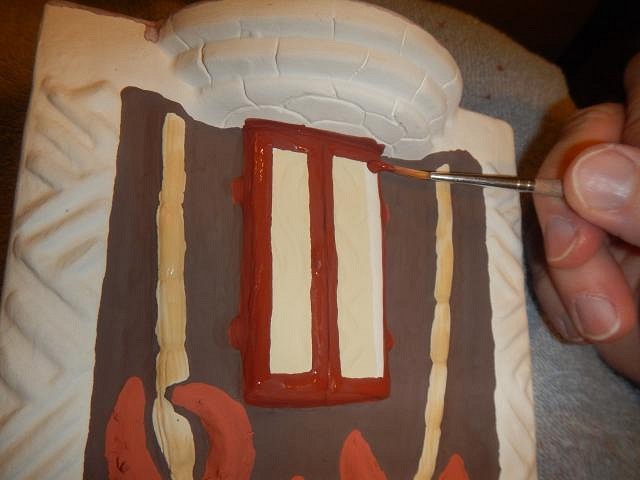
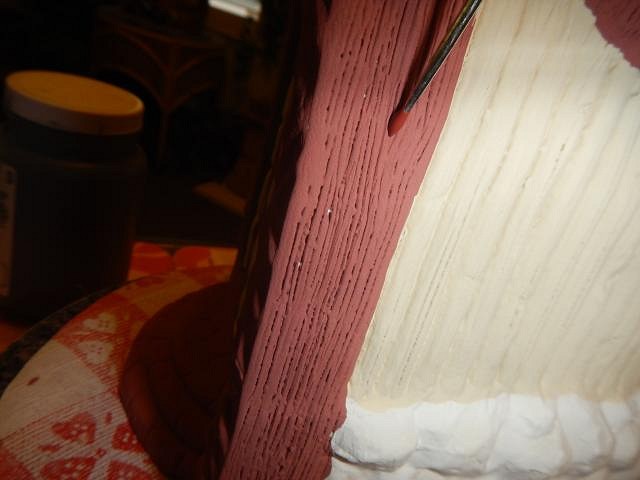
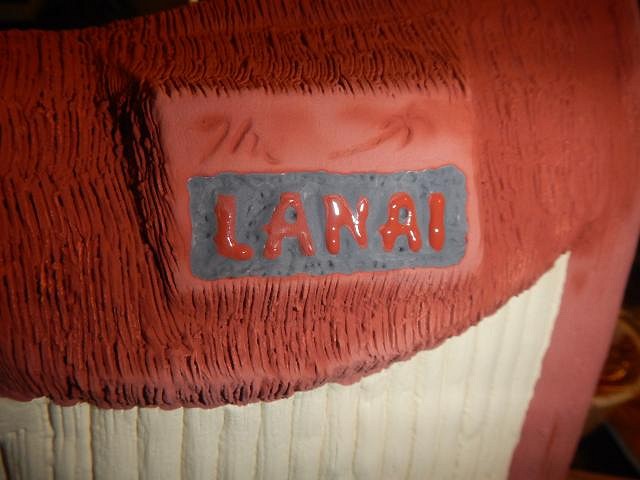
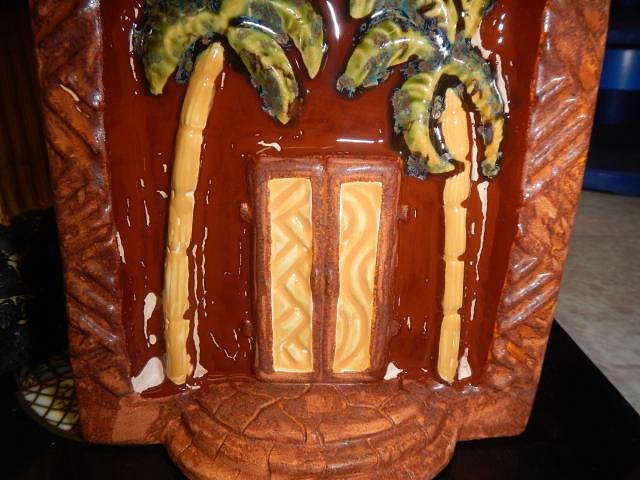
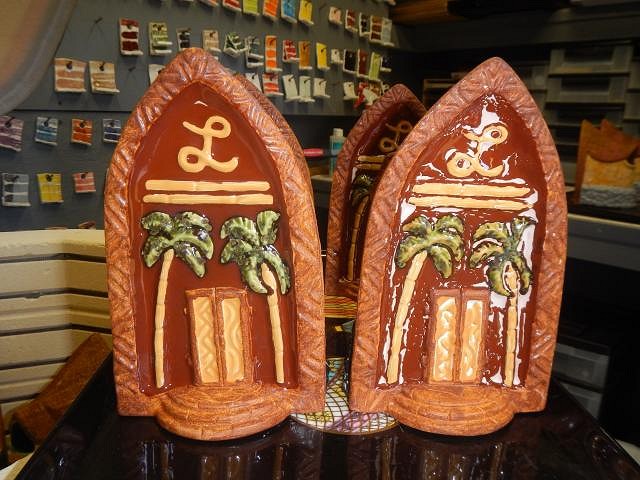
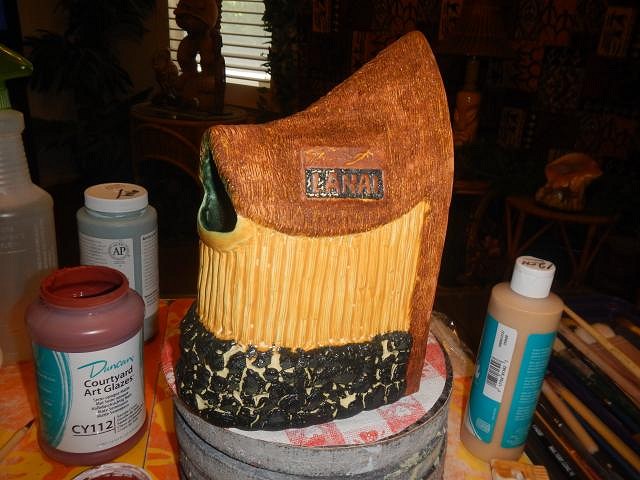
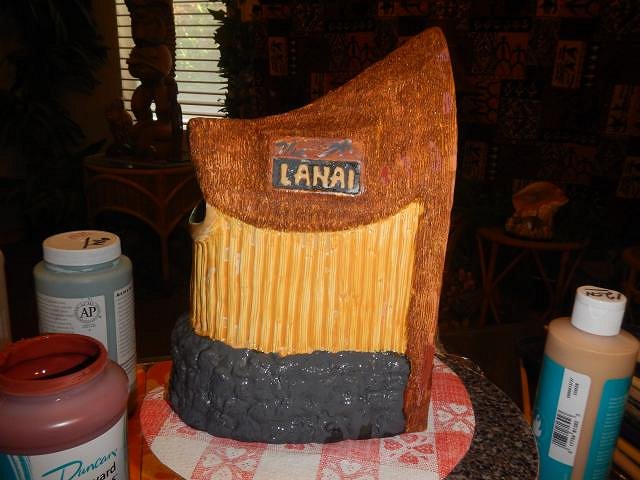
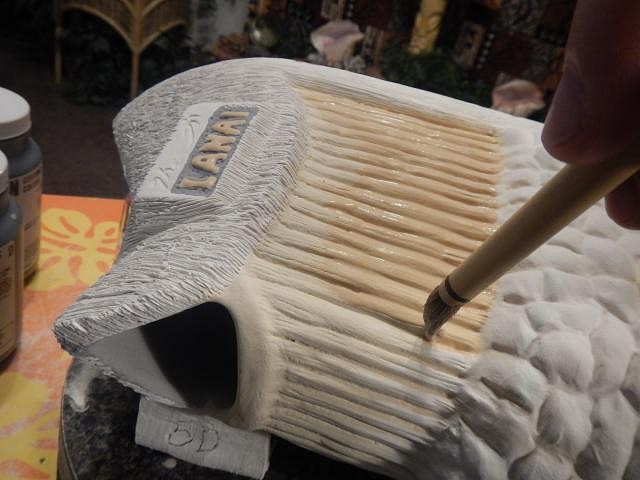
SACRAMENTO CRAWL MUG 2019 for the Lanai. You can search for the Lanai here on TC for more information. These steps were done from November 20th until November 24th, 2018. Having the right carving tools helps speed it up. First I built it with clay and now I'm removing some of that clay. I cut out what I needed to remove and then again I smoothed the sides. Next I began a lava rock foundation. The iron look is leaving fast. Next I began some bamboo siding. On the roof I made a block to support the sign for the Lanai. I made it so the mold piece could pull straight off. At the back end where the bamboo ends, that will be the opening into the mug. I printed out the Lanai logo and put it in place. I used a sharp knife to cut around each letter. Now it will be easy to have the letters just right. I used a flat stick to gouge out the clay. I used a ballpoint to make a look of lava around the letters. Then I added The and the palm tree. It's taking shape. I'm figuring it out as I go. I did not start with a drawing. Cheers, Wendy |
|
D
danlovestikis
Posted
posted
on
Sun, Feb 24, 2019 7:39 PM
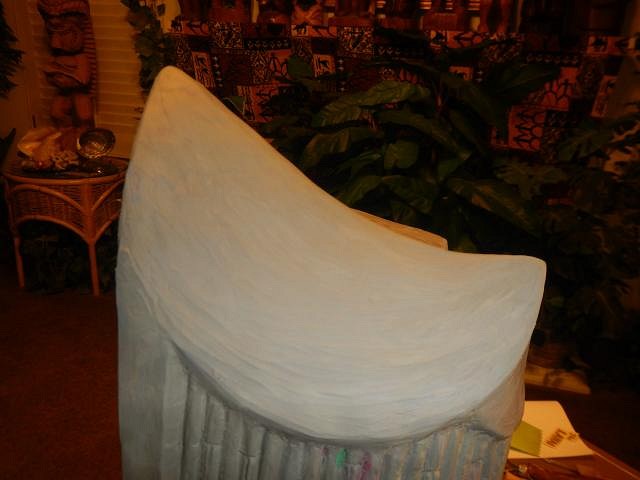
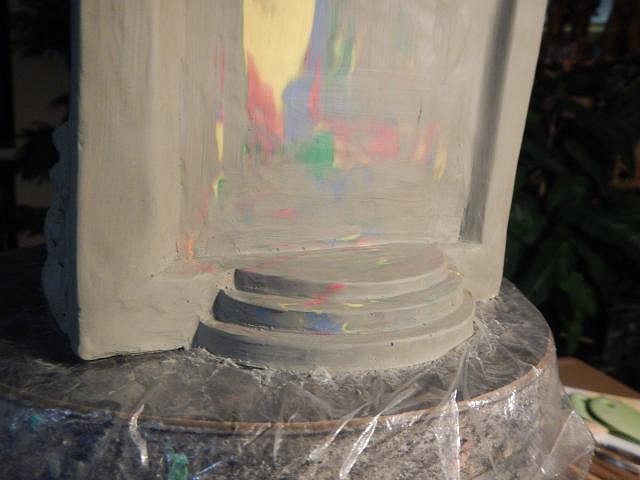
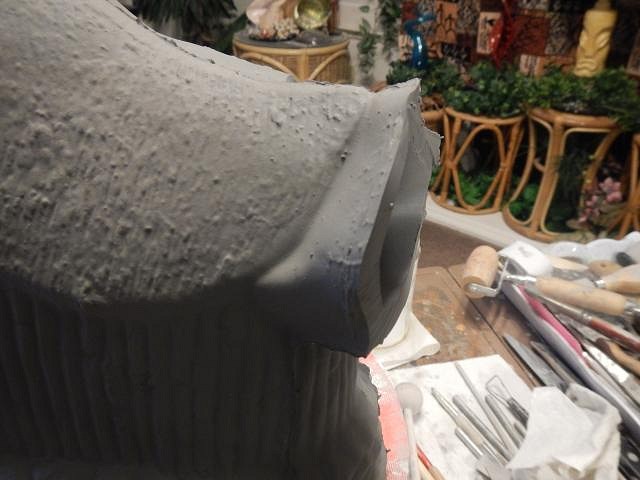
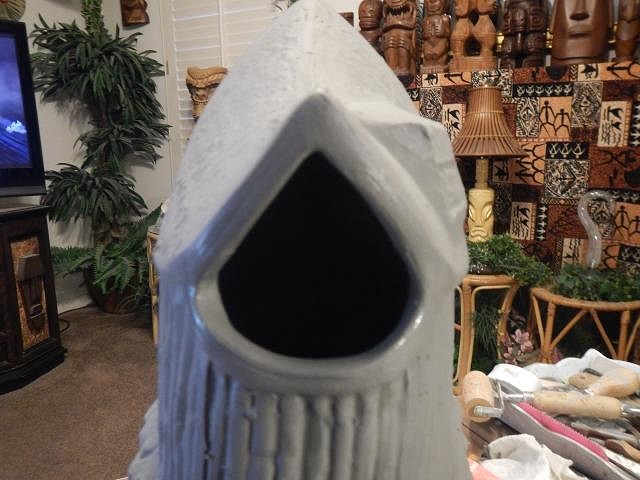
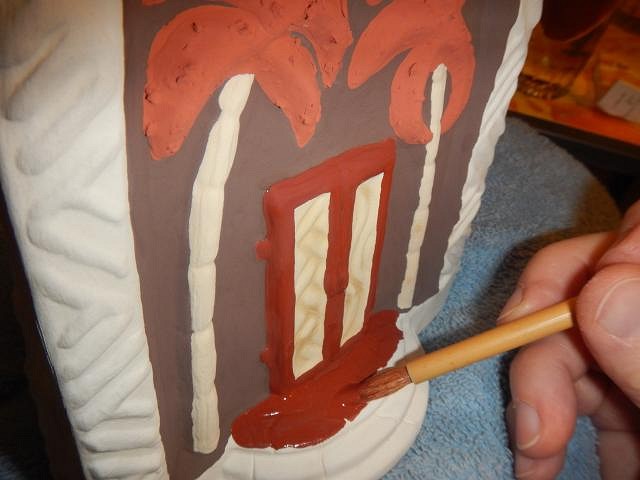
More steps for the SACRAMENTO CRAWL MUG for October 2019 I started to do texture for the roof and then I decided I didn't like the roofs shape. I added clay and built it up. Better. This is almost how it will look. I do a lot of detail work once it's out of the mold. Next I began the work on the front of the mug. Cut and smooth, that's the process. I figure that you can't have a mug for the Lanai unless it has a porch. So I built one.
The next steps will further tie it into the Lanai matchbook. Thank you all for the comments and visits, Wendy |
|
D
danlovestikis
Posted
posted
on
Mon, Feb 25, 2019 7:23 PM
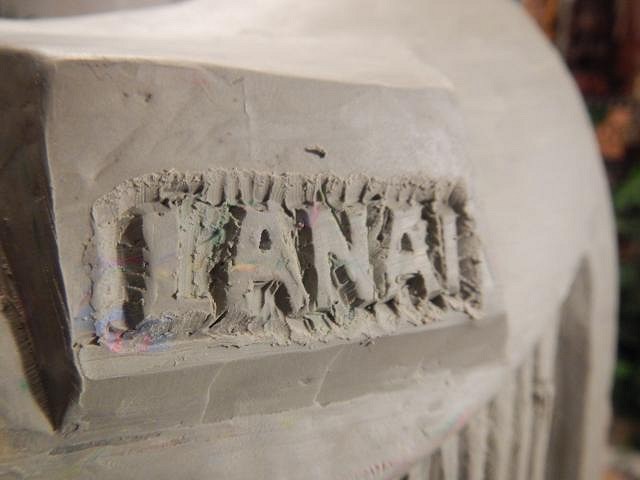
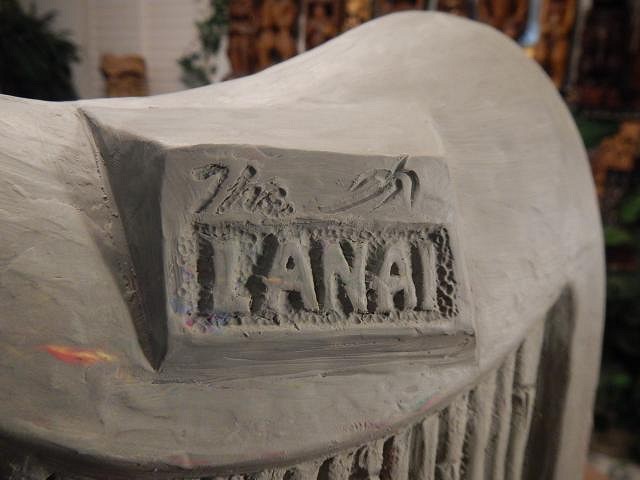
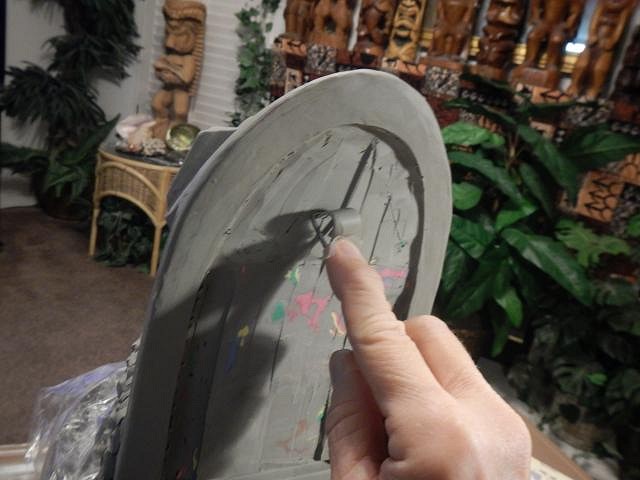
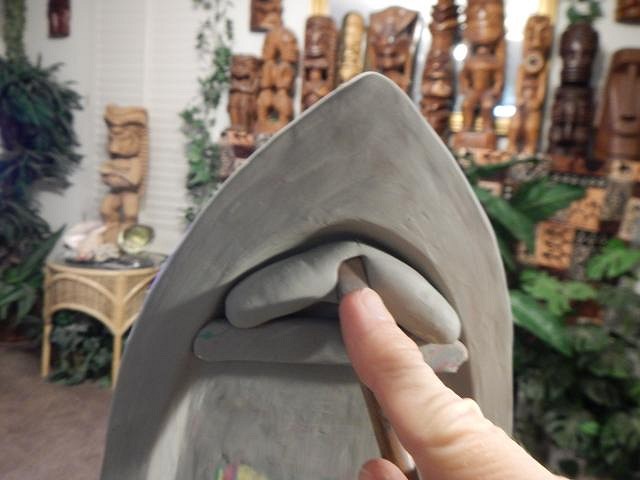
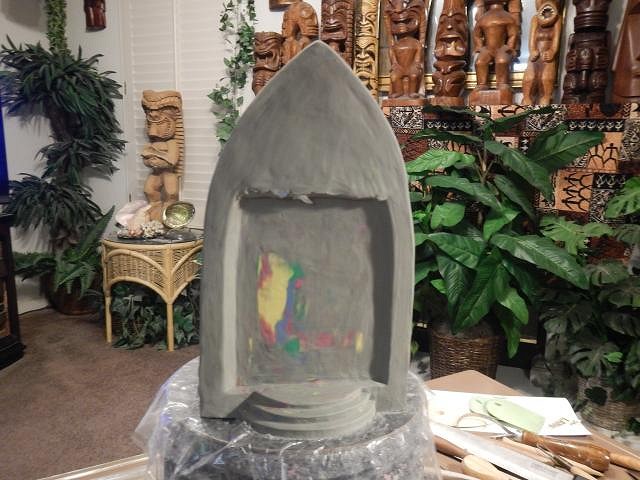
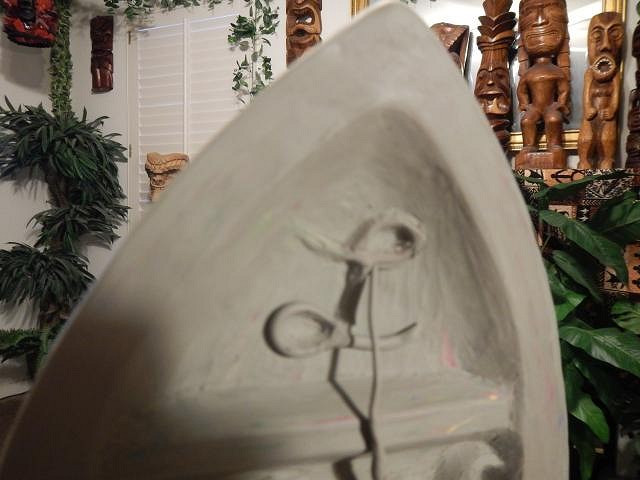
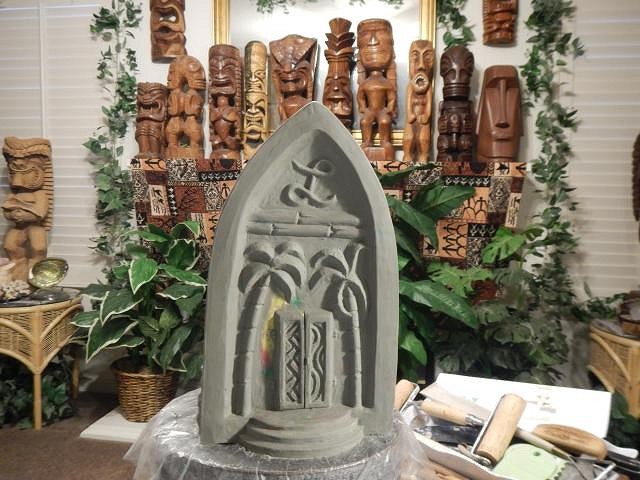
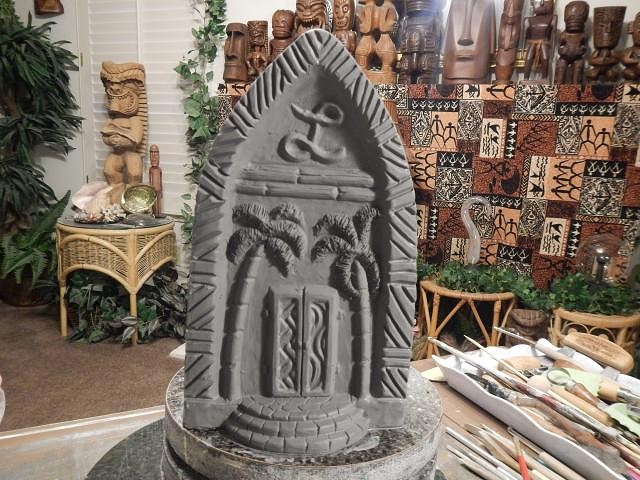
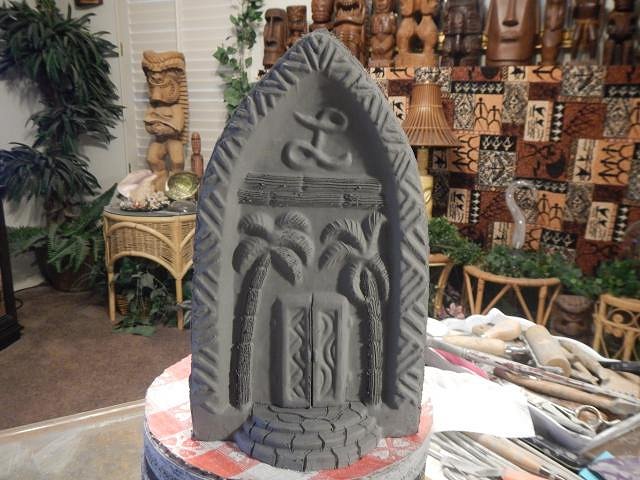
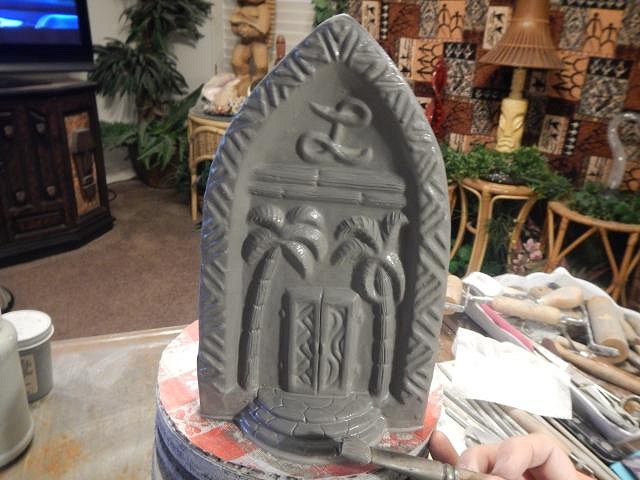
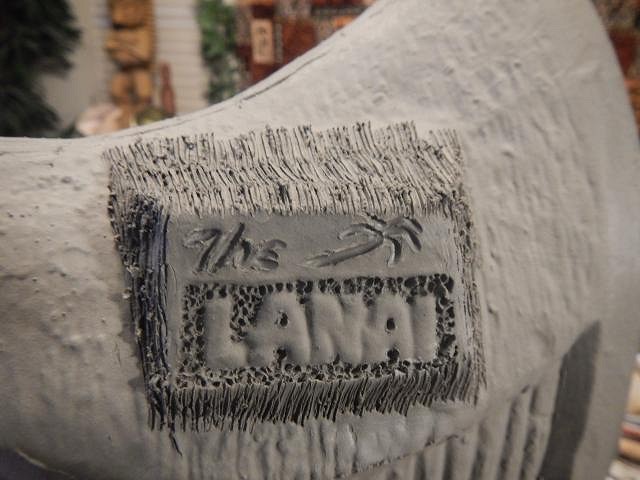
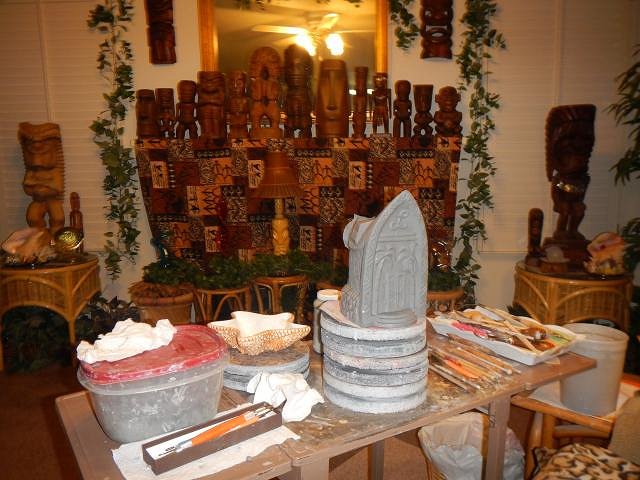
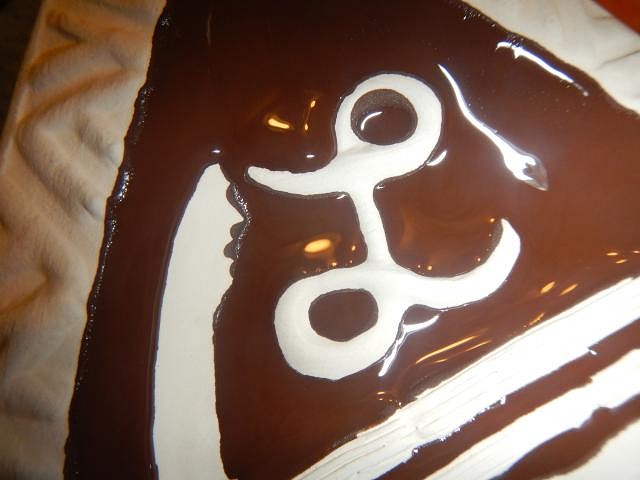
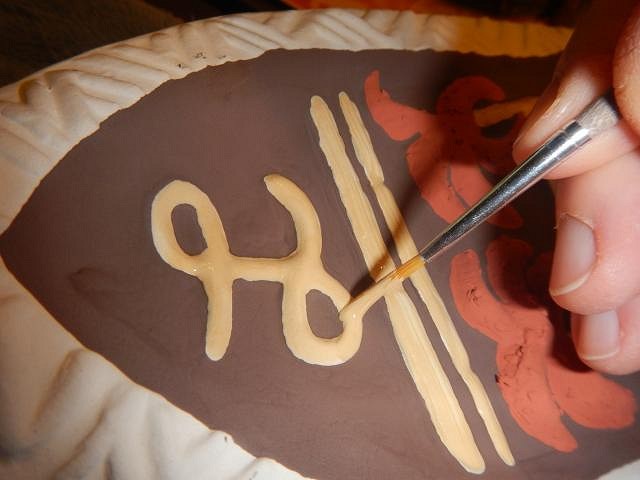
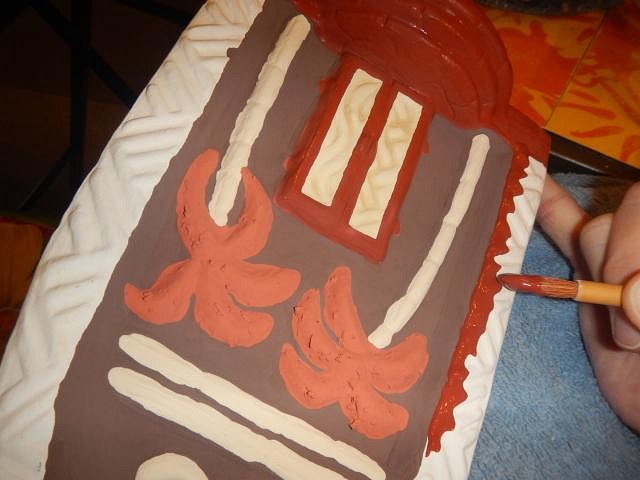
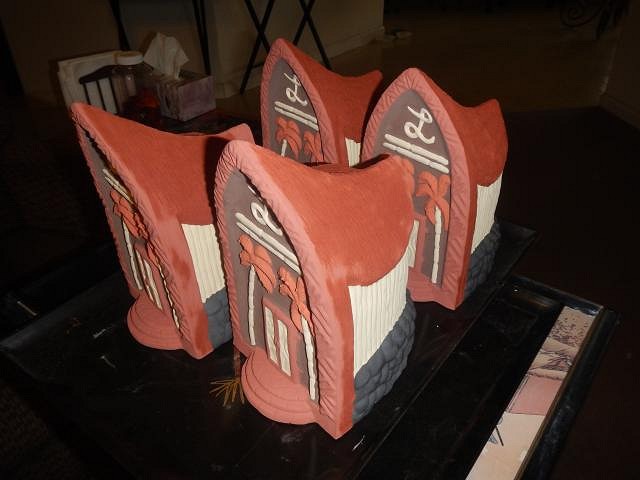
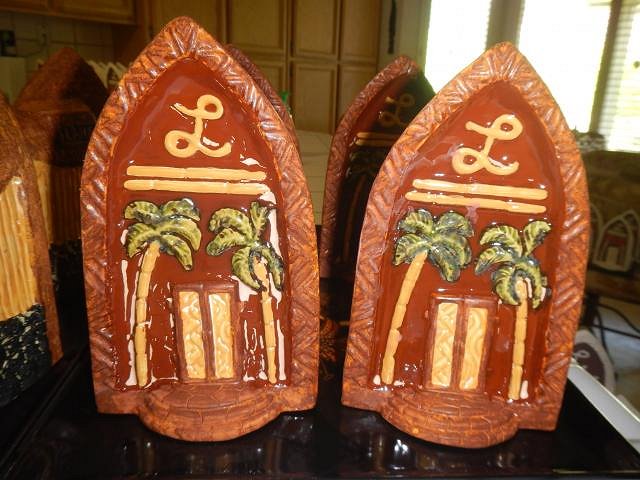
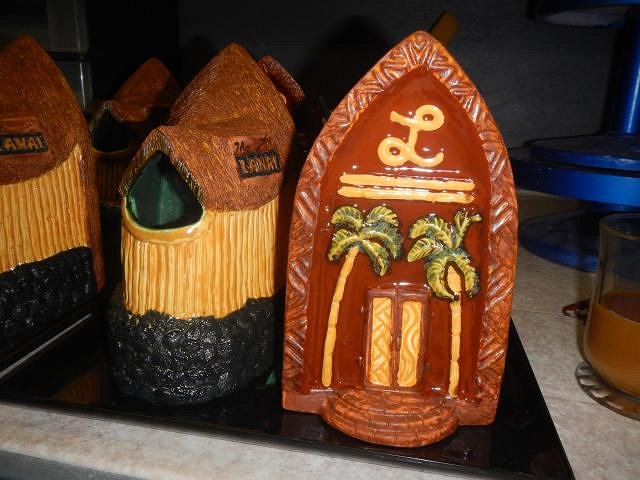
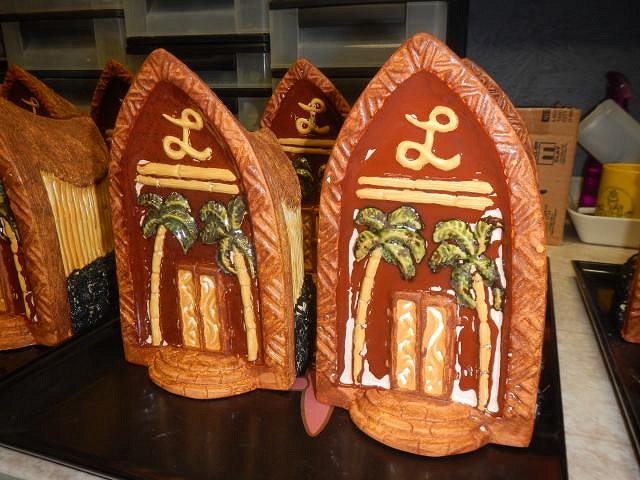
SACRAMENTO CRAWL MUG for October 2019 the last of the sculpting steps. Inside of the Lanai. First I wanted to work on the front top by filling it in until it was full of clay. You may notice that I go one way and then reverse it. I keep changing my plans. then carving it back out. I again looked at the match book and then it hit me. My next step would be palm trees. Here goes, I don't have to worry about watering them. I just need to have them look good. A written capital L has always been my favorite letter. I finally got to put it on something. L for Lanai, perfect. Here is the mug. It is going to be molded this way but the finished mug will have a design around the front where it's blank.
This mug will need a lot of fine tuning but I'm up for the task. So don't judge it yet it will improve. |
|
M

MaukaHale
Posted
posted
on
Tue, Feb 26, 2019 2:43 PM
Okay! I'm sold - I want one. |
|
D
danlovestikis
Posted
posted
on
Thu, Feb 28, 2019 7:59 AM
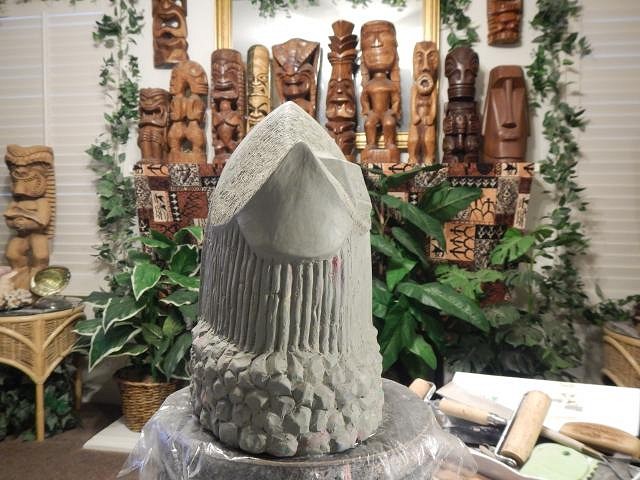
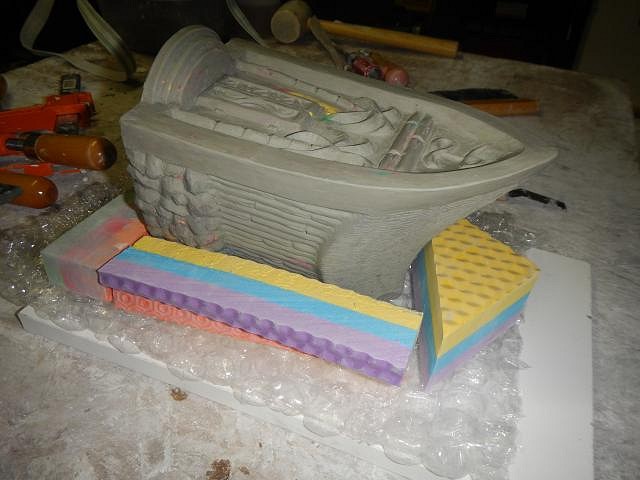
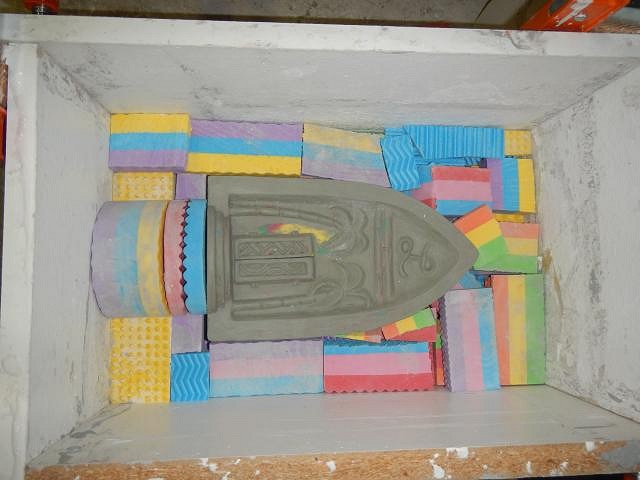
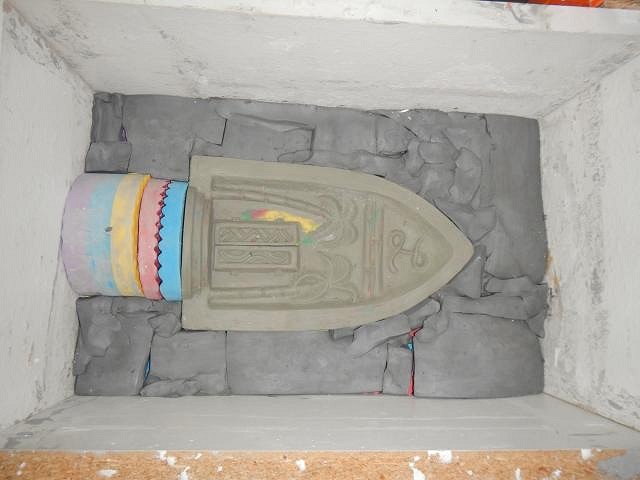
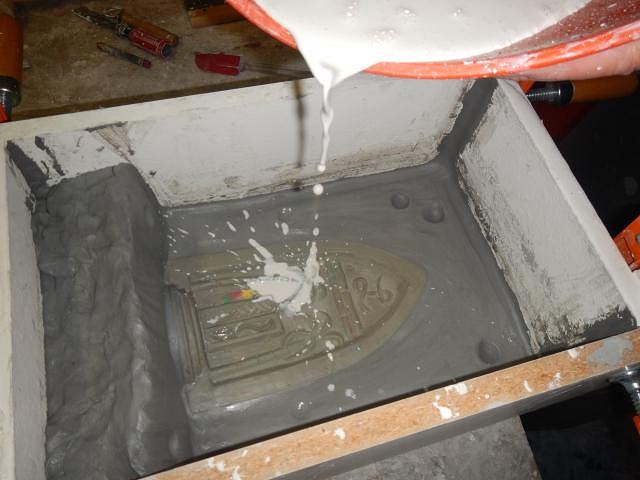
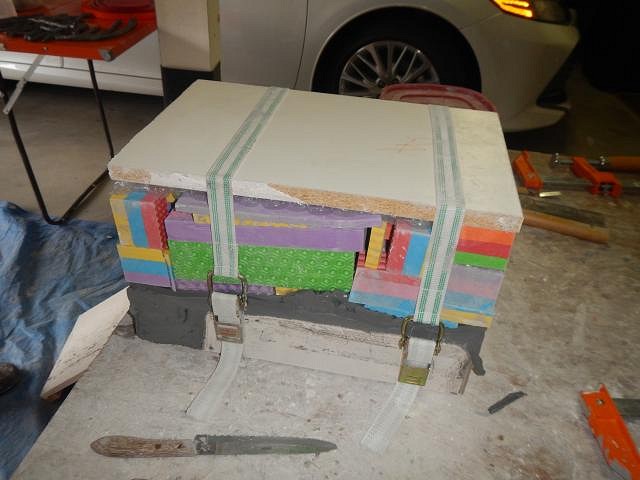
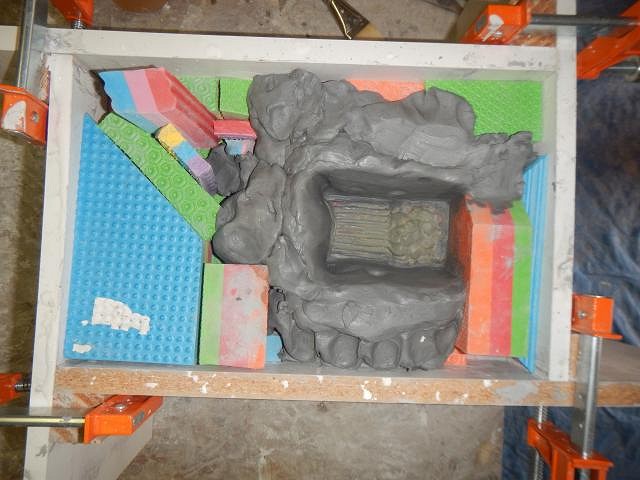
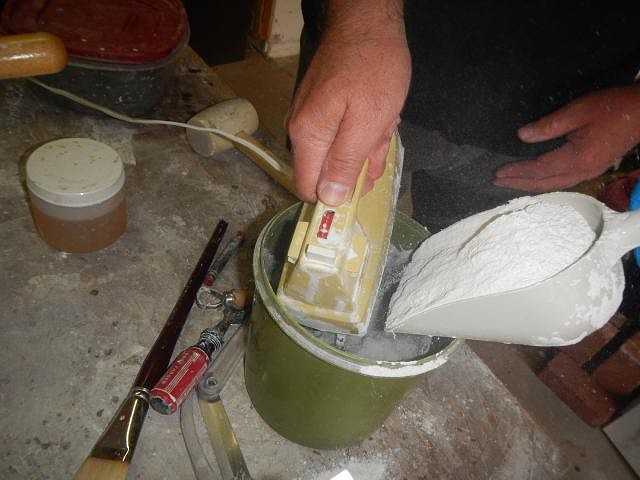
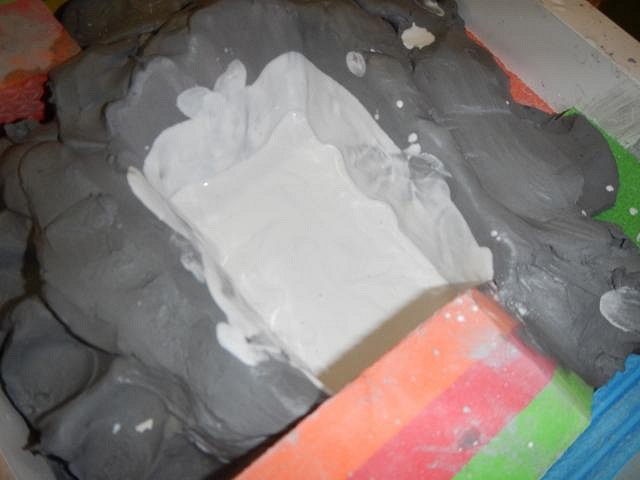
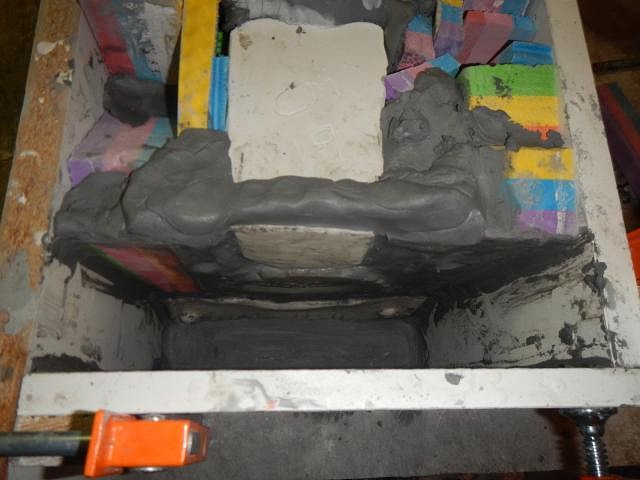
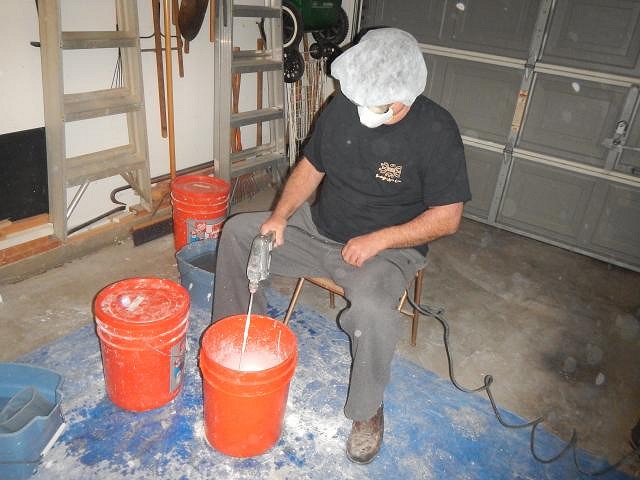
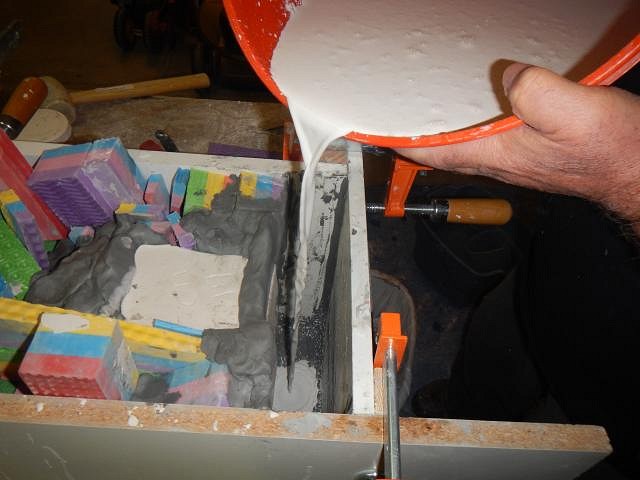
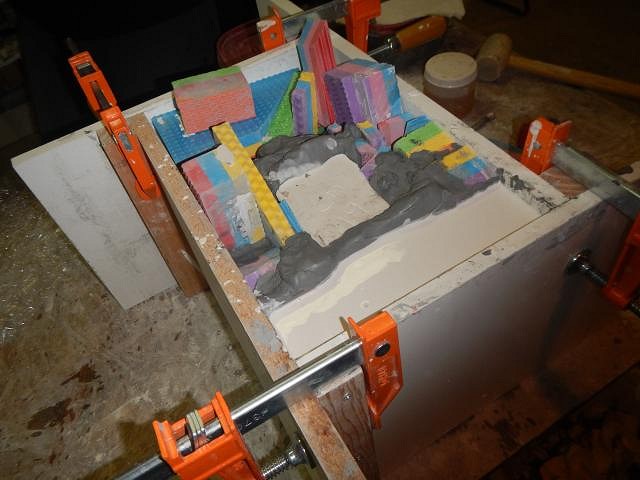
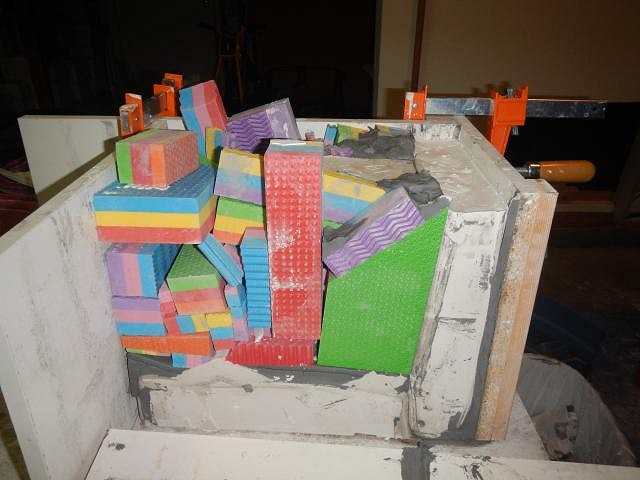
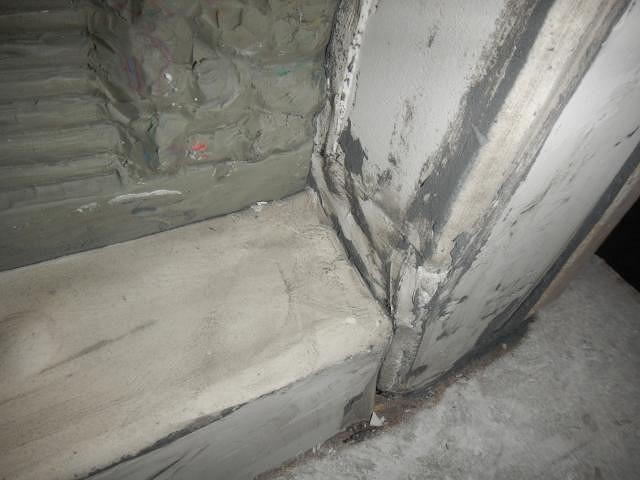
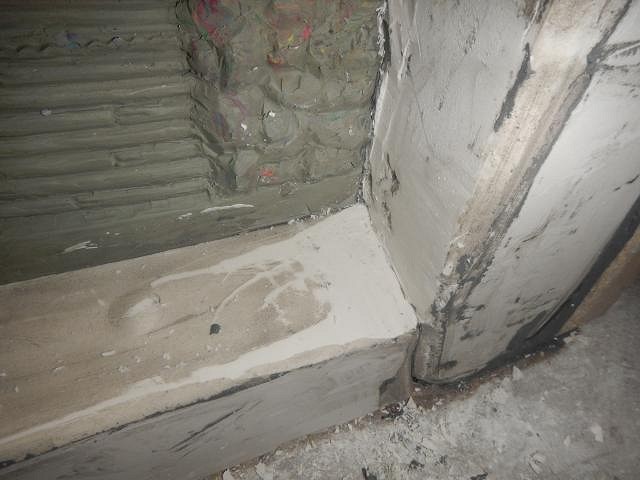
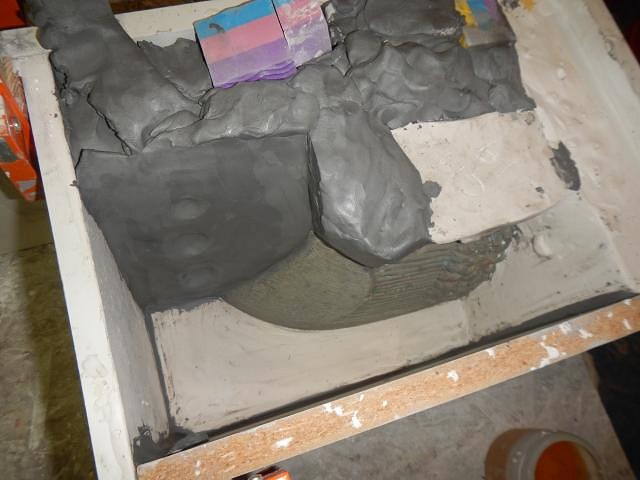
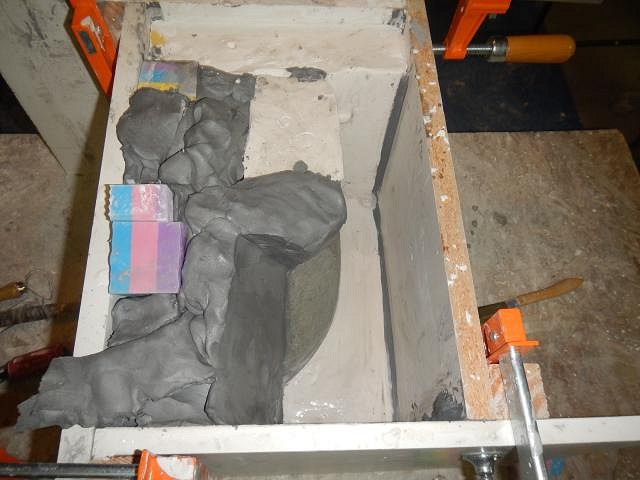
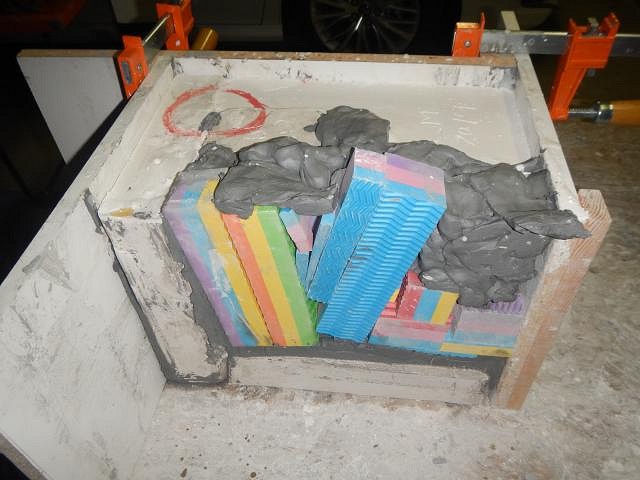
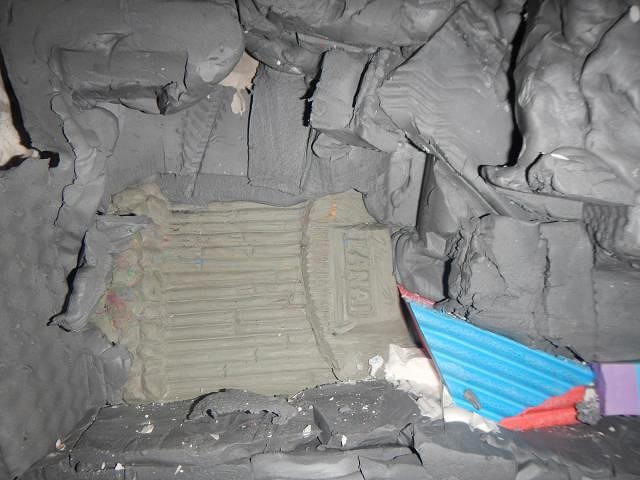
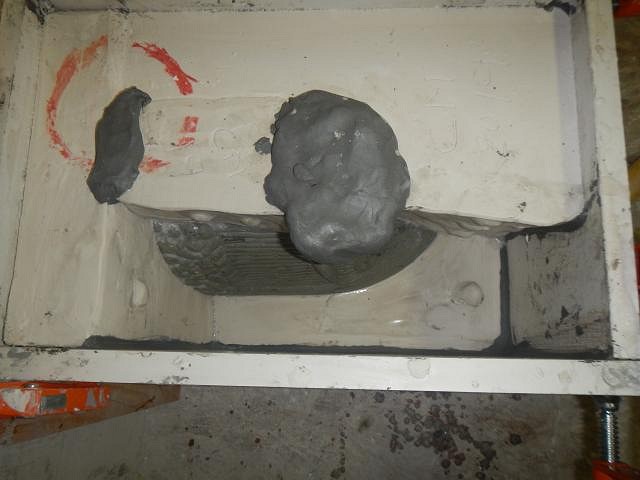
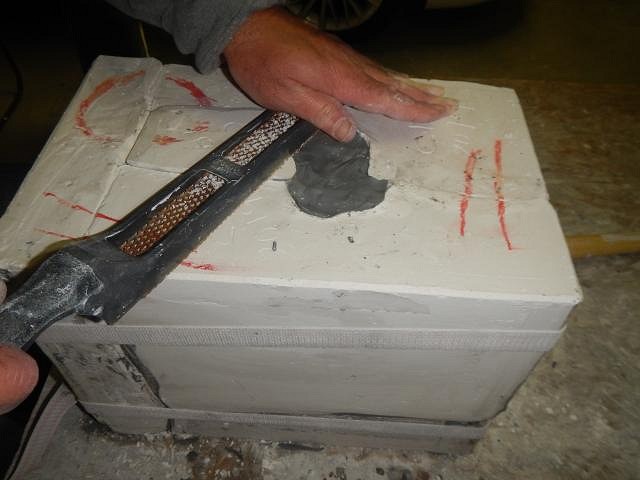
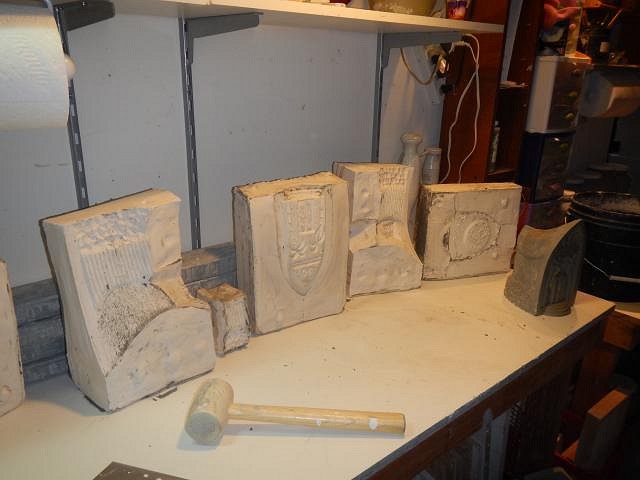
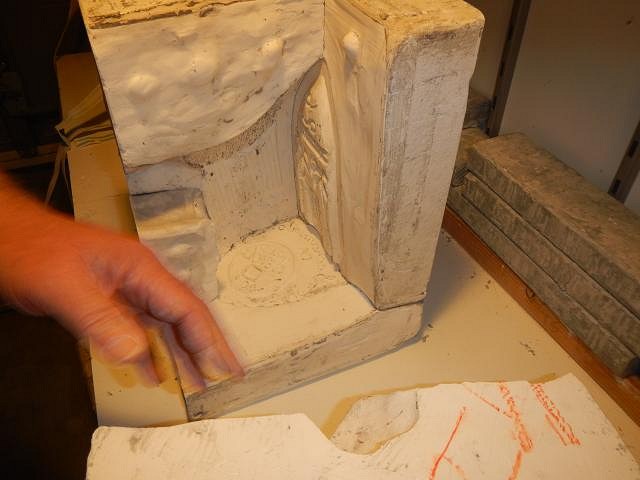
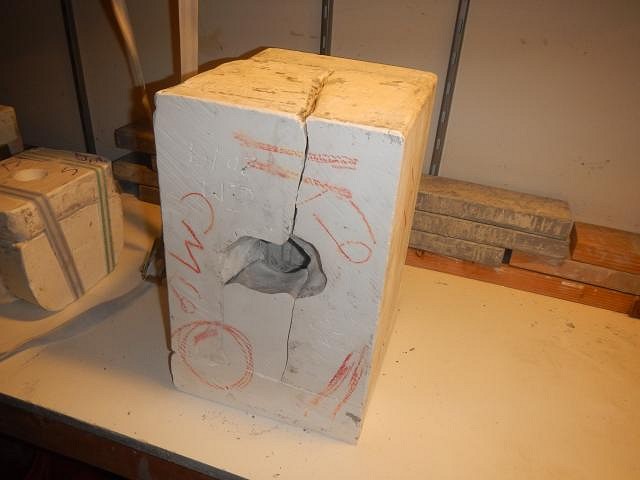
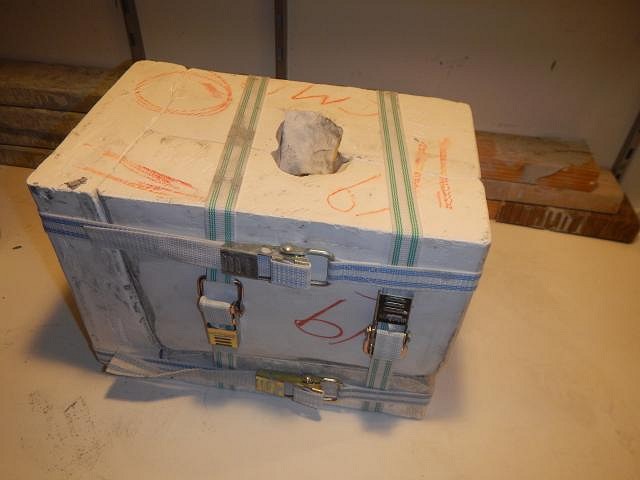
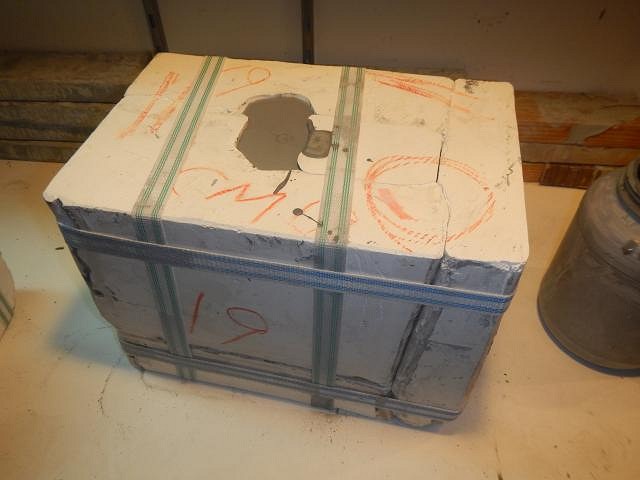
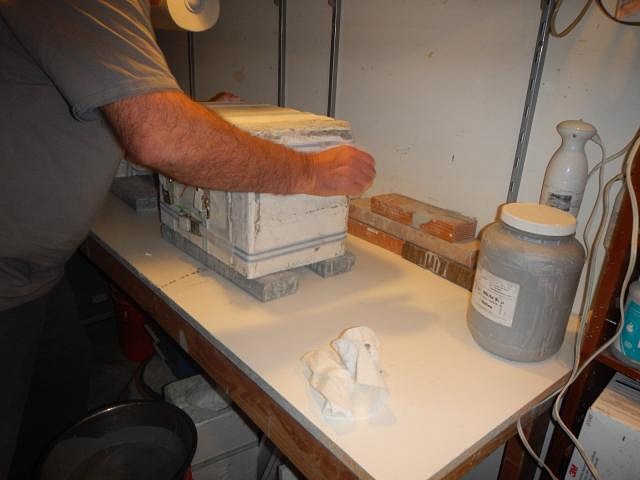
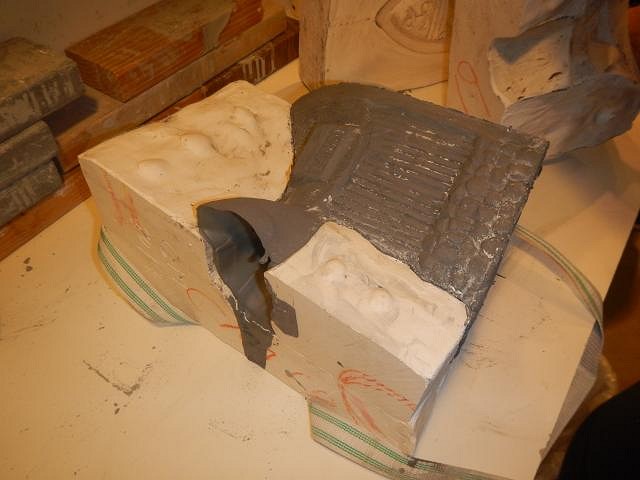
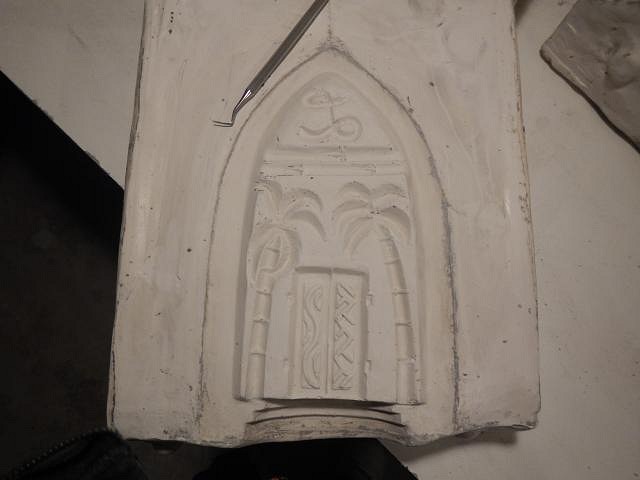
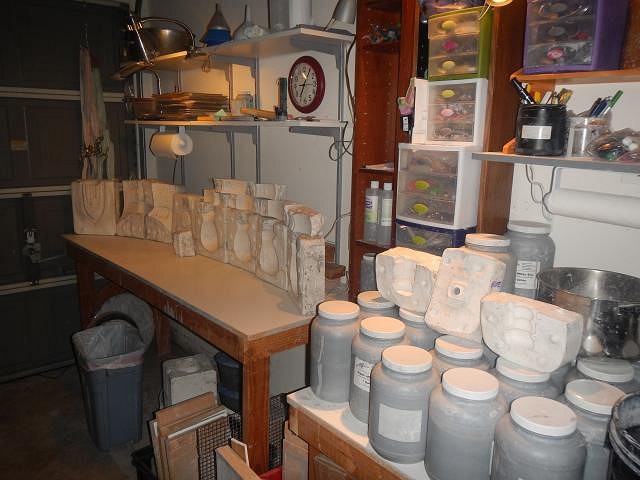
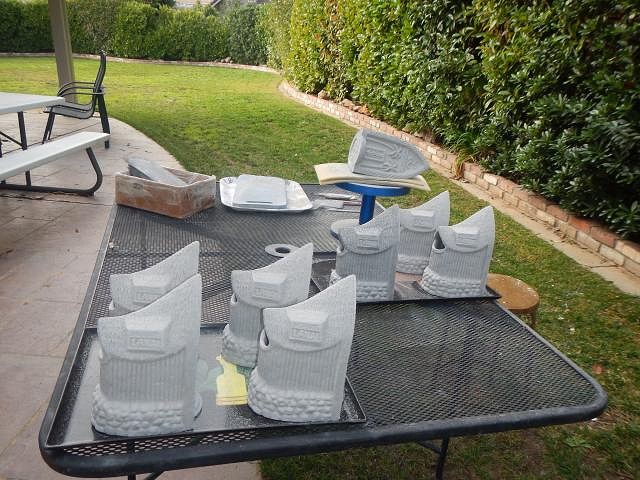
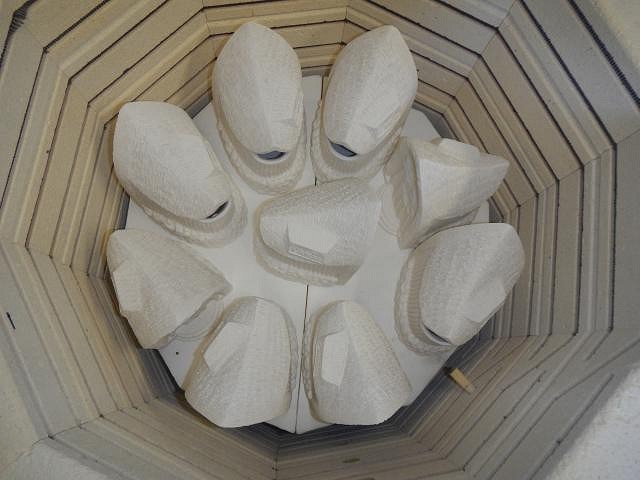
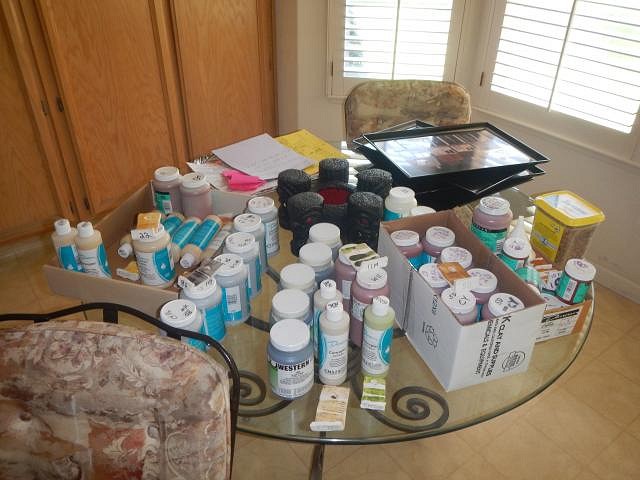
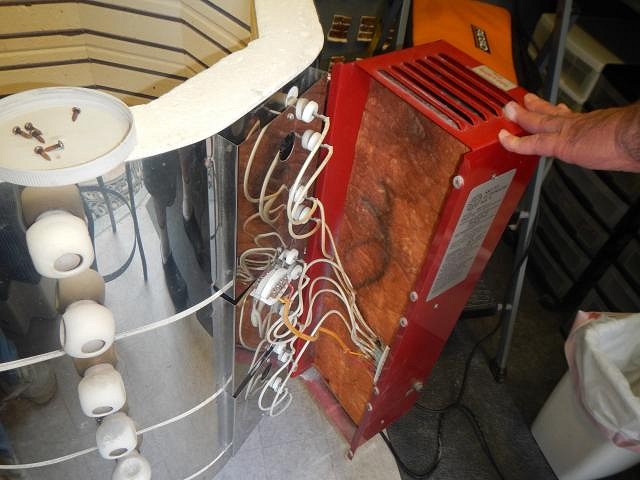
MaukaHale I put you on the list. Thank you. =================================== The horror of finishing a sculpt is that you have to then mold it. I had to look it over, figure out how to get the slip into the high point on the roof. That is when I chose to put the opening at the back end under the roof. Now it was time to execute my plan. Here are the steps for the first mold piece. This first piece will be the bottom of the mold. This is how I ensured that the slip could reach the highest point of the roof. To protect the carving I started with a piece of bubble wrap underneath. I kept adding blocks until they reached the face of the sculpt. I thought about the best way to so the steps and decided to only do the tops and front. That way nothing gets pulled out of a slot in a mold piece. This is clay I have cut off the tops of mugs. I save it in a plastic container to use when doing custom pieces or making molds. I will cover all of the blocks. I will smooth it with a wet paper towel to make a tight seal. I put a few lock dents in place. You really do not need many. I ran snakes of clay up all the seams to prevent leaks. Time to mix the plaster to the consistency of buttermilk and then to pour it in. It sits for around 45 minutes. Now I can take off the box. We put on straps so that we can flip it. It's important that the sculpt doesn't move or come loose from the mold piece just made. One down four more to go. Wendy |
|
D
danlovestikis
Posted
posted
on
Fri, Mar 1, 2019 7:26 PM
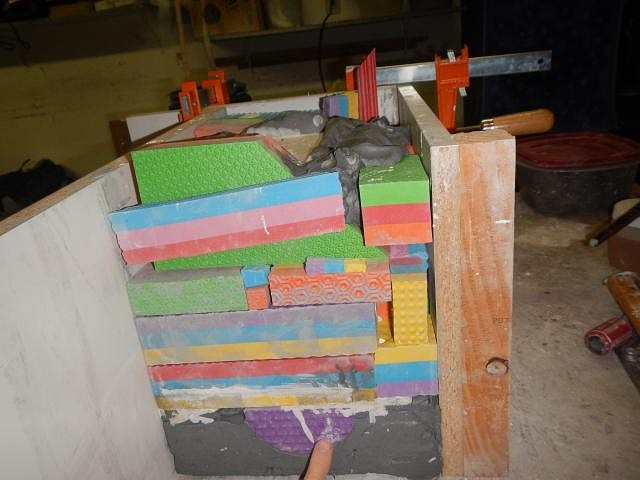
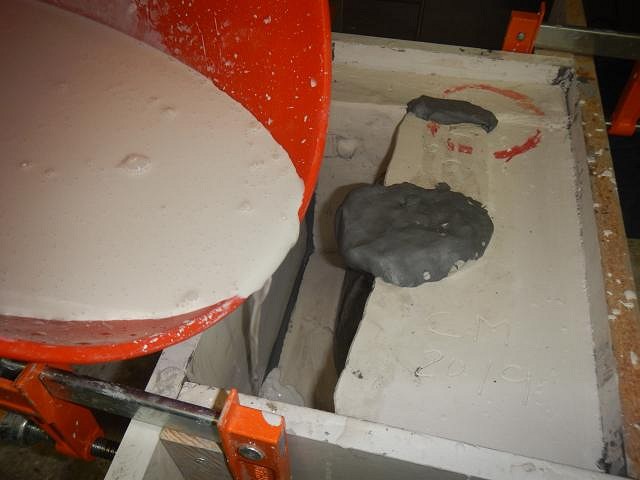
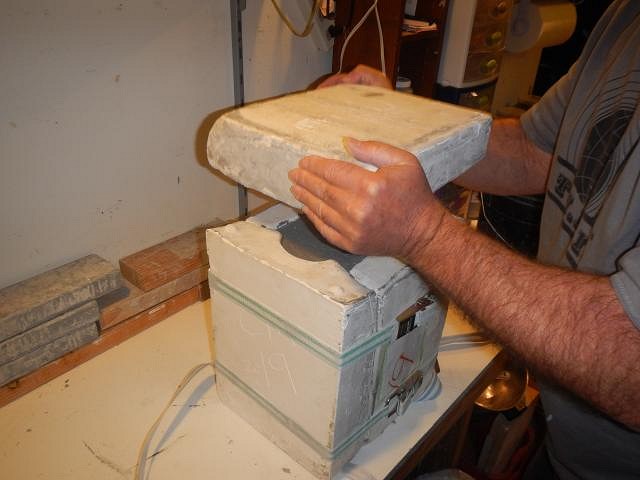
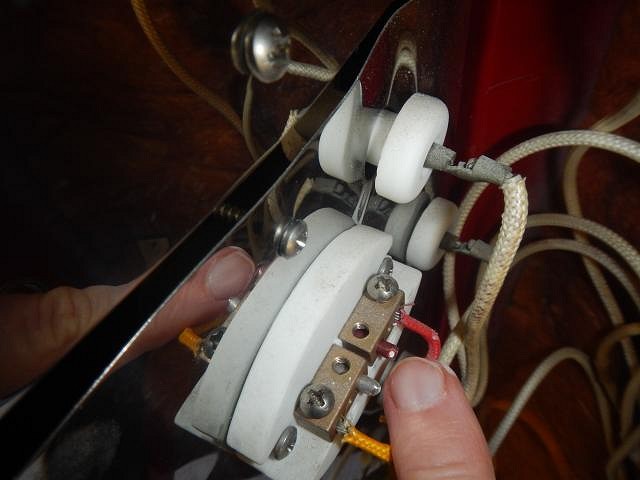
Sacramento Crawl mug for 2019. Time to make the second piece of the mold. Once the whole thing had flipped over I uncovered the top and then we put the box back on. I am making a small back piece this time so I built up the blocks around the rest of the mold. Next I made a clay box that will hold the plaster in place making this second piece. This is a weird mold but it's how I figured it out. I worked to make the seals around the clay box where it joined the sculpture. I missed doing it where there is a plastic block. I only noticed it when looking at my photos after the fact. We just mixed a small amount using a thrift store mixer. We poured in the plaster. A moment later we saw the level going down. Oh No! there is a leak. Quickly I just helped Dan make more and said we will fill it up again until the leak stops as the plaster turns hard. I'll deal with the leaked plaster later on. It worked eventually the leak stopped and this piece was made. Photo of the mess next time. Wendy |
|
D
danlovestikis
Posted
posted
on
Fri, Mar 1, 2019 7:27 PM
Sacramento Crawl mug for 2019. Time to make the second piece of the mold. Once the whole thing had flipped over I uncovered the top and then we put the box back on. I am making a small back piece this time so I built up the blocks around the rest of the mold. Next I made a clay box that will hold the plaster in place making this second piece. This is a weird mold but it's how I figured it out. I worked to make the seals around the clay box where it joined the sculpture. I missed doing it where there is a plastic block. I only noticed it when looking at my photos after the fact. We just mixed a small amount using a thrift store mixer. We poured in the plaster. A moment later we saw the level going down. Oh No! there is a leak. Quickly I just helped Dan make more and said we will fill it up again until the leak stops as the plaster turns hard. I'll deal with the leaked plaster later on. It worked eventually the leak stopped and this piece was made. Photo of the mess next time. Wendy |
|
D
danlovestikis
Posted
posted
on
Sat, Mar 2, 2019 8:00 PM
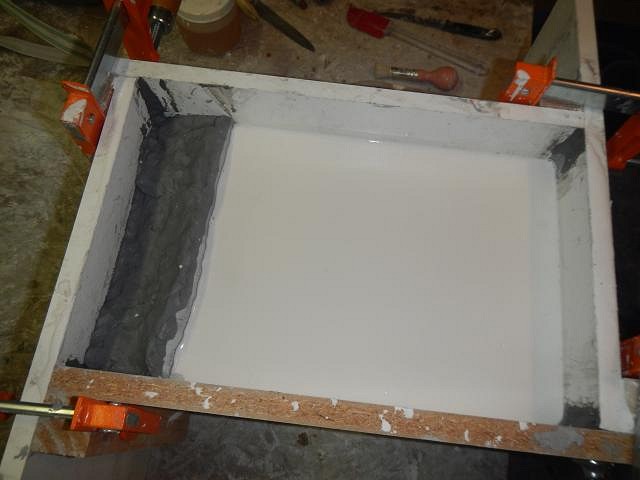
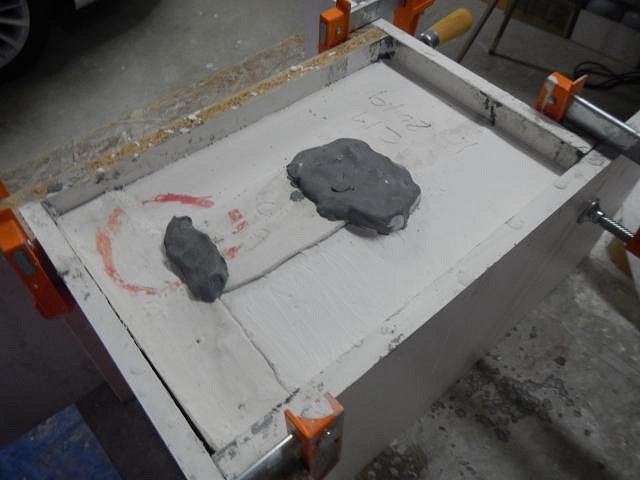
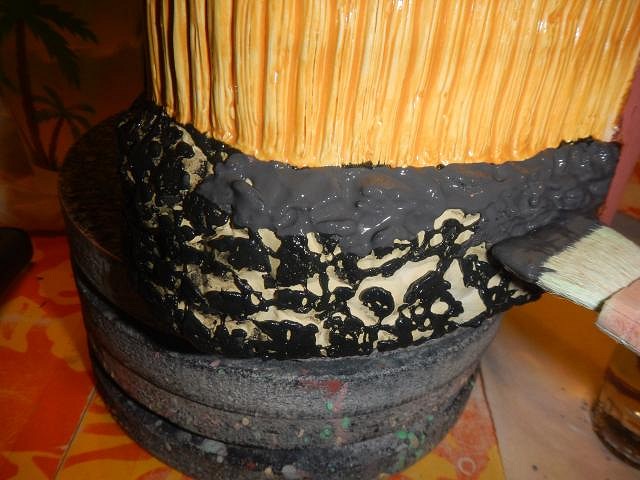
SACRAMENTO CRAWL MUG FOR 2019. More steps for making the mold. You know those structures where you drop a ball and it travels all over the place until it gets to the end. Well that's what this leak was like. The liquid plaster just kept traveling down a crack across a block and on and on. I knew that wherever it went I could clean it up. I just wanted a good mold piece. Once the mold piece was set it was time to see how much of a mess I had to clean up. We still wanted to make the mold in one day so I got to it. I took down one side of the box and not much of the traveling plaster showed up. I began to remove the blocks that I would need removed for making the next mold piece. Yep here's some of the escaped plaster. I removed the plaster from the blocks as I removed them. It came off easily. I need to remove enough to make the mold piece that covers the bottom of the mug. There's a lot of plaster here. It too came off easily. I pulled a big piece off that was stuck to the side of the sculpt. It didn't hurt it at all. Now I'm ready to start adding blocks so I can make a large mold piece. I put the blocks in place and then I placed clay wherever it was needed. I even put it on the bottom so that I could prevent leaks from happening there. I did three layers of mold soap on the two mold pieces that this new third piece would touch. I built a damn to stop the plaster from going over the top of the new mold piece. Dan mixed while I added plaster powder to the water in then bucket. When it was like buttermilk and all the lumps were gone he poured it into the mold box. 45 minutes later it was set. I will find more places that the plaster leaked to when I set up for the next two mold pieces. More photos soon. Cheers, Wendy |
|
D
danlovestikis
Posted
posted
on
Sun, Mar 3, 2019 7:56 PM
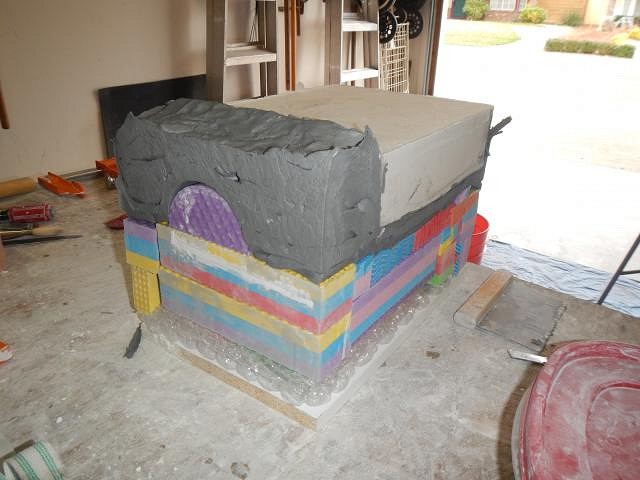
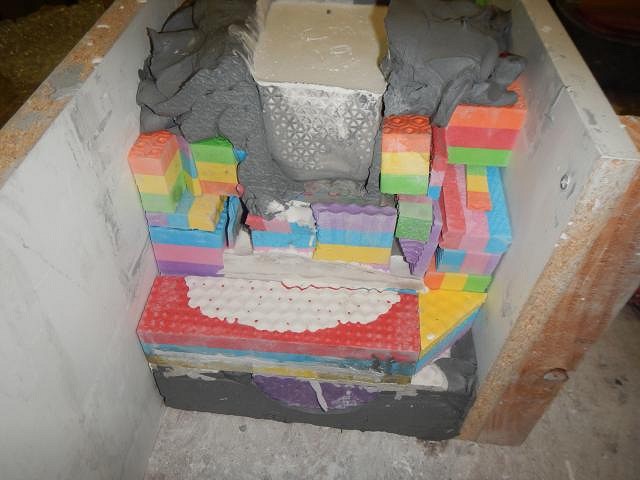
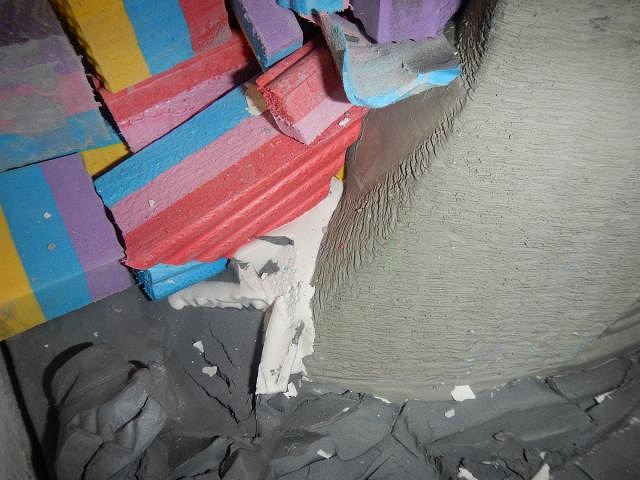
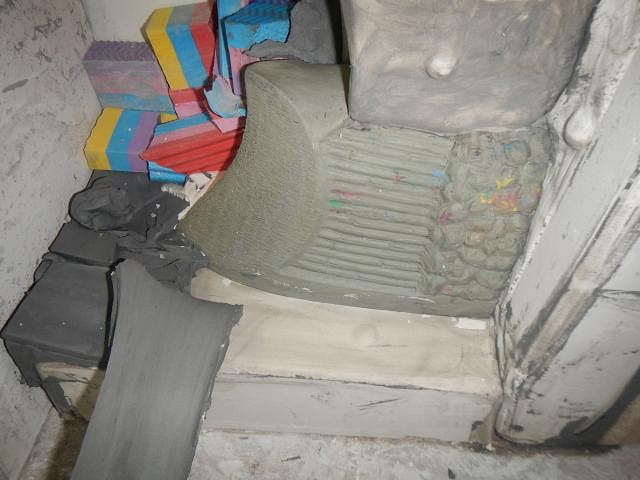
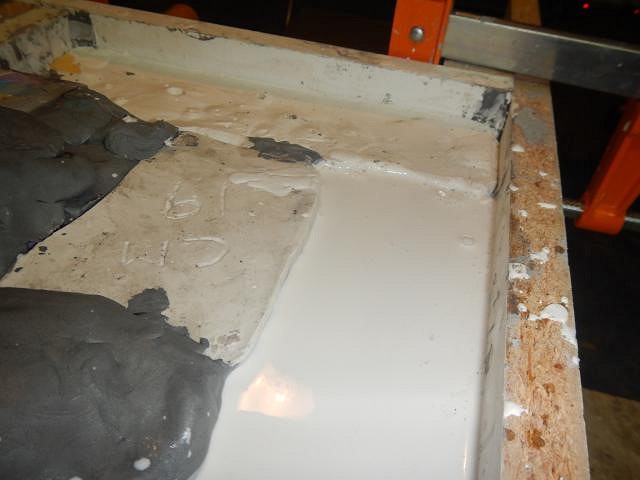
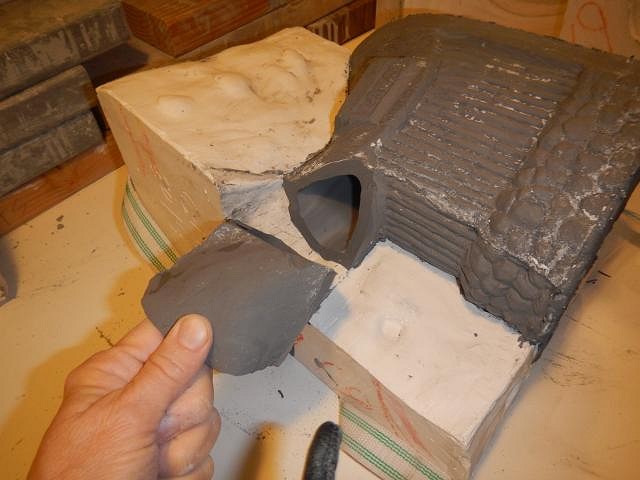
SACRAMENTO CRAWL MUG for 2019 step by steps for the mold. When the plaster set for mold piece number three it had some cracking at the top. I just trimmed this off. Nothing to worry about. To prepare for the mold piece number four I took off one side of the mold box. I removed the blocks and cleaned up the plaster from the leak. It went into so many pieces it had fun just running free. In this photo I'm cleaning off the clay so that the next plaster mold piece will touch the others. You can see a very grey mold piece at the top. I looked at the contact area between two of the mold pieces and decided that this would be an area where the mold would leak unless I can tighten it up. To do this I get out a chisel and I make the right angle perfect. This is how good it should look when finished. Then the next mold piece will fill this in and it will be tight. I decided that the locks I put on this mold piece would prevent me from pulling it away from the cast. So I chiseled them off. I built the clay wall where I needed this mold piece to end. I also made a glob of clay where the opening into the mold will go. I did the three layers of mold soap and then I checked it over carefully to make sure all the box seams had clay snakes to prevent leaks. Good to go so we mixed and poured in the plaster. One piece left to go. I bet you can see why no one likes to make molds. Notch did one sculpt that required 32 mold pieces. It was a masterpiece, both the art and the mold. Cheers, Wendy |
|
D
danlovestikis
Posted
posted
on
Sun, Mar 3, 2019 7:56 PM
SACRAMENTO CRAWL MUG for 2019 step by steps for the mold. When the plaster set for mold piece number three it had some cracking at the top. I just trimmed this off. Nothing to worry about. To prepare for the mold piece number four I took off one side of the mold box. I removed the blocks and cleaned up the plaster from the leak. It went into so many pieces it had fun just running free. In this photo I'm cleaning off the clay so that the next plaster mold piece will touch the others. You can see a very grey mold piece at the top. I looked at the contact area between two of the mold pieces and decided that this would be an area where the mold would leak unless I can tighten it up. To do this I get out a chisel and I make the right angle perfect. This is how good it should look when finished. Then the next mold piece will fill this in and it will be tight. I decided that the locks I put on this mold piece would prevent me from pulling it away from the cast. So I chiseled them off. I built the clay wall where I needed this mold piece to end. I also made a glob of clay where the opening into the mold will go. I did the three layers of mold soap and then I checked it over carefully to make sure all the box seams had clay snakes to prevent leaks. Good to go so we mixed and poured in the plaster. One piece left to go. I bet you can see why no one likes to make molds. Notch did one sculpt that required 32 mold pieces. It was a masterpiece, both the art and the mold. Cheers, Wendy |
|
D
danlovestikis
Posted
posted
on
Mon, Mar 4, 2019 7:32 PM
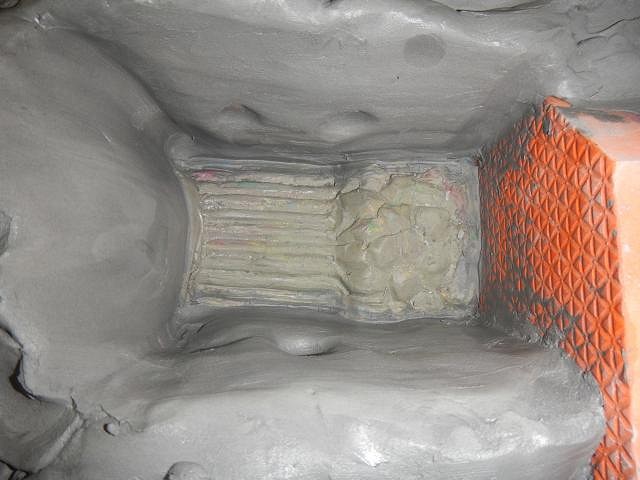
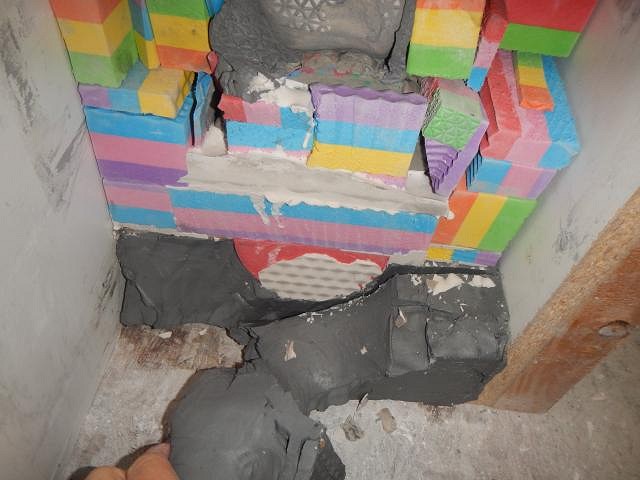
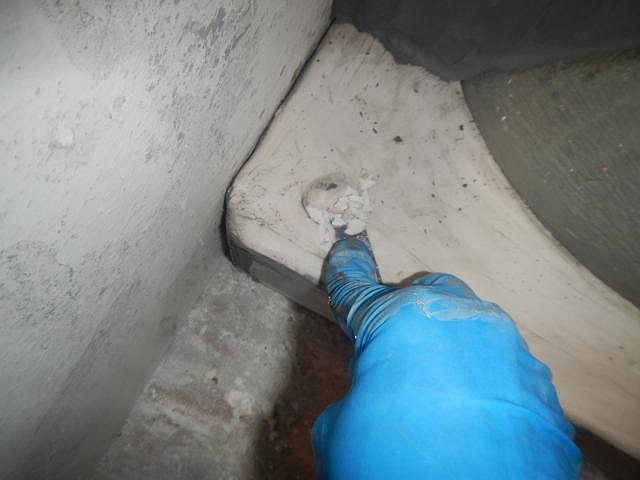
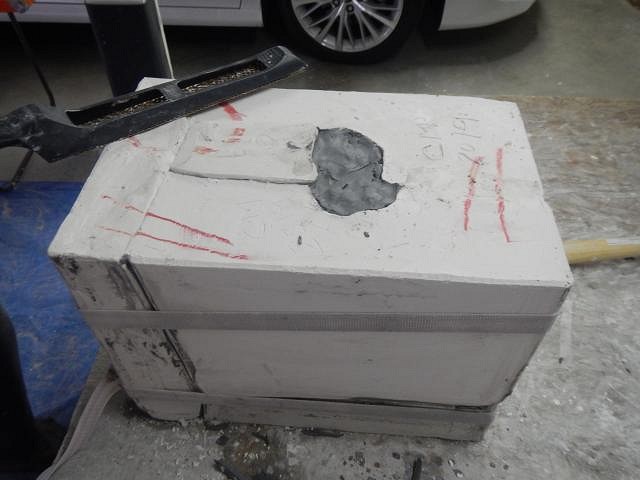
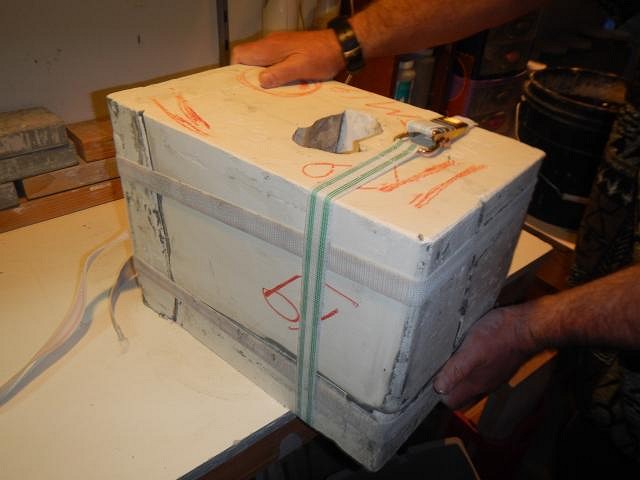
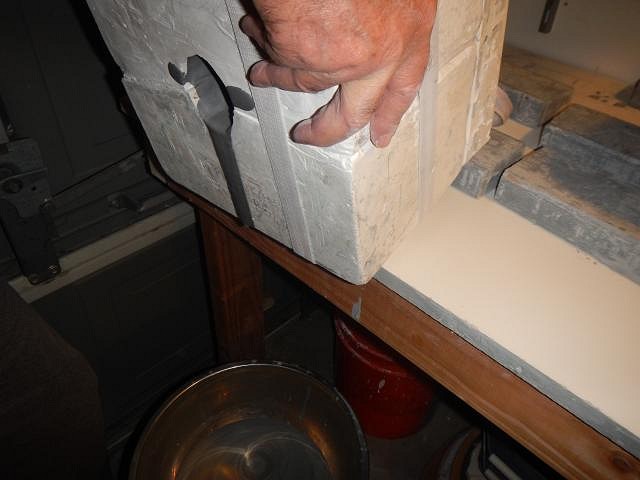
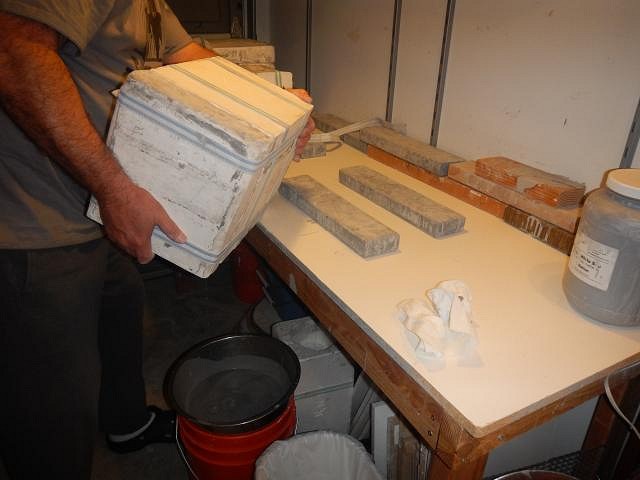
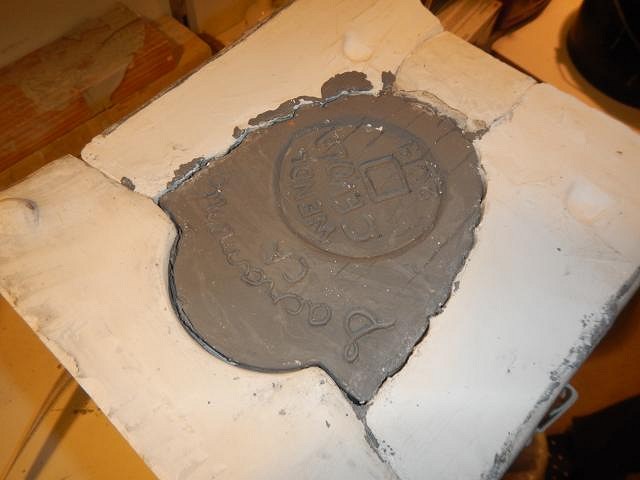
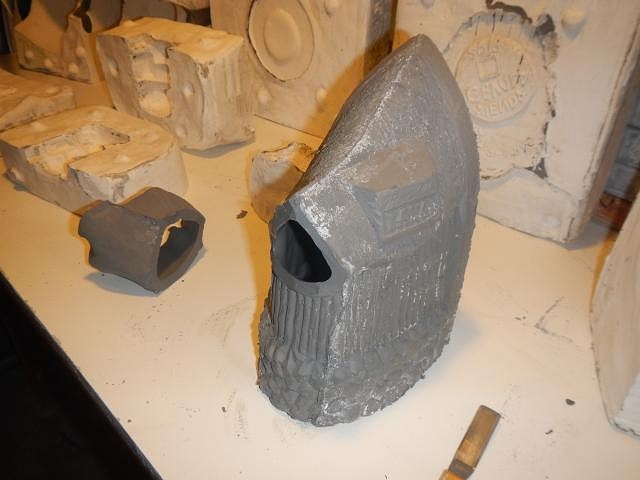
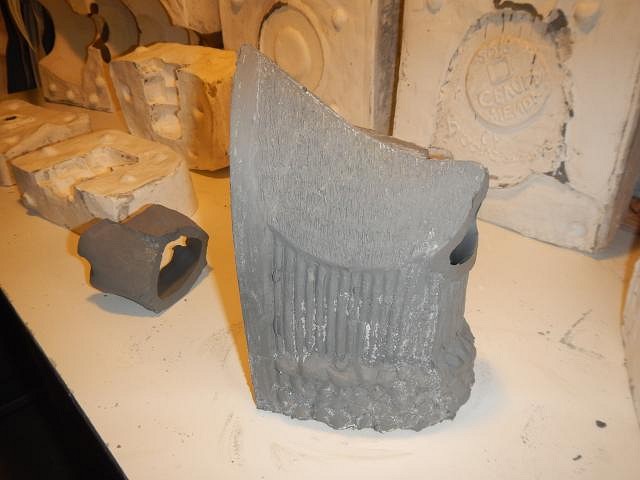
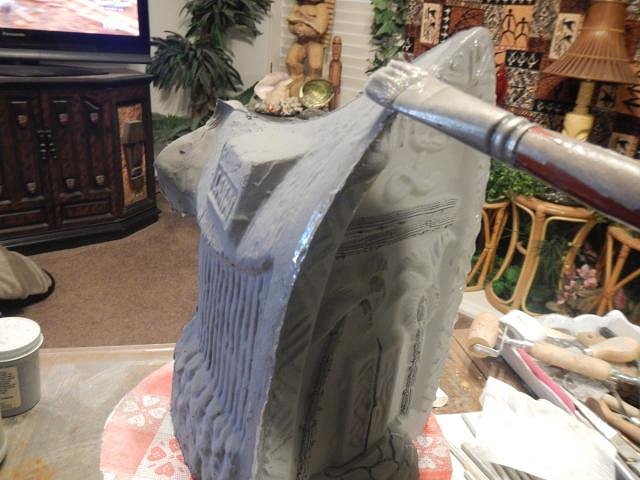
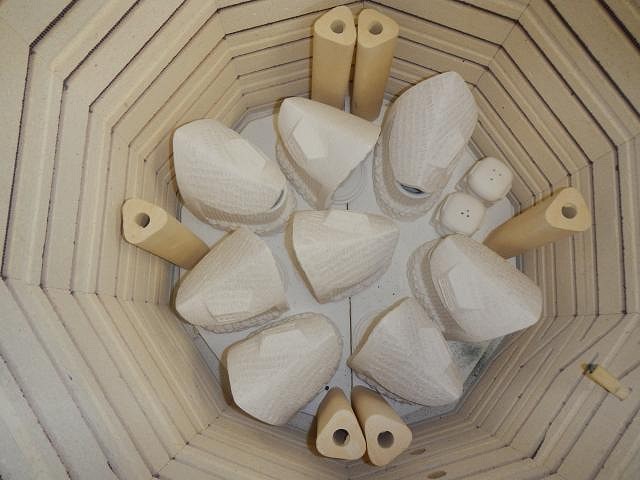
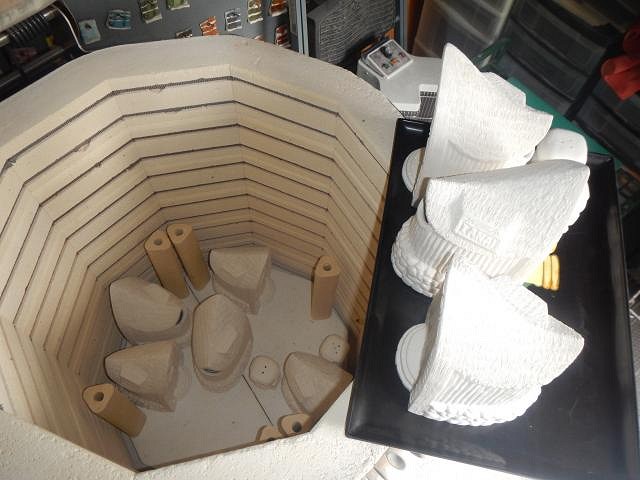
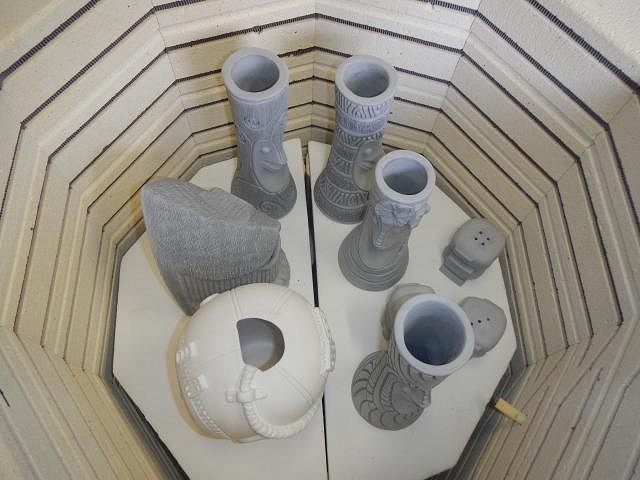
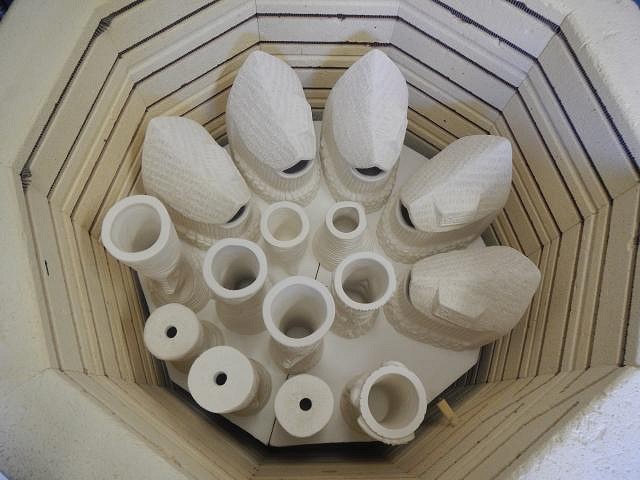
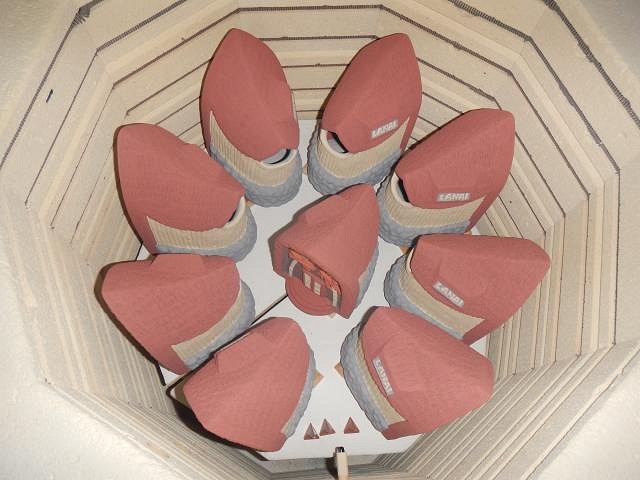
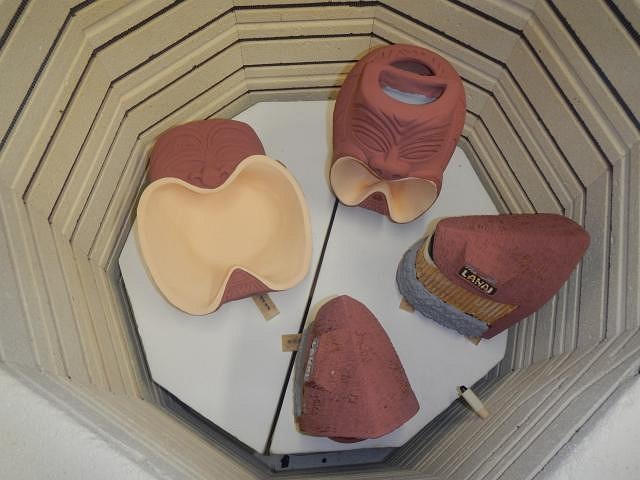
SACRAMENTO CRAWL MUG for 2019. The last mold piece is made step by step. I took off the box side where the last mold piece will be poured. I will remove all the blocks, clay and plaster from the leak. That plaster traveled really well. It had a fun trip. Not so fun to clean it up. Before putting the box side on I did the three layers of mold soap. Then the box side went on and I used clay snakes to seal all the places where the box met another box side or a mold piece. We mixed the plaster and Dan poured it in until it reached the very top. Then it took about 45 minutes to set up in the cold garage. It doesn't hurt the mold to leave it like this with the small jutting out but if I ever want to stack another mold on top I'd better make this piece level. So time to rasp. I had Dan do this part while I rested. I eventually dug out the clay so he could rasp across the entry hole for the mold. This is where the slip will pour into the mold. Now all the pieces are level. We began the work to clean up our work space. Dan put straps on the mold to hold it together while he carried it to my table around the corner. Success the mold opened easily and the sculpt came right out. Close up of the most important mold piece. I have a trick to share in the future. Then I put three fans to blow on the mold pieces 24/7. We will rotate the pieces once a day to get the fans blowing on a different side. This speeds it up. We set up the garage for making the mold the night before. Then we started the next morning at 6 am. We finished making this mold at 3 PM. Not bad when you think of the leak taking extra time. Any questions? Wendy |
|
D
danlovestikis
Posted
posted
on
Mon, Mar 11, 2019 8:28 PM
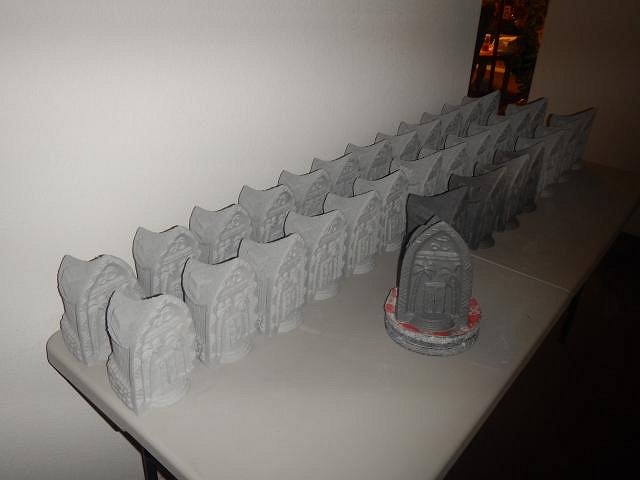
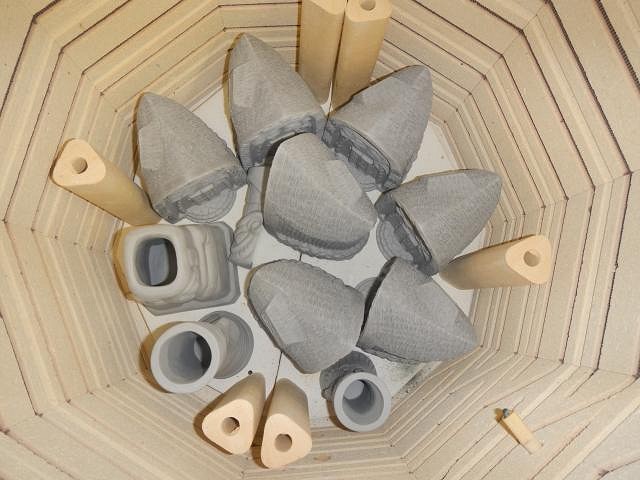
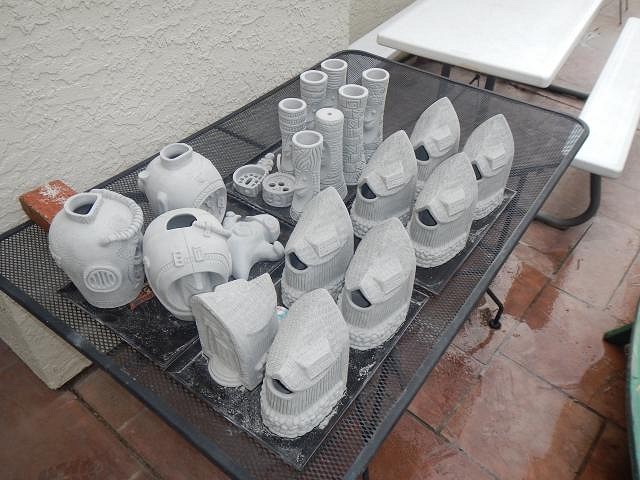
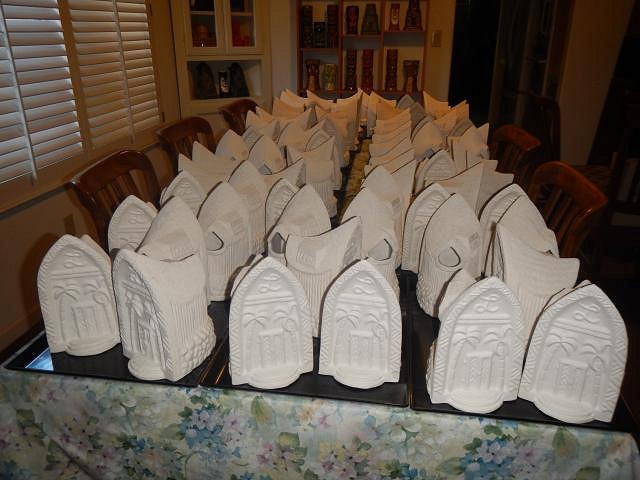
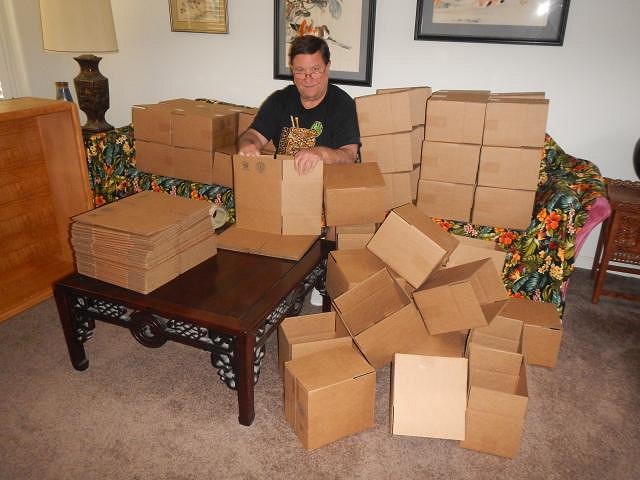
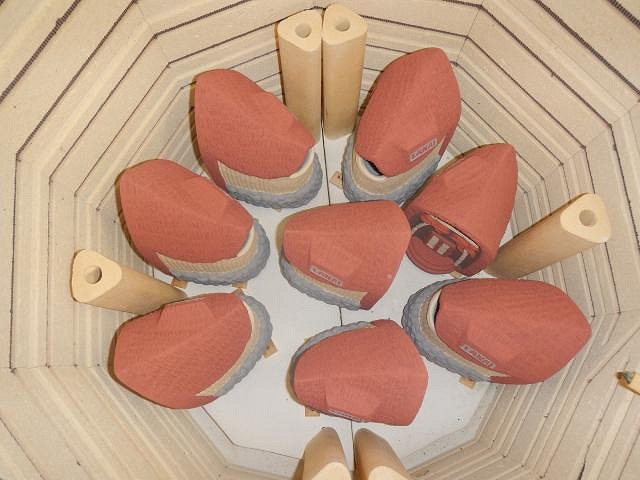
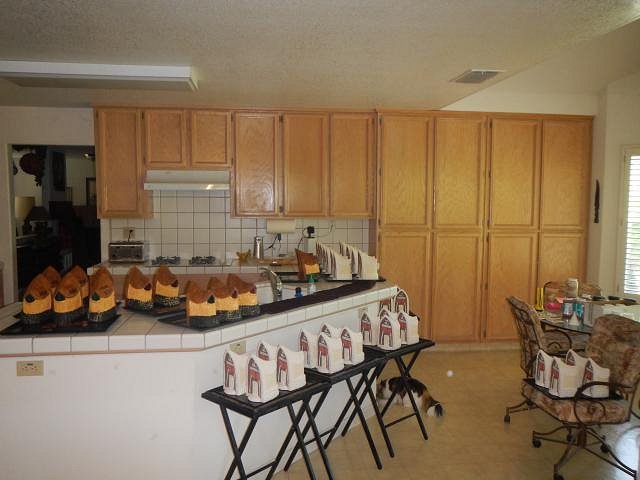
Progress Report for the Sacramento Crawl mug. On 12/21/18 I decided that the mold was 100% dry and we could pour the first mug. We figured out the best way to put the mold together. I made crayon marks on the mold so that it would be easy to put together each time. To make it really secure and the pieces well locked into place we used four belts. Each time I pour a mug I carve a line into the side until I get to five and can slash through the first four. This way I can keep track without counting the mugs in the house. We mixed the slip and poured into the mold. 45 minutes later I came out and topped it off. Otherwise the top of the hut would not be as thick as the rest of the mug. I leave the slip in for two hours. So we aren't trapped at home we get up every morning at 6 am to pour a mug. Two hours later Dan pours out the slip and lifts the heavy mold and put it onto these 2 x 4's so it can continue to drain a bit more. I can open the mold around five hours later. One down and 75 to go. Wendy |
|
D
danlovestikis
Posted
posted
on
Tue, Mar 12, 2019 9:07 AM
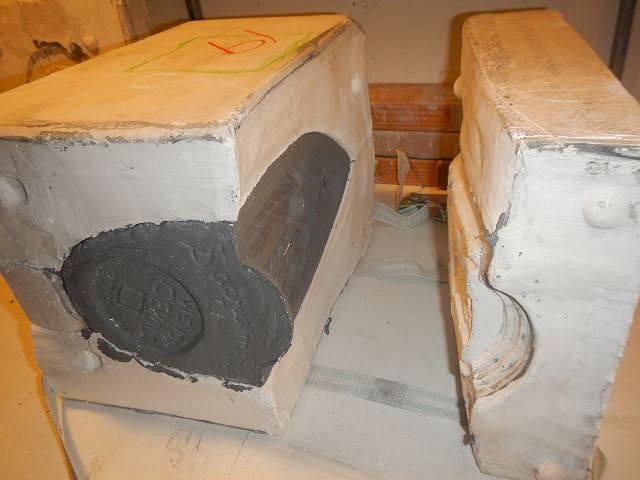
SACRAMENTO CRAWL MUG for 2019. Opening the mold for the first cast on 12/22/18
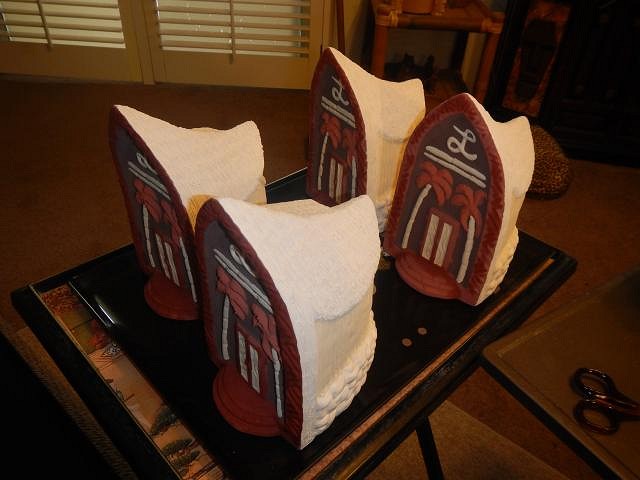
OK this is going to work out. The mug above has not been fine tuned. Also after doing around 9 and hand craving the front arch I figured out what I wanted to do. That new trick that I figured out on my own will change this mug for the better. Stay tuned! Wendy [ Edited by: danlovestikis 2019-03-12 09:09 ] |
|
D
danlovestikis
Posted
posted
on
Wed, Mar 13, 2019 8:00 PM
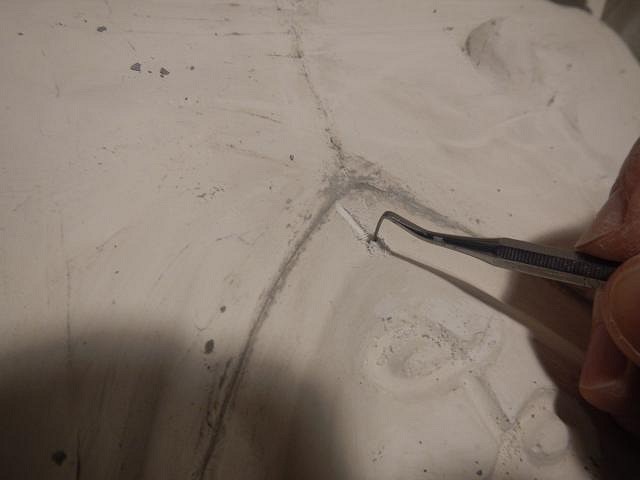
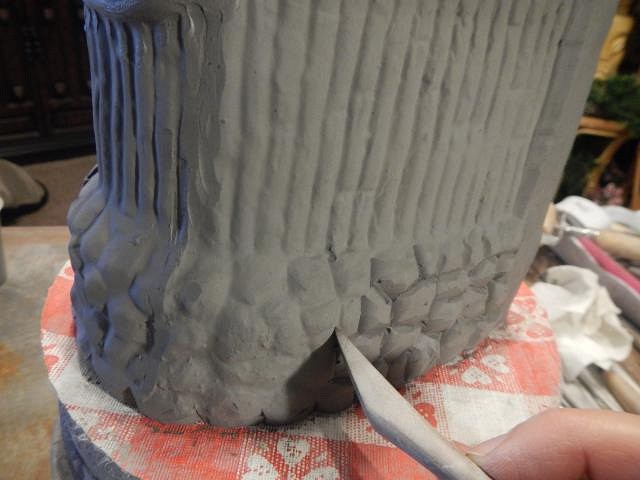
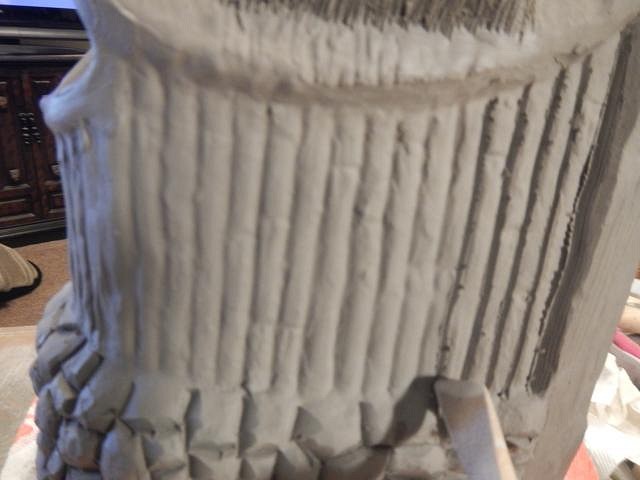
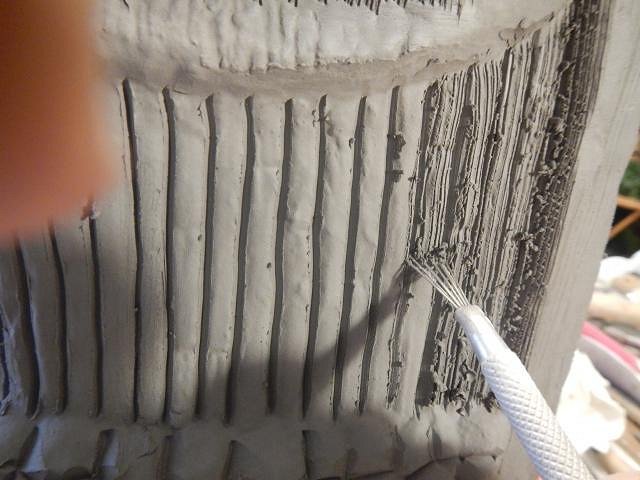
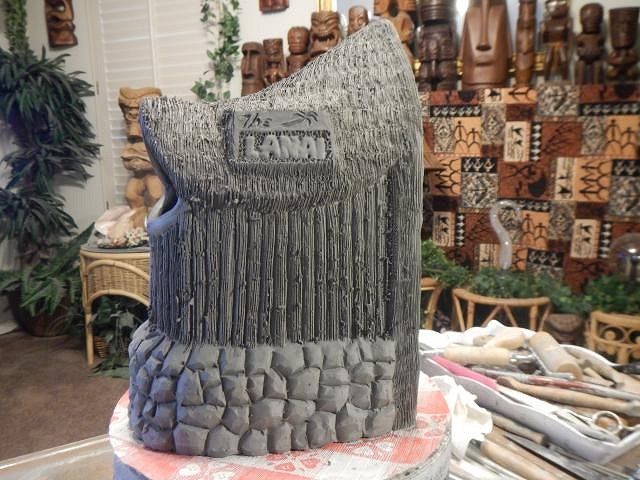
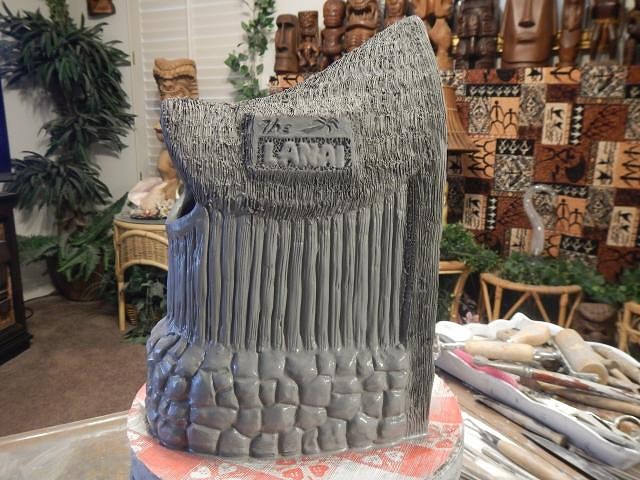
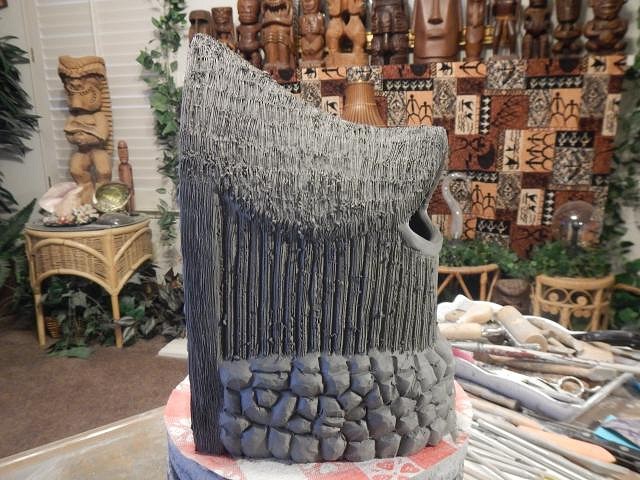
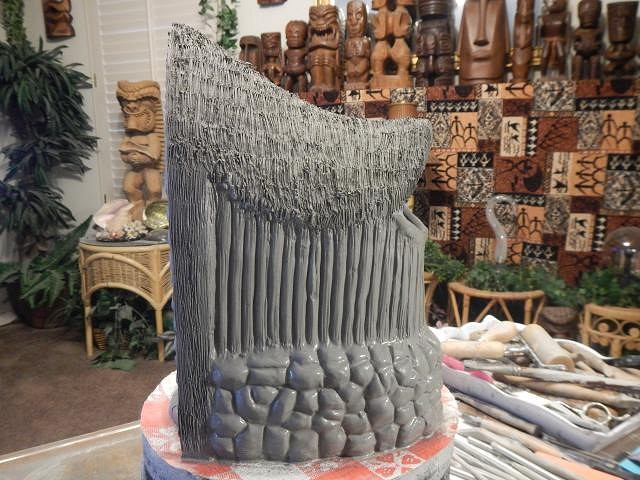
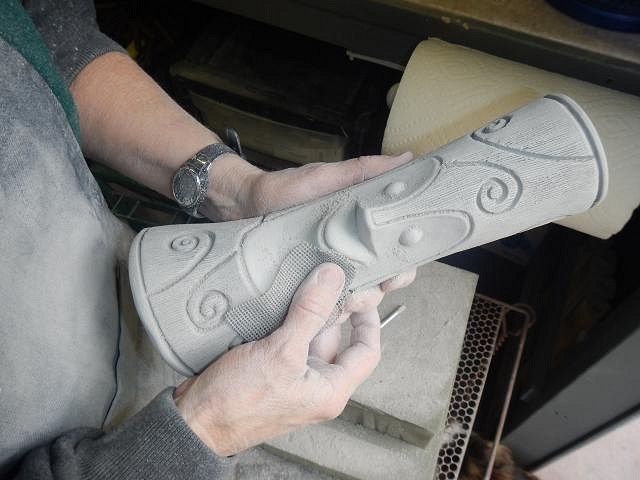
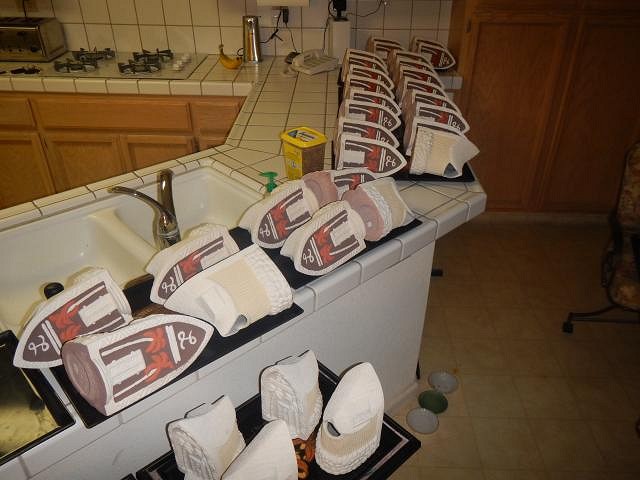
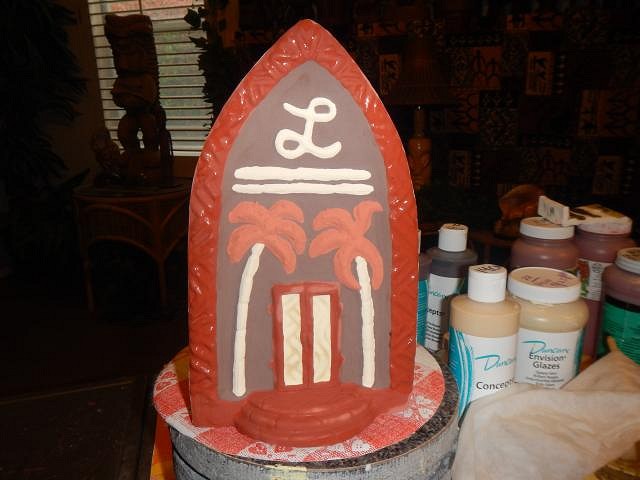
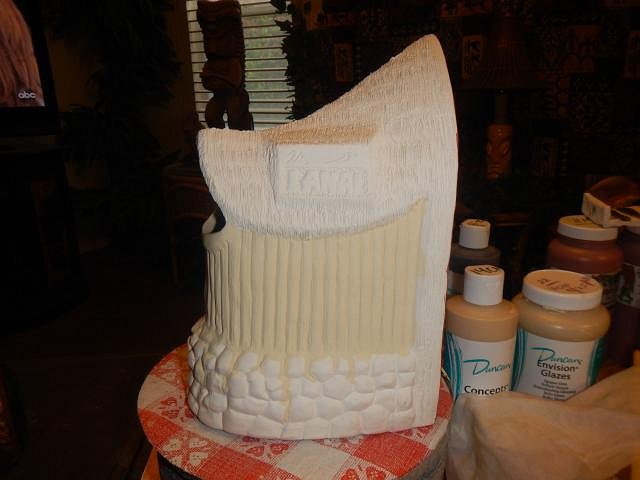
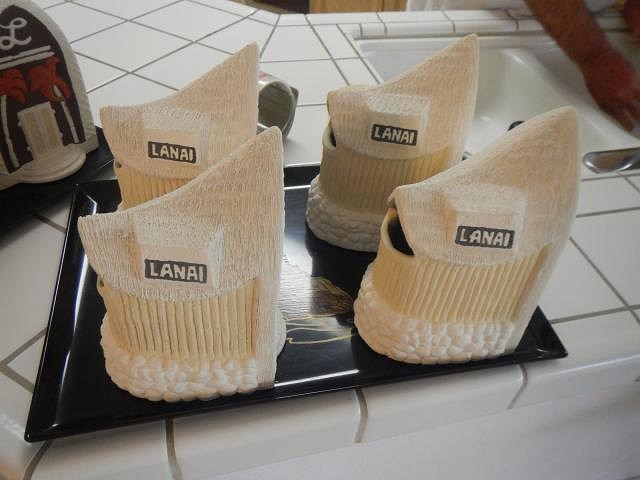
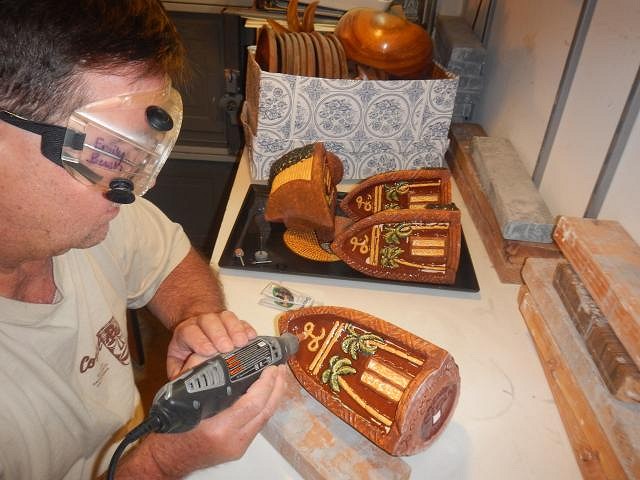
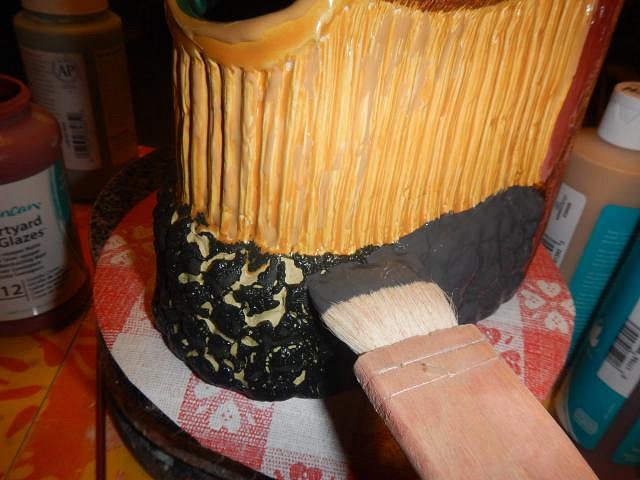
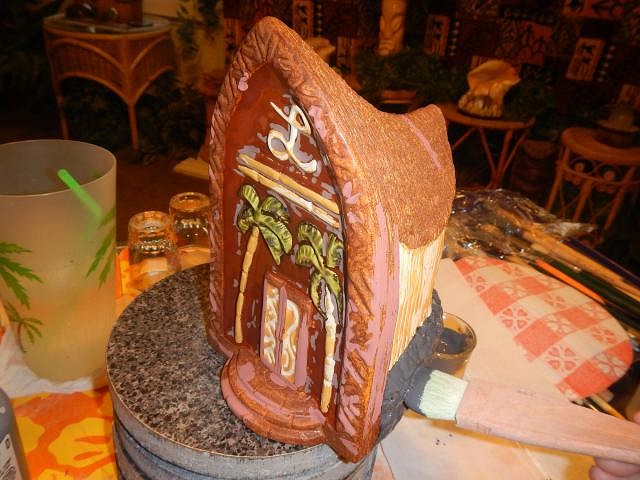
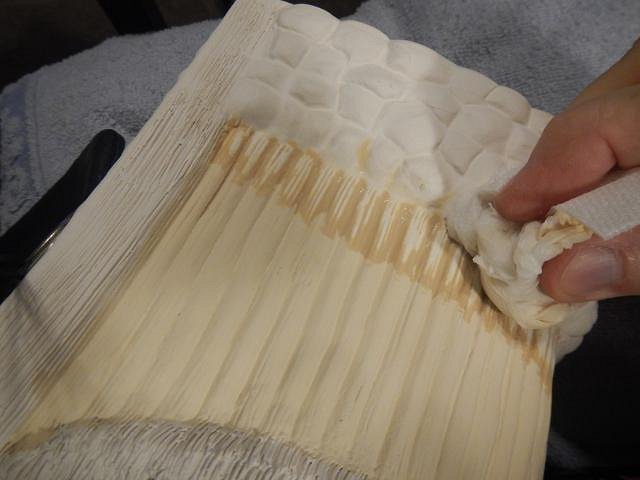
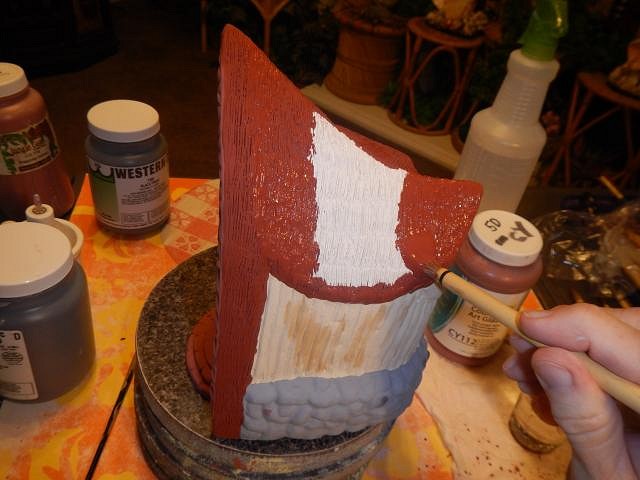
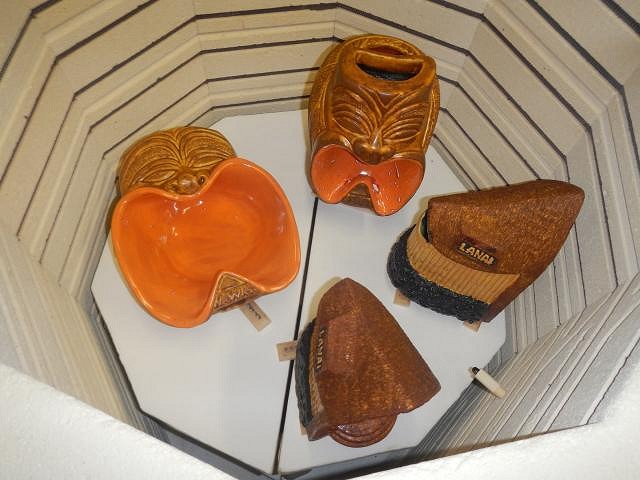
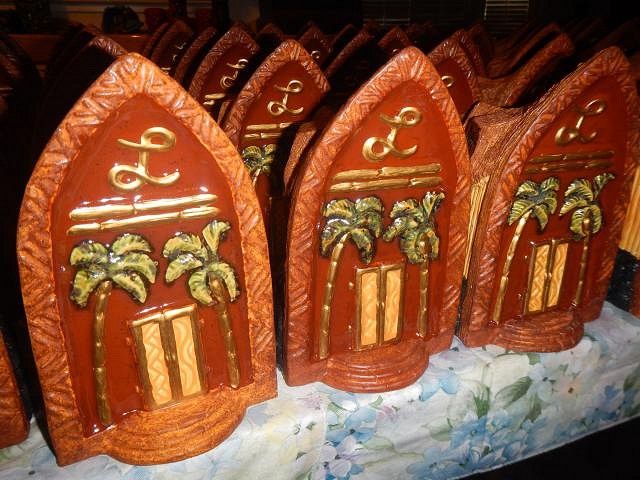
SACRAMENTO CRAWL MUG for 2019 is finalized. Here is my new technique and how it turned out and then what I do to each mug when I fine tune it. I fine tuned the front of this mug and then carved a design around the arch. It took a long time when I also have the rest of the mug to fine tune. So I had to think up a better plan. My mother had a dental lab and I have all her tools. I decided to alter my mold. Risky because I only have one shot at getting it right. The best part is that the design will stand out rather than being carved in. Here are the steps I did to fine tune each mug. I will do this 76 times and then stop. If I need more mugs they will be done as part of the next Wish List. So much better and it will be this way for the run of mugs. Those I hand carved will be used for the glaze tests. Her I added texture to the cross beam, the palm trees and then I carved the flagstone design which will change for each mug. Similar but different. I use a wet paint brush to sand it as I go along. It removes the sharp edges that wouldn't glaze well. Just how it should be. Next I tackle the opening at the back of the mug. I cut off the right amount of clay, cleaned the mold lines and then I use a spike to cut the opening to the right size and shape. Then I "wet" sand it. The lettering didn't hold up and started to fade but clay is there to be manipulated and I just worked harder. Here's how it looks after fine tuning. I will do the scratches on the entire thatch roof as well. I thought the stones should have been more pronounced so I actually carved around each stone. I also carved between each bamboo slat to make them better as well. Then I used a wire brush to add texture to the bamboo. I used the wire brush to do the roof and then I sanded with a wet brush all the appropriate areas. I fine tuned the last side and wet sanded it too. One down and 75 more to go. If I run out then I will make more on the next Wish List. Cheers, Wendy |
|
D
danlovestikis
Posted
posted
on
Sun, Mar 17, 2019 7:35 PM
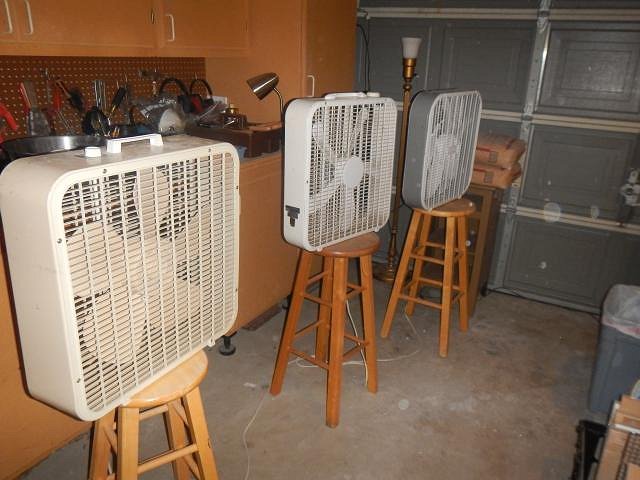
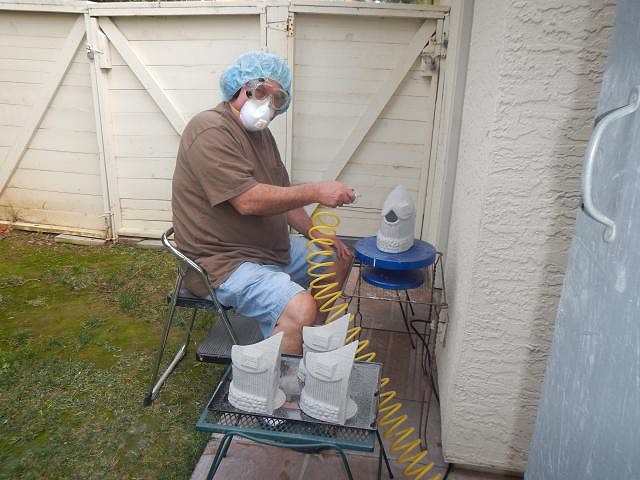
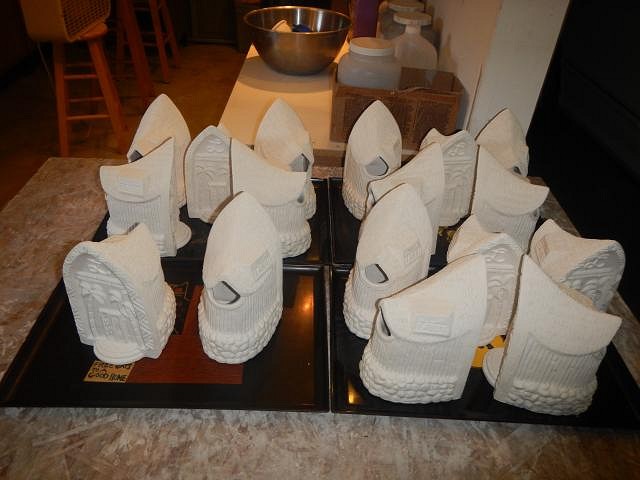
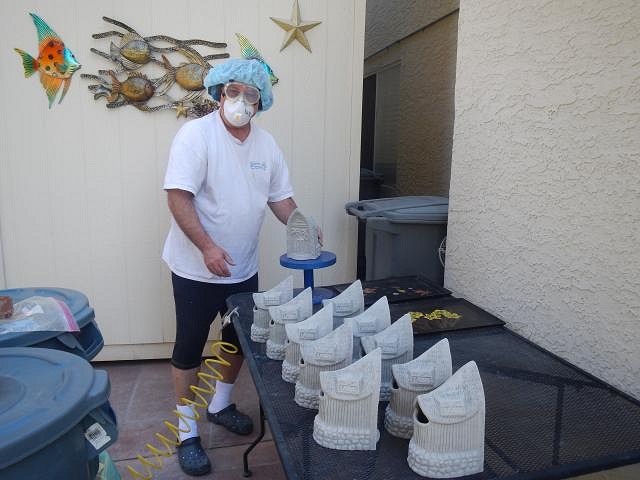
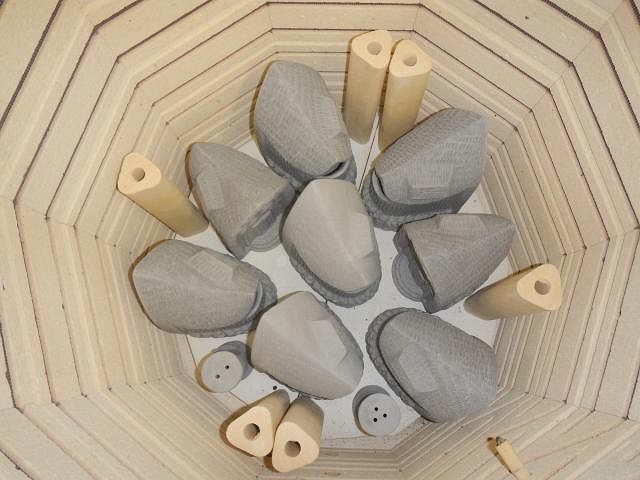
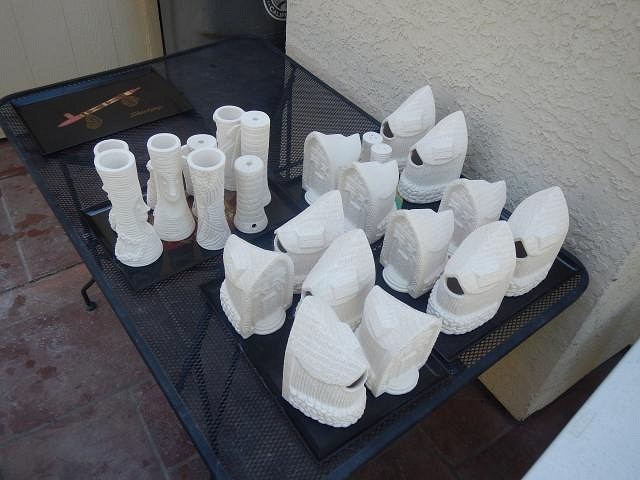
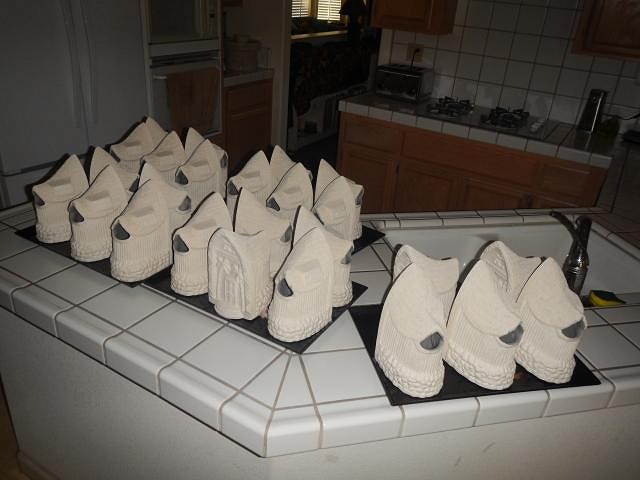
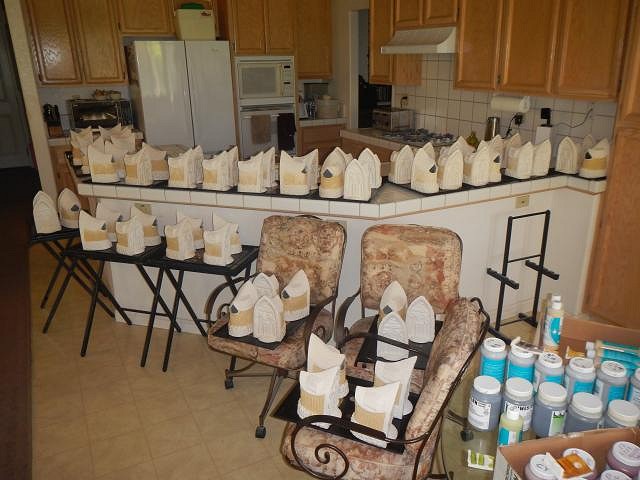
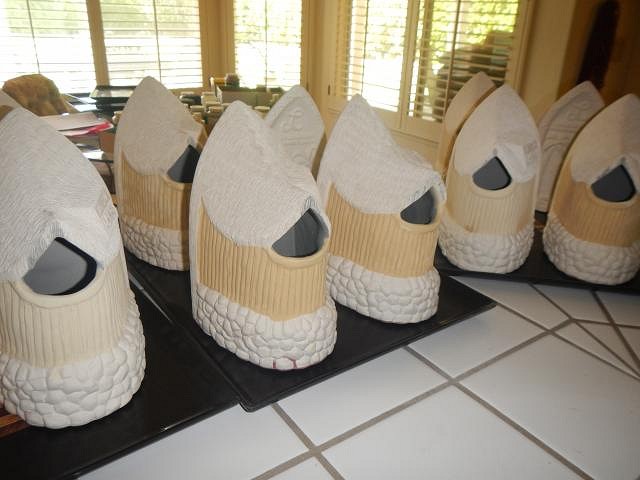
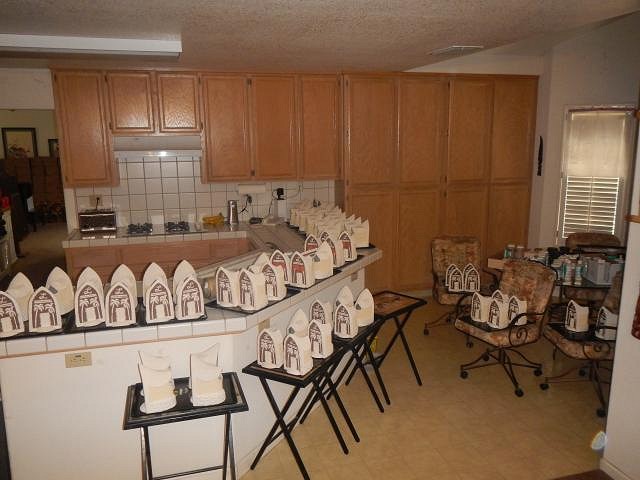
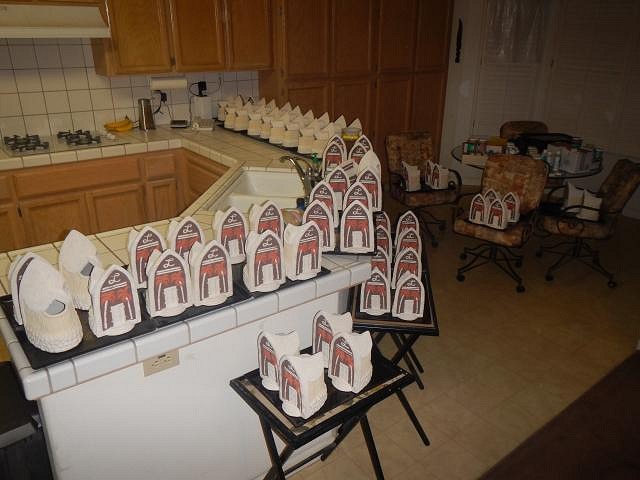
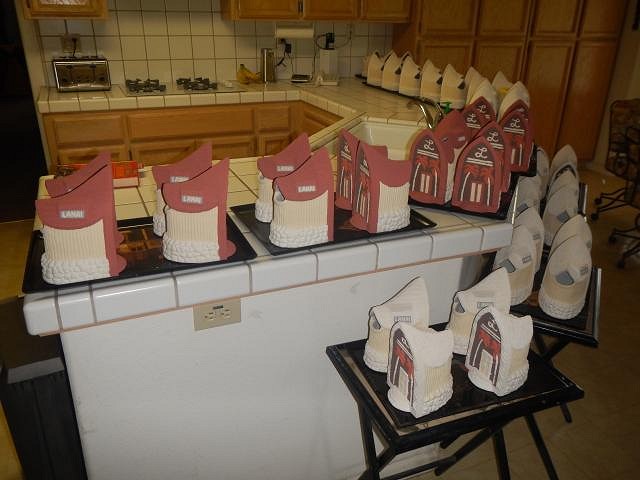
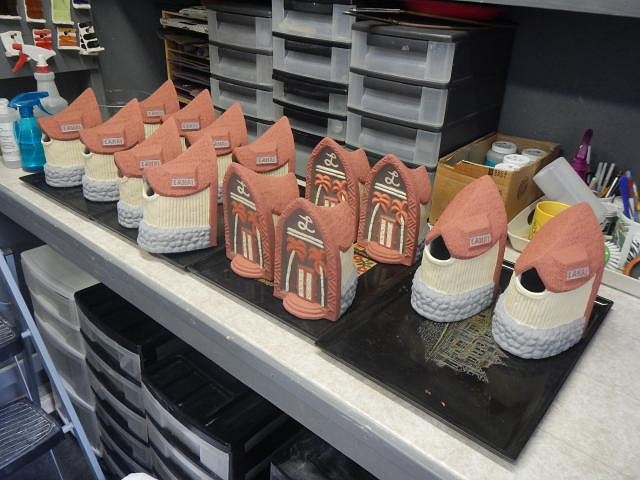
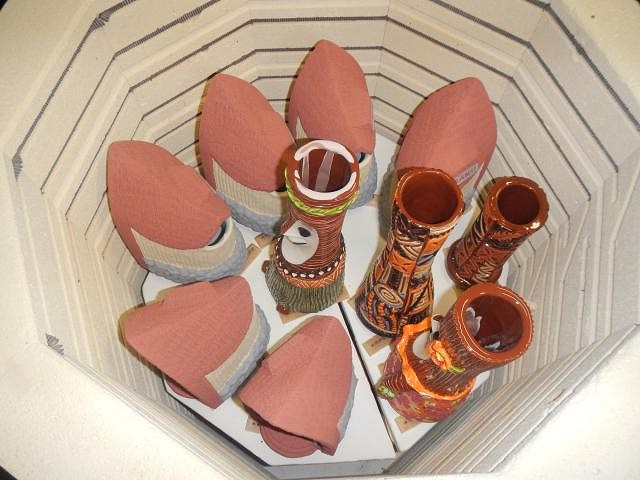
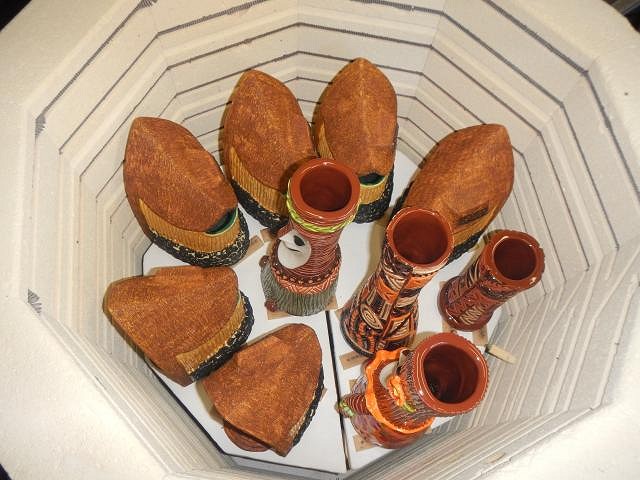
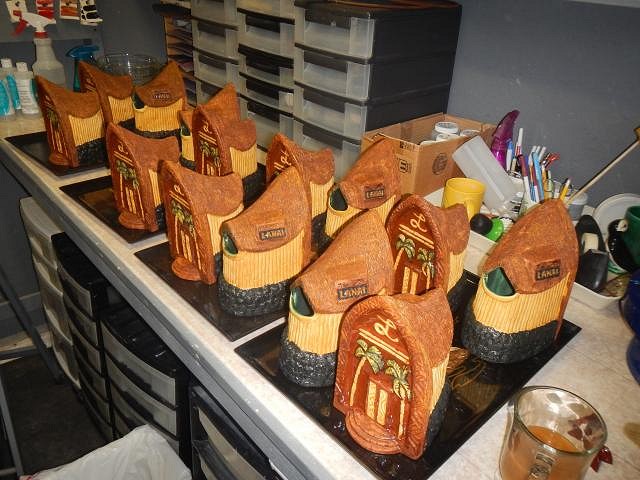
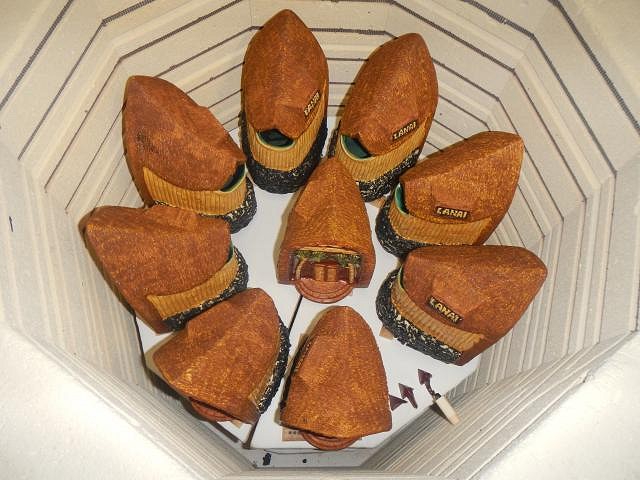
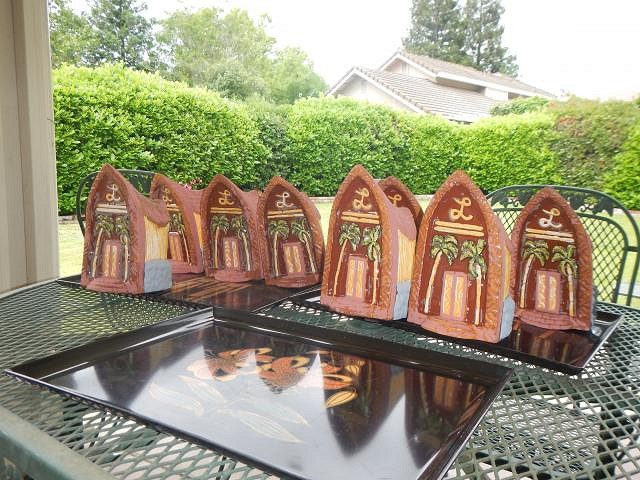
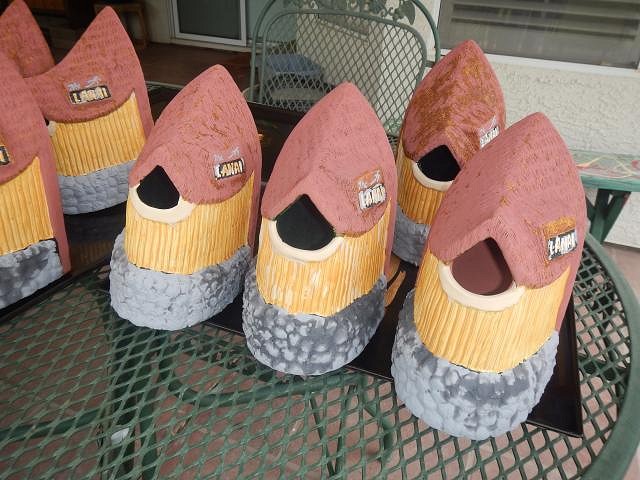
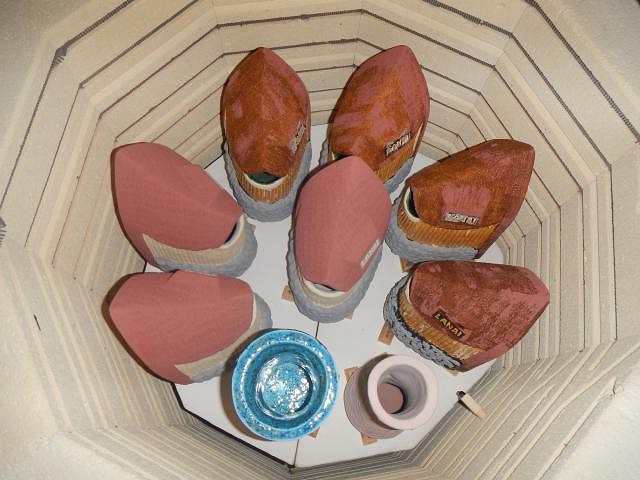
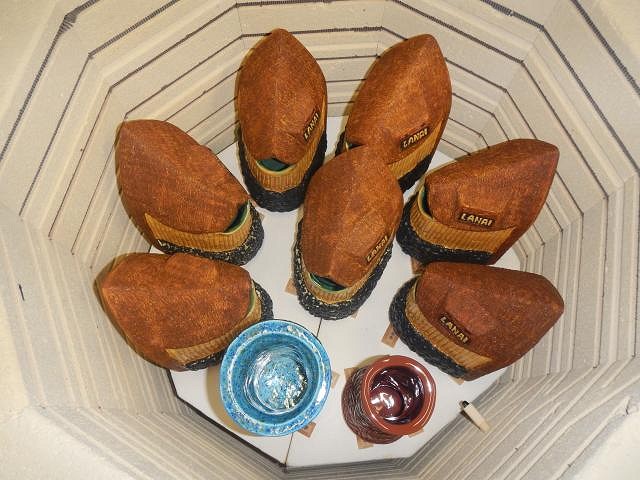
SACRAMENTO CRAWL MUG FOR 2019 based on the Lanai on Freeport Blvd. For 76 days I've dried the molds each night and poured a mug each day. Molds have to be cleaned after each cast too. 76 times I've cleaned a mug while listening to TV. One by one they lined up to dry. When completely dry they were moved into my kiln shed where in 40 degree weather I wore long johns, gloves and a coat with a heater behind me so I could sand and finish off the bottom of each mug.
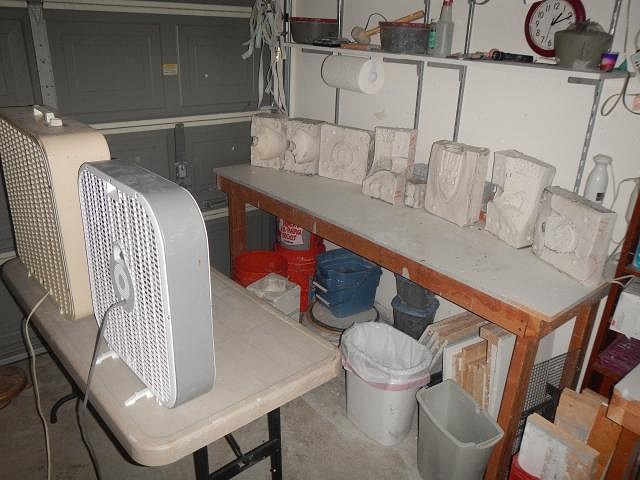
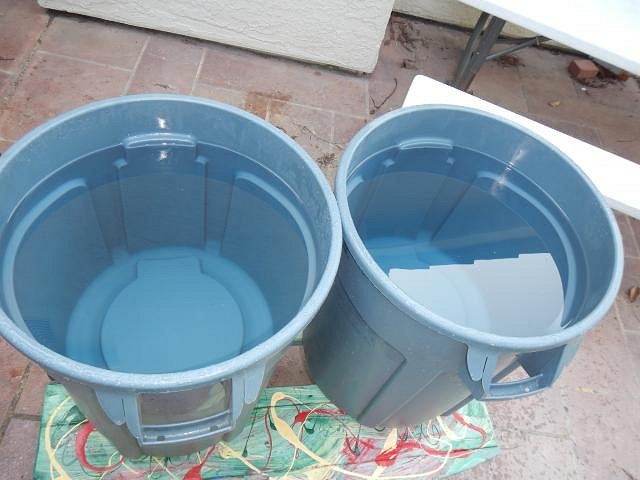
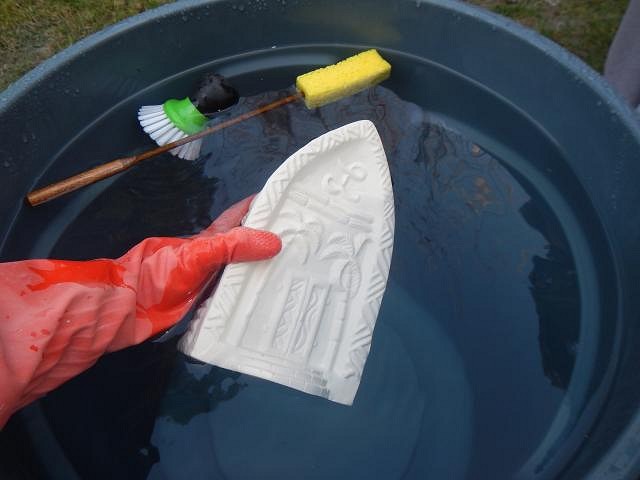
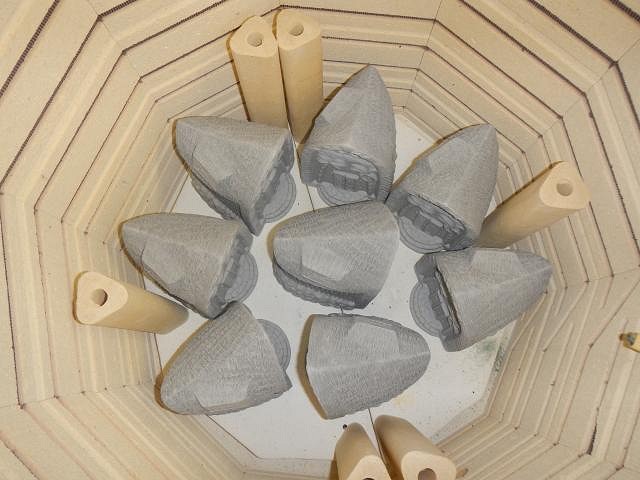
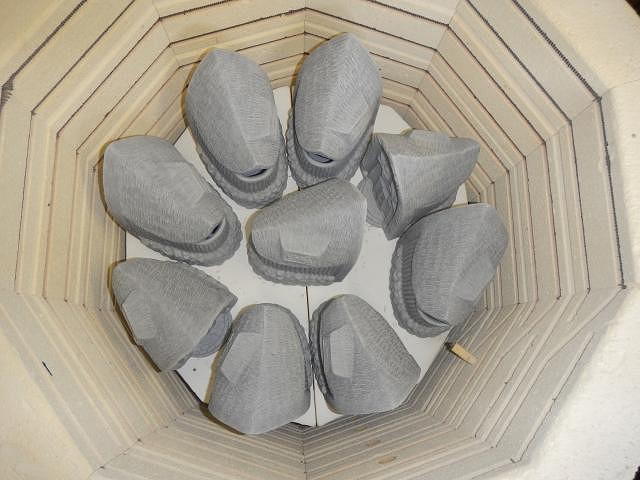
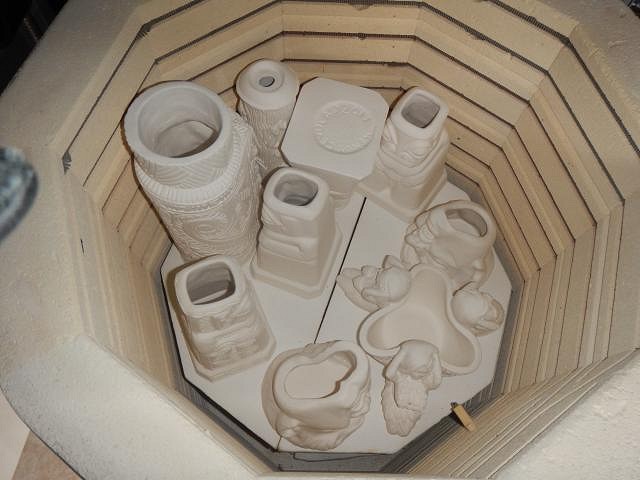
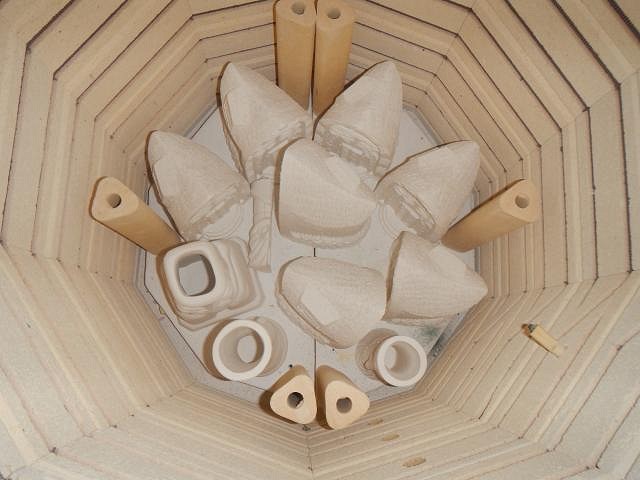
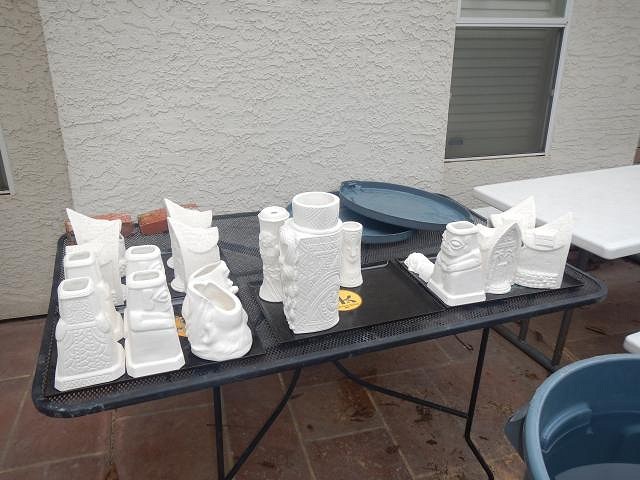
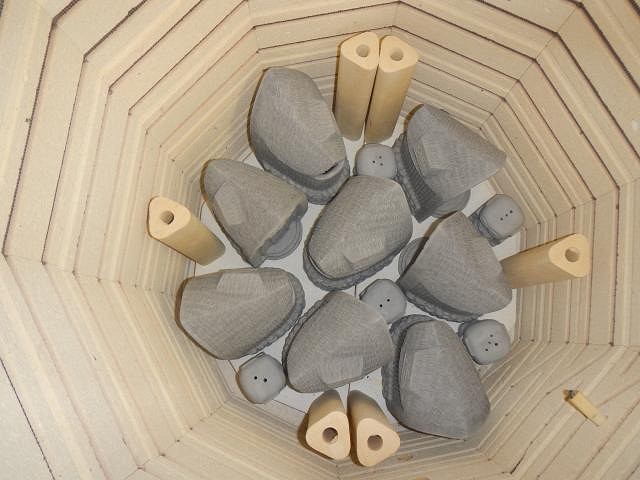
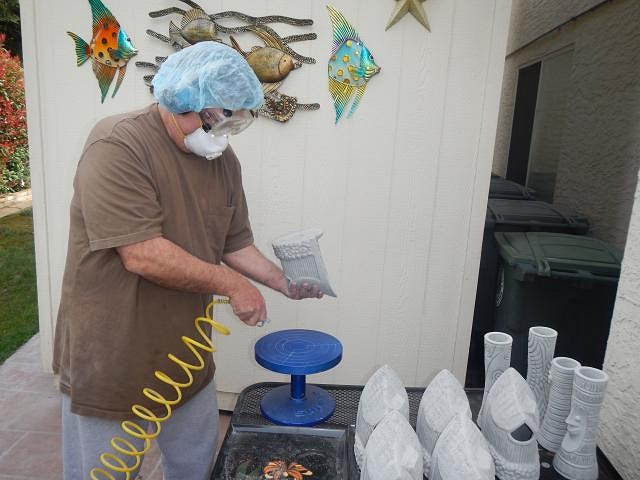
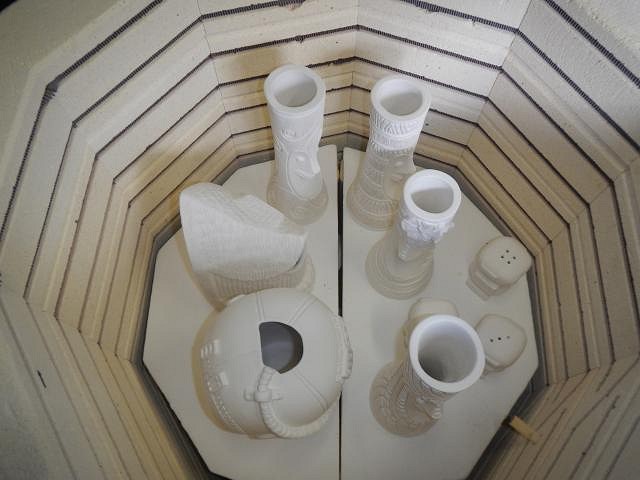
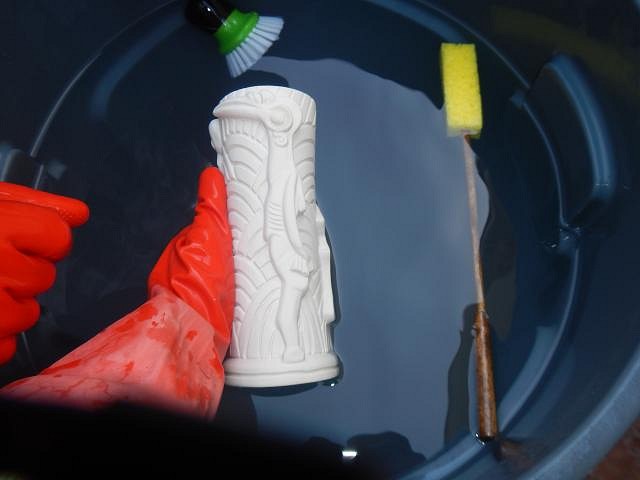
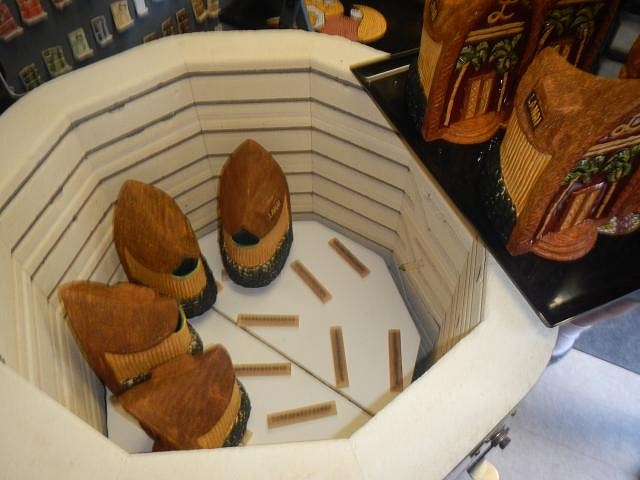
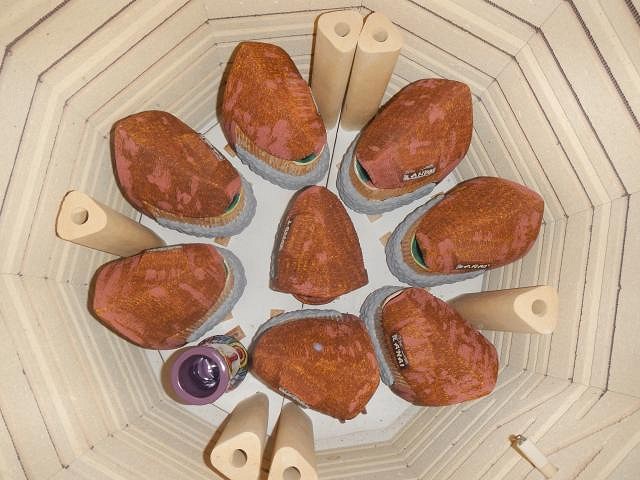
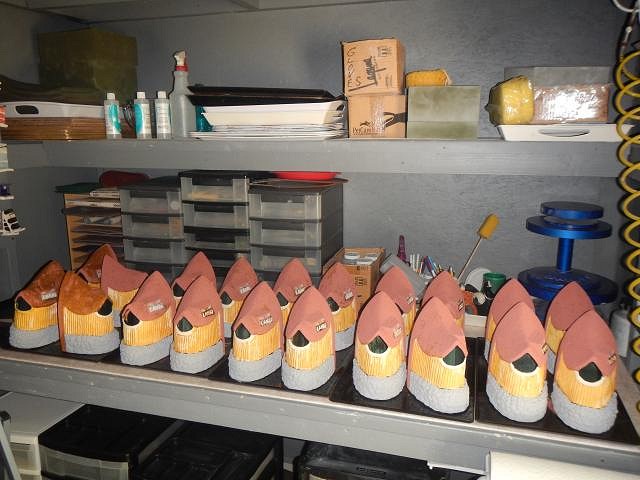
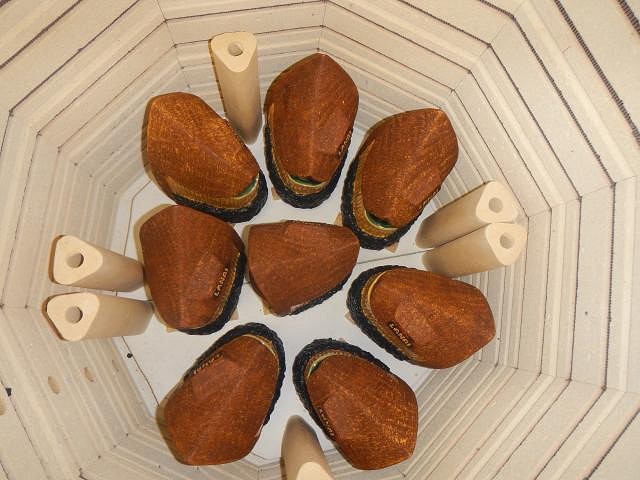
After they were dusted with an air compressor we loaded the kiln and they fired overnight. Then they cooled for another day. We filled dedicated garbage cans with ice cold water. One for scrubbing in and one for rinsing. We scrub them inside and out with numb hands. One whole kiln load held 17 mugs. They were touching in the kiln so when I glaze the kiln will hole 15 mugs with space between them. We close up the tops so that we can use the water again. There were more drying in the house as the project continues. I plan to get them all done and then I will do glaze tests and then I will glaze them all. Cheers, Wendy |
|
D
danlovestikis
Posted
posted
on
Sat, May 11, 2019 8:35 PM
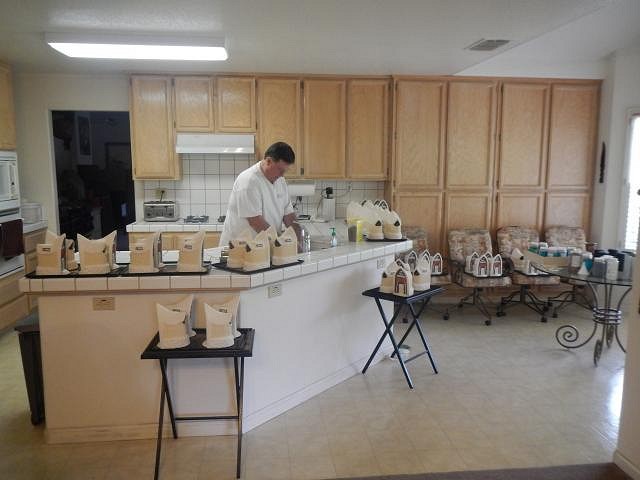
We have been working hard on the Sacramento Crawl mug for October 2019. Here are some catch up photos taken from 1/28/19 to 2/1/19. So few hours in a day. These show sanding, dusting, bisque firing and washing. There are lots of steps to making a mug.
I hope to see many of you at the crawl. Cheers, Wendy |
|
D
danlovestikis
Posted
posted
on
Mon, May 13, 2019 7:47 PM
Catch up photos of the production of the Sacramento Crawl mug. These photos were taken 2/22/19 to2/28/19.
Ceramics take a long time from start to finish but it's such fun when they head out to new homes. Wendy |
|
D
danlovestikis
Posted
posted
on
Wed, May 15, 2019 7:17 PM
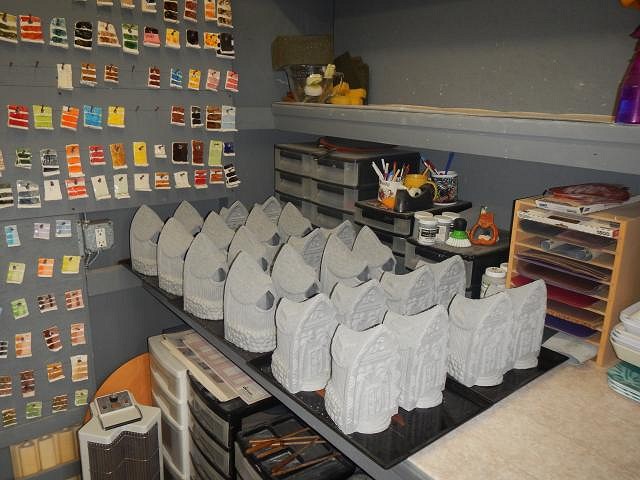
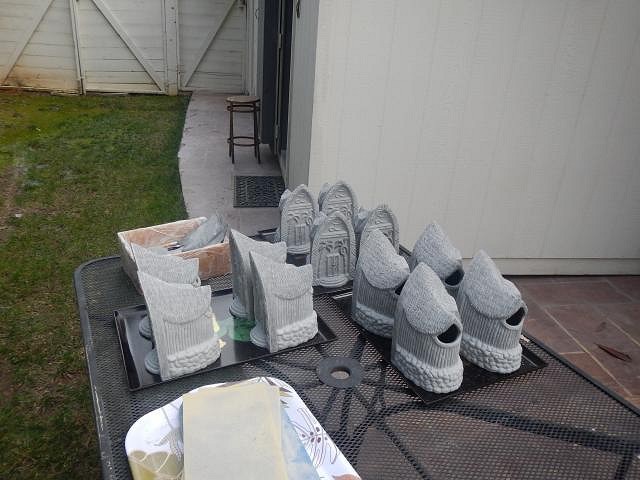
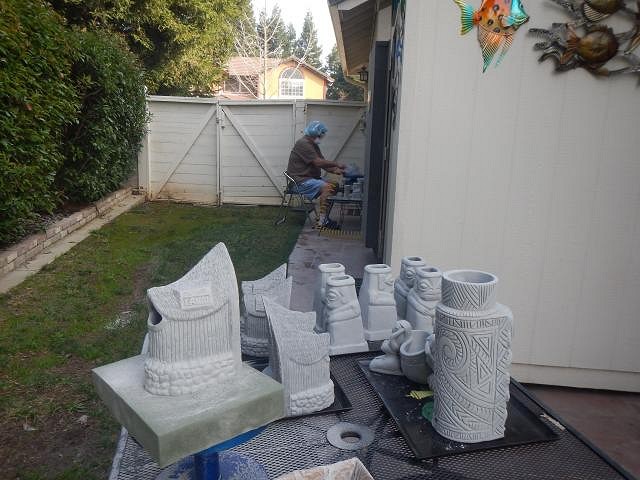
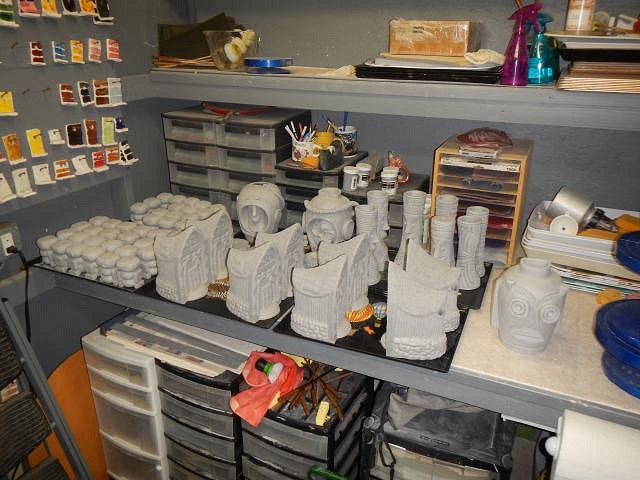
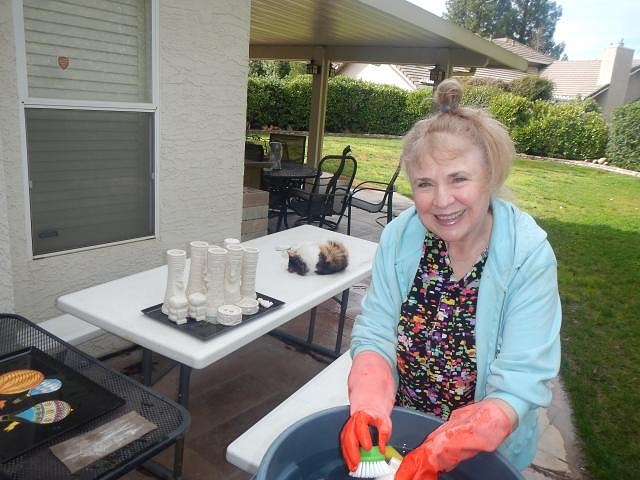
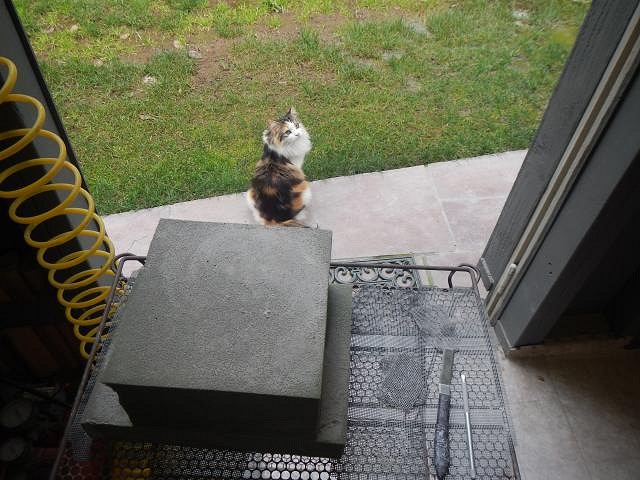
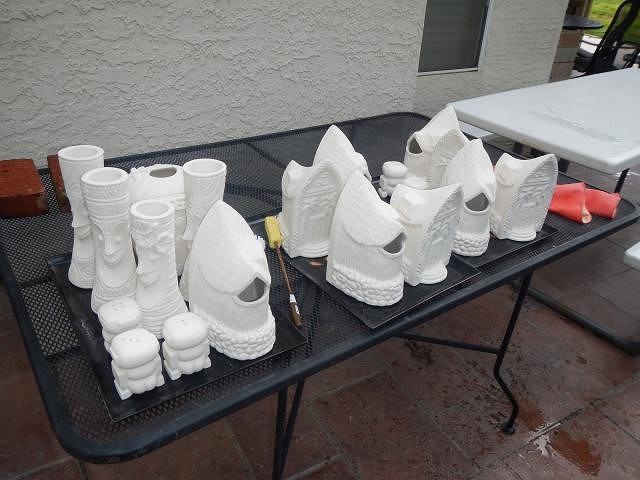
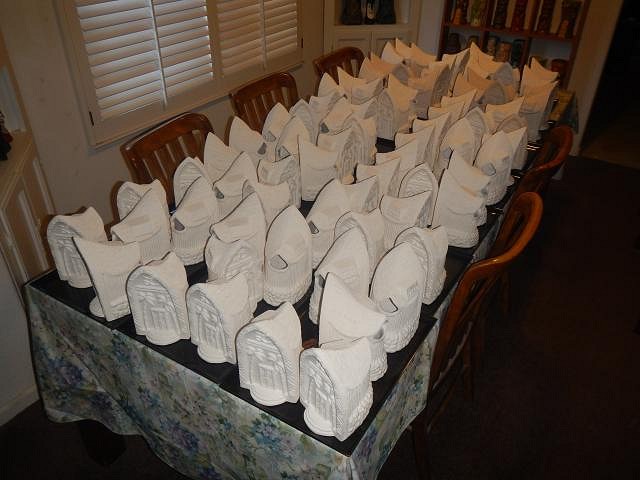
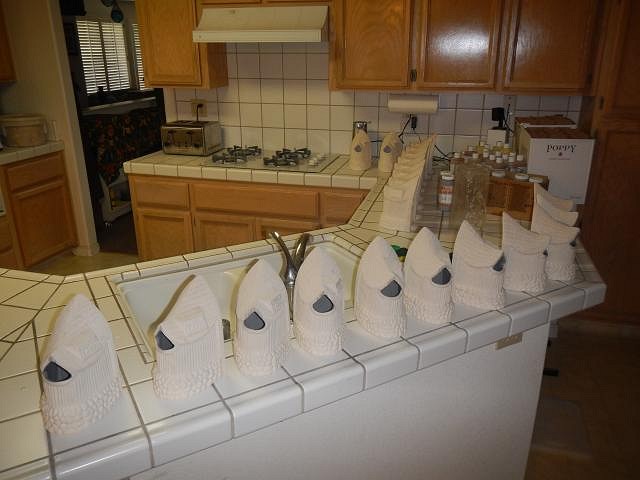
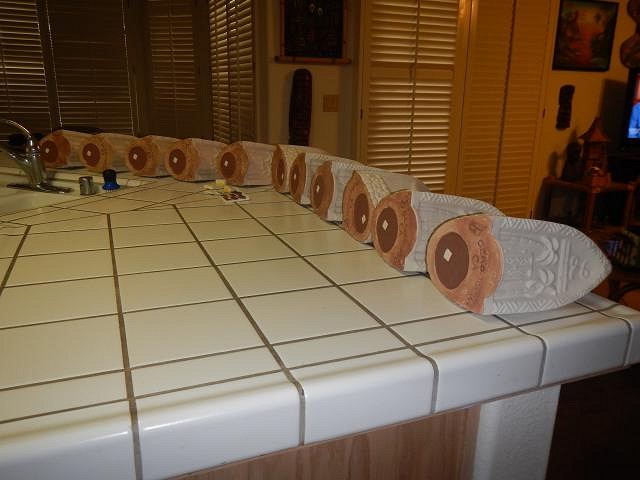
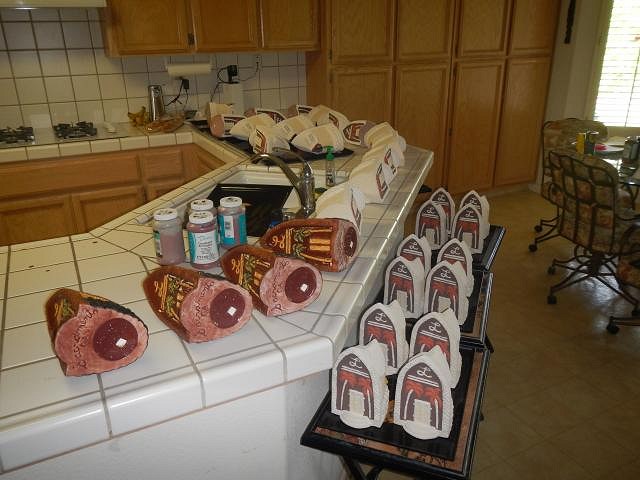
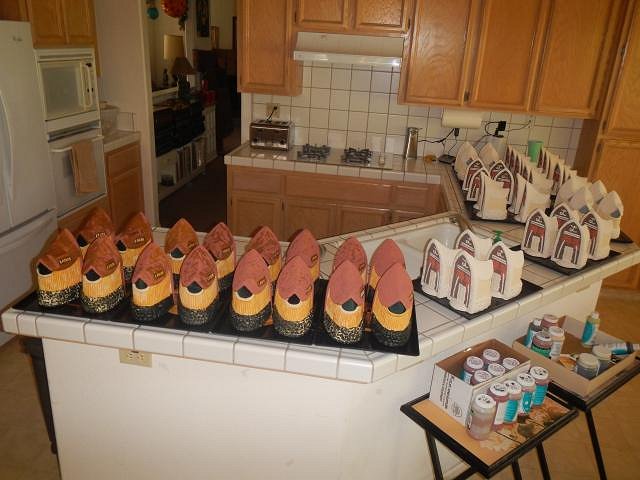
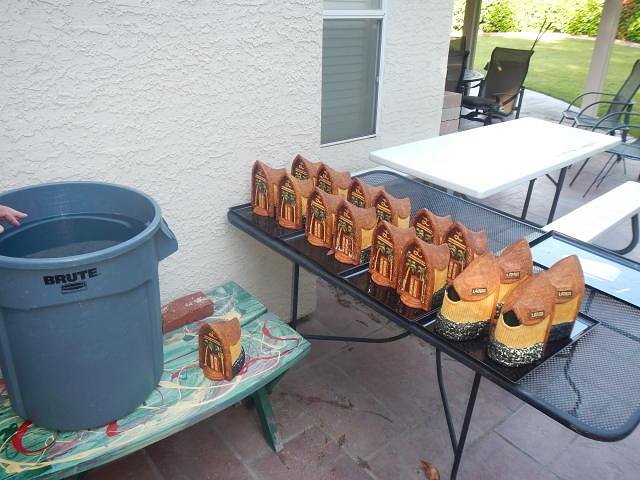
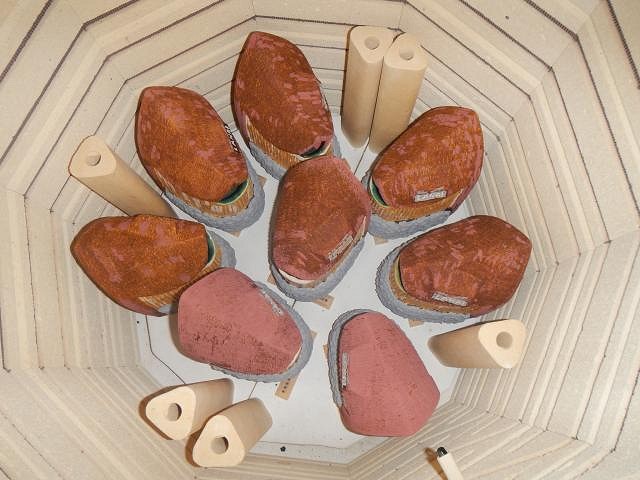
Catch up work photos. These are from 3/4/19 until 3/18/19 As soon as the kiln shed is empty I fill it up again with more waiting to be sanded. Our neighbors cat Scrabble comes to visit while we work and is rewarded with Temptation treats. Cats really do love those. Sanding. Dusting. Loading the kiln
Two days later these come out to be scrubbed.
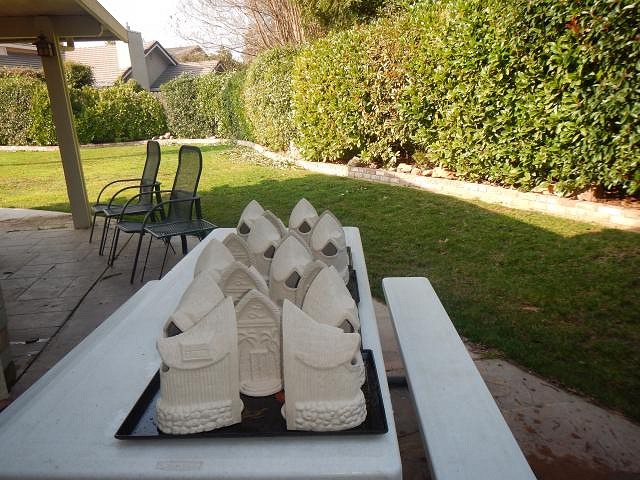
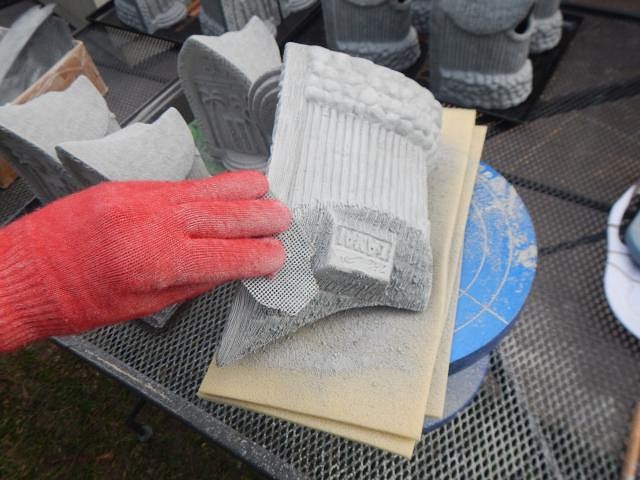
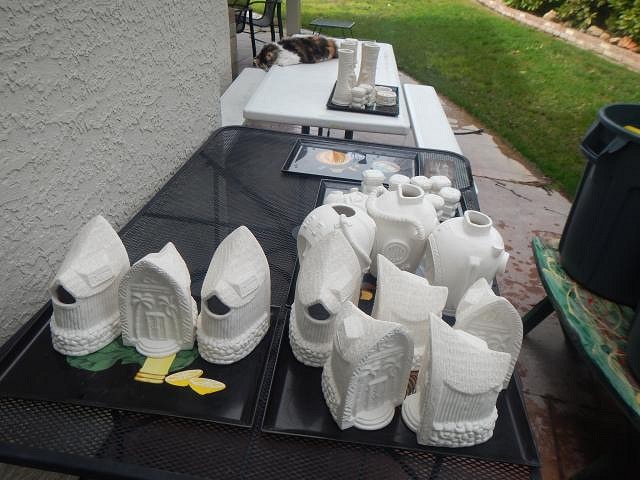
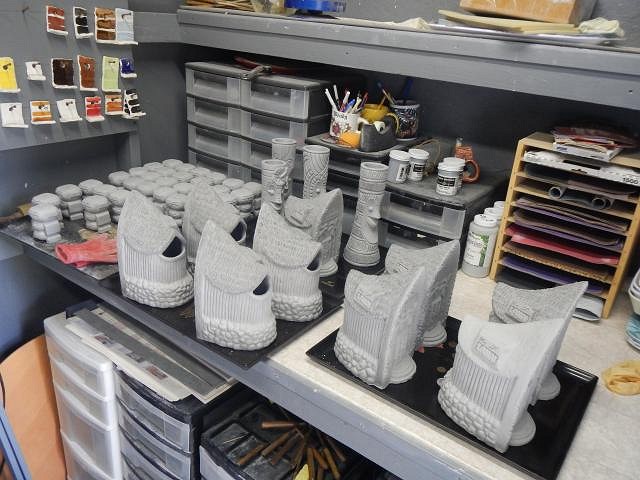
Out on the table while we dress up to keep warm while our hands freeze. The kiln shed is filled with more projects waiting to be sanded. The bottoms of my crawl mugs didn't come out of the mold well so on sanding day I have to really work to fine tune them by sanding and carving until they look like this one. One by one they are adding up. Wendy |
|
D
danlovestikis
Posted
posted
on
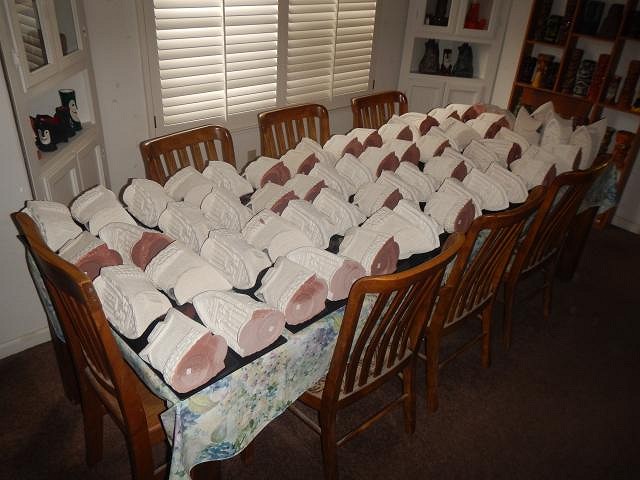
Wed, May 15, 2019 7:30 PM
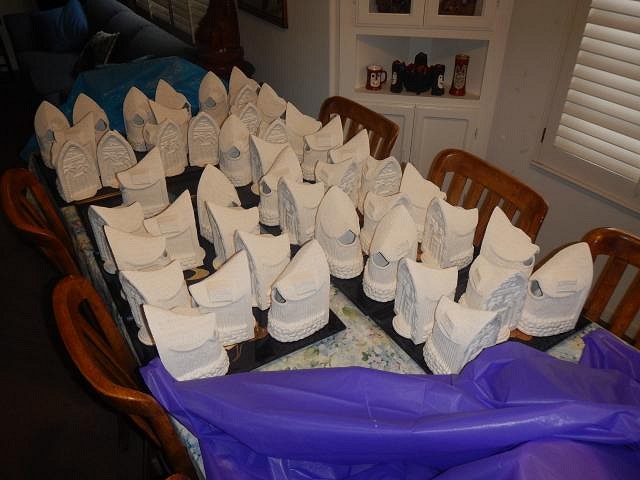
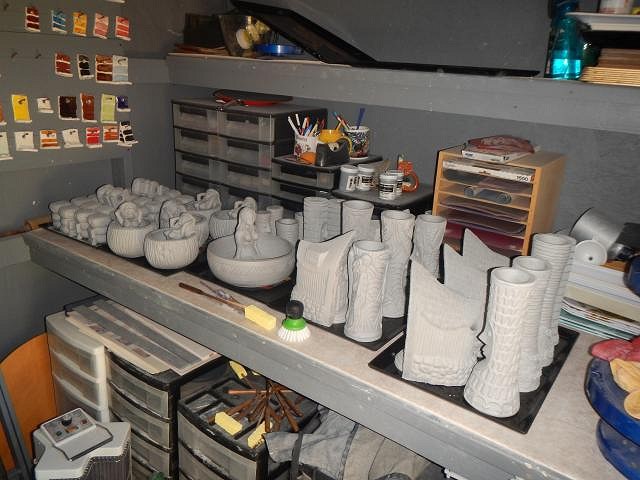
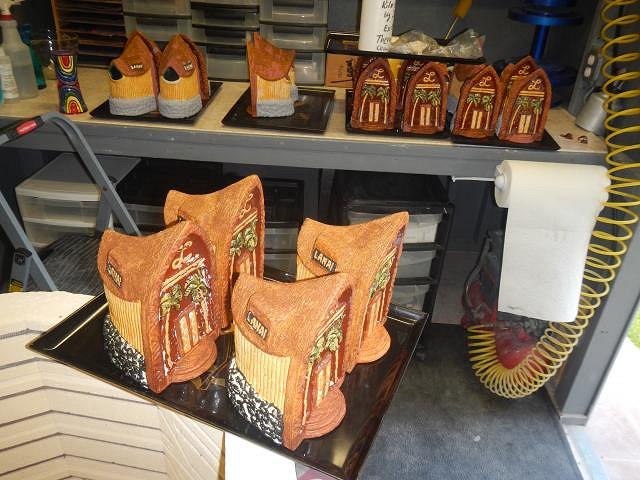
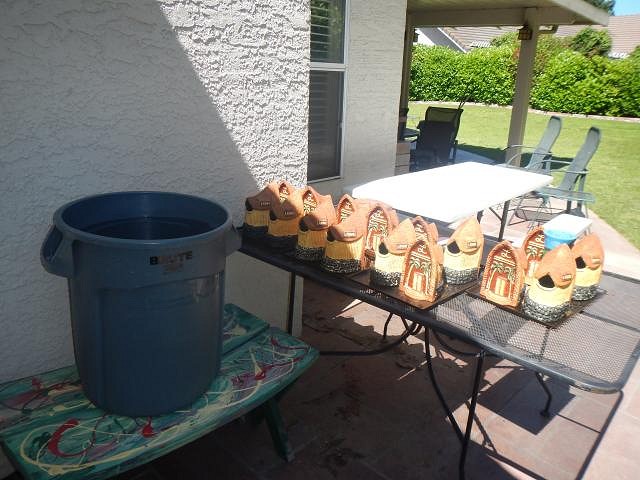
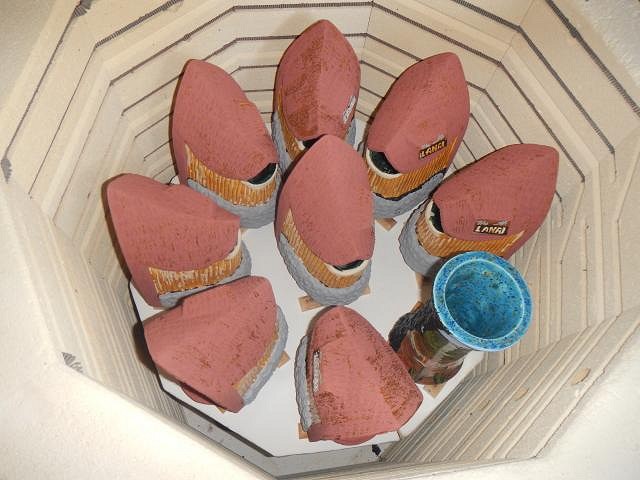
More Catch up photos of the behind the scenes work. These were taken 3/18/19 to 3/21/19. I sanded an entire day but I wasn't alone. Scottie kept me company while I sanded. When I finish Dan comes out and does the dusting and I load the kiln one by one. One layer and another layer. Two days later they are done and ready to be scrubbed. We take them outside and start to scrub. Hhang10tiki's mug was first. So far all the projects have been just fine. These are most of the crawl mugs. There is one more table with about a dozen on it. But they have all been fired and when the time is right I will do the glaze tests and then all these mugs. It's not possible to show all the work that goes on in one day but I try to give you a good sample. Cheers, Wendy |
|
D
danlovestikis
Posted
posted
on
Sat, May 18, 2019 8:21 PM
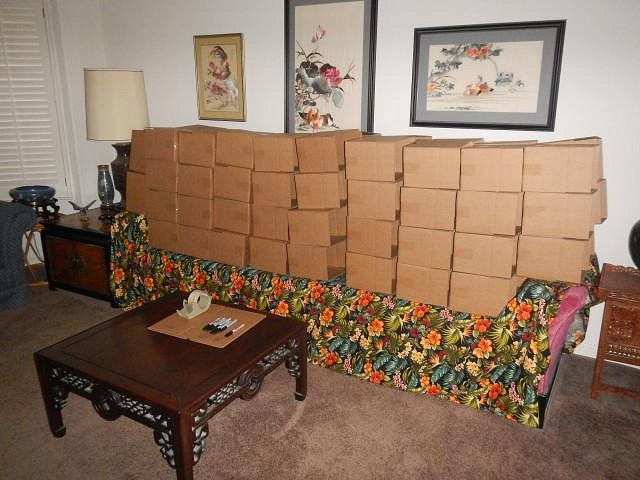
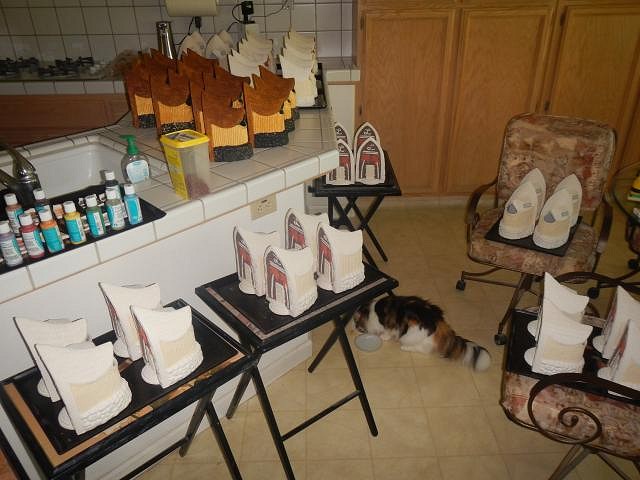
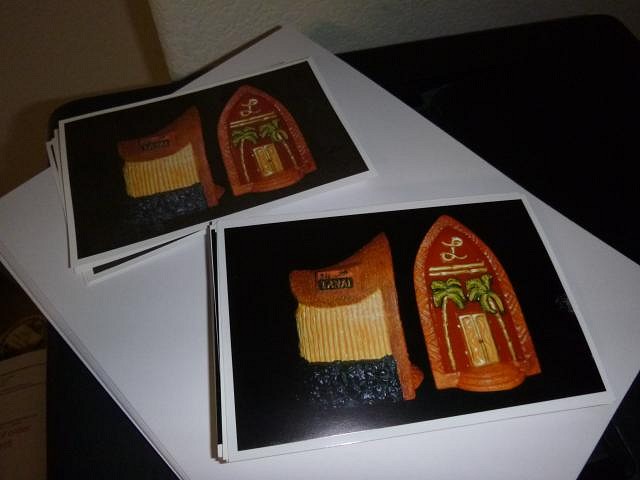
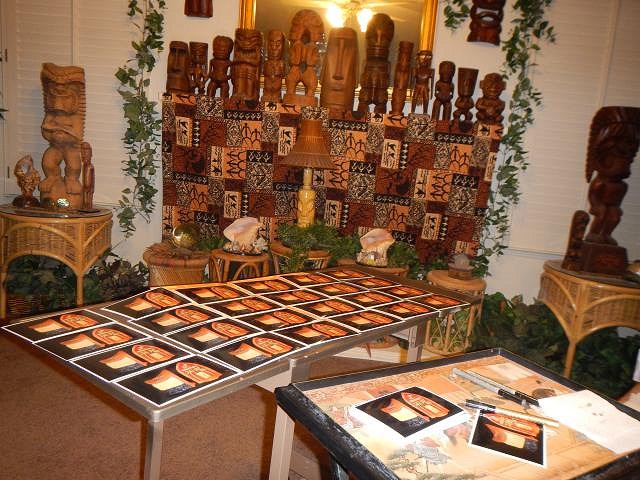
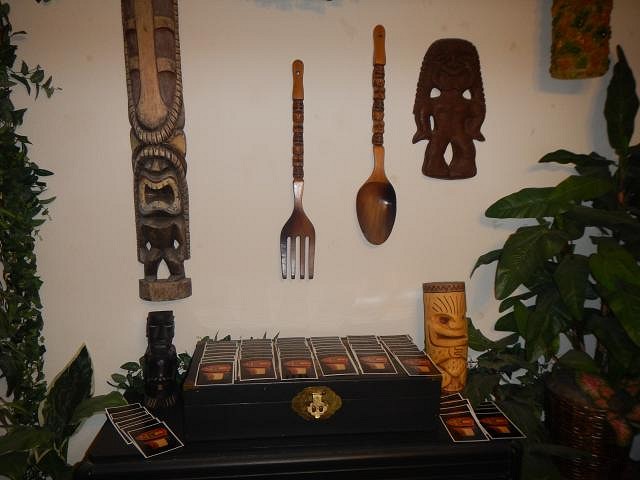
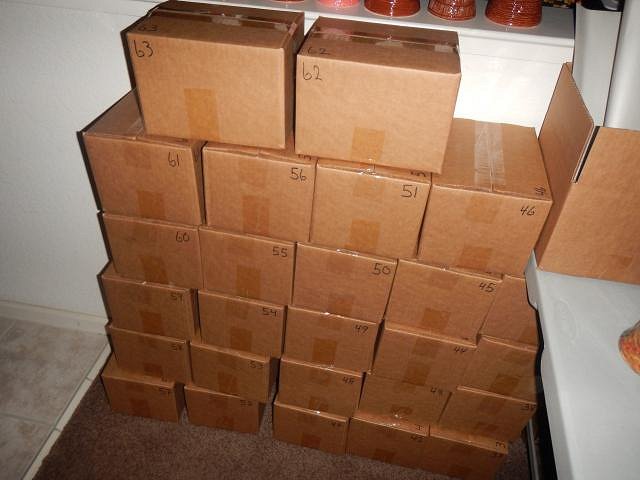
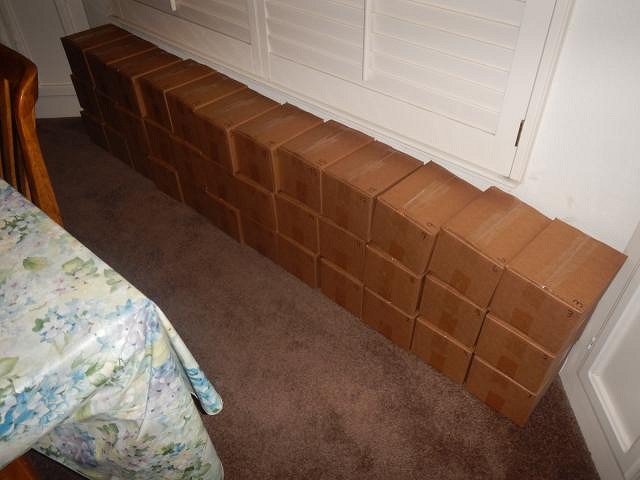
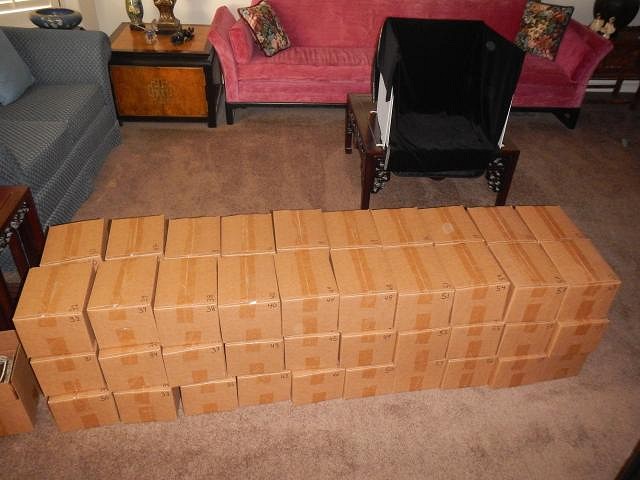
I like to do anything I can ahead of time. So I asked Dan to put together all the boxes for the Sacramento Crawl mug. He numbered them too. So when we glaze one we are ready to put it into it's box.
|
|
T

TikiTnT
Posted
posted
on
Fri, May 24, 2019 9:16 PM
Aloha Wendy and Dan! We can't wait to see you two in October (if not sooner☺️). This project looks amazing, and we have one question... Is this a 3 drink vessel? ? We hope so! |
|
S

Sandbartender
Posted
posted
on
Sat, May 25, 2019 5:55 AM
This is so cool to watch! You and Dan are a well oiled machine. |
|
D
danlovestikis
Posted
posted
on
Sun, Jun 30, 2019 12:46 PM
TikiTnT I've never made a drink since my honeymoon and 50% vodka and 50% orange juice just made me very ill. Tell me how much volume in cups and I can see how many drinks it will hold. It is smaller than the volcano from last time. I have your numbered mug labeled for your pick up. Sandbartender I couldn't get it done without him. Yesterday I took a mallet to the jugs of slip and I still couldn't get them loose enough to open. Wendy |
|
D
danlovestikis
Posted
posted
on
Fri, Jul 5, 2019 8:55 PM
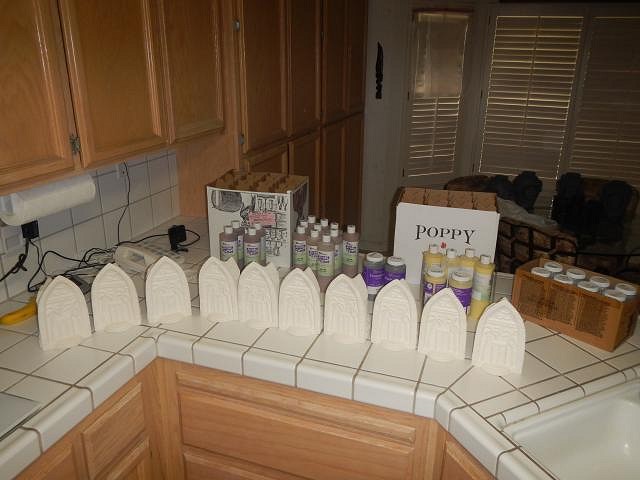
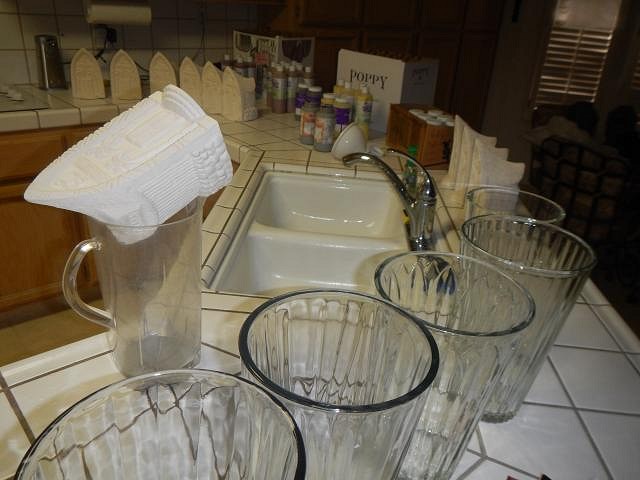
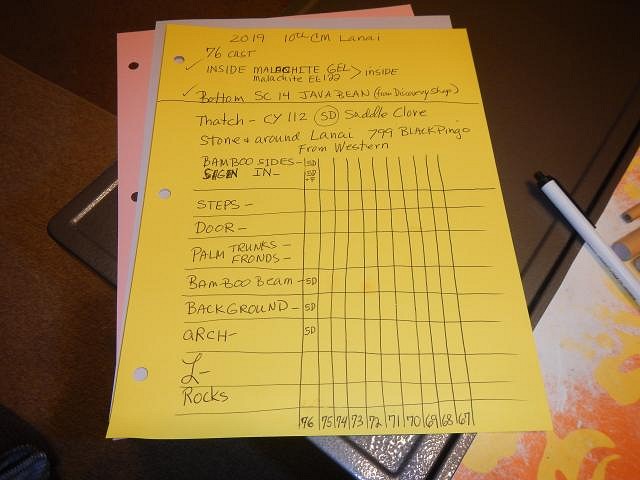
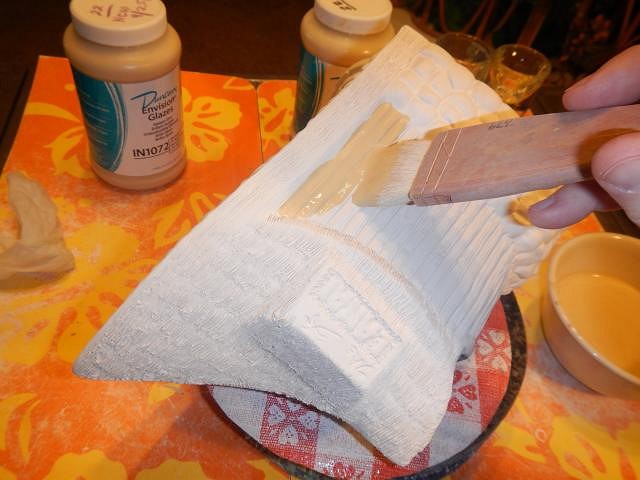
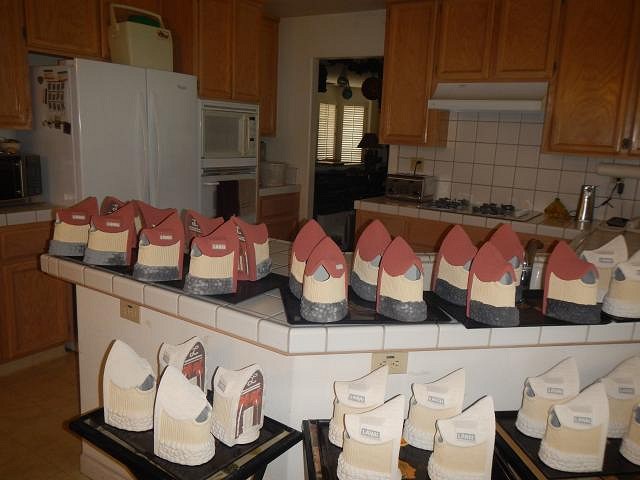
It is now time to begin the photos to show the glazing of the crawl mug. There's so much to the story that I have removed all the glaze testing photos for now. I will just show what I did to get the run done. These photos were taken April 5, 2019 through April 11, 2019. Just a few photos of so many steps taken on those days. So much clean up that doesn't show at all. I get all the glaze and mugs set up to go. First all the mugs had water run inside and out so that the glaze would stick. Then I poured in the glaze let it sit for 30 seconds and then poured it back out. Dan started putting the boxes together so that we would be able to keep working at all times. Eventually all 76 mugs had the inside portion done. On a different day it was time to do all the bottoms. These mugs got carried all over the house while in progress. Dan finished putting the boxes together and then numbering them. I leave a box on the bottom unglazed so I can number the mug in this spot. More insides are done. Now I prepped for the glaze tests by making a chart so I can keep track of what glaze was used where. I can see now why there have been so many mugs that are all brown. This is most of the mugs. On their sides so the the bottoms can dry. Wendy |
|
D
danlovestikis
Posted
posted
on
Sat, Jul 6, 2019 10:15 AM
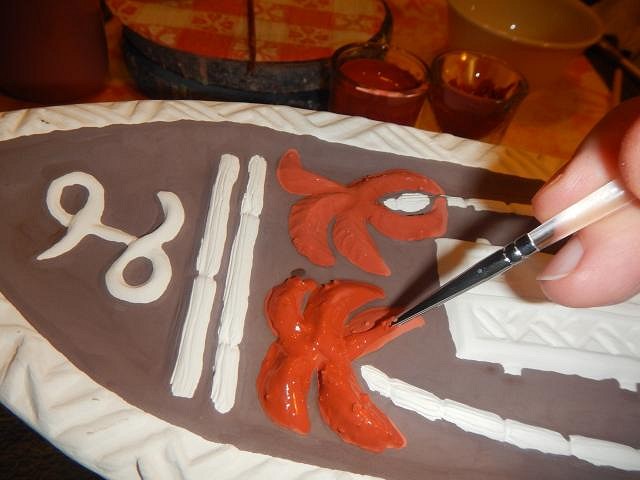
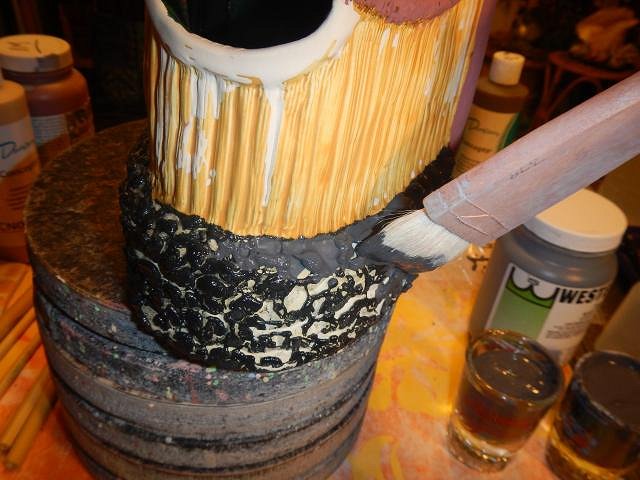
More photos of the steps to glaze the Sac Ohana Tiki Bar Crawl 2019. These were taken from 4/18/19 though 5/12/19. So while it looks fast in photos it wasn't and my kitchen was a tiki factory for a long time. All the clichés are true. One foot in front of the other, one step at a time, never give up. It's all worth it. In the end I get smiles, hugs and oh yes a payday! This mug required many glazes and types of glazes. I had a list like this for every test mug. Notice Scrabble taking a nap? I love this cat. I started off with a Duncan In glaze called Baroque Gold. It's used to show detail. Do a layer let it dry and do another layer. A couple of weeks later I had them all double layered and drying. During the tests I had tables of glazes that I tried out on this mug. I finally got it right. I used a CN brown glaze by Duncan for the front. I also decided not to use a brush but to use a squeeze bottle. It was much faster. I filled up the front with the glaze but I had to keep it on it's back until they dried so that the glaze didn't run. By 5/12/19 I had a lot of fronts with the brown glaze in place. We have only just begun. Dan doesn't do glazing, he is my heavy lifter. Wendy |
|
D
danlovestikis
Posted
posted
on
Sun, Jul 7, 2019 8:48 AM
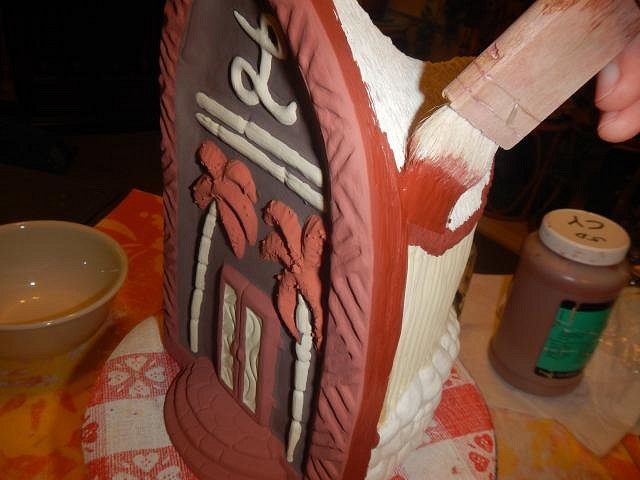
More work to show. These photos were taken 5/13/19 through 5/16/19. You can get a lot done if you work 14 hours a day. Continuing on with doing more of the brown glaze on the front of the mugs. Each of these had to dry on their backs until they could be put upright without running. I do one really thick layer so that one will be enough. That's why it take a long time to dry. Palm fonds were done with a Jungle Gem Mayco Glaze. These next three photos show how many times one mug is carried to the glazing table and then back to the kitchen. I had to become a weigh lifter. Each mug is around 3 to 4 pounds. When the palm fronds were finished on all the mugs I moved on to do the door with a IN Duncan glaze which shows detail. Then I did the bamboo beams and the palm trunks. The last using that glaze was the L for Lanai. Thank you for watching the steps for my last Sacramento Crawl mug. This is the tenth and the hardest to glaze of all I've made. Cheers, Wendy |
|
K

KBP
Posted
posted
on
Sun, Jul 7, 2019 6:17 PM
The mugs look amazing! Can't wait to get mine. October will be here before we know it. |
|
D
danlovestikis
Posted
posted
on
Sun, Jul 7, 2019 7:44 PM
KBP you are so right, time goes by so fast. It's going to be so much fun. This is my 10th and last crawl mug. Next year Mahalo Tiki will take it on. I've taught him glazing and mold making. He's ready to start. Cheers, Wendy |
|
D
danlovestikis
Posted
posted
on
Mon, Jul 8, 2019 9:13 AM
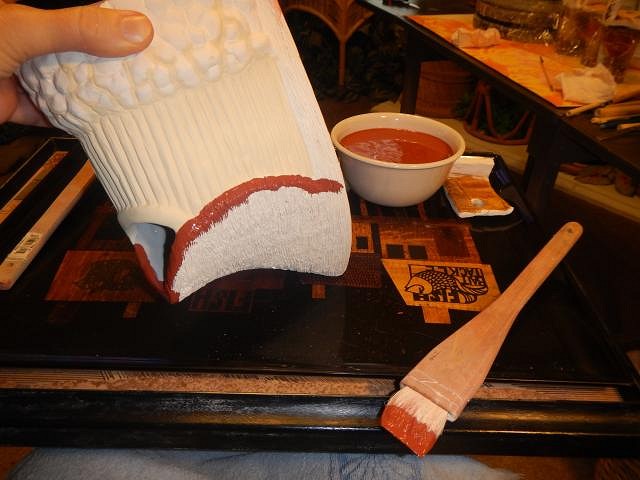
More steps on the Sacramento Crawl mugs. Ideas evolve and we keep on making progress. I collect Couroc Trays. They are sturdy works of art that are perfect for carrying my supplies and my projects. In this photo after glazing the doorways I taped the mugs in place so they would stay in this position while drying. If Dan is with me I have him hold the first three and then I transfer those and the last one to a tray. I tape them and then he carries the tray to the kitchen to add to those I've already done and to bring me new ones. When I find a jar of glaze that has dried out I put it in a bowl, add water then I use one of these drink mixers that I've found in a thrift shop. They do a great job of blending the glaze back to the right consistency. After using a brush on a few doors it occurred to me to get out the squeeze bottle so I could do them faster. Next it was time to work on all the doorways, lanai and the trim around the outside.
Four done and so many more to go. Also remember it's two or three times each area is glazed in these colors. Weight lifting for Dan and I is all about the mugs, Wendy |
|
D
danlovestikis
Posted
posted
on
Wed, Jul 10, 2019 8:48 AM
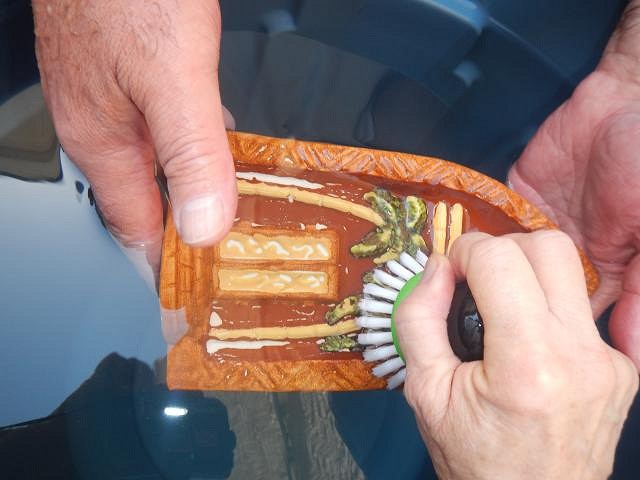
More steps accomplished. Photos 5/16/19 to 5/21/19. Some of the yellow In glaze ran down into the rocks at the bottom. This will cause me a problem in the future. Time to use the squeeze bottle again. It's so much better than a brush. I did the area around the LANAI sign. Dan is always the star of my show because I control the camera. Next up was to start on the thatch roofs using CY Saddle Clove glaze by Duncan. I tired to make this mug easy. I failed. I just kept at it one by one. When they dried I would go over each roof and where I found tiny skips I re-glazed in those tiny places. I hope you are all having fun going though the steps with me, Wendy |
|
D
danlovestikis
Posted
posted
on
Fri, Jul 12, 2019 9:38 AM
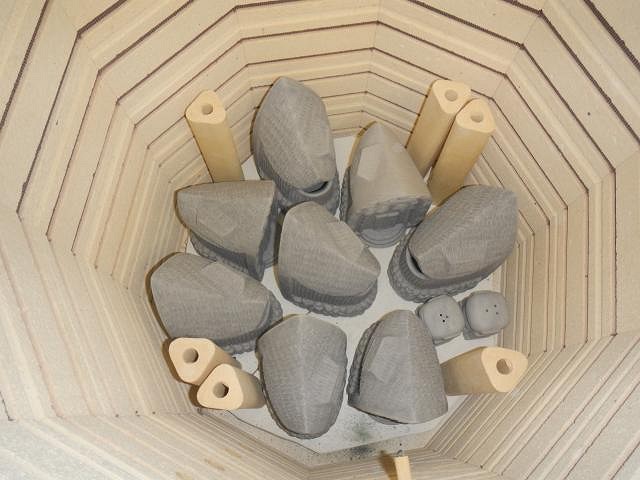
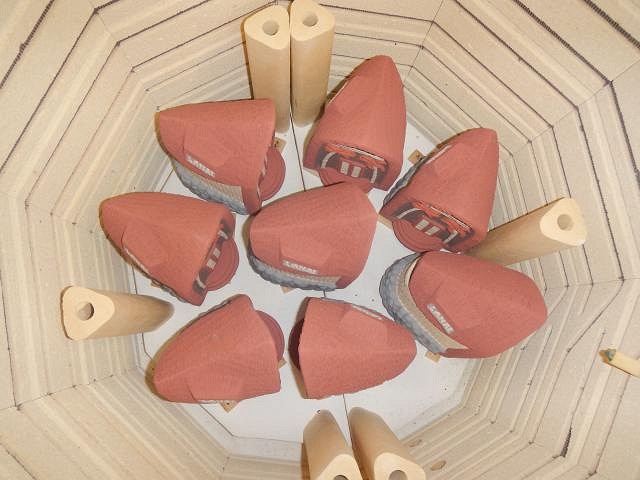
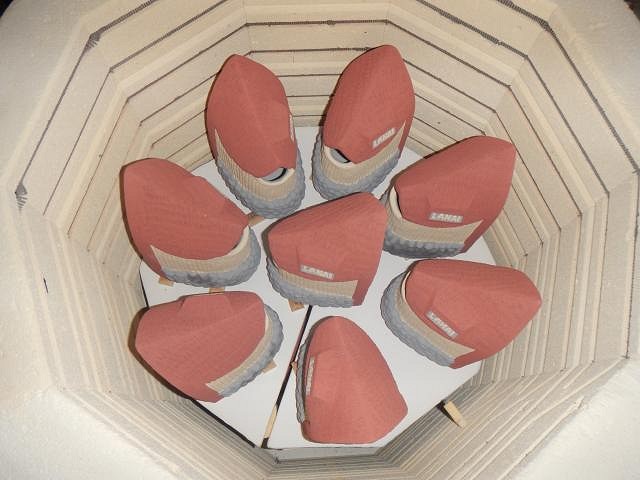
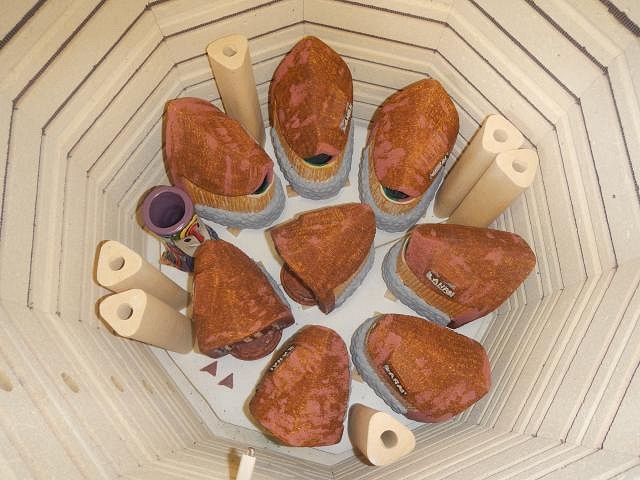
These progress photos of the Sacramento Crawl mug were taken 5/16/19 to 5/17/19 however I missed taking photos of the work for some steps. I just got tired. I glazed the name of the mug LANAI on all of the run after the black background dried. Next I did two layers of black pingo on the rocks at the bottom on all of the run. The first set of completely glazed mugs went out to dry. Horrors the pingo cracked. That means that I dried it too fast. Now there will be skips at the bottom. More work but easy to fix with elbow grease. I loaded the bottom and then put in the first shelf. I used my camera to check to make sure none of the roof tips were touching the shelf. Then I loaded the top layer. So now I'm on the way with the first load of crawl mugs ready to fire the first time. Wendy |
|
D
danlovestikis
Posted
posted
on
Sun, Jul 14, 2019 6:49 PM
These photos were taken from 5/20/19 to 5/22/19. After the kiln cooled It was time to open it and to remove the mugs. I could already see that the pingo glaze on the black rocks had dozens of glaze skips. So already I knew that I would be re-glazing and re-firing all of these mugs. But the big shock was to see that the Duncan CN glaze has many skips. We scrubbed the mugs in 40 degree water this past winter and maybe we didn't do a good enough job. All these problems can be fixed with more work. There wasn't a good solution because all the fronts of the mugs were all glazed and many of the rocks too. The next load was dry so into the kiln one layer at a time. Then I put Dan to work with the dremmel. Some brown glaze poured over the L on the front so I needed that removed. When the mugs come out of the kiln I scrubbed them again to remove the dust that caused the glazes to crawl. The next load out of the kiln had the exact same problems. More scrubbing in preparation for re-glazing. More mugs are waiting for the next steps. What a way to retire from the crawl mugs. Number 10 is a dozy! Wendy |
|
D
danlovestikis
Posted
posted
on
Tue, Jul 16, 2019 7:56 PM
These photos were all taken on 5/23/19. No matter what I have to just keep on going. I have a deadline for the Sacramento Crawl. The first weekend in October. As I lifted them onto Couroc trays, the best ever work trays for my ceramics I inspected each one. Even the very best one had multiple spots to re-glaze. I know now that I will do every mug twice. There were skips in every glaze color. Each mug had to be scrubbed to remove the dust.I just did one right after the next. Then it was time to glaze. In this shot there are problems with the sign, the bamboo sides and the rocks. I sure hope I've scrubbed all the dust off each mug. I did do more work on the sign to make it better. I have now glazed the word The and the tiny palm tree. I will do that for every mug. One by one I will get them done. However I have yet to see if they are fine after the second glazing and firing. I was hopeful. Cheers, Wendy |
|
D
danlovestikis
Posted
posted
on
Thu, Jul 18, 2019 8:03 PM
These work photos were taken 5/23/19 to 5/26/19. After they had all the different glaze issues re-glazed they went into the kiln to fire when there were dry. Bottom shelf and top shelf. When they came out in when another load. The mugs were in so many stages but I was doing my best to see if I could actually finish a mug. Some mugs were far worse than others but after scrubbing I just did the work to re-glaze. I did all the brown glaze first. Then the doorway and bamboo sides. Then the rocks. If there were any tiny missed spots on the roof I fixed those too. I loaded the kiln as I went. When it was filled I fired. After the second firing I examined each mug. The flash glare shows up as white but I didn't have any skips the second time around. I just keep at it day after day. These are the most touched up mug I've ever made. In the end it's worth the trouble. Cheers, Wendy |
|
D
danlovestikis
Posted
posted
on
Sat, Jul 20, 2019 10:58 AM
ost of my photos will not seem repetitious because they are. These are Progress Report photos as I keep glazing, firing, re-glazing and re=firing. But you know I can't help but share. Thank you all for taking time to view them. Wendy These photos were taken from 5/26/19 to 6/2/19. So I loaded the kiln. When it finished I saw that the cones on the shelf that were 05, 06 and 07 had melted showing the kiln to be over heated. This will need to be fixed. Maybe that's the problem? Every mug that was fired for the first time had skips that could have been caused by dust. To out to the yard they went. We re-scrubbed every white spot so that the glaze the second time around would stick. Re-glazing the Pingo. Then into the yard to dry. They can't have direct sun on them or the glaze will crack and that will cause more skips when fired. I began to wonder if the yellow glaze that had run onto the rocks was the cause of the black pingo skipping so badly. So I scrubbed it off and then re-glazed the bamboo leaving it on it's side to dry so that the glaze would stay off the rocks. After doing a couple I gave this up. Too hard to do. I'd rather just re-glaze the pingo. I continued to glaze more mugs for the first time. However I had done all of the fronts in a marathon and that's why I couldn't go back and re-scrub after the failure of the first batch. Oh well! When I re-glazed the fronts I kept them like this to dry. Work all the time and you get a lot done. Wendy |
|
D
danlovestikis
Posted
posted
on
Mon, Jul 22, 2019 9:27 AM
=================================== I confess. I've been negligent in putting the temperature cones into the kiln when firing. I finally did it. You want the cone to bend like the first one. However that's on 05 and I'm firing at 06. My kiln is firing too hot. I still think the problem was dust but I need to install a new thermal couple. Meanwhile I will fire at 07 to cool it down. Kilns fire like this: 08 07 06 05 04 03 02 01 0 1 2 3 4 5 6 etc. So 07 is cooler than 06. Glazing. Glazing. Firing. Firing. The mugs go to so many locations as the work is done. Out of the kiln. Even with the lower temperature the same skips are showing up. Fire. Scrub. Glazing. Fire. Fire. Those having fired twice and looking pretty good now. After the first firing it's back to the glazing table. There's so much work to do however I am seeing the end coming closer. Wendy |
|
D
danlovestikis
Posted
posted
on
Tue, Jul 23, 2019 9:24 AM
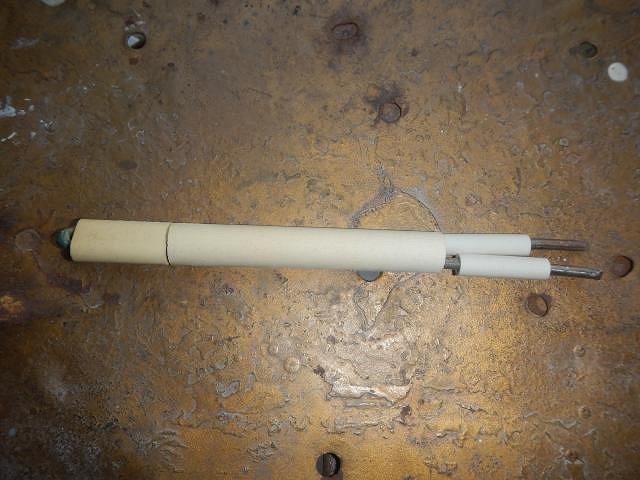
Back to work on the production of the Sacramento Crawl mug for October 2019. Once again the cones that are too melted are the 06 cones. Those that are just bent over are the 05 cones. The kiln is firing too hot. So even though that proved to not be the reason for the skips it is time to change the thermal couple, which measures the heat level inside the kiln. The part that is sticking out is the thermal couple. I need to remove it and put in a new one. Dan removed all the screws for me and opened the box. The thermal couple is right in the middle of this mess. I'm pointing to the two ends of the thermal couple. The two screws holding it in place are lessened and then I just pulled it out from inside of the kiln. So this is now garbage. I reversed the process and installed a new one. Since I was still worried as to whether this fixed the heat issue I put a line up of cones to check. The first is O5, the second just bent over is the 06 and the last one badly melted is 07. Fixed? NO because I fired at 07 just in case. So it's still too hot. But since I can just fire one number down I'm not going to worry about it. Problem solved. Wendy |
|
D
danlovestikis
Posted
posted
on
Thu, Jul 25, 2019 10:37 AM
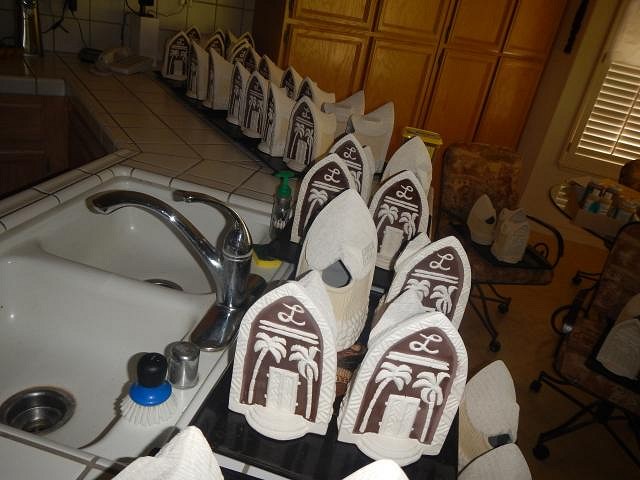
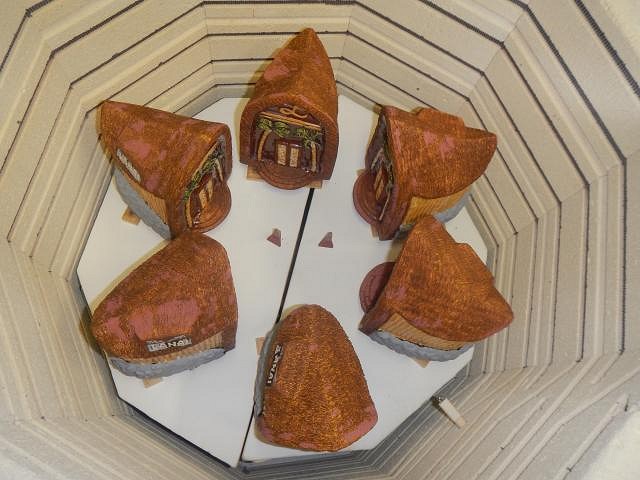
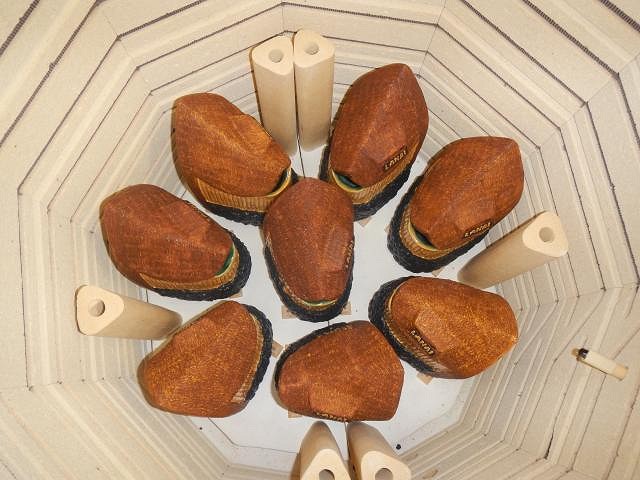
Progress Report on the Sac Ohana Tiki Crawl mug for October 2019. My last and tenth crawl mug. I'm ready to pass the torch to Mahalo Tiki. I will in the future stick to my own projects and the Wish List. I'm scaling down my work load. This is my hobby not a business. These photos were taken from 6/5/19 to 6/10/19. I filled up the kiln shed with mugs to dry. Then they were loaded into the bottom layer and then top layer to fire for the second time. Dan doesn't do art but he helps me do all the heavy lifting and clean up. He makes it all possible. Time to unload mugs that have fired twice and are now almost done. Next load re-glazed and ready to fire. Out of the kiln and ready to go into the house. All the skips are gone. The white you see in the photos is from the flash. The last few mugs needing to be fired are into the kiln. Done! Done! I can't believe they are all fired and the skips are all gone. The last load of crawl mug have been removed from the kiln. This will be my last photo of Scrabble in my house. Busted for keeping her too many hours. Now I have to be good and just play with her outside. All the mugs have been glazed twice and fired twice. They will each be tweaked next so stay tuned for that! Cheers, Wendy |
|
D
danlovestikis
Posted
posted
on
Fri, Jul 26, 2019 9:57 AM
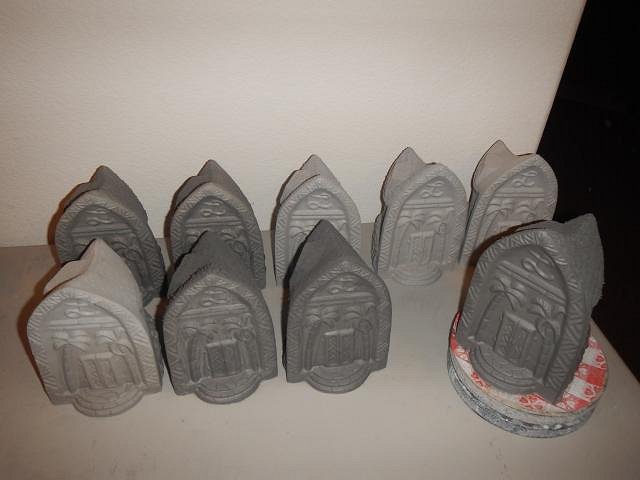
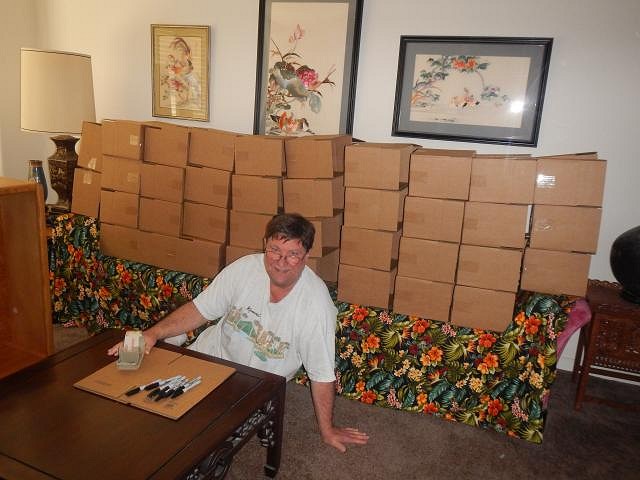
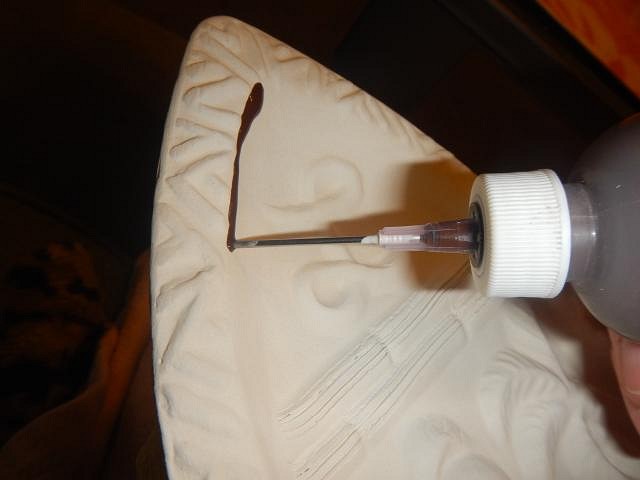
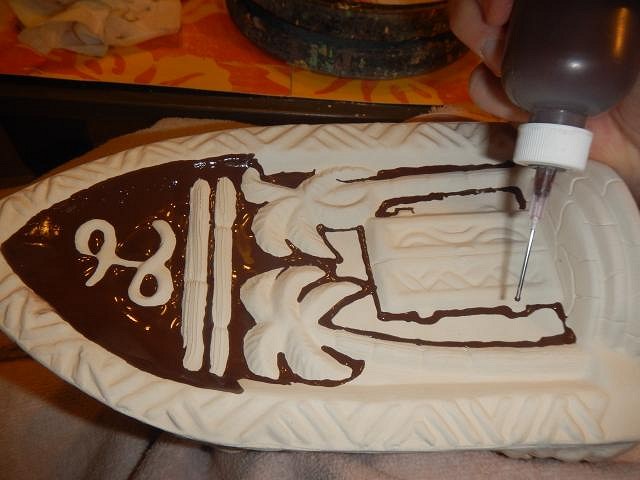
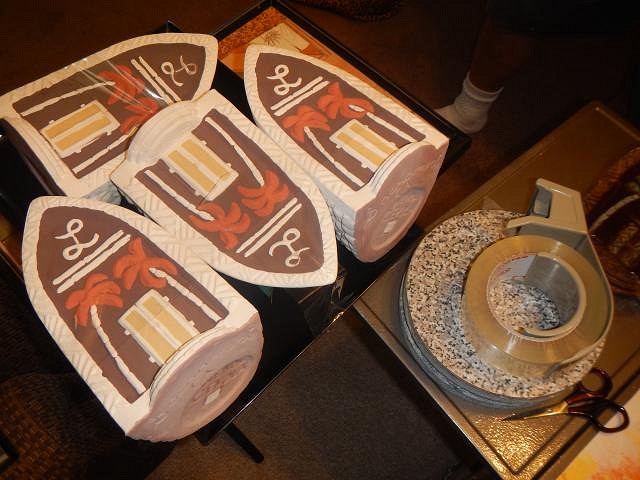
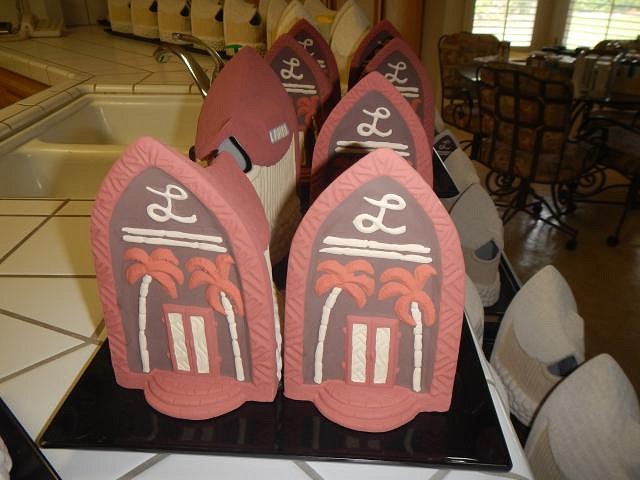
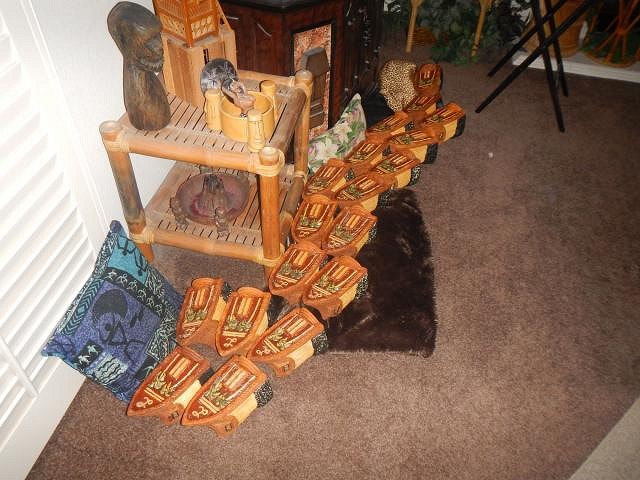
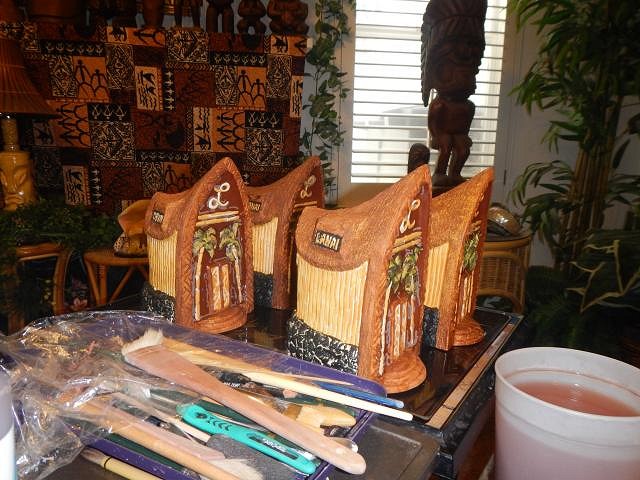
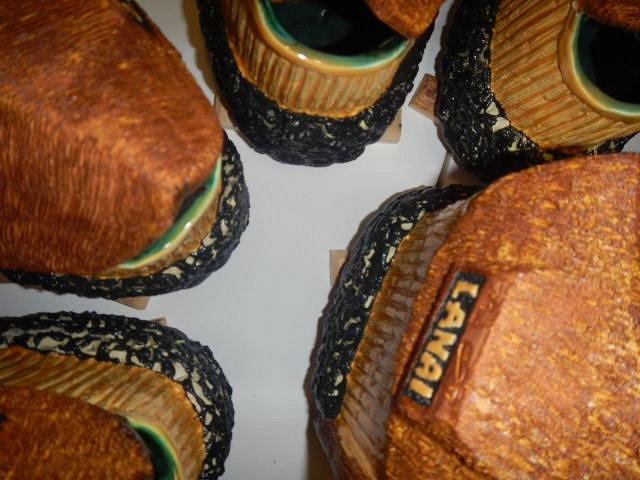
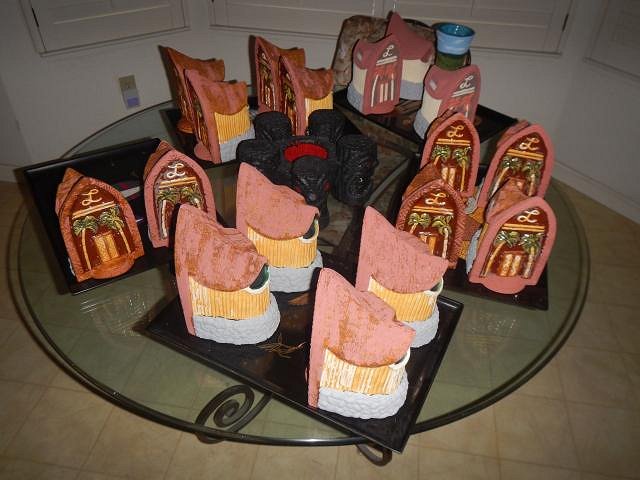
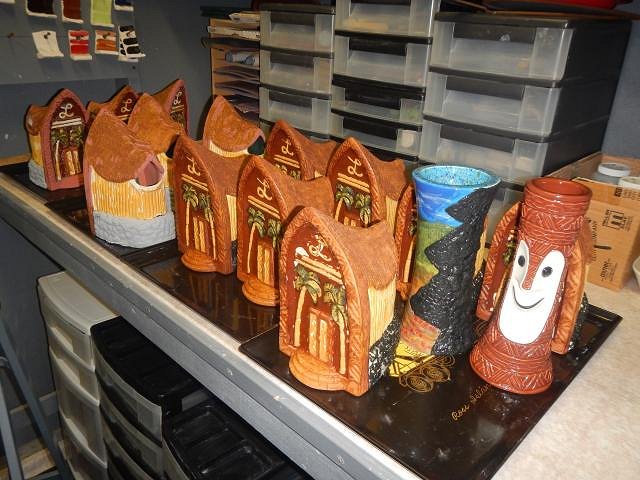
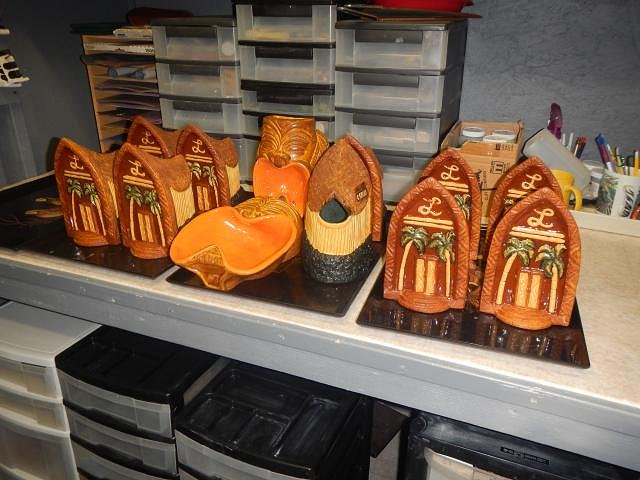
The Sac Ohana Tiki Crawl mug for October 4th, 5th, and 6th, 2019 is finished! Actually I was done on 6/13/19. I've been glazing ever since so I'm not going to run out of photos to post. Here are the last production steps. Some of the glaze ran a bit outside of where it belonged. I decided to use automotive pin stripping paint in gold to fine tune the mugs. I chose the areas that made the mug better so it also went where it wasn't even needed. I started with the name LANAI. Then I did the L, the cross beams, the palm trunks and the door frame. See how well the second glazing and firing filled in all the skips. One by one I carried them to my work table and did the painting. Done! I'm done! I'm really done! This is my last crawl mug. I did 10! It's fun to see these all together. There is another table with the glaze tests. Close up. All the glaze skips went away with a second glazing and firing. I'm such a happy artist. Next I did the photo for the signature card. I sat down and went to work with a gold pen. All the cards were numbered and put with the mug. I had to spread them out to dry. No smears allowed. Once the cards were done I matched them to their boxes and mugs and we packaged them up. We did a good job of protecting the mugs so that these can go into a second box for shipping after the crawl. No more deadlines. Now I will work on the Wish List and my own SMALL projects. It's been a fun run. Now Nelson Parker aka Mahalo Tiki will take over for 2020. Cheers, Wendy |
|
D

Dr.TikiMojo
Posted
posted
on
Thu, Aug 29, 2019 5:34 PM
** 10 years of amazing Tiki Mugs, touring beautiful home Tiki Bars and Tiki Homes, bonding with local Ohana and making new friends, while enjoying delicious foods and wonderful drinks. Wishing a million Mahalos to everyone that made this crawl possible from the beginning to the present! ** :drink:
|
|
D
danlovestikis
Posted
posted
on
Wed, Sep 25, 2019 8:33 PM
Wylee Raven it sure is fun to see shelves with my crawl mugs. It's sad that this is my last one but I look forward to seeing what Wendy |
|
KD

Kapu Dru
Posted
posted
on
Sat, Sep 28, 2019 9:24 AM
Wendy - can we prepay for a mug this year? Or is it pay when pick up? |
|
D
danlovestikis
Posted
posted
on
Sun, Sep 29, 2019 9:08 AM
The Sacramento Crawl 2019 is gearing up to start on October 4th, 5th and 6th. If you are attending and I hope you can all come and have some Ohana Love, Wendy |
|
D
danlovestikis
Posted
posted
on
Sun, Sep 29, 2019 9:08 AM
Kapu Dru I've sent you a Personal Message. Wendy |
|
D
danlovestikis
Posted
posted
on
Fri, Oct 4, 2019 8:45 AM
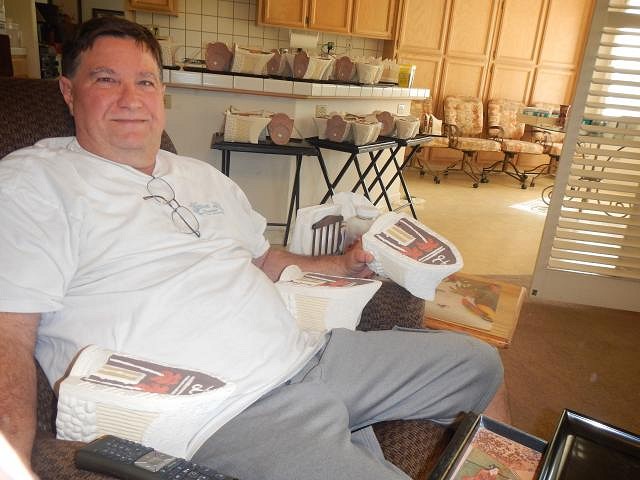
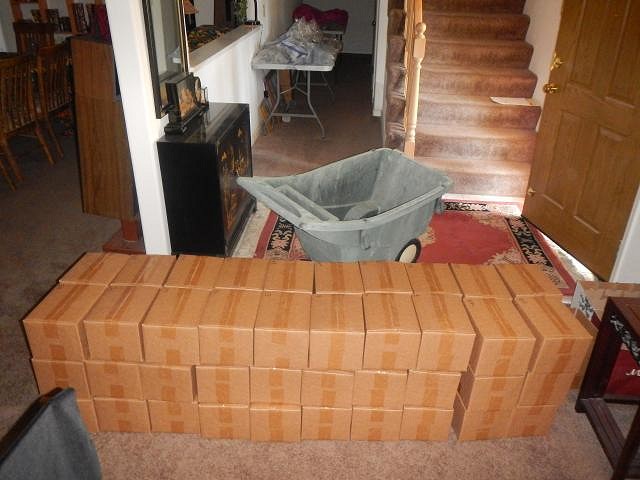
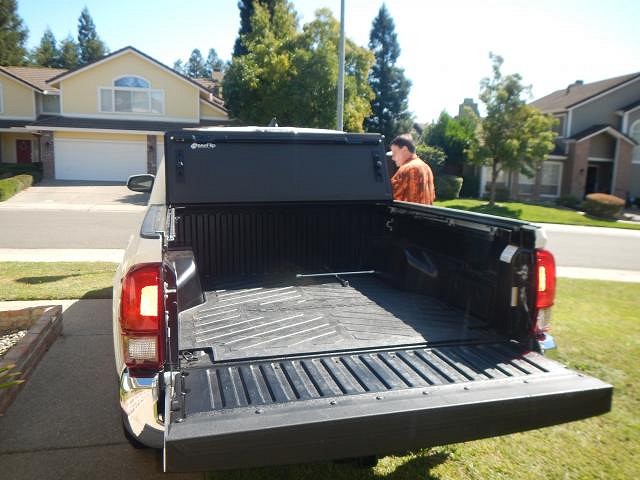
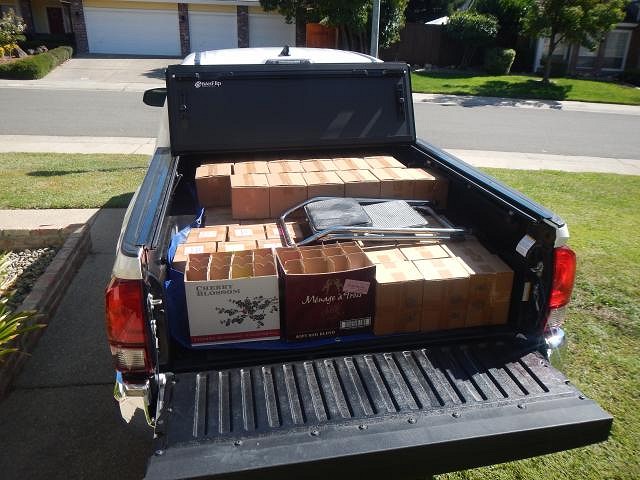
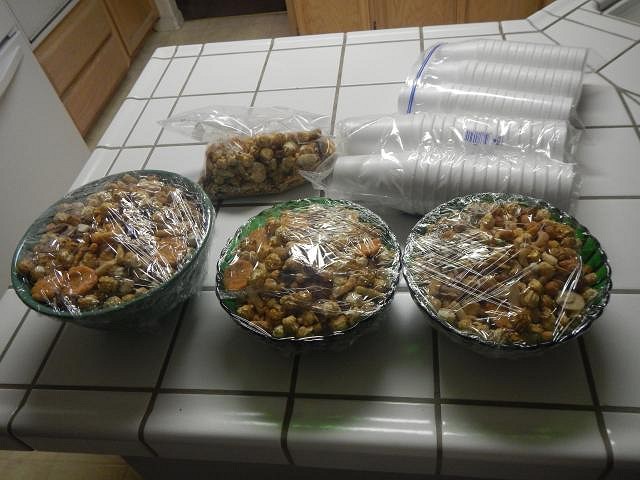
The Sac Ohana Tiki Crawl 2019 starts today!!! We have loaded the truck. I moved all the boxes of mugs near the front door. They are lined up in order for loading into the truck. Dan figured out to bring in the gardening wheelbarrow to haul them in mass. We backed the truck up on the lawn. This past year we traded tiki sales money to get a new Toyota Tacoma. Last year we did the same thing and got a Toyota Camry. We had no idea that our tiki collection was also a retirement account! My job was to put all the mugs in order so I can find them easily for handing them out at the crawl. This is the same truck kind of truck that Thor took to Tiki Oasis and had stolen. I am staying with the truck a lot of the time during the crawl but it also has a very loud alarm system. Whylee Raven and Eva are doing all the cooking for their spot on Sunday. I contributed money but I needed to also bring something so I made big bowls of Chinese crackers, nuts and popcorn for those who like to munch! I wish you could all come to the crawl. I will try to get some good photos to share. Boy am I behind in posting. Cheers, Wendy |


Pages: 1 46 replies