Tiki Central / Home Tiki Bars
Vitu Waitui
|
E

ECTiki
Posted
posted
on
Tue, Aug 22, 2023 1:11 PM
in reply to MadDogMike
Thanks Mike. I appreciate all of your kind words. |
|
E
ECTiki
Posted
posted
on
Wed, Aug 23, 2023 2:59 PM
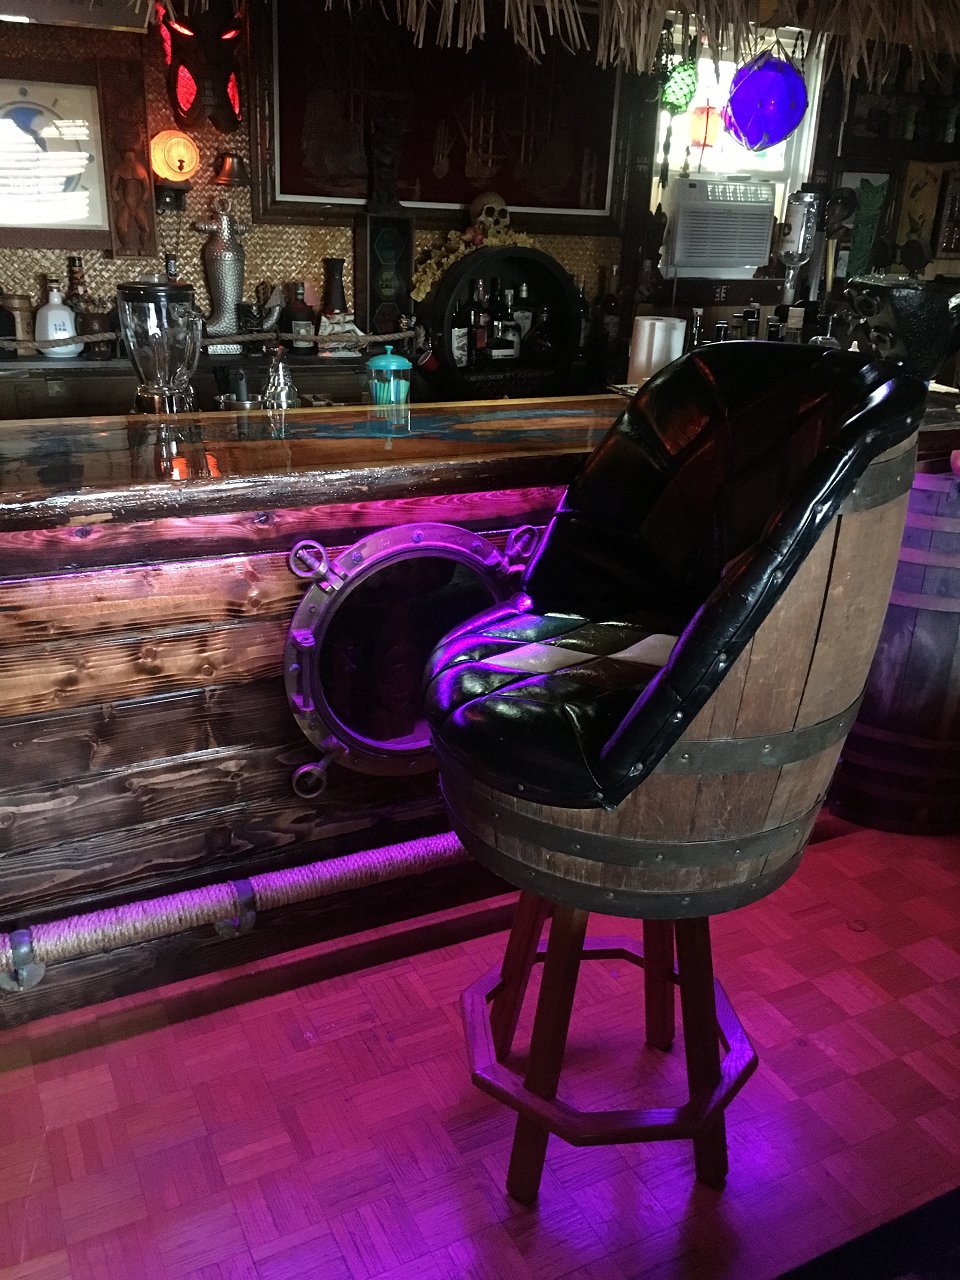
So barstools. I suppose you cant have a bar without barstools. I started with the standard rattan barstools with tropical fabric on the cushions. I never felt like these styles of barstools were very comfortable or very sturdy. The patrons of Vitu Waitui have been tough on barstools. I always liked the 70's style barrel pub chairs manufactured by Bothers of Kentucky. There was one significant problem with the chairs.....They weren't bar height. My solution, find some bar height bases and bolt the barrel seats to the frame. Because of their size it reduced the number of butts that could be at the bar. They are however much more comfortable.
[ Edited by ECTiki on 2023-08-23 15:02:01 ] |
|
M

MadDogMike
Posted
posted
on
Thu, Aug 24, 2023 7:41 AM
Stencil "RUM" on the barrel back and you are full tilt Tiki! |
|
E
ECTiki
Posted
posted
on
Tue, Aug 29, 2023 3:18 PM
Ceiling - check. Bar - check. Pool table - check…. On to the walls. I decided to line the walls with bamboo slats. I started next to Lego and worked my way around the walls clockwise. After some trial and error, I think mastered working with bamboo. Ok, well maybe I haven’t mastered it, at least I’m not apprehensive to work with bamboo slats anymore. Some things that I found helpful working with bamboo slats:
Full round bamboo is different monster all together. I have watched craftsman in the tropics make precision lengthwise splits with machetes. I quickly learned that what they make look easy, isn’t. Absent some technique the cutting edge tends to migrate to one side making for uneven cuts. More on that later….
|
|
E
ECTiki
Posted
posted
on
Tue, Aug 29, 2023 3:22 PM
I used “carbonized” bamboo slats as baseboard and ceiling joint trim. I don’t think I have a picture of it, but it definitely helps it look finished. |
|
T

TheTackyTiki
Posted
posted
on
Tue, Aug 29, 2023 3:24 PM
Looking great man... keep them pics and updates a coming. |
|
E
ECTiki
Posted
posted
on
Fri, Sep 1, 2023 4:59 PM
Once I had the bamboo slats all across the corner it was time to put the decorations back up. Here is how the southwest corner looks today.
|
|
U

UnkleChewie
Posted
posted
on
Sat, Sep 2, 2023 12:57 PM
Looks great! I'm still going back and forth between bamboo slats or half round poles for the wainscotting on the back wall of my patio. |
|
E
ECTiki
Posted
posted
on
Mon, Sep 4, 2023 8:46 AM
I prefer the way the half rounds look. Plus, half rounds allow for the hiding electric cords. But slats are sooooo much easier to work with. |
|
E
ECTiki
Posted
posted
on
Sat, Sep 9, 2023 8:59 AM
The room I built the bar in originally had giant wide windows on three of the four walls. The north and east facing windows were in filled since light is the “enemy” of tiki bars. The west facing window (A giant 4x12 beast) overlooking the valley and great for sunsets was left for the view. It remains the only big window in the room. Wooden shutters attempt to block light. I continued the bamboo slats under the window towards the northwest corner. Not a terribly exciting post but it seems systematic to move around the room clockwise.
[ Edited by ECTiki on 2023-09-11 07:55:55 ] |
|
E
ECTiki
Posted
posted
on
Sat, Sep 9, 2023 12:18 PM
As Vitu Waitui became more popular with our friends we realized that the space was insufficient for the number of guests we often entertained. So my wife came up with the idea of building a deck off of the bar. Guests could hang out on the deck and enjoy the view with cocktails. Finally a crazy idea that wasn’t mine! Her design was adding a 25’x20’ deck outside of the second story bar. One of the 4x10 windows would be the new doorway.….simple right. A view from the outside before we started construction.
|
|
E
ECTiki
Posted
posted
on
Mon, Sep 11, 2023 7:24 AM
In late spring of last year we started construction on the deck. The deck wasn’t supposed to be tiki but since it has been built I’ve been able to sneak a tiki or two into the space. Unfortunately during the build we had to fire our contractor. Long story but the deck ended up taking five months to complete.
|
|
E
ECTiki
Posted
posted
on
Mon, Sep 11, 2023 7:52 AM
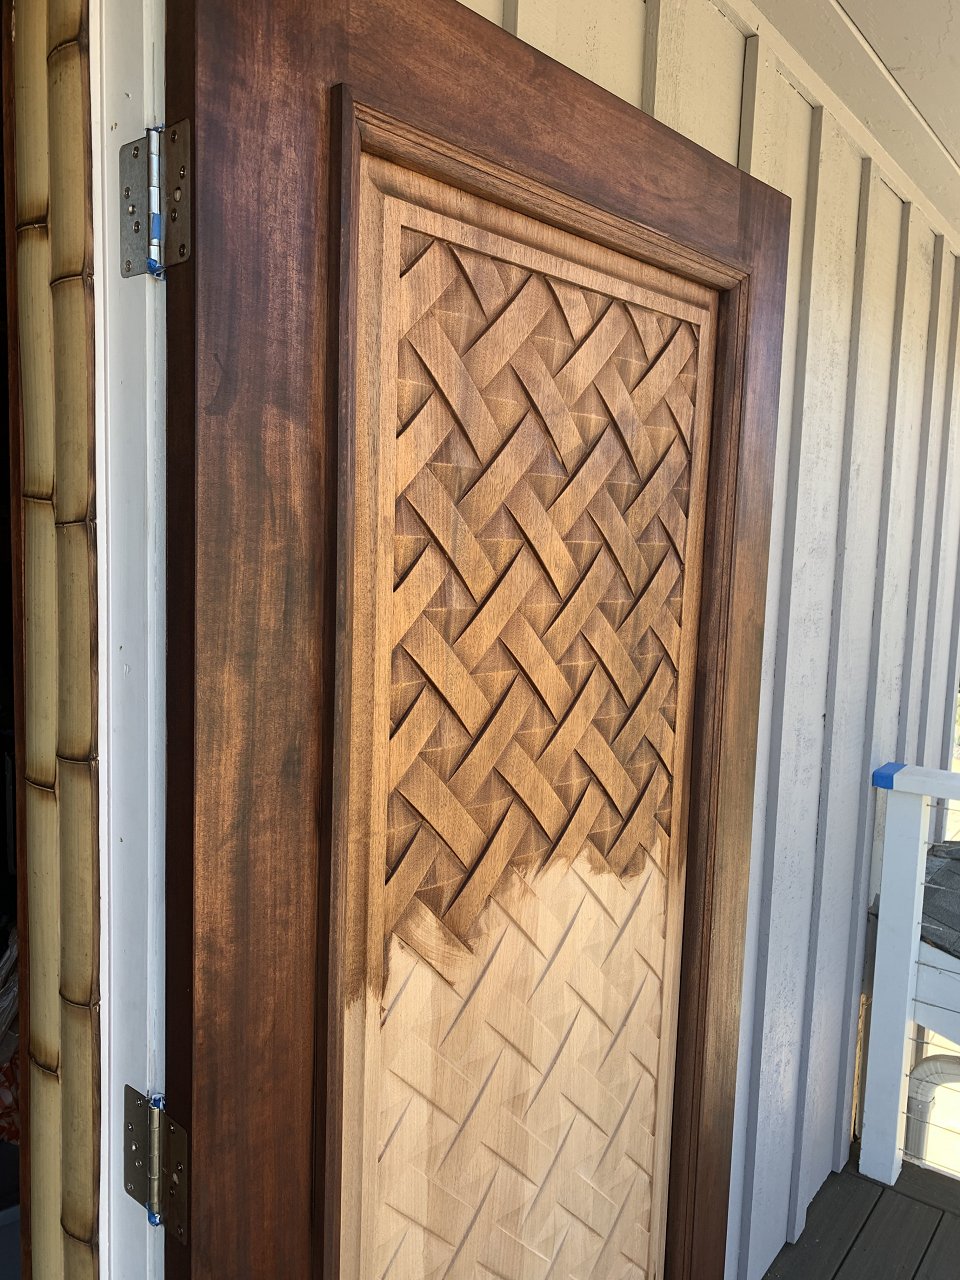
One of the design/decoration aspects of home tiki bars that I always focus on has to be doors. I give a lot of credit to people who find ways to make a doorway camouflaged by tiki. For me those who gloss over the importance of the door miss one of the greatest aspects of tiki. The door is the portal to escape. During my last bar build I used a large Moai decal on a vibrantly colored door to jazz up the doorway a bit. I was neither pleased nor proud of the results. Wallpaper seems to be a common method to blend a conventional doorway. I’ve also seen dark wood stain and bamboo slats used to skin a door’s surface. For some odd reason the doorway for me is the portal to the escape and sets a tone. For example (to me) the entrance door at Don the Beachcomber had a very “escapey” feel to me. When I compare the doorways of the two juggernaut tiki bars in Vegas. The Golden Tiki’s door feels like you’re entering someplace special, while Frankies (one of our favorite bars ever) just feels like the way in… So, we needed doors to access the new deck placed in the spot where the window had been removed. We wanted the doors to be special. We found some very interesting doors in our search. Our design was for a set of double doors. Based on our budget and timeline we opted for some commercially available mahogany doors….
|
|
M
MadDogMike
Posted
posted
on
Mon, Sep 11, 2023 1:42 PM
Looks great! I agree about the door being a portal. I like what you have chosen. Another technique that can work, depending on your space, can be a faux plank bridge or a winding trail through the plants |
|
T
TheTackyTiki
Posted
posted
on
Mon, Sep 11, 2023 7:52 PM
Man you are not messing around... it is really looking awesome... congrats. |
|
E
ECTiki
Posted
posted
on
Tue, Sep 12, 2023 1:42 PM
Thanks for the continued support Mike and Tacky. I like both ideas related to the entrance. |
|
E
ECTiki
Posted
posted
on
Tue, Sep 12, 2023 1:42 PM
Thanks for the continued support Mike and Tacky. I like both ideas related to the entrance. |
|
E
ECTiki
Posted
posted
on
Tue, Sep 12, 2023 1:44 PM
During the really long completion time of the deck, the bar was essentially down. So many cocktail opportunities missed…sigh. The original contractor hung the doors with an aluminum threshold. I guess we didn’t pick a contractor with an acute sense of detail. So we started looking for a door guy that could make a new threshold out of similar mahogany the doors were made from. We found one but he said since it was such a small job we would have to wait until he had time. We agreed….. and waited. While we waited I continued working on the interior walls where the window had been. After filling with insulation and some matching depth plywood it was time for more bamboo slats.
|
|
E
ECTiki
Posted
posted
on
Thu, Sep 14, 2023 7:01 AM
Once we had the threshold issue resolved (and about a dozen other F-ups from our inept contractor) it was time to dress up the doors with some stain and Oceanic Arts door casing previously around the large window and salvaged from the destructive path of the deck contractor. (Can you tell we’re still upset with him? Maybe I need a Mai Tai to calm down) 🍹
[ Edited by ECTiki on 2023-10-10 13:26:06 ] |
|
E
ECTiki
Posted
posted
on
Thu, Sep 14, 2023 7:10 AM
Now that the door was stained and cased, it was time to build a bamboo overhang to match the “roof” over the bar. In my mind this would give the doorway texture against the otherwise flat wall.
|
|
T

Tikifrog
Posted
posted
on
Fri, Sep 15, 2023 9:22 AM
Your bar is amazing! And this is such a large space, I'm jealous!!!! |
|
E
ECTiki
Posted
posted
on
Fri, Sep 15, 2023 2:04 PM
in reply to Tikifrog
Thank you Tikifrog. I appreciate the compliment. Hopefully when you’re in SD we can have you over for a cocktail. |
|
E
ECTiki
Posted
posted
on
Fri, Sep 15, 2023 2:08 PM
A quick coat of Amber Shellac and the overhang was ready for thatch.
Once the thatch was installed I used some tapa cloth on the back wall for texture then hung four LED lit puffers in the overhang space.
And, since there was already so much Disney’ish stuff in the bar I figured a Jolly Roger over the door header wouldn’t be “Over the top.”
|
|
B

BeachcomberNC
Posted
posted
on
Sat, Sep 16, 2023 2:04 PM
I continue to be amazed by your build. Not enough space? Just add a giant deck, obviously. The dark stain on the doors really makes the detail pop. |
|
E
ECTiki
Posted
posted
on
Sat, Sep 16, 2023 2:56 PM
Your reply had me laughing. Thanks Beachcomber! |
|
E
ECTiki
Posted
posted
on
Mon, Sep 18, 2023 5:52 AM
So with the deck and the door finished….
We decided to host a Halloween party to christen the deck. We had a stand In bartender who wasn’t worth a shit…
Good thing we had prepared a serve yourself area with batch cocktail’s….But eventually by the end of the evening the little glasses started coming out and the rum supply was tested.
|
|
T
Tikifrog
Posted
posted
on
Mon, Sep 18, 2023 9:05 AM
in reply to ECTiki
Thank you! My daughter is starting at UCSD next week so we might be in SD quite often in the next years :) [ Edited by Tikifrog on 2023-09-18 09:05:45 ] |
|
E
ECTiki
Posted
posted
on
Mon, Sep 18, 2023 10:17 AM
Well TikiFrog let us know when you’re in town and we’ll pour some rum! |
|
M
MadDogMike
Posted
posted
on
Mon, Sep 18, 2023 10:59 AM
Here's a trick I've used before instead of a punch bowl that gets diluted. Batch mix drinks with no ice or dilution and put one serving each in 5 oz labeled and lidded containers. When the guests arrive, they pick their drink, pour it in a simple, screw-top shaker, shake with ice, dirty dump into their glass, and garnish from a garnish tray. The guests feel like a bartender, the chilling and dilution is perfect, with fresh citrus juice they are great for several hours and good for even for a day or two. Superjuice might extend that time even longer. |
|
PP

Prikli Pear
Posted
posted
on
Mon, Sep 18, 2023 1:58 PM
Oh. My. This is absolutely spectacular! One of the biggest things I love about Tiki Central are the home bar build threads and yours does not disappoint. That pool table? Holy moly, that is tiki AF! A true thing of beauty. The deck is magnificent. I applaud your attention to detail and am deeply envious of your animatronics, giant tikis (both fiberglass and not) and the entire immersive environment you have created. Bravo, sir! |
|
E
ECTiki
Posted
posted
on
Mon, Sep 18, 2023 4:20 PM
in reply to MadDogMike
That’s a great idea MadDog. We’ll try that for our next event! |
|
E
ECTiki
Posted
posted
on
Mon, Sep 18, 2023 4:22 PM
in reply to Prikli Pear
Thank you Prikli. I am humbled by your kind words. It’s great we all get to brainstorm together and create our own visions of escape. |
|
PP
Prikli Pear
Posted
posted
on
Mon, Sep 18, 2023 7:07 PM
You know, ECTiki, ever since I started doing the YouTube show lots of folks ask me questions about home bar builds. The one thing I stress more than anything else is "Let the space dictate what the room becomes." That is, don't try to force your tiki room into being just like the Rincon Room or Desert Oasis Room or Forbidden Idol or whatever. Home tiki bars are organic things that should be a reflection of their owners rather than a slavish copy of something someone else has already done (although by all means, take inspiration from those!). Vitu Waitui is a case in point: The ceiling, the lone remaining window, that great tongue-and-groove paneling (that would be a showpiece on its own were it not for the tiki thing) and OH MY SWEET BABY JESUS THAT DECK! The limitations of the interior led directly to the creation of that deck, and if your home wasn't situated perfectly to accommodate that extension it would not have happened. Ergo, it was meant to be. Your home wanted the tiki to extend outdoors into the starry night. All those crazy ideas you're complaining about upstream? They're not really yours--they're your home subtly guiding you. So the next time you start something and your wife raises a questioning eyebrow, you just say, "Sorry, it's not me. This is just what our tiki space wants me to do!" |
|
E
ECTiki
Posted
posted
on
Tue, Sep 19, 2023 2:12 PM
Although the doors to the deck were an important access point, the main entrance to the bar remained a set of stairs from the first floor of the house up to the bar. The first floor entry way needed some flair to set the tone for the entrance to the bar. As I mentioned in a previous post I had to add a first floor bathroom to bring plumbing under the bar area for my long dreamed about sink and drain. The bar stairs were adjacent to an entryway closet and and air handler closet. My idea was to turn the entry way closet in to a bathroom. In my mind this would provide not only the crucial plumbing but also a bathroom close to the bar. This way we could also keep our main bathrooms clean for us. Let’s face it…..men have bad aim….and drunk men pee everywhere. So a dedicated bar bathroom…. Win win! We also moved an air handler which also provided for a small coat closet near the bar entrance. The bathroom needed to have a nautical feel and provide enough uniqueness that it added to the bar ambiance in its own way. Here is the completed bathroom:
And, the bar regulars have their own mugs on the Friendship shelf also located in the entryway. Easy to grab on the way up to the bar....
[ Edited by ECTiki on 2023-10-10 13:28:32 ] |
|
E
ECTiki
Posted
posted
on
Wed, Sep 20, 2023 5:49 AM
Now that we took a visit to “HGTV land” we can get back to the bar. The stairwell entrance was originally decorated with the name of the bar carved into a wooden sign and two wooden masks flanking the sign. One of the masks (pretty special to me) I purchased in 1982 while I was in the Yucatán. Way back then, I was a stoked kid carrying back tiki treasure from an adventure. I’m sure everyone on the plane thought I was “touched”. Anyway, ….And there was a beaded curtain to “conceal” the bar entrance and stairs. During the years we went through several beaded curtains. Apparently rum causes the brain to think beaded curtains can hold the weight of a grown human. Surprisingly, beaded curtains cannot support the weight of a human. (Tested as fact) One day my wife asked me to make a door to hide the bar entrance and effectively turn the bar into a speakeasy. So I started searching online. The Murphy door company wouldn’t make a door to our dimensions and I couldn’t find another supplier. So, I was left to my own devices, scheming and plans. Here is the “entrance” prior to me putting on my thinking cap.
[ Edited by ECTiki on 2023-10-04 13:13:03 ] |
|
E
ECTiki
Posted
posted
on
Fri, Sep 29, 2023 9:12 AM
So how do we conceal a stairway and turn Vitu Waitui into speakeasy in our home? There are quite a few examples of speakeasys here in San Diego to emulate. I think the most elaborate has to be Raised by Wolves. Although not tiki, definitely the most stunning speakeasy entrance anywhere. Since I don’t have an unlimited budget, I settled on a bookcase door as the most logical way to conceal the entrance to our home speakeasy. If I made the bookcase of stain grade wood, then, I could then match the door to the new bathroom and coat closet doors. Maybe, the speakeasy concealment solution would be simple. (Simple, …..funny) Anyway, the stairwell opening was 96” H and 47”W. That would be a massive door, probably too heavy to open once loaded with books. On the internet, I saw several bookcase doors that weren’t. Only spines of books glued to a door to create the illusion of depth. This would save weight…. But ….My brain couldn’t grasp the concept of destroying books for any purpose. Not even my precious dive bar. Plus, there is already a significant loss of knowledge occurring with book banning in our country. So, damaging books, out of the question. The door had to hold actual books. Obviously, the doors had to hold actual books which create significant weight. (Boxes of books are always the heaviest on moving day) and couldn’t require a Herculean effort to open and close the door. So, I came up with the idea for two outwardly opening bookcases as doors. Half the weight for each door. Math by brain could grasp. I couldn’t really reduce the size and weight with a shorter door. I couldn’t lower the header with a soffit…..Well not without risking head injury to drunken visitors when they went down the stairs from the bar. The bookcase doors then, had to be tall. The depth of two bookcases would also be a concern. Although this design would narrow the entrance significantly, I figured there would still be enough room (barely) even for our very portly guests to make it up the stairs. So I built some rudimentary bookcase boxes and began experimenting with movement.
|
|
E
ECTiki
Posted
posted
on
Sat, Sep 30, 2023 3:55 PM
Honestly, I had to trash the first bookshelf frame after I made it. It was too large for the space and there wouldn’t have been sufficient clearance to operate the dual door system. Apparently my math and design skills decline proportionally to the amount of Rum I drink……So, back to the drawing board and I made a smaller bookcase outer box. Once I got the tolerances and motion down it was time to install and stain the speakeasy doors to match.
Once stained it was time for detail work and test the operation weighted with books.
It works….
|
|
E
ECTiki
Posted
posted
on
Sat, Sep 30, 2023 4:07 PM
I just remembered my friend made a video of the door…. |
|
FW

Fourth Wave
Posted
posted
on
Sat, Sep 30, 2023 8:21 PM
Amazing truly amazing. Love the hidden door. |
|
C

coldwarspacemonkey
Posted
posted
on
Sun, Oct 1, 2023 4:05 AM
Beautiful work! |
|
E
ECTiki
Posted
posted
on
Sun, Oct 1, 2023 8:54 AM
Wave and SpaceMonkey, Thank you for the compliments. |
|
E
ECTiki
Posted
posted
on
Fri, Oct 6, 2023 9:09 AM
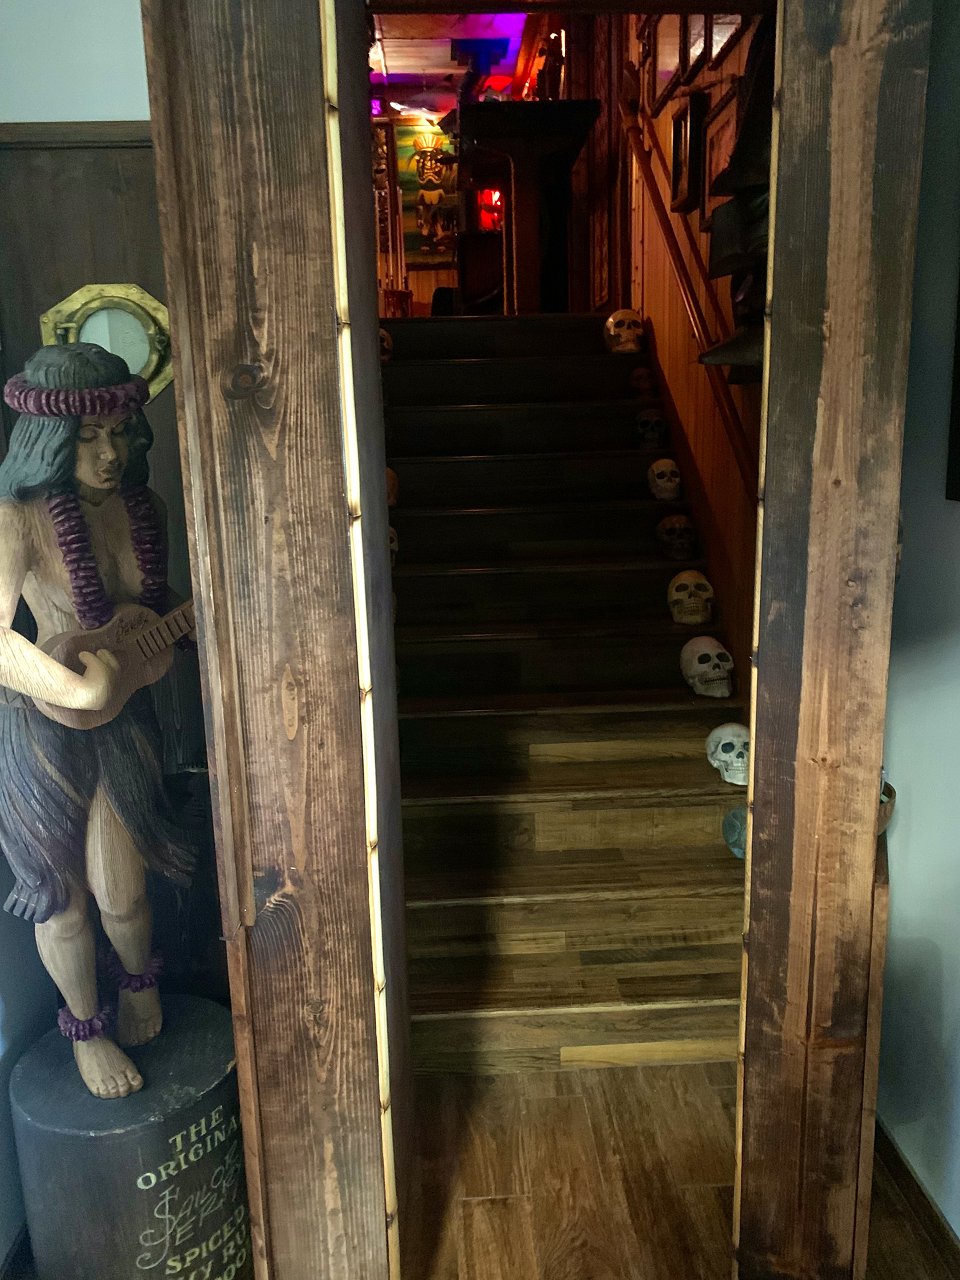
Around about the time I finished the speakeasy door the price of bamboo slats went insane. Online prices were over $7 a slat. Even the ultimate supply connect in San Diego (Love you Cobain) couldn’t get bamboo slats for a reasonable price …..or if at all. I used to pay $0.50 or a dollar per slat….. now I would be happy to pay triple that price…..So more delays waiting for bamboo. While waiting for bamboo slats to come down in price, to finish the northwest corner and the stairwell, I looked at working on other projects. One of those projects was inspired by a non tiki source. While we were walking around Ala Moana (I know the ultimate tourist trap area of Waikiki) I saw a bar that had the Indonesian carved “Hawaiian” looking masks across the front of the bar. It was in a sports bar burger joint…..Although I am not a fan of those masks I did however like the look of them all in a line down at knee level of a bar. So, my little brain went to work. What if I lined the stair well below the hand rail with similar tikis?
|
|
M
MadDogMike
Posted
posted
on
Fri, Oct 6, 2023 10:55 AM
Just to be clear - the Friendship Shelf is NOT located in the bathroom correct? LOL |
|
E
ECTiki
Posted
posted
on
Mon, Oct 9, 2023 4:33 PM
LOL, No MadDog the friendship shelf isn’t in the bathroom……ewww |
|
E
ECTiki
Posted
posted
on
Mon, Oct 9, 2023 4:40 PM
Once the masks were attached to the wall we decided that they were way too damn colorful. I considered burning them to subdue the colors ….Instead, I opted for black gel stain….
Now I needed a new hand rail …. Bamboo Ofcourse…. But how large?
|
|
M
MadDogMike
Posted
posted
on
Tue, Oct 10, 2023 8:02 AM
That black stain was a good choice! |
|
M

maulrat
Posted
posted
on
Tue, Oct 10, 2023 7:21 PM
in reply to ECTiki
The black stain is a big improvement on those tikis. The hidden door is amazing! |
|
E
ECTiki
Posted
posted
on
Wed, Oct 11, 2023 2:59 PM
Thank you MadDog and Maulrat. I agree the black definitely help the masks look less garish. Stairways are a challenge to decorate. I considered wall paper or Tapa initially. For now the black tiki masks will work. I'll post the finished look soon. I thought I had a pic on my phone....Perhaps I shall have to take another....An excuse to go up to the bar .....wait, there is Rum up there...... |