Tiki Central / Home Tiki Bars
The Hut....The inside done .... outside begins...
|
E

ErichTroudt
Posted
posted
on
Fri, Jul 27, 2012 1:08 PM
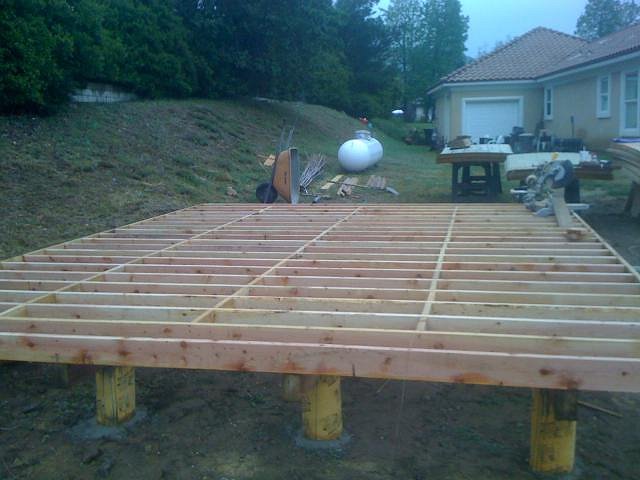
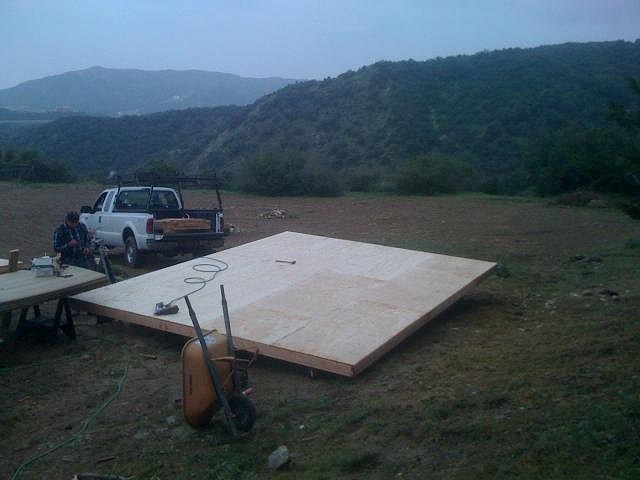
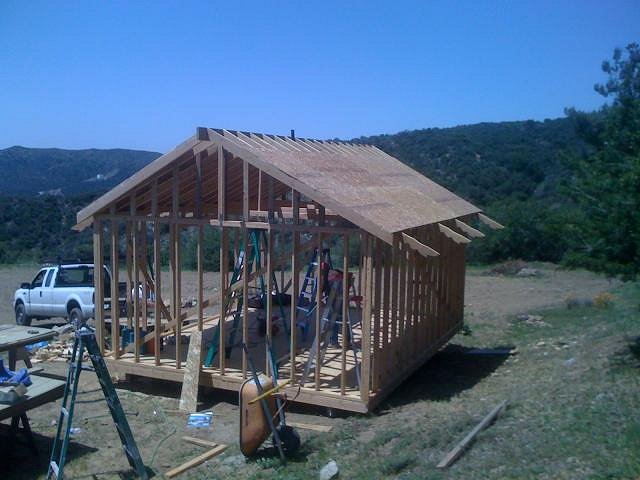
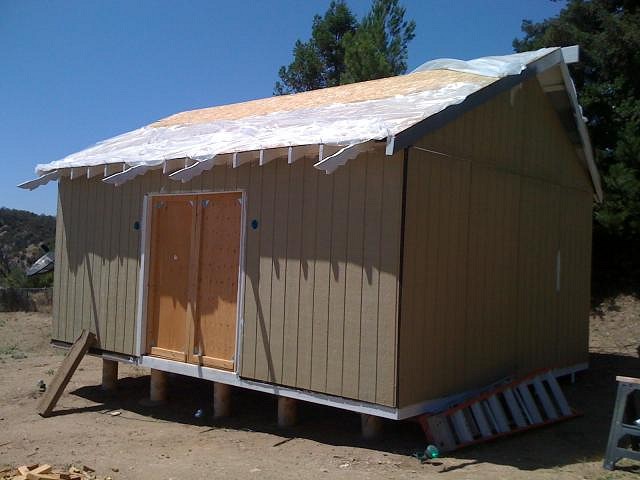
So for 11 years this was my hut. It was the only 8x8, but it was my place to smoke cigars, watch tv, and escape. I was even lucky enough to have it in an issue of tiki magazine.... So now its time for a new hut..... its a slow process, doing most of it myself or with my dad. My contractor buddy helped me with the framing..or I helped him actually.... 99% of the electricity, speaker wire, and remote light controller is all in. All the bare wood outside has been primered. Next will be paint and the corrugated metal roof.
Thats it for now..... Long long long long long way to go... so many ideas and thoughts, so little time and money...lol [ Edited by: ErichTroudt 2014-09-17 14:33 ] [ Edited by: ErichTroudt 2015-03-10 20:05 ] [ Edited by: ErichTroudt 2015-05-03 16:17 ] |
|
W

WestADad
Posted
posted
on
Fri, Jul 27, 2012 1:18 PM
Erich that is fantastic! I really like the outrigger beams on the roof trusses. Best of luck, and thanks for the pictures, keep them coming! Chris |
|
Q

Q-tiki
Posted
posted
on
Fri, Jul 27, 2012 1:48 PM
Wow! You've more than doubled the size. This ought to be fun to watch. :) Congrats on the new project. It's really looking good so far! Keep the pics coming when you can. Cheers!! |
|
BG

Bloody Good
Posted
posted
on
Fri, Jul 27, 2012 2:50 PM
Awesomeness!! Can't wait to see pics of the new hut, the old one looked sweet! |
|
H

hang10tiki
Posted
posted
on
Fri, Jul 27, 2012 8:14 PM
Sweet |
|
V

VampiressRN
Posted
posted
on
Fri, Jul 27, 2012 9:51 PM
Oooooh....how exciting. I love the decor style you have planned and that door is off the hook. Have fun...looking forward to more pictures as you progress. |
|
EJ

El Jefe
Posted
posted
on
Sat, Jul 28, 2012 12:51 AM
Very cool!! Looking forward for updates. |
|
L

LoriLovesTiki
Posted
posted
on
Mon, Jul 30, 2012 2:19 PM
Holy moly that thing is HUGE! Can't wait to see how it develops. :) |
|
E
ErichTroudt
Posted
posted
on
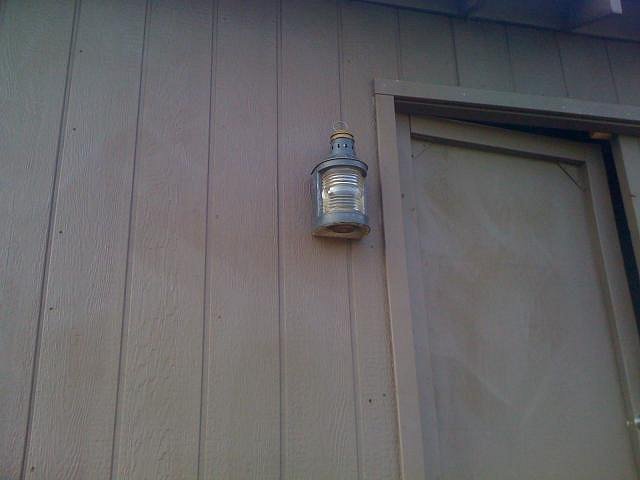
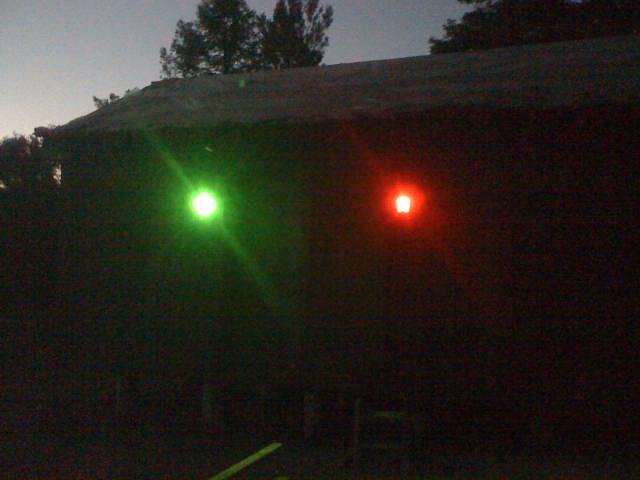
Wed, Aug 15, 2012 2:45 PM
Got the ship porch lights up and working.....This weekend the roof goes on... Night shot... |
|
DM

Derek Mitchell
Posted
posted
on
Thu, Aug 16, 2012 3:48 PM
I take it you're up near Wildwood Canyon/Oak Glen area? |
|
E
ErichTroudt
Posted
posted
on
Thu, Aug 16, 2012 4:10 PM
real close to oak glen... trying to build a tropical place in the mountains with snow and bears.... lol |
|
T

tikiskip
Posted
posted
on
Fri, Aug 17, 2012 7:24 AM
[ Edited by: tikiskip 2016-02-06 06:25 ] |
|
T

tikirancher
Posted
posted
on
Thu, Aug 23, 2012 8:25 AM
AWesomeeee. love the steel door - keep on keeping on...if you need some ideas check out my hut blog...diy http://www.tikirancher.blogspot.com |
|
E
ErichTroudt
Posted
posted
on
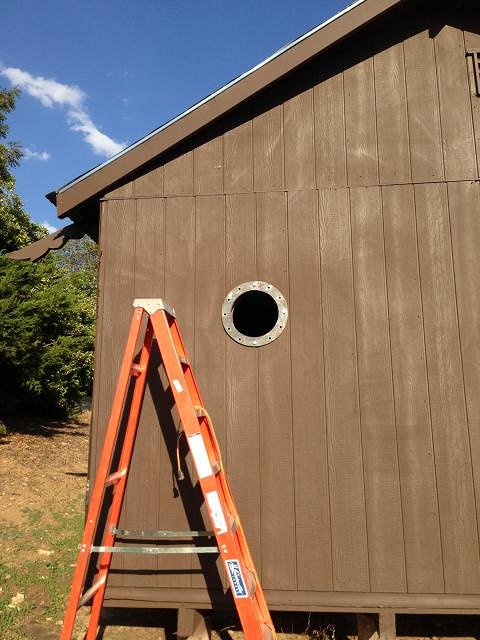
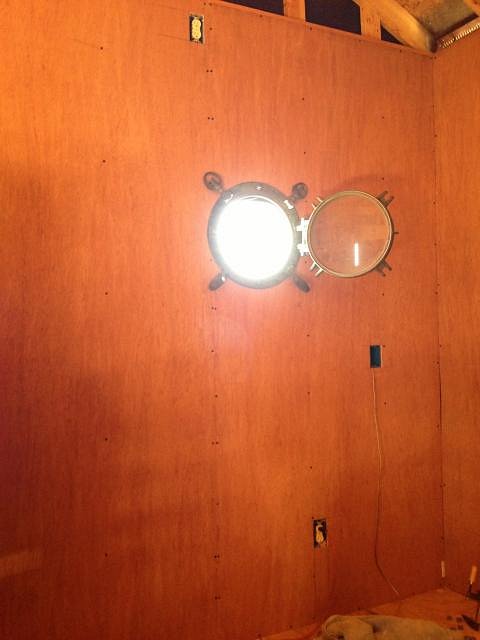
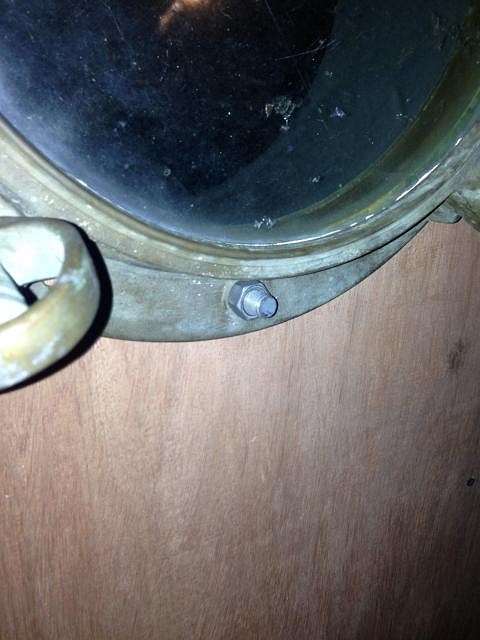
Fri, Oct 12, 2012 4:15 PM
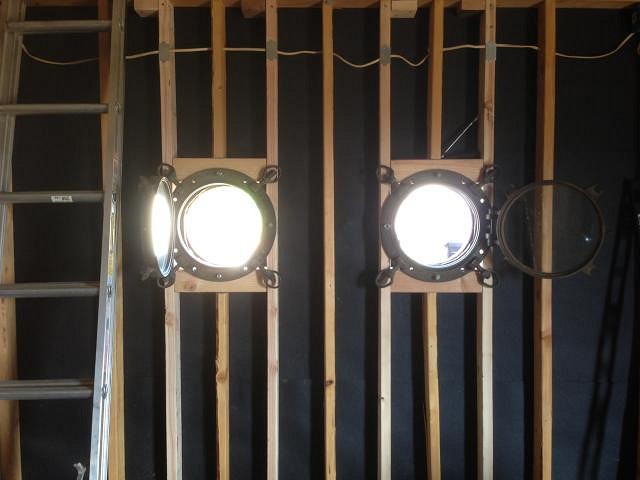
slow going so far..working on interior walls and insulation. I got 1 of 3 porthole windows in and working. Didn't leak in the rain either!!!! Had a metal company make the outside portholes to exactly match the size and bolt pattern of the old ship portholes. I built a tunnel system between them. I learned to if you take your torch and burn the zinc shiny nuts and bolts they will look gray, old and ugly real quick...which is exactly the look I wanted to match the porthole... I know I know...hurry up with the tiki and bamboo.... :wink: |
|
V
VampiressRN
Posted
posted
on
Fri, Oct 12, 2012 6:08 PM
Quality takes time...looking good!!! |
|
L

littlegiles
Posted
posted
on
Fri, Oct 12, 2012 7:18 PM
Thanks for an update. Love the look of the portholes. We fully understand that quality takes time and we are a very patient group. No rush.
|
|
J

jimsflies
Posted
posted
on
Fri, May 17, 2013 6:56 PM
Any updates for us on this project? Love what you have so far! |
|
E
ErichTroudt
Posted
posted
on
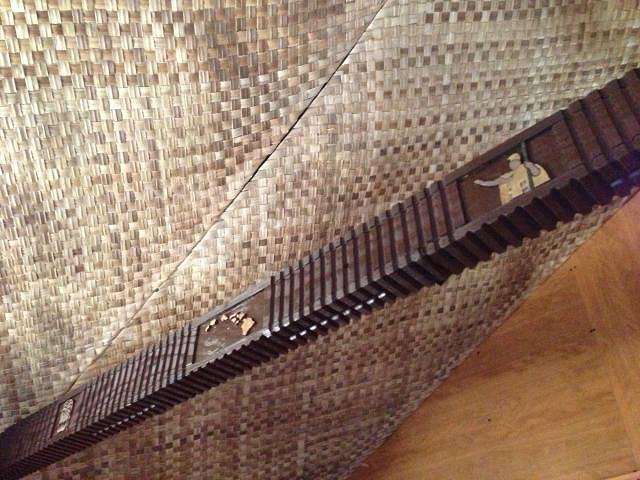
Sun, May 19, 2013 6:28 PM
Thanks man. It's been real slow. Doing 99.9% of it by myself which takes even more time. Also the winter month kinda slowed down the process too. And the fact I'm lazy doesn't help either... I haven't posted any updates because I've been doing all the boring stuff... Ceiling, walls, insulation, vents etc. I'm just now starting to get some lauhala matting on the ceiling and the bamboo ceiling fan up. I've been learning to router boards for the beams. Self taught, trial and error. I'm pretty happy with the results. I still have 2 portholes to put in, a closet to build, a wall project, lauhala matting, fishnet, etc etc etc... Lol I should be done in 2046 Here's a peek .... |
|
L
littlegiles
Posted
posted
on
Sun, May 19, 2013 6:45 PM
That is some fine router work. Did you carve out the islands and other items with the router?
|
|
E
ErichTroudt
Posted
posted
on
Sun, May 19, 2013 7:39 PM
Yes.. All done with a router. Each beam represents a different theme, hawaii, maori, etc. I have some killer ideas for themes of the other beams that I'm working on... I'll post them when I'm finished. See why I figure I'll finish my hut 3 weeks after I'm dead? Lol |
|
J
jimsflies
Posted
posted
on
Mon, May 20, 2013 7:41 AM
I'm thinking I would like to add a porthole in my design. How large are the portholes you are using? They seem to get expensive pretty quick for the larger ones. Also, I guess that with most I have seen for sale that they would need that outside ring made like you did for it to screw into. What material did they use? Also if you don't mind me asking, what was the approximate cost to the outside ring made? |
|
L
littlegiles
Posted
posted
on
Mon, May 20, 2013 8:29 AM
That is some amazing router work. Love the detail you were able to get on those. I can totally see why you will not be done for a while. LOL Great work!
|
|
T

tikilongbeach
Posted
posted
on
Mon, May 20, 2013 8:51 AM
Beautiful router work! |
|
E
ErichTroudt
Posted
posted
on
Mon, May 20, 2013 10:23 AM
Thanks everyone. Jimsflies, I sent you a pm... |
|
L

Longboard
Posted
posted
on
Mon, May 20, 2013 12:32 PM
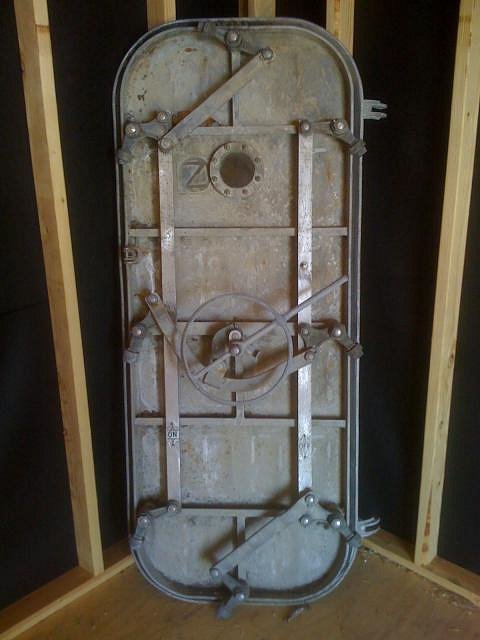
The Navy door is bad ass. |
|
FT

forgotten tikiman
Posted
posted
on
Mon, May 20, 2013 2:02 PM
Awesome Erich!!! Love the nautical stuff. That Navy door is way cool. This is going to be a fun space. :D |
|
T

ToddVegas
Posted
posted
on
Mon, May 20, 2013 2:09 PM
Simply... WOW! |
|
PP

Pele Paul
Posted
posted
on
Tue, May 21, 2013 10:34 AM
WOW id kill for your navy door!!!! so so cool!!! wish I had that kind of property paul |
|
T

TikiRetardo
Posted
posted
on
Wed, May 22, 2013 11:35 PM
Wow thats amazing router work cant wait to see the rest..... |
|
M

Masher88
Posted
posted
on
Sat, May 25, 2013 5:39 AM
Wow fantastic carving on those beams! Are you using a plunge router or a Dremel tool of some kind? |
|
E
ErichTroudt
Posted
posted
on
Tue, May 28, 2013 11:32 AM
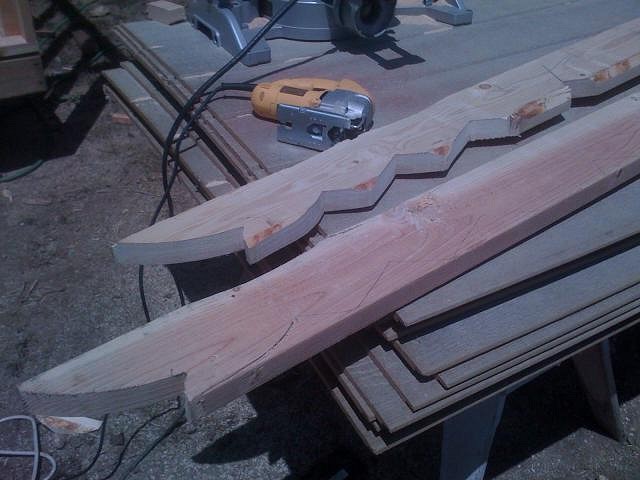
I'm not using a plunge router...although it would probably make life easier at times. No dremel tool either. Just going slow, setting the router at different depths and being careful. In the words of Indiana Jones..."I don't know, I'm making this up as I go".... |
|
E
ErichTroudt
Posted
posted
on
Tue, Jul 2, 2013 5:39 PM
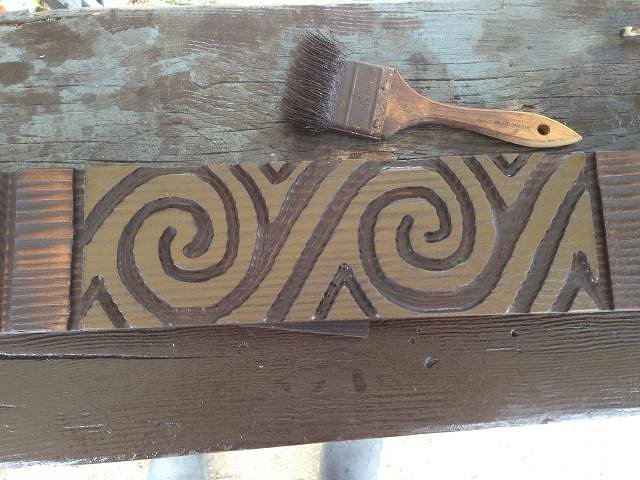
Couple of new router carvings in the Maori beam...
|
|
L
littlegiles
Posted
posted
on
Wed, Jul 3, 2013 9:17 AM
More nice Router work. Keep it coming!
|
|
E
ErichTroudt
Posted
posted
on
Wed, Jul 31, 2013 3:52 PM
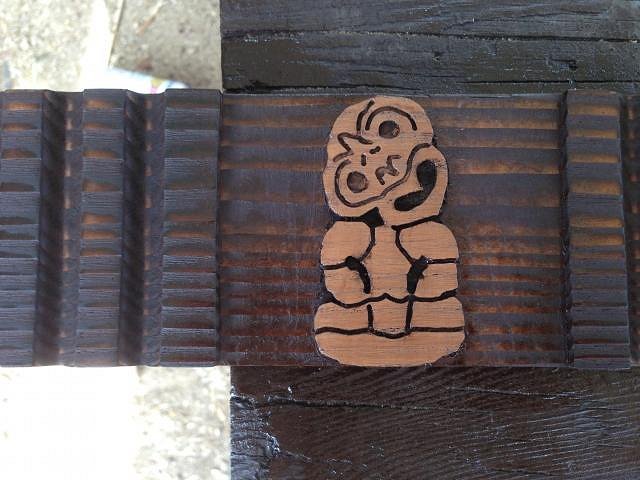
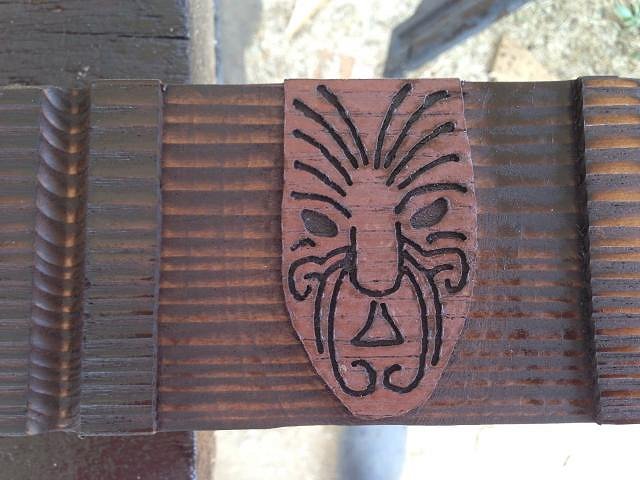
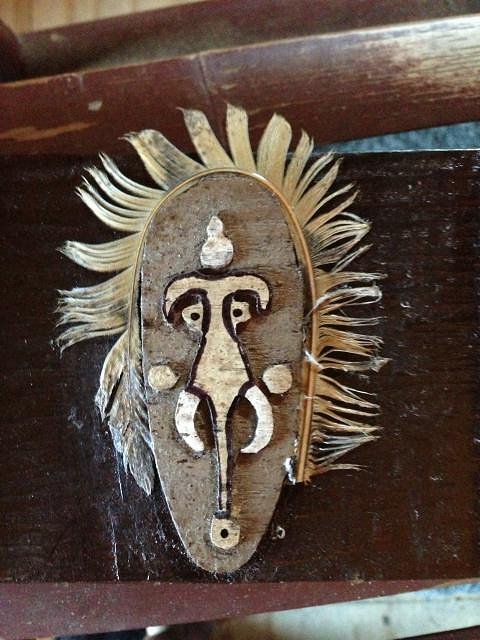
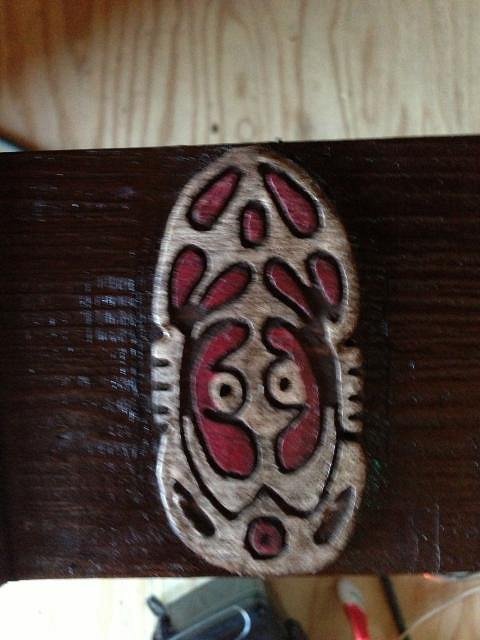
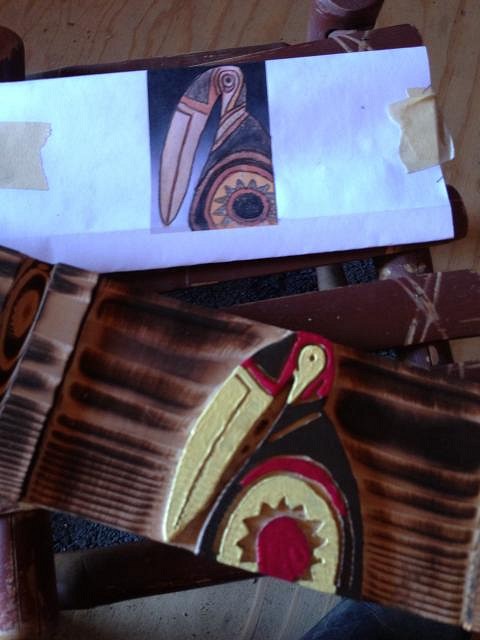
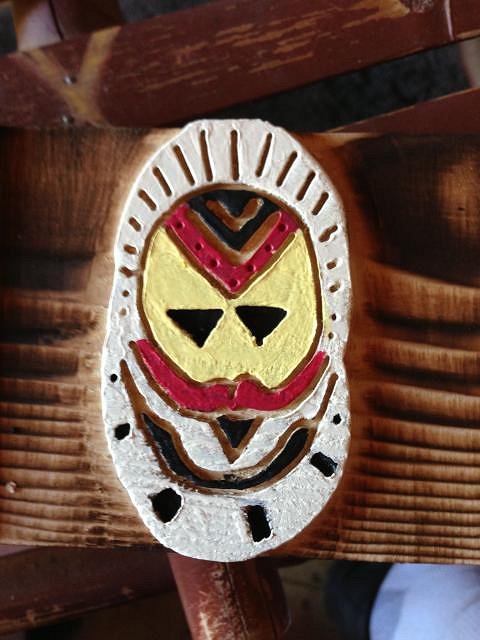
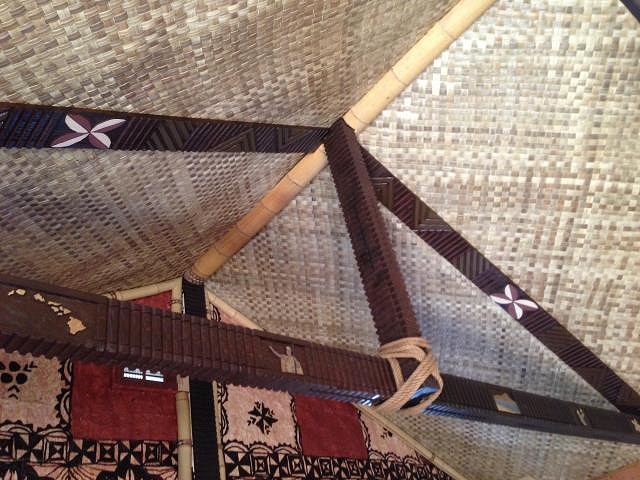
The ceiling is starting to come together slightly.... need bamboo to cover the ridge beam down the center. here are the PNG images I carved. They are all based on actual pieces I found on different PNG museum sites... all are 3 1/2 inches in height.... not a lot of room for detail...
I used an owl feather I found in my backyard for this one... these were taking before the stain, but you get the idea anyway
Once again...I should be done 2 weeks after I"m dead... |
|
H

hiltiki
Posted
posted
on
Wed, Jul 31, 2013 8:14 PM
Eric great job on making your own art pieces. I am thinking of doing same but not sure exactly how. Clever use of the owl feather. Keep us posted. |
|
TG

Trader Gino
Posted
posted
on
Sat, Aug 3, 2013 4:44 PM
Awesome job so far. Keep up the great work! |
|
V
VampiressRN
Posted
posted
on
Sat, Aug 3, 2013 6:00 PM
Love the routing on the beams....have fun with those masks!!! |
|
E
ErichTroudt
Posted
posted
on
Fri, Aug 23, 2013 5:16 PM
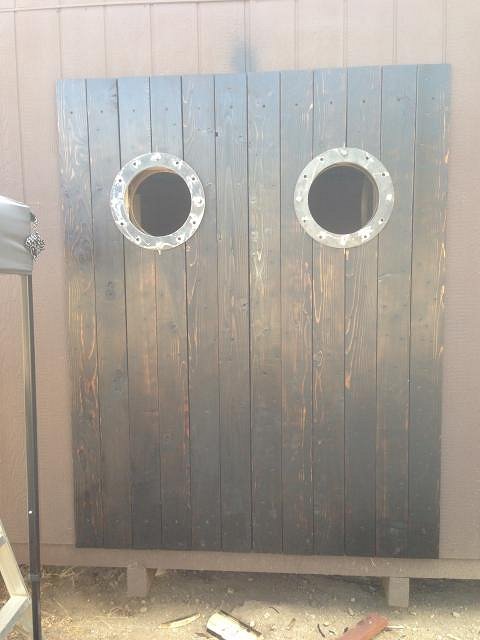
I spent this week building all the supports and today I cut the holes for the last of the porthole windows... casualty, 1 cheap @ss black and decker jig saw.... Now I have to put in the insulation and put up the wall boards. Hey its only 101 degrees out, wearing long sleeves for insulation sounds great!! Then build the tunnels between the outside and inside portholes to make them weather and leak proof. Heres the outside view with the unfinished fake doors... which will make sense later in the project.... :) [ Edited by: ErichTroudt 2013-08-23 17:17 ] |
|
TY

Tipsy Yeti
Posted
posted
on
Fri, Aug 23, 2013 5:26 PM
Wow, the details are amazing! |
|
E
ErichTroudt
Posted
posted
on
Wed, Aug 28, 2013 2:24 PM
Some tapa print up on the wall... |
|
E
ErichTroudt
Posted
posted
on
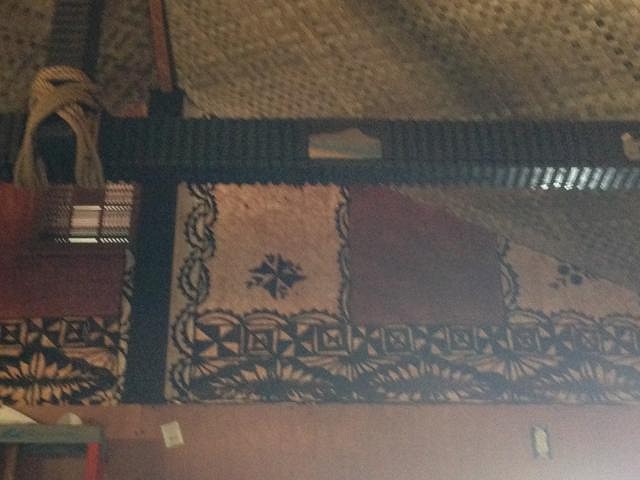
Wed, Sep 4, 2013 6:05 PM
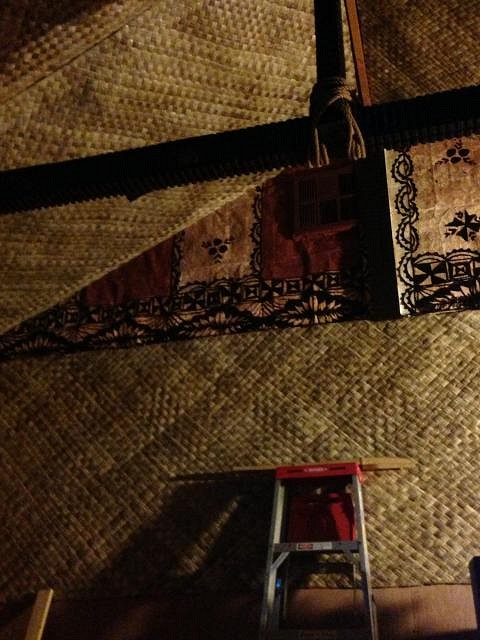
Got the tapa on the east wall done. Some Lauhala matting on the west wall... cutting it around the porthole was not fun... |
|
H
hang10tiki
Posted
posted
on
Wed, Sep 4, 2013 6:53 PM
Dude, u r cruZin now Jon |
|
E
ErichTroudt
Posted
posted
on
Mon, Sep 30, 2013 4:21 PM
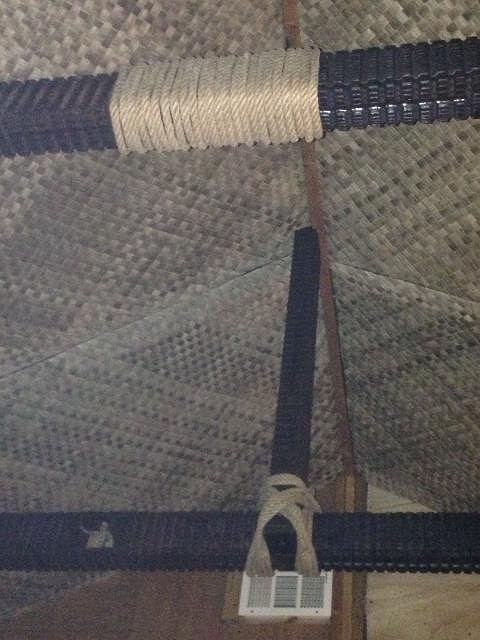
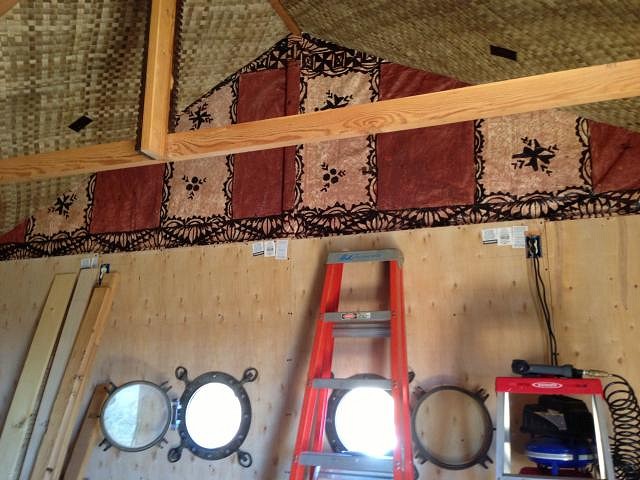
getting some bamboo up, covering all the screw holes with the lauhala braid, and routing the boards to cover the matting seams on the ceiling....
|
|
L
Longboard
Posted
posted
on
Tue, Oct 1, 2013 8:02 AM
I'm digging the beams and portholes. When are you going to put in the Ship's door? -Longboard |
|
E
ErichTroudt
Posted
posted
on
Tue, Oct 1, 2013 2:32 PM
Ships door will be soon....hopefully. Lot of problems are going to come with it. I'm doing almost all of this by myself and the door is way too heavy, so I have to wait for some help. No instruction manual for this install.... lol |
|
E
ErichTroudt
Posted
posted
on
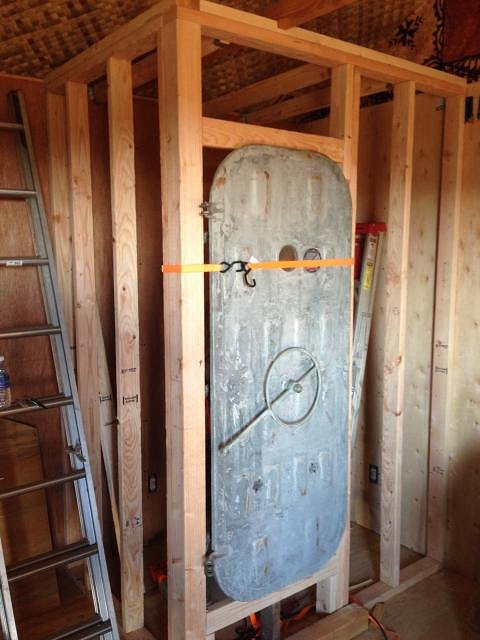
Sun, Oct 27, 2013 8:40 PM
Okay, the ship door... Dad came over and we framed the walls for the 4ft x 6ft closet. We built the top and bottom supports for the door, put it in, and realized .....X...... 3 inches off. So now I'll be spending some time moving the stud and re-building the supports. Here's a pic of it so far... |
|
T
ToddVegas
Posted
posted
on
Tue, Oct 29, 2013 1:17 PM
NICE work! Wouldn't it be nice if a 2x4 was actually 2x4?! I'll never understand why they're not. It makes everything more complicated. |
|
E
ErichTroudt
Posted
posted
on
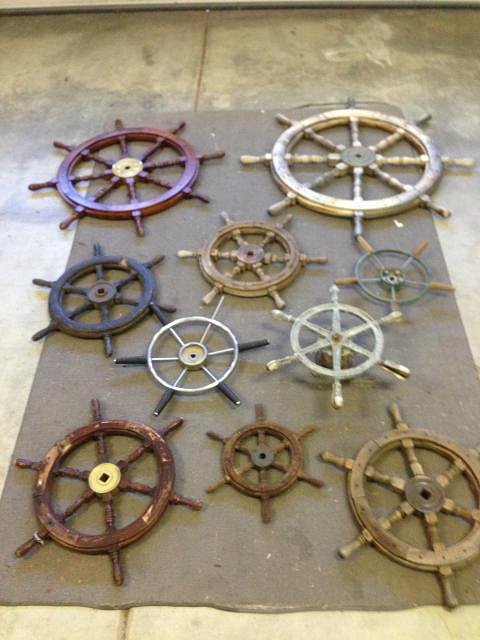
Wed, Nov 13, 2013 12:13 PM
Ive been decorating part of the ceiling...glass floats, fishnet, corks floats, rope, shark jaws, etc.... I thought Hey, I'll hang up a ships wheel on the ceiling.... so I dug thru the garage and got them out.... I may be a hoarder..... |