Tiki Central / Tiki Carving
Stone Carving: Q&A + Gallery...
Pages: 1 2 3 4 5 6 7 8 9 420 replies
|
T

Tamapoutini
Posted
posted
on
Fri, Oct 6, 2006 2:06 PM
Howdy 'Stoners'! ***It seems we have a new breed of carvers coming through who are brave enough to try their hand at STONE... Thought Id take the initiative & start a thread devoted to Q&A regarding stone carving & as a gallery of finished works for those who wish to share. Please treat this as a chance to chat/help each other -I dont intend for this to be 'my' thread... *I recommend reading the stone carving threads of the Kiwi-boys if you havent already, as this will give a basic rundown on tools & processes, but this might be a good place to get into the nitty-gritty for those having a go... There is much to learn & no teacher like shared experience! Hope to see you here... ROCK ON!!! [ Edited by: Tamapoutini 2006-11-12 16:17 ] [ Edited by: Tamapoutini 2006-11-25 22:37 ] |
|
B

Benzart
Posted
posted
on
Fri, Oct 6, 2006 2:47 PM
Thanks Tama, I think this is a god idea for a thread since I'm sure that I will have a few questions in the future and now even. |
|
P

Paipo
Posted
posted
on
Fri, Oct 6, 2006 3:24 PM
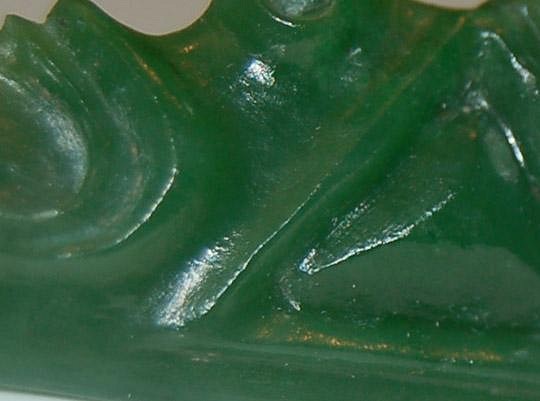
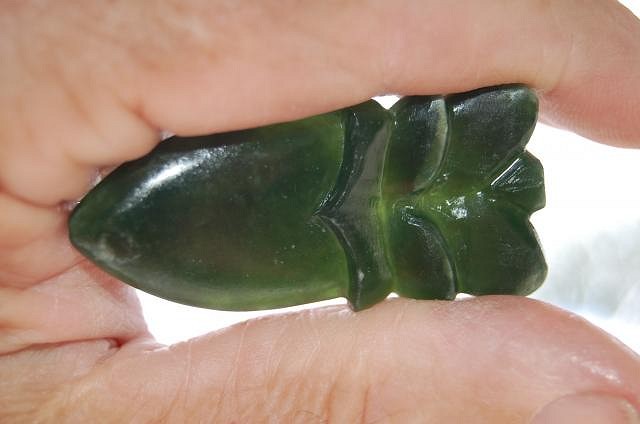
Feathering is pretty common when you create a "cliff" edge like that - just work towards the edge from the flat surface, be careful when cleaning up in the area at the base of the "cliff", and you'll be fine. Cheap rough burrs will take their toll on the stone - I find the no name brand ones just don't run anywhere near as true in my handpiece and tend to "grab" at the stone because the diamond bonded surface is quite inconsistent in texture. Those feathers don't look like they're going to fall off though, so take it easy and you should be fine. |
|
T
Tamapoutini
Posted
posted
on
Fri, Oct 6, 2006 3:30 PM
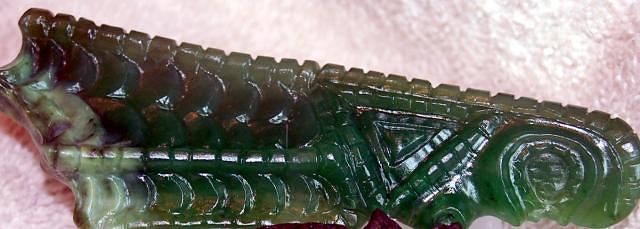
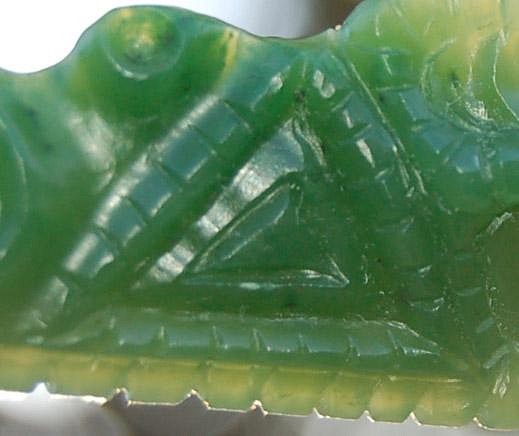
Hey Benz. Answer: Yes, yes & yes. A combination of all... It is possible that these will 'ping' out at some point. There is never a guarentee & I certainly point these out & discount heavily if/when anything like this occurs (& it occurs frequently!!) *True 'cracks' are easier to read & trust, and often serve well aesthetically. It is pretty rare for a piece to be absolutely perfect, so dont give yourself a hard time! This is also fairly limited to jade (or other translucent stones), being kind of crystalline & brittle... 'Normal' stones, such as Paipo is using tend to be a bit more trustworthy in this regards..? Or do they chip/break Paip'?... PM me your address Benz & Ill send you a variety of slabs to have a go with. Youre doing wonderfully & Im sure youll be thrilled when you have finished a few & can admire the added bonus of glowing TRANSLUCENCY, dribble... Tama |
|
B
Benzart
Posted
posted
on
Fri, Oct 6, 2006 6:56 PM
Thanks guys, Here you are the New Zealand boys ganging up on the old man and having a merry time with it or so it would seem.'S OK, I can take it. LOL Trust me I'm not gonna become the next big rock cutter dumping Junque on ebay. I appreciate the help and assistance you are offering. I only hope I can do you as proud some of my followers think I can. How could I ask for more? |
|
CS

Capt'n Skully
Posted
posted
on
Mon, Oct 9, 2006 7:05 AM
Here's a small, 3 inch tall Moai I carved in a rock I found.. I think it's sandstone? Very soft, relatively easy to work with.. I was almost expecting the stone to snap in half with the pressure of my hands while working on him and had to be careful.
I'm posting this as a what not to do.. I used a set of small, detailing files to create it which are now ruined (I expected them to wear out doing this piece- Just not as quickly as they did). So it's best to work with the proper tools when working in stone. |
|
B
Benzart
Posted
posted
on
Mon, Oct 9, 2006 7:39 AM
Skully, This guy has some really nice features. I Love how you placed and executed the mouth and cheeks. He is a very lousy piece that you should throw away. I'll give you my address and I will properly dispose of him for you. You ccan't have him coming back to haunt you, you know! |
|
T
Tamapoutini
Posted
posted
on
Mon, Oct 9, 2006 1:17 PM
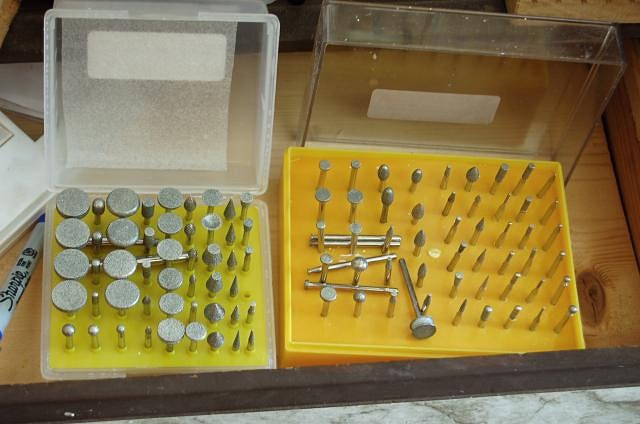
Hey Capt'n. Try a set of diamond coated 'riffler' files... Sets of 5-10 Chinese made files are cheap as chips & wont wear out the way ordinary steel files do. There are various qualities (as with anything) & the method of diamond 'application' seems to determine this. The cheapest are usually 'dipped & crushed' in diamonds, next best are electroplated, & the best of all are 'sintered' (diamonds are throughout the steel matrix)... Small diamond burrs/points for running in an electric handpiece are a must have for stonework too. Again available in a wide range of quality and price. Hope this helps! Tama |
|
CS
Capt'n Skully
Posted
posted
on
Mon, Oct 9, 2006 5:53 PM
Thanks for the info- I may have to try another stone piece or two in the future.. Have you worked with Turquoise before? I have a really nice chunk my uncle from Arizona gave me when I was a kid.. Haven't had the courage to tackle it yet, but it's starting to feel like it may be time. It's a block about 2" x 2.5" x 1" deep. Not sure what to expect from turquoise tho- Haven't bothered to research it yet.. |
|
T
Tamapoutini
Posted
posted
on
Mon, Oct 9, 2006 9:20 PM
No, youll be trail blazing with the turquoise Scully, never tried it... Reasonably soft I imagine & probably not much inherant strength, I wouldnt go drilling too many holes through it... Tama |
|
T
Tamapoutini
Posted
posted
on
Wed, Oct 18, 2006 3:44 AM
Bump. Anybody stonin'..? :) |
|
B
Benzart
Posted
posted
on
Wed, Oct 18, 2006 5:08 AM
Soon, Real Soon! |
|
J

JohnnyP
Posted
posted
on
Wed, Oct 18, 2006 7:03 AM
I am going to give this a shot. Do you need flowing water when you are carving stone, or does the bit just need to be wet? What about other cutting fluids such as oil? JP |
|
S

saxotica
Posted
posted
on
Wed, Oct 18, 2006 8:48 AM
|
|
B
Benzart
Posted
posted
on
Wed, Oct 18, 2006 12:20 PM
Saxotica, pretty cool, what kind of stone? |
|
P
Paipo
Posted
posted
on
Wed, Oct 18, 2006 1:41 PM
I like 'em saxotica - they still look like rocks as well as tikis. Are you just using hand tools? We actually have some pretty good large rocks around here that can be carved with chisels too, one in particular is a really tight multicoloured limestone, although the colours aren't too tiki friendly (pink, yellow and orange!). I'm itching to do something bigger... |
|
T
Tamapoutini
Posted
posted
on
Wed, Oct 18, 2006 1:47 PM
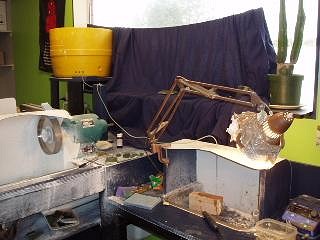
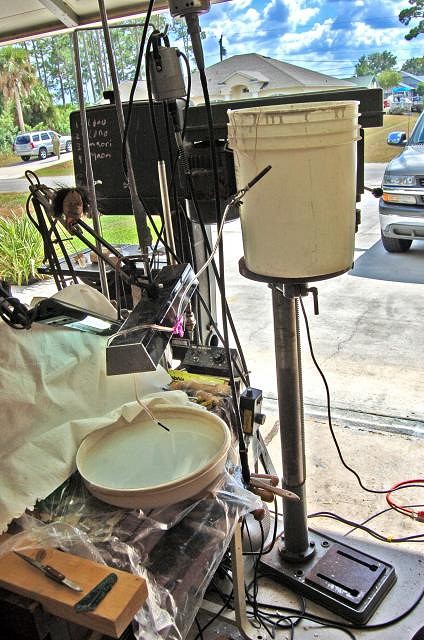
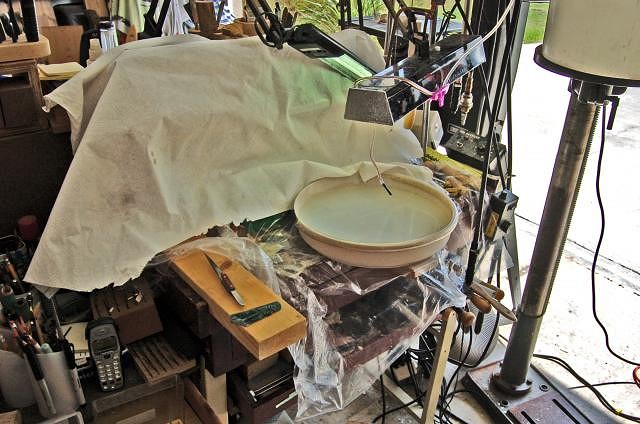
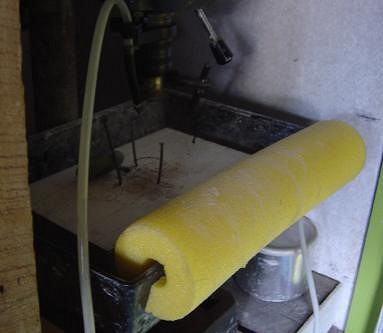
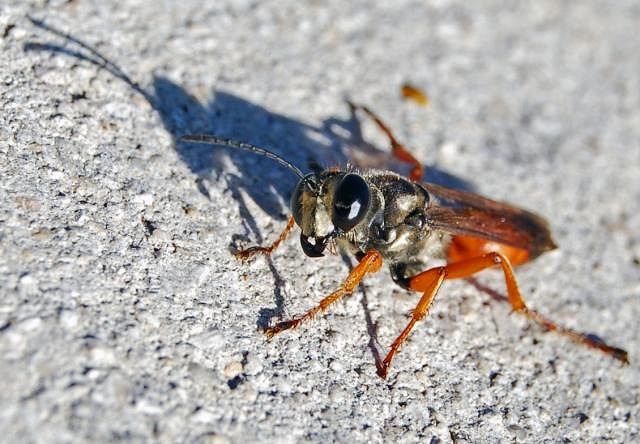
Benz, We're watchin, we're waiting. patiently... Ditto JohnnyP!: Yep, you need a trickle of water onto handpiece burrs or whatever diamond tools you might use... *If you can peer through the chaos & follow the small hose in pic... Just a bucket (manually filled with another bucket) with a small hose (like the fishtank bubbler hose Benz mentioned) that leads to wherever you are working... Mine is long enough to reach several different tools & is clipped high on a peg to stop flow when not needed... If you get as far as setting up any lapidary/'lap' wheels, the best way to get water to 'stick' to them whilst spinning; is to have a sponge sitting against the wheel & have the water dribbling into/onto sponge... (You might be able to see a blue sponge poking through the cowling above the wheel @ left...) Hope this helps! Saxotica: Yeehaa!Great stuff. Very large, what/how did you carve these?? Im assuming they started out as big river stones?? Angle-grinder?? Please give us the scoop... **Good to see a few of you coming out of the woodwork (pun intended!) Tama :) |
|
S
saxotica
Posted
posted
on
Wed, Oct 18, 2006 4:55 PM
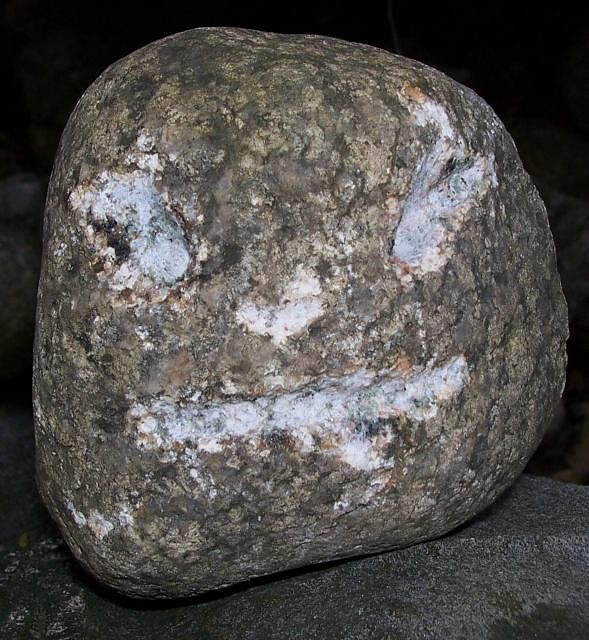
Hello to all. Yeah, I need to get an angle grinder. That's my next tool acquisition. I use a pneumatic hammer made by Trow and Holden but I only have a very few chisels. The stone are just river rocks...some type of hard sandstone...but is much harder than limestone. All my chisels are carbide and I still have to sharpen alot. I sandblast the carvings when I'm thru to age them and remove tool marks. I don't like to finish too much. I try to make them look old and primitive.My next one is going to be a little more detailed. I've only had my tools a few months and I'm still getting the hang of it. I need some smaller sized chisels; my smallest is 1/2". I really admire you guys' work and may steal a few ideas.I want to carve bigger but my back can't handle moving them. |
|
T

teaKEY
Posted
posted
on
Wed, Oct 18, 2006 5:12 PM
I love stone carving because as a kid, I would have never believed that stone could be carved. It seemed that only the ancients could have done it with months and months of hard work. Its still strange and probably something that I will never do and that it why I have to respect it so much. |
|
T
Tamapoutini
Posted
posted
on
Thu, Oct 19, 2006 12:27 AM
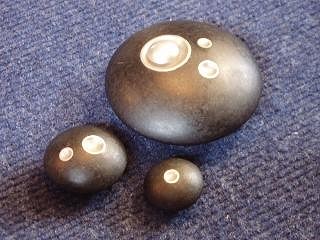
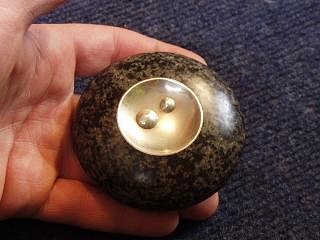
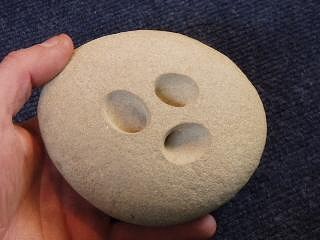
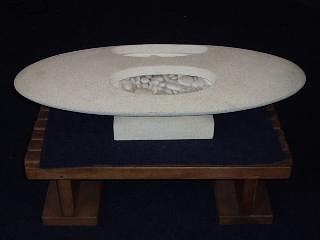
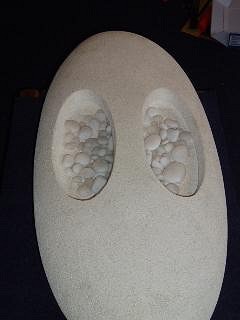
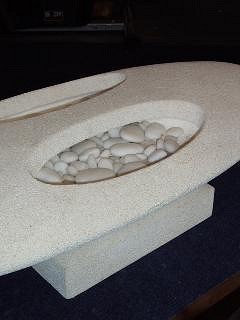
teaKEY: It does happen a lot faster nowdays :) but compared to the rest of this technology-mad world, the art-making of the modern lapidarist is still a pretty laid-back, introspective/meditative affair, haha. Good things take time! Nice to hear how you get your results Sax. How did you come to be carving stone in the first place? Were you shown by anyone or trailblazing? The following is not strictly TIKI but is relevant to stone carving so I thought Id bang them up... All made a few years ago when I was on a 'circles/spheres/holes' kick, haha... These are made from granite 'cores' which are removed as waste from HEADSTONES, the place where the flower-pot goes to be precise... They were carved on the same lapidary gear that I make my jewellery on. Stg. silver details were added. This shelf-sculpture was carved from/into an ordinary (unknown) river stone. The holes meet in the middle. And this is one of a few similar creations in limestone, titled 'Mother-fruit'. Probably not the best material to use for a form like this, Ive always feared that the centre section (also cut right through) will someday break out... Filled with white quartz beachstones. Approx 30" long. So theres a little of something different..? Ill have a poke around & see what other strange things I can find... So long Stoners! Tama :) |
|
B
Benzart
Posted
posted
on
Thu, Oct 19, 2006 12:24 PM
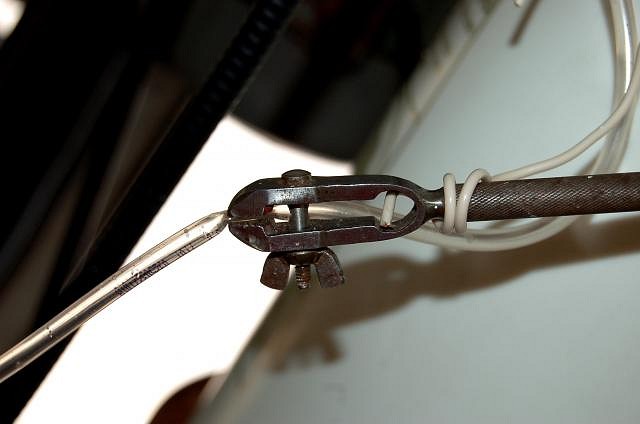
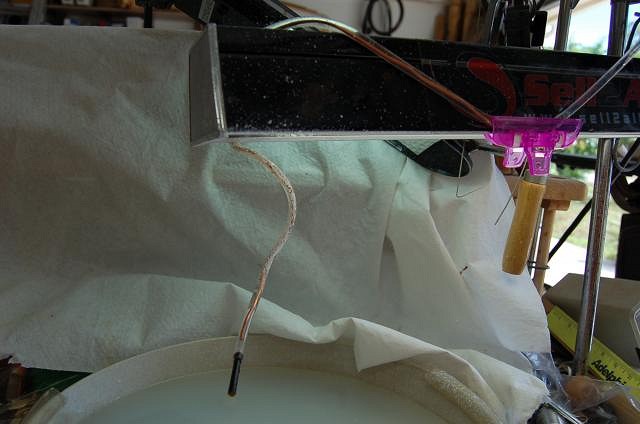
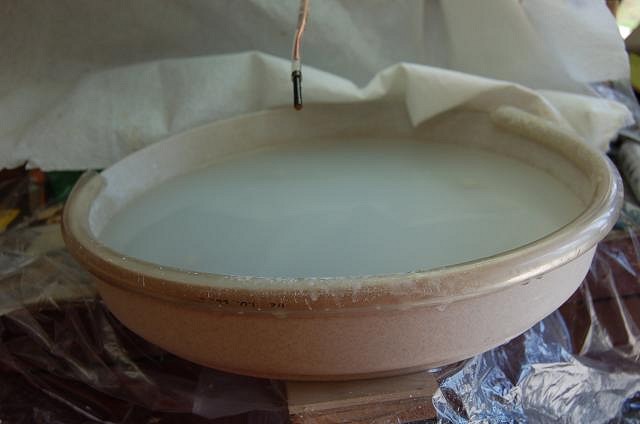
Tama, Neat to look back at some of the "Stages we go thru Huh? Circles/Stones/spheres and stuff was a pretty neat phase, you should Still do some of those along with your current stuff. I inserted about 15" of copper wire so I can position the floppy hose where I want it. |
|
P
Paipo
Posted
posted
on
Thu, Oct 19, 2006 12:59 PM
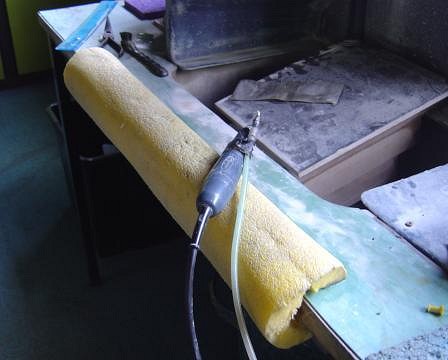
Benz, you might want upgrade to this stuff - they are sold here as 6' "pool noodles" for kids to play with in the water. Hollow centred foam about 3" in diameter, works a treat! I can't believe it took me so long to start using these. You can carve all day without getting sore arms or wrists: |
|
B
Benzart
Posted
posted
on
Thu, Oct 19, 2006 1:03 PM
Great Idea, I can get those at the local stores for a few $. Thanks--HappyHappyHappy |
|
T
Tamapoutini
Posted
posted
on
Thu, Oct 19, 2006 1:44 PM
Benz: Great work on this fella! Your skill is evident, half of the local jade carving industry would be struggling with something of this complexity, seriously! I did go on to develop a wide range of jewellery work using the circle/sphere/hole thing, not very tiki so Ive kept 'em away..? The pic of your workshop above is giving me flashbacks of that damn abduction/implant incident a few years back, arrrgh... No, not the probe..!! hahah :) Ingenious solution for water-restriction & the copper wire adjustment... Ka pai! Ah, thanks for making this Terrible TC'er feel so at home... :) :) :), happy happy happy! Tama |
|
B
Benzart
Posted
posted
on
Thu, Oct 19, 2006 1:58 PM
Thanks,T3, appreciate the kind words. |
|
B
Benzart
Posted
posted
on
Sat, Oct 21, 2006 5:35 PM
Tama, I'm glad my messy bench makes you feel at home, I know the feeling. |
|
G

GMAN
Posted
posted
on
Sat, Oct 21, 2006 5:45 PM
Benz, Yep you are right, there is no hope for him at this point. If you send him over here, I will dispose of him properly for you - leaving no toxic residue. :wink: -Gman |
|
B
Benzart
Posted
posted
on
Sat, Oct 21, 2006 8:06 PM
Yeah, send me your address and I'll send him over..Oh Wait, he can't go anywhere, he gets air sick and doesn't like being cooped up in confined spaces. Oh Well. |
|
T
Tamapoutini
Posted
posted
on
Sat, Oct 21, 2006 10:46 PM
No, Im afraid that getting into small areas requires small burrs... Its looking really good Ben. Getting smoother & smoother by the looks of it. Tama :) |
|
B
Benzart
Posted
posted
on
Sun, Oct 22, 2006 8:18 AM
I was afraid of that. It's just like carving wood, when you rough out a ton of small detail, you eventually have to finish it up and how fine you get it done determines the quality of the piece. Something like this that will be seen Close up, deserves to be finished as finely as possible, which means a Lot of hand sanding and worrking with whatever I have until I can get some finer burs. |
|
B
Benzart
Posted
posted
on
Mon, Oct 23, 2006 1:47 PM
Ahhh, I See what you were saying about the Orange-peel, I found it! |
|
T
Tamapoutini
Posted
posted
on
Mon, Oct 23, 2006 2:14 PM
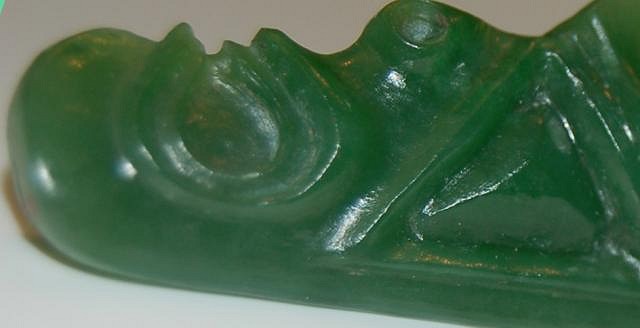
Bother! The ususal advice would be to 'tear it back' with some of that diamond cloth mentioned earlier. Basically it would 'shave' that orange-peel/skin off, leaving a fresh 'diamond-finish' which would then be readdressed with wet n dry paper (only not working so long this time...) You may? be able to recitfy by going back to a heavy grade paper (100/180) & then just a quick going over with something lighter (400?) -Id really have to see a close-up of surface... Could make things worse..! Alternatively, you could chalk it up to experience... Im sure the shaping is still fine & it's the carving skill that makes the piece in my eyes. Really not your fault, it is a notoriously difficult stone to finish, but some of the last readily-available, bright/translucent stone in NZ... As long as you have gone over 600grit wet/dry, you should have a finish that will 'last' with a wee smear of baby-oil/leather wax etc. A lesser-grade stone would tend to 'dry out' if not sanded further. The very best quality jade will keep getting smoother/shinier the more you sand, but who has any of that material? -not me! I personally prefer a matte/satin shine that doesnt cause so many reflections & this is by far the most popular choice with todays' customers too. More 'authentic'-looking finish... Be sure to show us the results & brace yourself for prospective buyers! Tama :) |
|
B
Benzart
Posted
posted
on
Mon, Oct 23, 2006 2:55 PM
Thanks for the steps. It's not so bad yet as I'm actually playng and used some abrasive rubber burs on it. I have some smaller, higher grit burs on the way so I can finish getting into the corners and finish it up to 600 grit. After that the hand sanding will work. Now, all I'm doing is polishing the 100 grit scratches. |
|
J
JohnnyP
Posted
posted
on
Mon, Oct 23, 2006 3:19 PM
OK, what am I doing wrong? :lol:
|
|
P
Paipo
Posted
posted
on
Mon, Oct 23, 2006 3:37 PM
What's wrong with it? What are you using ... a rock hammer? |
|
G
GMAN
Posted
posted
on
Mon, Oct 23, 2006 4:10 PM
JohnnyP, Man, that's your best piece yet! I love it. Maybe you could help straighten Benz out? He's having trouble with the finish on his stone tiki. By the looks of this guy, it looks like you have that all figured out. :lol: -Gman |
|
T
Tamapoutini
Posted
posted
on
Mon, Oct 23, 2006 4:21 PM
Tama sez: Nothing, he's a perfect Mr Potato-Head!! heehee. :) Tama |
|
T
Tamapoutini
Posted
posted
on
Mon, Oct 23, 2006 6:28 PM
Benz: I forgot to add; another no-no for stones like this is letting wet/dry paper get too 'blunt'! Your on to it with the 600grit burrs! From those I would go with wet/dry paper: 400, (maybe 600), 800, then check for orange peel. If ok, give a light dry sand with 1200, if not stop there... *I wish I had some REAL gem-quality stone to give you. I've only ever had my hands on a small amout & it just makes the job so much easier, very hard to go wrong. The first really nice piece I ever worked was from an old boy who was sitting on hundreds of lbs of the stuff (& understandably reluctant to sell), I asked him, "how do I go about getting a nice finish with this?". His reply, "hit it with a hammer", meaning that it could take any sort of finish & would never pit/orange-peel or give any result other than gorgeous... Sadly those days of abundant good/cheap material are gone... Aue! Tama :( |
|
B
Benzart
Posted
posted
on
Tue, Oct 24, 2006 4:11 AM
Thanks Tamma the Teacher, This is all making sense. Can't wait to get the other burs so I can get to the point of finish sanding. HappyHappyHappy |
|
T
Tamapoutini
Posted
posted
on
Tue, Oct 24, 2006 1:22 PM
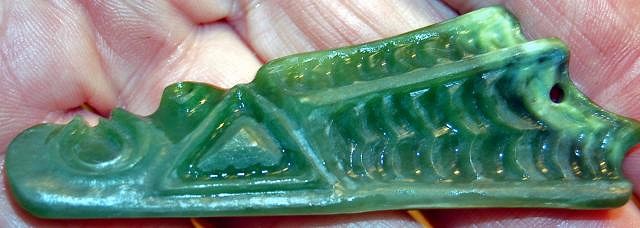
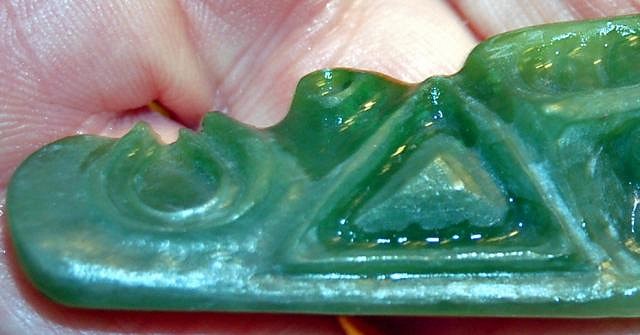
You're bang-on with the comparison with wood Benz! More than any other stone, jade also has a grain that runs through it which gives strength. When a large boulder is found, it is usually cut clean through the middle 'cross-grain', in order to get a glimpse into the heart... It is then flipped onto the cut/flat face & slabbed 'with' the grain (like a length of timber)to ensure that the slabs have the grain running through them (hopefully Ive cut those slabs the right way for you, haha) This is the main reason why jade can be carved so finely. Cant wait to see the finished product!! Tama :) |
|
B
Benzart
Posted
posted
on
Tue, Oct 24, 2006 8:56 PM
Tama, I would Sure love to see THAT Process, WOW.They are probably slabbing out Jad rocks as big as a car. I will be gone for a few daze but will then be living in this thread until I get that Lono done.Thanks. |
|
C

Clarita
Posted
posted
on
Wed, Oct 25, 2006 12:49 PM
"These are made from granite 'cores' which are removed as waste from HEADSTONES, the place where the flower-pot goes to be precise... They were carved on the same lapidary gear that I make my jewellery on. Stg. silver details were added. " |
|
T
Tamapoutini
Posted
posted
on
Wed, Oct 25, 2006 1:18 PM
Thanks Clarita! Unfortunately they weren't understood/purchased by many, haha |
|
B
Benzart
Posted
posted
on
Tue, Oct 31, 2006 8:29 PM
Warm this baby up because I think it is about to see some hot and heavy action tomorrow or the next day,but SSOONNNNN! |
|
B
Benzart
Posted
posted
on
Thu, Nov 2, 2006 8:08 AM
I might have a question or two! I think I can see that the detail does not need to be carved with the 100 grit stones all the time, True? |
|
P
Paipo
Posted
posted
on
Thu, Nov 2, 2006 12:39 PM
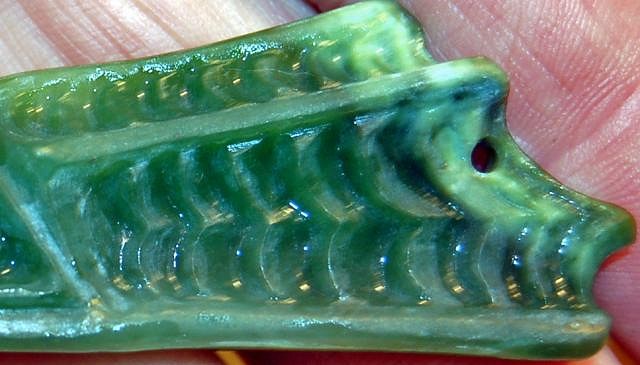
You've got it Benz...carving with the finer grit burrs will leave smoother surfaces, but they do wear out quickly, so use them sparingly for detailing etc. As for the machined look - Time! Hours of sanding out the cuts using the burrs, but with much less water and on lower speeds. This is where experience comes to the fore, as the burrs like to catch when there's no water to lubricate them, so you need to use a light hand. Getting rid of fine tool marks is probably the most frustrating part of the whole process. I personally like the taiaha head a lot how it is now, because it has that nice chiselled look to it. I am going to start doing a few pieces quicker and less machined looking for this very reason, and also to make them more affordable. |
|
T
Tamapoutini
Posted
posted
on
Thu, Nov 2, 2006 1:31 PM
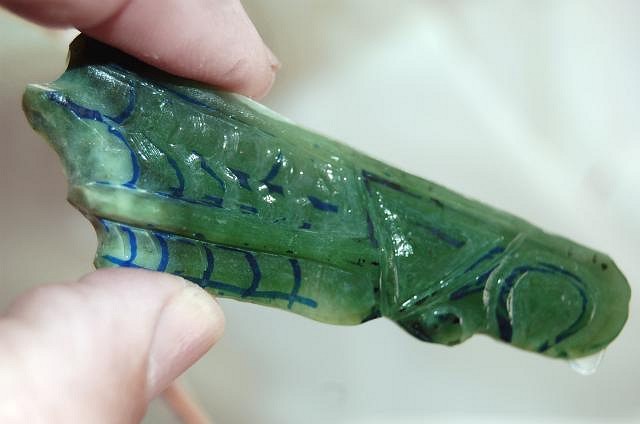
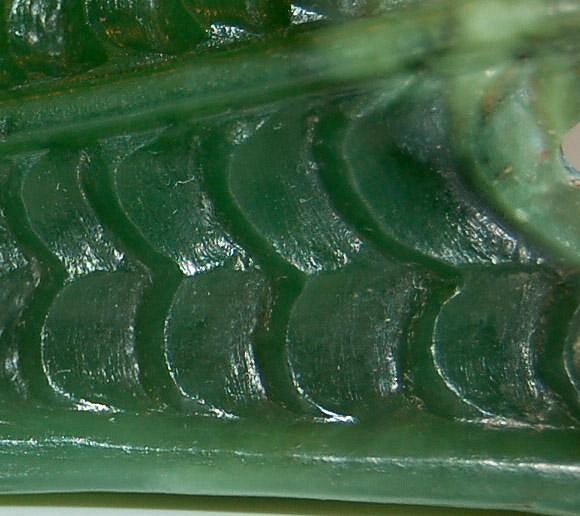
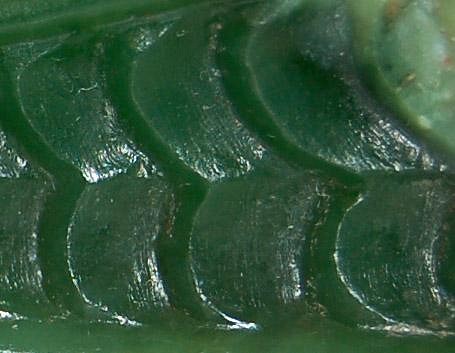
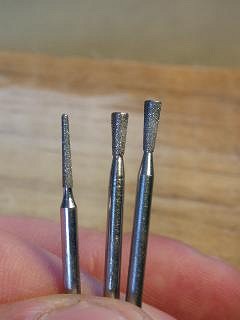
OK Benz. I think youve earned the right to one of TamasTrickyTradeSecrets... The thin needle-burr on the left is first used to incise a line, and then the 'flared-end' burr/s is used each from side of incised line to form the V-cut. Working them at about 45degrees to the cut...Does this make sence? As for dropping/breaking stonework; its just the Ancients playing with you! :lol: See if you can pick up one of those flared fellas for your next project & Im sure we will see some Supreme Crispness from Benz!! Tama :) |
|
B
Benzart
Posted
posted
on
Thu, Nov 2, 2006 2:17 PM
Thanks Paipo, That makes sense, going dry. It sounds like something to do in the morning only for me as I can see where it could get out of hand. I can see where the Machining work is more labor intensive. |

 Here's one of mine that's for sale over at "Marketplace" right now.It is 17" tall. Here's some earlier ones that were bought by one of Tiki Central's California members
  These were about 2 feet tall.