Pages: 1 31 replies
|
T

TikiMeplus3
Posted
posted
on
Sat, Mar 1, 2008 12:26 PM
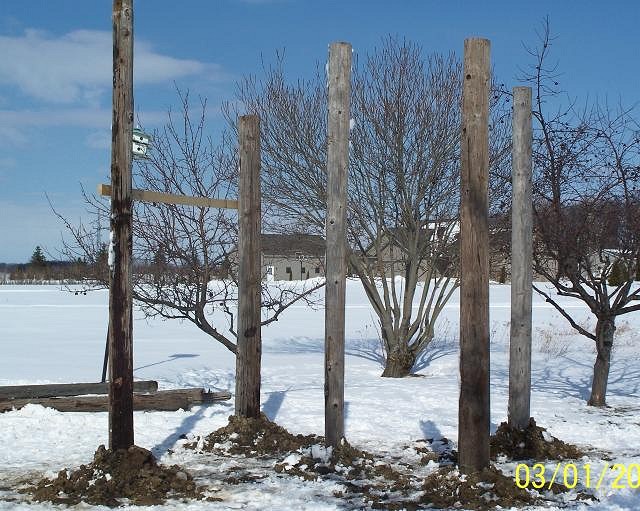
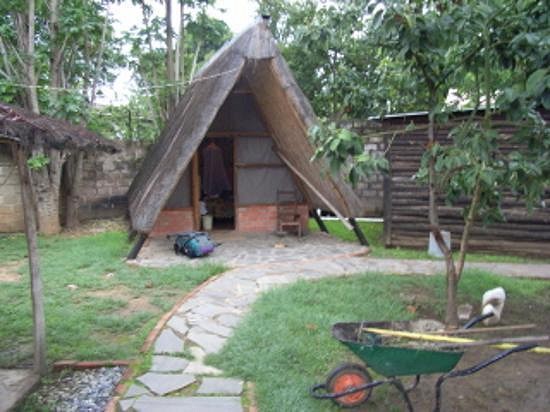
Its never to early to start your tiki project in Michigan!! I set my poles yesterday and I am in the starting process of figuring how high I want the header beams to go so I can clear all to join me for a drink or two. This will be 12x12 and I figure a 3 ft overhang for the roof. If the header goes 9 ft the over hange should be near 7 ft high which I think will be pretty good. I am going to make this nice but not to perfect so I have the effect of something thats been standing a while. If weather holds out I am planning on having this done by spring so I can move onto the floor and so on. So these are the VERY EARLY stages show and soon to follow I will have more.
|
|
M

Murph
Posted
posted
on
Sat, Mar 1, 2008 5:37 PM
Too cool! The sand is really white at your tiki hut. [ Edited by: Murph 2008-03-01 17:38 ] |
|
T

thick
Posted
posted
on
Sat, Mar 8, 2008 9:01 PM
Nice! If you happen to be in the northern end of the lower p. & want some help, let me know, gladly lend a hand for a sweet place to hang out. |
|
M

MrBaliHai
Posted
posted
on
Sun, Mar 9, 2008 8:53 AM
Must've been fun trying to dig post holes in the frozen tundra...:) |
|
T
TikiMeplus3
Posted
posted
on
Sun, Mar 9, 2008 8:17 PM
I had a bad a$$ post hole digger and believe it or not NO FROST in the ground. So 4 feet down was really no problem, suppose to have a warm up this week so maybe I will get more done!! WHOOO HOOOO. |
|
TZ

Tiki Zen
Posted
posted
on
Mon, Mar 10, 2008 7:38 AM
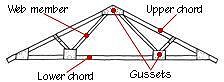
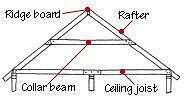
Your plan to have the ridge pole supported by cross members, leaving the center open sounds a lot like what I did.
|
|
S

Swanky
Posted
posted
on
Mon, Mar 10, 2008 9:02 AM
I hate to be a party pooper here, but, structurally, this is a no good plan. Ther eis nothing keeping that roof from fallin in except a few nails. We gotta get some engineers in here helping with these designs. I have had just a bit of statics and dynamics and strength of materials classes and I know this is extremely worrisome. There are good ways to open up the roof interior and there are dangerous ways. I would not allow anyone to stand on that roof and try to put shingles up or anything. It is very likely to collapse. |
|
T

TikiLaLe
Posted
posted
on
Mon, Mar 10, 2008 10:32 AM
http://im1.shutterfly.com/procserv/47b6dc35b3127cce9722c0bf7b7000000026100AZtWLZm2ZsWJg Just some nails holding it up !!!! |
|
T
TikiLaLe
Posted
posted
on
Mon, Mar 10, 2008 10:45 AM
Still holding up !!! Good Nails !! |
|
TZ
Tiki Zen
Posted
posted
on
Mon, Mar 10, 2008 11:59 AM
Guess I should have warned these guys that the roof was going to collapse.
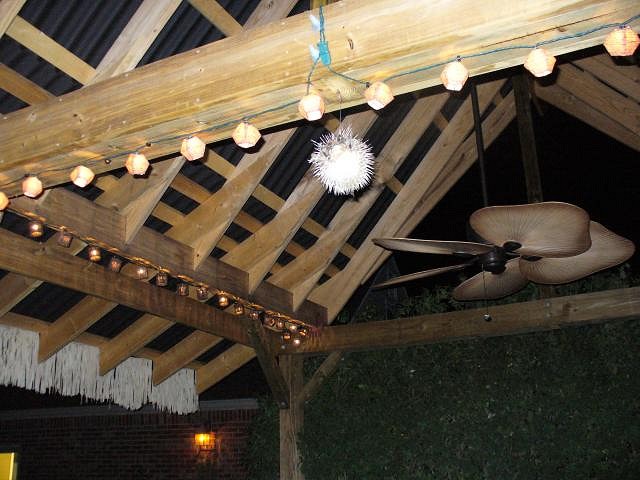
Holding up well so far. Survived a recent storm with winds that tore the roofs off conventionally framed structure. 24 foot 2X12 ridge pole, supported by three 4X6 poles. Steel angle brackets secure the ridge pole to the uprights. Center load is carried by three sets of double 2x10, running to 6x6 posts set four feet in concrete. All through-bolted with carriage bolts. Rafters are 2x8 with 2x4 cross-purlins to prevent wracking. All construction is carriage bolt, lag screw or exterior screw - no nails.
I think it rather well engineered, myself. The building inspector agreed. [ Edited by: Tiki Zen 2008-03-10 12:05 ] [ Edited by: Tiki Zen 2008-03-10 12:07 ] |
|
T
TikiLaLe
Posted
posted
on
Mon, Mar 10, 2008 12:14 PM
you musta yous thos gooda nails!!! Great Job !!! |
|
TZ
Tiki Zen
Posted
posted
on
Mon, Mar 10, 2008 12:41 PM
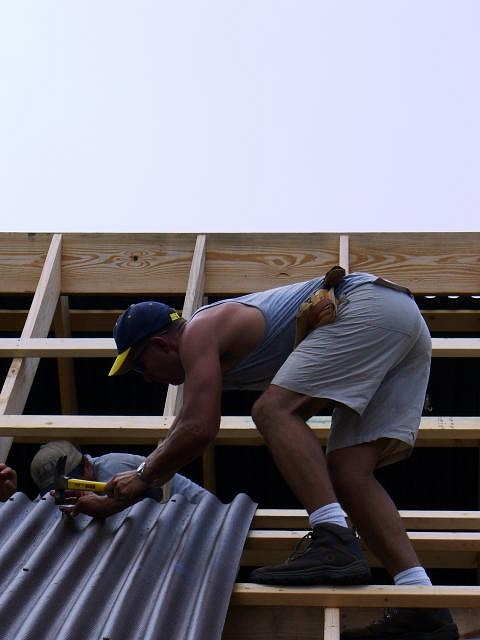
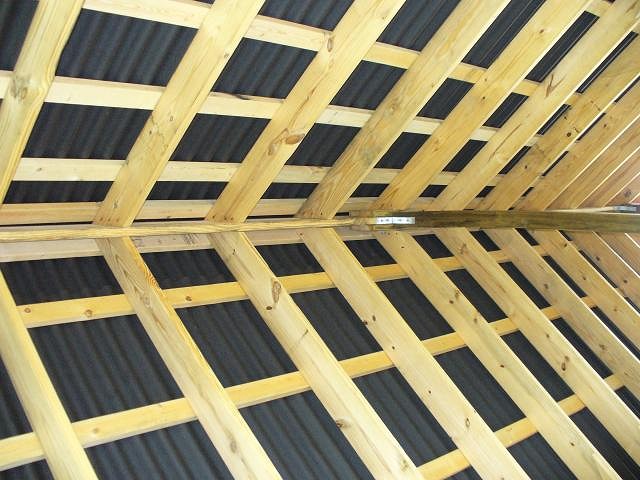
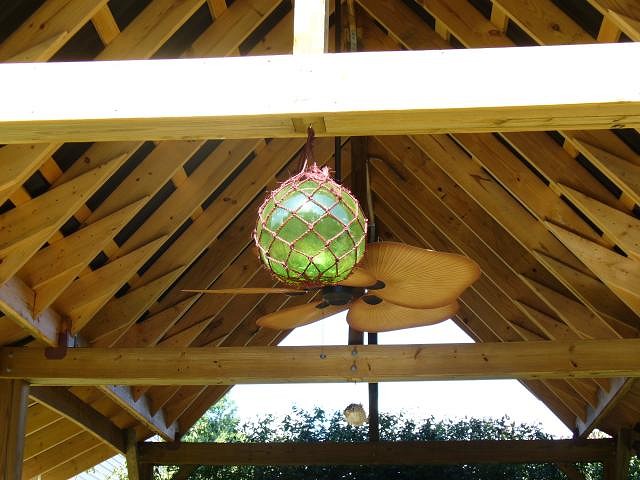
Here is a photo where you can see the cross-beam construction a bit better. The beam is two boards, through-bolted on either side of the 6x6 in-ground post. This creates a six-inch gap between the boards. The 4x6 post that supports the ridge pole is sandwiched between the boards and through bolted. The beam is then boxed with 2x6's top and bottom for added support and to prevent any twisting.
Note also that the rafters, in addition to being secured by screws, are supported by a "birds-mouth" notch at the beam, for wood-on-wood load bearing. We had 8 guys on the roof at one time and it was rock-solid. For this manner of construction, I certainly wouldn't suggest using only nails as they would likely shear. The design using appropriate fastners is sound. [ Edited by: Tiki Zen 2008-03-10 12:52 ] |
|
S
Swanky
Posted
posted
on
Mon, Mar 10, 2008 12:54 PM
I'm not an engineer, I just play one on TC. Strength of materials will go a long way, but, a little bit more truss design will make the whole thing rock solid forever. Basically, it needs to be channeled, in gearhead talk. Okay, let me focus and not ramble. If you bolt your roof beams to those cross beams to form a solid triangle, then you can take that center post out. It serves no purpose. Make a series of strong triangles of that structure, rather than haveing the roof sitting on top of the bolted together box as it is. Then you are using design strength and not material strength to hold it together. Is that at all clear? [ Edited by: Swanky 2008-03-10 13:38 ] |
|
TZ
Tiki Zen
Posted
posted
on
Mon, Mar 10, 2008 1:51 PM
I understand your point about using a truss. Here, the downward load is not sufficient to merit additional support for the rafters - all they have to hold up is the weight of the Ondura corrugated roofing and the 2x4 purlins, which is well within the load bearing capacity of the 2x8's. The load you are referring to is the lateral scissoring force imposed by the rafters on the support beams. Where a truss is not used, conventional framing often utilizes ceiling joists and collar ties to resist this force in tension.
Even in conventional framing, the ends of the rafters (the fins, as you have described it) still either rest on the support beam (or top sill of the support wall) with a notch, rest on top with a tie-strap, or end-butt with through nail or a support bracket. The difference wtht the design I used is that, instead of collar ties and and ceiling joists to oppose the scissoring force of the rafters, I used three very large beams, that are more than sufficient to hold the roof in tension. Moreover, conventional framing ususally uses few or no vertical supports, whereas here we have three, significantly lessening the outward scissoring force because they carry the load of the ridge pole, rather than transfering it down through the rafters. The lateral support beams on which the rafters (fins) rest are secured with both steel brackets and angle brackets - they cannot be pushed anywhere. |
|
T
TikiMeplus3
Posted
posted
on
Mon, Mar 10, 2008 2:26 PM
I understand the concern but I also have spoken to many construction guys and they think this plan will work just fine. I am NOT using nails but I am using 5/8 or 3/4 bolts of varied length to put this all together. So all corners and cross beams will be BOLTED and I am sure this should be fine and would trust my life with it. I am going to take more photos as I go and if there is any other concerns and you have actually built a hut let me know I am more than willing to take ideas, and again thanks for being concerned. This construction I am doing will consisit of the poles show in all of the construction and I am trying to make it look old and used so to speak which is harder than I thought. I am going to keep that tiki theme and run with what I have in my head. By the way AWESOME job on the tiki hut in the photos, its an awesome party place. Take care all.. |
|
TZ
Tiki Zen
Posted
posted
on
Mon, Mar 10, 2008 2:42 PM
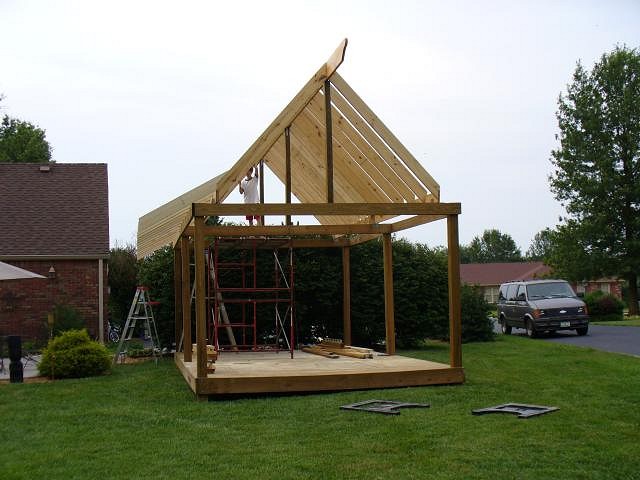
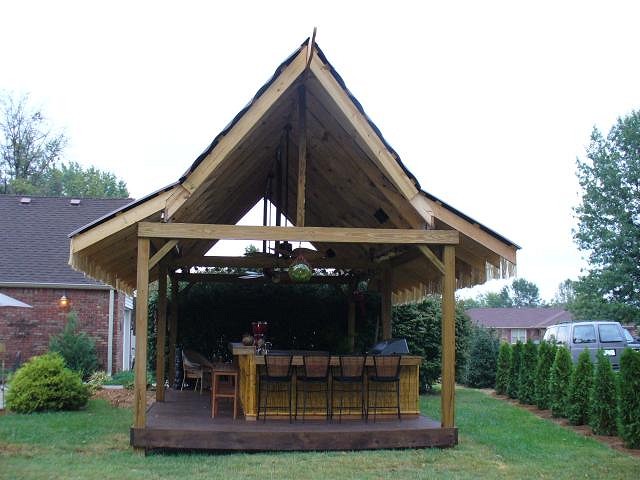
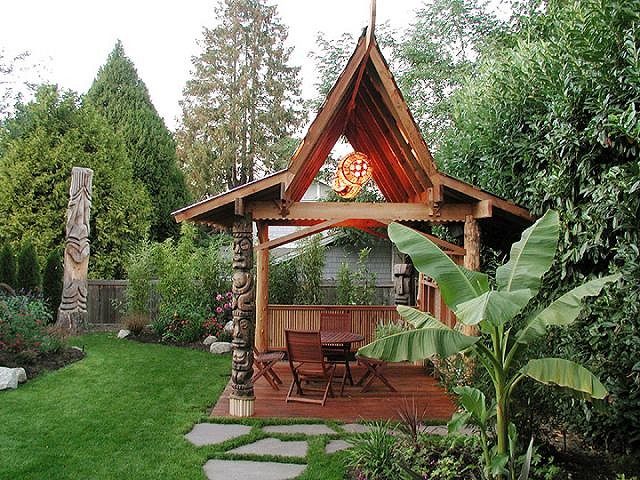
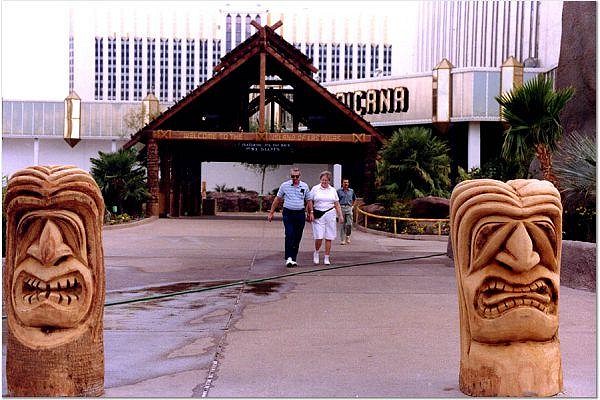
Design from which I took the inspiration. Smaller but essentially the same framing:
And similar, and a heck of a lot bigger:
[ Edited by: Tiki Zen 2008-03-10 14:47 ] |
|
S
Swanky
Posted
posted
on
Tue, Mar 11, 2008 8:56 AM
Sounds like it is well thought out. My main suggestion here is to make sure you have the main "triangles" of the roof structure bolted together soundly. The cross beam won't fly apart and as long as the roof supports are bolted to it, it won't go anywhere. 3-4 of these supports will keep the roof safe. |
|
M

Martiki-bird
Posted
posted
on
Tue, Mar 11, 2008 12:15 PM
I'm kind of lost here. Swanky, are your comments directed to Tiki Zen or TikiMeplus3? If it’s directed toward the structure of Tiki Zen’s awesome hut, there doesn’t seem to be anything structurally wrong with the roofing system. From the photos and Tiki Zen’s description, the size and species of the lumber is appropriate. The appropriate fasteners were used to connect beams at the ridge (I’m assuming back-to-back shear plates with a through bolt.) and metal tie straps (or plates) were used. Apart from the interesting angles, it’s a pretty standard two-layer wood system (beams, purlins and decking), with a hefty ridge board keeping the rafter pairs aligned. The cross members (beams) within the structure function similarly to ceiling joists in that they form a continuous tie and provide the structure with resistance to lateral thrusts. Also, if it’s been built according to code and inspected, I think it’s safe to say that it’s is indeed structurally sound. (And a fabulously designed space to boot!) TikiMeplus3’s hut has a different footprint than Tiki Zen’s. If the comments were offered for his benefit, it would help greatly if TikiMeplus3 could show a rough sketch of what he’s got in mind. I read it as hipped roof rather than gable ended like Tiki Zen’s, but that’s probably because I’ve been staring at ahip roof plan for days now. :) Anyhow, the cautions regarding proper use of fasteners that Swanky has voiced are valid- also keep this mind: the size and spanning of the roof beams is directly related to the roof load (dead, live and wind loads) and beam spacing, which in turn is directly related to the thickness and spanning capability of the wood species and grade used. TikiMeplus3, have you gotten a permit for your structure? Your idea is so cool (I love ‘old’ things) that it would be a real shame if you had to tear it down. I’m not sure what the laws are in MI, but in my town we have to get a permit for permanent structures over 6 feet tall. (Hint: when you go for a permit, don’t be surprised if there isn’t a form for a “Tiki Hut”. Here, an open design is called “gazebos” or “pavilions” depending on the design.) Sorry for beeing so wordy and looking forward to seeing your progress! |
|
TZ
Tiki Zen
Posted
posted
on
Tue, Mar 11, 2008 12:53 PM
Good point about the building permit, Martiki. When I went for mine, and after trying to describe what I was building, the lady issuing the permit finally settled on "recreational structure" as the appropriate designation. |
|
M
Martiki-bird
Posted
posted
on
Tue, Mar 11, 2008 2:11 PM
Ha ha, "recreational structure". That's the catch-all here, too. By applying for a permit first, we discovered that we couldn't build anything permanent on our lot. Oh well, we got a 'garden house' instead (tubular steel frame, staked in, not affixed to a foundation.) A far cry from a tiki hut, but at least we can enjoy our mai tais and lapu lapus in the fresh air. By the way, did they request a drawing or rough sketch to be submitted as well? Apparently, they're doing that in some parts of this state. ~gina |
|
TZ
Tiki Zen
Posted
posted
on
Wed, Mar 12, 2008 6:25 AM
Since it was not a residential structure, no design submission was required. I did have to submit a rough diagram showing the location of the structure in relationship to other structures, the property line and utilities. I don't think they even looked at it, though. |
|
T
TikiLaLe
Posted
posted
on
Thu, Mar 13, 2008 7:35 AM
Was thinking if Swanky posted some of his outdoor tiki hut pictures so we would get a better sense of what he's talking about !!!!! |
|
S
Swanky
Posted
posted
on
Thu, Mar 13, 2008 7:56 AM
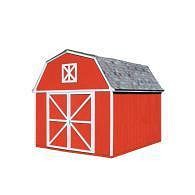
My long term project is to build an A-frame over the barn-like work shed in the backyard. I use the shed for all sorts of projects, but it just looks awful. The idea is to cover it. To something like this: I will do a true A-Frame with the roof coming to the ground and completely open inside. It will simply be a roof over the other building and facade. The angle of the sides of the roof will be the basis for the A-Frame angle.
[ Edited by: Swanky 2008-03-13 12:26 ] |
|
H

Heath
Posted
posted
on
Thu, Mar 13, 2008 7:31 PM
Well, any progress? |
|
R

RevBambooBen
Posted
posted
on
Thu, Mar 13, 2008 8:09 PM
This topic is getting interesting............ |
|
T
TikiMeplus3
Posted
posted
on
Thu, Mar 13, 2008 8:20 PM
There has been progress but no pictures yet. I have been on call for work and my time has been rushed. I will show you guys whats up soon though and I think this is going to look realy cool when finished. I have an idea in my head so hope this will be reality while I put my ideas together. |
|
T
TikiMeplus3
Posted
posted
on
Sun, Mar 16, 2008 10:34 AM
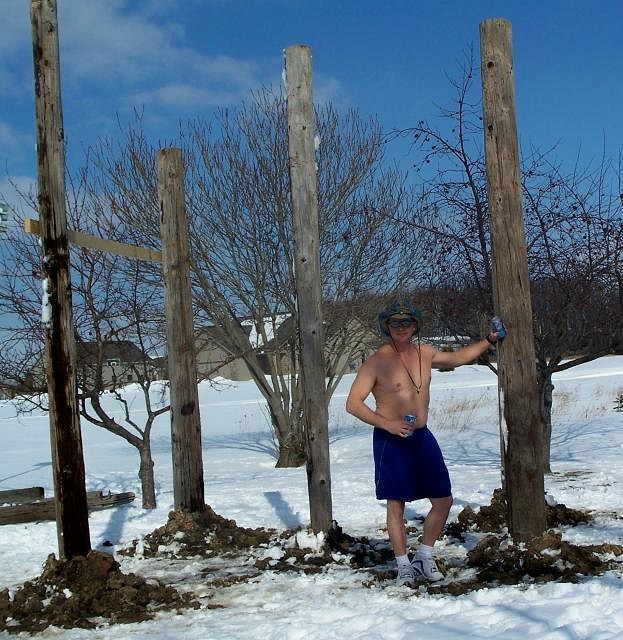
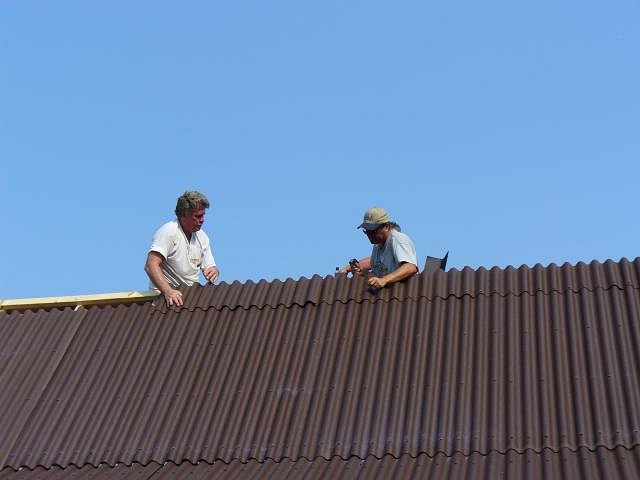
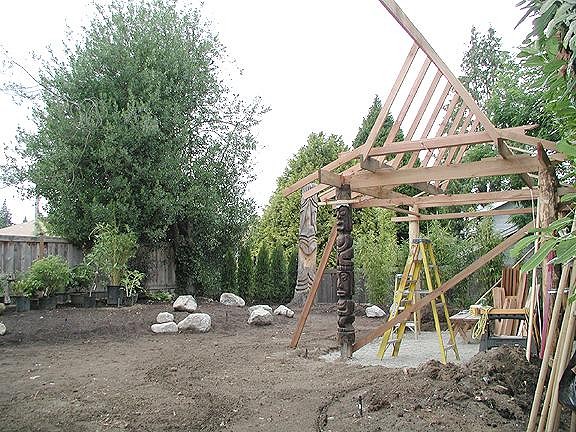
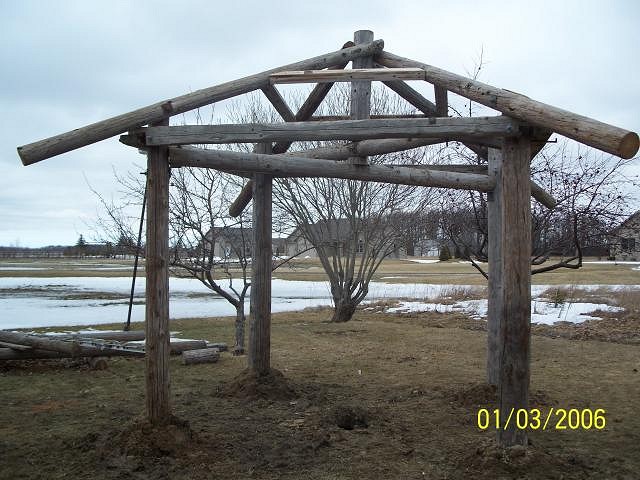
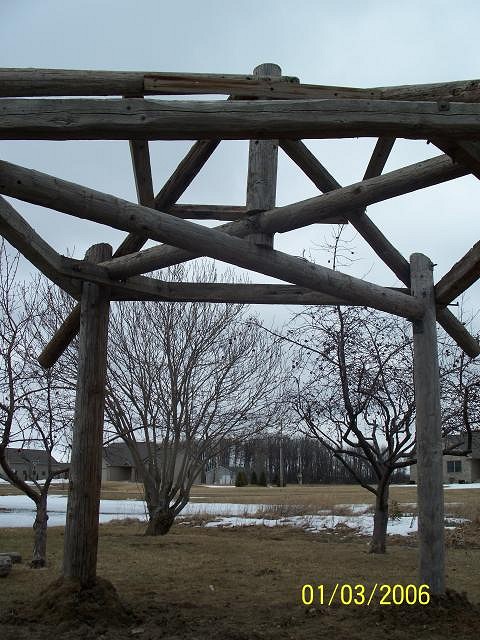
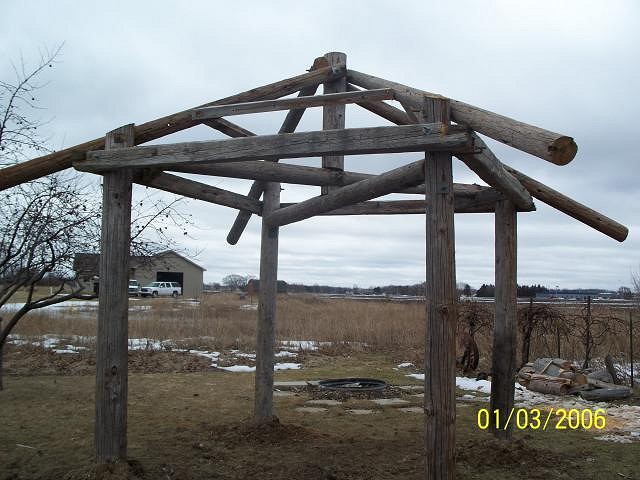
Ok here are progress photos as promised. Go easy on me I am doing this ALONE and this crap is heavy!!! Remember corner poles are 4 ft in the ground all construction is BOLTED together via 5/8 bolts of varied length. The bottom beam that helps carry roof load was the only piece that I used a steel 1/4 plate in a "L" shape and bolted that plate to corner pole then to the cross beam both with 5/8 bolts again. Its not perfect straight but I think it will have that old look Im looking for plus be TIKIFIED when this project is completed in early spring. |
|
H
Heath
Posted
posted
on
Sun, Mar 16, 2008 1:49 PM
Quite a bit of progress, especially if you're working by yourself! |
|
T
thick
Posted
posted
on
Thu, Mar 20, 2008 2:39 AM
Man thats got potential! |
|
T
TikiMeplus3
Posted
posted
on
Fri, Jul 25, 2008 2:03 PM
For anyone who has ever wondered if my project is near done I have great news. The project is almost done and pictures will be attached asap. The structure is complete, the cement floor is poured and colored and looks great and now the actual bar is being constructed. I will keep updating so all can see. |
|
P

Polly_Nesia
Posted
posted
on
Fri, Jul 25, 2008 6:40 PM
Looking forward to your completed project. Have you had a chance to add landscaping yet? |
|
E

exotica59
Posted
posted
on
Fri, Jul 25, 2008 10:31 PM
hey that's good news! I was just wondering if you had time to finish the project. Time to set up the bar and start drinking. |


Pages: 1 31 replies