Tiki Central / Tiki Carving
TikiMango's Carvings- P31, Bone Hawaiian Tapa Hook
Pages: 1 2 3 4 5 6 7 8 9 10 467 replies
|
A

AlohaStation
Posted
posted
on
Tue, Apr 21, 2009 12:49 PM
I like the name: |
|
T

TikiG
Posted
posted
on
Tue, Apr 21, 2009 1:04 PM
Mango - How much $ should I send you...to ship this baby to me out to Sylmar? Love the eyes, man. For me its always the eyes. Dig it! |
|
D

drasticwagon
Posted
posted
on
Tue, Apr 21, 2009 6:34 PM
Awesome |
|
F

FreddieBallsomic
Posted
posted
on
Tue, Apr 21, 2009 7:16 PM
This guy is filled with personality.. Great work! |
|
S

seeksurf
Posted
posted
on
Tue, Apr 21, 2009 7:54 PM
great work on the shading and the area of usage on |
|
T

Tikilizard
Posted
posted
on
Tue, Apr 21, 2009 7:58 PM
Way cool and very unique! If you ever find a job for just laying about and carving, and need an assistant, let me know and I'll bring the doughnuts and coffee. [ Edited by: Tikilizard 2009-04-22 09:52 ] |
|
B

benella
Posted
posted
on
Wed, Apr 22, 2009 12:26 AM
I think that perfect could be the word ! Bravo, Benjamin. |
|
T

TikiMango
Posted
posted
on
Wed, Apr 22, 2009 4:37 AM
Grog, I don't speak the Spanish, only Amurican... I think I'll stick with "The Kneeler". Dos mai tais por favor? AlohaStation, drasticwagon, FreddieBallsomic, seeksurf, and Tikilizard thanks for the kind words. TikiG, I can't ship this one, he's being donated to a charity auction. I have a friend's client that was diagnosed with some medical problems and she doesn't have insurance. My friend is trying to conduct some fund raising to help with medical bills, so my hope is this little guy can help. Benella, when I look at this guy now, he reminds me of a goldfish. :lol:
|
|
T
TikiG
Posted
posted
on
Wed, Apr 22, 2009 8:41 AM
The Kneeler will be part of a charity auction? Let us in on that one! Forward any info. Thanks |
|
T
TikiMango
Posted
posted
on
Thu, May 7, 2009 10:31 AM
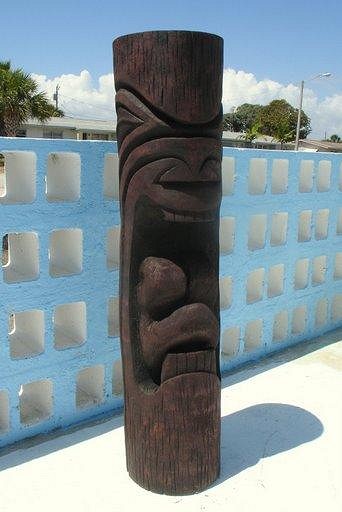
I had a great visit with Ed Volonnino (of http://www.edsheadstikis.com) last week. He sent me an email to welcome me to Brevard county, and then invited me over to his house. He's got some wickedly DEEP cuts in all his work, and I am amazed that he manages such fine "bridges" of palm wood without them breaking or chipping off. It was fun hearing some of his early stories of carving (like 31yrs ago) and how his path has crossed with Wayne Coombs' (of http://www.maitiki.com) more than once. He skooled me on how he strips the bark off a palm log with his chainsaw, and showed me his stash of aged logs, many over a year seasoned. I also managed a small trade of two sets of tiki salt & pepper shakers for a bunch of chisels that Ed had no use for, but could not bare to get rid off, and 2 of his aged logs. I think I got the better deal, but don't tell Ed. This Kanaloa is not one of those aged logs. I don't think I would have the patience to wait that long, especially since I have nothing else to do with my time. This carving is 41" tall and 13" in diameter, and was based off of a Cocoa Joe's mini statue of the same name.
Not sure if you can see them in these photos or not, but there were a few "bad spots" on this log, and it forced me to change my design several times. I suppose it was palm rot, the wood was dark, dry, and brittle, and no matter how sharp my chisels were I couldn't get a clean cut without a chunk coming lose. |
|
T
TikiG
Posted
posted
on
Thu, May 7, 2009 11:20 AM
Wow! Damn! Nice work Mango - gettin' better all the time. At this rate you'll be carving 6 footers by the end of summer. Don't think you've hit your stride (yet) but I see your off and running pretty FAST. Thanks for posting. Can't wait to see more. Cheers! G |
|
T
TikiMango
Posted
posted
on
Fri, May 8, 2009 1:59 PM
TikiG, thanks for the comments. I wish I had a chance to carve 6-footers! About the tallest log I have is 5ft, I won't complain with that. |
|
SD

Savage Daddy
Posted
posted
on
Fri, May 8, 2009 4:55 PM
NIce carvings Mango. :) I really enjoy seeing your work and the originality you put into it. |
|
TD

Tiki Duddy
Posted
posted
on
Fri, May 8, 2009 5:04 PM
Yo, Great carvings! |
|
T
TikiMango
Posted
posted
on
Sat, May 9, 2009 6:58 PM
Savage Daddy, thanks for the comments. I actually wish I had a steady job, for things like insurance, income, helping to stave-off boredom, etc. :( Tiki Duddy, I find carving very fun, and a different creative process and outlet over painting. You too can paint AND carve, just make sure you don't cut-off any digits on your brush hand. |
|
WP

Watango productions
Posted
posted
on
Wed, May 13, 2009 3:31 PM
Great stuff mango, dig the eyes on the third guy kinda Bumatay-esque. |
|
T
TikiMango
Posted
posted
on
Sun, May 17, 2009 9:28 AM
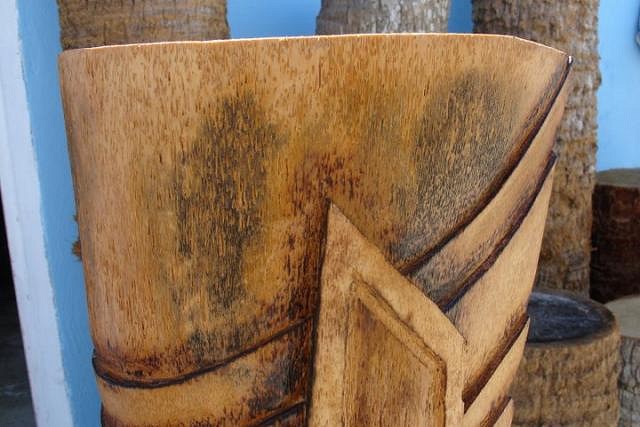
Watango- thanks, I was inspired by the Bumatay mug, I'm glad the origin was recognizable. Quick question all, what does mold look like? Does it look like the images below? I'm seeing these areas grow in size, and it is under the polyurethane finish. Anyone care to share fixes? Would it make sense to sand the finish off and let the log dry out more (if that is the cause)? Or is this just a lost cause? On to a new carving! I wanted to experiment with different styles, and decided to stray a bit from the more traditional styles that I prefer. I wanted something with a gaping mouth, gnashing teeth, and tongue. I also wanted to get the feel for really removing material and practice on carving holes. So I don't have any in-process shots, but I did carve a bunch of thru-holes that I later joined to form this mouth and tongue. As I started to work with this log, it became apparent that this log did not want to play nice, it was very stringy and springy. I really had to angle my chisels for them to bite into the wood. The tiki itself is 41" tall and 10" in diameter. After torching, I first stained it in Ebony, thinned out to create a wash (about 1:3 stain:mineral spirits). I then sanded it a bit and stained it with a wash of Red Mahogany. I was trying to go for an older look.
As I was working on this guy, the wood was splitting pretty bad too. The center of the tongue was the worst, but there are cracks all inside the mouth and around the tongue. Is this due to removing so much material, it is causing the wood to split to reduce stresses, or is it just drying out too fast? I tried to incorporate the splitting wood into the design by carving my own "splits & cracks" at the top and bottom of the tiki. I believe in being proactive. Pupule Tiki! [ Edited by: TikiMango 2009-05-17 10:06 ] |
|
M

mp
Posted
posted
on
Sun, May 17, 2009 9:58 AM
Awesome Tikis TikiMango! I dig your style. |
|
A
AlohaStation
Posted
posted
on
Sun, May 17, 2009 12:26 PM
That's mold! The only way to get rid of it is to sand it off. The mold comes from when you seal the wood before its dry. There is so much moisture in FL not only in the logs but the air as well, that waiting for a log to dry is a study in patience. Sometimes the mold can actually make a tiki look pretty cool. I've cut dead trees and had buckets of water drain from them. The cracking your getting from the inside is again from the moisture that the log had. The heart of the palm has the most water in it and when you make those deep cuts the water escapes faster - causing the cracks. Wait till you get a log with rot. It will look great on the outside but the inside is soft and stringy. All of these issues with Palm have pushed me over to the hard wood. |
|
B
benella
Posted
posted
on
Sun, May 17, 2009 11:28 PM
Sorry Mang: I can't help you on mold but I can tell you that your style's outstanding ! The last one has clean and neat lines and look really great. Bravo, Benjamin. |
|
T
TikiG
Posted
posted
on
Mon, May 18, 2009 10:52 AM
Nice work, Ray! Thanks for posting. G |
|
LLT

little lost tiki
Posted
posted
on
Mon, May 18, 2009 11:17 AM
mold sux,Ray! this new one is looking great! |
|
T
TikiMango
Posted
posted
on
Mon, May 18, 2009 3:30 PM
MP, thanks for the comments. I'm sorry I moved away before getting a chance to see your work at the Tonga Hut art show. AlohaStation, thanks for the mold insights. So is this mold only on the surface, or can it sometimes run deeper? It's raining too much right now, but maybe next week I'll break out the sander and see what happens. Benella, thank you for the support. I took French for 2yrs in high school, then promptly forgot it all as soon as I left school. C'est la vie. LLT, thank you... now if I could only be as fast with a chisel as you are with a brush. Oh wait, on second thought, that would be just plain scary. |
|
S
seeksurf
Posted
posted
on
Mon, May 18, 2009 5:06 PM
Nice! he is so bold and strong looking great job. |
|
D
drasticwagon
Posted
posted
on
Mon, May 18, 2009 5:57 PM
LOVE IT! |
|
B
benella
Posted
posted
on
Tue, May 19, 2009 1:42 AM
:lol: I'm sure you can still understand that: tes tikis sont fantastiques ! :wink: Benjamin. |
|
B

Benzart
Posted
posted
on
Tue, May 19, 2009 3:03 AM
Aloha hit the nail on the head, you've got mold and the sanding Is the only way to go. |
|
S

surfintiki
Posted
posted
on
Tue, May 19, 2009 2:45 PM
Space Coast! My old stomping grounds, good to see a talented carver there. PLENTY of surf shops to put 'em too! Beautiful work my friend! |
|
T
TikiMango
Posted
posted
on
Sat, May 23, 2009 1:39 PM
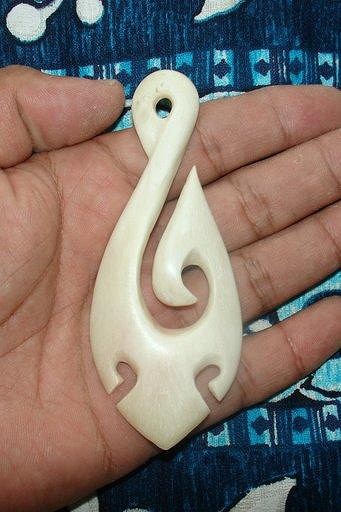
So for anyone not in FL, it's been raining pretty much this entire week. It's been too wet to carve outside, so I had to bring my carving into the garage. I decided to try my hand at bone. You bone carvers never bothered to mention that it smells like burning hair (and that's with a mask on)! I was lucky enough to get this bone from the local pet store, a perk of finally owning a puppy/dog. So here's my first attempt with bone, a NZ Hook Pendant.
Looking for advice and pointers about this pendant from all you regular bone carvers. I found this very fun and a nice change of pace from carving palms. Maybe I'm hooked, no pun intended. |
|
G

GMAN
Posted
posted
on
Sat, May 23, 2009 1:49 PM
Too BIG? Hell no! Ask Buzzy what the correct pendant size iz! He likes 'em BIG! Very nice work, especially considering what you have to work with. I would have paid money to see you putting the beat down on that bone to get at smaller pieces. Kinda like chimps using "tools" :lol: . Gotta love it. That's my kinda work.....bang it on the ground man! I recommend getting a scroll saw and some teeny weenie burrs....especially bud burrs. Be proud of that one! -G http://www.oceanandislandarts.blogspot.com/ [ Edited by: GMAN 2009-05-23 13:50 ] |
|
T

tikimecula
Posted
posted
on
Sat, May 23, 2009 8:37 PM
Nice work! I tried that once but the burning bone smell about killed me. Keep em coming! |
|
B
Benzart
Posted
posted
on
Sat, May 23, 2009 9:04 PM
Yeah, That's Perfect for a pendant! Nice work. |
|
T
TikiMango
Posted
posted
on
Sat, May 23, 2009 10:01 PM
GMAN, thanks! I know my way around a hammer and sledge, I use to be a Rockhound... though I did feel like an ape on 2001: A Space Odyssey. I need to get them smaller burrs. Tikimecula, yea, they seem to gloss over that smell here on the forums. After awhile though you get numb to it, till after you take a shower and walk back to the carving area. Whew! Benzart, thanks. I strung it on some hemp twine, the size is perfect. I was really worried it was too massive. So this bone was slightly discolored, and is not nearly as "white" as some of the other carvings I have see. Is there some pre-treatment or post-treatment that you guys are doing? I did boil this piece for about 45mins in salt water before the final sanding and buffing, it seems to brighten it up a tad. |
|
G
GMAN
Posted
posted
on
Sun, May 24, 2009 4:19 AM
Mango, In regard to whitening.....use peroxide to go whiter (never use chlorine bleach) and a cold tea bath for a more aged look. I use a lot of peroxide over here for non-carving stuffs and use 20 volume clear developer that I buy at Sally Beauty Supply. If you go there, do not get the creame developer, get the clear developer. A small bottle is about 3 buck and will last you a long time. I usually soak my bonz in tea to darken them up. I like the look of old stuffs. Havee fun, G |
|
B
Benzart
Posted
posted
on
Sun, May 24, 2009 5:45 AM
Hey Tiki Mango, Oh Yeah, The Bone Stinks when you carve it, sorry you weren't prepared. There is mantion of that smell several times here but not as strongly as it should be. |
|
TJ

tyger jymmy
Posted
posted
on
Mon, May 25, 2009 9:33 AM
Hi Mango Very kool stuff ya got there , the one you and Kirby colaberated on the fire burning looks Awsum , Wow the Grain is killer . Hava good one . |
|
QK

Queen Kamehameha
Posted
posted
on
Mon, May 25, 2009 10:53 AM
nicely done! Amy |
|
BPB

Bay Park Buzzy
Posted
posted
on
Mon, May 25, 2009 11:36 AM
I think one of my pendants could actually wear that pendant. It's never too big... That's what she said! |
|
T
TikiMango
Posted
posted
on
Tue, May 26, 2009 10:19 AM
Thanks for all the comments! I finally got some of the "correct" bone from the pet store and did another pendant.
|
|
IK

Iokona Ki'i
Posted
posted
on
Tue, May 26, 2009 11:07 AM
Killer bone carving tikimango! |
|
T
TikiG
Posted
posted
on
Tue, May 26, 2009 11:55 AM
You've just blown the collective mind of everyone here in Van Nuys, Mango! I'm f'ckin proud to say I can count on you to liven up my spirit with your creativity. Needless to say you have customers lined up if you want the work..PM me if interested. Thank God for the rain in Florida otherwise we may not have seen this type of work so soon. Thanks again for posting your latest work. G |
|
T

tikisbytyler
Posted
posted
on
Tue, May 26, 2009 12:38 PM
WOW! I'm glad you mentioned the smell. I live in FL too & lost part of the roof on my outdoor workshop last week. I was considering bringing my small tools in the house & trying my hands at something similar to this. These look great & I actually think that barb that comes down at the bottom of the second one gives it quite a lot of originality & character. I would be proud to have one of your pieces occasionally harpoon me when I forgot to keep mind of it. |
|
T
TikiMango
Posted
posted
on
Tue, May 26, 2009 1:47 PM
Iokona Ki'i, thanks! I love the direction your art, especially the velvets, are taking. TikiG, I know you have a Dremel... hop to it! Your comments drive me to try different things. Tell everyone back in the Valley I said Howdy. Tikisbytyler, yes, your wife would have killed you! If she didn't kill you over the smell, she would have killed you over the amount of dust that was generated. Neptune Beach you say? We should try to find someone in Ormond Beach or Daytona to host a weekend chop & carve... Speaking of dust, when one carves bone, should you do it dry or wet? So far I have done most of it dry, sometimes on the 140 grit sanding I'll dunk the piece in water. The only time I have burned the bone is when I'm using the buffing wheel. Should I buff wet? |
|
F

finkdaddy
Posted
posted
on
Tue, May 26, 2009 4:14 PM
Very cool bone work. Nice! |
|
L

laojia
Posted
posted
on
Tue, May 26, 2009 8:15 PM
Maybe too many speed rpm on your buffing wheel... Can you try more slow? J. |
|
T
TikiMango
Posted
posted
on
Wed, May 27, 2009 2:02 PM
Wow, is there a Bone Carver's Anonymous or something? I'm addicted to the stuff now! Must be the smell... :lol: Here's the latest, finished this one off this morning (and look, raining again). I wanted to make something that fell in between the two others I made. This one is 3" x 1.38" and though it may be hard to tell in the photos, the hook sort of overlaps the body a la Paipo's Goddess of Death and Night (thanks for the inspiration Paipo!).
I'm having a hard time getting inside the nooks and crannies with rolled-up sandpaper. I guess I need to put some jeweler's files on the list of Things That Cost Money. As for the buffing, Laojia, I've got my tool on a speed controler and it's going as slow as it can without stalling. |
|
T
tikisbytyler
Posted
posted
on
Wed, May 27, 2009 5:12 PM
Awesome, Mango!!! You are on fire! |
|
S
surfintiki
Posted
posted
on
Wed, May 27, 2009 5:46 PM
Stuff's looking great. If you choose some files, share with us what you get. |