Tiki Central / Tiki Carving
TikiMango's Carvings- P31, Bone Hawaiian Tapa Hook
Pages: 1 2 3 4 5 6 7 8 9 10 467 replies
|
T

TikiMango
Posted
posted
on
Thu, May 28, 2009 12:45 PM
Surfintiki, I picked up some needle files, both traditional (12pcs) and diamond (5pcs). They aren't the greatest since they are from Harbor Freight, but the price was right ($5 and $4). They even came with handles. Playing around on some bone, both seem to do a good job. The traditional files leave ridges while the diamond ones do not. |
|
T

tikisbytyler
Posted
posted
on
Thu, May 28, 2009 1:03 PM
Alright TMango, can you show me a shot or two of the initial approach? I can't seem to pick a starting spot. My natural instinct has always been to just go at it with the chainsaw first, but that is not going to work in this case. |
|
T
TikiMango
Posted
posted
on
Thu, May 28, 2009 1:47 PM
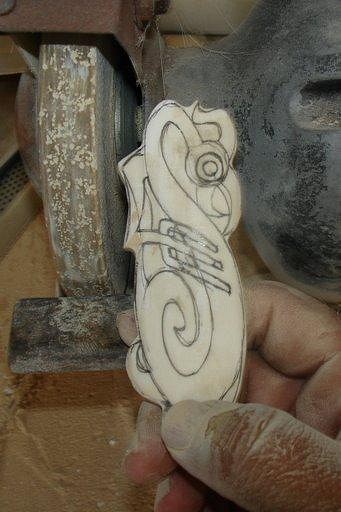
TbT, I just started with the bone myself, so I am not sure I'm the one that you should be asking. I'd hate to teach you inefficient work flow and bad habits, but... I don't have any images of my process (maybe next one), but I'll try to explain things. I first start by cutting a piece of bone off the tubular shank. I don't have power tools for this, I use a manual Japanese pull-saw. I then go over to the bench grinder and try to form the "C" shaped fragment into a flat work piece. This generates the most smell and dust, and it is very easy to burn/scorch the bone, so be careful if you follow this. Once my piece is relatively flat and equal thickness (or not), I sketch the design with a pigment pen. Pencil doesn't work for me. Usually I like my pendants to be thicker at the top, I reason that the area around the lanyard should be the strongest area. After the design is roughed-in, it's back to the pull-saw to cut away the majority of waste material that isn't part of the pendant. I should use a vice or something, but I don't. Then I use the bench grinder again to shape the outside of the pendant, smooth down all the sharp edges I don't want. I think if you had a coping saw and were good at it, this step would go much quicker. I then use my Dremel-like tool with an 1/8" round burr to create all the through-holes. It removes material very quickly, and can jump around if you try to take too much, or are pushin' when you should be draggin' (or vice versa). I have mine plugged into a speed controller so I have more control. When I have a large opening, I'll create several holes, then join them to form the shape I want. After that, there's a lot of bit changes... smaller burrs, different shapes, grinding and sanding bits. I think I need a micro-chuck to save some time looking for that stupid tool wrench. Once your design is done, it's all finish work- sanding and more sanding (and filing now), till everything is smooth and the surfaces have decent (your call) transitions. I hit things with a small buffing wheel, again, it's too easy to burn the bone at this step... and that's it in a nutshell. I hope those doing it longer than me (the experts) chime-in and provide proper advice. :D |
|
T
TikiMango
Posted
posted
on
Fri, May 29, 2009 10:35 AM
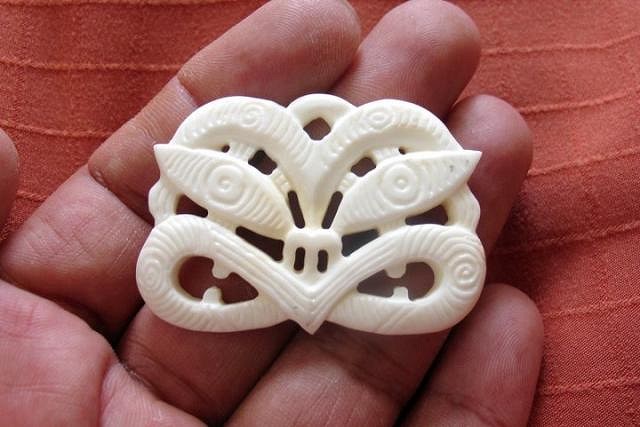
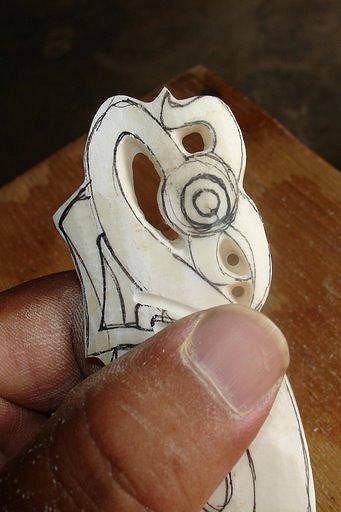
I got a few new burrs and had to test them out. I might have attempted something beyond my means for now, but it was good practice regardless. Still learning the tool behavior. Here's the Maori Wheku that I attempted. Maybe I need to lay off the caffeine to steady-up my line work. :D
I envy you other bone and stone carvers and the glass-smooth look you give your pieces. When I look at this I am reminded of the quote, “If at first you don't succeed, destroy all evidence that you tried”- Jack Handy |
|
IK

Iokona Ki'i
Posted
posted
on
Fri, May 29, 2009 11:17 AM
I think it looks great! Very intricate details. Velvets by J. Sallin [ Edited by: Iokona Ki'i 2009-05-29 11:19 ] |
|
T
TikiMango
Posted
posted
on
Sat, May 30, 2009 12:38 PM
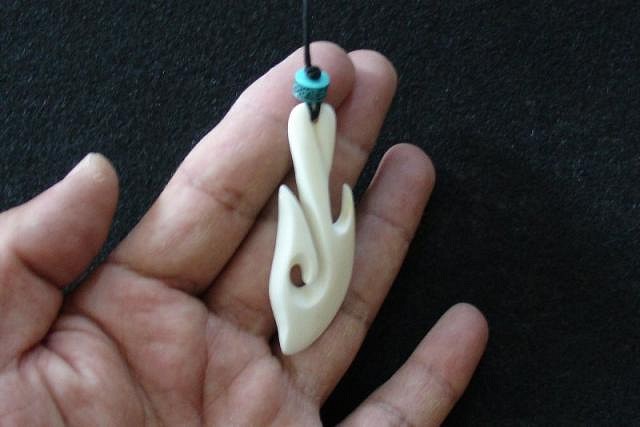
I thought I'd go ahead and post my pendant that I did for the Tiki Art Swap. I finished this off this morning.
|
|
T

Tikilizard
Posted
posted
on
Sat, May 30, 2009 2:56 PM
Really wonderful bone carvings. I like the antiquing. Really makes a difference. Keep up the great work. |
|
B

Benzart
Posted
posted
on
Sun, May 31, 2009 3:19 AM
Excellent stuff here t-Mango,I see you have been caught by the lure of the bone carving. It is Very possessive and addicting. It seems that bone allows you to get finer detail and opens creative doors not found with wood or stone (though the wood and stone have their own high points). I have never tried carving the bone wet, always dry so if you are burning the piece then the burs are spinning too fast, are you using a flex-shaft unit or micro motor? If not and you see a lot of small stuff in your future then one of those will do wonders for you. As for burs, I use small dental diamonds for the intricate fine detail and for a lot of cleanup there. Also us small carbide burs too. Also lots of small bits of sandpaper here and there but I'm not one for a lot of hand sanding. I get a Lot of my burs on eBay from the dental supply houses and jewelry tool suppliers. PM me if you would like more specifics. |
|
LS

Lake Surfer
Posted
posted
on
Sun, May 31, 2009 5:54 PM
Those are excellent carvings! I've dabbled a little with bone, and for me it is a difficult media to work in. These cuts you've made and the detail work are wonderful. They look very delicate to work with, but you've handled them well! |
|
S

seeksurf
Posted
posted
on
Mon, Jun 1, 2009 6:47 AM
Very nice work looks like you know what your doing with this. |
|
QK

Queen Kamehameha
Posted
posted
on
Mon, Jun 1, 2009 8:37 AM
wow, the detail is great! I love the size of this piece! Amy |
|
L

laojia
Posted
posted
on
Mon, Jun 1, 2009 12:30 PM
This bones lace make me Happy! :D And more happy what you join the art swap!! :D :D Top cool PNG bone carving... J. |
|
T
TikiMango
Posted
posted
on
Mon, Jun 1, 2009 2:02 PM
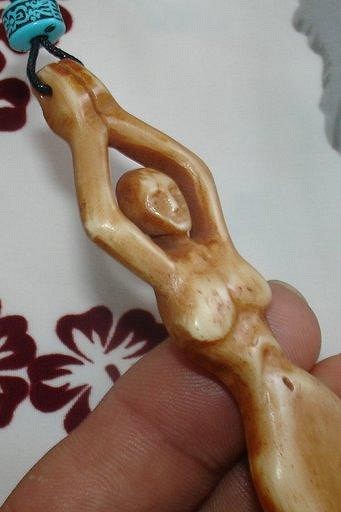
Tikilizard, thanks for the comments. I'm diggin' the antique staining, but I might be taking it a bit far. I don't want to lose the bone. Benzart, thanks for the tool info. I am burning only when I am buffing. I've found that vigorous rubbing against the jeans works pretty well (minds out of the gutter folks). I need to get a flex-shaft and a real Dremel one of these days. I'm not ready to invest in a micro-motor just yet. Lake Surfer, thanks, your relief carvings blow me away. Seeksurf, I don't have a clue, but I'm learning and am a great faker in the mean time. Queen K, I enjoy these sizes too, at least now that I'm used to looking at 'em. Laojia, carving the "bone lace" made me nervous as heck. Merci. On the Exotica Girl thread, and numerous others, I was drawn to the thought of mermaids, especially since I have missed watching Marina in the water for the first time/last time. The below pendant looks nothing like her, except maybe for the tail and other anatomical features.
|
|
B
Benzart
Posted
posted
on
Mon, Jun 1, 2009 7:37 PM
Pupule, its difficult to get consistent coloring when trying to stain the bone which is why most of mine are left natural. On this girl's face you did great just to get any definition at all, that is a Small head. |
|
S
seeksurf
Posted
posted
on
Mon, Jun 1, 2009 9:39 PM
I think she is cool stain area or not. |
|
T

TikiG
Posted
posted
on
Tue, Jun 2, 2009 8:05 AM
Nice work Ray...lucky f'ckers in Florida! They get first dibs on this beautiful work. SEND SOME TO SO.CAL SOON!!!! |
|
K

kirby
Posted
posted
on
Tue, Jun 2, 2009 10:03 AM
dude.. i sum how misssed all this stuff.. fucken amazing!!! |
|
G

GROG
Posted
posted
on
Tue, Jun 2, 2009 10:09 AM
It's Mangoliscious! |
|
T
TikiMango
Posted
posted
on
Tue, Jun 2, 2009 1:50 PM
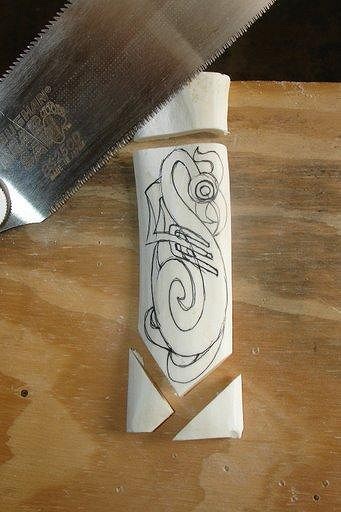
Benzart, thanks again for all the nifty tool info, I'll search the Toolz thread when I get into a position to buy a micro-motor or other item. You're saying this is a Small head? Wow, thanks. Seeksurf, thanks for liking the stain. I will probably hit it with some fine sandpaper and rebuff to change the look a tad. TikiG, thanks for the comments. I'll send a few your way one of these days. Kirby, following your thread, it is easy to see how you missed mine... USB pendant, commemorative CD work, losing a Rumpus Room alumni. Thanks for the peek. Grog, thanks. Now if Grog could only send me his dino bones (a la Flintstones)from dinner or his lunch, I would be set for life. I remembered to take some in-process photos today, and thought I would share a little bit more about how I go about this.
Pupule Tiki! [ Edited by: TikiMango 2009-06-02 13:53 ] |
|
S

squid
Posted
posted
on
Tue, Jun 2, 2009 2:12 PM
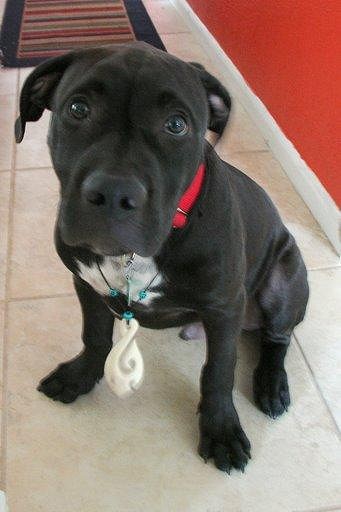
Looks like bone dust is more like Canine Quaaludes! Awesome stuff Mango! |
|
G

Grapa-RuHa
Posted
posted
on
Tue, Jun 2, 2009 2:35 PM
Great bone carving TikiMango. The PNG piece is killer. |
|
S
seeksurf
Posted
posted
on
Tue, Jun 2, 2009 3:09 PM
I'm digging this new design. |
|
S

surfintiki
Posted
posted
on
Tue, Jun 2, 2009 3:41 PM
Wow! Great stuff! The bone dust is REAL bad for us humans, I have no idea what it'll do for dogies. I can't picture him with a mask! HA HA |
|
L
laojia
Posted
posted
on
Tue, Jun 2, 2009 10:52 PM
You're on fire: one piece per day!! Ryoba saw, me too my prefer... Very interesting in-progress pics and very good piece! J. |
|
T
TikiMango
Posted
posted
on
Mon, Jun 8, 2009 8:51 AM
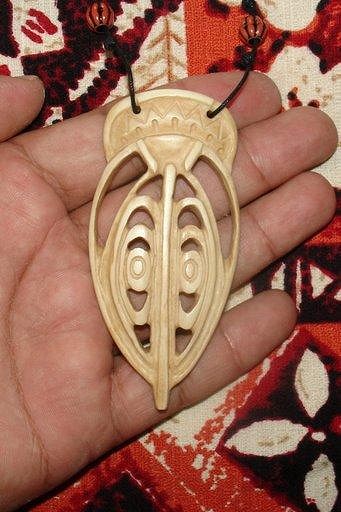
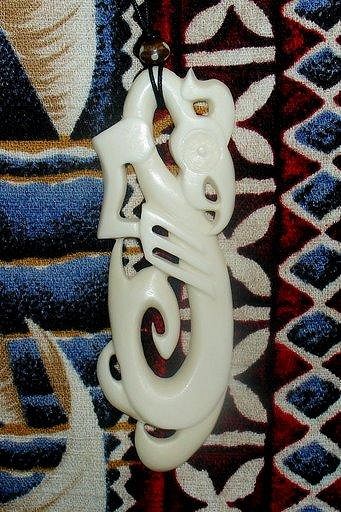
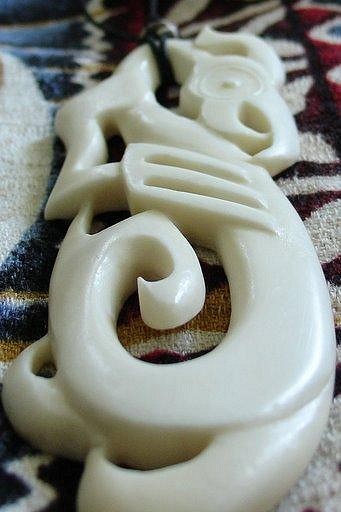
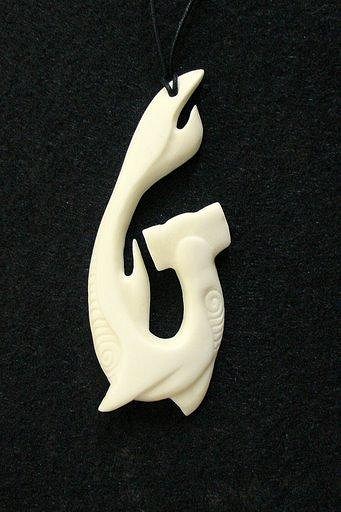
Wow, what a busy week for me. I had friends drop-in from Kentucky, Alaska and Japan, some that I haven't seen in 15yrs. I guess June is the vacation month. It's really cool to be able to talk with old friends like you just saw them yesterday. All the "make nice" with old friends didn't leave me any time to be creatively productive, but I did manage to finish up the Manaia from the progress pictures.
|
|
T
tikisbytyler
Posted
posted
on
Mon, Jun 8, 2009 9:21 AM
Your stuff is really beautiful, Mango. Keep raising the bar! |
|
G

GMAN
Posted
posted
on
Mon, Jun 8, 2009 11:26 AM
Ohhhhhhhhh! Gman likee!!!! |
|
CC

Creative Chimp
Posted
posted
on
Mon, Jun 8, 2009 12:34 PM
there seems to be a sunami of GREAT stuff hitting the post these last couple weeks. yours to be included in that creative wave MR Mango! great work... man i have to get off my butt!!!!! Awsome work.......nothing else i can say but ...NICE |
|
T
TikiMango
Posted
posted
on
Mon, Jun 8, 2009 6:49 PM
Tikisbytyler, if we keep pushing each other, sooner or later one of us is going over the edge without a barrel. Thanks. GMAN and Creative Chimp, thanks for the comments. This piece was fun, and it actually forced a little patience out of me. So I was talking about going smaller, and had a few scraps of bone handy. I find that I'm not throwing anything out just yet. I had bought some hardware at the store, but didn't really know what is was for until I knew what it was for.
|
|
T
tikisbytyler
Posted
posted
on
Mon, Jun 8, 2009 6:57 PM
Very nice! |
|
L
laojia
Posted
posted
on
Mon, Jun 8, 2009 8:57 PM
Your manaia is WOW!! Very impressive!! J. |
|
M

MooneyTiki
Posted
posted
on
Tue, Jun 9, 2009 9:50 AM
TikiMango you have it goin on my friend!!What a bunch of Beautiful carvings.Great stuff !!Keep it up,Aloha, Mooney |
|
S
surfintiki
Posted
posted
on
Tue, Jun 9, 2009 10:16 AM
MAN! Good show there TM! Nice smooth, white bone. I'm loving what's coming out of Satellite. |
|
K
kirby
Posted
posted
on
Tue, Jun 9, 2009 2:49 PM
your kicking ass and taking names, your no hack, thats for sure.. you defiantly have my respect!!!Awesome!! |
|
T
TikiMango
Posted
posted
on
Tue, Jun 9, 2009 4:47 PM
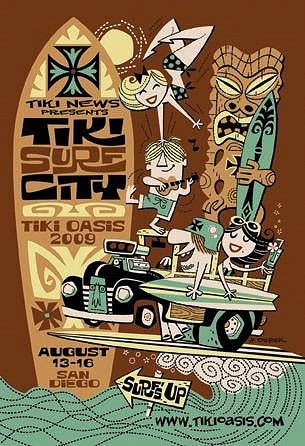
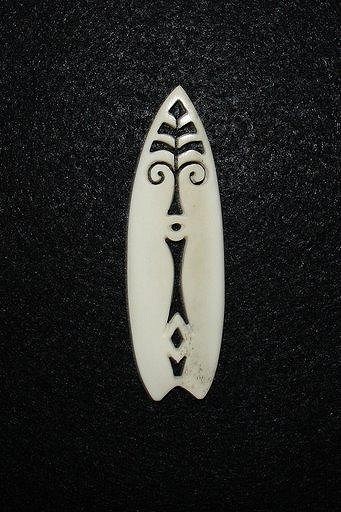
Tikisbytyler, thanks for the comments. Grab inspiration where ever you can, sometimes in the most unexpected places. Laojia, thank you for the kind words. Does your handle mean anything in particular? MooneyTiki, mahalo! I just spent the better part of an hour going through your carvings. Great, huge, gorgeous pieces! Surfintiki, thanks for checking in again. I have not had the chance to get to Dakine Diego's yet, not sure why. I do like burritos. If you're ever over this way... Kirby, thanks for the props! It's all your fault for not showing me how to handle a hook knife while I was in SoCal. Speaking of inspiration, I was inspired by Surfintiki's surfboards I saw yesterday, and the fact that I probably won't be making it out to Tiki Oasis this year. So I figured that I needed to make my own memorabilia. Besides, after a few drinks, people won't remember if I was there or not (but I was there, see? I have this pendant). So I tried to duplicate Ku's surfboard in the TO9 flier in bone.
|
|
B
Benzart
Posted
posted
on
Wed, Jun 10, 2009 10:28 AM
Really nice bone works. Careful or the bone won't let you go back to wood. :lol: |
|
T
TikiMango
Posted
posted
on
Wed, Jun 10, 2009 12:34 PM
Benzart, I think it already has it's claws sunk deep! |
|
T
TikiMango
Posted
posted
on
Wed, Jun 10, 2009 1:07 PM
I managed to squeeze one more out, now I gotta pack for Hukilau!
|
|
T
TikiG
Posted
posted
on
Wed, Jun 10, 2009 1:23 PM
Nice Ray! Whatever you don't sell at Hukilau.... ....who am I kidding? |
|
T
tikisbytyler
Posted
posted
on
Wed, Jun 10, 2009 2:20 PM
Awesome, Mango!!! Have a blast! |
|
L
laojia
Posted
posted
on
Wed, Jun 10, 2009 9:32 PM
One more time a very cool pendant... You're on fire with bone carving! Have you find a cow skeleton in your garden? :roll: J. |
|
S
seeksurf
Posted
posted
on
Thu, Jun 11, 2009 9:45 PM
nice nice nice! |
|
B
Benzart
Posted
posted
on
Fri, Jun 12, 2009 3:17 AM
Excellent stuff mango, can't wait to see it and you at Hukilau! |
|
T
TikiMango
Posted
posted
on
Tue, Jun 16, 2009 7:42 AM
Wow, what a weekend! Hukilau was great, hot, but still great. The pool temp at the hotel I was staying at was a refreshing 92f. I remember after Oasis last year, I had such a tiki overload that I couldn't even think about trying to make anything. It took me a solid 2 months to come down from that high! This time however I am steeled and resolved. TikiG- I sold 3 of the 7 I brought. I have to thank TikiMike and TikiHana for letting me share some table space during the weekend. Tikisbytyler- Thanks, you missed a great event, but you can redeem yourself by either going to Oasis in Auguest, or next year's Hukilau. Laojia- No cow skeletons in my garden, but I do know where a few canines are buried... hmm? The guy at the store where I get my bone must think something is afoot. Seeksurf- Thanks, thanks, thanks for enjoying my stuff. Benzart- It was great meeting you face-to-face, and your art! They are so much more amazing when you actually get to hold one of your pieces. And to actually get a chance to watch you carve... way cool.
Oops, almost forgot... Pupule Tiki! [ Edited by: TikiMango 2009-06-16 07:46 ] |
|
M
MooneyTiki
Posted
posted
on
Tue, Jun 16, 2009 8:06 AM
TikiMango you are crankin out some really sweet carvings!!!I love the flow with your lines, Aloha, Mooney |
|
LLT

little lost tiki
Posted
posted
on
Tue, Jun 16, 2009 8:08 AM
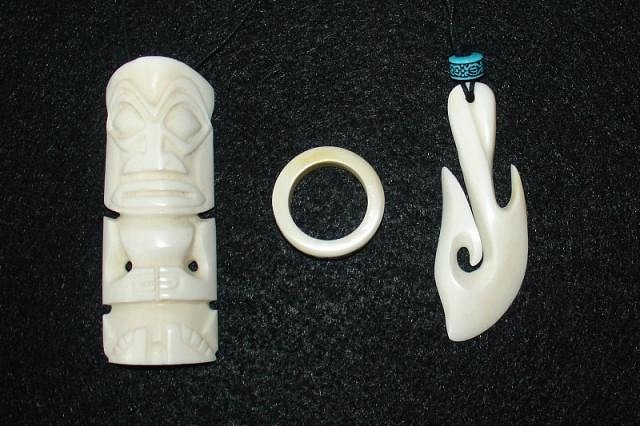
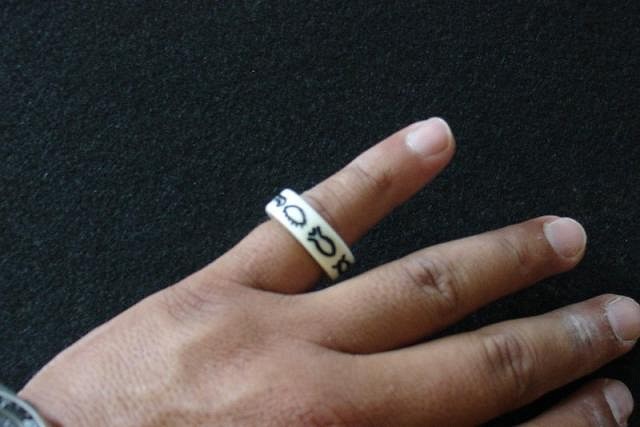
that Marquesan and RongoRongo ring RULE! |
|
T
TikiG
Posted
posted
on
Tue, Jun 16, 2009 8:08 AM
Mango - Awesome new things. Of all of them, I like the Marquesan best. Rings too huh? I like that too! The scrimshaw technique should be explored furthur I see potential there. Great to hear you sold a few things at Hukilau. When are you going to carve a Matai pendant? His (cute and innocent)face just screams bone carving..and..instead of a hook..how cool would it be to see Matai wearing a small Matai pendant? Thanks again for sharing. |
|
ES

el Stingray
Posted
posted
on
Tue, Jun 16, 2009 3:09 PM
Hey TikiMango. Love your stuff! Great details! |